


入门实例
OpenCV-开源计算机视觉和机器学习软件库,由 C 和 C++构成,提供 Python、Java、MatLAB、JS、C++ 语言接口
用于图像和视频处理分析和机器学习领域
- 图像处理: 图像滤波、边缘检测、颜色空间转换、形态学操作、特征提取等。
- 视频分析: 视频捕捉、运动分析、物体检测与追踪等。
- 机器学习与人工智能: OpenCV 集成了深度学习框架,可以进行人脸识别、目标检测、图像分类等。
- 计算机视觉: 图像匹配、物体识别、立体视觉、深度图计算等。
pip install opencv-python
# 额外模块,例如contrib
pip install opencv-contrib-python
# 换源
pip install opencv-python -i https://pypi.tuna.tsinghua.edu.cn/simple
# 验证完成
import cv2
print(cv2.__version__)
# conda安装
conda create -n opencv_env python=3.11
conda activate opencv_env
conda install -c conda-forge opencv

pip install moviepy
#读取并显示一张图片

# 1.导入cv2 别名cv
import cv2 as cv
# 2.读取图片
img=cv.imread("image")
# 如果None退出
if img is None:
    print("没有找到图片")
    exit()

# 3.显示图片
cv.imshow("窗口名称",img)
# 等待按键输入,然后关闭窗口
# 0表示无限等
k=cv.waitKey(0)
if k==27:
    cv.destroyAllWindows()
案例 1-爬取米哈游并单击键盘显示下一张上一张+自动保存
import os.path

import cv2 as cv
import numpy as np
import requests
url="https://bbs-api.miyoushe.com/post/wapi/getPostFull?gids=2&post_id=70866259&read=1"
headers={"Cookie":"_MHYUUID=95e0788a-3bc5-431e-9adf-fbcf1c53e133; DEVICEFP_SEED_ID=717756ecda992498; DEVICEFP_SEED_TIME=1758245231322; DEVICEFP=38d810e662a63",
         "User-Agent":"Mozilla/5.0 (Macintosh; Intel Mac OS X 10_15_7) AppleWebKit/537.36 (KHTML, like Gecko) Chrome/143.0.0.0 Safari/537.36",
"Referer": "https://www.miyoushe.com/",
    "x-rpc-client_type": "4",
    "x-rpc-app_version": "2.99.0",
    "Origin": "https://www.miyoushe.com",
         }
response=requests.get(url,headers=headers).json()
import screeninfo

cv.namedWindow("image", cv.WINDOW_NORMAL)
cv.setWindowProperty("image", cv.WND_PROP_FULLSCREEN, cv.WINDOW_FULLSCREEN)
# 如果你想保持原图比例但填满屏幕,可以 resize
screen = screeninfo.get_monitors()[0]
screen_w, screen_h = screen.width, screen.height

images=response["data"]["post"]["post"]["images"]
def get_img(image):
    r = requests.get(image)
    r.raise_for_status()
    img_array = np.frombuffer(r.content, np.uint8)
    return cv.imdecode(img_array, cv.IMREAD_COLOR)
i=0
while True:
    i=i%len(images)
    image_url=images[i]
    image=image_url.split("/")[-1]

    if os.path.exists("images/"+image):
        img=cv.imread("images/"+image)
    else:
        img = get_img(image_url)
        cv.imwrite("images/"+image, img)
    if img is None:
        print("无法解析图片:",image)
        continue
    img_resized = cv.resize(img, (screen_w, screen_h))
    cv.imshow("image",img_resized)
    key=cv.waitKey(0)
    if key==ord("q") or key==27:
        print("退出")
        break
    elif key==ord("n") or key==83:
        i-=1
        continue
    elif key==ord("p") or key==81:
        i+=1
        continue
cv.destroyAllWindows()
案例 2-视频处理之进行只看运动中的画面
- VideoCapture().read()获取帧
- 灰度
- absdiff 找两帧差异
- 二值化得到运动区域掩码 threshold 并 maxval 为 255 全白 (代表静止部分为黑色 0,运动区域为 255 白色)
- 掩码转为三通道 merge (运动为彩色,其余为黑色 0False)
- 原彩色图做按位与 bitwise_and
- imshow 显示
改进:太闪了
<font style="color:rgb(13, 18, 57);">history</font>:背景模型记忆长度,值越大保持运动物体的时间越久。<font style="color:rgb(13, 18, 57);">varThreshold</font>:像素检测阈值,值小更敏感,值大更稳。<font style="color:rgb(13, 18, 57);">iterations</font>:形态学去噪迭代次数,增加会让画面更干净,但可能丢失细节。改进:都显示了,因为历史:
- 限制 history 的长度(比如只保留最近5帧)
- 或者对旧 mask 做衰减
- 或者直接交给背景建模器(MOG2/KNN)自动处理持久化
def get_diff_mp4(video_path):
    cap = cv.VideoCapture(video_path)

    # 读取第一帧
    ret, prev_frame = cap.read()
    if not ret:
        print("无法读取视频")
        return

    prev_gray = cv.cvtColor(prev_frame, cv.COLOR_BGR2GRAY)

    while True:
        ret, frame = cap.read()
        if not ret:
            break

        gray_frame = cv.cvtColor(frame, cv.COLOR_BGR2GRAY)

        # 计算当前帧与前一帧的差异
        frame_diff = cv.absdiff(prev_gray, gray_frame)

        # 二值化,得到运动区域的掩码
        _, mask = cv.threshold(frame_diff, 30, 255, cv.THRESH_BINARY)

        # 掩码转成三通道,与原彩色图做按位与
        mask_3ch = cv.merge([mask, mask, mask])
        moving_parts = cv.bitwise_and(frame, mask_3ch)

        # 显示只有运动部分的彩色画面(背景全黑)
        cv.imshow('Moving Only', moving_parts)

        # 更新前一帧
        prev_gray = gray_frame

        if cv.waitKey(25) & 0xFF == ord('q'):
            break

    cap.release()
    cv.destroyAllWindows()
案例 3-提取 mp4 中的音频 并导出有声音的视频
import cv2 as cv
import numpy as np
import matplotlib.pyplot as plt
from moviepy.editor import VideoFileClip
import subprocess
from moviepy.editor import VideoFileClip
def exert_mp4_audio(out_path = "videos/33708180019-1-192.mp4")
    clip = VideoFileClip(out_path)

    print("时长:", clip.duration)
    print("音轨对象:", clip.audio)

    if clip.audio:
        # 导出音频单独看看
        clip.audio.write_audiofile("test_audio.wav")
    else:
        print("⛔ 这个视频没有音频轨")

def merge_video(processed_video="videos/33708180019-1-192adaptiveThreshold.mp4",
                original_video="videos/33708180019-1-192.mp4",
                output_video="videos/33708180019-1-192adaptiveThreshold_with_audio.mp4"):
    cmd = [
        "ffmpeg", "-y",
        "-i", processed_video,
        "-i", original_video,
        "-c", "copy",
        "-map", "0:v:0",
        "-map", "1:a:0",
        output_video
    ]
subprocess.run(cmd, check=True)
print("✅ 合并完成,必有音轨")

#  MoviePy 写的时候(哪怕 set_audio(audio))如果参数不对,或者源音频和视频长度略有差异,它会直接丢掉音轨 → 导致最终只有视频流。
def merge_but_no_audio_video(video_path="videos/33708180019-1-192adaptiveThreshold.mp4",
                audio_path="videos/33708180019-1-192.mp4",
                output_video="videos/33708180019-1-192adaptiveThreshold_with_audio.mp4"):

    video = VideoFileClip(video_path) # 截取20秒
    # 从原视频提取音频
    audio = VideoFileClip(audio_path).audio

    if audio is None:
        print("无法解析音频:", audio)
        exit()
    # 添加音频
    final_clip=video.set_audio(audio)
    final_clip.write_videofile(output_video,codec="libx264",            # 视频编码
        audio_codec="pcm_s16le")          # 音频编码
基础模块
OpenCV 基础模块
cv2.
- core:基础(图像数组表示和操作)
- imgproc:图像处理(滤波、图像变换、形态学操作)
- highgui:用户界面模块(显示图像和视频)
- video:视频处理(视频捕捉、视频流)
- features2d:特征检测与匹配(角点、边缘、关键点检测)
- ml:机器学习(图像分类、回归、巨雷)
- calib3d:相机校准和 3D 重建
- objdetect:目标检测
- dnn:深度学习
其他模块:
- flann:快速近似最近邻搜索
- Photo:图像修复和去躁
- Stitching:图像拼接
- Shape:形状匹配和距离计算
模块库
1. Core 模块
功能: 提供 OpenCV 的核心功能,包括基本数据结构、矩阵操作、绘图函数等。
主要类和函数:
- Mat: OpenCV 中用于存储图像和矩阵的基本数据结构。
- Scalar: 用于表示颜色或像素值。
- Point、Size、Rect: 用于表示点、尺寸和矩形。
- 基本绘图函数:
<font style="color:rgb(51, 51, 51);background-color:rgb(250, 252, 253);">cv.line()</font>、<font style="color:rgb(51, 51, 51);background-color:rgb(250, 252, 253);">cv.circle()</font>、<font style="color:rgb(51, 51, 51);background-color:rgb(250, 252, 253);">cv.rectangle()</font>、<font style="color:rgb(51, 51, 51);background-color:rgb(250, 252, 253);">cv.putText()</font>等。
应用场景:
- 图像的基本操作(如创建、复制、裁剪)。
- 绘制几何图形和文本。
2. Imgproc 模块
功能: 提供图像处理功能,包括图像滤波、几何变换、颜色空间转换等。
主要类和函数:
- 图像滤波:
<font style="color:rgb(51, 51, 51);background-color:rgb(250, 252, 253);">cv.blur()</font>、<font style="color:rgb(51, 51, 51);background-color:rgb(250, 252, 253);">cv.GaussianBlur()</font>、<font style="color:rgb(51, 51, 51);background-color:rgb(250, 252, 253);">cv.medianBlur()</font>等。 - 几何变换:
<font style="color:rgb(51, 51, 51);background-color:rgb(250, 252, 253);">cv.resize()</font>、<font style="color:rgb(51, 51, 51);background-color:rgb(250, 252, 253);">cv.warpAffine()</font>、<font style="color:rgb(51, 51, 51);background-color:rgb(250, 252, 253);">cv.warpPerspective()</font>等。 - 颜色空间转换:
<font style="color:rgb(51, 51, 51);background-color:rgb(250, 252, 253);">cv.cvtColor()</font>(如 BGR 转灰度、BGR 转 HSV)。 - 阈值处理:
<font style="color:rgb(51, 51, 51);background-color:rgb(250, 252, 253);">cv.threshold()</font>、<font style="color:rgb(51, 51, 51);background-color:rgb(250, 252, 253);">cv.adaptiveThreshold()</font>。 - 边缘检测:
<font style="color:rgb(51, 51, 51);background-color:rgb(250, 252, 253);">cv.Canny()</font>、<font style="color:rgb(51, 51, 51);background-color:rgb(250, 252, 253);">cv.Sobel()</font>、<font style="color:rgb(51, 51, 51);background-color:rgb(250, 252, 253);">cv.Laplacian()</font>。
应用场景:
- 图像平滑、锐化、边缘检测。
- 图像缩放、旋转、仿射变换。
- 图像二值化、颜色空间转换。
3. HighGUI 模块
功能: 提供高层 GUI 和媒体 I/O 功能,用于图像的显示和交互。
主要类和函数:
- 图像显示:
<font style="color:rgb(51, 51, 51);background-color:rgb(250, 252, 253);">cv.imshow()</font>、<font style="color:rgb(51, 51, 51);background-color:rgb(250, 252, 253);">cv.waitKey()</font>、<font style="color:rgb(51, 51, 51);background-color:rgb(250, 252, 253);">cv.destroyAllWindows()</font>。 - 视频捕获:
<font style="color:rgb(51, 51, 51);background-color:rgb(250, 252, 253);">cv.VideoCapture()</font>、<font style="color:rgb(51, 51, 51);background-color:rgb(250, 252, 253);">cv.VideoWriter()</font>。 - 鼠标和键盘事件:
<font style="color:rgb(51, 51, 51);background-color:rgb(250, 252, 253);">cv.setMouseCallback()</font>。
应用场景:
- 显示图像和视频。
- 捕获摄像头或视频文件。
- 处理用户交互(如鼠标点击、键盘输入)。
4. Video 模块
功能: 提供视频分析功能,包括运动检测、目标跟踪等。
主要类和函数:
- 背景减除:
<font style="color:rgb(51, 51, 51);background-color:rgb(250, 252, 253);">cv.createBackgroundSubtractorMOG2()</font>、<font style="color:rgb(51, 51, 51);background-color:rgb(250, 252, 253);">cv.createBackgroundSubtractorKNN()</font>。 - 光流法:
<font style="color:rgb(51, 51, 51);background-color:rgb(250, 252, 253);">cv.calcOpticalFlowPyrLK()</font>。 - 目标跟踪:
<font style="color:rgb(51, 51, 51);background-color:rgb(250, 252, 253);">cv.TrackerKCF_create()</font>、<font style="color:rgb(51, 51, 51);background-color:rgb(250, 252, 253);">cv.TrackerMOSSE_create()</font>。
应用场景:
- 视频中的运动检测。
- 目标跟踪(如行人、车辆跟踪)。
5. Calib3d 模块
功能: 提供相机校准和 3D 重建功能。
主要类和函数:
- 相机校准:
<font style="color:rgb(51, 51, 51);background-color:rgb(250, 252, 253);">cv.calibrateCamera()</font>、<font style="color:rgb(51, 51, 51);background-color:rgb(250, 252, 253);">cv.findChessboardCorners()</font>。 - 3D 重建:
<font style="color:rgb(51, 51, 51);background-color:rgb(250, 252, 253);">cv.solvePnP()</font>、<font style="color:rgb(51, 51, 51);background-color:rgb(250, 252, 253);">cv.reprojectImageTo3D()</font>。
应用场景:
- 相机标定(用于去除镜头畸变)。
- 3D 重建(如从 2D 图像恢复 3D 信息)。
6. Features2d 模块
功能: 提供特征检测和描述功能。
主要类和函数:
- 特征检测:
<font style="color:rgb(51, 51, 51);background-color:rgb(250, 252, 253);">cv.SIFT_create()</font>、<font style="color:rgb(51, 51, 51);background-color:rgb(250, 252, 253);">cv.ORB_create()</font>、<font style="color:rgb(51, 51, 51);background-color:rgb(250, 252, 253);">cv.SURF_create()</font>。 - 特征匹配:
<font style="color:rgb(51, 51, 51);background-color:rgb(250, 252, 253);">cv.BFMatcher()</font>、<font style="color:rgb(51, 51, 51);background-color:rgb(250, 252, 253);">cv.FlannBasedMatcher()</font>。 - 关键点绘制:
<font style="color:rgb(51, 51, 51);background-color:rgb(250, 252, 253);">cv.drawKeypoints()</font>。
应用场景:
- 图像特征提取和匹配。
- 图像拼接、物体识别。
7. Objdetect 模块
功能: 提供目标检测功能。
主要类和函数:
- Haar 特征分类器:
<font style="color:rgb(51, 51, 51);background-color:rgb(250, 252, 253);">cv.CascadeClassifier()</font>(用于人脸检测)。 - HOG 特征分类器: 用于行人检测。
应用场景:
- 人脸检测、行人检测。
8. ML 模块
功能: 提供机器学习算法。
主要类和函数:
- 支持向量机 (SVM):
<font style="color:rgb(51, 51, 51);background-color:rgb(250, 252, 253);">cv.ml.SVM_create()</font>。 - K 均值聚类 (K-Means):
<font style="color:rgb(51, 51, 51);background-color:rgb(250, 252, 253);">cv.kmeans()</font>。 - 神经网络 (ANN):
<font style="color:rgb(51, 51, 51);background-color:rgb(250, 252, 253);">cv.ml.ANN_MLP_create()</font>。
应用场景:
- 图像分类、聚类分析。
9. DNN 模块
功能: 提供深度学习功能,支持加载和运行预训练的深度学习模型。
主要类和函数:
- 模型加载:
<font style="color:rgb(51, 51, 51);background-color:rgb(250, 252, 253);">cv.dnn.readNetFromCaffe()</font>、<font style="color:rgb(51, 51, 51);background-color:rgb(250, 252, 253);">cv.dnn.readNetFromTensorflow()</font>。 - 前向传播:
<font style="color:rgb(51, 51, 51);background-color:rgb(250, 252, 253);">net.forward()</font>。
应用场景:
- 图像分类、目标检测、语义分割。
图像处理
读取
读取 imread(文件)、显示 imshow、等待 waitKey、关闭 destroyAllWindows、保存 imwrite…
opencv 通过 numpy 的多维数组(uint8(0-255)、float32 或其他) 表示图像数据,每个元素对应图像中的一个像素。
图像尺寸:img.shape
颜色通道:RGB 三通道或灰度图单通道
imread 就是返回一个 numpy 数组,如果图像错误或不存在会返回 None
显示
cv.imshow(“窗口名”,img) # 显示图像
cv.waitKey(0) # 等待按键输入
cv.destroyAllWindows() # 关闭所有窗口
cv.imwrite(“图像名”,img) # 保存
图像基本操作
访问和修改像素值
# 像素点
pixel_value=image[100,100] # 获取行为100列为100的像素值
image[100,100]=[255,255,255] # 修改(100,100)位置的像素值为白色

# 范围 ROI region of interest
roi=image[50:150,50:150]
image[50:150,50:150]=[0,255,0]
# 分离rgb通道和合并
b,g,r=cv.split(image)
merged_image=cv.merge([b,g,r])

# 图像缩放、旋转、平移、翻转
resized_image=cv.resize(image,(new_width,new_height)) # 缩放
(h,w)=img.shape[:2]
center=(w//2,h//2)
center_x=w//2
center_y=h//2
rotation_matrix=cv.getRotationMatrix2D((center_x,center_y),angle,scale) # 沿着(center_x,center_y)旋转angle度,同时缩放scale倍
rotated_image=cv.warpAffine(image,rotation_matrix,(width,height)) #旋转
translation_matrix=np.float32([[1,0,平移的x距离],[0,1,平移的y距离]])
translated_image=cv.warpAffine(image,translation_matrix,(width,height)) # 旋转后的图像平移width和height个像素点
flipped_image=cv.flip(image,flip_code) # 翻转,0垂直翻转 1水平翻转 -1双向翻转

# 算数运算
# 可以两个图像相加、相减、相乘、相除混合
result=cv.add(image1,iamge2)
result=cv.subtract(image1,image2)
result=cv.multiply(image1,image2) # 超过255,自动截断为255
result=cv.divide(image1,iamge2)
result=cv.addWeighted(image1,alpha,image2,beta,gamma)  # alpha和beta是权重,gamma是标量,result = img1 * alpha + img2 * beta + gamma

# 也可以进行***与或非***的位运算(可以实现分割、叠加、反色、差异检测的作用)
result=cv.bitwise_and(img1,img2) # 与操作,可以加密图片进行掩码,自己的拿一个图片作为钥匙,也可以图像分割,单独的白色或黑色
result=cv.bitwise_or(img1,img2) # 或操作,图像叠加
result=cv.bitwise_not(img1,img2) # 图像反色,两个not反过来
result=cv.bitwise_xor(img1,img2) # 图像差异检测
# 图像阈值处理(先灰度再阈值、阈值就是超过thresh的为0,高于的变为maxval,跟锐化一样)
ret,thresholded_image=cv.threshold(image,thresh,maxval,cv.THRESH_BINARY) #thresh是阈值,maxval是最大值
# cv.THRESH_BINARY :大于阈值的为maxval,否则为0,素描画
# cv.THRESH_BINARY_INV :大于阈值为0否则为maxval,跟嫌疑剧情一样
# cv.THRESH_TRUNC:大于阈值,等于阈值,否则不变 :调低亮度和对比度
# cv.THRESH_TOZERO:大于阈值不变,否则0:日本无彩漫画,666
# cv.THRESH_TOZERO_INV:大于阈值为0,否则不变:嫌疑剧


# 自适应阈值处理(nb,最厉害的,跟边缘检测一样)
thersholded_iamge=cv.adaptiveThreshold(image,maxval,cv.APAPTIVE_THRESH_MEAN_C,
                                      cv.THRESH_BINARY,block_size,C) #block_size必须为奇数
# cv.ADAPTIVE_THRESH_MEAN_C:阈值是邻域的平均值减去常数C
# cv.ADAPTIVE_THRESH_GAUSSIAN_C:阈值是邻域的加权平均值减去常数C,权重由高斯函数确定

# Otsu's 二值化(比简单阈值处理优化一点)
ret,thresholded_image=cv.threshold(image,125,255,cv.THRESH_BINARY+cv.THRESH_OTSU) #type通常为cv.THRESH_BINARY/THRESH_BINARY_INV+cv.THRESH_OTSU

# 图像平滑处理
blurred_iamge=cv.blur(image,(kernel_size,kernel_size)) # 均值滤波:(5,5)就是均值模糊,在水平和垂直方向取平均值的范围,用于去除噪声,但也会让图像模糊
blurred_image=cv.GaussianBlur(image,(kernel_size,kernel_size),sigmaX) # (5,5),0就是高斯模糊,sigmaX为高斯核的标准差,为0代表自动,用除图像中的高斯噪声,保留图像边缘信息
blurred_image=cv.medianBlur(image,kernel_size) # 中值模糊,5就是中值模糊,kernel_size必须为奇数,去除图像中的椒盐噪声,保留图像边缘信息
blurred_image=cv.bilateralFilter(image,d,sigmaColor,sigmaSpace) # 双边滤波,去除噪声的同时保留图像的边缘信息,常用于图像美化或预处理,去除过曝

# 颜色空间与转换(灰度、HSV、YUV等)
gray_img=cv.cvtColor(img,cv.COLOR_BGR2GRAY) # 灰度
hsv_img=cv.cvtColor(img,cv.COLOR_BGR2HSV) # 热力图
yuv_img=cv.cvtColor(img,cv.COLOR_BGR2YUV) # 特别像夜魂迸发

# 大小调整和裁剪
resized_img=cv.resize(img,(width,height)) # 调整大小
cropped_img=img[y1:y2,x1:x2] # 裁剪

# 图片边缘检测(边缘为白色,其余为黑色)
edges=cv2.Canny(img,100,200) # 边缘检测,大多数场景
sobel_x=cv.Sobel(image,cv.CV_64F,1,0,ksize=5)# Sobel算子,立体的壁画,水平和垂直边缘
sobel_y=cv.Sobel(image,cv.CV_64F,0,1,ksize=5) # 细微的边缘
laplacian=cv.Laplacian(image,cv.CV_64F)#Laplacian 算子,跟墙壁刻画似的,检测边缘和角点

# 形态学:腐蚀、膨胀、开运算、闭运算,用于二值图像处理,将白色区域收缩、扩展、先收缩再扩展、先扩展再收缩
kernel=cv.getStructuringElement(cv.MORPH_RECT,(5,5))
eroded_img=cv.erode(img,kernel,iterations=1) # 收缩,黑色水笔描边+黑色点点水彩画,前景对象变小,边缘被腐蚀掉,用于去除噪声或分离连接的对象
dilated_img=cv.dilate(img,kernel,iterations=1) # 扩展,高糊+白色边,前景对象变大,边缘被扩展,用于填补前景对像中的空洞或连接断裂的对象
opening_img=cv.morphologyEx(img,cv.MORPH_OPEN,kernel) # 去除小物体,模糊+黑色小边,开运算去除图像中的小噪声,同时保留图像中的主要前景对象
closing_img=cv.morphologyEx(img,cv.MORPH_CLOSE,kernel) # 填补小孔洞,白色点点水彩画+亮度提高,填补前景对象中的小孔,同时保留图像中的主要前景对象
gradient_img=cv.morphologyEx(img,cv.MORPH_GRADIENT,kernel) # 提取前景对象的边缘,用于边缘检测

# 轮廓检测
# 检测轮廓:轮廓是具有相同颜色或强度的连续点的曲线
gray_img=cv.cvtColor(img,cv.COLOR_BGR2GRAY) # 灰度
_,threshold_img=cv.threshold(gray_img,127,255,cv.THRESH_BINARY) # 阈值二值化,低于127为0黑色,高于127为255白色, thresh越大越细节,越好看,thresh小的话直接圈住图画了
contours,_=cv.findContours(threshold_img,cv.RETR_EXTERNAL,cv.CHAIN_APPROX_SIMPLE) #提取轮廓,输入为经过阈值处理或边缘检测后的图像
# 检测模式mode: cv.RETER_EXTERNAL :只检测最外层轮廓
# 检测模式mode:cv.RETER_LIST:检测所有,但不建立层次关系
# 轮廓近似方法:cv.CHAIN_APPROX_NONE:存储所有轮廓点
# 轮廓近似方法: cv.CHAIN_APPROX_SIMPLE:只保留端点
# 绘制轮廓
cv.drawContours(img,contours,-1,(0,255,0),3) # 原画上绘制轮廓
cv.imshow("contours",img)
# 轮廓计算
cv.contourArea()# 计算轮廓面积
cv.arcLength() #计算轮廓周长/弧长
cv.boundingRect() #计算轮廓的边界矩形
cv.minAreaRect() #计算轮廓最小外接矩形
cv.minEnclosingCircle() #计算轮廓的最小外接圆
cv.approxPolyDP() # 对轮廓进行多边形近似

# 绘制文本
cv2.putTest(image,text文本,org左下角坐标,fontFace字体类型,fontScale文本缩放,color文本颜色,thickness字宽)
#fontFace:cv2.FONT_HERSHEY_SIMPLEX
cv2.putText(img, 'Hello, OpenCV!', (50, 50), cv2.FONT_HERSHEY_SIMPLEX, 1, (255, 0, 0), 2)
案例 2:图片的各种操作并播放灰度、轮廓化的视频
import cv2 as cv
import numpy as np


def get_gray_mp4(video_path):
    cap = cv.VideoCapture(video_path)
    while cap.isOpened():
        ret, frame = cap.read()
        if not ret:
            break
        gray_frame = cv.cvtColor(frame, cv.COLOR_BGR2GRAY)
        cv.imshow("showimage", gray_frame)
        # 25毫秒延时,相当于40fps,如果按 q 退出就 break
        if cv.waitKey(25) & 0xFF == ord('q'):
            break
    cap.release()
def get_contours_mp4(video_path):
    cap = cv.VideoCapture(video_path)
    while cap.isOpened():
        ret, frame = cap.read()
        if not ret:
            break
        gray_img = cv.cvtColor(frame, cv.COLOR_BGR2GRAY)
        _, threshold_img = cv.threshold(gray_img, 200, 255, cv.THRESH_BINARY)
        contours, _ = cv.findContours(threshold_img, cv.RETR_EXTERNAL, cv.CHAIN_APPROX_SIMPLE)

        blank = np.zeros_like(frame)  # 黑色背景
        cv.drawContours(blank, contours, -1, (255, 255, 255), 1)

        cv.imshow("showimage", blank)
        if cv.waitKey(25) & 0xFF == ord('q'):  # q 退出
            break
    cap.release()
def get_adaptiveThreshold_mp4(video_path):
    cap = cv.VideoCapture(video_path)
    while cap.isOpened():
        ret, frame = cap.read()
        if not ret:
            break
        gray_img = cv.cvtColor(frame, cv.COLOR_BGR2GRAY)
        img_resized = cv.adaptiveThreshold(gray_img, 255, cv.ADAPTIVE_THRESH_MEAN_C, cv.THRESH_BINARY, 11, 2)
        cv.imshow("showimage", img_resized)
        if cv.waitKey(25) & 0xFF == ord('q'):  # q 退出
            break
    cap.release()

if __name__ == '__main__':
    img = cv.imread("images/6a23a8c8c6fd94cac2cc0d6d9b959c9b_8768218066985869315.png")
    if img is None:
        print("无法解析图片:",img)
        exit()
    img_resized = cv.resize(img, (1080, 640))
    cv.imshow("showimage", img_resized)
    ori_img=img_resized
    kernel = cv.getStructuringElement(cv.MORPH_RECT, (5, 5))
    while True:
        key=cv.waitKey(0)
        if key==ord("q") or key==27:
            print("退出")
            break
        elif key==ord("w"):
            img_resized=cv.flip(img_resized,-1)
            cv.imshow("showimage", img_resized)
            continue
        elif key==ord("e"):
            img_resized=cv.flip(img_resized,0)
            cv.imshow("showimage", img_resized)
            continue
        elif key==ord("r"):
            img_resized=cv.flip(img_resized,1)
            cv.imshow("showimage", img_resized)
            continue
        elif key==ord("t"):
            img_resized=cv.rotate(img_resized,cv.ROTATE_90_CLOCKWISE)
            cv.imshow("showimage", img_resized)
            continue
        elif key==ord("y"):
            img_resized=cv.rotate(img_resized,cv.ROTATE_90_COUNTERCLOCKWISE)
            cv.imshow("showimage", img_resized)
            continue
        elif key==ord("u"):
            img_resized=cv.rotate(img_resized,cv.ROTATE_180)
            cv.imshow("showimage", img_resized)
            continue
        elif key==ord("h"):
            img_resized=cv.cvtColor(ori_img, cv.COLOR_BGR2GRAY)  # 转灰度
            cv.imshow("showimage", img_resized)
            continue
        elif key==ord("i"):
            ret, img_resized = cv.threshold(img_resized, 125, 255, cv.THRESH_BINARY)  # thresh是阈值,maxval是最大值
            cv.imshow("showimage", img_resized)
        elif key==ord("j"):
            img_resized=cv.adaptiveThreshold(img_resized,255,cv.ADAPTIVE_THRESH_MEAN_C,cv.THRESH_BINARY,11,2)
            cv.imshow("showimage", img_resized)
        elif key==ord("k"): # Otsu's二值化
            ret, img_resized = cv.threshold(img_resized, 125, 250, cv.THRESH_BINARY+cv.THRESH_OTSU)
            cv.imshow("showimage", img_resized)
        # 滤波
        elif key==ord("f"):
            img_resized=cv.blur(img_resized,(5,5))
            cv.imshow("showimage", img_resized)
        elif key==ord("g"):
            img_resized=cv.medianBlur(img_resized,5)
            cv.imshow("showimage", img_resized)
        elif key==ord("b"):
            img_resized=cv.bilateralFilter(img_resized,9,75,75)
            cv.imshow("showimage", img_resized)
        elif key==ord("n"):# 高斯滤波
            img_resized=cv.GaussianBlur(img_resized,(5,5),0)
            cv.imshow("showimage", img_resized)
        elif key==ord("z"):
            img_resized=cv.cvtColor(ori_img, cv.COLOR_BGR2HSV)  # hsv
            cv.imshow("showimage", img_resized)
        elif key == ord("x"):
            img_resized = cv.cvtColor(ori_img, cv.COLOR_BGR2YUV)  # yuv
            cv.imshow("showimage", img_resized)
            continue
        elif key==ord("c"):
            img_resized=cv.Canny(img_resized,100,100)
            cv.imshow("showimage", img_resized)
            continue
        elif key==ord("v"):
            img_resized=cv.Laplacian(img_resized,cv.CV_64F)
            cv.imshow("showimage", img_resized)
            continue
        elif key==ord("m"):
            img_resized=cv.Sobel(img_resized,cv.CV_64F,1,0,ksize=3)
            cv.imshow("showimage", img_resized)
            continue
        elif key==ord("p"):
            img_resized=cv.Sobel(img_resized,cv.CV_64F,0,1,ksize=1)
            cv.imshow("showimage", img_resized)
            continue
        elif key==ord("o"): #形态学
            img_resized=cv.morphologyEx(img_resized,cv.MORPH_OPEN,kernel)
            cv.imshow("showimage", img_resized)
        elif key==ord("l"):
            img_resized=cv.morphologyEx(img_resized,cv.MORPH_CLOSE,kernel)
            cv.imshow("showimage", img_resized)
        elif key==ord("s"):
            img_resized=cv.erode(img_resized,kernel,iterations=1)
            cv.imshow("showimage", img_resized)
        elif key==ord("a"): #dilate
            img_resized=cv.dilate(img_resized,kernel,iterations=1)
            cv.imshow("showimage", img_resized)
        elif key==ord("d"):
            gray_img = cv.cvtColor(ori_img, cv.COLOR_BGR2GRAY)
            _, threshold_img = cv.threshold(gray_img, 190, 255, cv.THRESH_BINARY) # thresh越大越细节,越好看,thresh小的话直接圈住图画了
            contours, _ = cv.findContours(threshold_img, cv.RETR_EXTERNAL, cv.CHAIN_APPROX_SIMPLE)
            img=cv.drawContours(ori_img, contours, -1, (255, 255, 0), 1)
            cv.imshow("showimage", img)
        elif key== 32: # 空格键
            get_adaptiveThreshold_mp4("videos/33708180019-1-192.mp4")
        elif key==13: # 回车
            get_gray_mp4("videos/33708180019-1-192.mp4")
        elif key== 8: # 删除键
            get_contours_mp4("videos/33708180019-1-192.mp4")
        else:
            img_resized=ori_img
            cv.imshow("showimage",img_resized)

    cv.destroyAllWindows()
边缘检测
Candy
- 噪声抑制:高斯滤波器对图像进行平滑处理,减少噪声的影响
- 计算梯度:Sobel 算子计算图像的梯度幅值和方向
- 非极大值抑制:严梯度方向保留局部梯度最大的像素点,抑制其他像素点
- 双阈值检测:使用两个阈值(低阈值和高阈值)确定真正的边缘,高于高阈值被认为强边缘,低于第阈值被抑制,之间的如果与强边缘相连就被保留
- 边缘连接:通过滞后阈值处理,将弱边缘和强边缘连接起来,形成完整的边缘
cv.Candy(image,低阈值,高阈值,Sobel 算子孔径大小默3,是否L2范数(默认 False L1))
Sobel 算子
基于梯度的边缘检测算子,通过计算图像在水平和垂直方向上的梯度来检测边缘
因为结合了高斯平滑和微分操作,因此对噪声具有一定的抑制作用
- 使用 3x3 计算水平和垂直方向的梯度
- x 方向:
<font style="color:rgb(0, 0, 0);background-color:rgb(249, 249, 249);">cv2.</font><font style="color:rgb(0, 85, 170);">Sobel</font><font style="color:olive;">(</font><font style="color:rgb(0, 0, 0);background-color:rgb(249, 249, 249);">image</font><font style="color:gray;">,</font><font style="color:rgb(0, 0, 0);background-color:rgb(249, 249, 249);"> cv2.</font><font style="color:rgb(0, 85, 170);">CV_64F</font><font style="color:gray;">,</font><font style="color:rgb(0, 0, 0);background-color:rgb(249, 249, 249);"> </font><font style="color:maroon;">1</font><font style="color:gray;">,</font><font style="color:rgb(0, 0, 0);background-color:rgb(249, 249, 249);"> </font><font style="color:maroon;">0</font><font style="color:gray;">,</font><font style="color:rgb(0, 0, 0);background-color:rgb(249, 249, 249);"> ksize</font><font style="color:gray;">=</font><font style="color:maroon;">3</font><font style="color:olive;">)</font>- y 方向:
<u><font style="color:rgb(0, 0, 0);background-color:rgb(249, 249, 249);">cv2.</font></u><u><font style="color:rgb(0, 85, 170);">Sobel</font></u><u><font style="color:olive;">(</font></u><u><font style="color:rgb(0, 0, 0);background-color:rgb(249, 249, 249);">image</font></u><u><font style="color:gray;">,</font></u><u><font style="color:rgb(0, 0, 0);background-color:rgb(249, 249, 249);"> cv2.</font></u><u><font style="color:rgb(0, 85, 170);">CV_64F</font></u><u><font style="color:gray;">,</font></u><u><font style="color:rgb(0, 0, 0);background-color:rgb(249, 249, 249);"> </font></u><u><font style="color:maroon;">0</font></u><u><font style="color:gray;">,</font></u><u><font style="color:rgb(0, 0, 0);background-color:rgb(249, 249, 249);"> </font></u><u><font style="color:maroon;">1</font></u><u><font style="color:gray;">,</font></u><u><font style="color:rgb(0, 0, 0);background-color:rgb(249, 249, 249);"> ksize</font></u><u><font style="color:gray;">=</font></u><u><font style="color:maroon;">3</font></u><u><font style="color:olive;">)</font></u>- 使用两个方向的梯度计算梯度幅值
G=sqrt(Gx^2+Gy^2)
<font style="color:rgb(0, 0, 0);background-color:rgb(249, 249, 249);">sobel_combined </font><font style="color:gray;">=</font><font style="color:rgb(0, 0, 0);background-color:rgb(249, 249, 249);"> np.</font><font style="color:rgb(0, 85, 170);">sqrt</font><font style="color:olive;">(</font><font style="color:rgb(0, 0, 0);background-color:rgb(249, 249, 249);">sobel_x**</font><font style="color:maroon;">2</font><font style="color:rgb(0, 0, 0);background-color:rgb(249, 249, 249);"> + sobel_y**</font><font style="color:maroon;">2</font><font style="color:olive;">)</font>- 根据梯度幅值展示
<font style="color:rgb(0, 0, 0);background-color:rgb(249, 249, 249);">cv2.</font><font style="color:rgb(0, 85, 170);">imshow</font><font style="color:olive;">(</font><font style="color:rgb(170, 17, 17);">'Sobel Combined'</font><font style="color:gray;">,</font><font style="color:rgb(0, 0, 0);background-color:rgb(249, 249, 249);"> sobel_combined</font><font style="color:olive;">)</font>
Laplacian 算子
二阶微分算子,通过计算图像二阶导数检测边缘,对噪声比较敏感,所以需要在使用之前对图像进行高斯平滑处理
卷积核得到的 Laplacian 值较大的区域为边缘
img_resized=cv.Laplacian(img_gray, cv.CV_64F, ksize=9,scale=1,delta=0,borderType=cv.BORDER_DEFAULT)
| 函数 | 算法 | 优点 | 缺点 | 适用场景 |
|---|---|---|---|---|
**<font style="color:rgb(51, 51, 51);">cv2.Canny()</font>** | Canny 边缘检测 | 噪声抑制能力强,边缘检测效果好。 | 参数调节较为复杂。 | 通用边缘检测,适合大多数场景。 |
**<font style="color:rgb(51, 51, 51);">cv2.Sobel()</font>** | Sobel 算子 | 计算简单,适合检测水平和垂直边缘。 | 对噪声敏感,边缘检测效果一般。 | 检测水平和垂直边缘。 |
**<font style="color:rgb(51, 51, 51);">cv2.Scharr()</font>** | Scharr 算子 | 对边缘的响应更强,适合检测细微边缘。 | 对噪声敏感。 | 检测细微的边缘。 |
**<font style="color:rgb(51, 51, 51);">cv2.Laplacian()</font>** | Laplacian 算子 | 可以检测边缘和角点。 | 对噪声非常敏感。 | 检测边缘和角点。 |
轮廓检测
轮廓就是图像中具有相同颜色或强度的连续点的曲线
- 轮廓: 图像中物体的边界,由一系列点组成。
- 轮廓层次结构: 轮廓之间的嵌套关系,例如一个轮廓是否包含另一个轮廓。
- 轮廓特征: 轮廓的面积、周长、边界矩形、最小外接矩形、最小外接圆等。
步骤:
- 灰度处理:cvtColor/threshold
<font style="color:rgb(0, 0, 0);background-color:rgb(249, 249, 249);">_</font><font style="color:gray;">,</font><font style="color:rgb(0, 0, 0);background-color:rgb(249, 249, 249);"> binary </font><font style="color:gray;">=</font><font style="color:rgb(0, 0, 0);background-color:rgb(249, 249, 249);"> cv2.</font><font style="color:rgb(0, 85, 170);">threshold</font><font style="color:olive;">(</font><font style="color:rgb(0, 0, 0);background-color:rgb(249, 249, 249);">image</font><font style="color:gray;">,</font><font style="color:rgb(0, 0, 0);background-color:rgb(249, 249, 249);"> </font><font style="color:maroon;">127</font><font style="color:gray;">,</font><font style="color:rgb(0, 0, 0);background-color:rgb(249, 249, 249);"> </font><font style="color:maroon;">255</font><font style="color:gray;">,</font><font style="color:rgb(0, 0, 0);background-color:rgb(249, 249, 249);"> cv2.</font><font style="color:rgb(0, 85, 170);">THRESH_BINARY</font><font style="color:olive;">)</font>- 高斯模糊
<font style="background-color:#ffffff;">img_gray=cv.GaussianBlur(ori_img,(5,5),0)</font>- 边缘检测
<font style="background-color:#ffffff;">cv.Canny(img_gray, 50, 150, apertureSize=3)</font>- 查找轮廓:
<font style="color:rgb(0, 0, 0);background-color:rgb(249, 249, 249);">contours</font><font style="color:gray;">,</font><font style="color:rgb(0, 0, 0);background-color:rgb(249, 249, 249);"> hierarchy </font><font style="color:gray;">=</font><font style="color:rgb(0, 0, 0);background-color:rgb(249, 249, 249);">cv2.</font><font style="color:rgb(0, 85, 170);">findContours</font><font style="color:olive;">(</font><font style="color:rgb(0, 0, 0);background-color:rgb(249, 249, 249);">binary</font><font style="color:gray;">,</font><font style="color:rgb(0, 0, 0);background-color:rgb(249, 249, 249);"> cv2.</font><font style="color:rgb(0, 85, 170);">RETR_TREE</font><font style="color:gray;">,</font><font style="color:rgb(0, 0, 0);background-color:rgb(249, 249, 249);"> cv2.</font><font style="color:rgb(0, 85, 170);">CHAIN_APPROX_SIMPLE</font><font style="color:olive;">)</font>- 绘制轮廓:纯色背景或者原图绘制
* -1 代表所有轮廓都绘制,1 代表 thickness 宽度
* 还可以设置 lineType 线型、hierarchy 轮廓的层次结构信息、maxLevel 绘制的最大层次深度,offset 轮廓点的偏移量
output = np.zeros_like(ori_img)cv.drawContours(ori_img, contours, -1, (255, 255, 0), 1)cv.drawContours(output, contours, -1, (255, 255, 0), 1)- 展示
<font style="color:#080808;background-color:#ffffff;">cv.imshow("showimage2", output)</font>官方步骤:
- 灰度图 cvtColor
- 二值化 threshold
- 查找轮廓 findContours
- 绘制轮廓 drawContours
- 计算面积 contourArea
- 计算周长 arcLength
- 计算边界矩形 boundingRect
- 最小外接矩形 minAreaRect
- 最小外接圆 minEnclosingCircle
- 多边形逼近 approxPolyDP
| 函数名称 | 功能描述 |
|---|---|
<font style="color:rgb(51, 51, 51);">cv2.findContours(图片,检索模式,近似方法,轮廓列表,层次结构,偏移量)</font> | 查找图像中的轮廓 |
<font style="color:rgb(51, 51, 51);">cv2.drawContours(底图,轮廓集,索引,颜色,厚度,线型,层次结构,最大层次深度,偏移量)</font> | 在图像上绘制轮廓 |
<font style="color:rgb(51, 51, 51);">cv2.contourArea(轮廓集,是否返回符号)</font> | 计算轮廓的面积 |
<font style="color:rgb(51, 51, 51);">cv2.arcLength(轮廓集,是否闭合)</font> | 计算轮廓的周长或弧长 |
<font style="color:rgb(51, 51, 51);">cv2.boundingRect(轮廓集)</font> | 计算轮廓的边界矩形 |
<font style="color:rgb(51, 51, 51);">cv2.minAreaRect(轮廓集)</font> | 计算轮廓的最小外接矩形 |
<font style="color:rgb(51, 51, 51);">cv2.minEnclosingCircle(轮廓集)</font> | 计算轮廓的最小外接圆 |
<font style="color:rgb(51, 51, 51);">cv2.approxPolyDP(轮廓集,近似精度,是否闭合)</font> | 对轮廓进行多边形近似 |
img_gray = cv.cvtColor(ori_img, cv.COLOR_BGR2GRAY)
img_gray=cv.GaussianBlur(ori_img,(5,5),0)
# img_resized=cv.Laplacian(img_gray, cv.CV_64F, ksize=9,scale=1,delta=0,borderType=cv.BORDER_DEFAULT)
img_resized=cv.Canny(img_gray, 50, 150, apertureSize=3)
contours,img_resized=cv.findContours(img_resized, cv.RETR_EXTERNAL, cv.CHAIN_APPROX_SIMPLE)
output = np.zeros_like(ori_img)
cv.drawContours(ori_img, contours, -1, (255, 255, 0), 1)
cv.drawContours(output, contours, -1, (255, 255, 0), 1)
cv.imshow("showimage", ori_img)
cv.imshow("showimage2", output)
人脸追踪
pip install --upgrade opencv-python -i https://pypi.tuna.tsinghua.edu.cn/simple不行的话下载一个:haarcascade_frontalface_default.xml
def get_HOG_mp4(video_path):

    if hasattr(cv, 'data'):
        xml_path = cv.data.haarcascades + "haarcascade_frontalface_default.xml"
    else:
        xml_path = "test.xml"
    face_cascade=cv.CascadeClassifier(xml_path)
    cap=cv.VideoCapture(video_path)
    while True:
        ret, frame = cap.read()

        if not ret:
            break

        # 将帧转换为灰度图像
        gray_frame = cv.cvtColor(frame, cv.COLOR_BGR2GRAY)

        # 检测人脸
        faces = face_cascade.detectMultiScale(gray_frame, scaleFactor=1.1, minNeighbors=5, minSize=(30, 30))

        # 在帧上绘制矩形框标记人脸
        for (x, y, w, h) in faces:
            cv.rectangle(frame, (x, y), (x + w, y + h), (255, 0, 0), 2)

        # 显示带有人脸标记的帧
        cv.imshow('Face Detection', frame)

        if cv.waitKey(25) & 0xFF == ord('q'):
            break

    cap.release()
    cv.destroyAllWindows()
图像直方图
了解图像的像素分布情况,进行图像增强、对比度调整、图像分割等操作
是图像像素强度分布的图形表示,灰度为 0-255 在图像中的频率,彩色是每个通道的直方图
可以看出:如果直方图集中在低灰度区域,说明图像偏暗;分布均匀说明对比度较好
cv.calcHist(images)
- images:
| 功能 | 函数 | 说明 |
|---|---|---|
| 计算直方图 | <font style="color:rgb(51, 51, 51);">cv2.calcHist(输入的图像列表,灰色[0]彩色[0蓝/1绿/2红],掩码,bin数量,通常[256],像素值范围 [0,256],输出的直方图数组,是否累积直方图)</font> | 计算图像的直方图。 |
| 直方图均衡化 | <font style="color:rgb(51, 51, 51);">cv2.equalizeHist(images)</font> | 增强图像的对比度。 |
| 直方图比较 | <font style="color:rgb(51, 51, 51);">cv2.compareHist(hist1,hist2,比较方法 cv.HISTCMP_CORREL)</font> | 比较两个直方图的相似度。 |
| 绘制直方图 | <font style="color:rgb(51, 51, 51);">matplotlib.pyplot.plot()</font> | 使用 Matplotlib 绘制直方图。 |
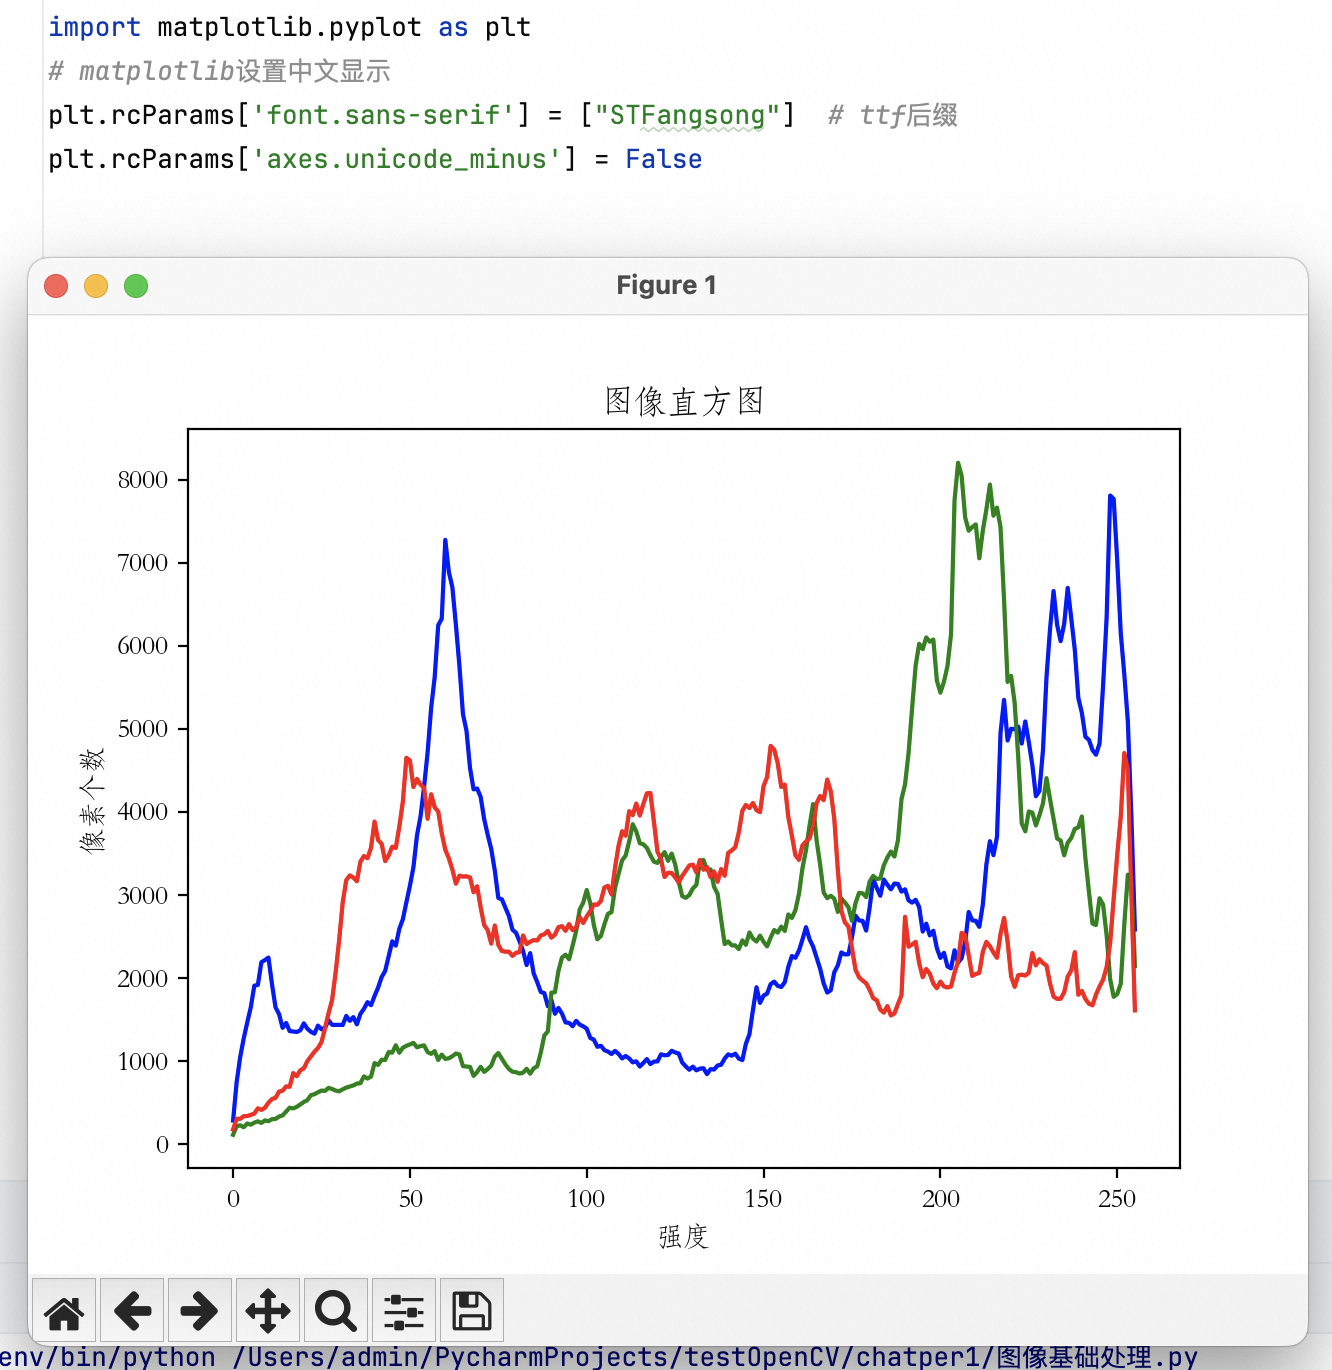
import matplotlib.pyplot as plt
# matplotlib设置中文显示
plt.rcParams['font.sans-serif'] = ["STFangsong"] # ttf后缀
# plt.rcParams['font.sans-serif'] = ["STHeiti"] # ttf后缀
# plt.rcParams['font.sans-serif'] = ["Hei"] # ttf后缀
plt.rcParams['axes.unicode_minus'] = False
# .....
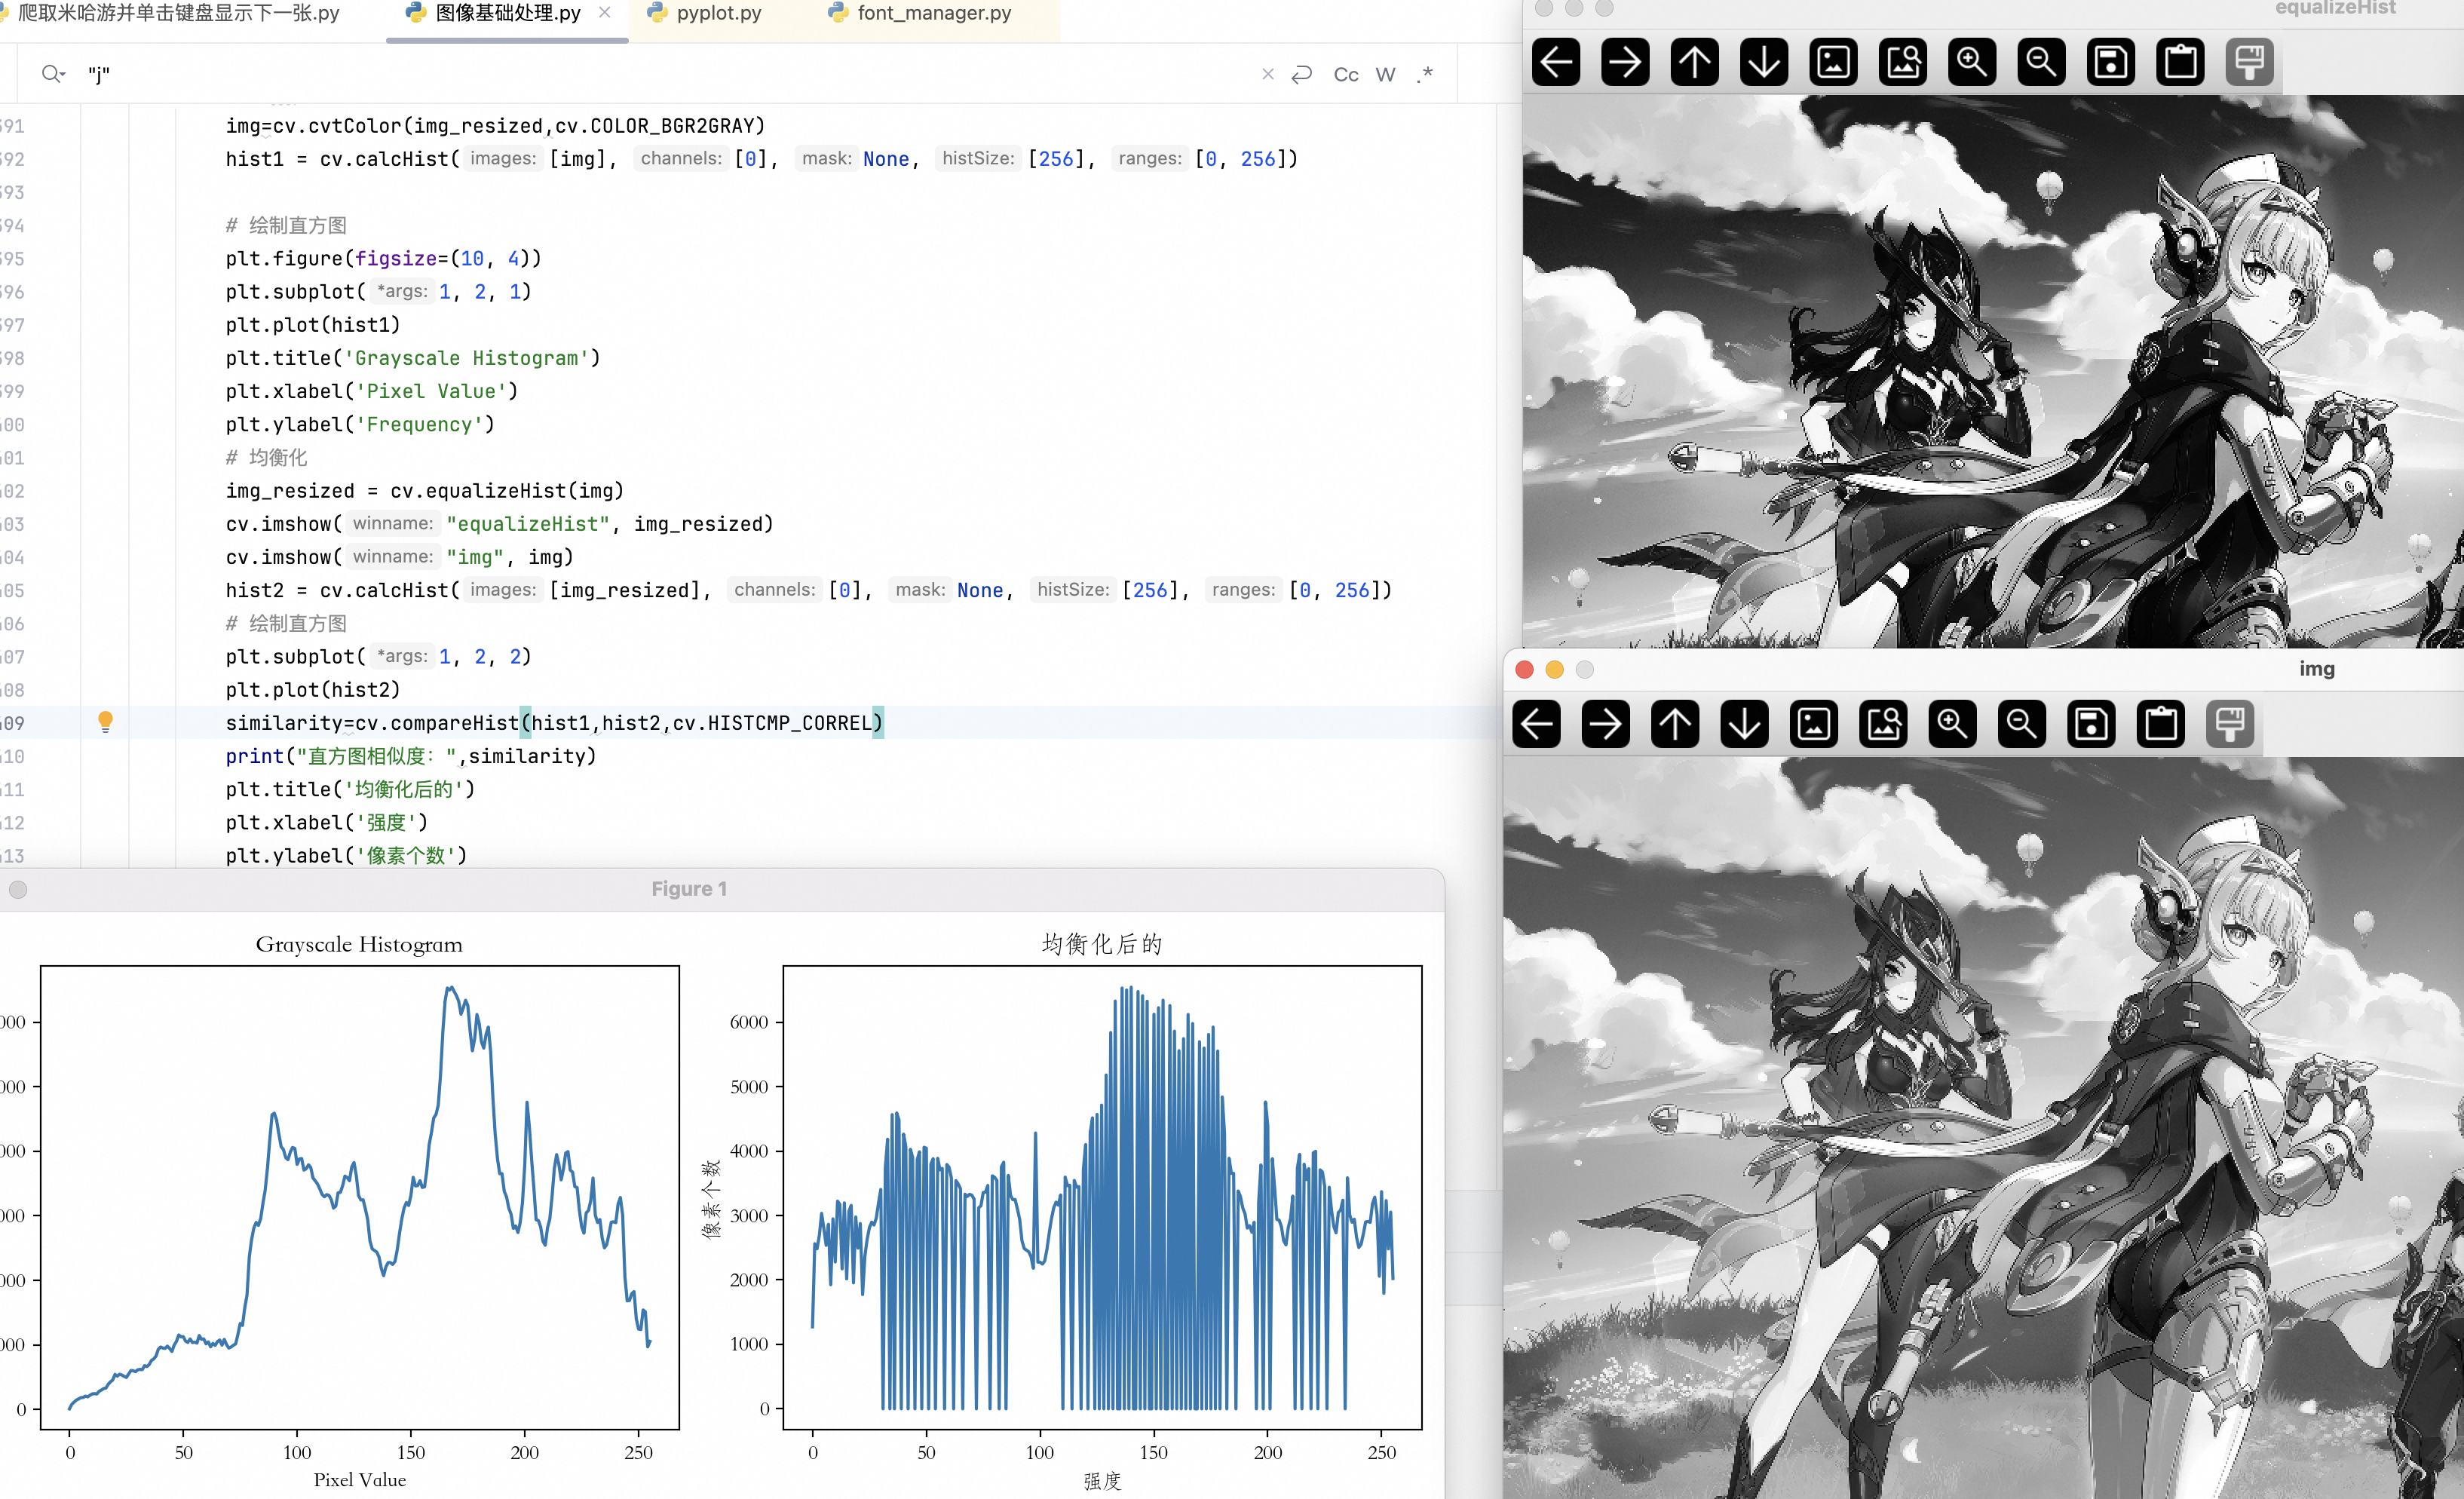
elif key==ord("t"):
img=cv.cvtColor(img_resized,cv.COLOR_BGR2GRAY)
hist1 = cv.calcHist([img], [0], None, [256], [0, 256])
# 绘制直方图
plt.figure(figsize=(10, 4))
plt.subplot(1, 2, 1)
plt.plot(hist1)
plt.title('Grayscale Histogram')
plt.xlabel('Pixel Value')
plt.ylabel('Frequency')
# 均衡化
img_resized = cv.equalizeHist(img)
cv.imshow("equalizeHist", img_resized)
cv.imshow("img", img)
hist2 = cv.calcHist([img_resized], [0], None, [256], [0, 256])
# 绘制直方图
similarity=cv.compareHist(hist1,hist2,cv.HISTCMP_CORREL)
print("直方图相似度:",similarity)
plt.subplot(1, 2, 2)
plt.plot(hist2)
plt.title('均衡化后的')
plt.xlabel('强度')
plt.ylabel('像素个数')
plt.tight_layout()
plt.show()
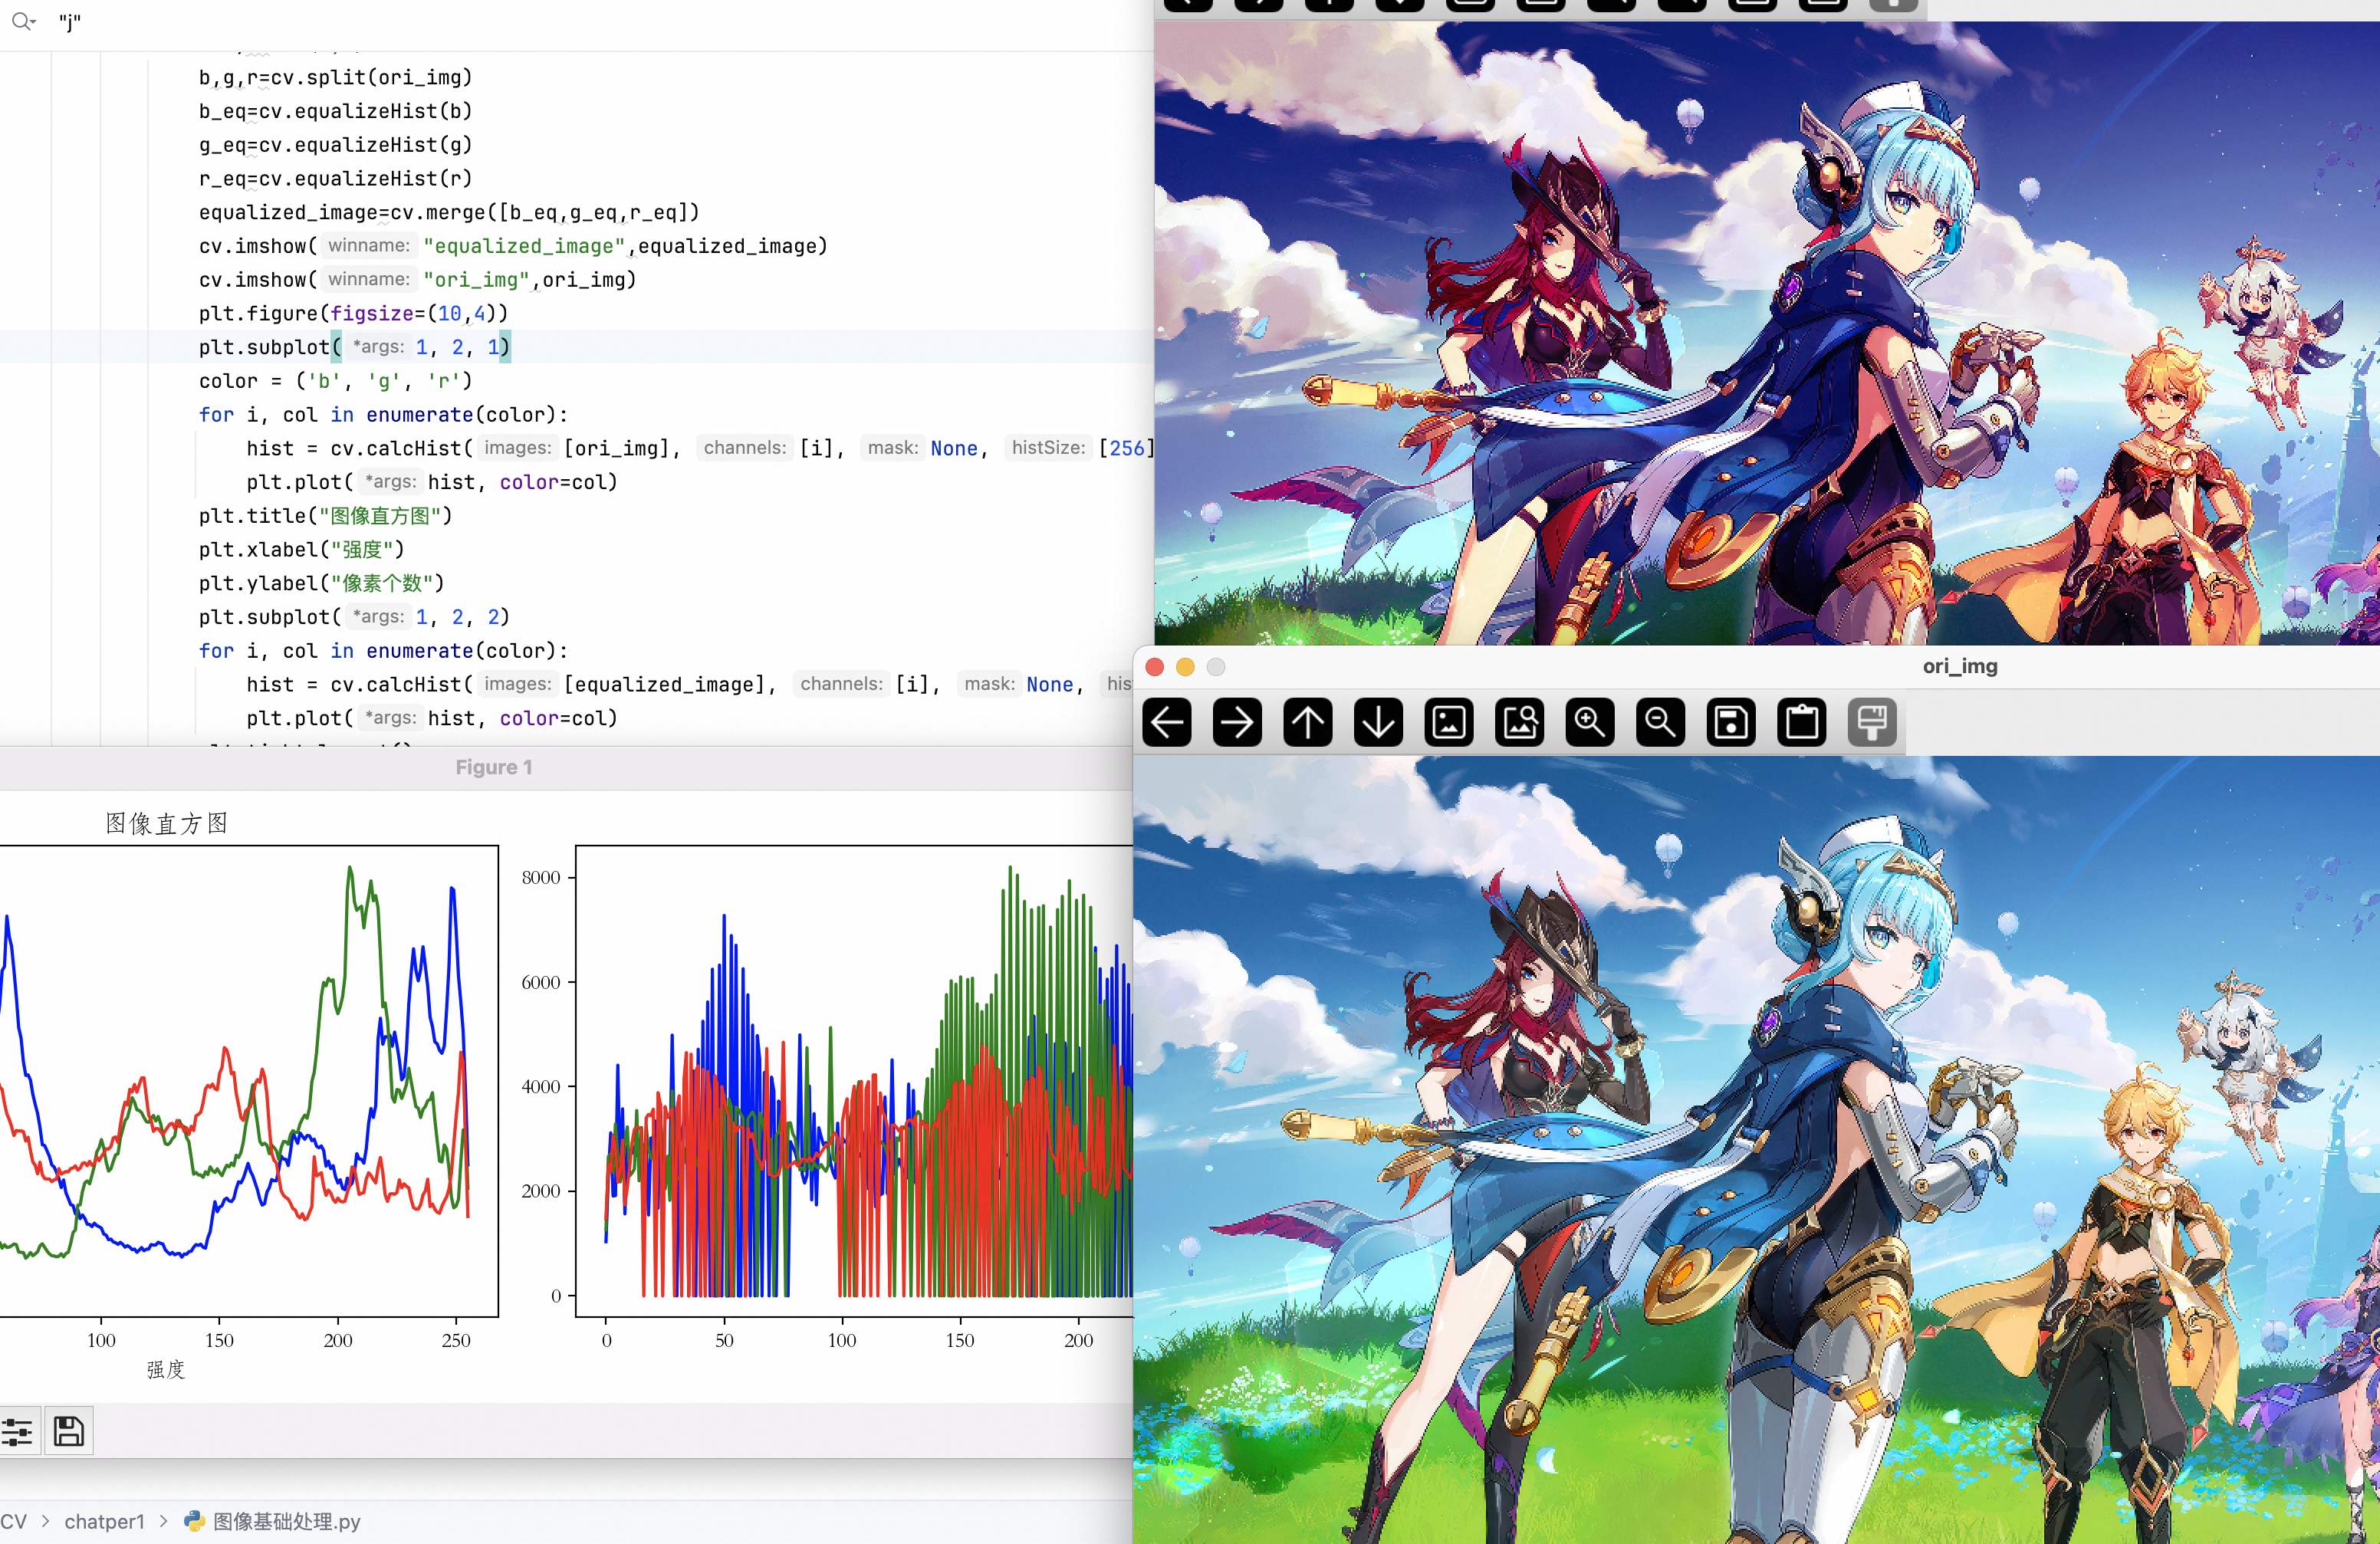
elif key==ord("y"):
b,g,r=cv.split(ori_img)
# 每个色相单独equalize
b_eq=cv.equalizeHist(b)
g_eq=cv.equalizeHist(g)
r_eq=cv.equalizeHist(r)
equalized_image=cv.merge([b_eq,g_eq,r_eq])
cv.imshow("equalized_image",equalized_image)
cv.imshow("ori_img",ori_img)
plt.figure(figsize=(10,4))
plt.subplot(1, 2, 1)
color = ('b', 'g', 'r')
# 每个色相单独calHist
for i, col in enumerate(color):
hist = cv.calcHist([ori_img], [i], None, [256], [0, 256])
plt.plot(hist, color=col)
plt.title("图像直方图")
plt.xlabel("强度")
plt.ylabel("像素个数")
plt.subplot(1, 2, 2)
for i, col in enumerate(color):
hist = cv.calcHist([equalized_image], [i], None, [256], [0, 256])
plt.plot(hist, color=col)
plt.tight_layout()
plt.show()
直方图均衡化
增强图像对比度的方法,通过重新分配像素强度值,使直方图更加均匀
 q
q
matplotlib 中文
只有 ttf 文件后缀才可以
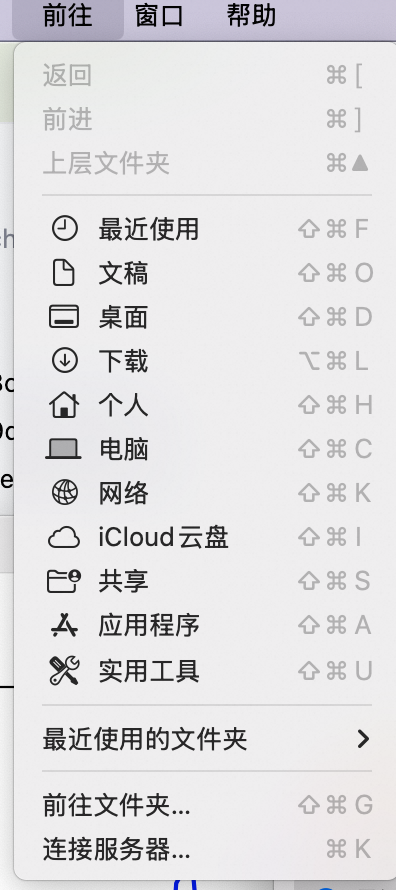
mac
设置打开字体
- 打开访达后菜单栏点击前往-电脑-mac-系统-资源库-Fonts
- 打开访达后 shift+command+c-mac-系统-资源库-Fonts
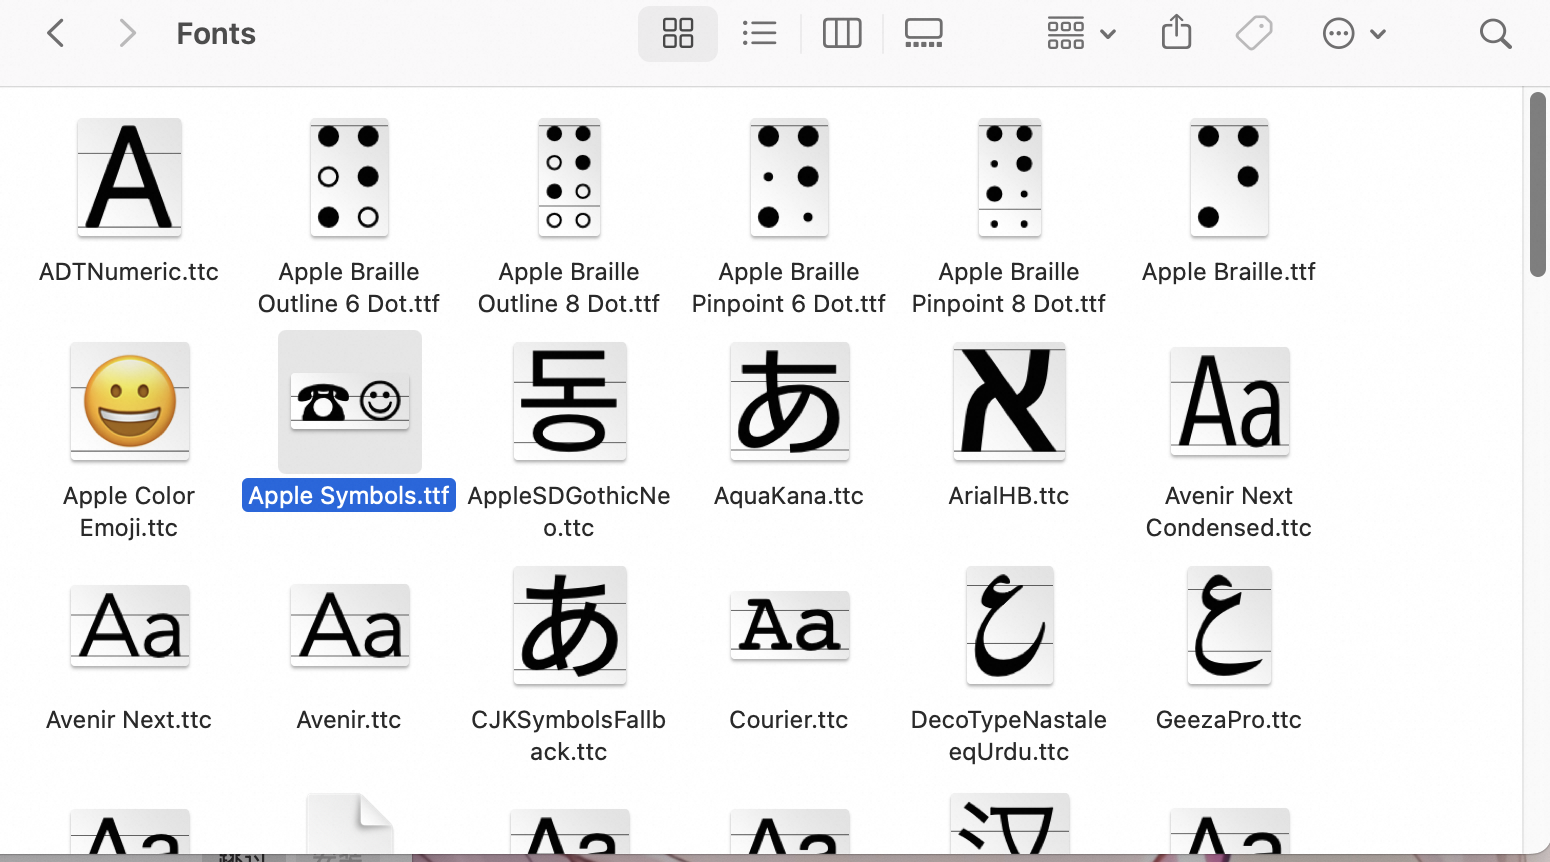
进入字体库
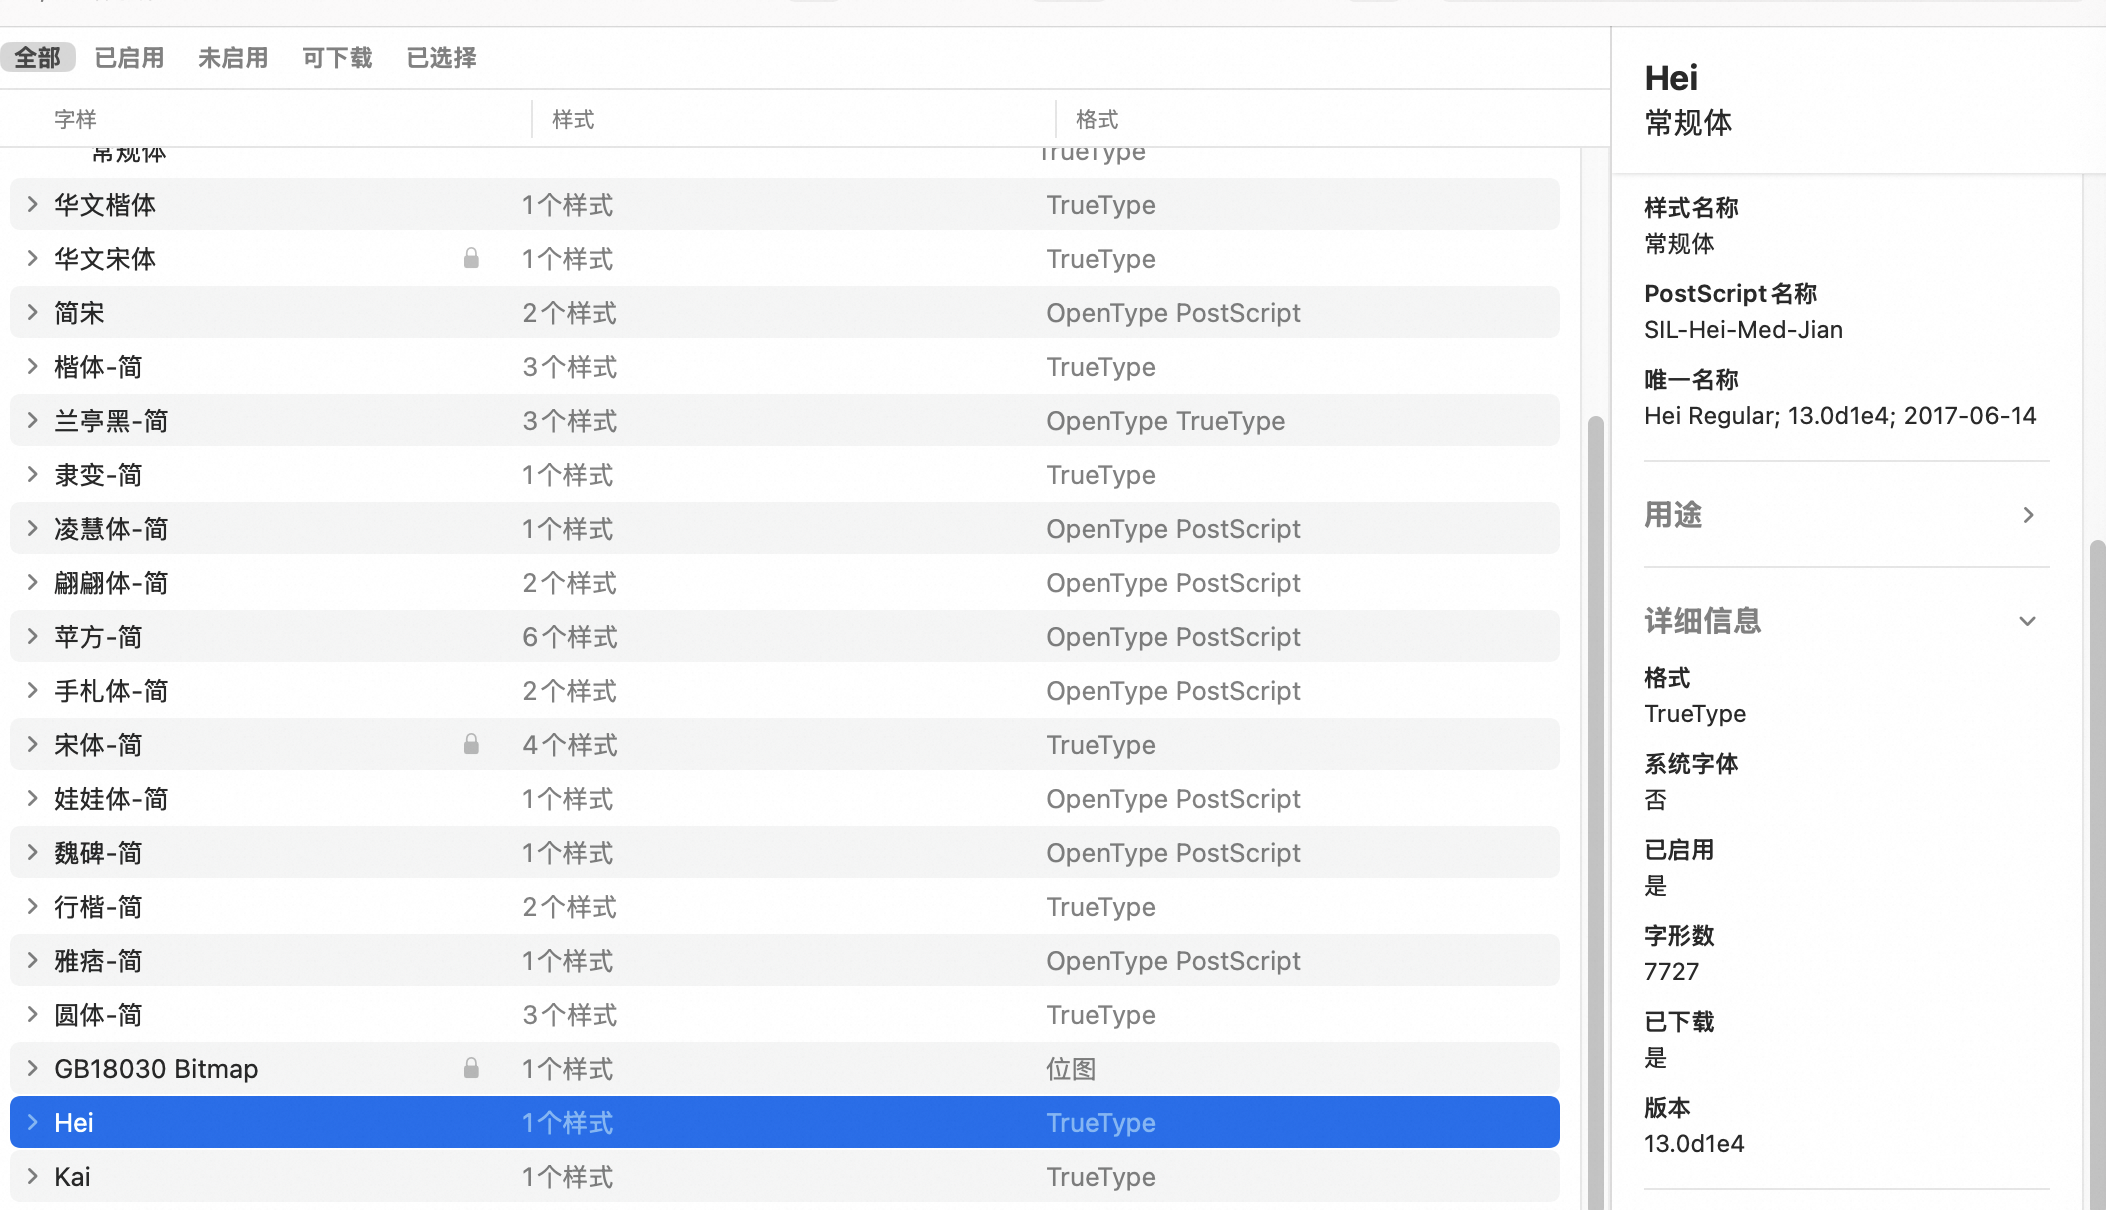
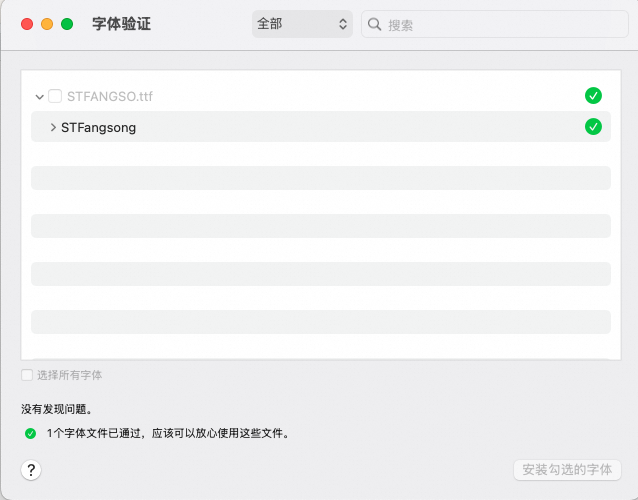
- Fonts 选择一个字体后 - 单击跳过 - 进入所有字体 - 简体中文 - 右击选择验证
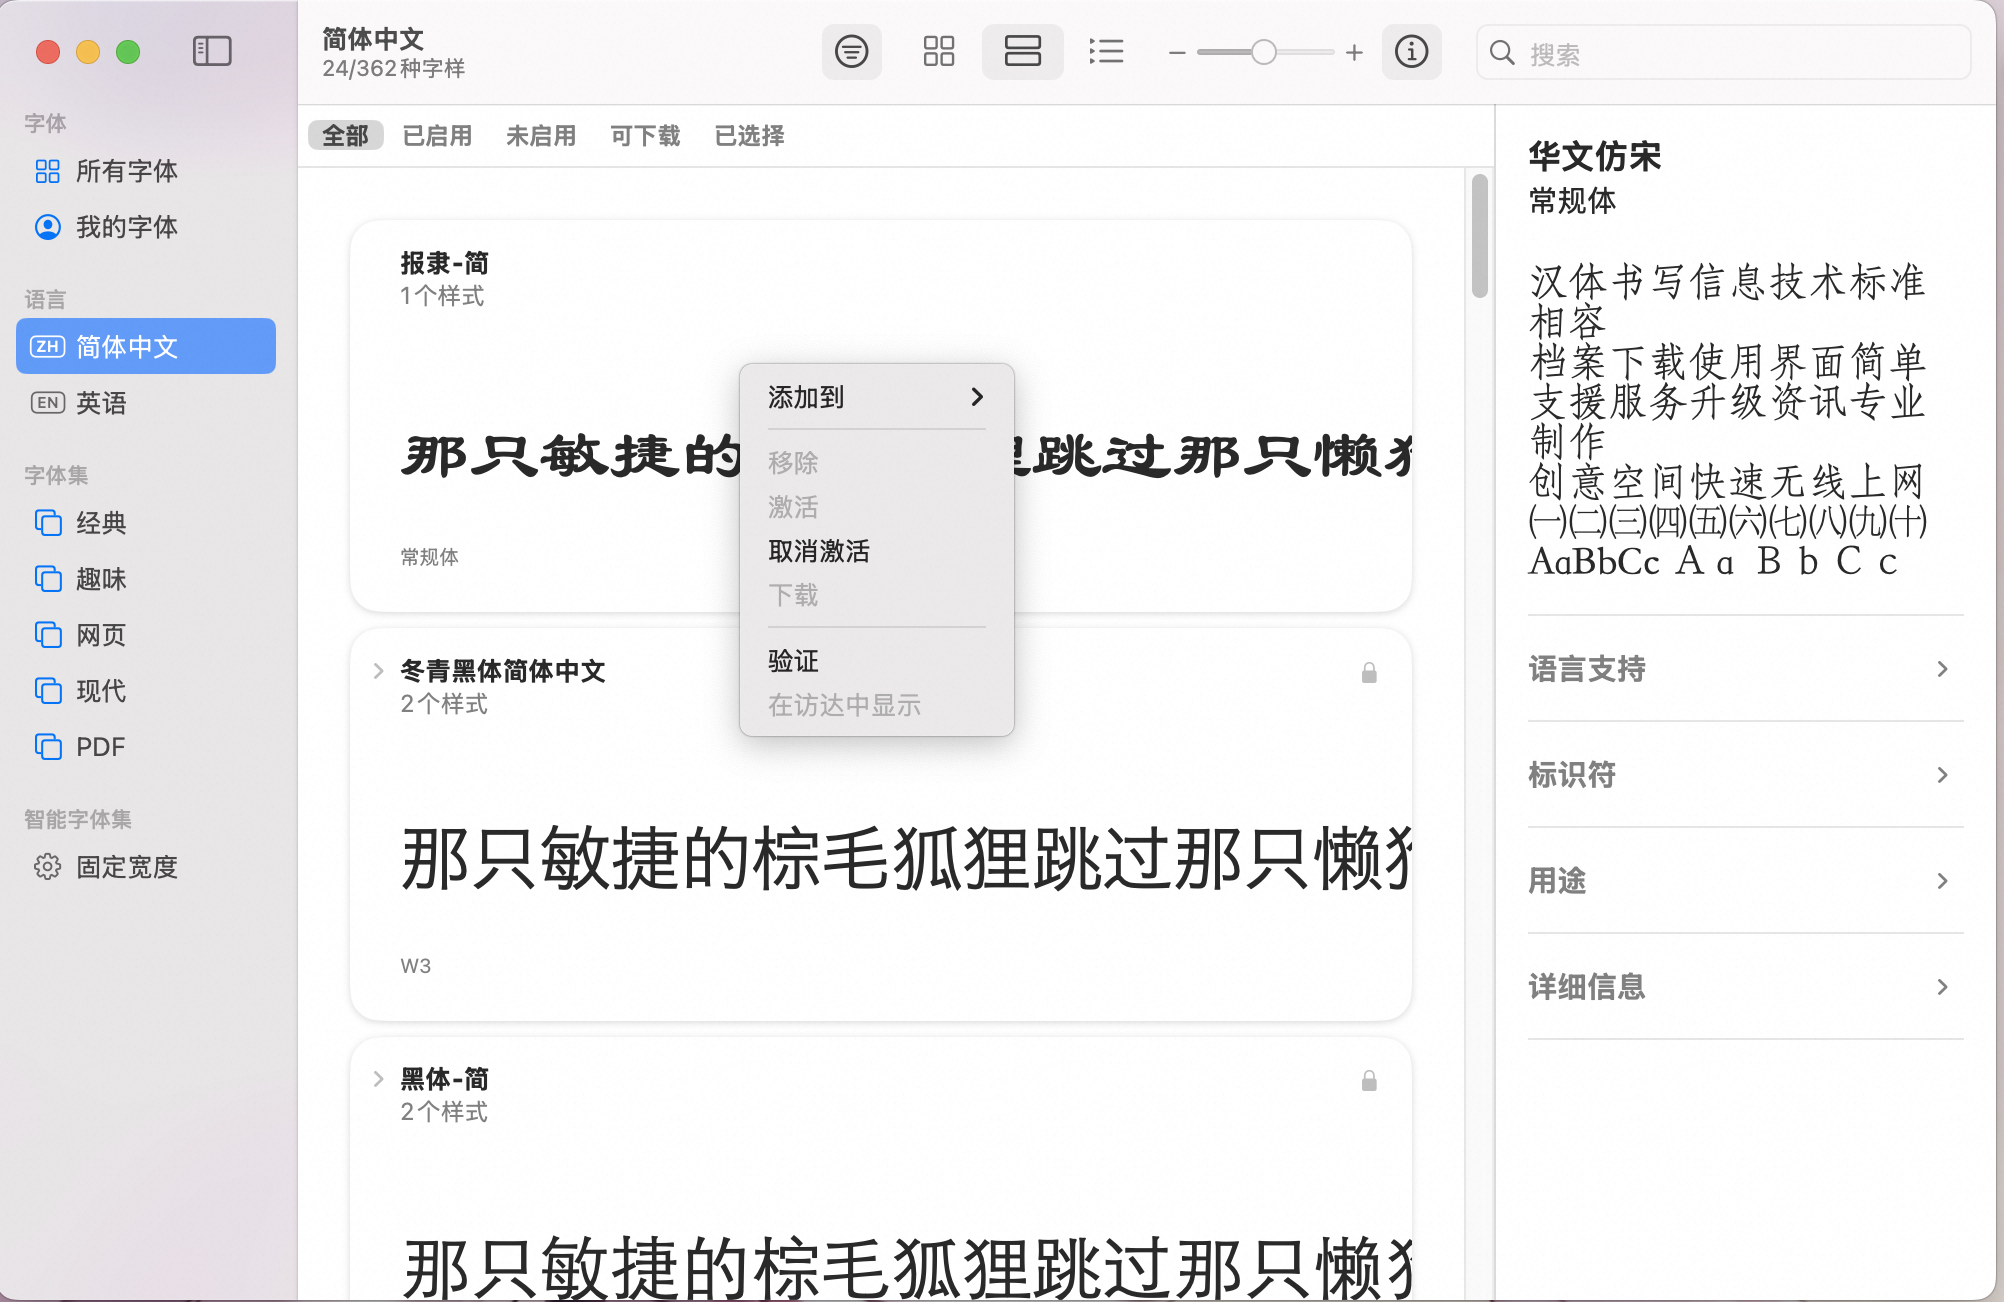
- 查找 TrueType 类型+ ttf 文件后缀,并复制名称(得试,可能是文件名),在 matplotlib 里面测试
plt.rcParams['font.sans-serif'] = ["STFangsong"]  # ttf后缀
plt.rcParams['font.sans-serif'] = ["STHeiti"]  # ttf后缀
plt.rcParams['font.sans-serif'] = ["Hei"]  # ttf后缀
plt.rcParams['axes.unicode_minus'] = False
视频处理
常见视频处理+摄像头
视频处理包括:视频读取
VideoCapture- 播放read+imshow- 帧处理 - 保存VideoWriter帧处理:
- 视频分析:通过视频处理技术,分析视频中的运动、目标、事件等
- 视频增强:对视频进行去躁、增强、稳定化等处理,提升视频质量
- 视频编辑:对视频进行剪辑、拼接、添加特效等操作
- 实时监控:通过摄像头实时监控场景,并进行目标检测、行为分析等
查看摄像头:只需将参数设置为摄像头索引(通常为 0)
<font style="color:#080808;background-color:#ffffff;">cap=cv.VideoCapture(0)</font>
def get_Camera_mp4():
    cap=cv.VideoCapture(0)
    if not cap.isOpened():
        print("无法打开摄像头")
        exit()
    while True:
        ret, frame = cap.read()
        if not ret:
            print("无法获取视频帧")
            break
        cv.imshow("Camera", frame)
        if cv.waitKey(25) & 0xFF == ord('q'):
            break
    cap.release()
    cv.destroyAllWindows()
添加声音
给视频添加声音
- ffmpeg(命令行)
- moviepy(python)
    # 读取无声视频(OpenCV生成的)
    video = moviepy.VideoFileClip(file_name+"adaptiveThreshold"+".mp4")
    # 从原视频提取音频
    audio = moviepy.VideoFileClip(file_name+".mp4").audio
    # 添加音频
    video.write_videofile(file_name+"adaptiveThreshold_video_noaudio.mp4", audio=audio)
边缘检测+合成声音+导出视频
帧的保存需要 VideoWriter(导出路径,fourcc视频编码器,fps帧率,frameSize 窗口大小)
- fourcc 视频编码器输入
ffmpeg -codecs | grep -i video查看是否支持

- fps、窗口大小
通过
int(cap.get(cv.CAP_PROP_FPS/CAP_PROP_FRAME_WIDTH/CAP_PROP_FRAME_HEIGHT))
fps = int(cap.get(cv.CAP_PROP_FPS))
width = int(cap.get(cv.CAP_PROP_FRAME_WIDTH))
height = int(cap.get(cv.CAP_PROP_FRAME_HEIGHT))
| 字符串 (fourcc) | 编码/作用 | 输出格式例子 |
|---|---|---|
<font style="color:rgb(0, 0, 0);">XVID</font> | Xvid MPEG-4 | <font style="color:rgb(0, 0, 0);">.avi</font> |
<font style="color:rgb(0, 0, 0);">MJPG</font> | Motion-JPEG | <font style="color:rgb(0, 0, 0);">.avi</font> (每帧独立JPEG) |
<font style="color:rgb(0, 0, 0);">MP4V</font> | MPEG-4 | <font style="color:rgb(0, 0, 0);">.mp4</font>、<font style="color:rgb(0, 0, 0);">.avi</font> |
<font style="color:rgb(0, 0, 0);">H264</font>/ <font style="color:rgb(0, 0, 0);">X264</font> | H.264 (AVC) | <font style="color:rgb(0, 0, 0);">.mp4</font> |
<font style="color:rgb(0, 0, 0);">DIVX</font> | DivX MPEG-4 | <font style="color:rgb(0, 0, 0);">.avi</font> |
<font style="color:rgb(0, 0, 0);">avc1</font> | H.264,另一种fourcc写法 | <font style="color:rgb(0, 0, 0);">.mp4</font> |
<font style="color:rgb(0, 0, 0);">WMV1</font>/ <font style="color:rgb(0, 0, 0);">WMV2</font> | Windows Media Video | <font style="color:rgb(0, 0, 0);">.wmv</font> |
def merge_video(processed_video="videos/33708180019-1-192adaptiveThreshold.mp4",
                original_video="videos/33708180019-1-192.mp4",
                output_video="videos/33708180019-1-192adaptiveThreshold_with_audio.mp4"):
    cmd = [
        "ffmpeg", "-y",
        "-i", processed_video,
        "-i", original_video,
        "-c", "copy",
        "-map", "0:v:0",
        "-map", "1:a:0",
        output_video
    ]
    subprocess.run(cmd, check=True)
    print("✅ 合并完成,必有音轨")
def get_adaptiveThreshold_mp4(video_path):
    cap = cv.VideoCapture(video_path)
    fps = int(cap.get(cv.CAP_PROP_FPS))
    width = int(cap.get(cv.CAP_PROP_FRAME_WIDTH))
    height = int(cap.get(cv.CAP_PROP_FRAME_HEIGHT))
    file_name=video_path.split(".")[0]+"adaptiveThreshold.mp4"
    fourcc = cv.VideoWriter_fourcc(*'mp4v')
    out=cv.VideoWriter(file_name,fourcc, fps, (width, height))
    while cap.isOpened():
        ret, frame = cap.read()
        if not ret:
            break
        gray_img = cv.cvtColor(frame, cv.COLOR_BGR2GRAY)
        gray_blur = cv.GaussianBlur(gray_img, (5, 5), 0)# ksize必须是奇数,否则报错
        img_resized = cv.adaptiveThreshold(gray_blur, 255, cv.ADAPTIVE_THRESH_GAUSSIAN_C, cv.THRESH_BINARY, 11, 2)
        out.write(cv.cvtColor(img_resized, cv.COLOR_GRAY2BGR)) # write要求三通道,所以需要转为BGR
        cv.imshow("showimage", img_resized)
        if cv.waitKey(25) & 0xFF == ord('q'):  # q 退出
            break
    # 需要先release然后保存
    cap.release()
    out.release()
    print("生成边缘检测文件成功")
    merge_video(output_video="videos/adaptiveThreshold_audio.mp4",original_video=video_path,processed_video=file_name)
    print("保存有音频的边缘检测文件成功完成")
    cv.destroyAllWindows()


 2223
2223

 被折叠的 条评论
为什么被折叠?
被折叠的 条评论
为什么被折叠?
 到【灌水乐园】发言


