


 本文介绍Eureka服务治理机制,涵盖服务注册、发现及高可用配置。解析Eureka工作原理,包括客户端和服务端源码分析。
Eureka
什么是服务治理?为什么要使用?
服务治理是微服务架构中最核心和基础的模块,主要用来实现微服务实例的自动注册和发现。
在最初开始构建微服务架构时,我们的服务可能并不多,我们可以通过静态配置来完成服务A对服务B的调用。比如,服务A需要调用服务B来完成一个操作,为了实现服务B的高可用,我们必须手工的维护服务B的实例清单,手动去填写要调用服务的ip地址、端口等等。为了但是随着业务的发展,系统的功能越来越复杂,服务也越来越多,我们的集群规模、服务的位置、服务的命名都可能发展变化,如果还是使用手工维护,那么极易发生错误,并且白白浪费了人力成本。
为了解决微服务架构中的服务实例维护问题,产生了服务治理框架和产品。
服务注册: 在服务治理框架中,注册中心是必不可少的。每个服务单元向注册中心登记自己提供的服务,将主机、端口号、版本号、通信协议等信息告知注册中心,注册中心按照服务名组织一个服务清单。并且,服务注册中心还需要以心跳的方式去监测清单中的服务是否可用,不可用就从清单中剔除。
服务发现: 由于在服务治理框架下运作,服务间的调用不再通过具体的服务地址来实现,而是通过向服务注册中心发起请求调用,获取服务清单。所以,服务调用方不再需要知道服务提供者的具体地址。例如服务C想要调用服务A,服务C要向服务注册中心发起咨询服务请求,服务注册中心会将服务A的所有位置信息返回给C,然后服务C便已某种负载均衡策略选出一个地址进行调用。这就算服务治理的基本思路,实际的框架中,为了性能等因素,不会每次都向服务注册中心获取服务信息。
Eureka
Spring Cloud Eureka是Spring Cloud Netflix微服务套件中的一部分,基于Netflix Eureka做了二次封装,主要负责微服务架构中的服务治理功能。我们只需要简单引入依赖和注解配置就能让Spring Boot构建的微服务应用轻松的与Eureka服务治理进行整合。
Spring Cloud Eureka既包含了服务端组件,也包含了客户端组件,均采用JAVA编写。
Eureka Server为服务注册中心。
Eureka Client为Eureka客户端,主要用来处理服务注册与发现。客户端通过注解配置等方式,嵌入在应用程序的代码中,在应用程序运行时,Eureka客户端向注册中心注册自身提供的服务。
Eureka入门案例
搭建服务注册中心
(1)首先创建一个工程,为了方便管理,我们创建一个多模块工程,我们的工程结构如下
eureka
	--eureka-server
	--eureka-client
	--pom.xml
父工程的pom文件如下,父工程的pom文件引入server和client都需要的依赖。
注意:Spring Boot和Spring Cloud版本有着严格的依赖关系,例如Fichley只能依赖于Spring Boot 2.0.X,否则会报错,使用之前可以先Google对应的依赖版本。
<?xml version="1.0" encoding="UTF-8"?>
<project xmlns="http://maven.apache.org/POM/4.0.0"
         xmlns:xsi="http://www.w3.org/2001/XMLSchema-instance"
         xsi:schemaLocation="http://maven.apache.org/POM/4.0.0 http://maven.apache.org/xsd/maven-4.0.0.xsd">

    <parent>
        <groupId>org.springframework.boot</groupId>
        <artifactId>spring-boot-starter-parent</artifactId>
        <version>2.0.0.RELEASE</version>
    </parent>

    <modelVersion>4.0.0</modelVersion>

    <groupId>com.springcloud</groupId>
    <artifactId>eureka</artifactId>
    <packaging>pom</packaging>
    <version>1.0-SNAPSHOT</version>

    <modules>
        <module>eureka-server</module>
    </modules>


    <dependencyManagement>
        <dependencies>
            <dependency>
                <groupId>org.springframework.cloud</groupId>
                <artifactId>spring-cloud-dependencies</artifactId>
                <version>Finchley</version>
            </dependency>
        </dependencies>
    </dependencyManagement>

    <build>
        <plugins>
            <plugin>
                <groupId>org.springframework.boot</groupId>
                <artifactId>spring-boot-maven-plugin</artifactId>
            </plugin>
        </plugins>
    </build>


</project>
(2)创建服务注册中心模块,然后在pom文件中引入注册中心依赖
pom文件
<?xml version="1.0" encoding="UTF-8"?>
<project xmlns="http://maven.apache.org/POM/4.0.0"
         xmlns:xsi="http://www.w3.org/2001/XMLSchema-instance"
         xsi:schemaLocation="http://maven.apache.org/POM/4.0.0 http://maven.apache.org/xsd/maven-4.0.0.xsd">
    <parent>
        <artifactId>eureka</artifactId>
        <groupId>com.springcloud</groupId>
        <version>1.0-SNAPSHOT</version>
    </parent>
    <modelVersion>4.0.0</modelVersion>

    <artifactId>eureka-server</artifactId>

    <dependencies>
        <dependency>
            <groupId>org.springframework.cloud</groupId>
            <artifactId>spring-cloud-starter-netflix-eureka-server</artifactId>
            <version>2.0.3.RELEASE</version>
        </dependency>
    </dependencies>

</project>
编写服务注册中心模块的启动类
import org.springframework.boot.SpringApplication;
import org.springframework.boot.autoconfigure.SpringBootApplication;
import org.springframework.cloud.netflix.eureka.server.EnableEurekaServer;

//通过EnableEurekaServer注解启动一个服务注册中心
@EnableEurekaServer
@SpringBootApplication
public class Application {
    public static void main(String args[]){
        SpringApplication.run(Application.class);
    }
}
由于默认情况下,服务注册中心会将自己也作为客户端进行注册,所以我们需要禁用它自己的客户端注册行为。配置文件:application.yml
eureka:
  client:
    register-with-eureka: false     --不向注册中心注册自己
    fetch-registry: false           --不拉取服务清单
    //先简单理解为注册中心的地址
    service-url:
        defaultZone:
            http://${eureka.instance.hostname}:${server.port}/eureka/
server:
  port: 8888
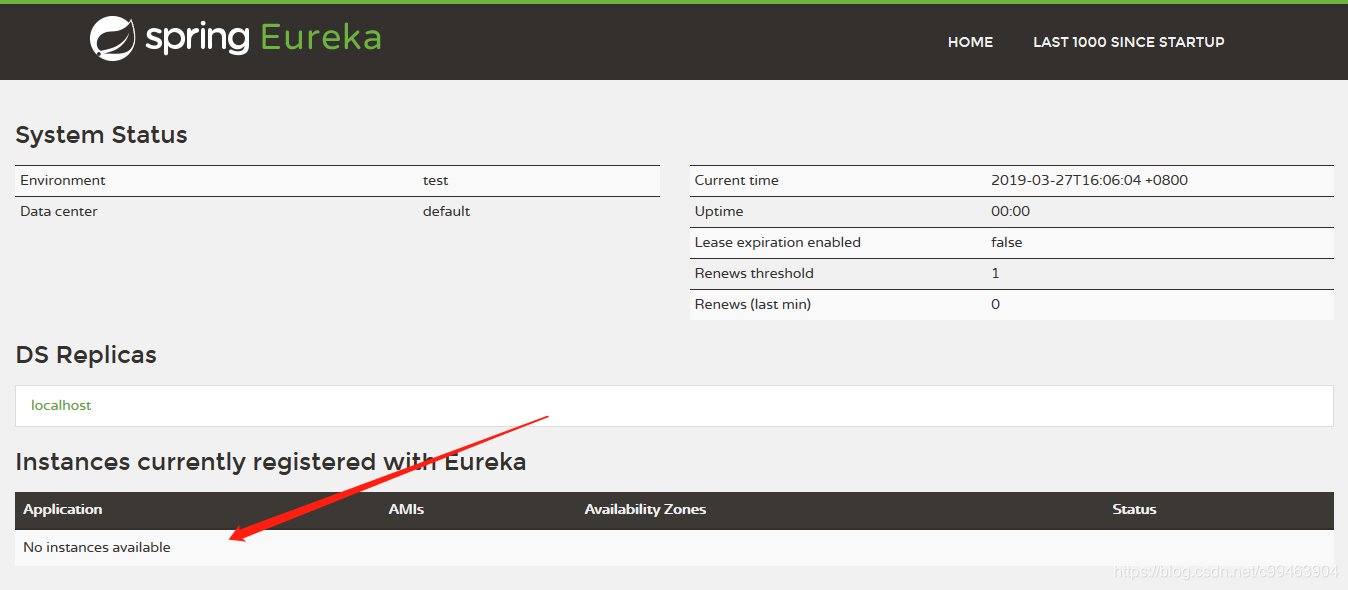
接下来我们启动项目,访问http://localhost:8888/
可以看到箭头所指的地方没有任何的注册服务。
搭建客户端
(1)创建客户端模块,然后在pom文件中引入需要的依赖
<?xml version="1.0" encoding="UTF-8"?>
<project xmlns="http://maven.apache.org/POM/4.0.0"
         xmlns:xsi="http://www.w3.org/2001/XMLSchema-instance"
         xsi:schemaLocation="http://maven.apache.org/POM/4.0.0 http://maven.apache.org/xsd/maven-4.0.0.xsd">
    <parent>
        <artifactId>eureka</artifactId>
        <groupId>com.springcloud</groupId>
        <version>1.0-SNAPSHOT</version>
    </parent>
    <modelVersion>4.0.0</modelVersion>

    <artifactId>eureka-client</artifactId>

    <dependencies>
        <dependency>
            <groupId>org.springframework.cloud</groupId>
            <artifactId>spring-cloud-starter-netflix-eureka-client</artifactId>
            <version>2.0.3.RELEASE</version>
        </dependency>
        <dependency>
            <groupId>org.springframework.boot</groupId>
            <artifactId>spring-boot-starter-web</artifactId>
            <version>2.0.0.RELEASE</version>
        </dependency>
    </dependencies>

</project>
(2)编写启动类
import org.springframework.boot.SpringApplication;
import org.springframework.boot.autoconfigure.SpringBootApplication;
import org.springframework.cloud.netflix.eureka.EnableEurekaClient;

//该注解开启Eureka客户端
@EnableEurekaClient
@SpringBootApplication
public class Application {
    public static void main(String[] args) {
        SpringApplication.run(Application.class);
    }
}
(3) 编写相关配置。配置文件:application.yml
spring:
  application:
    name: eureka-client01    --服务名字
server:
  port: 9999
eureka:
  client:
    service-url:         	 --注册中心地址
            defaultZone:
                http://localhost:8888/eureka/
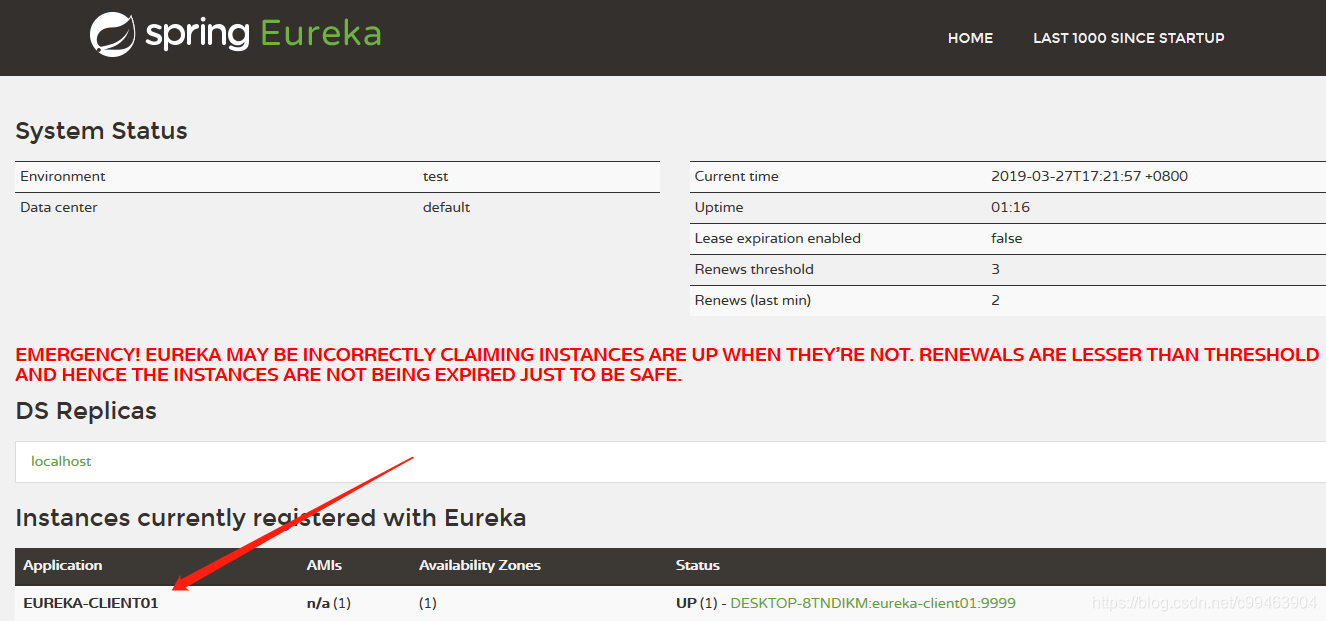
启动成功后,控制台打印如下信息

我们去服务注册中心就能看到已注册的服务。
高可用注册中心
在分布式架构中,我们要充分考虑发生故障如何去解决问题,比较统一的解决办法就是对各个组件进行高可用部署,所以我们要来学习如何构建高可用的服务注册中心。
Eureka Server充分考虑到了高可用的问题,前面说过,Eureka的设计中,所有节点既是服务提供者,也是服务消费者,服务注册中心也不例外。我们在前面单节点的服务注册中心配置时,设置了如下两个参数,让服务注册中心既不向注册中心注册自己,也不需要向注册中心拉取服务清单。
eureka.client.register-with-eureka: false     --不向注册中心注册自己
eureka.client.fetch-registry: false           --不拉取服务清单
而Eureka的高可用策略实际上就是将自己作为服务向其他服务注册中心注册自己,这样就可以形成一组相互注册的服务注册中心,通过互相拉取服务清单实现服务清单的同步。接下来我们就来实际的操作一下。构建一个三节点的服务注册中心
(1)首先我们需要在hosts文件里添加映射,在defaultZone里使用loacalhost会导致节点不可用。
127.0.0.1            server1
127.0.0.1            server2
127.0.0.1            server3
(2)创建第一个服务注册中心,具体步骤和前面一样,更改配置如下
eureka:
  client:
    register-with-eureka: true    --默认为true,不写也可以。允许注册自己
    fetch-registry: true		  --允许拉取服务清单
    service-url:
        defaultZone:
           --指定另外两个服务注册中心的地址,必须使用hosts里面的映射来映射本地,使用localhost会导致服务节点不可用
            http://server2:8002/eureka/,http://server3:8003/eureka/

  --本服务实例名称
  instance:
    hostname: server1
server:
  port: 8001
spring:
  application:
    name: eureka-server
(3)创建第二个服务注册中心,配置如下
eureka:
  client:
    register-with-eureka: true
    fetch-registry: true
    service-url:
        defaultZone:
            http://server1:8001/eureka/,http://server3:8003/eureka/
  instance:
    hostname: server2
server:
  port: 8002
spring:
  application:
    name: eureka-server
(4)创建第三个服务注册中心,配置如下
eureka:
  client:
    register-with-eureka: true
    fetch-registry: true
    service-url:
        defaultZone:
            http://server1:8001/eureka/,http://server2:8002/eureka/
  instance:
    hostname: server3
server:
  port: 8003
spring:
  application:
    name: eureka-server
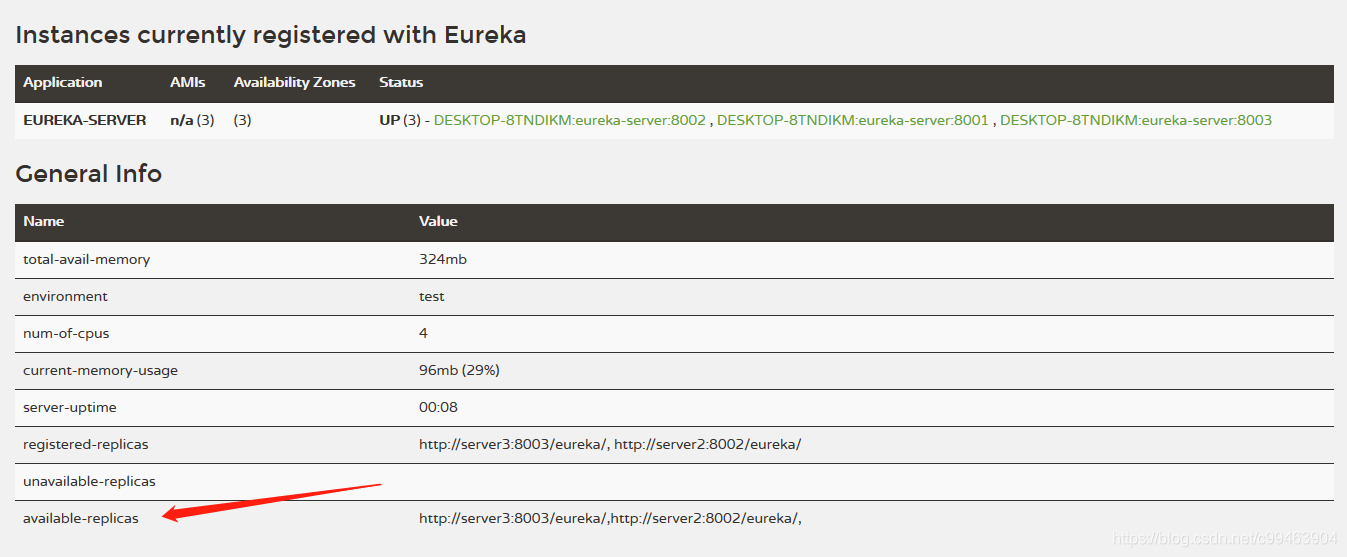
接下来我们启动三个服务注册中心,访问localhost:8001,localhost:8002,localhost:8003
可以看到registered-replicas注册副本中已经有了其他节点,并且这些节点在available-replicas(可用副本)中。
 我们关闭第二个服务注册中心,可以看到这个节点变成了不可用副本。
在创建完多节点的服务注册中心之后,还需要改变我们的服务提供者配置才能在服务注册中心的多个节点中进行注册。这时候大家会问了,不对啊,我们只需要向一个服务注册中心注册不就行了,注册中心是会自动同步的啊。说的没错,但是我们怎么知道我们指定的那个注册中心就一定可用?为了保证健壮性,还是多写几个为好。
spring:
  application:
    name: eureka-client01
server:
  port: 9999
eureka:
  client:
    service-url:
            defaultZone:
                http://server1:8001/eureka/,http://server2:8002/eureka/,http://server3:8003/eureka/

服务发现和消费
现在我们的服务注册中心和服务提供者都有了,我们需要构建一个服务消费者去调用服务提供者来进行消费。
我们需要知道,微服务中都是以HTTP接口的形式暴露自身服务的,因此在调用远程服务时就必须使用HTTP客户端。我们可以使用JDK原生的URLConnection、Apache的Http Client、Netty的异步HTTP Client和Spring提供的RestTemplate。
我们这里暂时使用Spring的RestTemplate,使用起来非常简单,具体的原理可以去Googel寻找文章。
(1)首先我们改造我们的服务提供者,让其提供一个REST接口,供服务消费者调用
@RestController
public class UserContrller {

    @RequestMapping("/hello/{msg}")
    public String hello(@PathVariable String msg){
        return "hello,SpringCloud,"+msg;
    }
}
(2)创建一个服务,无论是服务的提供者还是消费者都属于客户端,所以和前面的步骤一样。但是我们的消费者需要去服务注册中心发现服务。
@RestController
public class ConsumerController {

    private RestTemplate restTemplate;

	//注入一个发现服务的客户端
    @Autowired
    private DiscoveryClient discoveryClient;

    @RequestMapping("/test/{msg}")
    public  String  test(@PathVariable String msg){
            restTemplate=new RestTemplate();
            //通过服务名称获取到该服务的实例列表
            List<ServiceInstance> list=discoveryClient.getInstances("eureka-client01");
            //取第一个服务实例
            ServiceInstance serviceInstance=list.get(0);
            //获取该服务实例的地址和端口
            String url="http://"+serviceInstance.getHost()+":"+serviceInstance.getPort()+"/hello/"+msg;
            //远程进行调用
            return restTemplate.getForObject(url,String.class);
    }
}
(3)我们启动服务,访问test接口,可以看到远程调用成功
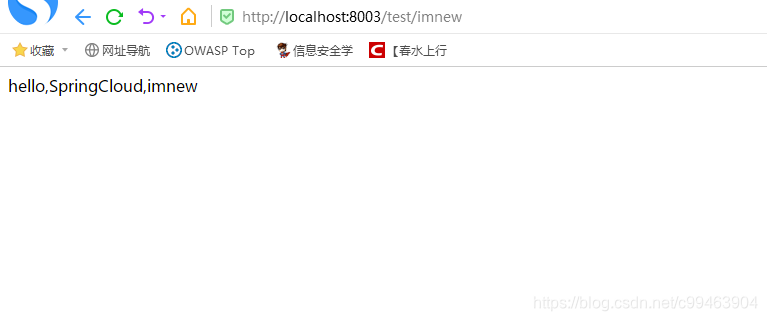
相信大部分人一眼就发现了问题,我们竟然自己手动指定获取第一个服务实例,那就意味着以后每次调用这个服务都要使用指定的服务实例,如果我们服务提供者部署了高可用,那么其他的服务实例我们根本没办法使用,所以这里我们需要用负载均衡算法动态获取实例。而Ribbon则为我们提供了很完善的负载均衡功能,我们在后面会进行详细的学习。
Eureka进阶
通过上述地例子,我们应该对Eureka的服务治理有了初步的认识。我们可以配置单节点或者多节点的服务注册中心,可以构建服务服务提供者或者消费者应用。接下来我们来学习Eureka的更多细节。
服务注册: 服务提供者在启动的时候会发送REST请求将自己注册到服务注册中心,同时提供自身的元数据信息。服务注册中心接收到请求后,会将元数据信息存储在一个双层Map中,第一层的key为服务名,第二层的key为具体的实例名。结构如下:Map<serviceName,Map<instanceName,instance>>。
服务同步: 服务注册中心集群之间相互注册为服务,当一个服务提供者发送注册请求到一个服务注册中心时,它会将该请求转发给其他服务注册中心,从而实现服务注册中心之间的信息同步。
服务续约: 服务提供者默认情况下每隔30秒发送一次心跳来进行服务续约,通过服务续约告诉服务注册中心自己仍然可用。默认情况下如果服务注册中心90秒没有收到服务提供者的心跳,将会把该它从服务列表中剔除。
//通过这两个参数进行调节,官方不建议更改默认参数。
eureka.instance.lease-renewal-interval-in-seconds=30
eureka.instance.lease-expiration-duration-in-seconds=90
获取服务: 当启动服务消费者时,它会发送一个REST请求到服务注册中心,获取服务清单,并将其缓存在本地,每隔30秒更新一次。默认情况下,使用JSON格式来获取服务注册列表信息。
//通过该参数进行修改更新时间
eureka.client.registry-fetch-interval-seconds=30
服务下线: 在服务实例进行关闭操作时,会触发一个服务下线的REST请求给服务注册中心,服务注册中心收到请求后,将服务状态置为DOWN,并传播出去。
服务剔除: 当服务提供者90秒没有向服务注册中心发送心跳时,服务注册中心会将该服务从服务列表中剔除。
自我保护
当我们本地调试Eureka时,基本上都会碰到这样一个问题,在服务注册中心的面板上出现红色警告信息。
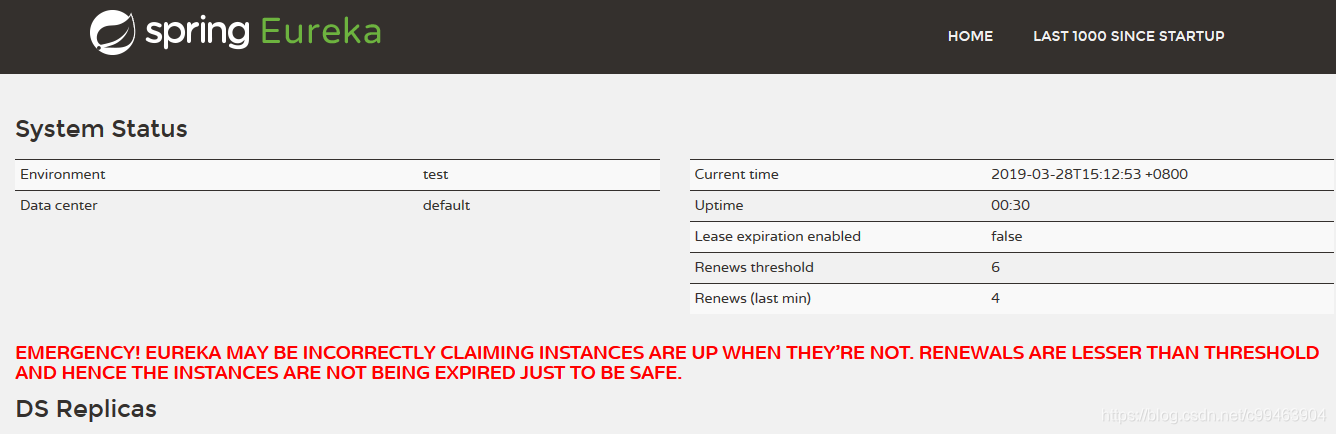
该警告是因为触发了Eureka的自我保护机制,我们讲过,服务提供者会维护一个心跳连接,服务注册中心会统计心跳失败的比例在15分钟内是否低于85%,如果出现低于的情况(生产情况下通常网络不稳定会导致这个问题),服务注册中心会先将这些服务实例保护起来,让这些实例不会被剔除,尽可能的保护注册信息。但是,在这段时间实例若出现问题,就会出现请求调用失败的情况,所以必须要有一定的容错机制。
本地调试的时候很容易引起这个问题,我们可以在服务注册中心关闭保护机制。
eureka.server.enable-self-preservation=false
Eureka源码分析
我们接下来结合源码来更深入的理解Eureka的运行机制。我们从客户端作为入口点,我们要将Spring Boot应用注册到服务注册中心,做了如下几个操作。
-
编写配置文件,添加注册中心位置等信息
-
类上添加@EnableDiscoveryClient注解
  我们在前面项目中添加的是@EnableEurekaClient这个注解,其实@EnableEurekaClient和@EnableDiscoveryClient作用基本一样。
  区别在于spring cloud中服务治理有许多种实现(eureka、consul、zookeeper等等)。
  @EnableDiscoveryClient基于spring-cloud-commons,。
  @EnableEurekaClient基于spring-cloud-netflix。
  使用任意的注册中心后,都可以使用@EnableDiscoveryClient注解。
  但是使用@EnableEurekaClient的情景,就是在服务采用eureka作为注册中心的时候,使用场景较为单一。
  推荐使用@EnableDiscoveryClient。
我们看看EnableDiscoveryClient的源码
/**
 * Annotation to enable a DiscoveryClient implementation.
 * @author Spencer Gibb
 */
@Target(ElementType.TYPE)
@Retention(RetentionPolicy.RUNTIME)
@Documented
@Inherited
@Import(EnableDiscoveryClientImportSelector.class)
public @interface EnableDiscoveryClient {

	/**
	 * If true, the ServiceRegistry will automatically register the local server.
	 */
	boolean autoRegister() default true;
}
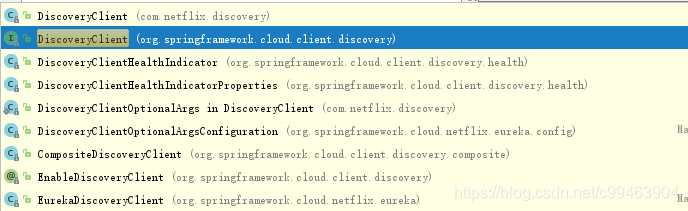
可以看到该注解的注释上写到,注解用来开启一个DiscoveryClient的实例。
我们搜索DiscoveryClient,搜到了一个接口和一个类。可以看到一个是SpringCloud的接口,一个是netflix的实现类。
他们之间的关系是这样的,我从网上偷过来了一张图。
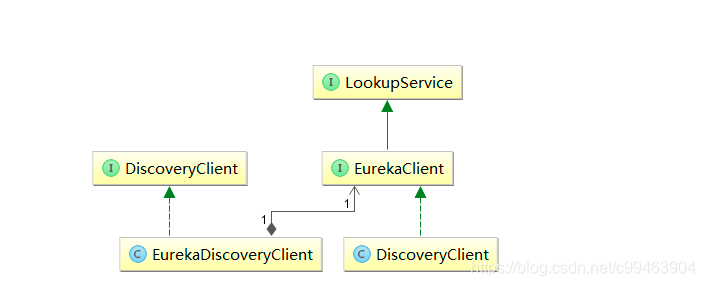
首先SringCloud提供了一个DiscoveryClient接口,定义了用来发现服务的抽象方法,通过该接口定义了一个规范,其他服务治理框架只要实现该接口即可,我们切换框架时就不需要改动程序代码。EurekaDiscoveryClient是SpringCloud对该接口的实现,从命名知道该类封装了Eureka的发现服务功能。打开EurekaDiscoveryClient可以看到它依赖了com.netflix.discovery.EurekaClient,而EurekaClient则继承了LookupService接口,它们都是Netflix包中的内容,主要定义了Eureka发现服务的抽象方法。而真正实现发现服务的则是com.netflix.discovery.DiscoveryClient类
我们详细的来看看DiscoveryClient类。先来看看该类的注释是用来做什么的
/**
 * 这个类用于和Eureka Server交互
 * The class that is instrumental for interactions with <tt>Eureka Server</tt>.
 *
 * <p>
 * Eureka Client负责
 * 向Eureka Server注册实例
 * 向Eureka Server续约租约
 * 在服务关闭期间,取消租约
 * <tt>Eureka Client</tt> is responsible for a) <em>Registering</em> the
 * instance with <tt>Eureka Server</tt> b) <em>Renewal</em>of the lease with
 * <tt>Eureka Server</tt> c) <em>Cancellation</em> of the lease from
 * <tt>Eureka Server</tt> during shutdown
 * <p>
 *
 * 查询注册在Eureka Server中的服务列表
 * d) <em>Querying</em> the list of services/instances registered with
 * <tt>Eureka Server</tt>
 * <p>
 *
 * <p>
 * Eureka Client需要配置一个Eureka Server列表,(这儿我的渣英语翻译不出来了。。)
 * <tt>Eureka Client</tt> needs a configured list of <tt>Eureka Server</tt>
 * {@link java.net.URL}s to talk to.These {@link java.net.URL}s are typically amazon elastic eips
 * which do not change. All of the functions defined above fail-over to other
 * {@link java.net.URL}s specified in the list in the case of failure.
 * </p>
 *
 * @author Karthik Ranganathan, Greg Kim
 * @author Spencer Gibb
 *
 */
我们先来看一下它如何完成服务注册,我们查看它的构造函数里面会执行一个初始化任务。
initScheduledTasks();
这个方法里面主要做了开启获取服务列表定时任务、注册服务等事情,我们先重点来说注册服务。
//这个分支主要是来做续约和注册服务的
if (clientConfig.shouldRegisterWithEureka()) {
			// client端向server端续租(心跳lei)定时任务
			// 这儿是不是看到熟悉的参数
            int renewalIntervalInSecs = instanceInfo.getLeaseInfo().getRenewalIntervalInSecs();
            int expBackOffBound = clientConfig.getHeartbeatExecutorExponentialBackOffBound();
            logger.info("Starting heartbeat executor: " + "renew interval is: {}", renewalIntervalInSecs);


			//发送心跳的任务
            // Heartbeat timer
            scheduler.schedule(
                    new TimedSupervisorTask(
                            "heartbeat",
                            scheduler,
                            heartbeatExecutor,
                            renewalIntervalInSecs,
                            TimeUnit.SECONDS,
                            expBackOffBound,
                            new HeartbeatThread()
                    ),
                    renewalIntervalInSecs, TimeUnit.SECONDS);

			//client端向server端注册
			// InstanceInfoReplicator实例用来执行任务
            // InstanceInfo replicator
            instanceInfoReplicator = new InstanceInfoReplicator(
                    this,
                    instanceInfo,
                    clientConfig.getInstanceInfoReplicationIntervalSeconds(),
                    2); // burstSize

            statusChangeListener = new ApplicationInfoManager.StatusChangeListener() {
                @Override
                public String getId() {
                    return "statusChangeListener";
                }

                @Override
                public void notify(StatusChangeEvent statusChangeEvent) {
                    if (InstanceStatus.DOWN == statusChangeEvent.getStatus() ||
                            InstanceStatus.DOWN == statusChangeEvent.getPreviousStatus()) {
                        // log at warn level if DOWN was involved
                        logger.warn("Saw local status change event {}", statusChangeEvent);
                    } else {
                        logger.info("Saw local status change event {}", statusChangeEvent);
                    }
                    instanceInfoReplicator.onDemandUpdate();
                }
            };

            if (clientConfig.shouldOnDemandUpdateStatusChange()) {
                applicationInfoManager.registerStatusChangeListener(statusChangeListener);
            }

            instanceInfoReplicator.start(clientConfig.getInitialInstanceInfoReplicationIntervalSeconds());
        } else {
            logger.info("Not registering with Eureka server per configuration");
        }
我们可以看到这个方法里先开启了续租心跳的定时任务,然后创建了一个instanceInfoReplicator 实例,这个用来执行一类实现了Runnable接口,执行定时任务,我们进去这个类看他的run方法做了什么事情。
public void run() {
        try {
            discoveryClient.refreshInstanceInfo();

            Long dirtyTimestamp = instanceInfo.isDirtyWithTime();
            if (dirtyTimestamp != null) {
                discoveryClient.register();
                instanceInfo.unsetIsDirty(dirtyTimestamp);
            }
        } catch (Throwable t) {
            logger.warn("There was a problem with the instance info replicator", t);
        } finally {
            Future next = scheduler.schedule(this, replicationIntervalSeconds, TimeUnit.SECONDS);
            scheduledPeriodicRef.set(next);
        }
    }
我们发现了它调用了discoveryClient.register();而这个方法就是真正的注册方法。我们跟进去看看
/**
     * Register with the eureka service by making the appropriate REST call.
  */
boolean register() throws Throwable {
        logger.info(PREFIX + "{}: registering service...", appPathIdentifier);
        EurekaHttpResponse<Void> httpResponse;
        try {
        	//发送请求进行注册
            httpResponse = eurekaTransport.registrationClient.register(instanceInfo);
        } catch (Exception e) {
            logger.warn(PREFIX + "{} - registration failed {}", appPathIdentifier, e.getMessage(), e);
            throw e;
        }
        if (logger.isInfoEnabled()) {
            logger.info(PREFIX + "{} - registration status: {}", appPathIdentifier, httpResponse.getStatusCode());
        }
        return httpResponse.getStatusCode() == 204;
    }
看注释知道,这个方法使用了REST请求注册到Eureka Server。而注册时传入的instanceInfo参数,就是客户端传给服务端的元数据。
我们进去这个方法看看怎么实现。其实这个方法的内部实现不过就是拼装Http请求而已。
@Override
    public EurekaHttpResponse<Void> register(InstanceInfo info) {
        String urlPath = "apps/" + info.getAppName();
        ClientResponse response = null;
        try {
            Builder resourceBuilder = jerseyClient.resource(serviceUrl).path(urlPath).getRequestBuilder();
            addExtraHeaders(resourceBuilder);
            response = resourceBuilder
                    .header("Accept-Encoding", "gzip")
                    .type(MediaType.APPLICATION_JSON_TYPE)
                    .accept(MediaType.APPLICATION_JSON)
                    .post(ClientResponse.class, info);
            return anEurekaHttpResponse(response.getStatus()).headers(headersOf(response)).build();
        } finally {
            if (logger.isDebugEnabled()) {
                logger.debug("Jersey HTTP POST {}/{} with instance {}; statusCode={}", serviceUrl, urlPath, info.getId(),
                        response == null ? "N/A" : response.getStatus());
            }
            if (response != null) {
                response.close();
            }
        }
    }
顺着这个思路,我们再来看一下initScheduledTasks()里面的服务获取和服务续约是怎么实现的。我们贴出整个方法源码。
private void initScheduledTasks() {

		//这个分支用来进行服务获取
        if (clientConfig.shouldFetchRegistry()) {
            // registry cache refresh timer
            int registryFetchIntervalSeconds = clientConfig.getRegistryFetchIntervalSeconds();
            int expBackOffBound = clientConfig.getCacheRefreshExecutorExponentialBackOffBound();
            scheduler.schedule(
                    new TimedSupervisorTask(
                            "cacheRefresh",
                            scheduler,
                            cacheRefreshExecutor,
                            registryFetchIntervalSeconds,
                            TimeUnit.SECONDS,
                            expBackOffBound,
                            new CacheRefreshThread()
                    ),
                    registryFetchIntervalSeconds, TimeUnit.SECONDS);
        }

		//这个分支用来进行服务续约和注册,也就是我们上面分析的那段代码
        if (clientConfig.shouldRegisterWithEureka()) {
            int renewalIntervalInSecs = instanceInfo.getLeaseInfo().getRenewalIntervalInSecs();
            int expBackOffBound = clientConfig.getHeartbeatExecutorExponentialBackOffBound();
            logger.info("Starting heartbeat executor: " + "renew interval is: {}", renewalIntervalInSecs);

            // Heartbeat timer
            scheduler.schedule(
                    new TimedSupervisorTask(
                            "heartbeat",
                            scheduler,
                            heartbeatExecutor,
                            renewalIntervalInSecs,
                            TimeUnit.SECONDS,
                            expBackOffBound,
                            new HeartbeatThread()
                    ),
                    renewalIntervalInSecs, TimeUnit.SECONDS);

            // InstanceInfo replicator
            instanceInfoReplicator = new InstanceInfoReplicator(
                    this,
                    instanceInfo,
                    clientConfig.getInstanceInfoReplicationIntervalSeconds(),
                    2); // burstSize

            statusChangeListener = new ApplicationInfoManager.StatusChangeListener() {
                @Override
                public String getId() {
                    return "statusChangeListener";
                }

                @Override
                public void notify(StatusChangeEvent statusChangeEvent) {
                    if (InstanceStatus.DOWN == statusChangeEvent.getStatus() ||
                            InstanceStatus.DOWN == statusChangeEvent.getPreviousStatus()) {
                        // log at warn level if DOWN was involved
                        logger.warn("Saw local status change event {}", statusChangeEvent);
                    } else {
                        logger.info("Saw local status change event {}", statusChangeEvent);
                    }
                    instanceInfoReplicator.onDemandUpdate();
                }
            };

            if (clientConfig.shouldOnDemandUpdateStatusChange()) {
                applicationInfoManager.registerStatusChangeListener(statusChangeListener);
            }

            instanceInfoReplicator.start(clientConfig.getInitialInstanceInfoReplicationIntervalSeconds());
        } else {
            logger.info("Not registering with Eureka server per configuration");
        }
    }
通过源码我们可以发现,服务续约和注册是在同个if语句里,而服务获取则是另一个独立的if语句。这个不难理解,我们服务注册以后自然需要心跳去续约。而服务续约代码则很简单,开启一个HeartbeatThread任务,通过发送REST请求去进行服务续约。
/**
     * Renew with the eureka service by making the appropriate REST call
     */
    boolean renew() {
        EurekaHttpResponse<InstanceInfo> httpResponse;
        try {
            httpResponse = eurekaTransport.registrationClient.sendHeartBeat(instanceInfo.getAppName(), instanceInfo.getId(), instanceInfo, null);
            logger.debug(PREFIX + "{} - Heartbeat status: {}", appPathIdentifier, httpResponse.getStatusCode());
            if (httpResponse.getStatusCode() == 404) {
                REREGISTER_COUNTER.increment();
                logger.info(PREFIX + "{} - Re-registering apps/{}", appPathIdentifier, instanceInfo.getAppName());
                long timestamp = instanceInfo.setIsDirtyWithTime();
                boolean success = register();
                if (success) {
                    instanceInfo.unsetIsDirty(timestamp);
                }
                return success;
            }
            return httpResponse.getStatusCode() == 200;
        } catch (Throwable e) {
            logger.error(PREFIX + "{} - was unable to send heartbeat!", appPathIdentifier, e);
            return false;
        }
    }
而服务获取则相对比较复杂一点,会根据是否是第一次获取发送不同的REST请求和内容。
接下来再来看看服务端的代码,找到EurekaBootstrap这个类,BootStrapContext类在程序启动时具有最先初始化的权限。
protected void initEurekaServerContext() throws Exception {
        EurekaServerConfig eurekaServerConfig = new DefaultEurekaServerConfig();

        // For backward compatibility
        JsonXStream.getInstance().registerConverter(new V1AwareInstanceInfoConverter(), XStream.PRIORITY_VERY_HIGH);
        XmlXStream.getInstance().registerConverter(new V1AwareInstanceInfoConverter(), XStream.PRIORITY_VERY_HIGH);

        logger.info("Initializing the eureka client...");
        logger.info(eurekaServerConfig.getJsonCodecName());
        ServerCodecs serverCodecs = new DefaultServerCodecs(eurekaServerConfig);

        ApplicationInfoManager applicationInfoManager = null;

        if (eurekaClient == null) {
            EurekaInstanceConfig instanceConfig = isCloud(ConfigurationManager.getDeploymentContext())
                    ? new CloudInstanceConfig()
                    : new MyDataCenterInstanceConfig();

            applicationInfoManager = new ApplicationInfoManager(
                    instanceConfig, new EurekaConfigBasedInstanceInfoProvider(instanceConfig).get());

            EurekaClientConfig eurekaClientConfig = new DefaultEurekaClientConfig();
            eurekaClient = new DiscoveryClient(applicationInfoManager, eurekaClientConfig);
        } else {
            applicationInfoManager = eurekaClient.getApplicationInfoManager();
        }

        PeerAwareInstanceRegistry registry;
        if (isAws(applicationInfoManager.getInfo())) {
            registry = new AwsInstanceRegistry(
                    eurekaServerConfig,
                    eurekaClient.getEurekaClientConfig(),
                    serverCodecs,
                    eurekaClient
            );
            awsBinder = new AwsBinderDelegate(eurekaServerConfig, eurekaClient.getEurekaClientConfig(), registry, applicationInfoManager);
            awsBinder.start();
        } else {
            registry = new PeerAwareInstanceRegistryImpl(
                    eurekaServerConfig,
                    eurekaClient.getEurekaClientConfig(),
                    serverCodecs,
                    eurekaClient
            );
        }

        PeerEurekaNodes peerEurekaNodes = getPeerEurekaNodes(
                registry,
                eurekaServerConfig,
                eurekaClient.getEurekaClientConfig(),
                serverCodecs,
                applicationInfoManager
        );

        serverContext = new DefaultEurekaServerContext(
                eurekaServerConfig,
                serverCodecs,
                registry,
                peerEurekaNodes,
                applicationInfoManager
        );

        EurekaServerContextHolder.initialize(serverContext);

        serverContext.initialize();
        logger.info("Initialized server context");

        // Copy registry from neighboring eureka node
        int registryCount = registry.syncUp();
        registry.openForTraffic(applicationInfoManager, registryCount);

        // Register all monitoring statistics.
        EurekaMonitors.registerAllStats();
    }
而PeerAwareInstanceRegistryImpl和PeerEurekaNodes 两个类从命名来看,和服务注册和高可用有关,我们打开PeerAwareInstanceRegistryImpl类,里面有个register方法。
@Override
    public void register(final InstanceInfo info, final boolean isReplication) {
        int leaseDuration = Lease.DEFAULT_DURATION_IN_SECS;
        if (info.getLeaseInfo() != null && info.getLeaseInfo().getDurationInSecs() > 0) {
            leaseDuration = info.getLeaseInfo().getDurationInSecs();
        }
        super.register(info, leaseDuration, isReplication);
        replicateToPeers(Action.Register, info.getAppName(), info.getId(), info, null, isReplication);
    }
该方法提供了服务注册,并且将服务注册后的信息同步给其他的Eureka Server服务中。里面的注册调用了其父类的注册方法,其父类中将注册列表中的信息保存在一个concurrenthashmap中。replicateToPeers()方法用于将注册列表信息同步到其他节点。
/**
     * Replicates all eureka actions to peer eureka nodes except for replication
     * traffic to this node.
     *
     */
    private void replicateToPeers(Action action, String appName, String id,
                                  InstanceInfo info /* optional */,
                                  InstanceStatus newStatus /* optional */, boolean isReplication) {
        Stopwatch tracer = action.getTimer().start();
        try {
            if (isReplication) {
                numberOfReplicationsLastMin.increment();
            }
            // If it is a replication already, do not replicate again as this will create a poison replication
            if (peerEurekaNodes == Collections.EMPTY_LIST || isReplication) {
                return;
            }

            for (final PeerEurekaNode node : peerEurekaNodes.getPeerEurekaNodes()) {
                // If the url represents this host, do not replicate to yourself.
                if (peerEurekaNodes.isThisMyUrl(node.getServiceUrl())) {
                    continue;
                }
                replicateInstanceActionsToPeers(action, appName, id, info, newStatus, node);
            }
        } finally {
            tracer.stop();
        }
    }
通过该方法发现通过循环调用了replicateInstanceActionsToPeers()方法向其他节点注册,然后追踪到最后,发现其执行了PeerEurekaNode类的register方法,该方法通过执行一个任务向其他节点同步信息。
public void register(final InstanceInfo info) throws Exception {
        long expiryTime = System.currentTimeMillis() + getLeaseRenewalOf(info);
        batchingDispatcher.process(
                taskId("register", info),
                new InstanceReplicationTask(targetHost, Action.Register, info, null, true) {
                    public EurekaHttpResponse<Void> execute() {
                        return replicationClient.register(info);
                    }
                },
                expiryTime
        );
    }
经过源码分析,我们可以了解到通过PeerAwareInstanceRegistryImpl类的register()方法实现了服务的注册,并且向其他节点同步信息。那么这个方法是被谁来调用的呢?我们可以查找该方法被谁调用,会找到一个ApplicationResource类的addInstance()方法
   @POST
    @Consumes({"application/json", "application/xml"})
    public Response addInstance(InstanceInfo info,
                                @HeaderParam(PeerEurekaNode.HEADER_REPLICATION) String isReplication) {
        logger.debug("Registering instance {} (replication={})", info.getId(), isReplication);
        // validate that the instanceinfo contains all the necessary required fields
        if (isBlank(info.getId())) {
            return Response.status(400).entity("Missing instanceId").build();
        } else if (isBlank(info.getHostName())) {
            return Response.status(400).entity("Missing hostname").build();
        } else if (isBlank(info.getIPAddr())) {
            return Response.status(400).entity("Missing ip address").build();
        } else if (isBlank(info.getAppName())) {
            return Response.status(400).entity("Missing appName").build();
        } else if (!appName.equals(info.getAppName())) {
            return Response.status(400).entity("Mismatched appName, expecting " + appName + " but was " + info.getAppName()).build();
        } else if (info.getDataCenterInfo() == null) {
            return Response.status(400).entity("Missing dataCenterInfo").build();
        } else if (info.getDataCenterInfo().getName() == null) {
            return Response.status(400).entity("Missing dataCenterInfo Name").build();
        }

        // handle cases where clients may be registering with bad DataCenterInfo with missing data
        DataCenterInfo dataCenterInfo = info.getDataCenterInfo();
        if (dataCenterInfo instanceof UniqueIdentifier) {
            String dataCenterInfoId = ((UniqueIdentifier) dataCenterInfo).getId();
            if (isBlank(dataCenterInfoId)) {
                boolean experimental = "true".equalsIgnoreCase(serverConfig.getExperimental("registration.validation.dataCenterInfoId"));
                if (experimental) {
                    String entity = "DataCenterInfo of type " + dataCenterInfo.getClass() + " must contain a valid id";
                    return Response.status(400).entity(entity).build();
                } else if (dataCenterInfo instanceof AmazonInfo) {
                    AmazonInfo amazonInfo = (AmazonInfo) dataCenterInfo;
                    String effectiveId = amazonInfo.get(AmazonInfo.MetaDataKey.instanceId);
                    if (effectiveId == null) {
                        amazonInfo.getMetadata().put(AmazonInfo.MetaDataKey.instanceId.getName(), info.getId());
                    }
                } else {
                    logger.warn("Registering DataCenterInfo of type {} without an appropriate id", dataCenterInfo.getClass());
                }
            }
        }

        registry.register(info, "true".equals(isReplication));
        return Response.status(204).build();  // 204 to be backwards compatible
    }
该方法对注册信息进行了一堆校验以后,调用register函数进行注册,接下来就是我们上面的过程。
源码分析过程真的是艰难,并且还是在参考书籍和网上其他人的分析的情况下进行的。好多细节根本读不懂,只能大概知道是什么意思,还是自己的技术太差。
参考书籍:
《Spring Cloud微服务实战》
《深入理解SpringCloud与微服务构建》
如有侵权,立马删除


 1129
1129

 被折叠的 条评论
为什么被折叠?
被折叠的 条评论
为什么被折叠?
 到【灌水乐园】发言


