


 本文详细介绍如何使用Spring Cloud的Eureka、Zuul、Feign等组件实现微服务架构,包括服务注册、服务发现、负载均衡及API网关的搭建过程。
本文参考:SpringCloud-Eurka-Zuul-Ribbon-Fegin负载均衡访问集群服务过程实战,并基于其原理搭建。
之前试着搭过,久了没用就忘了,这次项目有要加入到别人的微服上,又百度了半天,为避免重蹈覆辙,这边做个记录,下次直接用。有错误的地方烦请指正,共同进步。下面进入正题。
1.创建 管理注册服务的工具Eureka服务
新建springboot项目,我用的idea,新建时勾选依赖就行了。eclipse的话可以去官网选。
pom.xml如下:
<dependencies>
        <dependency>
            <groupId>org.springframework.cloud</groupId>
            <artifactId>spring-cloud-starter-netflix-eureka-client</artifactId>
        </dependency>
        <dependency>
            <groupId>org.springframework.cloud</groupId>
            <artifactId>spring-cloud-starter-netflix-eureka-server</artifactId>
        </dependency>

        <dependency>
            <groupId>org.springframework.boot</groupId>
            <artifactId>spring-boot-starter-test</artifactId>
            <scope>test</scope>
        </dependency>
    </dependencies>
application.yml
server:
  port: 8099
eureka:
  instance:
    hostname: localhost
  client:
    registerWithEureka: false
    fetchRegistry: false
    serviceUrl:
      defaultZone: http://${eureka.instance.hostname}:${server.port}/eureka/
启动类加注解
@SpringBootApplication
@EnableEurekaServer
public class Demo0Application {

    public static void main(String[] args) {
        SpringApplication.run(Demo0Application.class, args);
    }

}
2.创建 服务提供者
创建2个springboot模拟提供服务,端口不一样来观察。
pom.xml
<dependencies>
        <dependency>
            <groupId>org.springframework.cloud</groupId>
            <artifactId>spring-cloud-starter-openfeign</artifactId>
        </dependency>
        <dependency>
            <groupId>org.springframework.cloud</groupId>
            <artifactId>spring-cloud-starter-netflix-eureka-client</artifactId>
        </dependency>
        <dependency>
            <groupId>org.springframework.cloud</groupId>
            <artifactId>spring-cloud-starter-netflix-eureka-server</artifactId>
        </dependency>
        <dependency>
            <groupId>org.springframework.boot</groupId>
            <artifactId>spring-boot-starter-test</artifactId>
            <scope>test</scope>
        </dependency>
    </dependencies>
application.yml
注意:1.两个服务提供者端口不要一样;2.spring.application.name这里最好不要用下划线 '_'命名,如service_demo,调用时可能报错;3.defaultZone的端口就是第一步eureka的端口
eureka:
  client:
    service-url:
      defaultZone: http://localhost:8099/eureka/
  instance:
    prefer-ip-address: true


server:
  port: 8093

spring:
  application:
    name: service-demo
启动类加注解
@SpringBootApplication
@EnableDiscoveryClient
既然是服务提供者,我们写个供调用的接口吧。这里的port就是我们application.yml里面设置的那个,我们通过设置不同的端口来避免端口占用,同时观察具体是调用哪个端口的服务提供者(我们这里2个服务提供者的name是一样的,下面zuul会用到)。
package com.example.demo1.ctrl;


import org.springframework.beans.factory.annotation.Value;
import org.springframework.web.bind.annotation.RequestMapping;
import org.springframework.web.bind.annotation.RequestMethod;
import org.springframework.web.bind.annotation.RestController;

@RestController
public class TestCtrl {

    @Value("${server.port}")
    String port;

    @RequestMapping(value = "/messages",method = RequestMethod.GET)
    public String getmessage(){
        return "this a service from DEMO1 on port :"+ port;
    }
}
3.创建 zuul网关组件
通过zuul网关组件注册到Eureka并进行反向代理我注册的集群服务,这一部分我也是照着开头说的参考文章那样做的,具体原理还请自行百度,我这一块也不是很懂。。。
pom依赖
<dependencies>
        <dependency>
            <groupId>org.springframework.cloud</groupId>
            <artifactId>spring-cloud-starter-netflix-eureka-client</artifactId>
        </dependency>
        <dependency>
            <groupId>org.springframework.cloud</groupId>
            <artifactId>spring-cloud-starter-openfeign</artifactId>
        </dependency>

        <dependency>
            <groupId>org.springframework.boot</groupId>
            <artifactId>spring-boot-starter-test</artifactId>
            <scope>test</scope>
        </dependency>
        <!--zuul 依赖go-->
        <dependency>
            <groupId>org.springframework.cloud</groupId>
            <artifactId>spring-cloud-starter-zuul</artifactId>
        </dependency>
</dependencies>
application.yml
这里的defaultZone还是eureka的。
zuul.routes.api-a.serviceId是 服务提供者那边的name,对应的是服务提供者。
zuul.routes.api-a.path 可以自己设置,下面服务使用者会用到,相当于serviceId服务提供者的实例。
eureka:
  client:
    service-url:
      defaultZone: http://localhost:8099/eureka/
  instance:
    instance-id: ${spring.application.name}:${spring.application.instance_id:${server.port}}
    prefer-ip-address: true
server:
  port: 8094

spring:
  application:
    name: service-zuul
zuul:
  routes:
    api-a:
      path: /demo/**
      serviceId: service-demo
启动类注解
@SpringBootApplication
@EnableDiscoveryClient
@EnableZuulProxy
4.创建 服务使用者-feign客户端
我们创建一个服务使用者,来访问zuul节点代理的服务并执行请求。
pom依赖,
<dependencies>
		<dependency>
			<groupId>org.springframework.cloud</groupId>
			<artifactId>spring-cloud-starter-netflix-eureka-client</artifactId>
		</dependency>
		<dependency>
			<groupId>org.springframework.cloud</groupId>
			<artifactId>spring-cloud-starter-openfeign</artifactId>
		</dependency>

		<dependency>
			<groupId>org.springframework.boot</groupId>
			<artifactId>spring-boot-starter-web</artifactId>
		</dependency>
		<dependency>
			<groupId>org.springframework.boot</groupId>
			<artifactId>spring-boot-starter-test</artifactId>
			<scope>test</scope>
		</dependency>
	</dependencies>
application.yml
eureka:
  client:
    service-url:
      defaultZone: http://localhost:8099/eureka/
server:
  port: 8095

spring:
  application:
    name: feign-client
启动类注解
@SpringBootApplication
@EnableDiscoveryClient
@EnableFeignClients
来个FeginClient,设置和zuul的关联。
FeignClient里面用的zuul服务的name,@RequestMapping里面的/demo/** 就是我们在zuul里面设置的path,具体的服务名messages则是我们2服务提供者的服务。
import org.springframework.stereotype.Component;

import org.springframework.cloud.openfeign.FeignClient;
import org.springframework.web.bind.annotation.RequestMapping;
import org.springframework.web.bind.annotation.RequestMethod;

@Component
@FeignClient("service-zuul")
public interface TestFeignClient {
    @RequestMapping(value = "/demo/messages",method = RequestMethod.GET)
    public String findPort();
}
再写正常的控制器来处理稍后我们浏览器发起的请求。
import com.example.demo4.rest.TestFeignClient;
import org.springframework.beans.factory.annotation.Autowired;
import org.springframework.web.bind.annotation.GetMapping;
import org.springframework.web.bind.annotation.RequestMapping;
import org.springframework.web.bind.annotation.RequestMethod;
import org.springframework.web.bind.annotation.RestController;

@RestController
public class TestCtrl {

    @Autowired
    private TestFeignClient testFeignClient;

    @GetMapping
    @RequestMapping(value = "/findPort",method = RequestMethod.GET)
    public String findPort(){
        return testFeignClient.findPort();
    }
}
以上几步差不就完了。启动各个服务器,然后访问我们第1步eureka设置的端口就可以看到各个服务了。

我们访问最后一步,即feign-client 的findPort,多刷新几次进行观察。
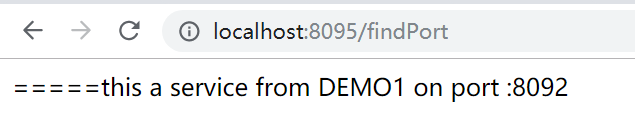
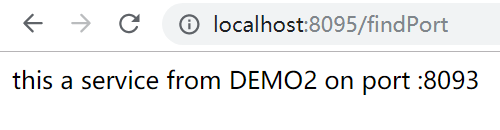
8092和8093端口分别是我们第2步服务提供者的端口,在eureka的管理页面可以看到。
以上。


 168万+
168万+

 被折叠的 条评论
为什么被折叠?
被折叠的 条评论
为什么被折叠?
 到【灌水乐园】发言


