


一、组件通信概述与重要性
1.1 为什么需要组件通信?
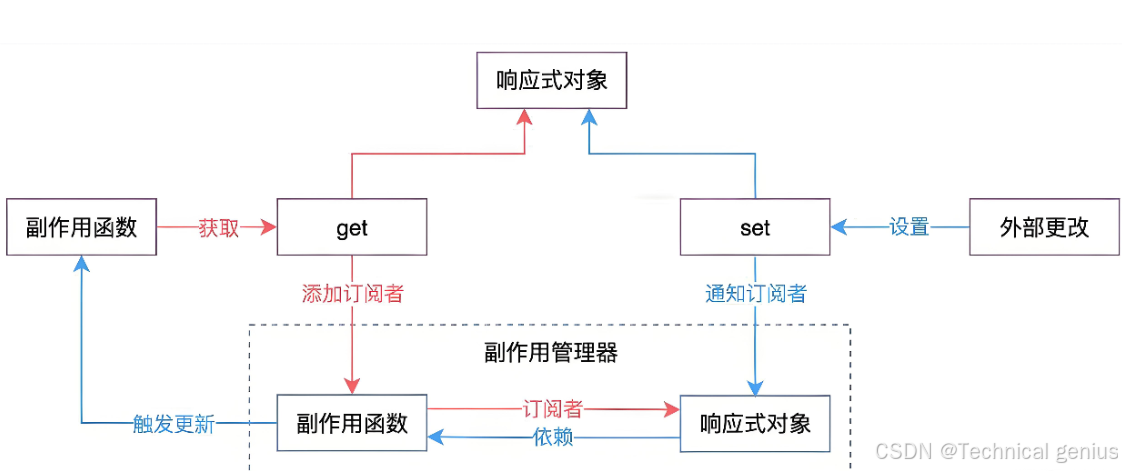
在现代前端开发中,组件化架构已成为主流。Vue3的组件通信机制如同应用的神经系统,负责数据流动和状态管理。良好的通信机制能够:
- ✅ 降低耦合度:组件间依赖关系清晰
- ✅ 提升可维护性:代码结构更易于理解和修改
- ✅ 增强复用性:组件可在不同场景下重复使用
- ✅ 支持复杂业务:应对大型应用的复杂数据流
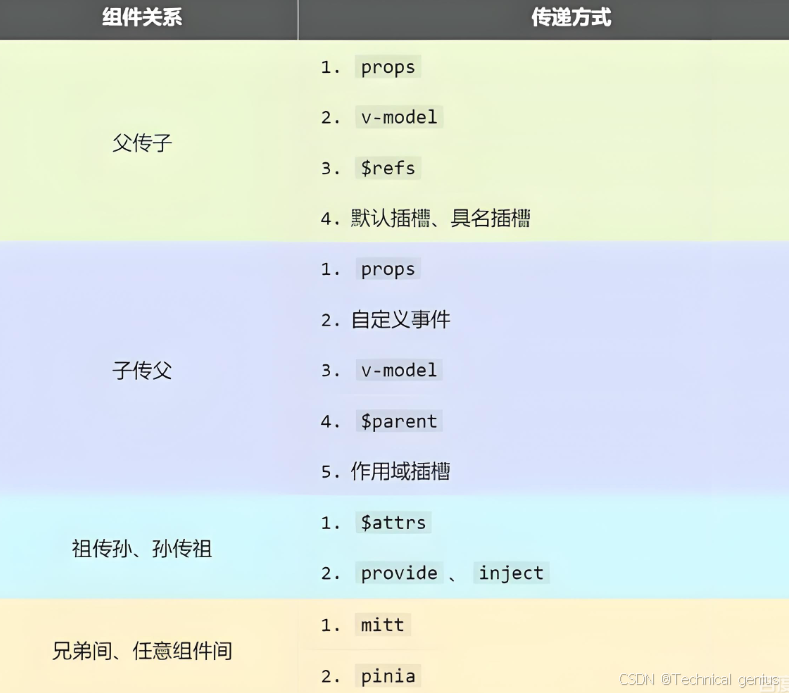
1.2 Vue3通信方式全景图
Vue3提供了从简单到复杂的多层次通信方案:
基础通信:
├── Props/Emits(父子)
├── v-model(双向绑定)
├—— ref/expose(方法调用)

高级通信:
├── Provide/Inject(跨层级)
├── 事件总线(任意组件)
├—— Pinia/Vuex(状态管理)
└── 全局状态(小型应用)
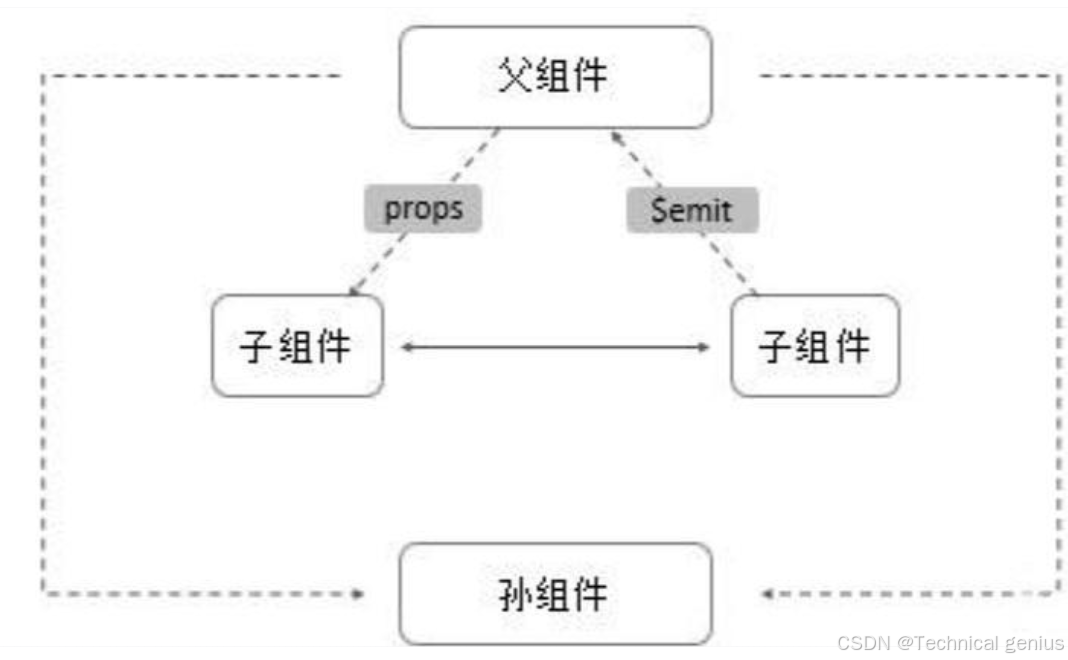
二、Props:单向数据流的基础
2.1 基本用法
Props是父组件向子组件传递数据的主要方式,遵循单向数据流原则。
<!-- 父组件 Parent.vue -->
<template>
  <div>
    <h2>父组件</h2>
    <ChildComponent
      :user-info="userData"
      :is-visible="showChild"
      :count="counter"
      @update-data="handleUpdate"
    />
  </div>
</template>

<script setup>
import { ref, reactive } from 'vue'
import ChildComponent from './ChildComponent.vue'

const userData = reactive({
  name: '张三',
  age: 25,
  email: 'zhangsan@example.com'
})

const showChild = ref(true)
const counter = ref(0)

const handleUpdate = (newData) => {
  Object.assign(userData, newData)
}
</script>
<!-- 子组件 ChildComponent.vue -->
<template>
  <div v-if="isVisible" class="child-container">
    <h3>子组件接收的数据:</h3>
    <p>姓名:{{ userInfo.name }}</p>
    <p>年龄:{{ userInfo.age }}</p>
    <p>计数:{{ count }}</p>

    <button @click="updateUserInfo">更新用户信息</button>
  </div>
</template>

<script setup>
// 定义Props - 对象写法(推荐)
const props = defineProps({
  userInfo: {
    type: Object,
    required: true,
    default: () => ({})
  },
  isVisible: {
    type: Boolean,
    default: false
  },
  count: {
    type: Number,
    default: 0
  }
})

// 定义Emits
const emit = defineEmits(['update-data'])

const updateUserInfo = () => {
  // 向父组件发送更新请求
  emit('update-data', {
    name: '李四',
    age: 30
  })
}
</script>

<style scoped>
.child-container {
  border: 1px solid #e1e1e1;
  padding: 20px;
  margin: 10px 0;
  border-radius: 8px;
  background: #f9f9f9;
}
</style>
2.2 Props验证与默认值
完整的Props验证确保数据类型的正确性:
<!-- 子组件 WithValidation.vue -->
<template>
  <div class="validation-demo">
    <h4>Props验证示例</h4>
    <p>标题:{{ title }}</p>
    <p>标签:{{ tags.join(', ') }}</p>
    <p>配置:{{ config }}</p>
  </div>
</template>

<script setup>
const props = defineProps({
  // 字符串类型,必需
  title: {
    type: String,
    required: true,
    validator: (value) => value.length > 0
  },

  // 数组类型,带默认值
  tags: {
    type: Array,
    default: () => ['默认标签']
  },

  // 对象类型,复杂验证
  config: {
    type: Object,
    default: () => ({
      theme: 'light',
      size: 'medium'
    }),
    validator: (value) => {
      return ['light', 'dark'].includes(value.theme) &&
             ['small', 'medium', 'large'].includes(value.size)
    }
  },

  // 自定义验证函数
  score: {
    type: Number,
    default: 0,
    validator: (value) => value >= 0 && value <= 100
  }
})
</script>
三、自定义事件:子向父通信
3.1 基础事件通信
<!-- 子组件 EventEmitter.vue -->
<template>
  <div class="event-emitter">
    <button @click="sendSimpleEvent">发送简单事件</button>
    <button @click="sendComplexEvent">发送复杂事件</button>
    <input
      v-model="inputValue"
      @input="sendInputEvent"
      placeholder="输入内容实时传递"
    />
  </div>
</template>

<script setup>
import { ref } from 'vue'

const inputValue = ref('')

// 定义事件类型(TypeScript风格)
const emit = defineEmits<{
  // 简单事件,无参数
  (e: 'simple-event'): void

  // 复杂事件,带参数
  (e: 'complex-event', data: { id: number; message: string }): void

  // 输入事件,实时传递
  (e: 'input-change', value: string): void
}>()

const sendSimpleEvent = () => {
  emit('simple-event')
}

const sendComplexEvent = () => {
  emit('complex-event', {
    id: Date.now(),
    message: '来自子组件的复杂数据'
  })
}

const sendInputEvent = () => {
  emit('input-change', inputValue.value)
}
</script>
3.2 事件验证与参数处理
<!-- 父组件 EventHandler.vue -->
<template>
  <div class="event-handler">
    <h2>事件处理示例</h2>

    <EventEmitter
      @simple-event="handleSimple"
      @complex-event="handleComplex"
      @input-change="handleInput"
    />

    <div class="event-log">
      <h4>事件日志:</h4>
      <ul>
        <li v-for="(log, index) in eventLogs" :key="index">
          {{ log }}
        </li>
      </ul>
    </div>
  </div>
</template>

<script setup>
import { ref } from 'vue'
import EventEmitter from './EventEmitter.vue'

const eventLogs = ref<string[]>([])

const handleSimple = () => {
  eventLogs.value.push(`[${new Date().toLocaleTimeString()}] 收到简单事件`)

const handleComplex = (data) => {
  eventLogs.value.push(`[${new Date().toLocaleTimeString()}] 收到复杂事件:${JSON.stringify(data)}`)

const handleInput = (value) => {
  eventLogs.value.push(`[${new Date().toLocaleTimeString()}] 输入变化:${value}`)
}
</script>
四、v-model:双向绑定进阶
4.1 基础v-model实现
<!-- 自定义输入组件 CustomInput.vue -->
<template>
  <div class="custom-input">
    <label v-if="label">{{ label }}</label>
    <input
      :value="modelValue"
      @input="$emit('update:modelValue', $event.target.value)"
      :placeholder="placeholder"
      class="input-field"
    />
    <div v-if="error" class="error-message">
      {{ error }}
    </div>
  </div>
</template>

<script setup>
const props = defineProps({
  modelValue: {
    type: [String, Number],
    default: ''
  },
  label: String,
  placeholder: String
})

const emit = defineEmits(['update:modelValue'])
</script>

<style scoped>
.custom-input {
  margin: 10px 0;
}

.input-field {
  width: 100%;
  padding: 8px 12px;
  border: 1px solid #ddd;
  border-radius: 4px;
  font-size: 14px;
}

.error-message {
  color: #e74c3c;
  font-size: 12px;
  margin-top: 4px;
}
</style>
4.2 多v-model绑定
Vue3支持多个v-model绑定,极大提升了组件灵活性:
<!-- 用户表单组件 UserForm.vue -->
<template>
  <div class="user-form">
    <div class="form-group">
      <label>用户名:</label>
      <input
        :value="userName"
        @input="$emit('update:userName', $event.target.value)"
    />
    </div>

    <div class="form-group">
      <label>邮箱:</label>
      <input
        :value="email"
        @input="$emit('update:email', $event.target.value)"
    />
    </div>
  </div>
</template>

<script setup>
const props = defineProps({
  userName: String,
  email: String
})

const emit = defineEmits(['update:userName', 'update:email'])
</script>
<!-- 父组件使用多v-model -->
<template>
  <UserForm
    v-model:userName="formData.name"
    v-model:email="formData.email"
  />
</template>

<script setup>
import { reactive } from 'vue'
import UserForm from './UserForm.vue'

const formData = reactive({
  name: '',
  email: ''
})
</script>
五、Provide/Inject:跨层级通信
5.1 基础provide/inject
<!-- 祖先组件 Ancestor.vue -->
<template>
  <div class="ancestor">
    <h2>祖先组件</h2>
    <div class="control-panel">
      <button @click="changeTheme">切换主题</button>
      <button @click="incrementCounter">增加计数</button>
    </div>

    <MiddleComponent />
  </div>
</template>

<script setup>
import { ref, provide } from 'vue'
import MiddleComponent from './MiddleComponent.vue'

// 提供响应式数据
const theme = ref('light')
const globalCounter = ref(0)

const changeTheme = () => {
  theme.value = theme.value === 'light' ? 'dark' : 'light'
}

const incrementCounter = () => {
  globalCounter.value++
}

// 提供数据给后代组件
provide('theme', {
  theme,
  changeTheme
})

provide('globalCounter', globalCounter)
5.2 注入和使用
<!-- 后代组件 Descendant.vue -->
<template>
  <div class="descendant" :class="themeClass">
    <h3>后代组件</h3>
    <p>当前主题:{{ themeData.theme }}</p>
    <p>全局计数:{{ counterValue }}</p>
    <button @click="themeData.changeTheme()">
      切换主题(来自祖先)
    </button>
  </div>
</template>

<script setup>
import { inject, computed } from 'vue'

// 注入数据
const themeData = inject('theme', {
  theme: 'light',
  changeTheme: () => {}
})

const counterValue = inject('globalCounter', ref(0))

const themeClass = computed(() => ({
  'theme-light': themeData.theme === 'light',
  'theme-dark': themeData.theme === 'dark'
}))
</script>

<style scoped>
.theme-light {
  background: #ffffff;
  color: #333333;
}

.theme-dark {
  background: #2c3e50;
  color: #ffffff;
}
</style>
六、模板引用与expose
6.1 使用ref获取组件实例
<!-- 父组件 ParentWithRef.vue -->
<template>
  <div>
    <h2>模板引用示例</h2>

    <ChildWithMethods ref="childRef" />

    <div class="control-buttons">
      <button @click="callChildMethod">调用子组件方法</button>
      <button @click="getChildState">获取子组件状态</button>
    </div>

    <div class="child-state">
      {{ childState }}
    </div>
  </div>
</template>

<script setup>
import { ref } from 'vue'
import ChildWithMethods from './ChildWithMethods.vue'

const childRef = ref(null)
const childState = ref('')

const callChildMethod = async () => {
  if (childRef.value) {
    try {
      const result = await childRef.value.fetchData()
      childState.value = `子组件返回:${result}`
    } catch (error) {
      childState.value = `调用失败:${error.message}`
    }
  }
}

const getChildState = () => {
  if (childRef.value) {
    childState.value = `子组件内部计数:${childRef.value.internalCount}`
  }
}
</script>
<!-- 子组件 ChildWithMethods.vue -->
<template>
  <div class="child-with-methods">
    <p>内部状态:{{ internalCount }}</p>
  </div>
</template>

<script setup>
import { ref } from 'vue'

const internalCount = ref(0)

const fetchData = () => {
  internalCount.value++
  return new Promise((resolve) => {
    setTimeout(() => {
      resolve(`异步数据 ${internalCount.value}`)
    }, 1000)
  })
}

const reset = () => {
  internalCount.value = 0
}

// 暴露方法给父组件
defineExpose({
  fetchData,
  reset,
  internalCount
})
</script>
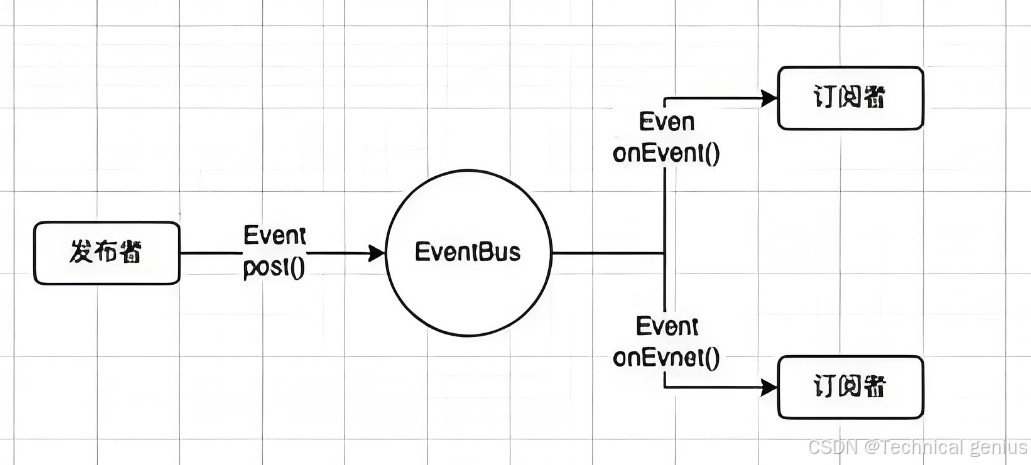
七、事件总线:任意组件通信
7.1 使用mitt实现事件总线
// eventBus.js
import mitt from 'mitt'

// 创建事件总线实例
const emitter = mitt()

// 定义事件类型
export const EventTypes = {
  USER_LOGIN: 'user-login',
  USER_LOGOUT: 'user-logout',
  DATA_UPDATED: 'data-updated',
  GLOBAL_NOTIFICATION: 'global-notification'
}

// 导出常用方法
export const useEventBus = () => {
  const emitEvent = (type, payload) => {
    emitter.emit(type, {
      timestamp: new Date(),
      payload
    })
  }

  const onEvent = (type, handler) => {
    emitter.on(type, handler)

    // 返回取消监听函数
    return () => {
      emitter.off(type, handler)
    }
  }

  return {
    emit: emitEvent,
    on: onEvent,
    off: emitter.off
  }
}

export default emitter
7.2 组件中使用事件总线
<!-- 组件A:事件发送者 -->
<template>
  <div class="event-sender">
    <h3>事件发送者</h3>
    <button @click="sendLoginEvent">发送登录事件</button>
    <button @click="sendDataUpdate">发送数据更新</button>
  </div>
</template>

<script setup>
import { useEventBus, EventTypes } from './eventBus.js'

const { emit } = useEventBus()

const sendLoginEvent = () => {
  emit(EventTypes.USER_LOGIN, {
    userId: 123,
    username: '张三'
  })
}

const sendDataUpdate = () => {
  emit(EventTypes.DATA_UPDATED, {
    type: 'user',
    action: 'update'
  })
}
<!-- 组件B:事件接收者 -->
<template>
  <div class="event-receiver">
    <h3>事件接收者</h3>
    <div class="event-log">
      <h4>收到的事件:</h4>
      <ul>
        <li v-for="(event, index) in receivedEvents" :key="index">
          {{ event }}
        </li>
    </div>
  </div>
</template>

<script setup>
import { ref, onMounted, onUnmounted } from 'vue'
import { useEventBus, EventTypes } from './eventBus.js'

const receivedEvents = ref([])
const { on } = useEventBus()

const handleUserLogin = (event) => {
  receivedEvents.value.push(`用户登录:${JSON.stringify(event.payload)}`)
}

const handleDataUpdate = (event) => {
  receivedEvents.value.push(`数据更新:${JSON.stringify(event.payload)}`)
}

// 组件挂载时注册事件监听
onMounted(() => {
  // 监听用户登录事件
  on(EventTypes.USER_LOGIN, handleUserLogin)

  // 监听数据更新事件
  on(EventTypes.DATA_UPDATED, handleDataUpdate)
})

// 组件卸载时取消监听
onUnmounted(() => {
  // 自动清理
})
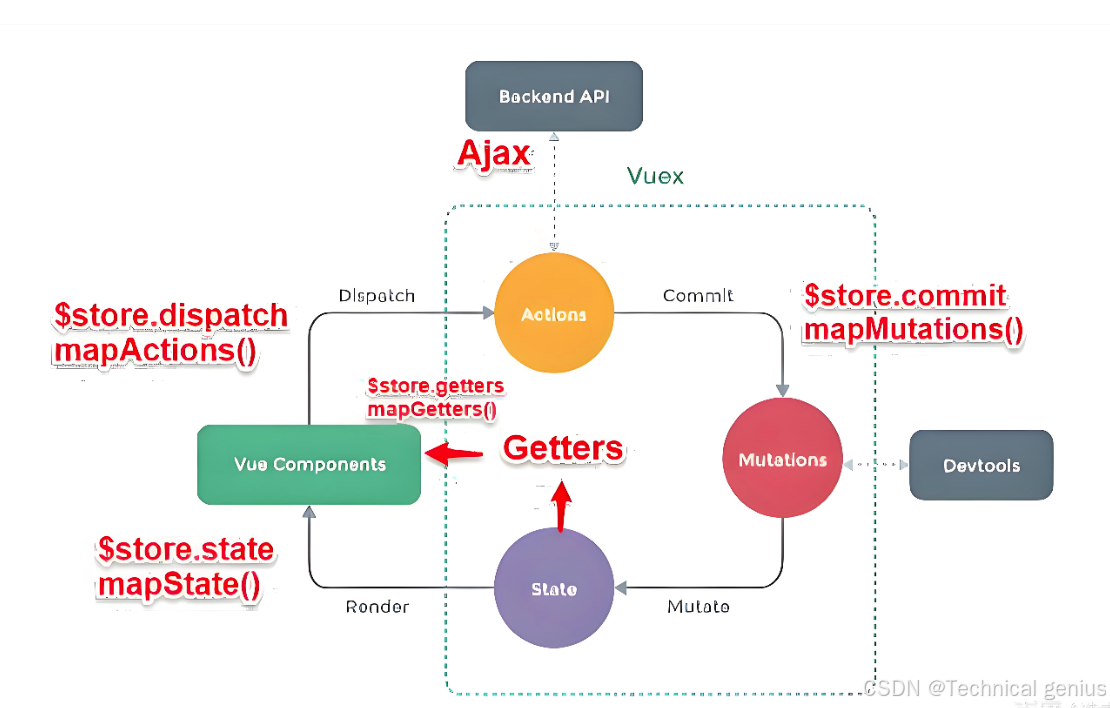
八、Pinia状态管理
8.1 创建Store
// stores/userStore.js
import { defineStore } from 'pinia'
import { ref, computed } from 'vue'

export const useUserStore = defineStore('user', () => {
  // 状态
  const user = ref(null)
  const isLoggedIn = ref(false)

  // Getter
  const userName = computed(() => user.value?.name || '未登录')

  // Action
  const login = async (credentials) => {
    try {
      // 模拟登录API调用
      const response = await fakeLoginApi(credentials)

      user.value = response.user
      isLoggedIn.value = true

      return true
    } catch (error) {
      isLoggedIn.value = false
      throw error
    }
  }

  const logout = () => {
    user.value = null
    isLoggedIn.value = false
  }

  return {
    user,
    isLoggedIn,
    userName,
    login,
    logout
  }
})

// 模拟API
const fakeLoginApi = (credentials) => {
  return new Promise((resolve) => {
    setTimeout(() => {
      resolve({
        user: {
          id: 1,
          name: credentials.username,
          email: 'user@example.com'
    })
  }, 1000)
})
8.2 在组件中使用Store
<!-- UserProfile.vue -->
<template>
  <div class="user-profile">
    <div v-if="userStore.isLoggedIn" class="logged-in">
      <h3>用户信息</h3>
      <p>用户名:{{ userStore.userName }}</p>
      <p>邮箱:{{ userStore.user?.email }}</p>

      <button @click="handleLogout" class="logout-btn">
        退出登录
      </button>
    </div>

    <div v-else class="logged-out">
      <LoginForm @login-success="handleLoginSuccess" />
    </div>
  </div>
</template>

<script setup>
import { storeToRefs } from 'pinia'
import { useUserStore } from './stores/userStore'
import LoginForm from './LoginForm.vue'

const userStore = useUserStore()

const handleLoginSuccess = () => {
  console.log('登录成功,用户信息:', userStore.user)
}

const handleLogout = () => {
  userStore.logout()
}
</script>
九、实战场景:完整通信示例
9.1 电商购物车系统
<!-- 商品组件 ProductItem.vue -->
<template>
  <div class="product-item">
    <h3>{{ product.name }}</h3>
    <p>价格:¥{{ product.price }}</p>
    <p>库存:{{ product.stock }}</p>

    <div class="product-actions">
      <button
        @click="addToCart"
        :disabled="product.stock === 0"
        class="add-btn"
      >
        {{ product.stock === 0 ? '缺货' : '加入购物车' }}
      </button>
    </div>
  </div>
</template>

<script setup>
const props = defineProps({
  product: {
    type: Object,
    required: true
  }
})

const emit = defineEmits(['add-to-cart'])

const addToCart = () => {
  if (props.product.stock > 0) {
    emit('add-to-cart', {
      productId: props.product.id,
      quantity: 1,
      price: props.product.price
    })
  }
}
</script>
<!-- 购物车组件 ShoppingCart.vue -->
<template>
  <div class="shopping-cart">
    <h3>购物车</h3>

    <div v-if="cartItems.length === 0" class="empty-cart">
      购物车为空
    </div>

    <div v-else class="cart-items">
      <CartItem
        v-for="item in cartItems"
        :key="item.id"
        :item="item"
        @update-quantity="updateQuantity"
        @remove-item="removeItem"
      />
    </div>
  </div>
</template>

<script setup>
import { computed } from 'vue'
import { useCartStore } from './stores/cartStore'
import CartItem from './CartItem.vue'

const cartStore = useCartStore()

const cartItems = computed(() => cartStore.items)
</script>
9.2 实时聊天系统
<!-- 聊天室组件 ChatRoom.vue -->
<template>
  <div class="chat-room">
    <div class="messages">
      <Message
        v-for="message in messages"
        :key="message.id"
        :message="message"
      />
    </div>

    <MessageInput @send-message="handleSendMessage" />
  </div>
</template>

<script setup>
import { ref } from 'vue'
import { useEventBus, EventTypes } from './eventBus.js'
import Message from './Message.vue'
import MessageInput from './MessageInput.vue'

const messages = ref([])
const { on, emit } = useEventBus()

const handleSendMessage = (content) => {
  const message = {
    id: Date.now(),
    content,
    timestamp: new Date(),
    sender: 'current-user'
  })

  messages.value.push(message)

  // 通知其他组件有新消息
  emit(EventTypes.NEW_MESSAGE, message)
}

// 监听其他用户的消息
on(EventTypes.NEW_MESSAGE, (event) => {
  if (event.payload.sender !== 'current-user') {
    messages.value.push(event.payload)
  }
})
</script>
十、最佳实践与性能优化
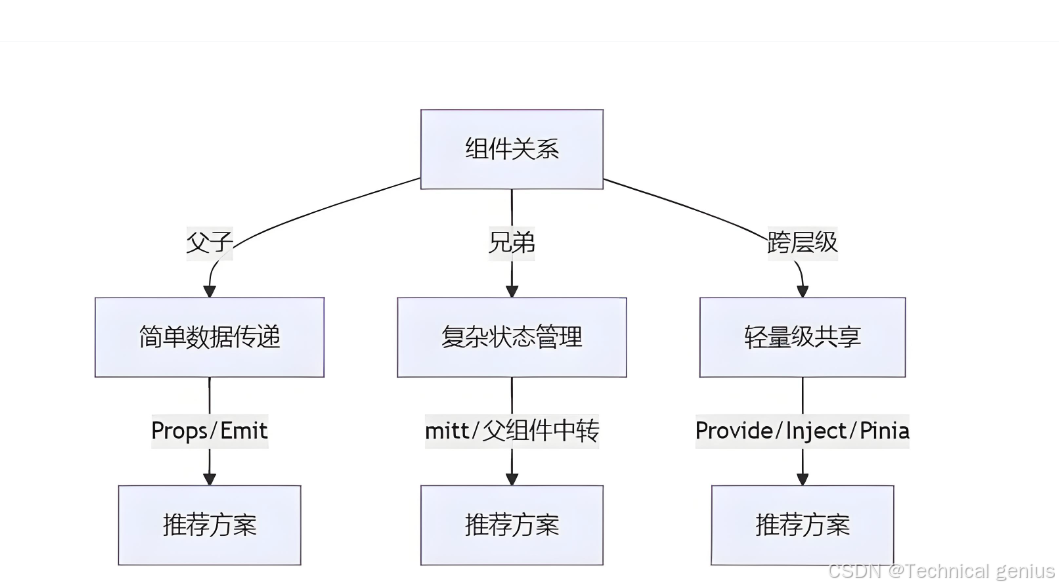
10.1 通信方式选择指南
根据不同的场景选择合适的通信方式:
| 场景 | 推荐方式 | 理由 |
|---|---|---|
| 父子组件简单数据传递 | Props/Emits | 简单直接,符合单向数据流 |
| 表单组件双向绑定 | v-model | 语法简洁,符合用户习惯 |
| 跨多层组件状态共享 | Provide/Inject | 避免prop逐层传递 |
| 任意组件事件通知 | 事件总线 | 灵活,解耦 |
| 复杂全局状态管理 | Pinia | 类型安全,开发体验好 |
10.2 性能优化技巧
// 避免不必要的响应式
import { shallowRef, markRaw } from 'vue'

// 大型静态数据使用shallowRef
const largeData = shallowRef({/* 大量数据 */})

// 大型配置对象使用markRaw
const config = markRaw({
  // 配置项...
})
10.3 内存泄漏防护
<script setup>
import { onUnmounted } from 'vue'
import { useEventBus } from './eventBus.js'

const { on, off } = useEventBus()

// 注册事件监听器
const unsubscribes = []

onMounted(() => {
  // 添加事件监听,保存取消函数
  unsubscribes.push(
    on('some-event', handler)
  )
})

// 组件卸载时清理所有事件监听
onUnmounted(() => {
  unsubscribes.forEach(unsubscribe => unsubscribe())
})
</script>
十一、总结
Vue3提供了丰富而灵活的组件通信方案,从简单的父子通信到复杂的全局状态管理,覆盖了各种开发场景。选择合适的通信方式需要考虑:
- 组件关系紧密程度
- 数据流动的复杂度
- 项目的规模和维护需求
- 团队的技术偏好和规范
掌握这些通信技术,能够帮助开发者构建出结构清晰、维护性高、性能优秀的Vue3应用。


 73
73

 被折叠的 条评论
为什么被折叠?
被折叠的 条评论
为什么被折叠?
 到【灌水乐园】发言


