 Springboot集成MQTT实战指南


 本文介绍了如何将MQTT与Springboot进行整合,包括在application.yml中配置MQTT参数,添加相关依赖,编写消息推送和订阅类,并通过MQTT.fx工具进行测试验证。
Springboot整合MQTT
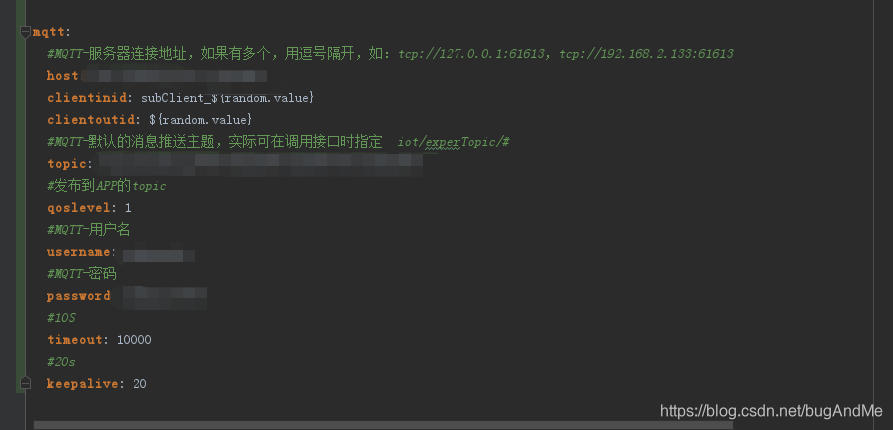
1.首先在application.yml中添加mqtt的配置
2.在pom.xml文件中倒入依赖
		<dependency>
			<groupId>org.springframework.integration</groupId>
			<artifactId>spring-integration-stream</artifactId>
		</dependency>
		<dependency>
			<groupId>org.springframework.integration</groupId>
			<artifactId>spring-integration-mqtt</artifactId>
			<version>5.0.6.RELEASE</version>
		</dependency>
3.编写mqtt推送消息类
@Configuration
@IntegrationComponentScan
public class MqttSenderConfig {

    @Value("${mqtt.username}")
    private String username;

    @Value("${mqtt.password}")
    private String password;

    @Value("${mqtt.host}")
    private String hostUrl;

    @Value("${mqtt.clientinid}")
    private String clientId;

    @Value("${mqtt.topic}")
    private String defaultTopic;

    @Value("${mqtt.timeout}")
    private int completionTimeout ;   //连接超时

    @Bean
    public MqttConnectOptions getMqttConnectOptions(){
        MqttConnectOptions mqttConnectOptions=new MqttConnectOptions();
        mqttConnectOptions.setCleanSession(true);
        mqttConnectOptions.setConnectionTimeout(10);
        mqttConnectOptions.setKeepAliveInterval(90);
        mqttConnectOptions.setAutomaticReconnect(true);
        mqttConnectOptions.setUserName(username);
        mqttConnectOptions.setPassword(password.toCharArray());
        mqttConnectOptions.setServerURIs(new String[]{hostUrl});
        mqttConnectOptions.setKeepAliveInterval(2);
        return mqttConnectOptions;
    }
    @Bean
    public MqttPahoClientFactory mqttClientFactory() {
        DefaultMqttPahoClientFactory factory = new DefaultMqttPahoClientFactory();
        factory.setConnectionOptions(getMqttConnectOptions());
        return factory;
    }
    @Bean
    @ServiceActivator(inputChannel = "mqttOutboundChannel")
    public MessageHandler mqttOutbound() {
        MqttPahoMessageHandler messageHandler =  new MqttPahoMessageHandler(clientId, mqttClientFactory());
        messageHandler.setAsync(true);
        messageHandler.setDefaultTopic(defaultTopic);
        return messageHandler;
    }
    @Bean
    public MessageChannel mqttOutboundChannel() {
        return new DirectChannel();
    }
}
4.编写mqtt订阅类
@Configuration
@IntegrationComponentScan
@Slf4j
public class MqttReceiveConfig {

    @Value("${mqtt.username}")
    private String username;

    @Value("${mqtt.password}")
    private String password;

    @Value("${mqtt.host}")
    private String hostUrl;

    @Value("${mqtt.clientinid}")
    private String clientId;

    @Value("${mqtt.topic}")
    private String defaultTopic;

    @Value("${mqtt.timeout}")
    private int completionTimeout ;   //连接超时

    @Autowired
    private MqttGateway mqttGateway;

    @Autowired
    private BTempChargesService bTempChargesService;

    @Bean
    public MqttConnectOptions getMqttConnectOptions(){
        MqttConnectOptions mqttConnectOptions=new MqttConnectOptions();
        mqttConnectOptions.setCleanSession(true);
        mqttConnectOptions.setConnectionTimeout(10);
        mqttConnectOptions.setKeepAliveInterval(90);
        mqttConnectOptions.setAutomaticReconnect(true);
        mqttConnectOptions.setUserName(username);
        mqttConnectOptions.setPassword(password.toCharArray());
        mqttConnectOptions.setServerURIs(new String[]{hostUrl});
        mqttConnectOptions.setKeepAliveInterval(2);
        return mqttConnectOptions;
    }
    @Bean
    public MqttPahoClientFactory mqttClientFactory() {
        DefaultMqttPahoClientFactory factory = new DefaultMqttPahoClientFactory();
        factory.setConnectionOptions(getMqttConnectOptions());
        return factory;
    }

    //接收通道
    @Bean
    public MessageChannel mqttInputChannel() {
        return new DirectChannel();
    }

    //配置client,监听的topic
    @Bean
    public MessageProducer inbound() {
        MqttPahoMessageDrivenChannelAdapter adapter =
                new MqttPahoMessageDrivenChannelAdapter(clientId+"_inbound", mqttClientFactory(),
                        defaultTopic);
        adapter.setCompletionTimeout(completionTimeout);
        adapter.setConverter(new DefaultPahoMessageConverter());
        adapter.setQos(1);
        adapter.setOutputChannel(mqttInputChannel());
        return adapter;
    }

    //通过通道获取数据
    @Bean
    @ServiceActivator(inputChannel = "mqttInputChannel")
    public MessageHandler handler() {
        return new MessageHandler() {
            @Override
            public void handleMessage(Message<?> message) throws MessagingException {
                log.info("主题:{},消息接收到的数据:{}", message.getHeaders().get("mqtt_receivedTopic"), message.getPayload());
            }
        };
    }
5.测试,这里使用的是MQTT.fx工具
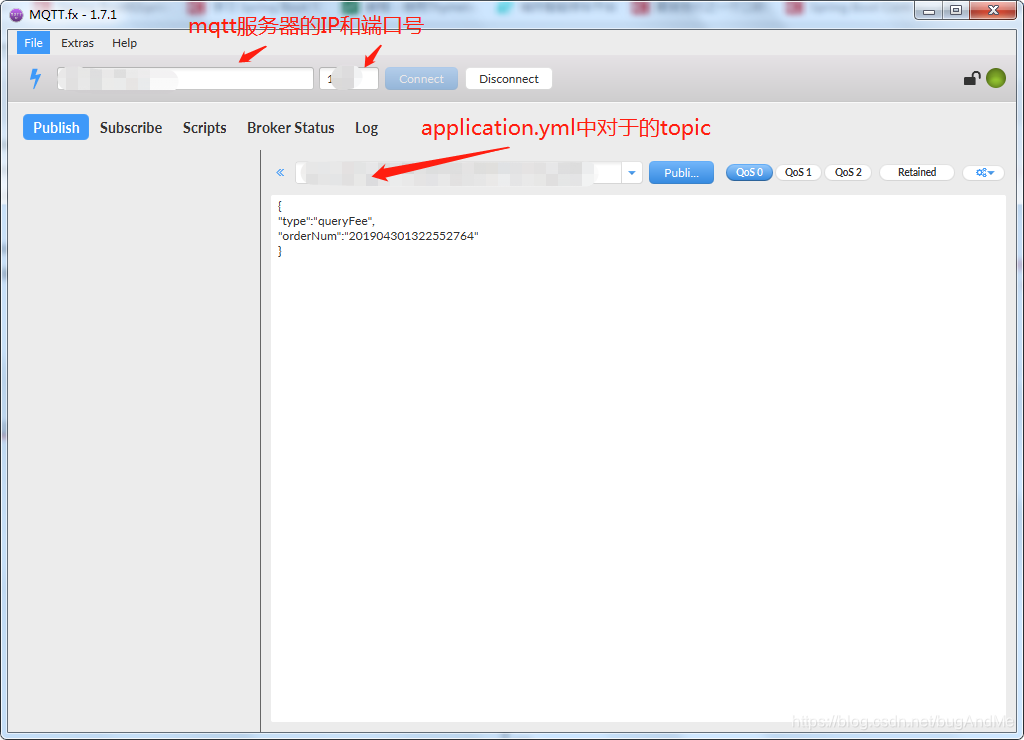
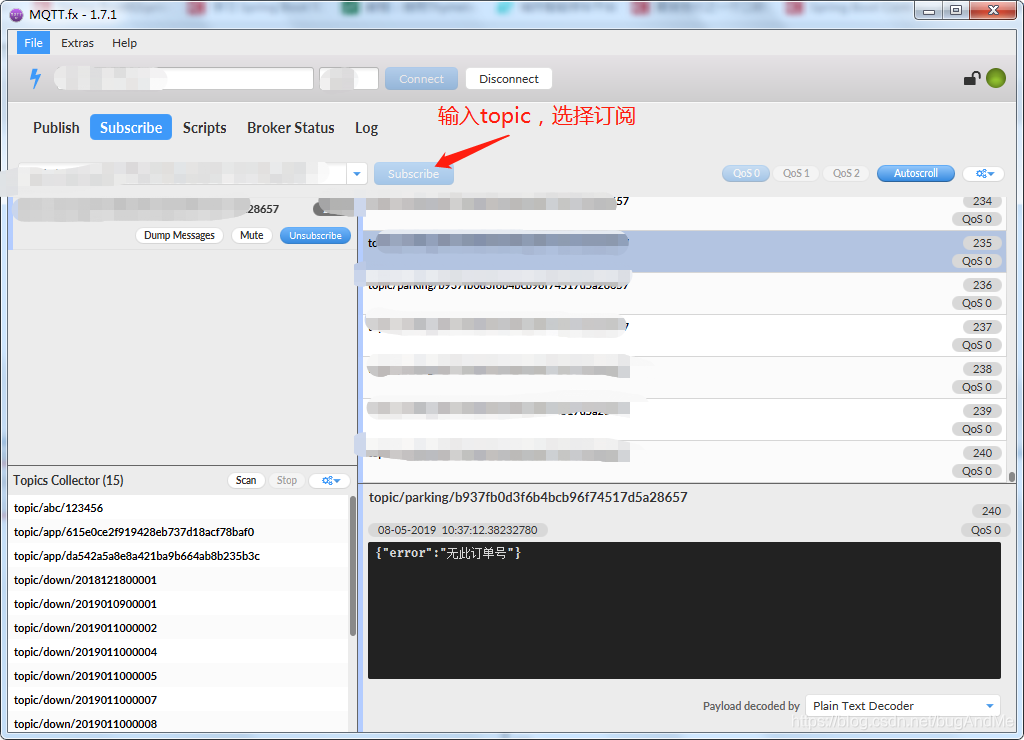
publish就可以看到订阅回复的信息(这里我省略了部分代码)。


 2101
2101


 到【灌水乐园】发言


