Linux系统之系统日志管理

Linux系统下的系统日志管理 ################### ####系统日志管理#### ###################   ####1.系统日志默认分类####        /var/log/messages                              ##系统服务及日志,包括服务的信息,报错等等        /var/log/secure                      ... 阅读详情

rsyslog

此服务是用来采集系统日志的,他不产生日志,只起到采集作用

rsyslog的管理

##/var/log目录下文件含义

名称方法
服务信息日志/var/log/message
系统登陆日志/var/log/secure
定时任务日志/var/log/cron
邮件日志/var/log/maillog
系统启动日志/var/log/boot.log

##日志采集规则

指定日志采集路径————/var/log/file(什么类型,什么级别的日志)

##日志的类型

名称说明
authpam产生的日志
authprivssh,ftp等登录信息的验证信息
cron时间任务相关
kern内核
lpr打印
mail邮件
mark(syslog)-rsyslog服务内部的信息,时间标识
news新闻组
user用户程序产生的相关信息
uucpunix  to  unix  copy,unix主机之间相关的通讯
local 1-7自定义日志设备

##日志的级别分为

名称说明
debug有调式信息的,日志信息的最多
info一般信息的日志,最常用
notice最具有重要性的普通条件的信息
warning警告级别
errr错误级别,阻止某个功能或模块不能正常工作的信息
crit严重级别,阻止整个系统或整个软件不能正常工作的信息
alert需要立刻修改的信息
emerg内核崩溃等严重信息
none内核崩溃等严重信息

从上到下,级别从底到高,记录的信息越来越少
详细可查手册:man 3 rsyslog

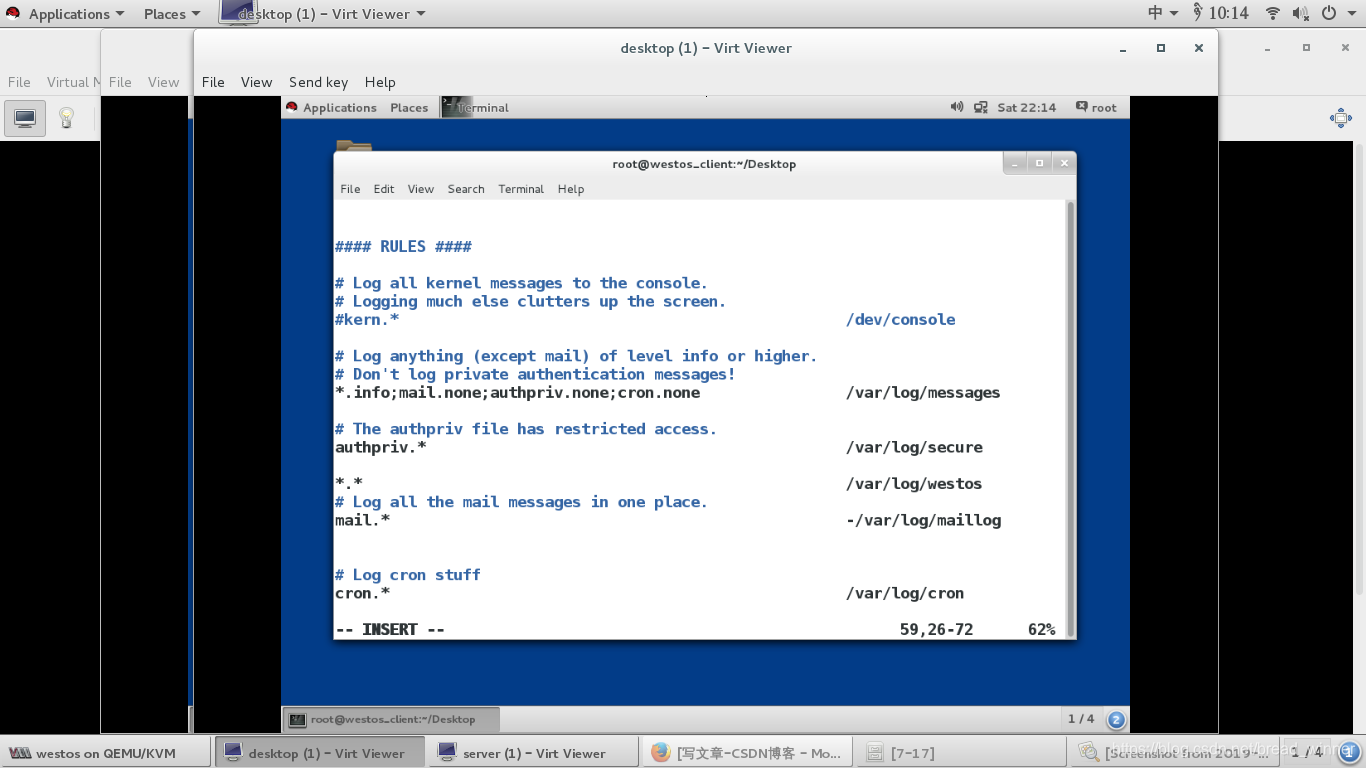
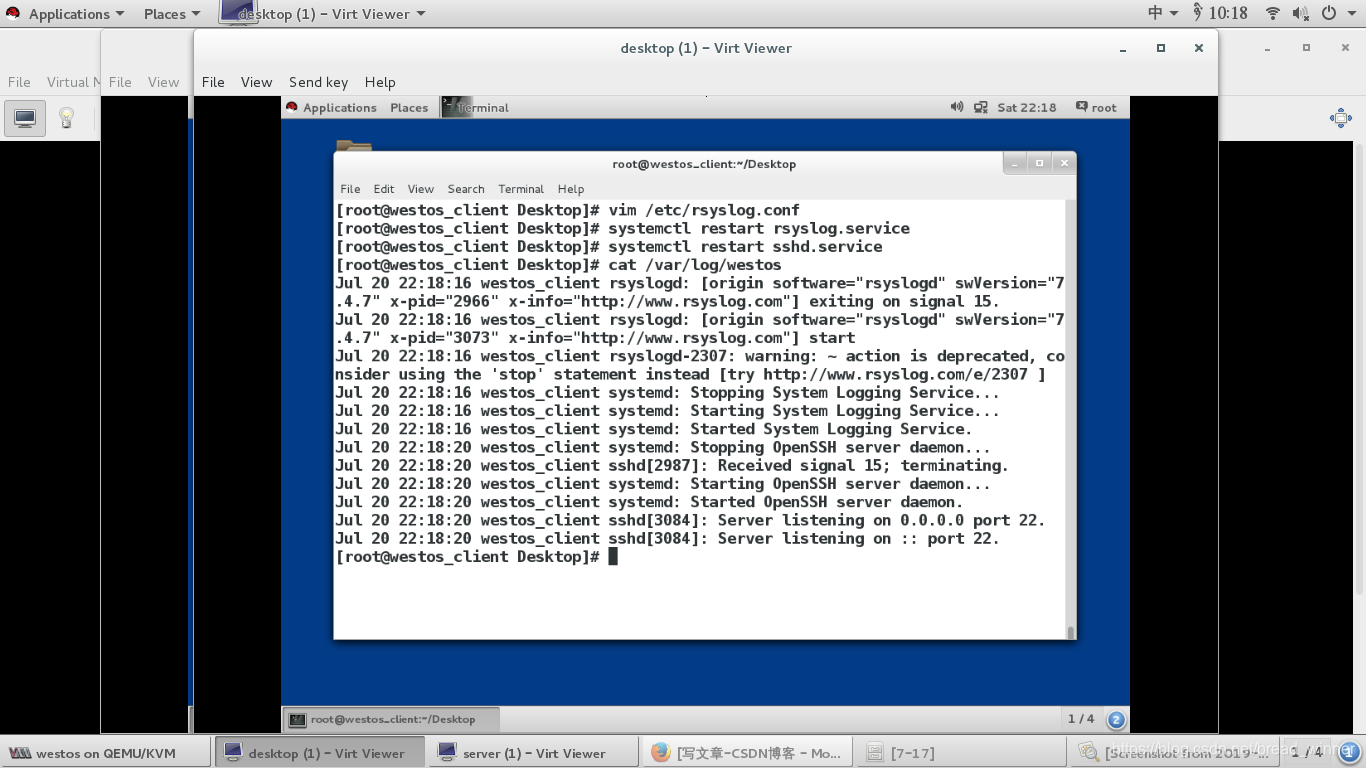
##把系统中所有的日志采集到/var/logwestos中
修改/etc/rsyslog.conf中的文件
在rule下填写*.*  指向/var/log/westos  如下图所示
[root@westos_client Desktop]# vim /etc/rsyslog.conf
##修改后重启采集日志(rsyslog)服务
[root@westos_client Desktop]# systemctl restart rsyslog.service
##使系统生成新的日志
[root@westos_client Desktop]# systemctl restart sshd.service
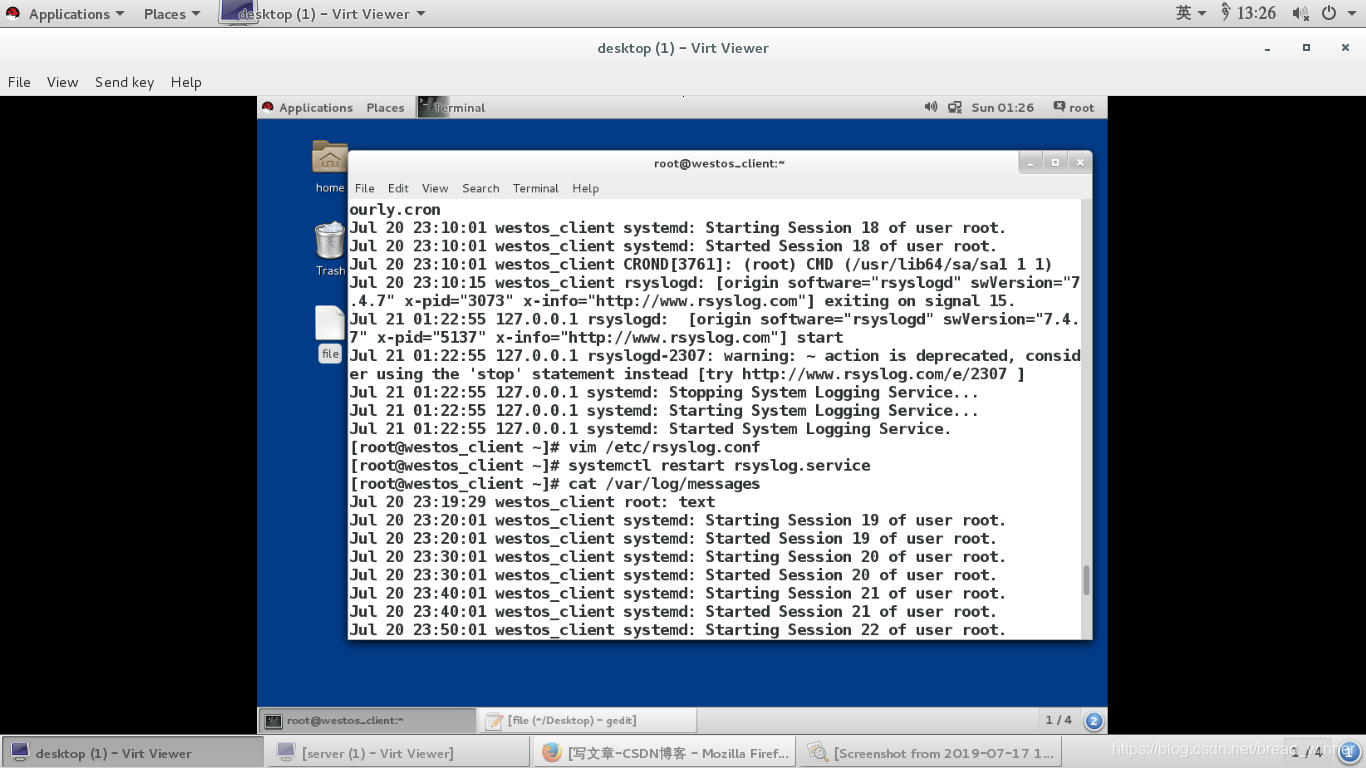
##查看/var/log/westos中的sshd的日志
[root@westos_client Desktop]# cat /var/log/westos
Jul 20 22:18:16 westos_client rsyslogd: [origin software=“rsyslogd” swVersion=“7.4.7” x-pid=“2966” x-info=“http://www.rsyslog.com”] exiting on signal 15.
Jul 20 22:18:16 westos_client rsyslogd: [origin software=“rsyslogd” swVersion=“7.4.7” x-pid=“3073” x-info=“http://www.rsyslog.com”] start
Jul 20 22:18:16 westos_client rsyslogd-2307: warning: ~ action is deprecated, consider using the ‘stop’ statement instead [try http://www.rsyslog.com/e/2307 ]
Jul 20 22:18:16 westos_client systemd: Stopping System Logging Service…
Jul 20 22:18:16 westos_client systemd: Starting System Logging Service…
Jul 20 22:18:16 westos_client systemd: Started System Logging Service.
Jul 20 22:18:20 westos_client systemd: Stopping OpenSSH server daemon…
Jul 20 22:18:20 westos_client sshd[2987]: Received signal 15; terminating.
Jul 20 22:18:20 westos_client systemd: Starting OpenSSH server daemon…
Jul 20 22:18:20 westos_client systemd: Started OpenSSH server daemon.
Jul 20 22:18:20 westos_client sshd[3084]: Server listening on 0.0.0.0 port 22.
Jul 20 22:18:20 westos_client sshd[3084]: Server listening on :: port 22.
在这里插入图片描述
在这里插入图片描述

日志的远程同步

  在真机中开启两台虚拟机,其中一台命名为westos_cilent,用来做测试端(发送方),ip地址为172.25.254.108;另一台命名为westos_server,ip地址为172.25.254.208,用来作服务端(接受方)
##日志发送方,在该文件中写入*.*  @172.25.254.208,其中@表示udp协议发送,@@表示tcp协议发送
[root@westos_client Desktop]# vim /etc/rsyslog.conf
##然后重启服务
[root@westos_client Desktop]# systemctl restart rsyslog.server

##日志接受方,在该文件中
15行 $ModLoad imudp ##日志接受模块
16行 $UDPServerRun 514 ##开启接受端口
[root@westos_client Desktop]# vim /etc/rsyslog.conf
##然后重启服务
[root@westos_client Desktop]# systemctl restart rsyslog.server
##关闭火墙
[root@westos_client Desktop]# systemctl restart rsyslog systemctl stop firewalld

##进行测试:
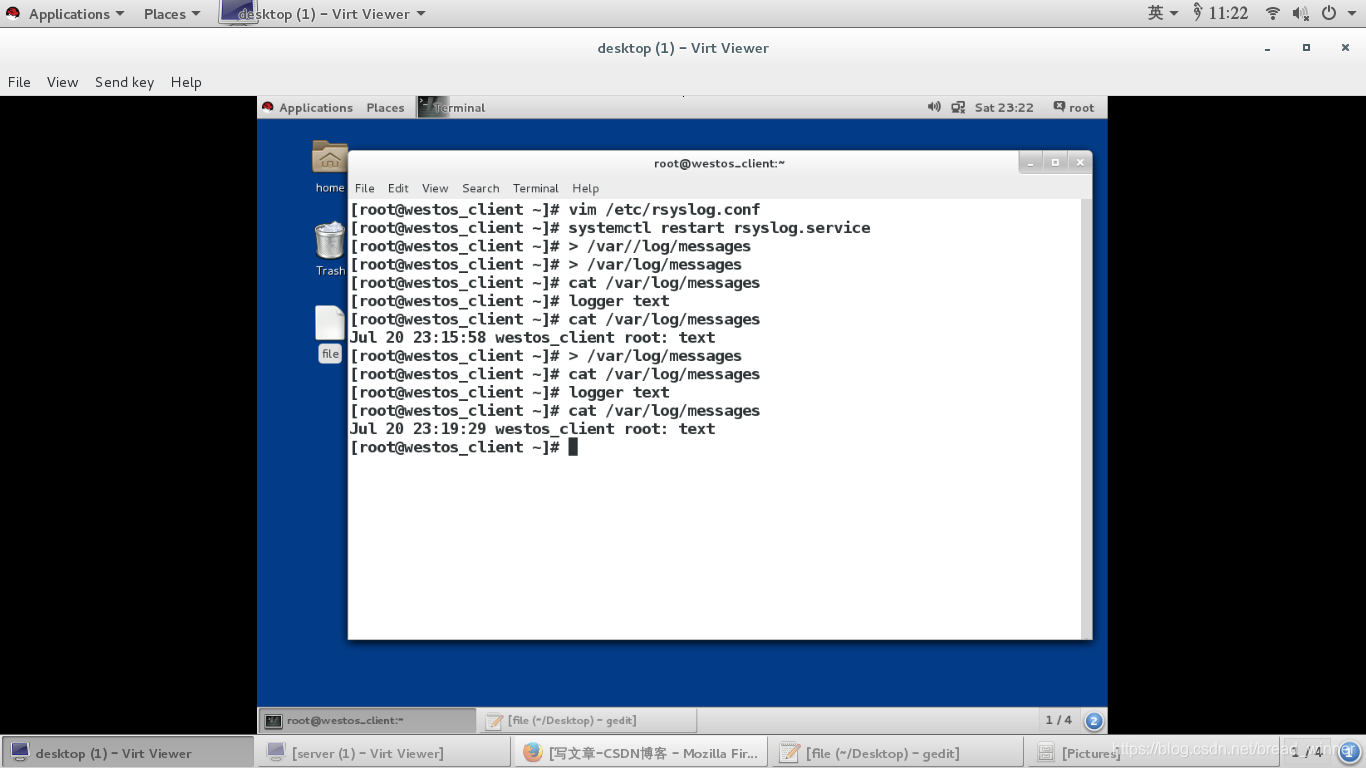
在两端都清空日志文件
[root@westos_client Desktop]# > /var/log/messages
[root@westos_server Desktop]# > /var/log/messages
在发送端生成日志
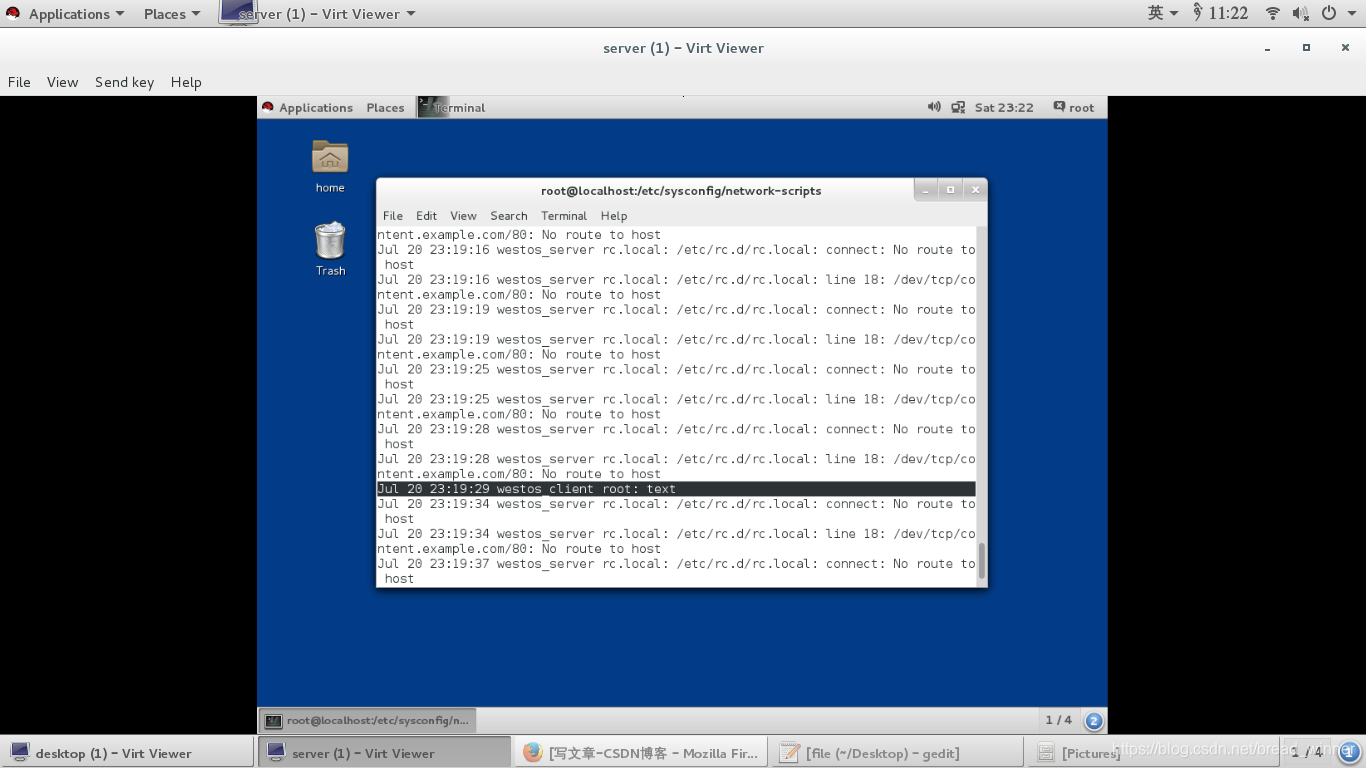
[root@westos_client Desktop]# logger test
在接收端和发送端查看
[root@westos_client Desktop]# cat /var/log/messages
[root@westos_server Desktop]# cat /var/log/messages
##两边内容一样,同步成功
发送方
发送方(westos_cilent)主机截图
在这里插入图片描述
接收方(westos_server)主机截图
systemctl disable firewalld ##可以设定火墙开机关闭
##日志采集格式设定

在vim /etc/rsyslog.conf中可以添加修改内容进行日志采集格式设定
例如:$template  NAME,"%timegenerated%  %FROMHOST-IP%  %syslogtag%  %msg% \n"

名称说明
%timegenerated%显示日志时间
%FROMHOST-IP%显示主机ip
%syslogtag%显示日志记录目标
%msg%显示日志内容
\n\n

##在指定日志中采用NAME格式 ————.  /var/log/westos;NAME
在这里插入图片描述
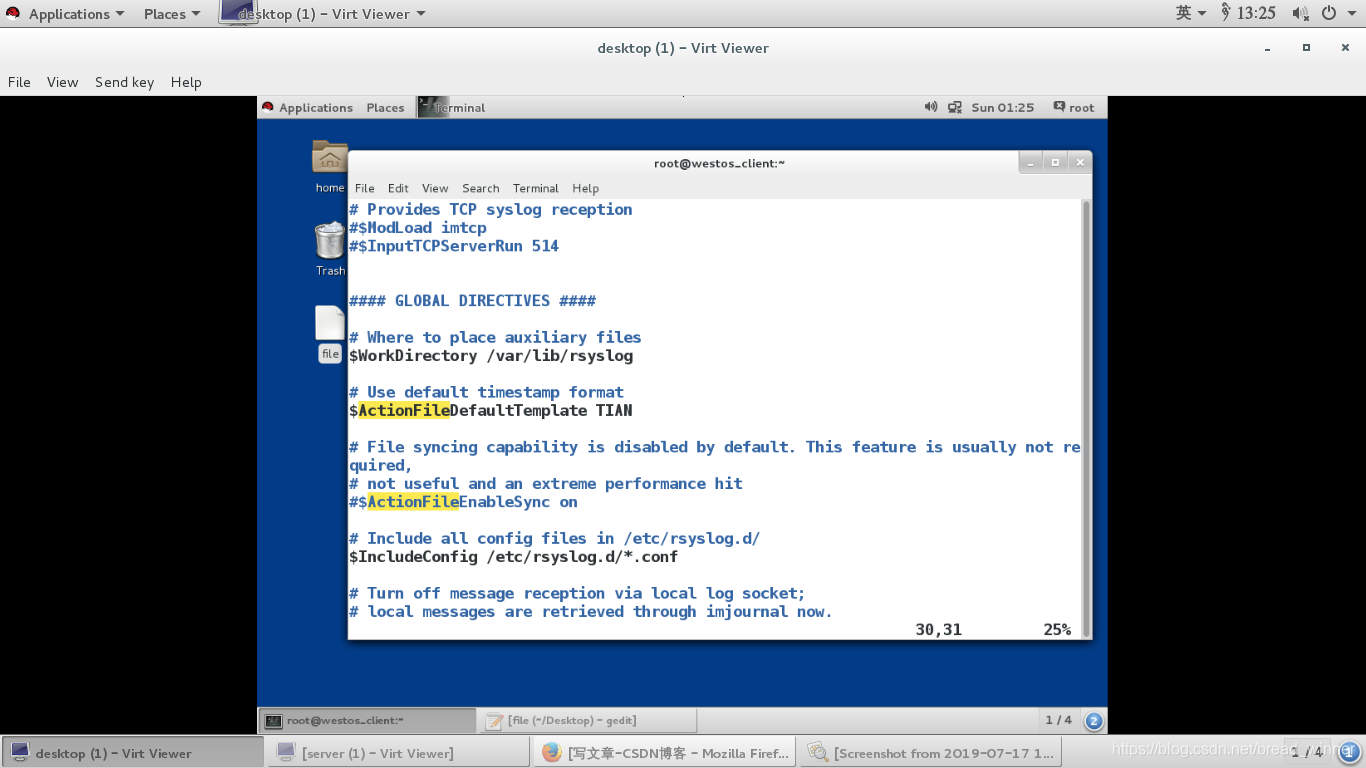
##修改系统默认日志格式为NAME
A c t i o n F i l e D e f a u l t T e m p l a t e R S Y S L O G T r a d i t i o n a l F i l e F o r m a t 修 改 为 为 ActionFileDefaultTemplate RSYSLOG_TraditionalFileFormat修改为为 ActionFileDefaultTemplateRSYSLOGT​raditionalFileFormat修改为为ActionFileDefaultTemplate NAME
在这里插入图片描述
重启系统后在文件中的更改才能生效

时间同步服务——chronyd

修改/etc/chrony.conf中的数据可以进行时间同步的相关内容
在服务端(westos_server):使用 vim  /etc/chrony.conf
在文件22行左右 ##允许这些客户端来同步本机时间——allow 172.25.254.108/24
在文件29行左右 ##本机不同步任何主机时间,本机作为主机 —— local stratum 10
然后重启服务:systemctl restart chronyd
在这里插入图片描述>在客户端(westos_client): vim /etc/chrony.conf
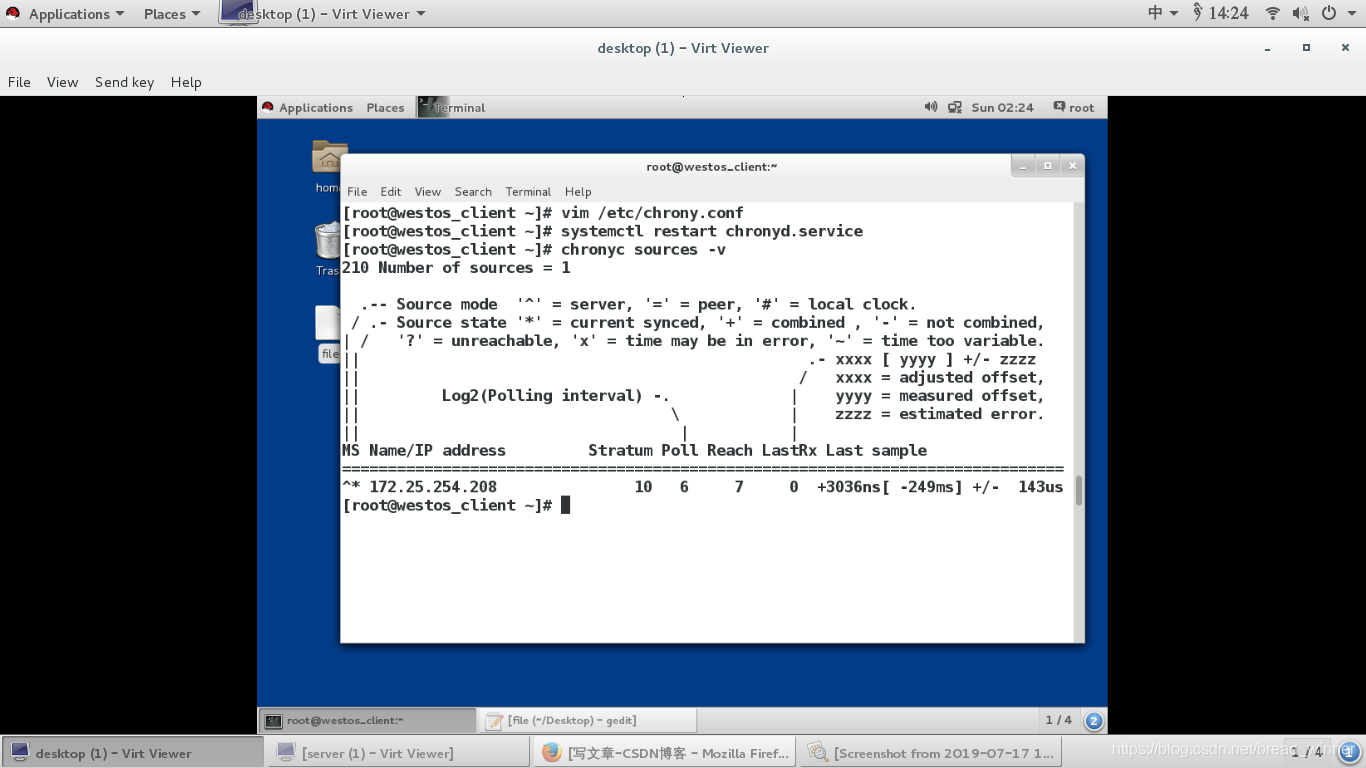
##本机立即同步208主机时间 ——server 172.25.254.208 iburst
在这里插入图片描述>然后重启服务:systemctl restart chronyd
测试:在客户端输入chronyc source -v
出现以下内容,即为测试成功
在这里插入图片描述

管理系统时间——timedatecal

名称方法
显示当前时间信息timedatecal status
设定当前时间timedatecal set-time
设定当前时区timedatecal set-timezomne
设定是否使用utc时间set-local-rtc 0
查看支持的所有时区list-timezones

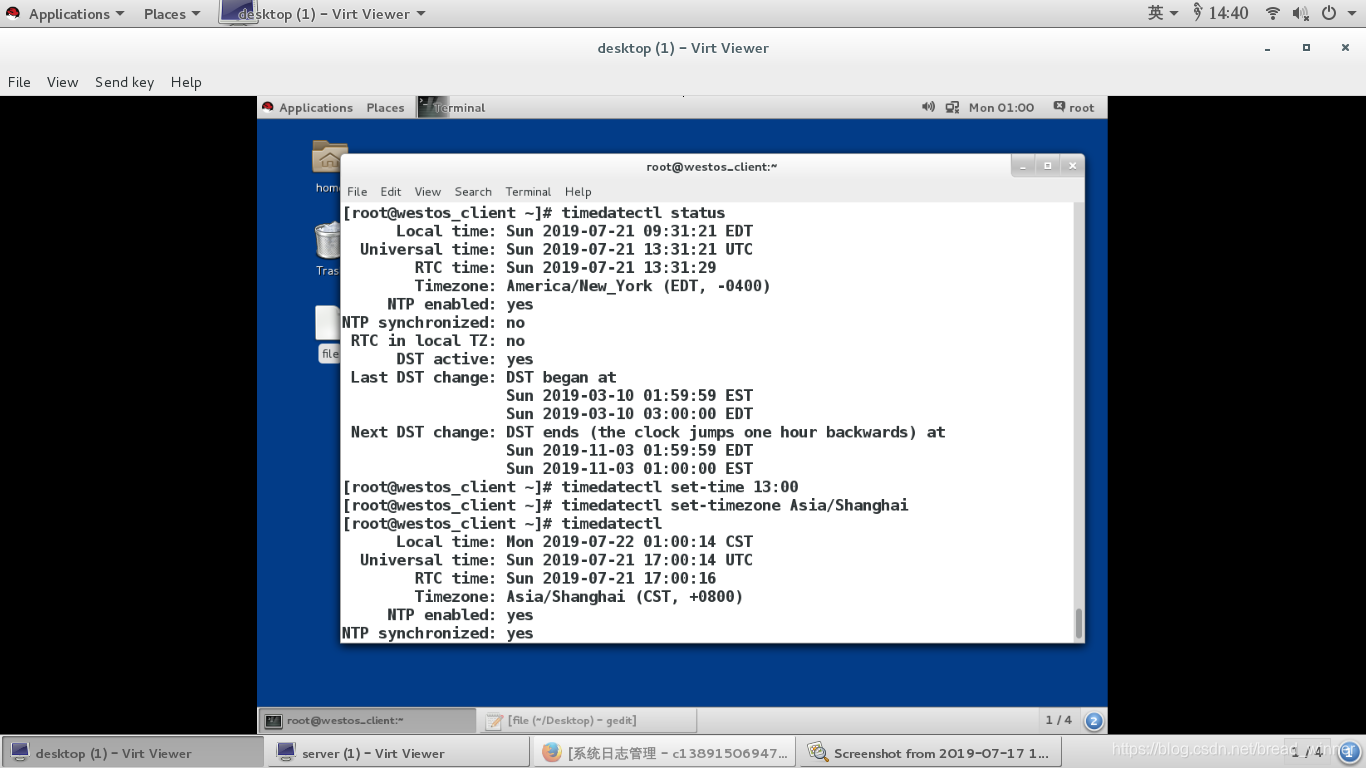
##显示当前时间信息
[root@westos_client ~]# timedatectl status
Local time: Sun 2019-07-21 09:31:21 EDT
Universal time: Sun 2019-07-21 13:31:21 UTC
RTC time: Sun 2019-07-21 13:31:29
Timezone: America/New_York (EDT, -0400)
NTP enabled: yes
NTP synchronized: no
RTC in local TZ: no
DST active: yes
Last DST change: DST began at
Sun 2019-03-10 01:59:59 EST
Sun 2019-03-10 03:00:00 EDT
Next DST change: DST ends (the clock jumps one hour backwards) at
Sun 2019-11-03 01:59:59 EDT
Sun 2019-11-03 01:00:00 EST
##设定当前时间
[root@westos_client ~]# timedatectl set-time 13:00
设定当前时区
[root@westos_client ~]# timedatectl set-timezone Asia/Shanghai
[root@westos_client ~]# timedatectl
Local time: Mon 2019-07-22 01:00:14 CST
Universal time: Sun 2019-07-21 17:00:14 UTC
RTC time: Sun 2019-07-21 17:00:16
Timezone: Asia/Shanghai (CST, +0800)
NTP enabled: yes
NTP synchronized: yes
RTC in local TZ: no
DST active: n/a
在这里插入图片描述

日志查看工具——journal

名称方法
查看最近三条日志journalctl  -n 3
查看错误日志journalctl  -p err
查看日志的详细参数journalctl  -o verbose
查看从什么时间开始的日志journalctl   --since
查看从什么时间为止的日志journalctl   – --until

##查看最近三条日志
[root@westos_client ~]# journalctl -n 3
– Logs begin at Sun 2019-07-21 08:59:45 CST, end at Mon 2019-07-22 01:10:01 CS
Jul 22 01:10:01 westos_client.westos.com systemd[1]: Starting Session 48 of use
Jul 22 01:10:01 westos_client.westos.com systemd[1]: Started Session 48 of user
Jul 22 01:10:01 westos_client.westos.com CROND[6777]: (root) CMD (/usr/lib64/sa
##查看错误日志
[root@westos_client ~]# journalctl -p err
– Logs begin at Sun 2019-07-21 08:59:45 CST, end at Mon 2019-07-22 01:10:01 CS
Jul 21 08:59:45 localhost kernel: Failed to access perfctr msr (MSR c1 is 0)
Jul 21 08:59:47 localhost rpcbind[169]: rpcbind terminating on signal. Restart
Jul 21 08:59:58 westos_client.westos.com smartd[507]: Problem creating device n
Jul 21 08:59:58 westos_client.westos.com smartd[507]: In the system’s table of
Jul 21 09:00:07 westos_client.westos.com systemd[1]: Failed to start LSB: Start
Jul 21 09:00:07 westos_client.westos.com systemd[1]: Failed to start /etc/rc.d/
Jul 21 09:00:07 westos_client.westos.com rpcbind[1254]: Cannot open '/var/lib/r
Jul 21 09:00:10 westos_client.westos.com libvirtd[1158]: libvirt version: 1.1.1
Jul 21 09:00:10 westos_client.westos.com libvirtd[1158]: Module /usr/lib64/libv
Jul 21 09:00:33 westos_client.westos.com bluetoothd[1816]: Parsing /etc/bluetoo
Jul 21 10:10:02 westos_client.westos.com systemd[1]: Failed to mark scope sessi
##查看日志的详细参数
[root@westos_client ~]# journalctl -o verbose
– Logs begin at Sun 2019-07-21 08:59:45 CST, end at Mon 2019-07-22 01:10:01 CS
Sun 2019-07-21 08:59:45.651453 CST [s=e42a391092aa4c4d96b1e22b51ab7c16;i=1;b=5a
PRIORITY=6
_TRANSPORT=driver
MESSAGE=Runtime journal is using 5.9M (max 47.3M, leaving 71.0M of free 467
MESSAGE_ID=ec387f577b844b8fa948f33cad9a75e6
_PID=81
_UID=0
_GID=0
_COMM=systemd-journal
_EXE=/usr/lib/systemd/systemd-journald
_CMDLINE=/usr/lib/systemd/systemd-journald
_CAP_EFFECTIVE=4402800cf
_SYSTEMD_CGROUP=/system.slice/systemd-journald.service
_SYSTEMD_UNIT=systemd-journald.service
_SYSTEMD_SLICE=system.slice
_SELINUX_CONTEXT=kernel
_BOOT_ID=5aa5861c1cad4c4d8dbe625df1789745
_MACHINE_ID=81343f9ea5964f1db7274f00e1291c46
_HOSTNAME=localhost
Sun 2019-07-21 08:59:45.657866 CST [s=e42a391092aa4c4d96b1e22b51ab7c16;i=2;b=5a
PRIORITY=6
_TRANSPORT=driver
##查看从14:53开始的日志
[root@westos_client ~]# journalctl --since 14:53
– Logs begin at Sun 2019-07-21 08:59:45 CST, end at Mon 2019-07-22 01:10:01 CS
##查看到14:52截至的日志
[root@westos_client ~]# journalctl --since 14:52
– Logs begin at Sun 2019-07-21 08:59:45 CST, end at Mon 2019-07-22 01:10:01 CS

##保存日志

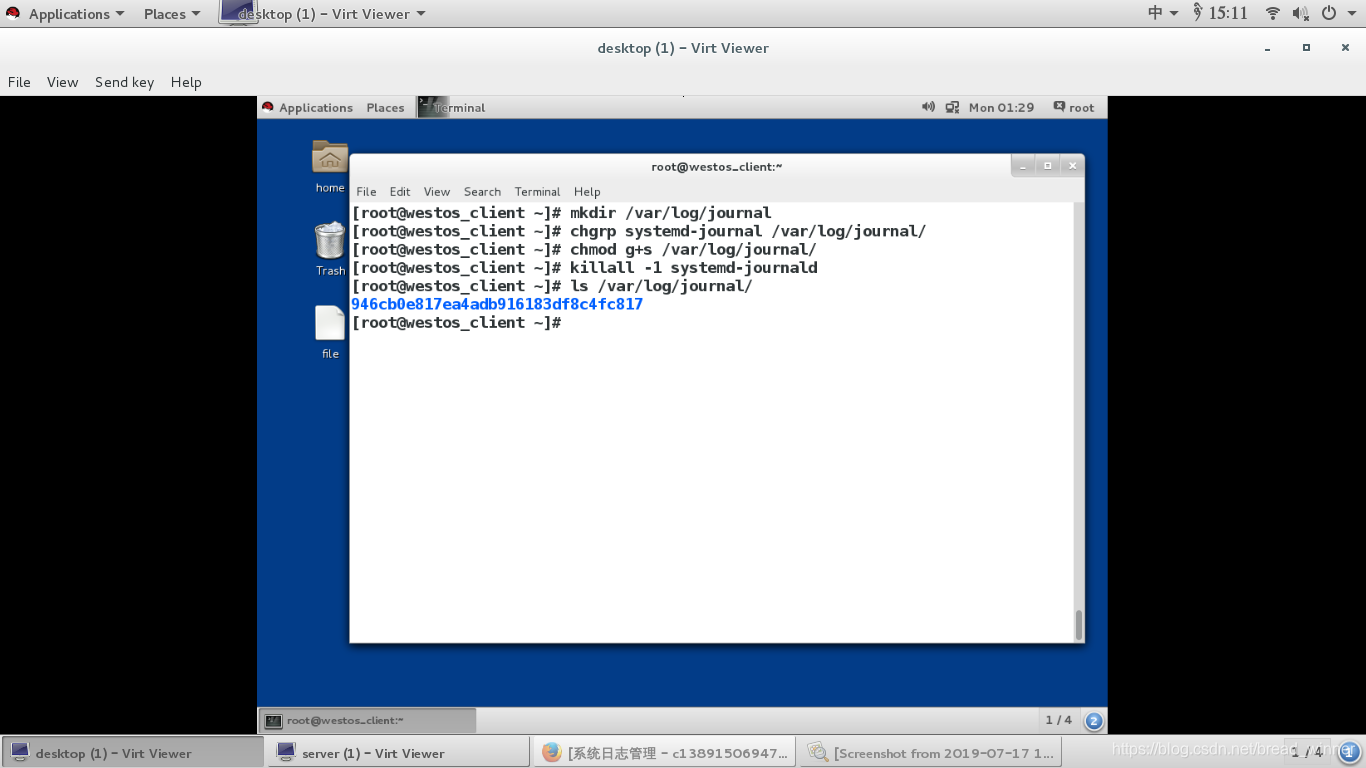
  因为日志默认是保存在内存中的,所以每次开关机都这能查看开机之后的日志,上次的日志会自动被释放。我们想要看开机之前的日志只能将其保存在硬盘中,在调取查看。
在硬盘中建立一个存放日志的目录
[root@westos_client ~]# mkdir /var/log/journal
该目录所有组属于系统用户systemd-journal
[root@westos_client ~]# chgrp systemd-journal /var/log/journal/
该目录下创建的所有文件的组都和目录所属组相同,为systemd-journal
[root@westos_client ~]# chmod g+s /var/log/journal/
不关机重新启动systemd-journald
[root@westos_client ~]# killall -1 systemd-journald
查看 /var/log/journal/中内容
[root@westos_client ~]# ls /var/log/journal/
946cb0e817ea4adb916183df8c4fc817
在这里插入图片描述

Linux系统的系统日志管理 系统日志管理 1.rsyslog ##此服务是用来采集系统日志的,它不产生日志,只是起到采集的作用 2.rsyslog的管理 使用cd /var/log 和ls命令查看 /var/log/messages ##服务信息日志 /var/log/secure ##系统登陆日志 /var/log/maillog ##邮件日志 /var/log/boot.log... 阅读详情

相关推荐

Linux——系统日志管理、时间同步、date系统时间设定、timedatectl系统的时间管理

一、系统日志管理 后台程序(可用ps看到 通常被称为守护进程或者服务进程)处理了你的linux系统的大部分任务,当这些守护进程工作时,它们会将任务的详细信息记录进日志文件中,作为他们做过什么的“历史”信息(包括错误信息) /var/log/messages #记录系统中所产生的日志 测试:(不清空不容易看到) vim /etc/ssh/sshd_config 78:修改成为一个错误的信息 sy...

weixin_44233369的博客 1417

sshd启动失败,一直重启

sshd出现了周期性连不上的情况,查看日志如下: /var/log/secure: sshd[3170]: Server listening on 0.0.0.0 port 22. sshd[3170]: Received signal 15; terminating. /var/log/messages: systemd: sshd.service holdoff time...

weixin_30906701的博客 1万+

linux系统下系统日志的管理以及时间的基本操作

1.系统常用的日志 /var/log/message ##系统服务及日志,包括服务的信息,报错等等 /var/log/secure ##认证信息日志 /var/log/mailog ##邮件服务信息 /var/log/cron ##定时任务信息 /var/log/boot.log ##系统启动信息 2.日志管理服务rsyslog 1)rsyslog负责采集和分类存放日志 2)主要的配置文件...

weixin_44246619的博客 1839

安装Centos的时候出现failed to access perfctr msr

 failed to access perfctr msr的问题分析及解决办法:关于这个错误: failed to access perfctr msr有非常多的地方会出现,我遇到的问题是在虚拟机中安装android后,启动时,就出现了 failed to access perfctr msr的错误!经过多方的资料及查旬,原因是CPU的问题,简单说:AMD的CPU不支持虚拟这个android,所以...

快乐de馒头 4287

Linux系统启动那些事—基于Linux 3.10内核

注:Linux310启动,为旧版本,请下载这版 也许你会好奇Linux是如何启动的?一些基础的服务又是何时准备好的?本文旨在揭秘操作系统是启动过程的,主要是内核态下发生的一些事。本文涉及grub、uboot、initrd、根文件系统、设备树、以及Linux内核编译等内容。 对那些好奇系统是如何启动的人本文非常适合,当然对于由于涉及操作系统的方方面面,bsp的开发人员也有点价值,但是这里没有对应用做介绍;本文讨论两种平台下的启动方式,因为它们均是对应体系架构下的典型。

【算法】图解A* 搜索算法

A* 算法是启发式搜索算法,是根据Dijkstra算法改进而来。 问题引入 如下图所示,S为起始(start)节点,G为目标(goal)节点。 节点之间连线是两点的路径长度,如A到E的路径长度c(A,E) = 9。 节点旁的h值时当前节点到达目标节点(G)的预估值,如h(A)=15, 表示从当前点A到达目标点G的估计路径长度为15,此处h(x)即为启发函数,启发函数的设计有很多方法,具体可......

zhuhua造轮子的博客 4万+

android安装问题集合

开启启动报错: 0.440000 failed to access perfctr msr (msr c0010004 is 0)  但是不影响进入系统,不知道什么yuan

wan26com的专栏 989

Codex 命令行高效操作指南

本文详细介绍了Codex命令行工具的高效使用方法,包括安装配置、核心参数解析和实战技巧。通过`codex complete`、`codex explain`等指令,开发者可以快速生成代码、调试错误和重构项目,显著提升开发效率。特别推荐使用`--temperature`和`--max-tokens`参数优化生成结果。

weixin_29201313的博客 530

android问题集合

刚开始学习android,在此过程中一定会遇到很多问题,在此记录分享一下 1. the user operation is waiting for building workspace to complete      第一次创建了一个helloword工程很是高兴,兴冲冲的准备安装到模拟器上,但是一直提示上述错误,卡在了页面上,怎么也安装不上,解决办法如下:     1. 把"p

king的专栏 733

Modbus CRC和LRC算法研究及代码实现

一、CRC(循环冗余校验) 1 CRC16实现流程 XOR = 异或 N = 字节的信息位 POLY = CRC16 多项式计算 = 1010 0000 0000 0001 (生成多项式 = 1 + x2 + x15 + x16) 在CRC16中,发送的第一个字节位低字节 2 CRC16实例推导 3 CRC16代码实现 unsigned short CRC16(unsigned char *a...

Hi, Boy 2891

GitLab教程(四):分支(branch)和合并(merge)

命令进行合并时,Git具备一定的智能自动化处理能力:如果一个分支仅修改了文件A,而另一个分支独立地修改了文件B,Git能够无缝整合这些更改,自动完成合并过程——即最终的代码既包含了对A文件的修改也包含了对B文件的修改。同样地,若两个分支虽然都修改了同一个文件,但涉及的是文件中互不重叠的部分,比如一个改动发生在第一行,另一个则在第二行,Git同样能巧妙地自动合并这些非冲突性修改。获取了远程分支的最新变化,或者当你想要合并本地的一个分支到当前分支时,就会用到这个命令。,默认会尝试合并远程分支到当前分支。

TracyCoder的博客 7885

Linux系统日志管理

Linux系统日志管理

qq_53772682的博客 356

ESP32设备驱动-VCNL4040趋近传感器

VCNL4040 将趋近传感器 (PS)、环境光传感器 (ALS) 和高功率 IRED 集成到一个小型封装中。它通过CMOS工艺将光电二极管、放大器和模数转换电路集成到一个芯片中。

视觉与物联智能 939

linux系统日志与时间管理

1.系统日志的作用 查看日志是系统的重要排错手段,系统日志由程序本身产生,rsyslong.service服务是系统用来采集日志的服务。 2.系统日志的分类 /var/log/messages   ##系统服务及日志,包括服务的信息,报错等等 /var/log/secure     ##认证信息日志 /var/log/maillog    ##邮件服务信息 /var/log/cron     ##...

weixin_41781946的博客 3510

6-Halcon-- var_threshold 函数功能(用于基于局部统计特性的动态阈值分割的算子)

var_threshold 是 HALCON 中用于基于局部统计特性的动态阈值分割的算子,特别适用于处理低对比度图像或纹理均匀但包含细微差异的场景。与 dyn_threshold 不同,它不依赖预处理生成的参考图像,而是直接在局部区域内计算灰度值的统计特性(均值和标准差),从而自适应调整阈值。

weixin_45590420的博客 1326

从菜鸟到大神:VSCode助力HTML开发全攻略

本文全面介绍 VSCode 在 HTML 开发中的高效应用。先引导读者完成 VSCode 的安装与个性化设置,助其快速适应开发环境;接着推荐 Live Server、Prettier 等实用插件,实现实时预览、代码格式化等功能,提升开发效率。通过详细的开发实战步骤,从新建文件到添加样式,带领读者掌握 HTML 基础结构与常用标签使用。还分享代码片段管理、多人协作等进阶技巧,解决常见开发问题。旨在帮助开发者利用 VSCode,轻松高效完成 HTML 开发,打造优质网页。

邓邓子的博客 3365

linux系统日志管理

0.什么是系统日志 后台的程序(通常被称为守护进程或者服务进程)处理了你的linux系统的大部分任务,当这些守护进程工作的时候,它们会将任务的详细信息记录进日志文件中,作为它们做过什么的‘历史’信息(包括错误信息)。 /var/log/message ##记录系统中所产生的日志 1.rsyslog服务 此服务用来采集系统日志,它不产生日志,只是起到了采集的作用。 2.rsyslog的管理 0.v...

赵泳智的博客 310

MFC 中实现 WebSocket 客户端以支持实时双向通信

3. **协议兼容**:若服务器使用 `wss://`(加密),需在 `lws_client_connect_info` 中配置 SSL 相关参数(`ssl_connection = LCCSCF_USE_SSL`)。- 编辑框(`m_editUrl`):输入 WebSocket 服务器地址(如 `ws://echo.websocket.events`)。2. 将编译后的库文件(`.lib`、`.dll`)和头文件路径添加到 MFC 项目中(项目属性 -> VC++ 目录)。// UI:服务器地址。

寒寒豆豆软件公司的博客 202

Linux下的系统日志管理

首先,配置实验所需的虚拟机环境:使用超级用户登陆虚拟机,修改ip地址,关闭火墙,修改主机名 一.系统日志的管理 1、rsyslog rsyslog.service:采集系统日志到指定文件,是一个采集系统日志的程序,若不采集,也会有日志产生。 命令 功能 systemctl status rsyslog.service 查看rsyslog.service状态 systemctl ...

因为觉得还太菜所以暂时不更新 322

TMS_WebGMaps_1.9.8.0_Full_Source

TMS_WebGMaps_1.9.8.0_Full_Source 全源码 delphi cbuilder

VB摄像头监控

该VB模块可对摄像头捕获的画面进行录像等,可在创建的窗口进行控制

Linux系统日志管理服务和配置

虽然运行在Linux系统上的各个服务都有自己的日志系统 ,如redis,nginx,mysql等,它们各自的日志都只是单独记录了它们自身服务的运行状况。如果这些服务自身宕掉了或起不来了该去查看什么日志呢?此时就需要去看Linux的系统日志了。Linux系统日志记录着Linux本身和运行在Linux系统上各种应用服务的事件和运行信息,它就是Linux系统的公用日志服务。 rsyslog rsyslog是CentOS 6以后版本的系统管理服务,它提供了高性能,出色的安全性和模块化设计。尽管rsyslog最初

flytalei的博客 2801

深度学习工具包 DeepLearningToolbox

深度学习工具包Deprecation notice.-----This toolbox is outdated and no longer maintained.There are much better tools available for deep learning than this toolbox, e.g. [Theano](http://deeplearning.net/software/theano/), [torch](http://torch.ch/) or [tensorflow](http://www.tensorflow.org/)I would suggest you use one of the tools mentioned above rather than use this toolbox.Best, Rasmus.DeepLearnToolbox================A Matlab toolbox for Deep Learning.Deep Learning is a new subfield of machine learning that focuses on learning deep hierarchical models of data.It is inspired by the human brain's apparent deep (layered, hierarchical) architecture.A good overview of the theory of Deep Learning theory is[Learning Deep Architectures for AI](http://www.iro.umontreal.ca/~bengioy/papers/ftml_book.pdf)For a more informal introduction, see the following videos by Geoffrey Hinton and Andrew Ng.* [The Next Generation of Neural Networks](http://www.youtube.com/watch?v=AyzOUbkUf3M) (Hinton, 2007)* [Recent Developments in Deep Learning](http://www.youtube.com/watch?v=VdIURAu1-aU) (Hinton, 2010)* [Unsupervised Feature Learning and Deep Learning](http://www.youtube.com/watch?v=ZmNOAtZIgIk) (Ng, 2011)If you use this toolbox in your research please cite [Prediction as a candidate for learning deep hierarchical models of data](http://www2.imm.dtu.dk/pubdb/views/publication_details.php?id=6284)```@MASTERSTHESIS\{IMM2012-06284, author = "R. B. Palm", title = "Prediction as a candidate for learning deep hierarchical models of data", year = "2012",}```Contact: rasmusbergpalm at gmail dot comDirectories included in the toolbox-----------------------------------`NN/` - A library for Feedforward Backpropagation Neural Networks`CNN/` - A library for Convolutional Neural Networks`DBN/` - A library for Deep Belief Networks`SAE/` - A library for Stacked Auto-Encoders`CAE/` - A library for Convolutional Auto-Encoders`util/` - Utility functions used by the libraries`data/` - Data used by the examples`tests/` - unit tests to verify toolbox is workingFor references on each library check REFS.mdSetup-----1. Download.2. addpath(genpath('DeepLearnToolbox'));Example: Deep Belief Network---------------------```matlabfunction test_example_DBNload mnist_uint8;train_x = double(train_x) / 255;test_x = double(test_x) / 255;train_y = double(train_y);test_y = double(test_y);%% ex1 train a 100 hidden unit RBM and visualize its weightsrand('state',0)dbn.sizes = [100];opts.numepochs = 1;opts.batchsize = 100;opts.momentum = 0;opts.alpha = 1;dbn = dbnsetup(dbn, train_x, opts);dbn = dbntrain(dbn, train_x, opts);figure; visualize(dbn.rbm{1}.W'); % Visualize the RBM weights%% ex2 train a 100-100 hidden unit DBN and use its weights to initialize a NNrand('state',0)%train dbndbn.sizes = [100 100];opts.numepochs = 1;opts.batchsize = 100;opts.momentum = 0;opts.alpha = 1;dbn = dbnsetup(dbn, train_x, opts);dbn = dbntrain(dbn, train_x, opts);%unfold dbn to nnnn = dbnunfoldtonn(dbn, 10);nn.activation_function = 'sigm';%train nnopts.numepochs = 1;opts.batchsize = 100;nn = nntrain(nn, train_x, train_y, opts);[er, bad] = nntest(nn, test_x, test_y);assert(er < 0.10, 'Too big error');```Example: Stacked Auto-Encoders---------------------```matlabfunction test_example_SAEload mnist_uint8;train_x = double(train_x)/255;test_x = double(test_x)/255;train_y = double(train_y);test_y = double(test_y);%% ex1 train a 100 hidden unit SDAE and use it to initialize a FFNN% Setup and train a stacked denoising autoencoder (SDAE)rand('state',0)sae = saesetup([784 100]);sae.ae{1}.activation_function = 'sigm';sae.ae{1}.learningRate = 1;sae.ae{1}.inputZeroMaskedFraction = 0.5;opts.numepochs = 1;opts.batchsize = 100;sae = saetrain(sae, train_x, opts);visualize(sae.ae{1}.W{1}(:,2:end)')% Use the SDAE to initialize a FFNNnn = nnsetup([784 100 10]);nn.activation_function = 'sigm';nn.learningRate = 1;nn.W{1} = sae.ae{1}.W{1};% Train the FFNNopts.numepochs = 1;opts.batchsize = 100;nn = nntrain(nn, train_x, train_y, opts);[er, bad] = nntest(nn, test_x, test_y);assert(er < 0.16, 'Too big error');```Example: Convolutional Neural Nets---------------------```matlabfunction test_example_CNNload mnist_uint8;train_x = double(reshape(train_x',28,28,60000))/255;test_x = double(reshape(test_x',28,28,10000))/255;train_y = double(train_y');test_y = double(test_y');%% ex1 Train a 6c-2s-12c-2s Convolutional neural network %will run 1 epoch in about 200 second and get around 11% error. %With 100 epochs you'll get around 1.2% errorrand('state',0)cnn.layers = { struct('type', 'i') %input layer struct('type', 'c', 'outputmaps', 6, 'kernelsize', 5) %convolution layer struct('type', 's', 'scale', 2) %sub sampling layer struct('type', 'c', 'outputmaps', 12, 'kernelsize', 5) %convolution layer struct('type', 's', 'scale', 2) %subsampling layer};cnn = cnnsetup(cnn, train_x, train_y);opts.alpha = 1;opts.batchsize = 50;opts.numepochs = 1;cnn = cnntrain(cnn, train_x, train_y, opts);[er, bad] = cnntest(cnn, test_x, test_y);%plot mean squared errorfigure; plot(cnn.rL);assert(er<0.12, 'Too big error');```Example: Neural Networks---------------------```matlabfunction test_example_NNload mnist_uint8;train_x = double(train_x) / 255;test_x = double(test_x) / 255;train_y = double(train_y);test_y = double(test_y);% normalize[train_x, mu, sigma] = zscore(train_x);test_x = normalize(test_x, mu, sigma);%% ex1 vanilla neural netrand('state',0)nn = nnsetup([784 100 10]);opts.numepochs = 1; % Number of full sweeps through dataopts.batchsize = 100; % Take a mean gradient step over this many samples[nn, L] = nntrain(nn, train_x, train_y, opts);[er, bad] = nntest(nn, test_x, test_y);assert(er < 0.08, 'Too big error');%% ex2 neural net with L2 weight decayrand('state',0)nn = nnsetup([784 100 10]);nn.weightPenaltyL2 = 1e-4; % L2 weight decayopts.numepochs = 1; % Number of full sweeps through dataopts.batchsize = 100; % Take a mean gradient step over this many samplesnn = nntrain(nn, train_x, train_y, opts);[er, bad] = nntest(nn, test_x, test_y);assert(er < 0.1, 'Too big error');%% ex3 neural net with dropoutrand('state',0)nn = nnsetup([784 100 10]);nn.dropoutFraction = 0.5; % Dropout fraction opts.numepochs = 1; % Number of full sweeps through dataopts.batchsize = 100; % Take a mean gradient step over this many samplesnn = nntrain(nn, train_x, train_y, opts);[er, bad] = nntest(nn, test_x, test_y);assert(er < 0.1, 'Too big error');%% ex4 neural net with sigmoid activation functionrand('state',0)nn = nnsetup([784 100 10]);nn.activation_function = 'sigm'; % Sigmoid activation functionnn.learningRate = 1; % Sigm require a lower learning rateopts.numepochs = 1; % Number of full sweeps through dataopts.batchsize = 100; % Take a mean gradient step over this many samplesnn = nntrain(nn, train_x, train_y, opts);[er, bad] = nntest(nn, test_x, test_y);assert(er < 0.1, 'Too big error');%% ex5 plotting functionalityrand('state',0)nn = nnsetup([784 20 10]);opts.numepochs = 5; % Number of full sweeps through datann.output = 'softmax'; % use softmax outputopts.batchsize = 1000; % Take a mean gradient step over this many samplesopts.plot = 1; % enable plottingnn = nntrain(nn, train_x, train_y, opts);[er, bad] = nntest(nn, test_x, test_y);assert(er < 0.1, 'Too big error');%% ex6 neural net with sigmoid activation and plotting of validation and training error% split training data into training and validation datavx = train_x(1:10000,:);tx = train_x(10001:end,:);vy = train_y(1:10000,:);ty = train_y(10001:end,:);rand('state',0)nn = nnsetup([784 20 10]); nn.output = 'softmax'; % use softmax outputopts.numepochs = 5; % Number of full sweeps through dataopts.batchsize = 1000; % Take a mean gradient step over this many samplesopts.plot = 1; % enable plottingnn = nntrain(nn, tx, ty, opts, vx, vy); % nntrain takes validation set as last two arguments (optionally)[er, bad] = nntest(nn, test_x, test_y);assert(er < 0.1, 'Too big error');```[![Bitdeli Badge](https://d2weczhvl823v0.cloudfront.net/rasmusbergpalm/deeplearntoolbox/trend.png)](https://bitdeli.com/free "Bitdeli Badge")

linux下的系统日志管理

linux下的系统日志管理 1.systemd-journald.service日志采集查看服务 指令:#journalctl 配置文件:/etc/systemd/journald.conf 默认日志存放路径:/run/log/journal日志在内存中重启会消失 常见使用: #journalctl 查看所有日志信息 #journalctl -n 5 最新5条日志信息 #journalctl ...

chitung_hsu的博客 486

老版QQ原生表情gif动态

这是老版的QQ表情,不过全是动态的的,Windows照片查看器是不会动的,可以右击用浏览器打开查看,再说一遍是老版的,只是分享给宁愿用老版也要动态的人。

上一篇: Linux系统之文件在系统中的传输
下一篇: Linux系统之网络配置
评论
成就一亿技术人!
拼手气红包6.0元
还能输入1000个字符
 
 条评论被折叠 查看
添加红包

请填写红包祝福语或标题

个

红包个数最小为10个

元

红包金额最低5元

当前余额3.43元 前往充值 >
需支付:10.00元
成就一亿技术人!
领取后你会自动成为博主和红包主的粉丝 规则
hope_wisdom
发出的红包
实付元
使用余额支付
点击重新获取
扫码支付
钱包余额 0

抵扣说明:

1.余额是钱包充值的虚拟货币,按照1:1的比例进行支付金额的抵扣。
2.余额无法直接购买下载,可以购买VIP、付费专栏及课程。

余额充值