


 本文详细介绍了Mybatis的基础知识,包括环境搭建、增删改查操作、数据查询、动态SQL、缓存机制和Spring整合等内容。通过实例演示了如何使用Mybatis进行数据库操作,同时讲解了Mybatis的配置和映射文件的编写,以及如何处理一级和二级缓存。此外,还探讨了Mybatis与Spring的集成,展示了如何在Spring中管理Mybatis的事务和DAO。
文章目录
一、Mybatis简介
Mybatis是一款经典的ORM(对象关系映射)框架, Mybatis避免 了传统JDBC操作中设置参数、手动封装结果集等冗余的操作。可以使用简单的XML或注解完成对数据库的操作。相较于其他ORM框架,Mybatis支持定制SQL, 更容易学习。
可以使用Mybatis对数据库进行CRUD操作、结果集映射、动态SQL、缓存、与Spring框架整合以及逆向工程简化开发。
二、环境搭建
1、创建maven工程
2、导入jar包
配置pom.xml
    <dependencies>
        <!-- mybatis核心包 -->
        <dependency>
            <groupId>org.mybatis</groupId>
            <artifactId>mybatis</artifactId>
            <version>3.4.1</version>
        </dependency>
        <!-- mysql驱动包 -->
        <dependency>
            <groupId>mysql</groupId>
            <artifactId>mysql-connector-java</artifactId>
            <version>5.1.29</version>
        </dependency>
        <!-- junit测试包 开发中不用导入-->
        <dependency>
            <groupId>junit</groupId>
            <artifactId>junit</artifactId>
            <version>4.11</version>
        </dependency>
        <!--日志包,方便看sql语句-->
        <dependency>
            <groupId>org.slf4j</groupId>
            <artifactId>slf4j-log4j12</artifactId>
            <version>1.6.1</version>
        </dependency>
    </dependencies>
    <build>
        <resources>
            <!--默认编译resource下的配置文件不会编译java下的,这个配置以后就会执行-->
            <resource>
                <directory>src/main/java</directory>
                <includes>
                    <include>**/*.xml</include>
                </includes>
                <filtering>true</filtering>
            </resource>
            <!--设置了编译resource下的配置文件不会再编译resource下的,默认配置需要显示写出来-->
            <resource>
                <directory>src/main/resources</directory>
                <includes>
                    <include>**/*.xml</include>
                    <include>**/*.properties</include>
                </includes>
            </resource>
        </resources>
    </build>
3、创建实体类
部门类
package pojo;
import java.util.List;

public class Dept {
    private Integer id;
    private String name;
    private List<Employee> employees;
    //getter and setter方法略
}
员工类
package pojo;
import java.util.Date;

public class Employee {
    private Integer id;//id
    private String name;//姓名
    private Dept dept;//部门
    private String job;//职位
    private Float salary;//薪水
    private Date hireDate;//入职日期
	 //getter and setter方法略
}
4、创建表
部门表并添加数据
CREATE TABLE IF NOT EXISTS dept(id INT PRIMARY KEY,name VARCHAR(30));

INSERT INTO dept VALUES(1,"产品部");
INSERT INTO dept VALUES(2,"设计部");
INSERT INTO dept VALUES(3,"开发部");
INSERT INTO dept VALUES(4,"测试部");
INSERT INTO dept VALUES(5,"运营部");
INSERT INTO dept VALUES(6,"销售部");
INSERT INTO dept VALUES(7,"财务部");
INSERT INTO dept VALUES(8,"人事部");
INSERT INTO dept VALUES(9,"行政部");
员工表并添加数据
CREATE TABLE IF NOT EXISTS employee(
id INT PRIMARY KEY,
name VARCHAR(30),
dept_id INT,
job VARCHAR(30),
salary FLOAT,
hire_date DATE,
CONSTRAINT foreign key(dept_id) references dept(id)
);

INSERT INTO employee VALUES(1,"张三",1,"产品总监",29999,"2000-01-01");
INSERT INTO employee VALUES(2,"李四",3,"开发工程师",16000,"2015-01-01");
INSERT INTO employee VALUES(3,"王五",4,"测试工程师",12000,"2016-07-01");
INSERT INTO employee VALUES(4,"赵六",6,"销售",8000,"2000-01-01");
INSERT INTO employee VALUES(5,"张三",8,"人事经理",15000,"2016-01-01");
5、创建Mapper映射文件
在dao.mapper下面创建实体类映射文件DeptMapper.xml和EmployeeMapper.xml,两个文件只是mapper节点namespace值不一样,一个工程中namespace值要唯一,通常一个Mapper文件对应一张表的增删改查,namespace可以设置成表名。
空的Mapper映射文件如下:
<?xml version="1.0" encoding="UTF-8" ?>
<!DOCTYPE mapper
        PUBLIC "-//mybatis.org//DTD Mapper 3.0//EN"
        "http://mybatis.org/dtd/mybatis-3-mapper.dtd">
<mapper namespace="DEPT">
    <!--<![CDATA[你的注释]]>-->
</mapper>
注意:Mapper文件如果要写中文注释,需要用<![CDATA[]]>将中文注释包起来,否则运行时会报编码错误。或者把工程的文件编码设置成UTF-8。
IDEA设置编码两种方式:
1)、File->Settings->Editor->File Encodings这种方式修改的文件编码方式只对当前project起作用,每次新建了一个工程后还需要重新设置编码方式。
2)、File->Other Settings->Default Settings->Editor->File Encodings,这儿设置的是默认的文件编码方式,所有新建的工程使用的都是默认的文件编码方式。
6、创建配置文件
mybatis配置文件mybatis-config.xml如下:
注意configuration中节点的位置是有先后顺序,写错了会看到提示。
<?xml version="1.0" encoding="UTF-8"?>
<!DOCTYPE configuration
        PUBLIC "-//mybatis.org//DTD Config 3.0//EN"
        "http://mybatis.org/dtd/mybatis-3-config.dtd">
<configuration>
    <typeAliases>
    <!-- 类型别名,表示可以使用 Dept 来代替 pojo.Dept -->
    <!-- 类型别名就是可以给类的全路径起一个简称 -->
    <typeAlias type="pojo.Dept" alias="Dept"/>
    <typeAlias type="pojo.Employee" alias="Employee"/>
    </typeAliases>
    <environments default="development">
        <environment id="development">
            <transactionManager type="JDBC"/>
            <dataSource type="POOLED">
                <!-- 数据库连接信息 -->
                <property name="driver" value="com.mysql.jdbc.Driver"/>
                <property name="url"
                          value="jdbc:mysql://localhost:3306/test?characterEncoding=UTF-8"/>
                <property name="username" value="root"/>
                <property name="password" value="root"/>
            </dataSource>
        </environment>
    </environments>
    <!--实体类的映射文件,在dao.mapper包下创建完Mapper文件后在此追加即可-->
    <mappers>
        <mapper resource="dao/mapper/DeptMapper.xml"/>
        <mapper resource="dao/mapper/EmployeeMapper.xml"/>
    </mappers>
</configuration>
7、添加log4j日志文件
log4j.rootLogger=DEBUG,stdout
log4j.appender.stdout=org.apache.log4j.ConsoleAppender
log4j.appender.stdout.layout=org.apache.log4j.PatternLayout
log4j.appender.stdout.layout.ConversionPattern=%d %p [%c] - %m%n

#begin
#for normal test, delete when online
log4j.logger.com.ibatis=DEBUG
1og4j.logger.com.ibatis.common.jdbc.SimpleDataSource=DEBUG
log4j.logger.com.ibatis.common.jdbc.ScriptRunner=DEBUG
1og4j.logger.com.ibatis.sqlmap.engine.impl.SqlMapClientDelegate=DEBUG
1og4j.logger.java.sql.Connection=DEBUG
1og4j.logger.java.sql.Statement=DEBUG
1og4j.logger.java.sql.PreparedStatement=DEBUG
1og4j.1ogger.java.sq1.ResultSet=DEBUG
#end
三、使用Mybatis进行增删改
使用Mybatis操作数据库,需要将SQL 写在Mapper映射文件中。sql语句封装到标签中,对应增删改查的操作,有四种标签
<insert>用于执行insert插入数据
<delete>用于执行delete删除数据
<update>用于执行update修改数据
<select>用于执行select查询数据
每个标签都有一个id属性, 在同一个Mapper文件中,每条语句的id都是唯一的,在执行语句的时候,通过namespace.id来调用语句。 sql语句中需要传入参数的时候,通过parameterType指定参数的类型,可以是基本数据类型,也可以是封装好的类或集合。通过#属性}或${属性}来得到参数值。
1、添加数据
以DEPT表为例。所有的语句都写在XXMapper.xml的节点中。 在Mybatis中,添加数据使用insert标签:
<mapper namespace="DEPT">
    <!--parameterType指定传入参数的类型-->
    <insert id="addDept" parameterType="Dept" keyProperty="id" useGeneratedKeys="true">
        insert into DEPT(name) values (#{name})
    </insert>
</mapper>
此标签对应生成的语句是: insert into DEPT (NAME) values (?)
parameterType="Dept"指定了调用语句时,传入的参数是Dept类型的,#{name}会获取到Dept对象中的name属性值,并在执行时替换掉语句中的?占位。
insert标签属性说明:
1)、 id在同一个Mapper文件中,每条语句的id都是唯一的, 在执行语句的时候,通过namespace.id来调用语句。
2) 、parameterType是指参数类型,sql语句执行的时候需要绑定参数,通常我们将参数封装到实体类中。parameterType的值可以是类的全路径如pojo.Dept,也可以是mybatis-config.xml文件中typeAlias中配置的别名alias。
3) 、keyProperty仅对insert有用,标记一个属性, MyBatis 会通过getGeneratedKeys或者通过insert 语句的selectKey 子元素设置它的值。默认:不设置。当添加完数据后, 如果想获得到刚刚添加的这条数据的主键,同时设置keyProperty和useGeneratedKeys即可。
4)、useGeneratedKeys仅对insert语句有用,告诉MyBatis使用JDBC的getGeneratedKeys方法来取出由数据(比如:像MySQL和sQLServer这样的数据库管理系统的自动递增字段)内部生成的主键。默认值: false。
测试代码:
import org.apache.ibatis.io.Resources;
import org.apache.ibatis.session.SqlSession;
import org.apache.ibatis.session.SqlSessionFactory;
import org.apache.ibatis.session.SqlSessionFactoryBuilder;
import org.junit.Test;
import pojo.Dept;

import java.io.IOException;
import java.io.Reader;

public class InsertTest {
    @Test
    public void testInsert(){
        String resource="mybatis-config.xml";//配置文件名
        Reader reader = null;//读取配置文件的工具
        SqlSession session = null;
        try {
            //使用MyBatis提供的Resources类加载配置文件
            reader = Resources.getResourceAsReader(resource);
            //创建sqlSession的工厂对象
            SqlSessionFactory sessionFactory = new SqlSessionFactoryBuilder().build(reader);
            //创建能执行映射文件中sql的sqlSession对象
            session = sessionFactory.openSession();
            //创建要insert到数据库中的实体类对象
            Dept dept = new Dept();
            dept.setName("新媒体");
            //使用session的insert方法执行添加操作
            //第一个参数是Mapper文件的namespace和语句的id
            //第二个参数的类型和语句的parameterType一致
            session.insert("DEPT.addDept",dept);
            session.commit();//增删改要提交事务
            System.out.println(dept.getId());//获取主键
        } catch (IOException e) {
            e.printStackTrace();
            session.rollback();//有异常事务回滚
        } finally {//关闭资源
            if(session!=null){
                session.close();
            }
            try {
                if (reader!=null) {
                    reader.close();
                }
            } catch (IOException e) {
                e.printStackTrace();
            }
        }
    }
}
运行结果:

为了简化代码,把打开连接和关闭连接封装到@Before和@After里
    String resource="mybatis-config.xml";//配置文件名
    Reader reader = null;//读取配置文件的工具
    SqlSession session = null;

    @Before
    public void open(){
        try {
            //使用MyBatis提供的Resources类加载配置文件
            reader = Resources.getResourceAsReader(resource);
            //创建sqlSession的工厂对象
            SqlSessionFactory sessionFactory = new SqlSessionFactoryBuilder().build(reader);
            //创建能执行映射文件中sql的sqlSession对象
            session = sessionFactory.openSession();
        } catch (IOException e) {
            e.printStackTrace();
        }
    }
    @After
    public void close(){
            if(session!=null){
                session.close();
            }
            try {
                if (reader!=null) {
                    reader.close();
                }
            } catch (IOException e) {
                e.printStackTrace();
            }
        }
简化后的测试方法
    @Test
    public void testInsert(){
        try {
            Dept dept = new Dept();
            dept.setName("研发部");
            session.insert("DEPT.addDept",dept);
            session.commit();//增删改要提交事务
            System.out.println(dept.getId());//获取主键
        } catch (Exception e) {
            e.printStackTrace();
            session.rollback();//有异常事务回滚
        }
    }
2、修改数据
    <update id="updateDept" parameterType="Dept">
        update DEPT set name=#{name} where id=#{id}
    </update>
测试代码:
    @Test
    public void testUpdate(){
        try {
            Dept dept = new Dept();
            dept.setId(13);
            dept.setName("市场部");
            int res = session.update("DEPT.updateDept", dept);
            System.out.println(res);
            session.commit();
        } catch (Exception e) {
            e.printStackTrace();
            session.rollback();
        }
    }
3、删除数据
    <delete id="deleteDept" parameterType="int">
        delete from dept where id=#{id}
    </delete>
delete根据主键查询,Dept主键 是Integer的。没有必要封装进类里,上面的语句中parameterType="int”,其中int是Integer的别名。
Mybatis默认的对基本数据类型都有起了别名。基本数据类型的参数,直接写类型或者类名小写即可。比如java.lang.Integer别名有Integer、integer、int虽然不是对象类型,但是int可以自动转化成Integer.语句中使用了#{id}获取具体的参数值,但是int类型中并没有一个叫id的属性。可是测试发现语句仍然能执行成功。所以在parameterType=”基本数据类型”的时候,可以通过#任意名称}获得参数值。这里将#{id}写成#{abc}也可以。
测试代码:
    @Test
    public void testDelete(){
        try {
            int res = session.delete("DEPT.deleteDept", 41);
            System.out.println(res);
            session.commit();
        } catch (Exception e) {
            e.printStackTrace();
            session.rollback();
        }
    }
四、Mybatis数据查询
1、直接查询
属性通过对象属性名映射到实体类,用resultType要求结果集的字段名(有别名以别名为准)和实体类的属性名一致才能映射,否则无法映射。
    <select id="getDeptList" resultType="Dept">
        select id,name from dept
    </select>
测试代码:
    @Test
    public void testGetDeptList(){
        List<Dept> Depts = session.selectList("DEPT.getDeptList");
        for(Dept dept:Depts){
            System.out.println(dept);
        }
    }
2、查询结果的映射
Mybatis通过<select>进行查询。通过<resultMap>将查询结果封装成实体类:
    <resultMap id="empMap" type="Employee">
        <!-- id是主键标签 -->
        <!--  property是类名的属性,column是类名查询出来的字段 -->
        <id property="id" column="id"/>
        <result property="name" column="name"/>
        <result property="dept.id" column="dept_id"/>
        <result property="dept.name" column="dname"/>
        <result property="job" column="job"/>
        <result property="salary" column="salary"/>
        <result property="hireDate" column="hire_Date"/>
    </resultMap>
    <select id="getEmpList" resultMap="empMap">
        select id,name,dept_id,job,salary,hire_Date from employee
    </select>
<resultMap>用于封装结果集。一个Mapper中可以有多个<resultMap>,每个<resultMap>的id是唯一-的。 type用于指定结果集对应的实体类类型。type=“Dept” 即将<resultMap>中所有的属性都对应到Dept类中。
我们可以这样理解,一个查询语句,从查询出结果,到封装成实体类,经历如下步骤:
1.当使用<select>查询出结果后,会根据<select>中resultMap="deptMap"找到id="deptMap"的<resultMap>标签
2.根据<resultMap> 的type="Dept"找到Dept对应的类,这里Dept是别名,也可以写成全路径pojo.Dept。
3. <resultMap> 中的<result>标签,将查询结果中的字段与实体类中的属性对应起来,property="name” 是找到Dept类中的name属性,column="NAME”中NAME是SQL语句中NAME字段对应的值,通过setName方法将结果集绑定到name属性上。
需要注意的是column="NAME"中的NAME不是数据库中的字段名,而是select语句中查询出来的字段别名,因为我们可以用as去给字段起别名。如上面改变上面的语句,为查询结果起别名,对应的column也要改变
测试代码:
    @Test
    public void testEmplist(){
        List<Employee> list = session.selectList("EMPLOYEE.getEmpList");
        for(Employee employee:list){
            System.out.println(employee);
        }
    }
session.selectList适用于查询结果是一个集合的情况,如果实现按主键
查询,则使用session.selectOne方法。 如按主键查询:
<select id="getDeptById" parameterType="int' resultMap= " deptMap">
select ID, NAME from DEPT where ID=#{id}
</select>
测试代码:
@Test
public void testSelectOne() {
Dept dept = session.selectOne( "DEPT. getDeptById", 21);
System.out.println( dept.getName()) ;
resultMap还支持继承:
    <resultMap id=" deptMap" type="Dept">
        <id column="ID" property="id"/>
        <result column="NAME" property="name"/>
    </resultMap>
    <resultMap id="deptMapChild" type= "Dept" extends="deptMap">
        <!--这里写新的<result>-->
    </resultMap>
当有多个<resultMap>的时候,有些属性<result>的配置可以复用,就可以使用extends进行继承,上面的示例中,deptMapChild可以使用deptMap中的配置。
3、关联查询
多对一查询
以员工EMPLOYEE为例。 多个员工同属于一个部门,所以员工对部门是多对一。
查询员工同时查询出所在部门:
    <resultMap id="empMap" type="Employee">
        <!-- id是主键标签 -->
        <!--  property是类名的属性,column是类名查询出来的字段 -->
        <id property="id" column="id"/>
        <result property="name" column="name"/>
        <result property="dept.id" column="dept_id"/>
        <result property="dept.name" column="dname"/>
        <result property="job" column="job"/>
        <result property="salary" column="salary"/>
        <result property="hireDate" column="hire_Date"/>
    </resultMap>
    <select id="getALLEmpWithDept" resultMap="empMap">
        select e.id,
        e.name,
        e.dept_id,
        e.job,
        e.salary,
        e.hire_Date,
        d.name dname
        from employee e inner join dept d on d.id=e.dept_id
    </select>
通过dept.id和dept.name这种级联的方式给Employee类中dept这个属性的id和name赋值。
测试代码:
    @Test
    public void testEmplist(){
        List<Employee> list = session.selectList("EMPLOYEE.getALLEmpWithDept");
        for(Employee employee:list){
            System.out.println(employee);
        }
    }
测试结果:
Employee{id=1, name='张三', dept=Dept{id=1, name='产品部'}, job='产品总监', salary=29999.0, hireDate=Sat Jan 01 00:00:00 CST 2000}
Employee{id=2, name='李四', dept=Dept{id=3, name='设计部'}, job='开发工程师', salary=16000.0, hireDate=Thu Jan 01 00:00:00 CST 2015}
Employee{id=3, name='王五', dept=Dept{id=4, name='开发部'}, job='测试工程师', salary=12000.0, hireDate=Fri Jul 01 00:00:00 CST 2016}
Employee{id=4, name='赵六', dept=Dept{id=6, name='测试部'}, job='销售', salary=8000.0, hireDate=Sat Jan 01 00:00:00 CST 2000}
Employee{id=5, name='张三', dept=Dept{id=8, name='运营部'}, job='人事经理', salary=15000.0, hireDate=Fri Jan 01 00:00:00 CST 2016}
结果集employeeMap也可以使用association进行优化:
    <resultMap id="empMap" type="Employee">
        <!-- id是主键标签 -->
        <!--  property是类名的属性,column是类名查询出来的字段 -->
        <id property="id" column="id"/>
        <result property="name" column="name"/>
        <result property="job" column="job"/>
        <result property="salary" column="salary"/>
        <result property="hireDate" column="hire_Date"/>
<!--    	<result property="dept.id" column="dept_id"/>
        <result property="dept.name" column="dname"/>-->
        <association property="dept" javaType="Dept">
            <id property="id" column="dept_id"/>
            <result property="name" column="dname"/>
        </association>
    </resultMap>
因为我们在DeptMapper.xml已经为Dept配置了结果集,所以上面的<association>可以通过resultMap引用其他的结果集:
<!--引用DEPT.deptMap-->
<association property="dept" resultMap="DEPT.deptMap">
</association>
一对多
一对多、多对多的配置都是通过<collection>进行的。以一对多为例,一个部门DEPT有多个员工EMPLOYEE。
查询部门的时候要查询出部门所有的员工
    <resultMap id="deptMap" type="Dept">
            <id property="id" column="did"/>
            <result property="name" column="dname"/>
            <collection property="employees" ofType="Employee">
                <id property="id" column="id"/>
                <result property="name" column="name"/>
                <result property="job" column="job"/>
                <result property="salary" column="salary"/>
                <result property="hireDate" column="hire_Date"/>
            </collection>
    </resultMap>
        <select id="getAllDeptwithEmp" resultMap="deptMap">
        select d.id did,
       d.name dname,
       e.id,
       e.name,
       e.job,
       e.salary,
       e.hire_date
        from  dept d left join employee e on d.id=e.dept_id
    </select>
<collection>也支持select属性:
    <resultMap id="deptMapWithEmployee2" type="Dept" extends=" deptMap">
        <!--collection用于映射一个集合-->
        <collection property="employees" ofType=" Employee"
                    select="EMPLOYEE.getEmpByDept" column="ID">
        </collection>
    </resultMap>
    <select id="getAllDept2" resultMap=" deptMapWi thEmployee2">
        select ID, NAME from DEPT
    </select>
<collection>的select调用了EMPLOYEE.getEmpByDept,需要提前在EmployeeMapper.xml中写好对应的语句:
    <select id="getEmpByDept" resultMap="employeeMap" parameterType= "int">
    	select ID, NAME FROM EMPLOYEE where DEPT. ID=# {deptid}
    </select>
和<association>一样,直接使用join会执行一条语句, 而在collection 中使用select,会执行n+1条。n是主表的查询结果集的条数,效率较低
五、动态SQL及SQL片段
1、if
<if test="条件">拼接的sql</if>
普通sql查询
    <select id="getDept" parameterType="Dept" resultType="Dept">
        select * from dept where id=#{id} and name=#{name}
    </select>
如果id和name两个条件要动态组合,即有时需要根据id查询,有时需要根据name查询,有时要id和name一起插查询。如果写三个语句会大大降低开发效率,增加代码冗余。如果需要动态组合的条件更多,那么开发人员将要写无数种情况的语句。这时,可以使用if标签进行动态sql的生成:
    <select id="getDept" parameterType="Dept" resultType="Dept">
        select * from dept
         where
         <if test="id!=null">id=#{id}</if>
         <if test="name!=null and name!=''">and name=#{name}</if>
    </select>
当test的条件满足的时候,<if> 标签中包含的语句会拼接到前面的sql中。
判断数值类型、日期类型不为空,可以直接使用“属性!=null"来判断。
判断字符串类型不为空,除了判断不为null意外,还要判断不等于空字符串。
以上仅仅使用if标签当id为空或id和name都为空的情况下生成的是一个不完整的sql,需要处理好and和where,此时就需要where或trim标签。
2、where
where标签可以根据条件,决定是否拼接where关键字并且能动态处理近邻where后的and或or关键字
如以上的示例加上where才是一个完整的sql:
    <select id="getDept" parameterType="Dept" resultType="Dept">
        select * from dept
         <where>
	         <if test="id!=null">id=#{id}</if>
	         <if test="name!=null and name!=''">and name=#{name}</if>
         </where>
    </select>
此时,id和name任意组合的四种查询都可以灵活组合正常查询
3、set
set标签用于update中,可以动态设置set关键字, 并且智能消除无关的逗号。
带条件的数据更新sql
    <update id="updateEmp" parameterType="Employee">
        update employee
        set
        <if test="name!=null and name!=''">name=#{name},</if>
        <if test="salary!=null">salary=#{salary}</if>
        where id=#{id}
    </update>
当name或salary为空或都为空情况下,sql中包含了“,”会导致执行报错,加上set标签可以灵活更新
    <update id="updateEmp" parameterType="Employee">
        update employee
        <set>
            <if test="name!=null and name!=''">name=#{name},</if>
            <if test="salary!=null">salary=#{salary}</if>
        </set>
        where id=#{id}
    </update>
4、trim
trim标签可以代替where和set标签
trim代替where标签示例:
    <select id="getDept" parameterType="Dept" resultType="Dept">
        select * from dept
        <trim prefix="where" prefixOverrides="and |or ">
            <if test="id!=null">id=#{id}</if>
            <if test="name!=null and name!=''">and name=#{name}</if>
        </trim>
    </select>
prefix:前缀
prefixoverride:去掉第一个and或者是or
prefix="where”是拼接where关键字,prefixOverrides="and |or ”是如果where后紧邻and或or的时候智能的去掉。注意AND和OR后面都有个空格。
使用trim代替set示例:
    <update id="updateEmp" parameterType="Employee">
        update employee
        <trim prefix="set" suffixOverrides=",">
            <if test="name!=null and name!=''">name=#{name},</if>
            <if test="salary!=null">salary=#{salary}</if>
        </trim>
        where id=#{id}
    </update>
suffix:后缀
suffixoverride:去掉最后一个逗号
5、choose,when,otherwise
三个标签要一起使用
    <select id="getDept1" parameterType="Dept" resultType="Dept">
        select * from dept
        <trim prefix="where" prefixOverrides="and |or ">
            <choose>
                <when test="id!=null">id=#{id}</when>
                <when test="name!=null and name!=''">and name=#{name}</when>
                <otherwise>id=5</otherwise>
            </choose>
        </trim>
    </select>
类似条件分支语句的switch,choose从上到下选择执行一个满足条件的when,后面的跳过,当都不满足条件执行otherwise。
6、foreach
foreach通常用在构建IN的查询条件:
    <select id="getDeptByIdList" parameterType="list" resultType="Dept">
        select * from dept
        <where>
            <if test="list!=null">
                id in
                <foreach collection="list" item="item" open="(" separator="," close=")">
                    #{item}
                </foreach>
            </if>
        </where>
    </select>
foreach用于遍历collection中指定的集合open和close指定前后拼接的字符,separator是集合元素间插入的符号。
如果parameterType类型是List,则collection=list
如果parameterType类型是ArrayList (数组), 则collection=array
如果parameterType是自定义的实体类,而类中有个集合属性,则collection=集合属性名
测试代码:
    @Test
    public void testGetDeptByIdList(){
        ArrayList<Integer> list = new ArrayList<>();
        list.add(1);
        list.add(3);
        list.add(5);
        list.add(7);
        List<Dept> depts= session.selectList("DEPT.getDeptByIdList", list);
        for (Dept d:depts){
            System.out.println(d);
        }
    }
7、bind
bind可以创建一个变量, 并绑定到上下文
    <select id="getDeptBind" parameterType="Dept" resultType="Dept">
        <bind name="param" value="'%'+name+'%'"/>
        select * from dept
         <where>
             name like #{param}
         </where>
    </select>
8、sql,include
sql标签可以把可复用的语句提取出来,通过include语句引用它。比如前面的示例中,很多地方都用到了select * from dept,可以把它提取出来:
    <sql id="deptSelect">
        select * from dept
    </sql>
    <select id="getDeptBind" parameterType="Dept" resultType="Dept">
        <bind name="param" value="'%'+name+'%'"/>
        <include refid="deptSelect"></include>
         <where>
             name like #{param}
         </where>
    </select>
六、补充
1、_parameter
在<select>标签中,parameterType传递基本数据类型的时候, 可以给参数取任意的名字,可以用#{id},#{abc}, #{xxx}都可以。
但是当使用<if>判断test条件的时候,就需要使用_parameter作为参数名,不能直接使用参数名判断,如:
    <select id="getDeptById" parameterType="int" resultType="Dept">
        select * from DEPT
        <where>
            <if test="_parameter!=null"> id=#{id}</if>
        </where>
    </select>
2、#{}和${}
#{}是将传入的值当做字符串的形式,并且有预编译功能。
${}是将传入的数据直接显示生成sql语句。
假设现在参数name的值是abc
select * from DEPT where name=#{name}
会预编译成select * from DEPT where ID=?
执行的时候给?赋值,实际执行的语句是:
select * from DEPT where name='abc'
注意’abc’外面有个引号,它是字符串形式。
select * from DEPT where name=${name}
没有预编译功能,直接生成:
select * from DEPT where name=abc
#方式能够很大程度防止sql注入,$方式无法防止Sq|注入。
$ 方式一般用于传入数据库对象,例如传入表名、列名。一般能用#的就别用$。
如果MyBatis排序时需要动态改变order by的排序字段,使用order by动态参数时需要注意,用$而不是#。ORDER BY ${columnName}。
七、分页插件PageHelper
1、手写分页
sql语句:
    <sql id="select-dept"> select * from dept </sql>

    <sql id="whereIdWithnName">
        <trim prefix="where" prefixOverrides="and |or ">
            <if test="id!=null">id=#{id}</if>
            <if test="name!=null and name!=''">
                and name like concat('%',#{name},'%')
            </if>
        </trim>
    </sql>

    <select id="getDeptListWithCriteria" parameterType="Dept" resultType="Dept">
        <include refid="select-dept"/>
        <include refid="whereIdWithnName"/>
        limit #{offset},#{pageSize}
    </select>

    <select id="getDeptCount" parameterType="Dept" resultType="int">
        select count(id) from dept
        <include refid="whereIdWithnName"/>
    </select>
便于查询,将查询偏移量直接封装进对象实体类
package pojo;
import java.util.List;

public class Dept {
    private Integer id;
    private String name;
    private List<Employee> employees;
	//分页条件
    private int offset;
    private  int pageSize;
   //以下略
测试代码:
    @Test
    public void testDeptPage(){
        Dept dept = new Dept();
//        dept.setName("部");//条件查询,不设置默认全部
        int pageSize=2;//页大小
        int pageNum =3;//当前页
        int offset =(pageNum-1)*pageSize;//查询偏移量
        int count = session.selectOne("DEPT.getDeptCount", dept);//总数量
        int total=count%pageSize==0 ? count/pageSize:count/pageSize+1;//总页数

        dept.setOffset(offset);
        dept.setPageSize(pageSize);
        List<Dept> list = session.selectList("DEPT.getDeptListWithCriteria", dept);
        System.out.println("总数量:"+count);
        System.out.println("总页数:"+total);
        System.out.println("当前页:"+pageNum);
        for(Dept d:list){
            System.out.println(d);
        }
    }
查询结果:
总数量:9
总页数:5
当前页:3
Dept{id=5, name='运营部'}
Dept{id=6, name='销售部'}
2、插件分页

mybatis中首先要在配置文件中配置一些东西, 然后根据这些配置去创建一个会话工厂,再根据会话工厂创建会话,会话发出操作数据库的sql语句,然后通过执行器操作数据,再使用mappedStatement对数据进行封装,这就是整个mybatis框架的执行情况。
mybatis的插件主要作用在Executor执行器与mappedeStatement之间,也就是说mybatis可以在插件中获得要执行的sql语句,在sql语句中添加limit语句,然后再去对sql进行封装,从而可以实现分页处理使用
PageHelper需要引入jar包:
<dependency>
    <groupId>com.github.pagehelper</groupId>
    <artifactId>pagehelper</artifactId>
    <version>4.2.1</version>
</dependency>
在mybatis-config.xml中添加插件的配置:
    <plugins>
        <!-- PageHelper4.1.1 -->
        <plugin interceptor="com.github.pagehelper.PageHelper">
            <property name="dialect" value="mysql"/><!--数据库方言-->
            <!--3.3.0版本可用一分页参数合理化,默认false禁用-->
            <!-- 启用合理化时,如果pageNum<1会查询第一 页,如果
            pageNum>pages会查询最后-一页-->
            <!--禁用合理化时,如果pageNum<1或pageNum>pages会返回空数
            据-->
            <property name="reasonable" value="false"/>
        </plugin>
    </plugins>
查询sql:
    <sql id="select-dept"> select * from dept </sql>

    <sql id="whereIdWithnName">
        <trim prefix="where" prefixOverrides="and |or ">
            <if test="id!=null">id=#{id}</if>
            <if test="name!=null and name!=''">
                and name like concat('%',#{name},'%')
            </if>
        </trim>
    </sql>

    <select id="getDeptListWithCriteria" parameterType="Dept" resultType="Dept">
        <include refid="select-dept"/>
        <include refid="whereIdWithnName"/>
    </select>
测试代码:
    @Test
    public void testPagehelper(){
        Dept dept = new Dept();
        PageHelper.startPage(5,2,"id desc");
        List<Dept> list = session.selectList("DEPT.getDeptListWithCriteria", dept);
        PageInfo<Dept> pageInfo = new PageInfo<>(list,5);
        System.out.println("总页数:"+pageInfo.getPages());
        System.out.println("总数量:"+pageInfo.getTotal());
        System.out.println("当前页:"+pageInfo.getPageNum());
        System.out.println("页大小:"+pageInfo.getPageSize());
        System.out.println("是否最后一页:"+pageInfo.isIsLastPage());
        System.out.println("导航栏:"+Arrays.toString(pageInfo.getNavigatepageNums()));
        for(Dept d:list){
            System.out.println(d);
        }
    }
测试结果:
总页数:5
总数量:9
当前页:5
页大小:2
是否最后一页:true
导航栏:[1, 2, 3, 4, 5]
Dept{id=1, name='产品部'}
八、Mybatis注解
注解只能实现简单的功能,复杂的语句还要在xml中进行。
package dao;

import org.apache.ibatis.annotations.*;
import pojo.Dept;

public interface DeptMapper {
    @Insert("insert into DEPT(name) values (#{name})")
    @Options(useGeneratedKeys = true,keyProperty = "id",keyColumn = "id")
    int insert(String name);

    @Update("update DEPT set name=#{name} where id=#{id}")
    int update(Dept dept);

    @Delete("delete from dept where id=#{id}")
    int delete(int id);

    @Select("select id,name from dept where id=#{id}")
    Dept select(int id);
}
在mybatis- config.xml中<mappers>节点加入:
<mapper class="dao.DeptMapper"/>
测试代码:
    @Test
    public void testDeptMapperInsert(){
        DeptMapper mapper = session.getMapper(DeptMapper.class);
        mapper.insert("行政部");
        session.commit();
    }
    @Test
    public void testDeptMapperUpdate(){
        DeptMapper mapper = session.getMapper(DeptMapper.class);
        Dept dept = new Dept();
        dept.setId(10);
        dept.setName("研发部");
        mapper.update(dept);
        session.commit();
    }
    @Test
    public void testDeptMapperDelete(){
        DeptMapper mapper = session.getMapper(DeptMapper.class);
        mapper.delete(10);
        session.commit();
    }
    @Test
    public void testDeptMapperSelect(){
        DeptMapper mapper = session.getMapper(DeptMapper.class);
        Dept dept = mapper.select(9);
        System.out.println(dept);
    }
九、Mybatis逆向工程
通过相应插件,自动生成MyBatis数据库连接的一些文件,如通过数据库生成实体类及相关映射文件,通过实体类生成数据库建表sql及相关映射文件。
1、mybatisgenerator
通过表生成实体类及相关映射文件
逆向工程jar包
		<!-- 逆向工程包 -->
        <dependency>
            <groupId>org.mybatis.generator</groupId>
            <artifactId>mybatis-generator-core</artifactId>
            <version>1.3.5</version>
        </dependency>
        <!-- mybatis核心包 -->
        <dependency>
            <groupId>org.mybatis</groupId>
            <artifactId>mybatis</artifactId>
            <version>3.4.1</version>
        </dependency>
        <!-- mysql驱动包 -->
        <dependency>
            <groupId>mysql</groupId>
            <artifactId>mysql-connector-java</artifactId>
            <version>5.1.29</version>
        </dependency>
创建逆向工程配置文件:
mybatis generator-config.xml,路径与resources和java同级.
<?xml version="1.0" encoding="UTF-8"?>
<!DOCTYPE generatorConfiguration
PUBLIC "-//mybatis.org//DTD MyBatis Generator Configuration 1.0//EN"
"http://mybatis.org/dtd/mybatis-generator-config_1_0.dtd" >
<generatorConfiguration>
<context id="context" targetRuntime="MyBatis3">
<commentGenerator>
<!-- 是否去除自动生成的注释 -->
<property name="suppressAllComments" value="false" />
<!--是否去除生成的注释包含时间戳-->
<property name="suppressDate" value="true" />
</commentGenerator>
<!-- 数据库链接URL、用户名、密码 -->
<jdbcConnection driverClass="com.mysql.jdbc.Driver"
connectionURL="jdbc:mysql://localhost:3306/test?characterEncoding=utf-8"
userId="root"
password="123456">
</jdbcConnection>
<!-- 默认false,把JDBC DECIMAL 和 NUMERIC 类型解析为 Integer,
为true时把JDBC DECIMAL 和 NUMERIC 类型解析为java.math.BigDecimal-->
<javaTypeResolver>
<property name="forceBigDecimals" value="false" />
</javaTypeResolver>
<!--生成实体类存放的包-->
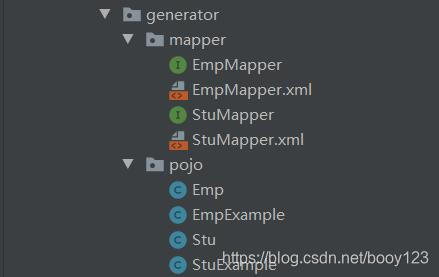
<javaModelGenerator targetPackage="generator.pojo" targetProject=".\src\main\java">
<property name="enableSubPackages" value="false"/>
<!-- 从数据库返回的值被清理前后的空格 -->
<property name="trimStrings" value="true" />
</javaModelGenerator>
<!--对应的mapper.xml文件存放的包 -->
<sqlMapGenerator targetPackage="generator.mapper" targetProject=".\src\main\java">
<property name="enableSubPackages" value="false"/>
</sqlMapGenerator>
<!-- 对应的Mapper接口生成的位置 -->
<javaClientGenerator targetPackage="generator.mapper" type="XMLMAPPER" targetProject=".\src\main\java">
<property name="enableSubPackages" value="false"/>
</javaClientGenerator>
<!-- 需要逆向生成的表 -->
<table tableName="STU"/>
<table tableName="EMP"/>
</context>
</generatorConfiguration>
逆向生成工具类:
import java.io.File;
import java.util.ArrayList;
import java.util.List;

import org.mybatis.generator.api.MyBatisGenerator;
import org.mybatis.generator.config.Configuration;
import org.mybatis.generator.config.xml.ConfigurationParser;
import org.mybatis.generator.internal.DefaultShellCallback;

public class GeneMain {
    public static void main(String[] args) throws Exception{
        List<String> warnings = new ArrayList<>();
        boolean overwrite = true;
        //指定逆向工程配置文件
        File configFile = new File("src/main/mybatis-generator-config.xml");

        ConfigurationParser cp = new ConfigurationParser(warnings);
        Configuration  config = cp.parseConfiguration(configFile);
        DefaultShellCallback callback = new DefaultShellCallback(overwrite);
        MyBatisGenerator myBatisGenerator = new MyBatisGenerator(config, callback, warnings);

        myBatisGenerator.generate(null);
        System.out.println("结束");
    }
}
执行工具类生成对应的文件
要使用执行相关操作,在mybatis-config.xml节点mappers加入<mapper resource="generator/mapper/StuMapper.xml"/>
测试代码:
    @Test
    public void testGenerator(){
        StuMapper mapper = session.getMapper(StuMapper.class);
        //创建Example对象
        StuExample stuExample = new StuExample();
        //创建criteria
        StuExample.Criteria criteria = stuExample.createCriteria();
        //添加查询条件
        criteria.andSidEqualTo("S_1001");
        List<Stu> stus = mapper.selectByExample(stuExample);
        for(Stu s:stus){
            System.out.println(s.getSname());
        }
    }
2、mybatiscodehelper
通过实体类生成建表sql及相关映射文件
安装mybatiscodehelper插件

使用方法
1、在数据库对象上使用alt+insert (generate mybatis files)来生成crud代码和建表sq|(mac上使用ctrl+N)
2、数据库对象添加字段后使用alt+insert (generate mybatis files)来生成更新sql,mapper xml中的字段
3、在mybatis接口的方法名上使用alt+ enter来生成对应的mapper sql
十、缓存
1、一级缓存
在对数据库的一次会话中,我们有可能会反复地执行完全相同的查询语句,如果不采取一些措施的话,每一次查询都会查询一次数据库,而我们在极短的时间内做了完全相同的查询,那么它们的结果极有可能完全相同,由于查询一次数据库的代价很大,这有可能造成很大的资源浪费。
MyBatis会在一次会话的表示一个SqlSession对象中创建一个本地缓存(local cache),对于每一次查询, 都会尝试根据查询的条件去本地缓存中查找是否在缓存中,如果在缓存中,就直接从缓存中取出,然后返回给用户;否则,从数据库读取数据,将查询结果存入缓存并返回给用户。
一级缓存是Mybatis自带的缓存。
如下面的测试代码:
    @Test
    public void testDeptById(){
        Dept dept = session.selectOne("DEPT.getDeptById", 5);
        Dept dept2 = session.selectOne("DEPT.getDeptById", 5);
        System.out.println(dept);
        System.out.println(dept2);
    }
控制台运行结果及日志:
同一个会话相同sql只打印了第一次的查询sql
第二次查询直接从缓存中读取

改变session会改变
    @Test
    public void testDeptById(){
        Dept dept = session.selectOne("DEPT.getDeptById", 5);
        SqlSession session2 = sessionFactory.openSession();
        Dept dept2 = session2.selectOne("DEPT.getDeptById", 5);
        System.out.println(dept);
        System.out.println(dept2);
        session2.close();
    }
控制台运行结果及日志:

同一个SqISession中,执行了任何一一个update()、insert()、 delete()或commit()后都会清空一级缓存。 下面的测试代码会查询两次:
    public void testDeptById(){
        Dept dept = session.selectOne("DEPT.getDeptById", 5);
        session.delete("DEPT.deleteDept",9);
        session.commit();
        Dept dept2 = session.selectOne("DEPT.getDeptById", 5);
        System.out.println(dept);
        System.out.println(dept2);
    }

2、二级缓存
二级缓存需要用户去设置。二级缓存比一级缓存范围更大,一级缓存是一个SqlSession范围内的,不同的SqlSession之间不共享。而二级缓存可以实现多个SqlSession之间共享对同一个Mapper的缓存。
二级缓存设置:
1)、二级缓存需要在mybatis- config.xml中设置开启:
    <settings>
        <!--开启二级缓存-->
        <setting name="cacheEnabled" value="true"/>
    </settings>
注意:<settings>节点要写在typeAliases之前,否则会报错。
2)、在需要开始二级缓存的Mapper中加入<cache>节点开启缓存。
<mapper namespace="DEPT">
    <!--开启本mapper的二级缓存-->
    <cache></cache>
3)、二级缓存要求放入缓存的pojo对象都必须实现java.io.Serializable接口:
public class Dept implements Serializable {
测试代码;
    @Test
    public void testDeptById(){
        Dept dept = session.selectOne("DEPT.getDeptById", 5);
        session.close();
        SqlSession session2 = sessionFactory.openSession();
        Dept dept2 = session2.selectOne("DEPT.getDeptById", 5);
        System.out.println(dept);
        System.out.println(dept2);
        session2.close();
    }
运行结果及日志:

<select>有useCache属性,默认是true, 使用二级缓存。设置成false禁用二级缓存。getDeptByld 增删改查的statement标签都有一个flushCache属性,默认是true,即执行后刷新缓存。一般不去改它。避免数据出现脏读。
<cache eviction='FIFO' flushInterval='60000' size='512' readOnly="true" />
这个更高级的配置创建了一个FIFO缓存,并每隔60秒刷新,存数结果对象或列表的512个引用,而且返回的对象被认为是只读的,因此在不同线程中的调用者之间修改它们会导致冲突。
可用的收回策略有:
1)、LRU- 最近最少使用的:移除最长时间不被使用的对象。
2) 、FIFO -先进先出:按对象进入缓存的顺序来移除它们。
3)、SOFT -软引用:移除基于垃圾回收器状态和软弓|用规则的对象。
4)、WEAK -弱弓|用:更积极地移除基于垃圾收集器状态和弱弓|用规则的对象
默认的是LRU。
flushInterval (刷新间隔)可以被设置为任意的正整数,而且它们代表一个合理的毫秒形式的时间段。默认情况是不设置,也就是没有刷新间隔,缓存仅仅调用语句时刷新。
size (引用数目)可以被设置为任意正整数,要记住你缓存的对象数目和你运行环境的可用内存资源数目。默认值是1024。
readOnly (只读)属性可以被设置为true或false。只读的缓存会给所有调用者返回缓存对象的相同实例。因此这些对象不能被修改。这提供了很重要的性能优势。可读写的缓存会返回缓存对象的拷贝(通过序列化)。这会慢一些,但是安全,因此默认是false。
一级缓存和二级缓存区别:
一级缓存在一个session范围内有效,Mybatis自带缓存
二级缓存是一个SqlSessionFactory针对同一个Mapper的缓存,需要手动进行配置
3、整合第三方缓存ehcache
ehcache缓存数据可以在内存和磁盘上缓存数据,无需担心容量问题。Mybatis与ehcache结合使用,可以实现多个SqISession对同一个Mapper的缓存共享。
1)、导入jar包
使用ehcache需要导入jar包,在pom.xml中加入如下配置:
<dependency>
    <groupId>net.sf.ehcache</groupId>
    <artifactId>ehcache-core</artifactId>
    <version>2.4.4</version>
</dependency>
<dependency>
    <groupId>org.mybatis.caches</groupId>
    <artifactId>mybatis-ehcache</artifactId>
    <version>1.1.0</version>
</dependency>
2)、创建ehcache配置文件
在resources目录下创建ehcache.xml文件:
<?xml version="1.0" encoding="UTF-8"?>
<ehcache xmlns:xsi="http://www.w3.org/2001/XMLSchema-instance"
         xsi:noNamespaceSchemaLocation="../bin/ehcache.xsd">
    <defaultCache overflowToDisk="true" eternal="false" />
    <!--硬盘上存放数据的位置-->
    <diskStore path="E:/tmp" />

    <cache name="DEPT" overflowToDisk="true" eternal="false"
           timeToIdleSeconds="300" timeToLiveSeconds="600"
           maxElementsInMemory="2" maxElementsOnDisk="10" diskPersistent="true"
           diskExpiryThreadIntervalSeconds="300" diskSpoolBufferSizeMB="100"
           memoryStoreEvictionPolicy="LRU"/>
</ehcache>
参数说明:
name : Cache的唯一标识, 与Mybatis结合使用时, name是Mapper的namespace
maxElementsInMemory :内存中最大缓存对象数
maxElementsOnDisk :磁盘中最大缓存对象数,若是0表示无穷大
eternal: Element 是否永久有效,一但设置了,timeout将不起作用
overflowToDisk :配置此属性,当内存中Element数量达到maxElementsInMemory时,Ehcache将 会Element写到磁盘中
timeToIdleSeconds :设置Element在失效前的允许闲置时间,指对象在多久没有被访问就会失效。仅当element不是永久有效时使用,可选属性,默认值是0,也就是可闲置时间无穷大.
timeToLiveSeconds :设置Element在失效前允许存活时间,指对象从创建到失效所需要的时间。最大时间介于创建时间和失效时间之间。仅当element不是永久有效时使用,默认是0,也就是element存活时间无穷大
diskPersistent :在磁盘上持久化,重启jvm之后数据是否有效。
diskExpiryThreadIntervalSeconds :磁盘失效线程运行时间间隔,默认是120秒,线程每隔多长时间运行一次, 检查对象状态
diskSpoolBufferSizeMB :这个参数设置DiskStore (磁盘缓存)的缓存区大小。默认是30MB。每个Cache都应该有自己的一个缓冲区
memoryStoreEvictionPolicy :当达到maxElementsInMemory限制时,Ehcache将会根据指定的策略去清理内存。默认策略是LRU (最近最少使用)。你可以设置为FIFO (先进先出)或是LFU (较少使用)。
3)、开启Mybatis二级缓存
在mybatis- config.xml中开启二级缓存:
    <settings>
        <!--开启二级缓存-->
        <setting name="cacheEnabled" value="true"/>
    </settings>
在Mapper中加入<cache>节点开启缓存。
<mapper namespace="DEPT">
    <!--开启本mapper的二级缓存-->
   <cache type="org.mybatis.caches.ehcache.EhcacheCache"></cache>
测试代码:
    @Test
    public void testCache(){
        SqlSession session1 = sessionFactory.openSession();
        Dept dept = session1.selectOne("DEPT.getDeptById", 1);
        session1.close();
        CacheManager cacheManager = CacheManager.getInstance();
        if(cacheManager.cacheExists("DEPT")){
            Cache cache = cacheManager.getCache("DEPT");
            for(Object key:cache.getKeys()){
            	//输出缓存中写入的数据
                System.out.println("遍历key:"+key);
            }
        }
        //开启新的session
        SqlSession session2 = sessionFactory.openSession();
        Dept dept2 = session2.selectOne("DEPT.getDeptById", 1);
        Dept dept3 = session2.selectOne("DEPT.getDeptById", 1);
        System.out.println(dept);
        System.out.println(dept2);
        System.out.println(dept3);
        session2.close();
    }
运行结果:

4、自定义缓存
使用GuavaCache实现- -一个简单的自定义缓存
<dependency>
    <groupId>com.google.guava</groupId>
    <artifactId>guava</artifactId>
    <version>28.2-jre</version>
</dependency>
实现代码:
package cache;

import com.google.common.cache.CacheBuilder;
import org.apache.ibatis.cache.Cache;

import java.util.concurrent.locks.ReadWriteLock;

public class MyGuavaCache implements Cache {
    private String id;
    //和接口有包名冲突,直接引入全路径,创建缓存集合
    private com.google.common.cache.Cache cache = CacheBuilder.newBuilder().build();

    public MyGuavaCache(String id) {
        this.id = id;
    }

    @Override
    public String getId() {
        return id;
    }
    //o缓存的key和value,o1缓存的key
    @Override
    public void putObject(Object o, Object o1) {
        cache.put(o,o1);
    }
    //缓存的key
    @Override
    public Object getObject(Object o) {
        System.out.println("自定义缓存,所查询的是:"+o);
        return cache.getIfPresent(o);
    }
    //删除
    @Override
    public Object removeObject(Object o) {
        Object obj = this.getObject(o);
        this.cache.invalidate(o);
        return obj;
    }
    //清除缓存
    @Override
    public void clear() {
        cache.cleanUp();
    }
    //缓存大小
    @Override
    public int getSize() {
        return (int)cache.size();
    }

    @Override
    public ReadWriteLock getReadWriteLock() {
        return null;
    }
}
在mapper文件中设置缓存的类
<cache type="cache.MyGuavaCache"/>
测试方法:
    @Test
    public void testCache(){
        SqlSession session1 = sessionFactory.openSession();
        Dept dept = session1.selectOne("DEPT.getDeptById", 1);
        session1.close();
        CacheManager cacheManager = CacheManager.getInstance();
        if(cacheManager.cacheExists("DEPT")){
            Cache cache = cacheManager.getCache("DEPT");
            System.out.println(cache.getKeys());
            for(Object key:cache.getKeys()){
                System.out.println("遍历key:"+key);
            }
        }
        //开启新的session
        SqlSession session2 = sessionFactory.openSession();
        Dept dept2 = session2.selectOne("DEPT.getDeptById", 1);
        System.out.println(dept);
        System.out.println(dept2);
        session2.close();
    }
十一、Spring和Mybatis整合
1、整合准备
1)、创建maven工程
2)、导入jar包
    <dependencies>
        <!-- mybatis核心包 -->
        <dependency>
            <groupId>org.mybatis</groupId>
            <artifactId>mybatis</artifactId>
            <version>3.4.1</version>
        </dependency>
        <!-- mysql驱动包 -->
        <dependency>
            <groupId>mysql</groupId>
            <artifactId>mysql-connector-java</artifactId>
            <version>5.1.29</version>
        </dependency>
        <!-- junit测试包-->
        <dependency>
            <groupId>junit</groupId>
            <artifactId>junit</artifactId>
            <version>4.12</version>
        </dependency>
        <!--日志包-->
        <dependency>
            <groupId>org.slf4j</groupId>
            <artifactId>slf4j-log4j12</artifactId>
            <version>1.6.1</version>
        </dependency>
        <!--spring数据库-->
        <dependency>
            <groupId>org.springframework</groupId>
            <artifactId>spring-jdbc</artifactId>
            <version>4.3.11.RELEASE</version>
        </dependency>
        <!--aop-->
        <dependency>
            <groupId>org.springframework</groupId>
            <artifactId>spring-aspects</artifactId>
            <version>4.3.11.RELEASE</version>
        </dependency>
        <!--spring核心包-->
        <dependency>
            <groupId>org.springframework</groupId>
            <artifactId>spring-context</artifactId>
            <version>4.3.11.RELEASE</version>
        </dependency>
        <!--spring-mybatis整合包-->
        <dependency>
            <groupId>org.mybatis</groupId>
            <artifactId>mybatis-spring</artifactId>
            <version>1.3.1</version>
        </dependency>
        <!--spring相关包-->
        <dependency>
            <groupId>org.springframework</groupId>
            <artifactId>spring-webmvc</artifactId>
            <version>4.3.11.RELEASE</version>
        </dependency>
    </dependencies>
    <!--配置资源文件扫描,否则Mapper-->
    <build>
        <resources>
            <resource>
                <directory>src/main/java</directory>
                <includes>
                    <include>**/*.xml</include>
                </includes>
                <filtering>true</filtering>
            </resource>
            <resource>
                <directory>src/main/resources</directory>
                <includes>
                    <include>**/*.xml</include>
                    <include>**/*.properties</include>
                </includes>
            </resource>
        </resources>
    </build>
3)、创建数据库连接信息
创建jdbc.properties
jdbc.driver=com.mysql.jdbc.Driver
jdbc.url=jdbc:mysql://localhost:3306/test?characterEncoding=utf8
jdbc.username=root
jdbc.password=123456
4)、创建日志文件
log4j.rootLogger=DEBUG,stdout
log4j.appender.stdout=org.apache.log4j.ConsoleAppender
log4j.appender.stdout.layout=org.apache.log4j.PatternLayout
log4j.appender.stdout.layout.ConversionPattern=%d %p [%c] - %m%n
#begin
#for normal test, delete when online
log4j.logger.com.ibatis=DEBUG
1og4j.logger.com.ibatis.common.jdbc.SimpleDataSource=DEBUG
log4j.logger.com.ibatis.common.jdbc.ScriptRunner=DEBUG
1og4j.logger.com.ibatis.sqlmap.engine.impl.SqlMapClientDelegate=DEBUG
1og4j.logger.java.sql.Connection=DEBUG
1og4j.logger.java.sql.Statement=DEBUG
1og4j.logger.java.sql.PreparedStatement=DEBUG
1og4j.1ogger.java.sq1.ResultSet=DEBUG
#end
5)、创建实体类和映射文件
实体类:
package com.pojo;
public class Dept {
    private Integer id;
    private String name;
    //略
映射文件DeptMapper.xml:
<?xml version="1.0" encoding="UTF-8" ?>
<!DOCTYPE mapper
        PUBLIC "-//mybatis.org//DTD Mapper 3.0//EN"
        "http://mybatis.org/dtd/mybatis-3-mapper.dtd">
<mapper namespace="DEPT">
    <select id="getDeptById"  resultType="Dept">
        select id,name from dept where id=#{id}
    </select>
</mapper>
6)、接口:
package com.dao;
import com.pojo.Dept;

public interface DeptDao {
    Dept getDeptById(Integer id);
}
2、开始整合
1)、spring- mybatis整合
在spring与mybatis整合示例中,spring负责管理数据源、加载mybatis配置文件、mybatis的session和事务。
<?xml version="1.0" encoding="UTF-8"?>
<beans xmlns="http://www.springframework.org/schema/beans"
       xmlns:xsi="http://www.w3.org/2001/XMLSchema-instance"
       xmlns:context="http://www.springframework.org/schema/context"
       xsi:schemaLocation=" http://www.springframework.org/schema/beans
       http://www.springframework.org/schema/beans/spring-beans-4.2.xsd
       http://www.springframework.org/schema/context
       http://www.springframework.org/schema/context/spring-context-4.2.xsd">
	<!--数据源管理-->
    <context:property-placeholder location="jdbc.properties" ignore-unresolvable="true"/>
    <bean class="org.springframework.jdbc.datasource.DriverManagerDataSource">
        <property name="driverClassName" value="${jdbc.driver}"/>
        <property name="url" value="${jdbc.url}"/>
        <property name="username" value="${jdbc.username}"/>
        <property name="password" value="${jdbc.password}"/>
    </bean>
</beans>
spring中mybatis的配置文件,省略mybatis.xml
    <!--管理session工厂-->
    <bean id="sessionFactory" class="org.mybatis.spring.SqlSessionFactoryBean">
        <!--指定数据源-->
        <property name="dataSource" ref="dataSource"/>
        <!--扫描pojo包,给包下所有pojo对象起别名-->
        <property name="typeAliasesPackage" value="com.pojo"/>
        <property name="mapperLocations" value="classpath:com/dao/mapper/*.xml"/>
        >
<!--        配置PageHelper插件,此处略
        <property name="plugins">
            <array>
                <bean class="com.github.pagehelper.PageHelper">
                    <property name="properties">
                        <value>
                            dialect=mysql
                            reasonable=true
                        </value>
                    </property>
                </bean>
            </array>
        </property>-->
    </bean>
2)、dao的基本整合
编写DeptDAO的实现类:
package com.dao;

import com.pojo.Dept;
import org.mybatis.spring.support.SqlSessionDaoSupport;

public class DeptDaoImpl extends SqlSessionDaoSupport implements DeptDao {
    @Override
    public Dept getDeptById(Integer id) {
        return super.getSqlSession().selectOne("DEPT.getDeptById",id);
    }
}
DAO继承了spring的SqlSessionDaoSupport, SqlSessionDaoSupport中注入sessionFactory,负责管理session。
声明DeptDAO的bean
	<bean id="deptDao" class="com.dao.DeptDaoImpl">
        <property name="sqlSessionFactory" ref="sessionFactory" />
    </bean>
测试代码:
    ApplicationContext applicationContext = new ClassPathXmlApplicationContext("spring-config.xml");
    @Test
    public void testGetDeptById(){
        DeptDao deptDao = (DeptDao)applicationContext.getBean("deptDao");
        Dept dept = deptDao.getDeptById(1);
        System.out.println(dept);
    }
面向接口的整合:
mybatis的dao可以没有实现类,只写接口,要求对应的Mapper映射文件的namespace是接口的全路径。接口中方法名与sql语句的id一致。
接口DeptDao:
package com.dao;

import com.pojo.Dept;

public interface DeptDao {
    Dept getDeptById(Integer id);
}
映射文件:
<?xml version="1.0" encoding="UTF-8" ?>
<!DOCTYPE mapper
        PUBLIC "-//mybatis.org//DTD Mapper 3.0//EN"
        "http://mybatis.org/dtd/mybatis-3-mapper.dtd">
<!--注意namespace和接口全路径一致-->
<mapper namespace="com.dao.DeptDao">
    <!--注意语句id和接口方法名一致-->
    <select id="getDeptById"  resultType="Dept">
        select id,name from dept where id=#{id}
    </select>
</mapper>
spring中配置bean:
	<!--面向接口的整合,deptDao接口没有实现类-->
    <!--自动扫描 将Mapper接口生成代理注入到Spring-->
    <bean id="deptDao" class="org.mybatis.spring.mapper.MapperFactoryBean">
        <property name="sqlSessionFactory" ref="sessionFactory"/>
        <property name="mapperInterface" value="com.dao.DeptDao"/>
    </bean>
测试代码:
    ApplicationContext applicationContext = new ClassPathXmlApplicationContext("spring-config.xml");
    @Test
    public void testGetDeptById(){
        DeptDao deptDao = (DeptDao)applicationContext.getBean("deptDao");
        Dept dept = deptDao.getDeptById(1);
        System.out.println(dept);
    }
简化配置:
Mybatis的接口可以没有实现类,当接口很多的时候,可以统一扫描,不需要每个接口都声明一个bean:
    <!--扫描接口包路径,生成包下所有接口的代理对象,并且放入spring容器中-->
    <bean class="org.mybatis.spring.mapper.MapperScannerConfigurer">
        <property name="basePackage" value="com.dao" />
    </bean>
注释掉deptDao的bean,运行测试代码一样可以成功。
简化: 当DAO的接口和Mapper映射文件在一 个文件夹下,且命名一致的时候:
接口:deptDao
映射文件:deptDao.xml
映射文件和接口的命名一样,只是文件拓展名不同,配置了上面的MapperScannerConfigurer后,可以省略sqISessionFactory中配置文件的路径:
    <!--管理session工厂-->
    <bean id="sessionFactory" class="org.mybatis.spring.SqlSessionFactoryBean">
        <!--指定数据源-->
        <property name="dataSource" ref="dataSource"/>
        <!--扫描pojo包,给包下所有pojo对象起别名-->
        <property name="typeAliasesPackage" value="com.pojo"/>
        <!--如果映射文件和接口在一个包下,并且命名一致,可以不用写这句-->
       <!-- <property name="mapperLocations" value="classpath:com/dao/mapper/*.xml"/>-->
        >
3)、事务
mybatis事务是自动提交的
添加数据sql
    <insert id="addDept" parameterType="Dept" keyProperty="id" useGeneratedKeys="true">
        insert into dept(name) values(#{name})
    </insert>
添加addDept接口方法
package com.dao;
import com.pojo.Dept;

public interface DeptDao {
    Dept getDeptById(Integer id);

    int addDept(Dept dept);
}
测试方法:
import com.dao.DeptDao;
import com.pojo.Dept;
import org.junit.Test;
import org.springframework.context.ApplicationContext;
import org.springframework.context.support.ClassPathXmlApplicationContext;

public class SpringMybatisTest {
    ApplicationContext applicationContext = new ClassPathXmlApplicationContext("spring-config.xml");
    @Test
    public void testGetDeptById(){
        DeptDao deptDao = (DeptDao)applicationContext.getBean("deptDao");
        Dept dept = new Dept();
        dept.setName("研发部");
        deptService.addDept(dept);
        System.out.println(dept);
    }
}
当需要执行多条语句时,可以在service里执行多条语句
在spring直接new出来的dao不好用,因为需要spring管理生成代理类和session工厂,在spring里是进行注入的
spring配置文件
    <!--扫描指定包,如果一个类带了@Service注解,将自动注册到Spring容器,不需要再在定义bean了-->
    <context:component-scan base-package="com.service" >
   		<!--指定扫描的是Service注解-->
        <context:include-filter type="annotation" expression="org.springframework.stereotype.Service"/>
    </context:component-scan>
直接创建service实现类
package com.service;

import com.dao.DeptDao;
import com.pojo.Dept;
import org.springframework.beans.factory.annotation.Autowired;
import org.springframework.stereotype.Service;
//Service标识会自动生成一个bean
@Service
public class DeptService {
// 从自己的容器里找到对应的dao对属性进行赋值
    @Autowired
    private DeptDao deptDao;

    public void addDept(Dept dept){
        deptDao.addDept(dept);
        deptDao.addDept(dept);
    }
}
测试代码:
import com.dao.DeptDao;
import com.pojo.Dept;
import com.service.DeptService;
import org.junit.Test;
import org.springframework.context.ApplicationContext;
import org.springframework.context.support.ClassPathXmlApplicationContext;

public class SpringMybatisTest {
    ApplicationContext applicationContext = new ClassPathXmlApplicationContext("spring-config.xml");
    @Test
    public void testGetDept(){
        DeptService deptService = applicationContext.getBean(DeptService.class);
        Dept dept = new Dept();
        dept.setName("市场部");
        deptService.addDept(dept);
        System.out.println(dept);
    }
}
4)、aop
当事务异常时,提交失败回滚处理
service抛出手动异常
package com.service;

import com.dao.DeptDao;
import com.pojo.Dept;
import org.springframework.beans.factory.annotation.Autowired;
import org.springframework.stereotype.Service;

//Service标识会自动生成一个bean
@Service
public class DeptService {
// 从自己的容器里找到对应的dao对属性进行赋值
    @Autowired
    private DeptDao deptDao;

    public void addDept(Dept dept) throws Exception{
        deptDao.addDept(dept);
        deptDao.addDept(dept);
        throw new Exception("这是一个手动异常");
    }
}
spring配置:
    <!-- 事务管理器-->
    <bean id="transactionManager" class="org.springframework.jdbc.datasource.DataSourceTransactionManager">
        <property name="dataSource" ref="dataSource"/>
    </bean>
    <!--定义事务规则-->
    <tx:advice id="txAdvice" transaction-manager="transactionManager">
    <!--对方法的增强-->
        <tx:attributes>
            <!--有异常时回滚事务-->
            <tx:method name="add*" rollback-for="Exception"/>
            <tx:method name="update*" rollback-for="Exception"/>
            <tx:method name="delete*" rollback-for="Exception"/>
            <tx:method name="get*" read-only="true"/>
        </tx:attributes>
    </tx:advice>
    <!--配置aop切入点-->
    <aop:config>
        <aop:pointcut id="point" expression="execution(* com.service..*(..))"/>
        <aop:advisor advice-ref="txAdvice" pointcut-ref="point"/>
    </aop:config>
测试代码:
import com.pojo.Dept;
import com.service.DeptService;
import org.junit.Test;
import org.springframework.context.ApplicationContext;
import org.springframework.context.support.ClassPathXmlApplicationContext;

public class SpringMybatisTest {
    ApplicationContext applicationContext = new ClassPathXmlApplicationContext("spring-config.xml");
    @Test
    public void testGetDeptById(){
        DeptService deptService = applicationContext.getBean(DeptService.class);
        Dept dept = new Dept();
        dept.setName("酱油部");
        try {
            deptService.addDept(dept);
            System.out.println(dept);
        } catch (Exception e) {
            e.printStackTrace();
        }
    }
}
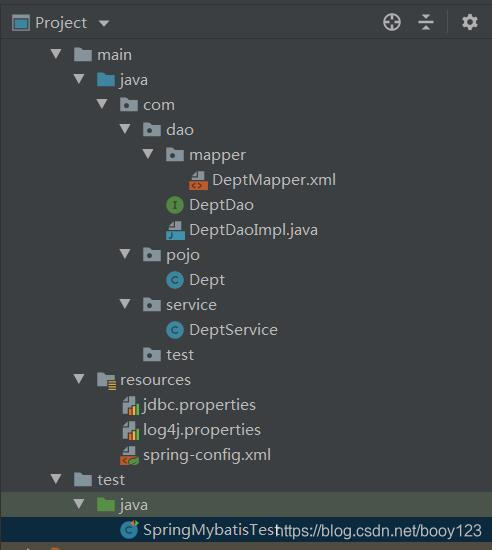
3、整合后文件清单
项目文件结构(DeptDaoImpl全被注释,忽略):
1)、pom文件不变
2)、dao层
deptDao接口:
package com.dao;

import com.pojo.Dept;

public interface DeptDao {
    Dept getDeptById(Integer id);

    int addDept(Dept dept);
}
DeptMapper.xml
<?xml version="1.0" encoding="UTF-8" ?>
<!DOCTYPE mapper
        PUBLIC "-//mybatis.org//DTD Mapper 3.0//EN"
        "http://mybatis.org/dtd/mybatis-3-mapper.dtd">
<!--注意namespace和接口全路径一致-->
<mapper namespace="com.dao.DeptDao">
    <!--注意语句id和接口方法名一致-->
    <select id="getDeptById"  resultType="Dept">
        select id,name from dept where id=#{id}
    </select>
    <insert id="addDept" parameterType="Dept" keyProperty="id" useGeneratedKeys="true">
        insert into dept(name) values(#{name})
    </insert>
</mapper>
3)、pojo包
Dept实体类:
package com.pojo;

public class Dept {
    private Integer id;
    private String name;
    //略
4)、service包
DeptService业务类:
package com.service;

import com.dao.DeptDao;
import com.pojo.Dept;
import org.springframework.beans.factory.annotation.Autowired;
import org.springframework.stereotype.Service;

//Service标识会自动生成一个bean
@Service
public class DeptService {
// 从自己的容器里找到对应的dao对属性进行赋值
    @Autowired
    private DeptDao deptDao;

    public void addDept(Dept dept) throws Exception{
        deptDao.addDept(dept);
        deptDao.addDept(dept);
        throw new Exception("这是一个手动异常");
    }
}
5)、resources包
jdbc.properties
jdbc.driver=com.mysql.jdbc.Driver
jdbc.url=jdbc:mysql://localhost:3306/test?characterEncoding=utf8
jdbc.username=root
jdbc.password=123456
log4j.properties
log4j.rootLogger=DEBUG,stdout
log4j.appender.stdout=org.apache.log4j.ConsoleAppender
log4j.appender.stdout.layout=org.apache.log4j.PatternLayout
log4j.appender.stdout.layout.ConversionPattern=%d %p [%c] - %m%n
#begin
#for normal test, delete when online
log4j.logger.com.ibatis=DEBUG
1og4j.logger.com.ibatis.common.jdbc.SimpleDataSource=DEBUG
log4j.logger.com.ibatis.common.jdbc.ScriptRunner=DEBUG
1og4j.logger.com.ibatis.sqlmap.engine.impl.SqlMapClientDelegate=DEBUG
1og4j.logger.java.sql.Connection=DEBUG
1og4j.logger.java.sql.Statement=DEBUG
1og4j.logger.java.sql.PreparedStatement=DEBUG
1og4j.1ogger.java.sq1.ResultSet=DEBUG
#end
spring-config.xml
<?xml version="1.0" encoding="UTF-8"?>
<beans xmlns="http://www.springframework.org/schema/beans"
       xmlns:xsi="http://www.w3.org/2001/XMLSchema-instance"
       xmlns:context="http://www.springframework.org/schema/context" xmlns:tx="http://www.springframework.org/schema/tx"
       xmlns:aop="http://www.springframework.org/schema/aop"
       xsi:schemaLocation="http://www.springframework.org/schema/beans
       http://www.springframework.org/schema/beans/spring-beans-4.2.xsd
       http://www.springframework.org/schema/context
       http://www.springframework.org/schema/context/spring-context-4.2.xsd http://www.springframework.org/schema/tx http://www.springframework.org/schema/tx/spring-tx.xsd http://www.springframework.org/schema/aop http://www.springframework.org/schema/aop/spring-aop.xsd">
    <!--数据源管理-->
    <context:property-placeholder location="jdbc.properties" ignore-unresolvable="true"/>
    <bean id="dataSource" class="org.springframework.jdbc.datasource.DriverManagerDataSource">
        <property name="driverClassName" value="${jdbc.driver}"/>
        <property name="url" value="${jdbc.url}"/>
        <property name="username" value="${jdbc.username}"/>
        <property name="password" value="${jdbc.password}"/>
    </bean>
    <!--管理session工厂-->
    <bean id="sessionFactory" class="org.mybatis.spring.SqlSessionFactoryBean">
        <!--指定数据源-->
        <property name="dataSource" ref="dataSource"/>
        <!--扫描pojo包,给包下所有pojo对象起别名-->
        <property name="typeAliasesPackage" value="com.pojo"/>
        <property name="mapperLocations" value="classpath:com/dao/mapper/*.xml"/>
    </bean>
<!--    <bean id="deptDao" class="com.dao.DeptDaoImpl">
        <property name="sqlSessionFactory" ref="sessionFactory" />
    </bean>-->
    <!--自动扫描 将Mapper接口生成代理注入到Spring-->
    <!--<bean id="deptDao" class="org.mybatis.spring.mapper.MapperFactoryBean">
        <property name="sqlSessionFactory" ref="sessionFactory"/>
        <property name="mapperInterface" value="com.dao.DeptDao"/>
    </bean>-->
    <!--扫描接口包路径,生成包下所有接口的代理对象,并且放入spring容器中-->
    <bean class="org.mybatis.spring.mapper.MapperScannerConfigurer">
        <property name="basePackage" value="com.dao" />
    </bean>
    <!--扫描指定包-->
    <context:component-scan base-package="com.service" >
    <!--指定扫描的是Service注解-->
        <context:include-filter type="annotation" expression="org.springframework.stereotype.Service"/>
    </context:component-scan>
    <!-- 事务管理器-->
    <bean id="transactionManager" class="org.springframework.jdbc.datasource.DataSourceTransactionManager">
        <property name="dataSource" ref="dataSource"/>
    </bean>
    <!--定义事务规则-->
    <tx:advice id="txAdvice" transaction-manager="transactionManager">
    <!--对方法的增强-->
        <tx:attributes>
            <!--有异常时回滚事务-->
            <tx:method name="add*" rollback-for="Exception"/>
            <tx:method name="update*" rollback-for="Exception"/>
            <tx:method name="delete*" rollback-for="Exception"/>
            <tx:method name="get*" read-only="true"/>
        </tx:attributes>
    </tx:advice>
    <!--配置aop切入点-->
    <aop:config>
        <aop:pointcut id="point" expression="execution(* com.service..*(..))"/>
        <aop:advisor advice-ref="txAdvice" pointcut-ref="point"/>
    </aop:config>
</beans>
6)、测试类:
import com.dao.DeptDao;
import com.pojo.Dept;
import com.service.DeptService;
import org.junit.Test;
import org.springframework.context.ApplicationContext;
import org.springframework.context.support.ClassPathXmlApplicationContext;

public class SpringMybatisTest {
    ApplicationContext applicationContext = new ClassPathXmlApplicationContext("spring-config.xml");
    @Test
    public void testGetDeptById(){
        DeptDao deptDao = (DeptDao)applicationContext.getBean("deptDao");
        Dept dept = deptDao.getDeptById(1);
        System.out.println(dept);
    }
    @Test
    public void testAddDept(){
        DeptService deptService = applicationContext.getBean(DeptService.class);
        Dept dept = new Dept();
        dept.setName("市场部");
        try {
            deptService.addDept(dept);
            System.out.println(dept);
        } catch (Exception e) {
            e.printStackTrace();
        }
    }
}


 1433
1433

 被折叠的 条评论
为什么被折叠?
被折叠的 条评论
为什么被折叠?
 到【灌水乐园】发言


