


 本文详细介绍了Java中的线程概念,包括线程模型、线程的创建(继承Thread、实现Runnable、Callable)、线程状态、线程同步(锁的使用、synchronized与Lock的区别)、线程协作(生产者消费者问题)以及线程池的工作原理和状态。还探讨了Lambda表达式在创建线程中的应用,展示了如何通过静态代理模式理解线程的运行机制。
文章目录
线程
线程是调度CPU的最小单元,也叫轻量级进程LWP
两种线程模型
- 用户级线程ULT:由用户程序创建、同步、调度、管理,不依赖于操作系统核心
- 直接由应用程序管理,不需要从
用户态到内核态的切换,速度快 - 内核对ULT无感知
- 直接由应用程序管理,不需要从
- 内核级线程KLT:由操作系统创建、调度、管理,内核保存线程的状态和上下文信息.
JVM使用的线程模型是KLT

Java线程的创建依赖于系统内核,通过JVM调用系统库创建内核线程,内核线程与Java-Thread是1:1映射
继承Thread创建线程
利用这个方法下载网络资源
下载网络资源需要导入commons-iojar包
public class ThreadFileDownload extends Thread{
    private String url;
    private String fileName;

    public ThreadFileDownload(String url, String fileName) {
        this.url = url;
        this.fileName = fileName;
    }

    @Override
    public void run() {
        new WebDownloader().downloader(this.url, this.fileName);
        System.out.println(fileName+ "下载完成");
    }

    public static void main(String[] args) {
        ThreadFileDownload t1 = new ThreadFileDownload(
                "https://timgsa.baidu.com/timg?image&quality=80&size=b9999_10000&sec=1584871360382&di=c92d66ef9b5e1ad56f9afe314ff88082&imgtype=0&src=http%3A%2F%2Fonline.sccnn.com%2Fimg2%2F371%2Fcreatures_deep_under_the_sea_047.jpg",
                "fish1.jpg");
        ThreadFileDownload t2 = new ThreadFileDownload(
                "https://timgsa.baidu.com/timg?image&quality=80&size=b9999_10000&sec=1584871360382&di=c92d66ef9b5e1ad56f9afe314ff88082&imgtype=0&src=http%3A%2F%2Fonline.sccnn.com%2Fimg2%2F371%2Fcreatures_deep_under_the_sea_047.jpg",
                "fish2.jpg");
        ThreadFileDownload t3 =  new ThreadFileDownload(
                "https://timgsa.baidu.com/timg?image&quality=80&size=b9999_10000&sec=1584871360382&di=c92d66ef9b5e1ad56f9afe314ff88082&imgtype=0&src=http%3A%2F%2Fonline.sccnn.com%2Fimg2%2F371%2Fcreatures_deep_under_the_sea_047.jpg",
                "fish3.jpg");

        t1.start();
        t2.start();
        t3.start();
    }
}

class WebDownloader{
    //下载方法
    public void downloader(String url, String fileName){
        try {
            FileUtils.copyURLToFile(new URL(url), new File(fileName));
        } catch (IOException e) {
            e.printStackTrace();
        }
    }
}
new Thread实例,直接启动这个Thread
实现Runnable方法创建线程
public class RunableDemo implements Runnable {

    private String url;
    private String fileName;

    public RunableDemo(String url, String fileName) {
        this.url = url;
        this.fileName = fileName;
    }

    @Override
    public void run() {
        new WebDownloader().downloader(url, fileName);
        System.out.println(fileName + "下载完成");
    }

    public static void main(String[] args) {
        RunableDemo r1 = new RunableDemo("https://timgsa.baidu.com/timg?image&quality=80&size=b9999_10000&sec=1584871360382&di=c92d66ef9b5e1ad56f9afe314ff88082&imgtype=0&src=http%3A%2F%2Fonline.sccnn.com%2Fimg2%2F371%2Fcreatures_deep_under_the_sea_047.jpg",
                "runnableFisher1.jpg");
        RunableDemo r2 = new RunableDemo("https://timgsa.baidu.com/timg?image&quality=80&size=b9999_10000&sec=1584871360382&di=c92d66ef9b5e1ad56f9afe314ff88082&imgtype=0&src=http%3A%2F%2Fonline.sccnn.com%2Fimg2%2F371%2Fcreatures_deep_under_the_sea_047.jpg",
                "runnableFisher2.jpg");
        RunableDemo r3 = new RunableDemo("https://timgsa.baidu.com/timg?image&quality=80&size=b9999_10000&sec=1584871360382&di=c92d66ef9b5e1ad56f9afe314ff88082&imgtype=0&src=http%3A%2F%2Fonline.sccnn.com%2Fimg2%2F371%2Fcreatures_deep_under_the_sea_047.jpg",
                "runnableFisher3.jpg");

        new Thread(r1).start();
        new Thread(r2).start();
        new Thread(r3).start();
    }
}
跟继承Thread相似,只是在开启线程时需要创建Tread,将Runnabel传入Thread构造器中
然后再启动Thread
线程模拟龟兔赛跑
public class Race implements Runnable{
    String winner;

    @Override
    public void run() {
        for (int i = 0; i <= 1000; i++) {
            if ("兔子".equals(Thread.currentThread().getName()) && i%10 == 0){
                try {
                    Thread.sleep(10);
                } catch (InterruptedException e) {
                    e.printStackTrace();
                }
            }

            if (hasWinner(i)){
                break;
            }
            System.out.println(Thread.currentThread().getName() + "跑了" + i + "步");
        }
    }

    private boolean hasWinner(int i){
        if (winner != null){
            return true;
        }
        if (i >= 100){
            winner = Thread.currentThread().getName();
            System.out.println(winner + "赢了");
            return true;
        }
        return false;
    }

    public static void main(String[] args) {
        Race r = new Race();
        new Thread(r, "乌龟").start();
        new Thread(r, "兔子").start();
    }

}
实现Callbale创建线程
public class CallableDemo implements Callable<Boolean> {
    private String url;
    private String fileName;

    public CallableDemo(String url, String fileName) {
        this.url = url;
        this.fileName = fileName;
    }

    @Override
    public Boolean call() throws Exception {
        new WebDownloader().downloader(url, fileName);
        System.out.println(fileName + "下载完成");
        return false;
    }

    public static void main(String[] args) throws ExecutionException, InterruptedException {
        CallableDemo c1 = new CallableDemo("https://timgsa.baidu.com/timg?image&quality=80&size=b9999_10000&sec=1584871360382&di=c92d66ef9b5e1ad56f9afe314ff88082&imgtype=0&src=http%3A%2F%2Fonline.sccnn.com%2Fimg2%2F371%2Fcreatures_deep_under_the_sea_047.jpg",
                "callableFish1.jpg");
        CallableDemo c2 = new CallableDemo("https://timgsa.baidu.com/timg?image&quality=80&size=b9999_10000&sec=1584871360382&di=c92d66ef9b5e1ad56f9afe314ff88082&imgtype=0&src=http%3A%2F%2Fonline.sccnn.com%2Fimg2%2F371%2Fcreatures_deep_under_the_sea_047.jpg",
                "callableFish2.jpg");
        CallableDemo c3 = new CallableDemo("https://timgsa.baidu.com/timg?image&quality=80&size=b9999_10000&sec=1584871360382&di=c92d66ef9b5e1ad56f9afe314ff88082&imgtype=0&src=http%3A%2F%2Fonline.sccnn.com%2Fimg2%2F371%2Fcreatures_deep_under_the_sea_047.jpg",
                "callableFish3.jpg");


        //创建执行服务
        ExecutorService ser = Executors.newFixedThreadPool(3);
        //提交执行
        Future<Boolean> r1 = ser.submit(c1);
        Future<Boolean> r2 = ser.submit(c2);
        Future<Boolean> r3 = ser.submit(c3);

        //获取结果
        boolean rs1 = r1.get();
        boolean rs2 = r2.get();
        boolean rs3 = r3.get();

        //关闭服务
        ser.shutdown();

    }
}
静态代理模式
以结婚与婚庆公司为例,当你结婚时,你去寻找婚庆公司,婚庆公司会为你办理关于结婚的一切琐碎的事物,这时,你只需要做结婚这一个动作。
public class StaticProxy {
    public static void main(String[] args) {
        new WeddingCompany(new You()).happyMarry();
    }
}

interface Marry{
    void happyMarry();
}

class You implements Marry{

    @Override
    public void happyMarry() {
        System.out.println("I will marry");
    }
}

class WeddingCompany implements Marry{
    private Marry target;

    public WeddingCompany(Marry target) {
        this.target = target;
    }

    @Override
    public void happyMarry() {
        before();
        target.happyMarry();
        end();
    }

    private void end() {
        System.out.println("you should pay for wedding company");
    }

    private void before() {
        System.out.println("do everything which before you marry");
    }
}
代理模式的好处是让被代理者专注于自己应该做的事,一些通用的操作,代理者为你设计好。
Thread就是一种静态代理模式,
new Thread(new Runnable()).start()Thread实现了Runnable接口,在run()方法中调用受代理者的run()方法。
这让Runnable接口的实现类专注于线程逻辑的开发,而不必考虑其他必要的操作。
Lambda表达式
函数式接口
任何一个接口,如果只包含唯一一个抽象方法,那他就是一个函数式接口。
Lambda表达式
只有函数式接口才可以使用Lambda表达式。
new Thread(()->{
            System.out.println("running");
        }).start();
等同于
new Thread(new Runnable() {
            @Override
            public void run() {
                System.out.println("running");
            }
        }).start();
Lambda表达式就是匿名内部类的简写,在jdk1.8之后出现
Lambda表达式的简化
public class LambdaDemo {
    public static void main(String[] args) {

        //Lambda表达式
        Love l = (String name) -> {
            System.out.println(name + " is my lover");
        };

        //简化类型
        Love l2 = (name) -> {
            System.out.println(name + " is my beloved");
        };

        //简化括号
        Love l3 = name -> {
            System.out.println(name + " is my wife");
        };

        l.myLove("倩");
        l2.myLove("倩倩");
        l3.myLove("倩宝宝");
    }

}

interface Love{
    void myLove(String name);
}
线程休眠
每一个线程对象都有一把锁,sleep不会释放锁
利用sleep方法打印时间
public class TimeDemo {
    public static void main(String[] args) {
        Date time = new Date(System.currentTimeMillis());
        while (true) {
            try {
                Thread.sleep(1000);
                System.out.println(new SimpleDateFormat("HH:mm:ss").format(time));
                time = new Date(System.currentTimeMillis());
            } catch (InterruptedException e) {
                e.printStackTrace();
            }

        }
    }
}
线程礼让
一个线程正在执行时,让CPU重新调度线程,礼让不一定成功
通过Thread.yield()方法礼让
public class YieldDemo {
    public static void main(String[] args) {
        new Thread(new MyTield(), "a").start();
        new Thread(new MyTield(), "b").start();
    }
}

class MyTield implements Runnable {
    @Override
    public void run() {
        System.out.println(Thread.currentThread().getName() + "---begin");
        Thread.yield();
        System.out.println(Thread.currentThread().getName() + "---end");
    }
}
线程状态
- 线程有5个状态
- 新生
- 就绪
- 执行
- 阻塞
- 死亡
线程一旦进入死亡状态九不能再次启动
public class StateDemo {
    public static void main(String[] args) {
        Thread t = new Thread(() -> {
            for (int i = 0; i < 5; i++) {
                try {
                    Thread.sleep(100);
                } catch (InterruptedException e) {
                    e.printStackTrace();
                }
            }
        });

        //观察状态
        Thread.State state = t.getState();
        System.out.println(state);

        //启动进程
        t.start();
        state = t.getState();
        System.out.println(state);

        while (state != Thread.State.TERMINATED) {
            try {
                Thread.sleep(100);
                state = t.getState();
                System.out.println(state);
            } catch (InterruptedException e) {
                e.printStackTrace();
            }

        }
    }
}
守护线程
public class DeamonDemo {
	public static void main(String[] args) {
		Thread t1 = new Thread(new God());
		t1.setDaemon(true);

		t1.start();

		new Thread(new You()).start();
	}

}

class God implements Runnable{

	@Override
	public void run() {
		// TODO Auto-generated method stub
		while (true) {
			System.out.println("I am here my children");
		}
	}

}


class You implements Runnable{

	@Override
	public void run() {
		// TODO Auto-generated method stub
		for (int i = 0; i < 20000; i++) {
			System.out.println("I am living");
		}
		System.out.println("I dead");
	}

}
只要线程使用
Thread.setDaemon(true);这个线程就变成了守护线程
并发问题
多个线程操作一个资源,会导致线程不安全
线程同步
- 锁:synchronized
- 当一个线程获得对象的排他锁,他就会独占资源,其他线程必须等待。
- 锁的问题
- 一个线程持有锁会导致其他需要此锁的线程挂起
- 在多线程竞争下,加锁和释放锁会导致较多的上下文切换和调度切换,影响性能
- 如果一个优先级高的线程等待优先级低的线程释放锁,会导致优先级倒置,影响性能
线程不安全的例子
账户取钱
public class UnsafeDemo {
	public static void main(String[] args) {
		Account account = new Account(100,"基金");

		Drawing youDrawing = new Drawing(account, 50, "I");
		Drawing wifeDrawing = new Drawing(account, 100, "mywife");

		youDrawing.start();
		wifeDrawing.start();
	}
}

//账户
class Account{
	int mony;
	String name;

	public Account(int mony, String name){
		this.mony = mony;
		this.name = name;
	}
}

//取钱线程
class Drawing extends Thread{
	Account account;
	int drawingMony;
	int nowMony;

	public Drawing(Account account, int drawingMony,String name){
		super(name);
		this.account = account;
		this.drawingMony = drawingMony;
	}

	@Override
	public void run() {
		if (account.mony - drawingMony < 0) {
			System.out.println(Thread.currentThread().getName() + "钱不够了");
			return;
		}

		try {
			Thread.sleep(1000);
		} catch (InterruptedException e) {
			// TODO Auto-generated catch block
			e.printStackTrace();
		}

		account.mony = account.mony - drawingMony;
		nowMony = nowMony + drawingMony;

		System.out.println(account.name + "余额" + account.mony);
		System.out.println(this.getName() + "手里的钱"+ nowMony);
	}

}
买票
public class BuyTicketDemo {
	public static void main(String[] args) {
		BuyTicket station = new BuyTicket();

		new Thread(station, "you").start();
		new Thread(station, "me").start();
		new Thread(station, "she").start();
	}
}


class BuyTicket implements Runnable{
	private int ticketNums = 10;
	boolean hasTicket = true;//外部停止方法

	@Override
	public void run() {
		while (hasTicket) {
			try {
				buy();
			} catch (InterruptedException e) {
				// TODO Auto-generated catch block
				e.printStackTrace();
			}
		}
	}

	private void buy() throws InterruptedException{
		if (ticketNums <= 0) {
			hasTicket = false;
			return;
		}

		Thread.sleep(100);
		System.out.println(Thread.currentThread().getName() + "买了票" + ticketNums--);
	}

}
锁的使用
使用synchronized
- 方法中需要修改的内容才需要锁,只读的内容本身就是安全的,锁太多会浪费资源
同步方法
在上述买票的实例中,可以将buy()方法加上锁,构成同步方法
private synchronized void buy() throws InterruptedException{
		if (ticketNums <= 0) {
			hasTicket = false;
			return;
		}

		Thread.sleep(100);
		System.out.println(Thread.currentThread().getName() + "买了票" + ticketNums--);
	}
同步代码块
在上述取钱实例中,可以给account设置锁,构成同步代码块
@Override
	public void run() {
		synchronized (account) {
			if (account.mony - drawingMony < 0) {
				System.out.println(Thread.currentThread().getName() + "钱不够了");
				return;
			}

			try {
				Thread.sleep(1000);
			} catch (InterruptedException e) {
				// TODO Auto-generated catch block
				e.printStackTrace();
			}

			account.mony = account.mony - drawingMony;
			nowMony = nowMony + drawingMony;

			System.out.println(account.name + "余额" + account.mony);
			System.out.println(this.getName() + "手里的钱"+ nowMony);
		}
	}
锁需要锁变化的量
synchronized默认锁的是this.
使用Lock上锁
public class LockDemo {
	public static void main(String[] args) {
		MyLock ml = new MyLock();

		new Thread(ml).start();
		new Thread(ml).start();
		new Thread(ml).start();
	}
}

class MyLock implements Runnable{

	int ticketNums = 10;

	private final ReentrantLock lock = new ReentrantLock();//定义Lock

	@Override
	public void run() {
		while(true){
			try {
				lock.lock();//加锁
				if (ticketNums < 0) {
					break;
				}
				try {
					Thread.sleep(100);
				} catch (InterruptedException e) {
					e.printStackTrace();
				}
				System.out.println(ticketNums--);
			} finally{
				lock.unlock();//释放锁
			}
		}
	}

}
private final ReentrantLock lock = new ReentrantLock();定义Lock
lock.lock();上锁
lock.unlock();释放锁
synchronized与Lock区别
- Lock是显式锁,需要手动开启和关闭锁,synchronized是隐式锁,出作用域后自行关闭
- Lock只能锁代码块,synchronized可以锁代码块和方法
- Lock性能更好
线程协作
生产者消费者问题
管程法解决生产者消费者问题
public class PCDemo {
	public static void main(String[] args) {
		SynContainer synContainer = new SynContainer();

		new Productor(synContainer).start();
		new Consumer(synContainer).start();
	}
}

// 生产者
class Productor extends Thread {
	SynContainer container;

	public Productor(SynContainer container) {
		this.container = container;
	}

	@Override
	public void run() {
		for (int i = 0; i < 100; i++) {
			Chicken chicken = new Chicken(i);
			container.push(chicken);
			System.out.println("生产" + i + "鸡");
		}
	}
}

// 消费者
class Consumer extends Thread {
	SynContainer container;

	public Consumer(SynContainer container) {
		this.container = container;
	}

	@Override
	public void run() {
		for (int i = 0; i < 100; i++) {
			Chicken chicken = container.pop();
			System.out.println("消费" + chicken.num + "鸡");
		}
	}
}

// 产品
class Chicken {
	int num;

	public Chicken(int num) {
		this.num = num;
	}
}

// 缓冲区
class SynContainer {
	// 容器
	Chicken[] chickens = new Chicken[10];
	// 容器计数器
	int counte = 0;

	// 生产者生产
	public synchronized void push(Chicken chicken) {
		if (counte >= this.chickens.length) {
			// 生产者等待
			try {
				this.wait();
			} catch (InterruptedException e) {
				e.printStackTrace();
			}
		}

		// 生产产品
		chickens[counte] = chicken;
		counte++;

		//唤醒消费者线程
		this.notifyAll();
	}

	// 消费者消费
	public synchronized Chicken pop() {
		if (counte <= 0) {
			// 消费者等待
			try {
				this.wait();
			} catch (InterruptedException e) {
				e.printStackTrace();
			}
		}

		counte--;

		//唤醒生产者线程生产
		this.notifyAll();
		return chickens[counte];

	}
}
wait()线程等待
notifyAll()线程唤醒
这两个方法都是在Object中
信号灯法解决生产者消费者问题
public class SignalLamp {
	public static void main(String[] args) {
		Mark mark = new Mark();
		new Productor2(mark).start();
		new Consumer2(mark).start();
	}

}

class Productor2 extends Thread {
	Mark mark;

	public Productor2(Mark mark) {
		this.mark = mark;
	}

	@Override
	public void run() {
		for (int i = 0; i < 100; i++) {
			mark.produce("生产" + i);
		}
	}
}

class Consumer2 extends Thread {
	Mark mark;

	public Consumer2(Mark mark) {
		this.mark = mark;
	}

	@Override
	public void run() {
		for (int i = 0; i < 100; i++) {
			mark.consume("消费" + i);
		}
	}
}

class Mark {
	String todo;
	boolean flag = true;// T生产,F消费

	// 生产
	public synchronized void produce(String todo) {
		if (!flag) {
			try {
				this.wait();
			} catch (InterruptedException e) {
				e.printStackTrace();
			}
		}
		this.todo = todo;
		System.out.println(todo);
		// 通知消费者消费
		this.flag = !this.flag;
		this.notifyAll();

	}

	public synchronized void consume(String todo) {
		if (flag) {
			try {
				this.wait();
			} catch (InterruptedException e) {
				e.printStackTrace();
			}
		}

		this.todo = todo;
		System.out.println(todo);
		// 通知生产者生产
		this.flag = !this.flag;
		this.notifyAll();

	}
}
线程池
提前创建多个线程放入线程池中,使用时直接获取,用完放回池中
public class PoolDemo {
	public static void main(String[] args) {
		//创建线程池
		ExecutorService service = Executors.newFixedThreadPool(10);//10为线程池大小

		//执行
		service.execute(new MyThread());
		service.execute(new MyThread());
		service.execute(new MyThread());
		service.execute(new MyThread());

		//关闭连接
		service.shutdown();

	}
}

class MyThread implements Runnable{

	@Override
	public void run() {
		System.out.println(Thread.currentThread().getName());
	}

}
ExecutorService service = Executors.newFixedThreadPool(10);创建线程池
void execute(Runnable command)执行任务,没有返回值,用来执行Runnable
<T> Future<T> submit(Callable<T> task)执行任务,有返回值,执行Callable
void shutdown()关闭连接
线程池原理
线程池是一个线程缓存,负责对线程进行统一分配 调优 监控
线程池的工作场景
- 单任务处理时间比较短
- 需要处理的任务数量大
阻塞队列
- 在任意时刻,不管并发有多高,永远只有一个线程能够入队和出队(线程是安全的)
- 队列满时,只能进行出队操作,入队等待
- 队列空时,只能进行入队操作,出队等待
线程池中线程执行顺序

线程先放入
核心线程(corePool)中核心线程放满,进入
阻塞队列(BlockingQueue)中阻塞队列放满,进入
非核心线程中非核心线程放满,触发拒绝策略,将 线程暂时返还给主线程
线程池5中状态
- Running:能够接收新任务,可以处理已添加任务
- Shutdown:不能接收新任务,可以处理已添加任务
- Stop:不接收新任务,不处理已添加任务,中断正在处理的任务
- Tidying:所有任务已经终止,
- Terminated:线程池彻底终止
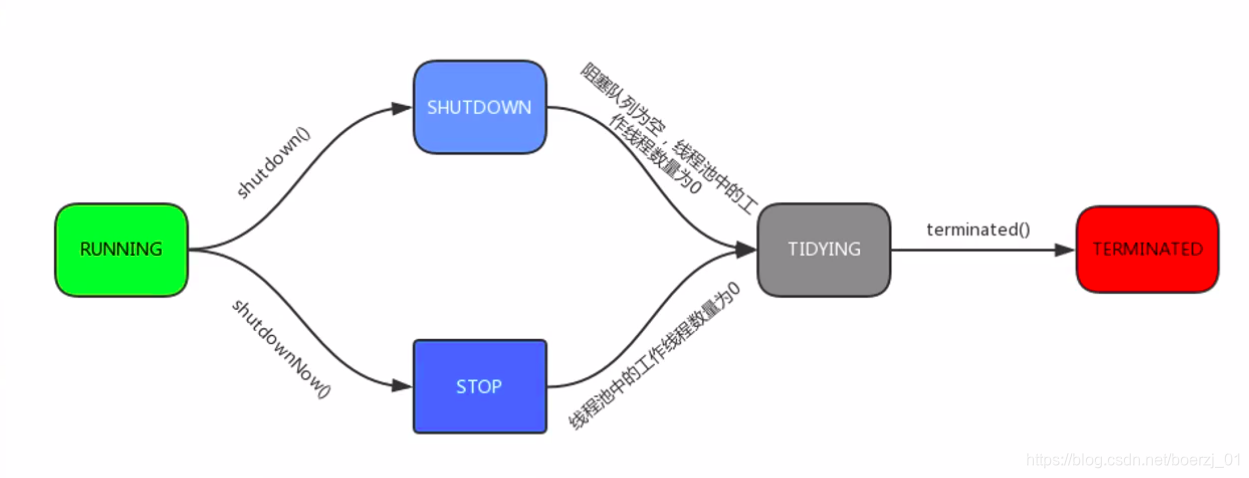
shutdown():不接收新任务,但队列中的任务可以执行完
shutdownNow():不接收新任务,所有正在执行的任务进入一个安全点中断,队列中的任务页不再执行


 被折叠的 条评论
为什么被折叠?
被折叠的 条评论
为什么被折叠?
 到【灌水乐园】发言


