


 本文介绍了SSH远程连接协议,包括公钥交换过程、OpenSSH服务端配置以及最佳安全实践。讨论了如何通过公钥认证实现免交互登录,强调了限制登录验证方式、设置连接白名单和使用密钥对增强安全性的重要性。
目录
ssh 远程连接加密协议
-
是一种安全通道协议
-
对通信数据进行加密、压缩
服务名:sshd
主程序:/usr/sbin/sshd
telnet 远程协议
-
明文协议、无压缩
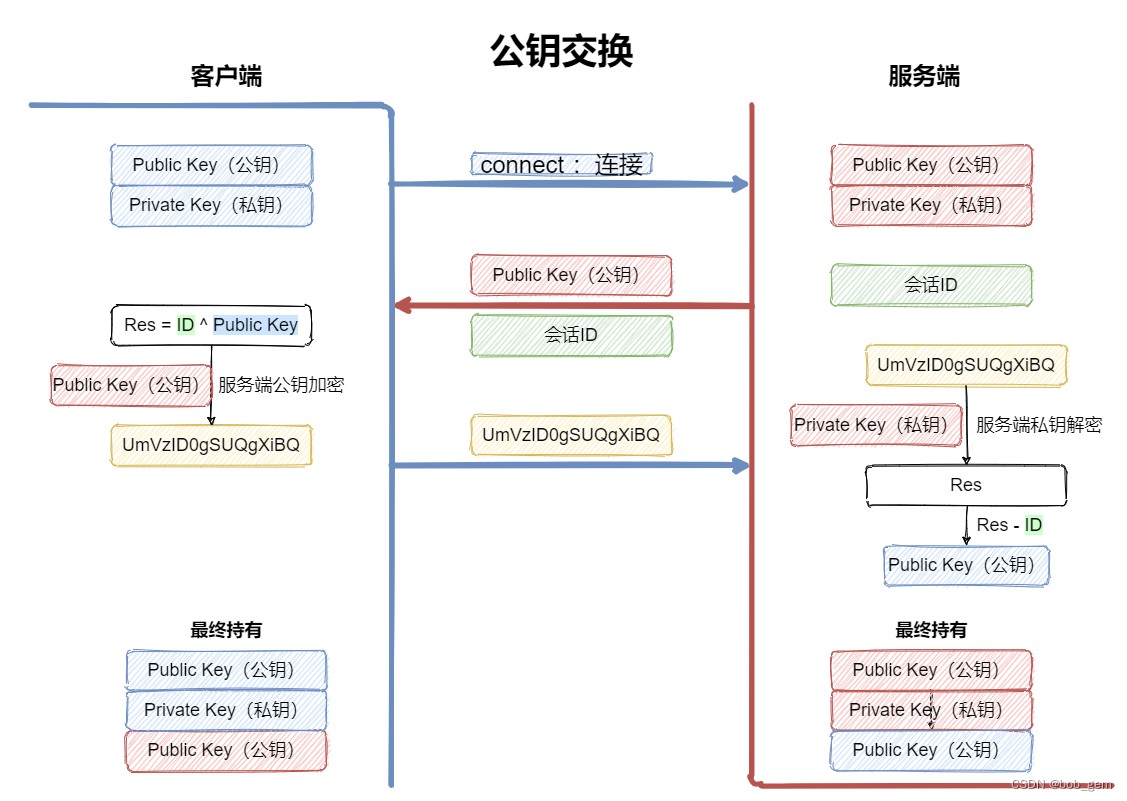
首次链接时的公钥交换
-
客户端首次发起连接——>服务端会生成一个随机会话ID——>将服务端ID及公钥发送给客户端
-
客户端收到会话ID及公钥——>用客户端公钥及ID做运算——>产生结果,用服务端公钥加密——>将加密结果发送给服务端
-
服务端收到加密结果后,用用自己的私钥解密——>得到客户端的公钥及会话ID的运算结果——>当已知会话ID,可算出客户端的公钥
-
交换结束,双方将持有对方的公钥
语法:
ssh [选项] [远程主机名] [远程ip地址] -p [端口号]
[选项]:
-
-l:指定登录名称
-
-o:
-
-p:指定登录端口(当服务端的端口非默认时,需要使用-p 指定端口进行登录)
-
-t
远程登录
方法一:
客户端命令
ssh [远程主机用户名]@[远程服务器或IP] -p 端口号
#端口号默认为22,若远程登录的主机不是默认端口,则用-p指定端口号
例:
[root@localhost test1]#ssh test2@192.168.190.130
#端口号默认为22
The authenticity of host '192.168.190.130 (192.168.190.130)' can't be established.
ECDSA key fingerprint is SHA256:Mpx5RZQuqO7YXXHJ8OiMUlG7ijpUvyNTd+TtMNZo6TY.
#Mpx5RZQuqO7YXXHJ8OiMUlG7ijpUvyNTd+TtMNZo6TY:主机的密钥
ECDSA key fingerprint is MD5:11:0b:92:29:c2:0d:ff:ec:34:1d:76:f4:04:c4:90:92.
#11:0b:92:29:c2:0d:ff:ec:34:1d:76:f4:04:c4:90:92:主机的
Are you sure you want to continue connecting (yes/no)? yes
Warning: Permanently added '192.168.190.130' (ECDSA) to the list of known hosts.
test2@192.168.190.130's password:
Last login: Tue Nov 14 18:16:31 2023
[test2@localhost ~]$ su
密码:
[root@localhost test2]#
服务端命令
[root@localhost test2]#
远程连接时每次询问是否确认
可以在客户端取消确认选项
[root@localhost test1]#vim know_hosts
······
StrictHostKeyChecking no
#将ask询问改为no,并取消注释
修改远程登录的端口号
[root@localhost test1]#vim /etc/ssh/ssh_config
#手动添加
······
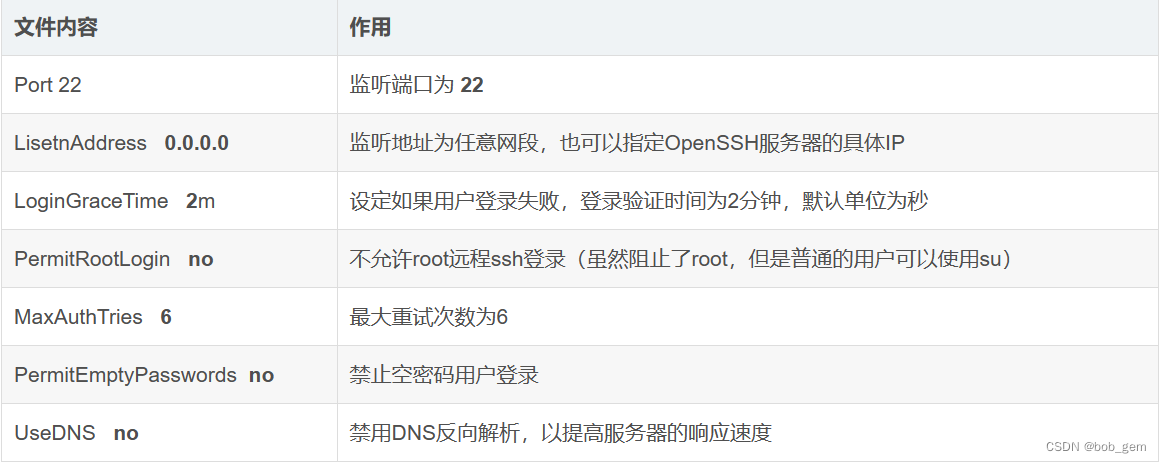
Port 22
#取消注释,端口号默认22,可以修改
······
[root@localhost test1]#systemctl restart sshd
#重启远程服务
远程连接时确认连接IP是否是自己想连的主机
可以用 ssh 本机ip 查看自己的公钥,是否在远程连接时显示一致
当设备损坏,更换设备,IP地址不变时,再次连接远程设备,会连接失败,此时可以将自己的公钥刷新
ssh服务的最佳实践
1.建议使用非默认端口22
2.禁止使用protocol version 1
3.限制可登录用户,白名单
4设定空闲会话超时时长
5.利用防火墙设置ssh访问策略
6.仅监听特定的IP地址公网内网
7.基于口令认证时,使用强密码策略,比如: tr -dc A-Za-z0-9_</dev/urandom |head -c 12 xargs
8使用基于密钥的认证
9.禁止使用空密码
10.禁止root用户直接登录
11限制ssh的访问频度和并发在线数
12.经常分析日志分离
13、禁用反向DNS解析
OpenSSH服务端配置
sshd_ config配置文件的常用选项设置
vim /etc/ssh/sshd_config
sshd 服务支持登录验证方式
—— 密码验证
以服务器中本地系统用户的登录名称、密码进行验证。这种方式使用最为简便,但从客户机角度来看,正在连接的服务器有可能被假冒,从服务器角度来看,当遭遇密码暴力破解攻击时防御能力比较弱。
—— 密钥对验证
要求提供相匹配的密钥信息才能通过验证,通常先在客户机中创建一对密钥文件(公钥和私钥),然后将公钥文件放到服务器中的指定位置,远程登录时,系统将使用公钥、私钥进行加密/解密关联验证,增强了远程管理的安全性
—— 公钥和私钥是成对生成的,这两个密钥互不相同,可以互相加密和解密
—— 不能根据一个密码来推算出另一个密钥
—— 公钥对外公开,私钥只有私钥的持有人才知道
设置连接白名单及黑名单
[root@localhost test1]#vim /etc/ssh/ssh_config
······
PermitRootLogin no
#取消注释,并将yes改为no,禁止登录root用户

[root@localhost test1]#systemctl restart sshd
#此时客户端依旧可以登录,需要修改模块
[root@localhost test1]#vim /etc/pam.d/su
#%PAM-1.0
auth            sufficient      pam_rootok.so
# Uncomment the following line to implicitly trust users in the "wheel" group.
#auth           sufficient      pam_wheel.so trust use_uid
# Uncomment the following line to require a user to be in the "wheel" group.
auth           required        pam_wheel.so use_uid
#开启第六行,取消注释,默认生效

[root@localhost test1]#id test1
uid=1000(test1) gid=1000(test1) 组=1000(test1)
#查看用户是否处于wheel组,root和wheel用户可以使用su
#如果用户处于wheel组,使用gpasswd -d test1 wheel将用户从wheel组中删除

[root@localhost test2]#ssh test1@192.168.190.129
test1@192.168.190.130's password:
Last login: Thu Nov 15 20:25:40 2023
[test1@localhost ~]$
[test1@localhost ~]$ su root
密码:
su: 拒绝权限
[test1@localhost ~]$


白名单:默认拒绝所有用户,加入才可登录
黑名单:默认允许所有用户,加入才可禁止

[root@localhost test1]#vim /etc/ssh/ssh_config
#手动添加
白名单:
AllowUsers test2@192.168.190.130 test1
#默认拒绝所有
#允许所有主机登录本机的test1用户
#只允许从192.168.190.130上访问test2用户

黑名单:
DenyUsers test2@192.168.190.130 test1
#默认允许所有
#禁止登录本机test1用户
#禁止192.168.190.130主机登录test2用户
使用密钥对及免交互验证登录
原理: 用户/密码
1.在客户端生成密钥和私钥
ssh-keygen
2.选择位置,默认在家目录下的.ssh(回车即默认)
3.设置打开这个文件的密码,默认没有密码(回车即默认)
4.进入家目录下的公钥文件
cd.ssh
5.将公钥文件上传至对方服务器
ssh-copy-id -i ~/.ssh/id_rsa.pub 对方服务器地址(默认考给root)
6.到对方服务器 测试是否成功
ssh 对方服务器的ip地址
-
cd .ssh/
查看密钥cat authorized_key是否上传成功
如何实现免交互登录:
在服务器里重新来一遍到客户端的配置,和客户端一样顺序
[root@localhost test1]#ssh-keygen
Generating public/private rsa key pair.
Enter file in which to save the key (/root/.ssh/id_rsa):
#密钥的保存路径,root用户默认保存在家目录下,一般不修改
Enter passphrase (empty for no passphrase):
#设置密钥保存文件的密码,可以不设置
Enter same passphrase again:
#确认密码
Your identification has been saved in /root/.ssh/id_rsa.
Your public key has been saved in /root/.ssh/id_rsa.pub.
The key fingerprint is:
SHA256:urq+CvRWS/tV1CdTPGE46FIEi+yw/ixfhEgJjpYRb+E root@localhost.localdomain
The key's randomart image is:
#生成的密钥,使用SHA256
+---[RSA 2048]----+
| o.o     .o.. o+.|
|  B o o . .o.ooo |
| + E + o .o. +...|
|. . . = ....  +  |
| .   = oS...     |
|. . + o.. .      |
|.  o +.  o       |
| ..  .+.o        |
|  .o=++=         |
+----[SHA256]-----+

[root@localhost test1]#cd .ssh/
[root@localhost .ssh]#ls
id_rsa  id_rsa.pub
#生成的密钥文件
[root@localhost .ssh]#ssh-copy-id -i ~/.ssh/id_rsa.pub 192.168.190.130
#将家目录下,隐藏文件ssh的密钥文件传输给192.168.190.130主机
/usr/bin/ssh-copy-id: INFO: Source of key(s) to be installed: "/root/.ssh/id_rsa.pub"
/usr/bin/ssh-copy-id: INFO: attempting to log in with the new key(s), to filter out any that are already installed
/usr/bin/ssh-copy-id: INFO: 1 key(s) remain to be installed -- if you are prompted now it is to install the new keys
root@192.168.190.130's password:

Number of key(s) added: 1

Now try logging into the machine, with:   "ssh '192.168.190.130'"
and check to make sure that only the key(s) you wanted were added.

[root@localhost .ssh]# ssh 192.168.190.130
Last login: Thu Nov 16 16:16:11 2023 from 192.168.190.1
[root@localhost ~]#

以上操作只能test1连接test2时免密,相互登录时需要再test2上重新操作
也可以使用脚本,方便操作


 2159
2159

 被折叠的 条评论
为什么被折叠?
被折叠的 条评论
为什么被折叠?
 到【灌水乐园】发言


