


韩顺平家具项目:
1.先创建Maven环境以及配置Tomcat,以及项目一些目录: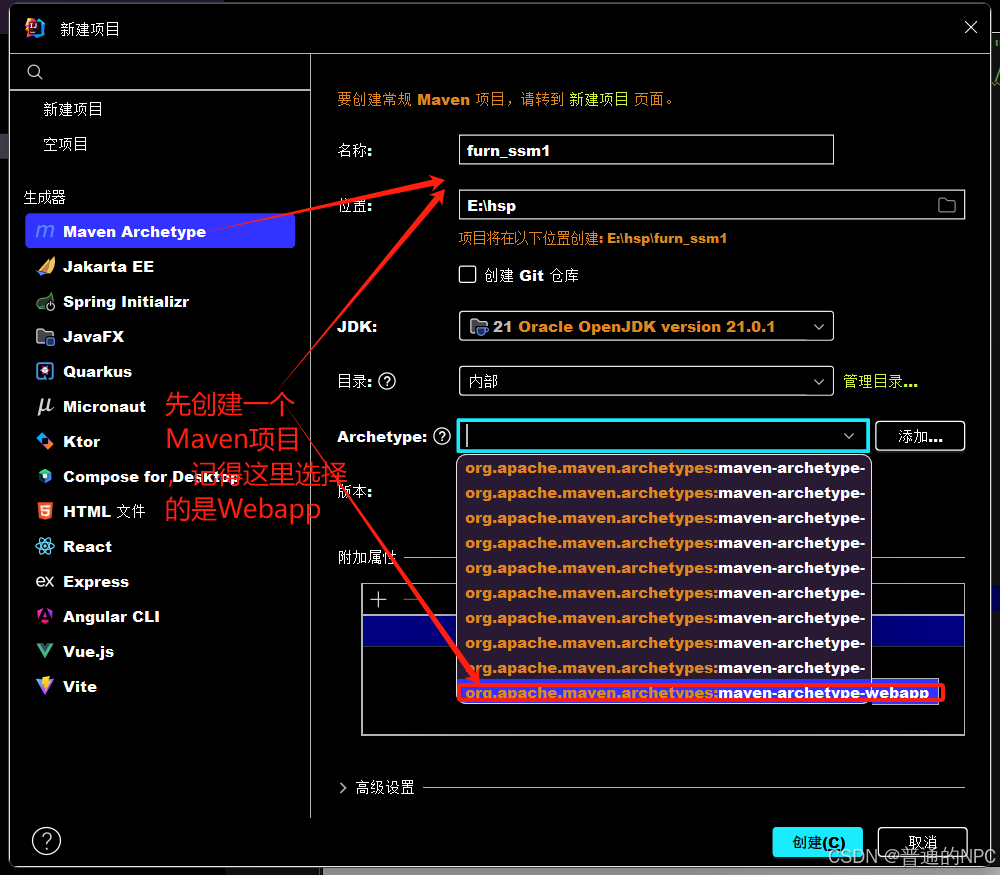
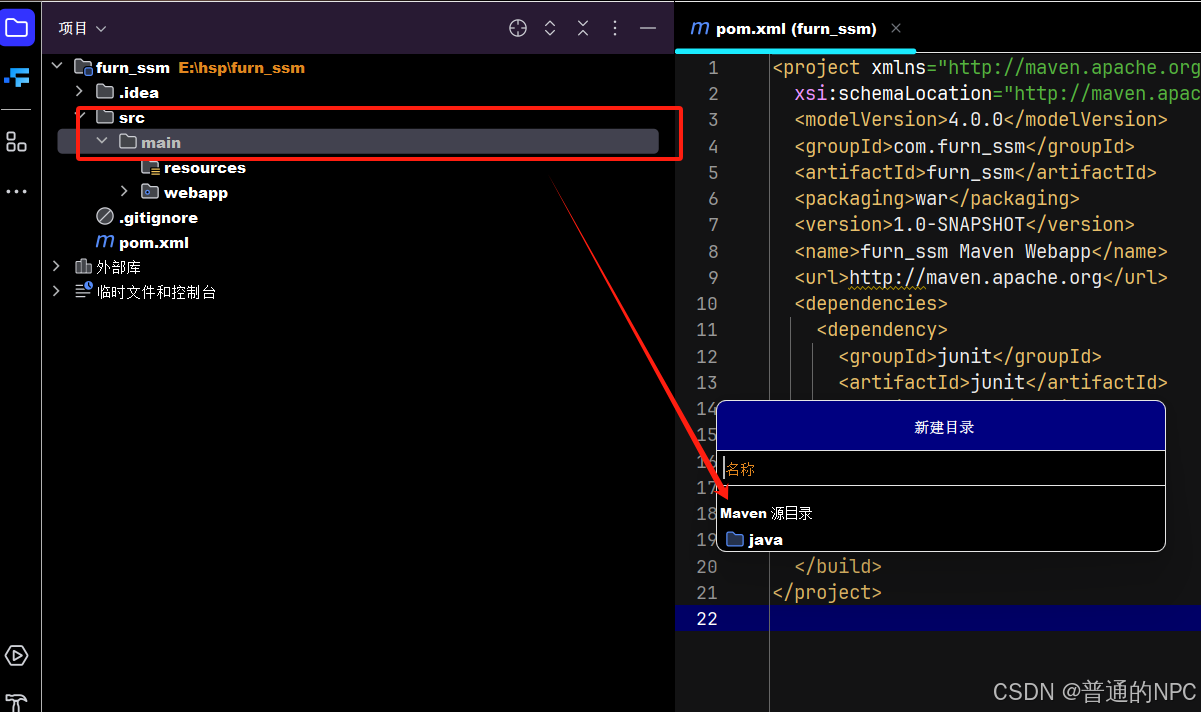
1.1在main目录下面创建两个目录,一个是Java目录一个是对应的Resources目录:
1.2创建与main目录同级的test目录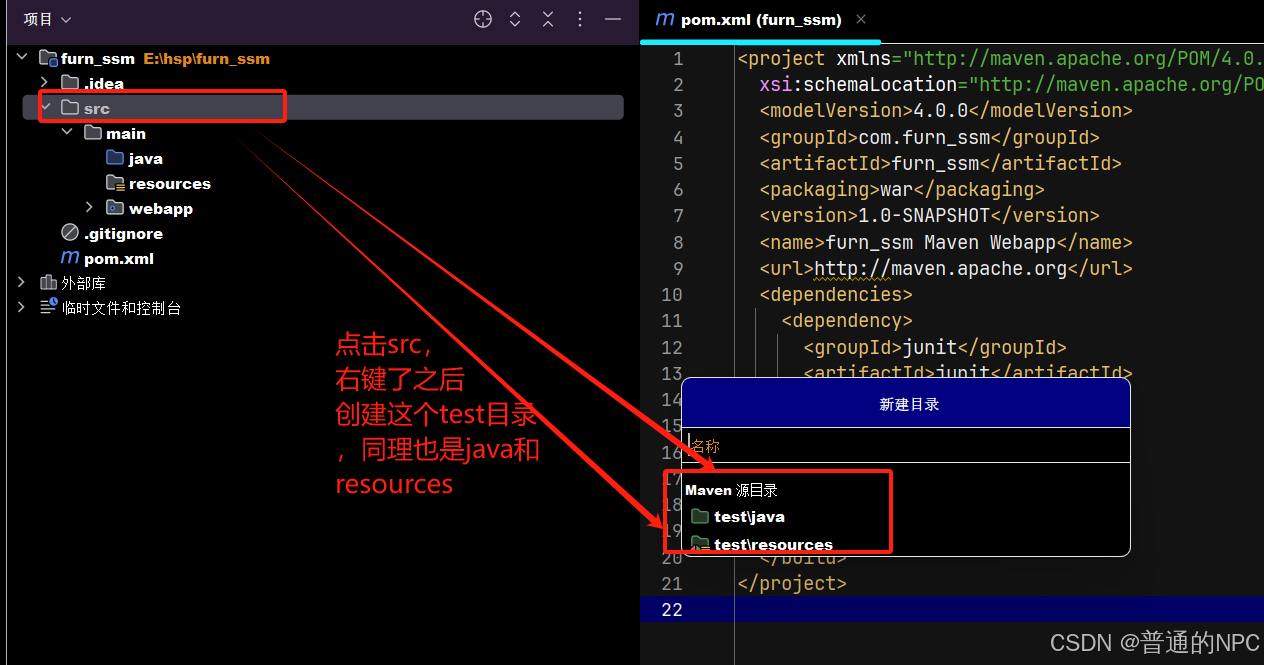
1.3然后引入相关的jar包,这里先引入基本包比如:引入springmvc的依赖,以及springmvc-JDBC的依赖,引入spring aspects 切面编程需要的库/jar--引入mybatis的依赖,引入Druid依赖,引入MySQL驱动:
<project xmlns="http://maven.apache.org/POM/4.0.0"
xmlns:xsi="http://www.w3.org/2001/XMLSchema-instance"
xsi:schemaLocation="http://maven.apache.org/POM/4.0.0 http://maven.apache.org/maven-v4_0_0.xsd">
<modelVersion>4.0.0</modelVersion>
<groupId>com.furn_ssm</groupId>
<artifactId>furn_ssm</artifactId>
<packaging>war</packaging>
<version>1.0-SNAPSHOT</version>
<name>furn_ssm Maven Webapp</name>
<url>http://maven.apache.org</url>
<properties>
<project.build.sourceEncoding>UTF-8</project.build.sourceEncoding>
<maven.compiler.source>1.8</maven.compiler.source>
<maven.compiler.target>1.8</maven.compiler.target>
</properties>
<dependencies>
<dependency>
<groupId>junit</groupId>
<artifactId>junit</artifactId>
<version>3.8.1</version>
<scope>test</scope>
</dependency>
<!-- Spring MVC -->
<dependency>
<groupId>org.springframework</groupId>
<artifactId>spring-webmvc</artifactId>
<version>5.3.20</version> <!-- 请根据需要选择合适版本 -->
</dependency>
<!-- Spring JDBC -->
<dependency>
<groupId>org.springframework</groupId>
<artifactId>spring-jdbc</artifactId>
<version>5.3.20</version> <!-- 请根据需要选择合适版本 -->
</dependency>
<!-- Spring AOP -->
<dependency>
<groupId>org.springframework</groupId>
<artifactId>spring-aop</artifactId>
<version>5.3.20</version> <!-- 请根据需要选择合适版本 -->
</dependency>
<!-- MyBatis -->
<dependency>
<groupId>org.mybatis</groupId>
<artifactId>mybatis</artifactId>
<version>3.5.7</version> <!-- 请根据需要选择合适版本 -->
</dependency>
<!-- Druid -->
<dependency>
<groupId>com.alibaba</groupId>
<artifactId>druid</artifactId>
<version>1.2.9</version> <!-- 请根据需要选择合适版本 -->
</dependency>
<!-- MySQL Driver -->
<dependency>
<groupId>mysql</groupId>
<artifactId>mysql-connector-java</artifactId>
<version>8.0.30</version> <!-- 请根据需要选择合适版本 -->
</dependency>
</dependencies>
<build>
<finalName>furn_ssm</finalName>
</build>
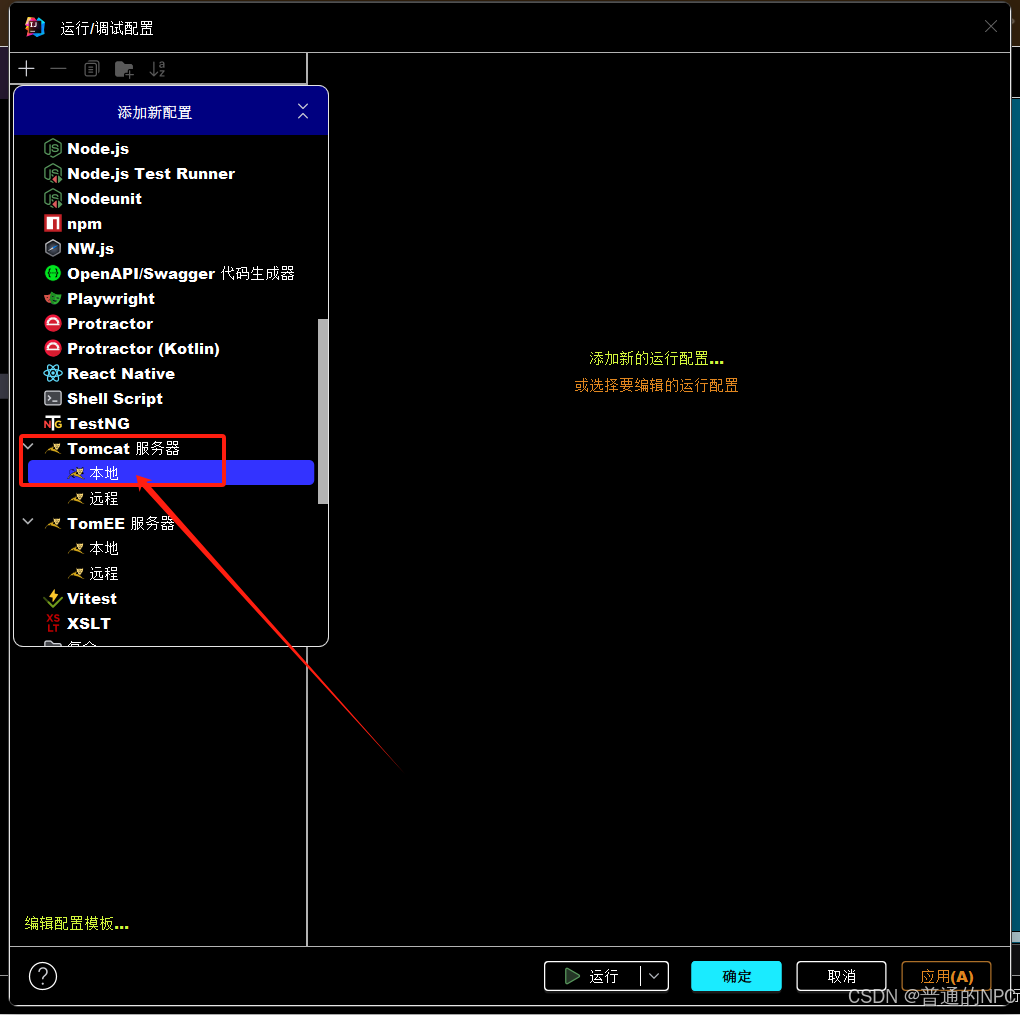
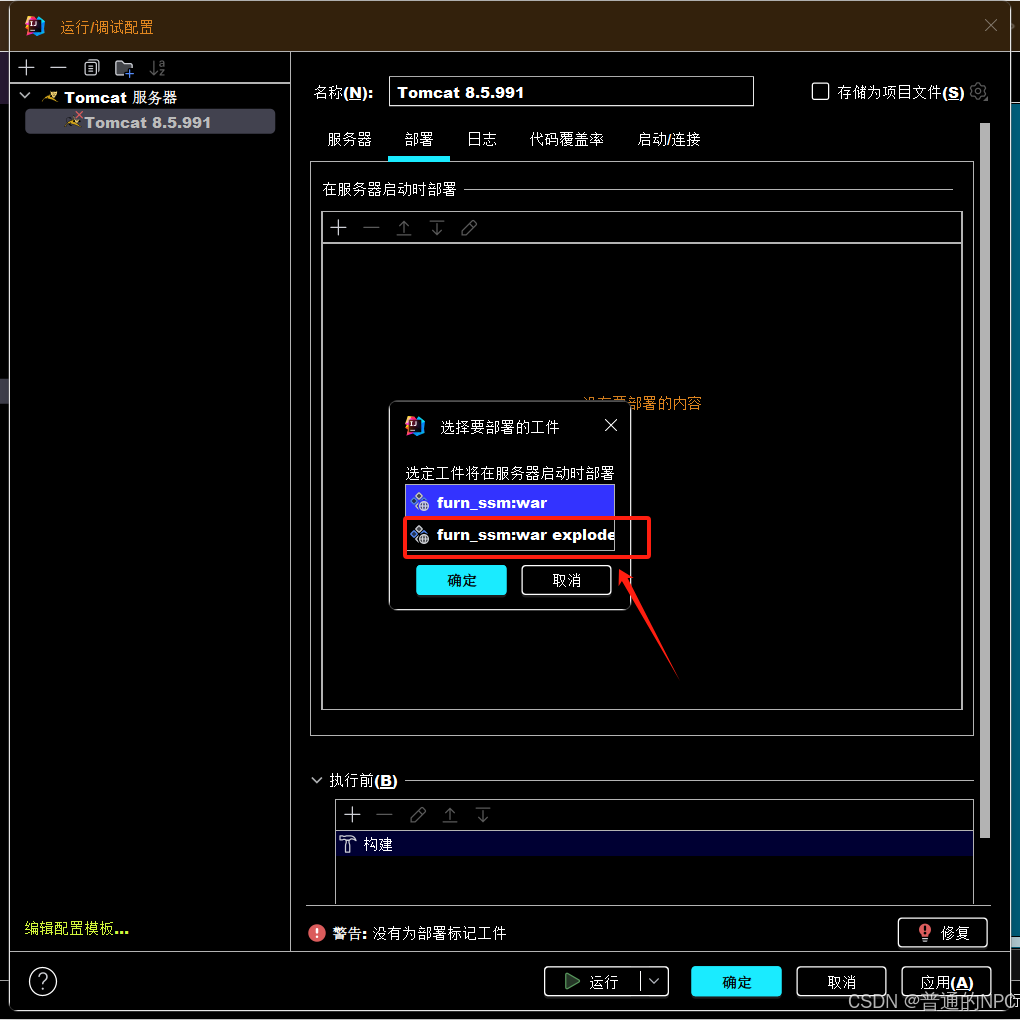
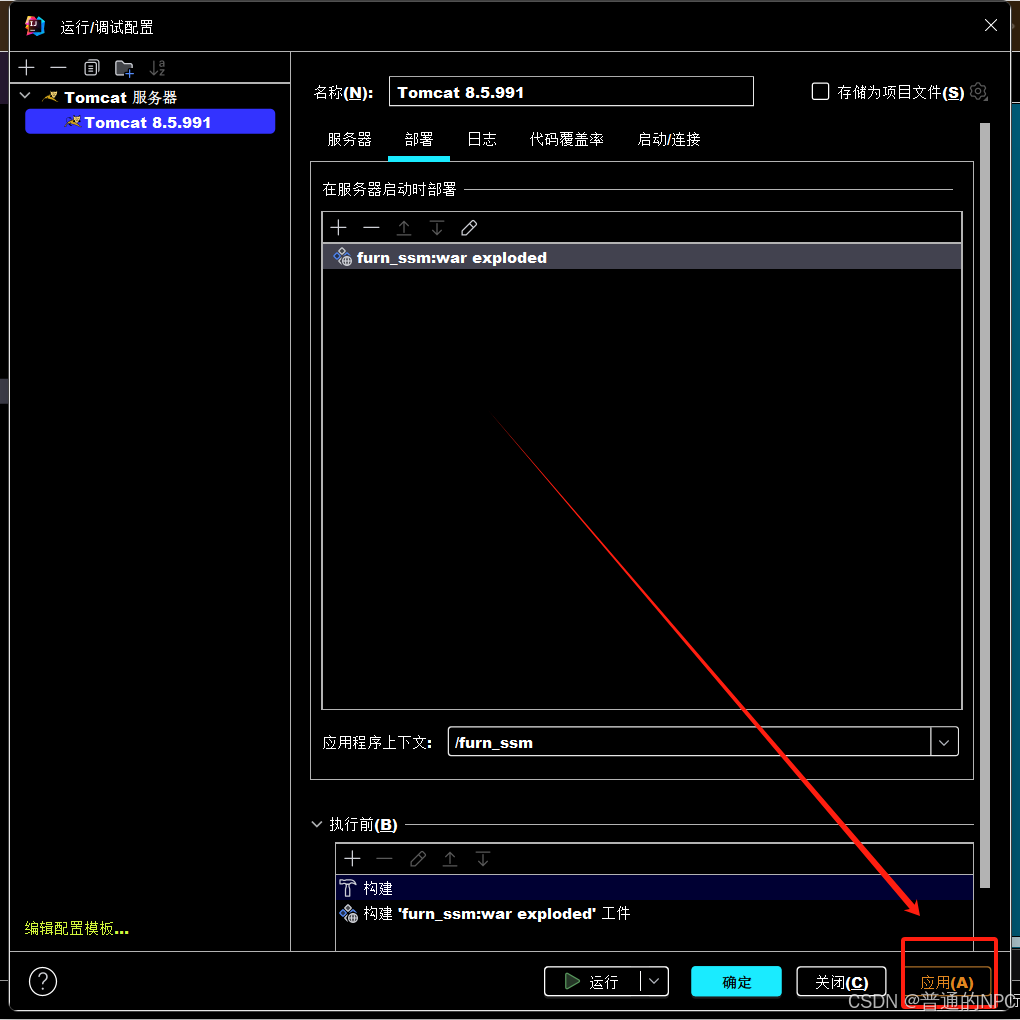
</project>1.4然后再去配置我们的Tomcat服务器:
2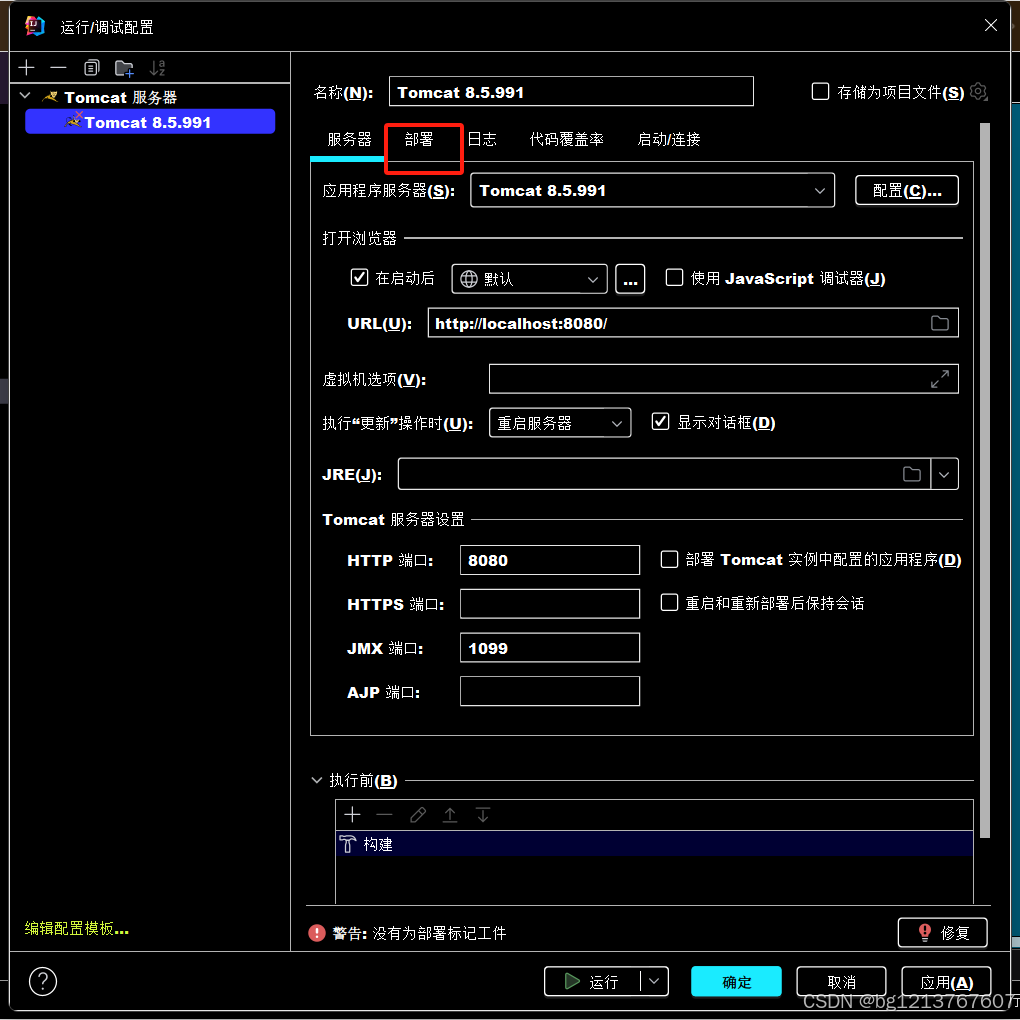 3.
3.
 7.
7.
8.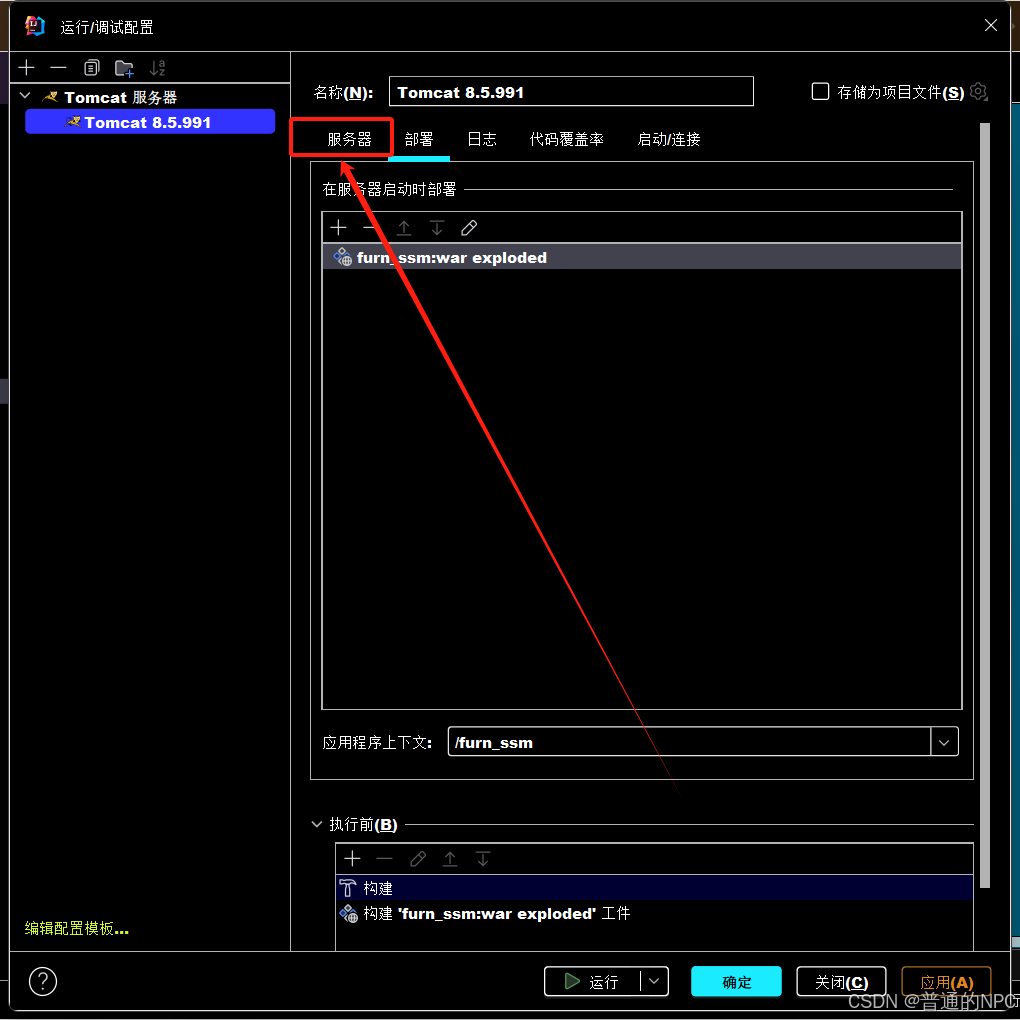
9.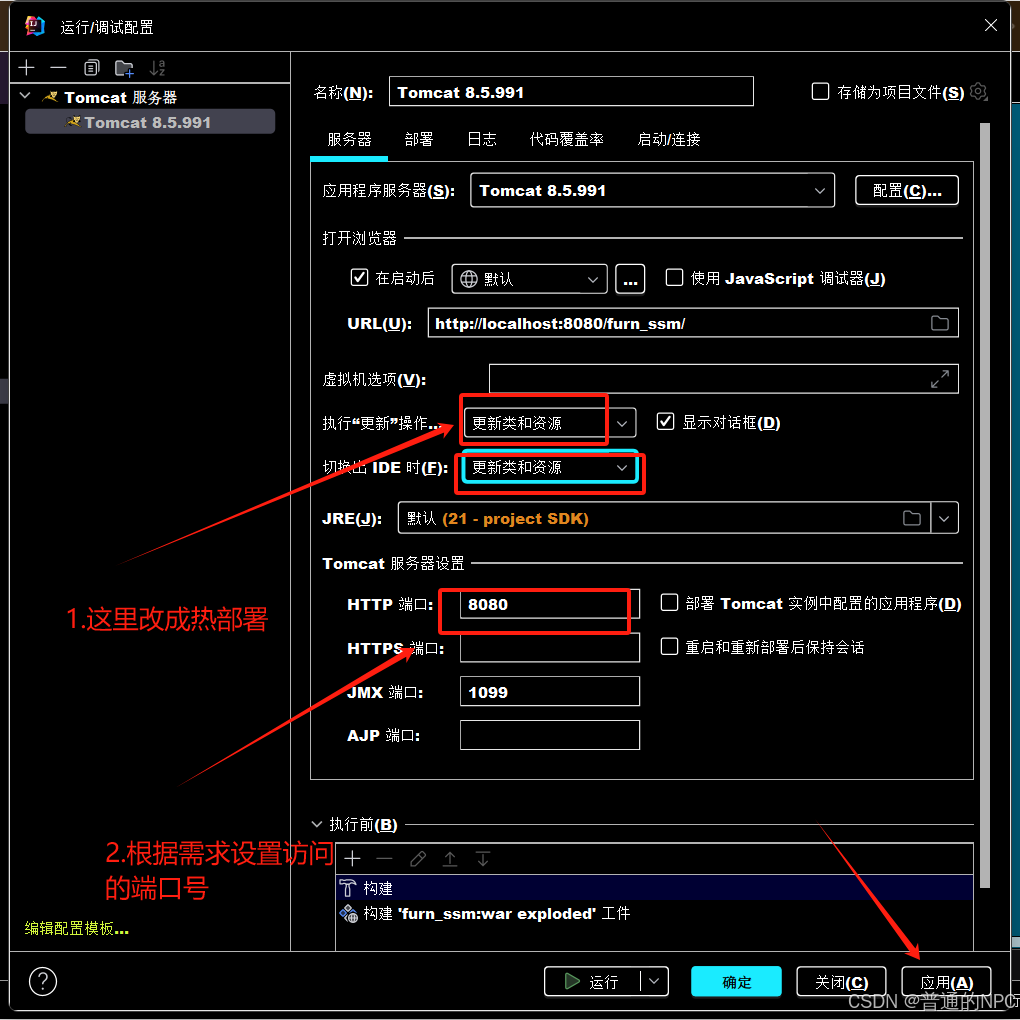 现在就是配置好项目的启动环境了。
2.完成springMvc,spring,Mybatis的配置,然后完成者三者之间的整合
2.1现在配置项目的全局全局配置文件:Web.xml,
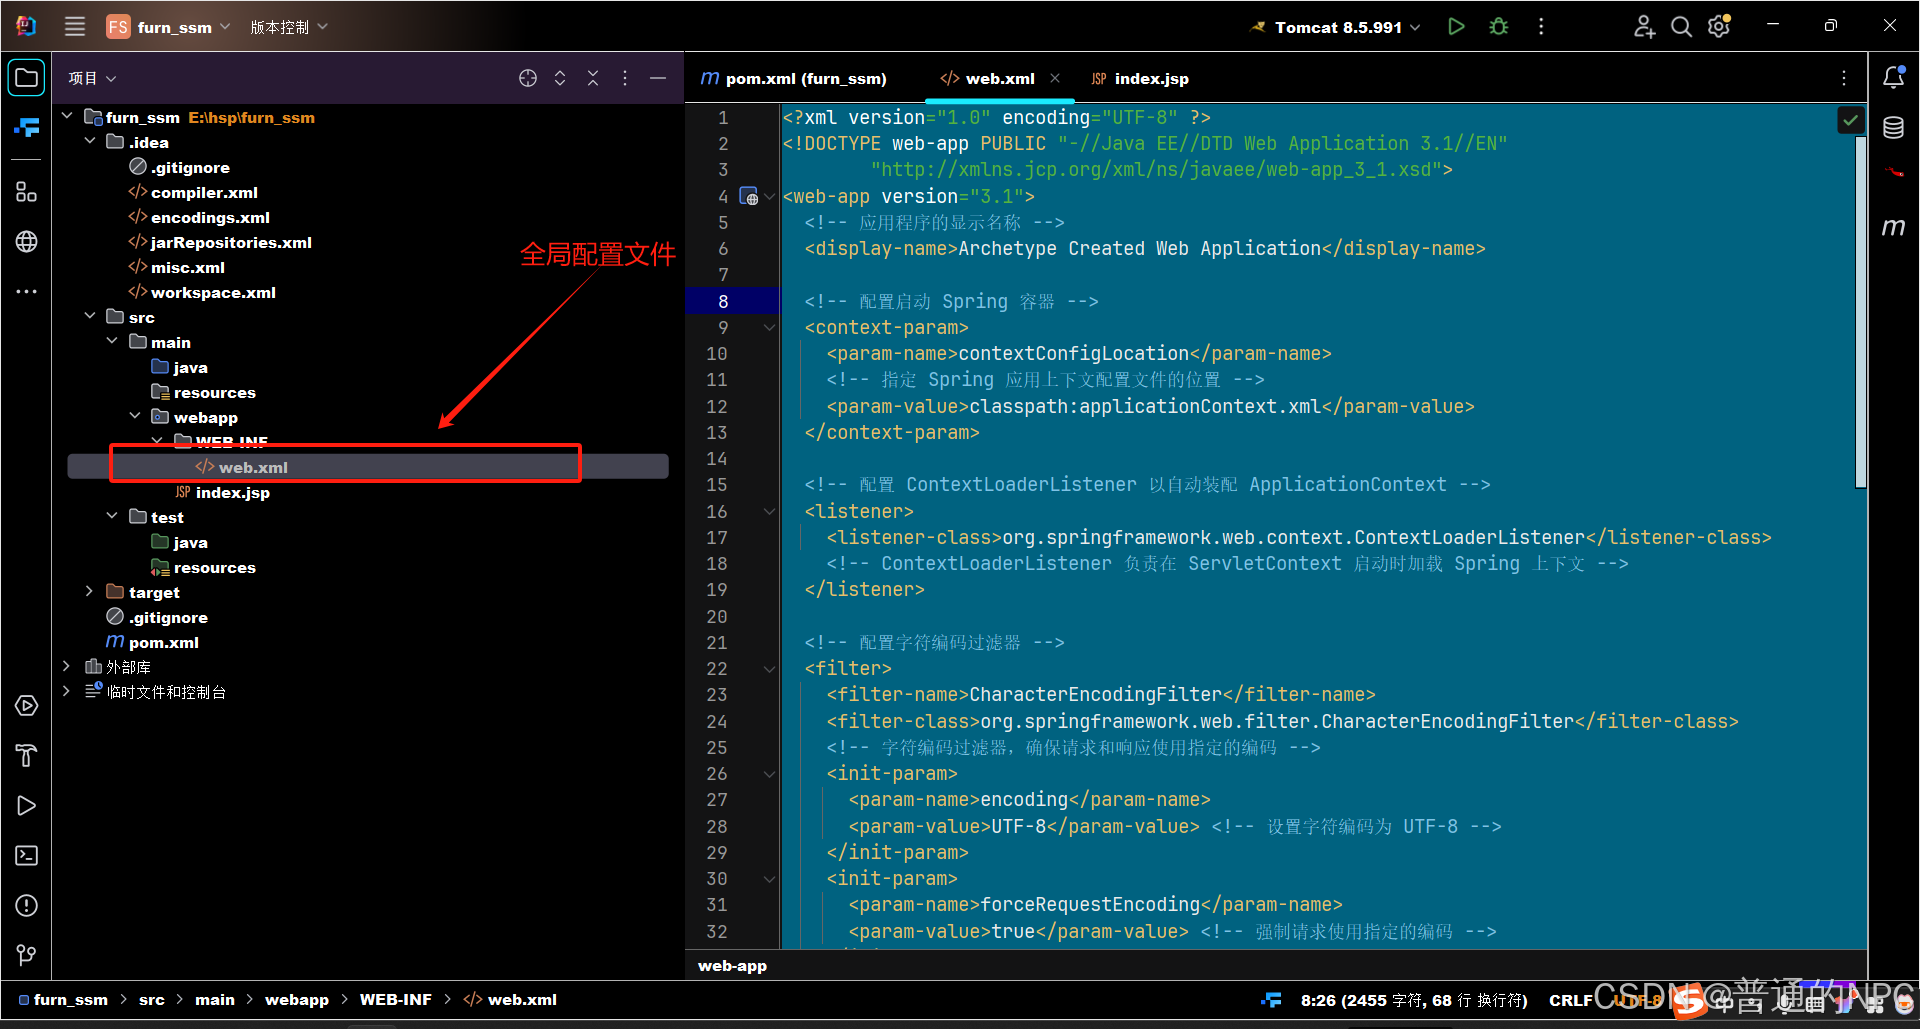
代码如下:
<web-app xmlns="http://xmlns.jcp.org/xml/ns/javaee"
         xmlns:xsi="http://www.w3.org/2001/XMLSchema-instance"
         xsi:schemaLocation="http://xmlns.jcp.org/xml/ns/javaee
                             http://xmlns.jcp.org/xml/ns/javaee/web-app_3_1.xsd"
         version="3.1">


<context-param>
        <param-name>contextConfigLocation</param-name>
        <param-value>classpath:applicationContext.xml</param-value>
    </context-param>

    <listener>
        <listener-class>org.springframework.web.context.ContextLoaderListener</listener-class>
    </listener>

    <filter>
        <filter-name>CharacterEncodingFilter</filter-name>
        <filter-class>org.springframework.web.filter.CharacterEncodingFilter</filter-class>
        <init-param>
            <param-name>encoding</param-name>
            <param-value>UTF-8</param-value>
        </init-param>
        <init-param>
            <param-name>forceRequestEncoding</param-name>
            <param-value>true</param-value>
        </init-param>
        <init-param>
            <param-name>forceResponseEncoding</param-name>
            <param-value>true</param-value>
        </init-param>
    </filter>

    <filter-mapping>
        <filter-name>CharacterEncodingFilter</filter-name>
        <url-pattern>/*</url-pattern>
    </filter-mapping>

    <servlet>
        <servlet-name>dispatcher</servlet-name>
        <servlet-class>org.springframework.web.servlet.DispatcherServlet</servlet-class>
        <load-on-startup>1</load-on-startup>
    </servlet>

    <servlet-mapping>
        <servlet-name>dispatcher</servlet-name>
        <url-pattern>/</url-pattern>
    </servlet-mapping>

</web-app>
2.2创建SpringMVC的配置文件dispatcher-servlet.xml:主要包含网站跳转逻辑的控制: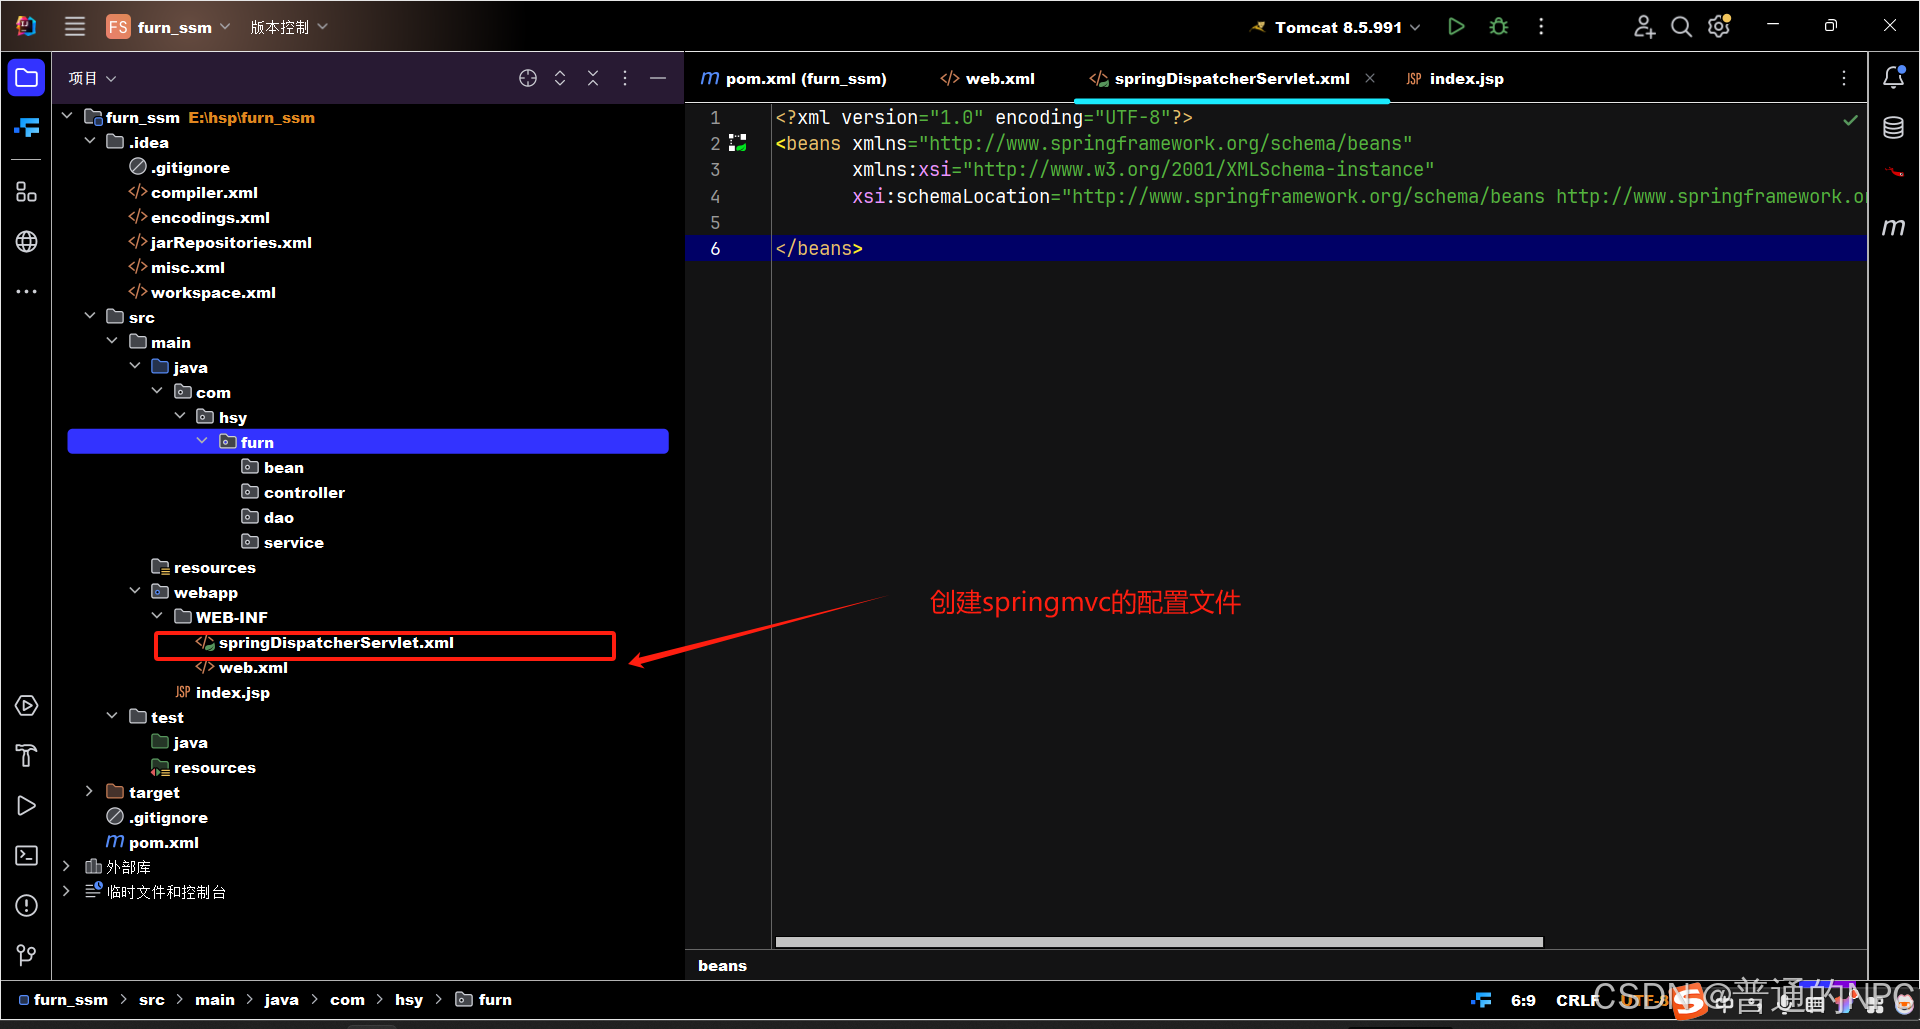 创建项目相关的包:
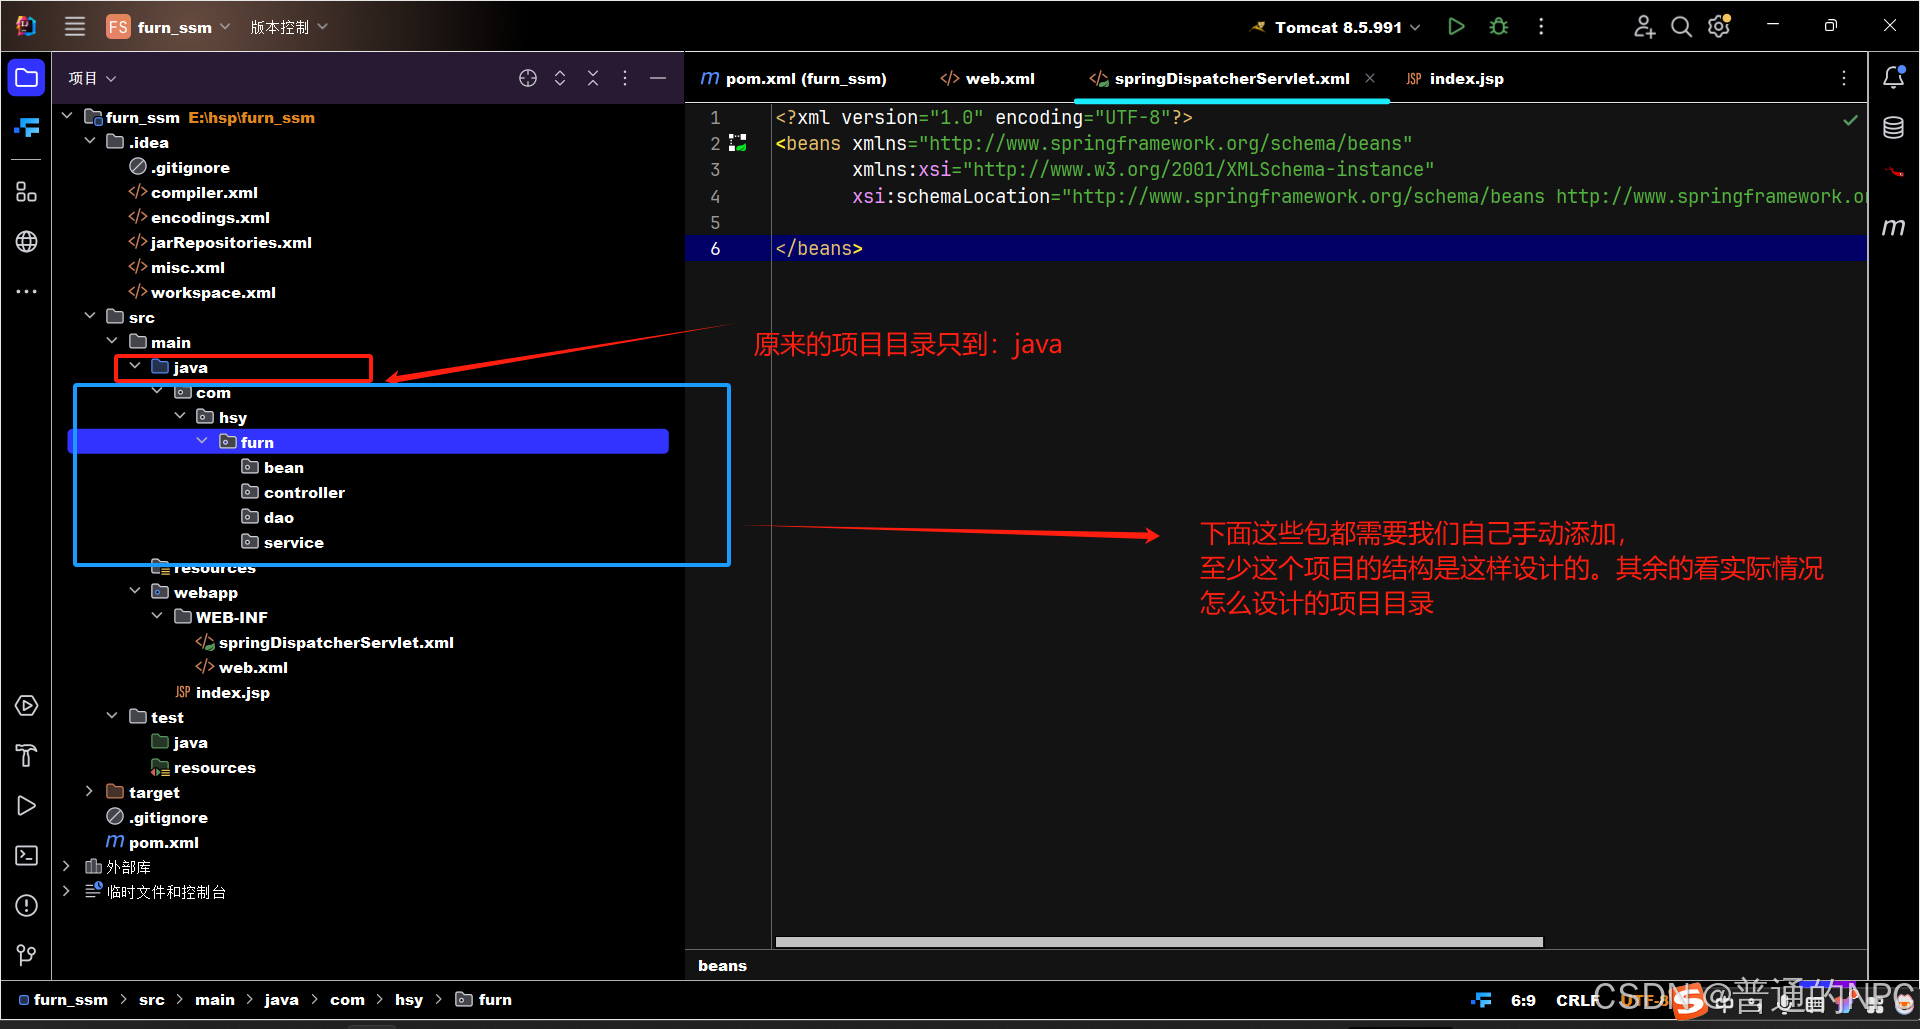 再添加一个utils目录:
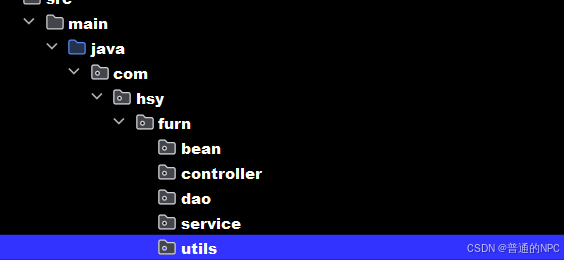
2.3配置dispatcher-servlet.xml文件的代码:这个是springMvc的配置文件
<?xml version="1.0" encoding="UTF-8"?>
<beans xmlns="http://www.springframework.org/schema/beans"
       xmlns:xsi="http://www.w3.org/2001/XMLSchema-instance"
       xmlns:mvc="http://www.springframework.org/schema/mvc"
       xmlns:context="http://www.springframework.org/schema/context"
       xsi:schemaLocation="http://www.springframework.org/schema/beans http://www.springframework.org/schema/beans/spring-beans.xsd
                           http://www.springframework.org/schema/mvc http://www.springframework.org/schema/mvc/spring-mvc.xsd
                           http://www.springframework.org/schema/context http://www.springframework.org/schema/context/spring-context.xsd">

    <!-- 启用 Spring MVC 注解 -->
    <mvc:annotation-driven/>

    <!-- 将 Spring MVC 不能处理的请求交给 Tomcat 处理,比如 CSS 和 JS -->
    <mvc:default-servlet-handler/>

    <!-- 启用 Spring MVC 组件扫描的包,只扫描带有 @Controller 注解的类 -->
    <context:component-scan base-package="com.hsy.furn">
        <context:include-filter type="annotation" expression="org.springframework.stereotype.Controller"/>
    </context:component-scan>

    <!-- 定义视图解析器 -->
    <bean class="org.springframework.web.servlet.view.InternalResourceViewResolver">
        <!-- 定义视图位置 -->
        <property name="prefix" value="/WEB-INF/views/"/>
        <!-- 使用 HTML 作为视图后缀 -->
        <property name="suffix" value=".html"/>
    </bean>

    <!-- 在这里定义其他 Spring Beans -->
</beans>
创建我们对应的applicationContext.xml文件:确保 applicationContext.xml 文件在指定的类路径下。使用的是 Maven,确认文件在 src/main/resources 目录中
<?xml version="1.0" encoding="UTF-8"?>
<beans xmlns="http://www.springframework.org/schema/beans"
       xmlns:xsi="http://www.w3.org/2001/XMLSchema-instance"
       xmlns:context="http://www.springframework.org/schema/context"
       xsi:schemaLocation="http://www.springframework.org/schema/beans http://www.springframework.org/schema/beans/spring-beans.xsd http://www.springframework.org/schema/context https://www.springframework.org/schema/context/spring-context.xsd">


    <!-- 扫描类 -->
    <context:component-scan base-package="com.hsy.furn.controller"/>

    <!-- 在这里定义其他 Spring Beans -->
</beans>
中间出现了这个报错: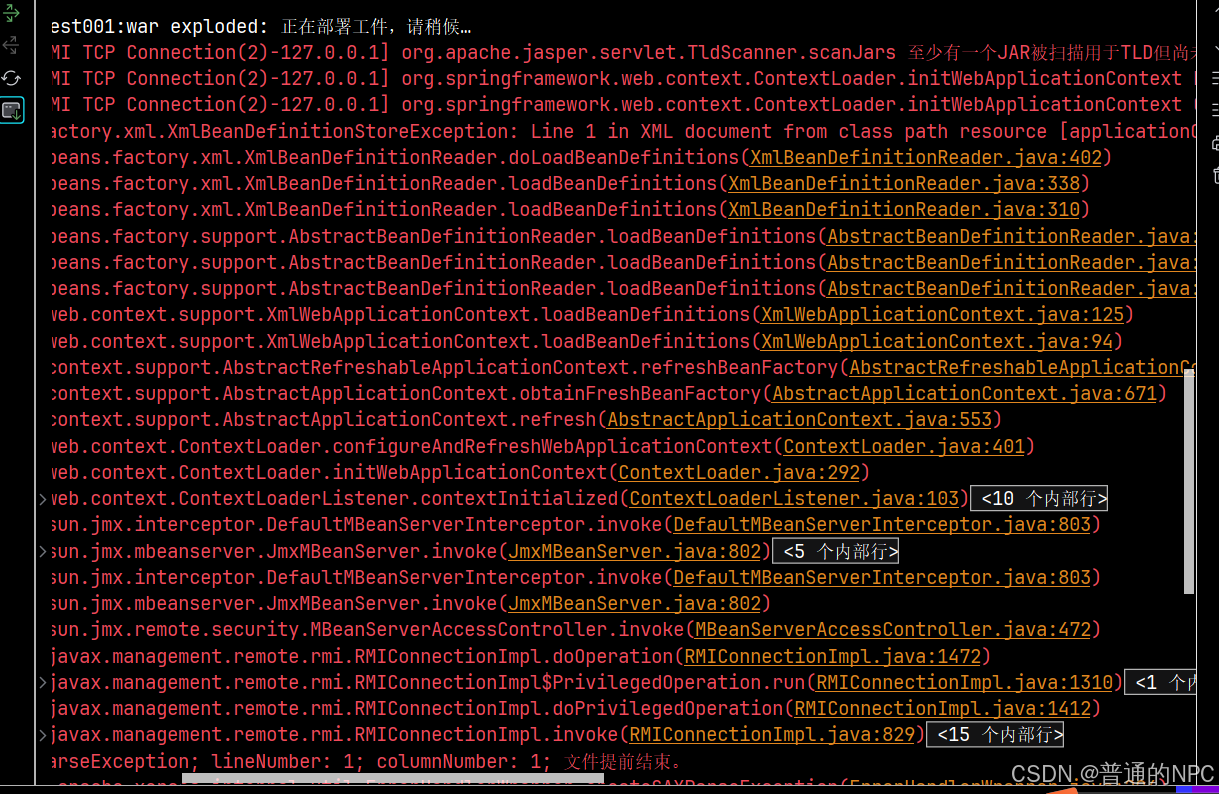
确保web.xml文件以及dispatcher-servlet.xml,applicationContext.xml,这三个文件没有错误,且路径放正确就没问题,不会是跟
1. applicationContext.xml
- 作用: 这是一个通用的 Spring 应用上下文配置文件,用于定义整个应用程序的 Bean,包括服务、数据源、业务逻辑等。
- 范围: 可以用于任何类型的 Spring 应用(如 Web 应用、桌面应用等)。
- 内容:
- 定义数据源和事务管理器。
- 配置服务层的 Bean。
- 可以包含其他配置文件或 Bean 定义。
- 通常还会设置一些全局的属性,例如环境变量。
2. dispatcher-servlet.xml
- 作用: 这是专门为 Spring MVC 应用程序配置的文件,通常用于配置与 Web 相关的组件,如控制器、视图解析器和拦截器。
- 范围: 仅适用于 Web 应用程序,特别是基于 Spring MVC 的应用。
- 内容:
- 定义控制器(Controllers)。
- 配置视图解析器(View Resolvers)以处理视图的返回。
- 配置 Web 相关的过滤器和拦截器。
- 处理与请求映射相关的设置。
总结:
- applicationContext.xml: 负责整个应用程序的 Bean 定义和配置,适用于所有类型的 Spring 应用。
- dispatcher-servlet.xml: 负责处理与 Web 相关的配置,专门用于 Spring MVC 应用。
Pom.xml文件没有引入相关的Servlet依赖有关系
application.xml这个就是spring配置文件:现在我们需要配置这个文件扫描com.hsy这个包下的文件,但是不扫描这个包下面的所有控制器,因为我们希望扫描控制器这个工作交给springMvc的配置文件里面去扫描(当然,spring配置文件也可以扫描,只是我们一般不扫描)
<?xml version="1.0" encoding="UTF-8"?>
<beans xmlns="http://www.springframework.org/schema/beans"
       xmlns:xsi="http://www.w3.org/2001/XMLSchema-instance"
       xmlns:context="http://www.springframework.org/schema/context"
       xsi:schemaLocation="http://www.springframework.org/schema/beans http://www.springframework.org/schema/beans/spring-beans.xsd
                           http://www.springframework.org/schema/context https://www.springframework.org/schema/context/spring-context.xsd">

    <!-- 扫描 com.hsy 包,但排除 com.hsy.furn.controller 包 -->
    <context:component-scan base-package="com.hsy">
        <context:exclude-filter type="assignable" expression="org.springframework.stereotype.Controller"/>
    </context:component-scan>


type="annotation": 指定过滤的类型为注解。
expression="org.springframework.stereotype.Controller":
表示排除所有被 @Controller 注解标记的类。
</beans>
2.4配置连接mysql的信息的jdbc.properties文件:也是和application放在Resource目路下面:这个文件也是提供给springMvc的配置文件使用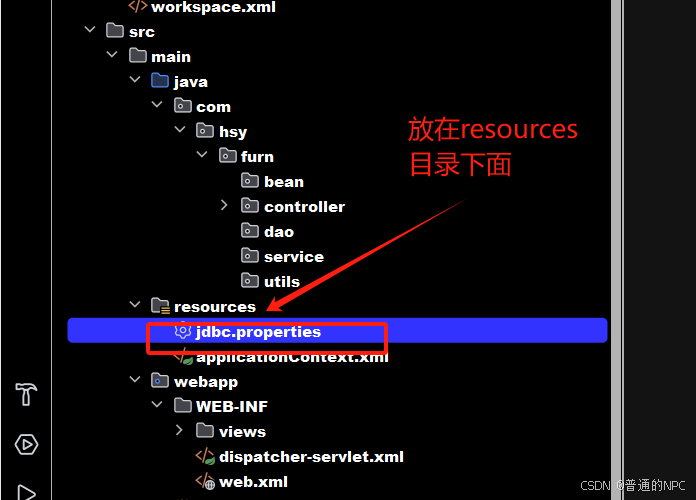
,通常情况下,jdbc.properties 文件应该放在 resources 目录下(例如 src/main/resources),原因如下:
-
类路径: Maven 项目在构建时会将
src/main/resources目录下的文件复制到最终的类路径中。这使得配置文件在运行时可以被 Spring 或其他框架方便地加载。 -
方便管理: 将配置文件放在
resources目录中,可以统一管理项目的资源文件(如配置文件、图片等)。 -
环境分离: 通过将不同环境(开发、测试、生产)的配置文件放在
resources中,可以更轻松地进行环境切换。
框架支持: 大多数 Java 框架(如 Spring)都默认从类路径中加载资源文件,因此将配置文件放在 resources 目录中是最好。
jdbc.properties配置文件模版:
# JDBC Properties
# 数据库连接信息
jdbc.driverClassName=com.mysql.cj.jdbc.Driver
jdbc.url=jdbc:mysql://localhost:3306/your_database_name?useSSL=false&serverTimezone=UTC
jdbc.username=your_username
jdbc.password=your_password
# 连接池相关配置(可选)
jdbc.initialSize=5
jdbc.maxActive=20
jdbc.minIdle=5
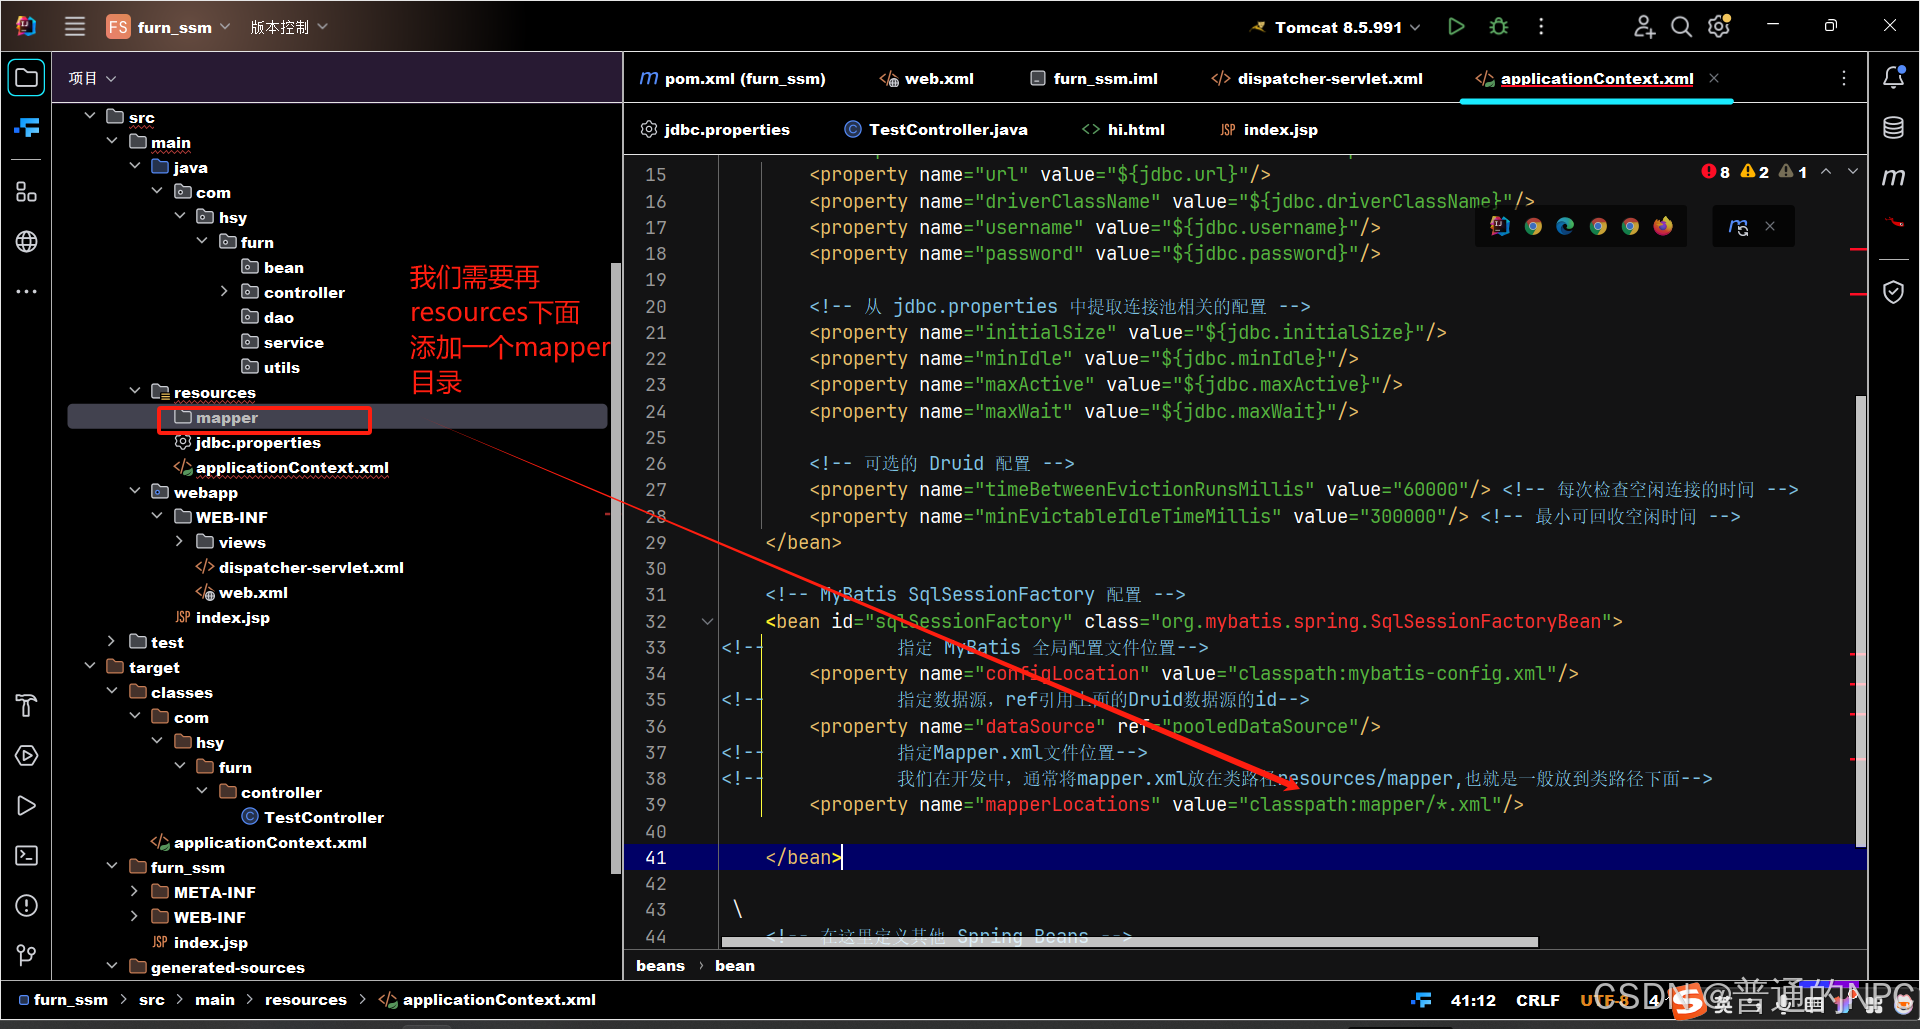
jdbc.maxWait=10000现在开始配置数据源,之前我们是在Mybatis.xml文件里面配置数据源,现在为了整合spring和Mybatis,所以我们在spring配置文件里面进行配置:
classpath : 类路径,指的是编译后的字节码文件存储路径,一般为target目录下的classes目录(java项目)
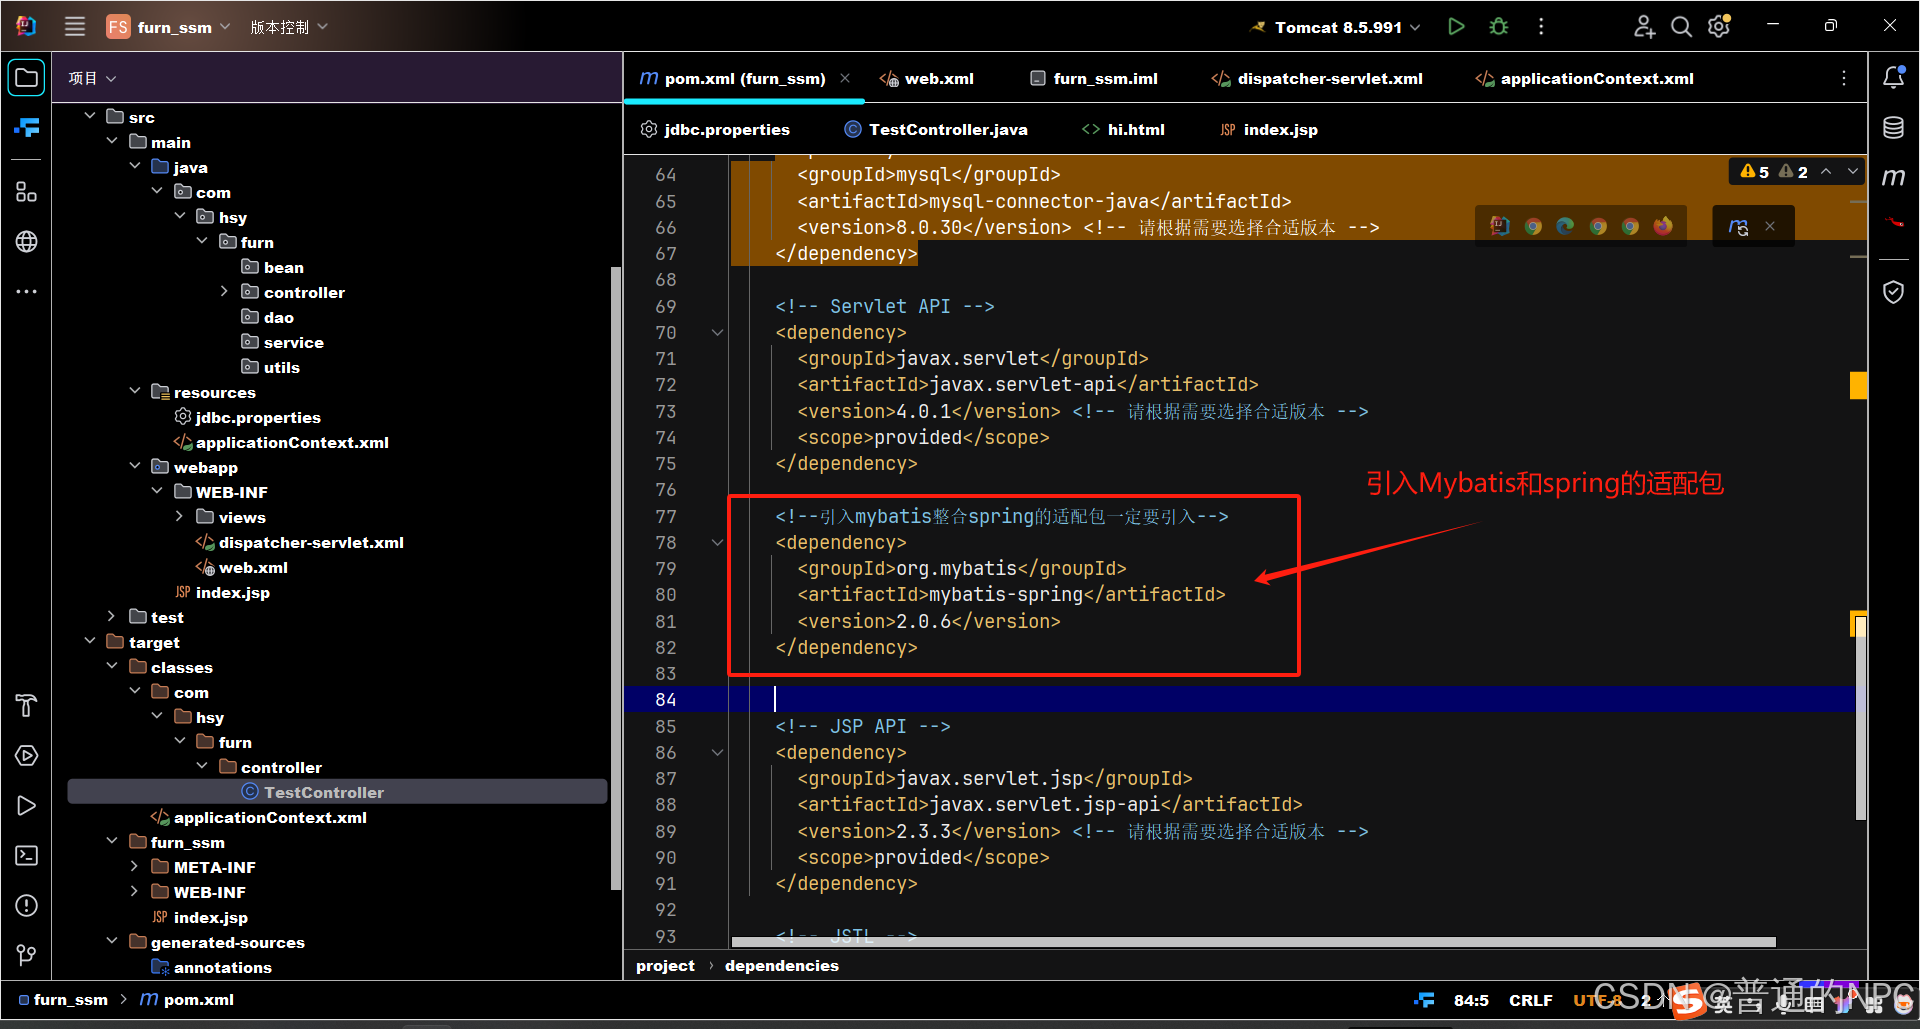
2.5在pom.xml文件里面引入Mybatis和spring的适配依赖:
 爆红的情况:
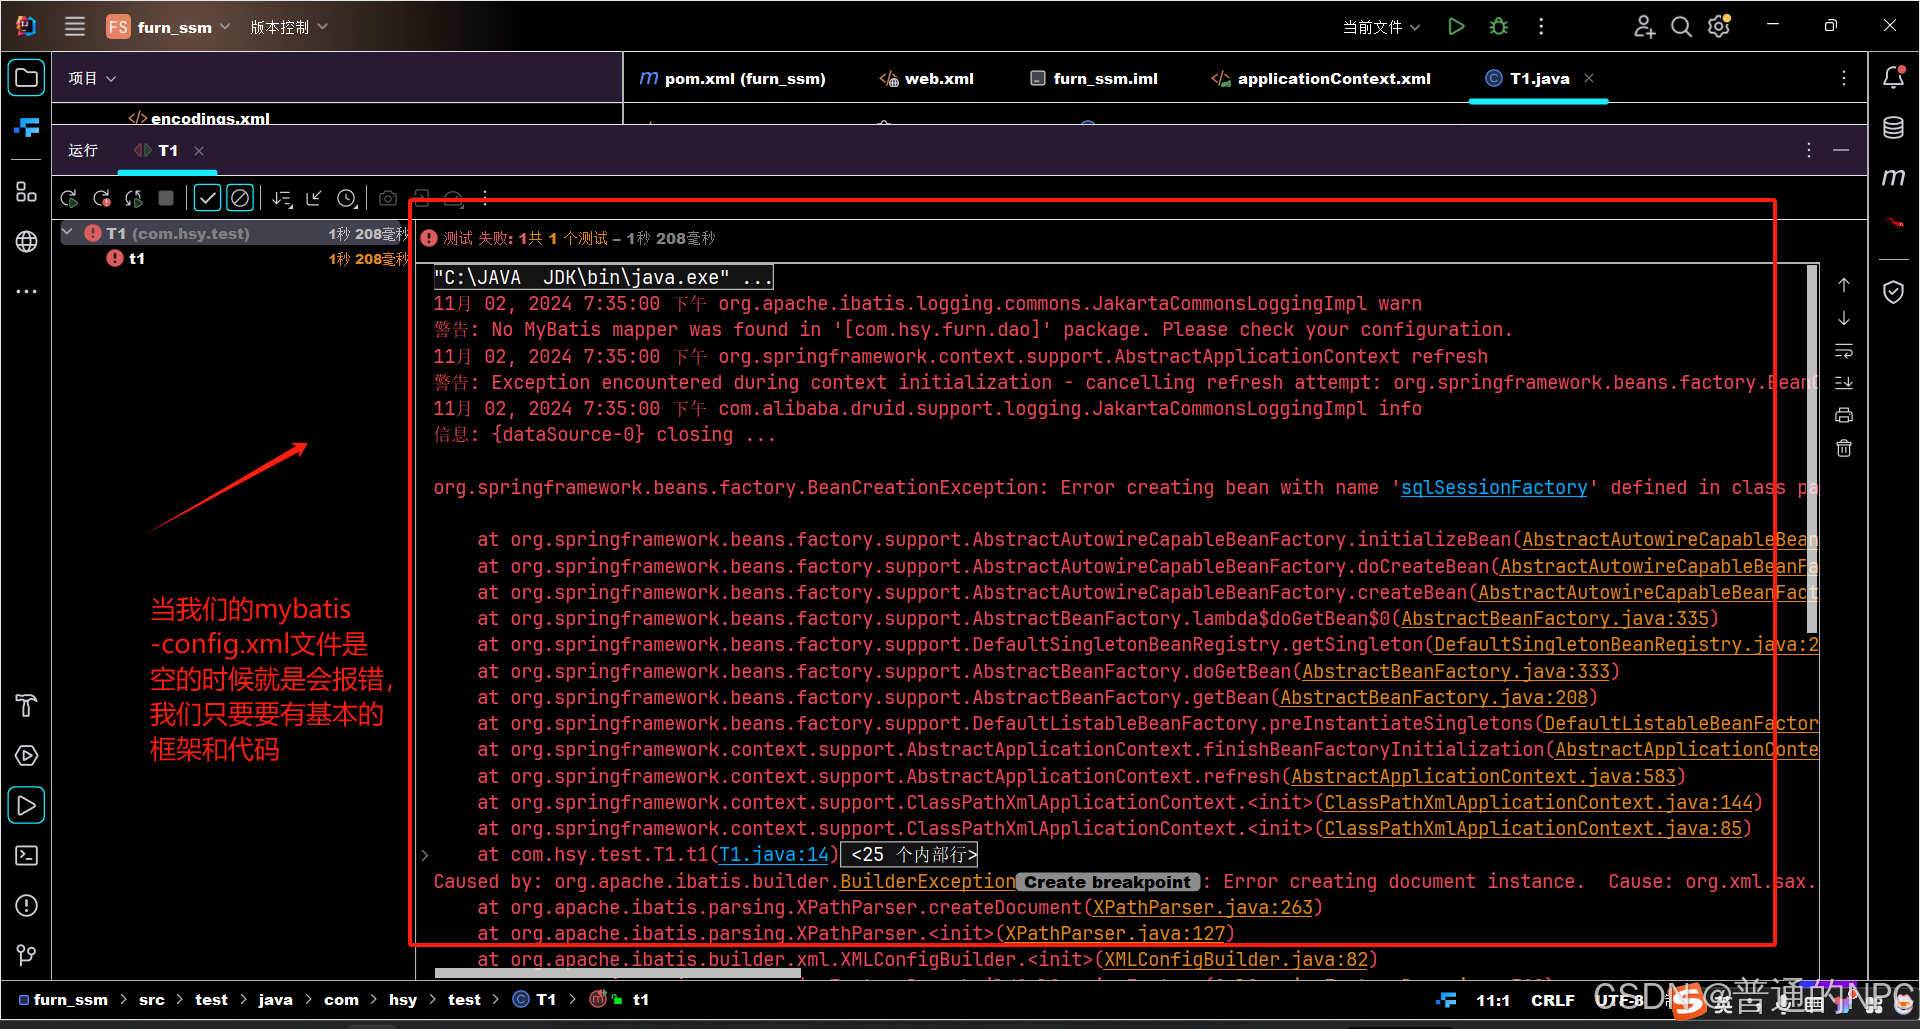 解决;
解决;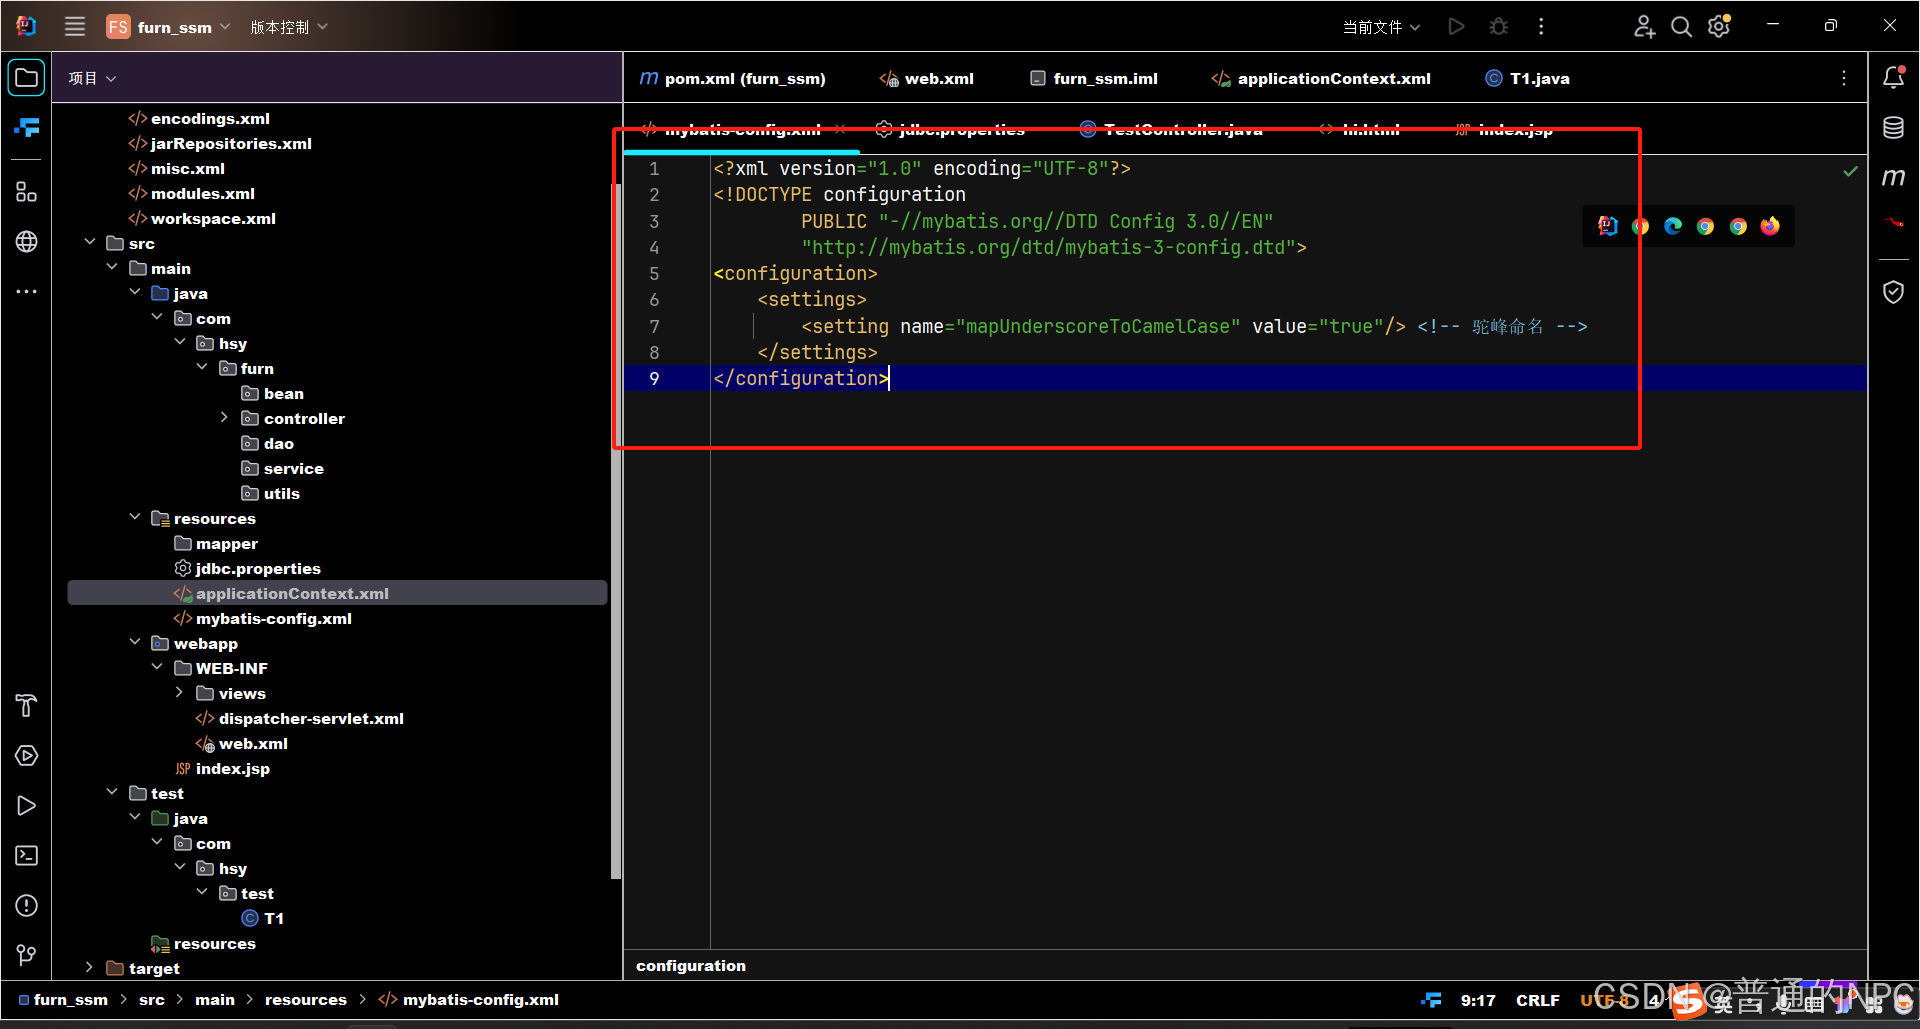
2.6总结:
- Spring 配置文件: 负责 Spring IoC 容器、MyBatis 集成和事务管理的配置。
- 文件名:
applicationContext.xml
- Spring MVC 配置文件: 负责配置 Spring MVC 的组件,如控制器扫描和视图解析。
- 文件名:
spring-mvc.xml或dispatcher-servlet.xml
- MyBatis 配置文件: 提供 MyBatis 的全局设置。
- 文件名:
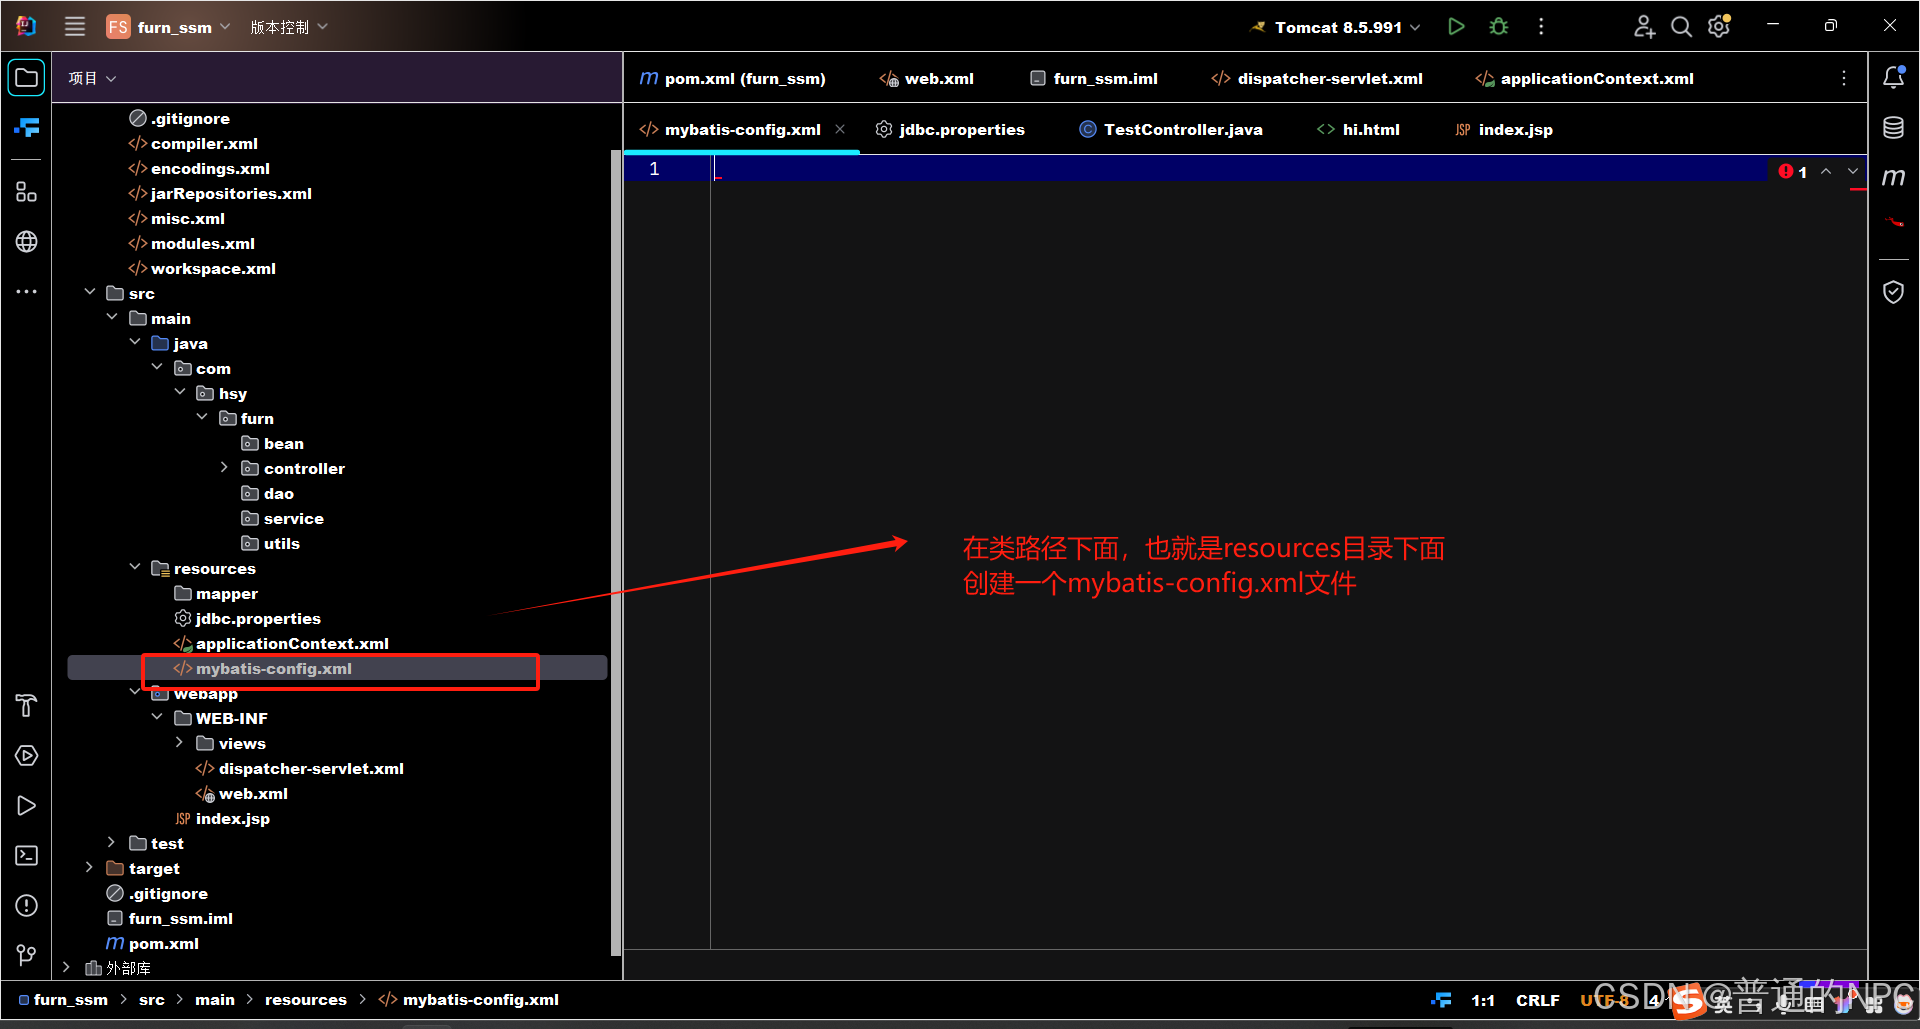
mybatis-config.xml
- Web 应用配置文件: 配置 Servlet、过滤器以及上下文参数,整合 Spring MVC。
- 文件名:
web.xml
3.Mybatis逆向工程:
3.1去我们的pom.xml文件里面配置逆向的依赖包:
    <!-- MyBatis Generator -->
    <dependency>
      <groupId>org.mybatis.generator</groupId>
      <artifactId>mybatis-generator-core</artifactId>
      <version>1.4.0</version> <!-- 请根据需要选择合适版本 -->
    </dependency>
3.2创建MyBatis Generator (MBG)逆向工程配置文件
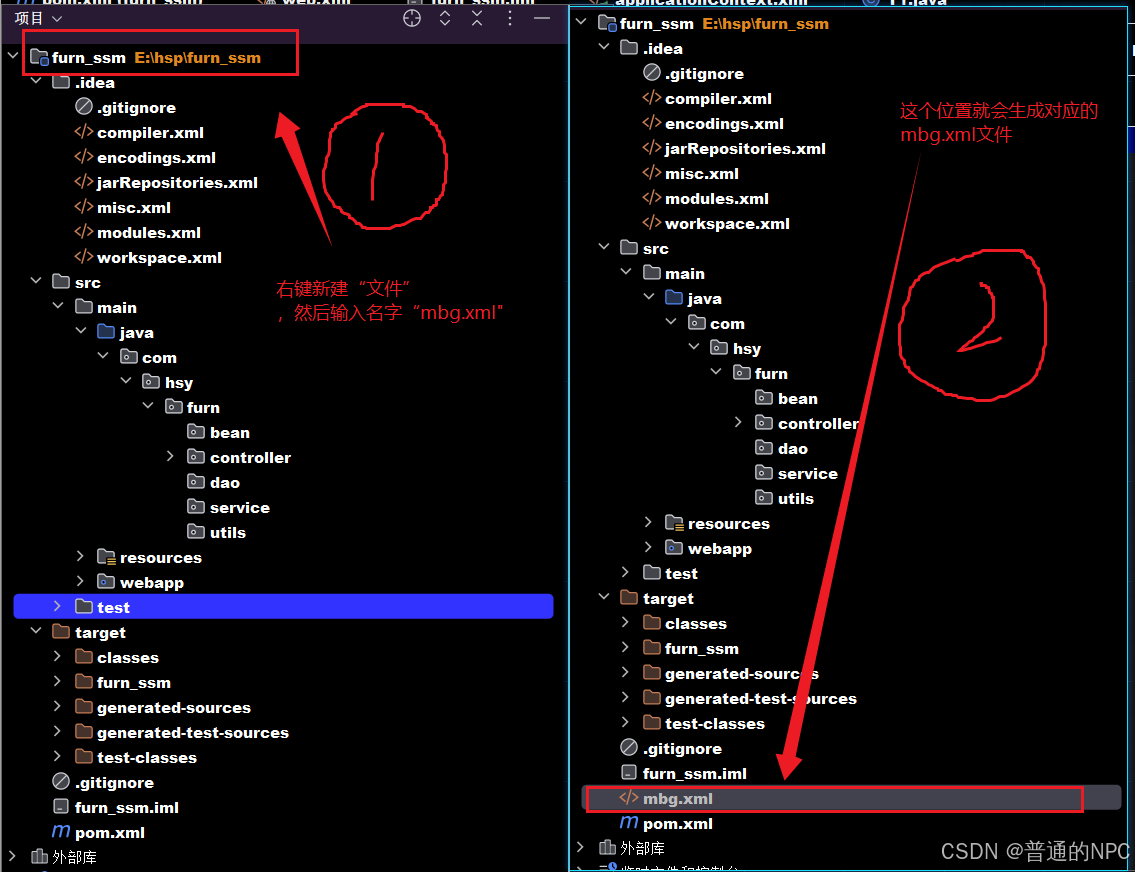 mbg.xml文件的代码示例:
<?xml version="1.0" encoding="UTF-8"?>
<!DOCTYPE generatorConfiguration
        PUBLIC "-//mybatis.org//DTD MyBatis Generator Configuration 1.0//EN"
        "http://mybatis.org/dtd/mybatis-generator-config_1_0.dtd">
<generatorConfiguration>
    <context id="defaultContext" targetRuntime="MyBatis3">


        这里配置了就不会生成bean的时候再给我们生成注解
        <commentGenerator>
            <property name="suppressJavaComments" value="true"/>
            <property name="suppressAllComments" value="true"/>
        </commentGenerator>


        <!-- 数据库连接配置 -->
        <jdbcConnection driverClass="com.mysql.cj.jdbc.Driver"
                        connectionURL="jdbc:mysql://localhost:3306/furns_ssm"
                        userId="root"
                        password="123456">
        </jdbcConnection>

        <!-- Java模型生成配置 -->
        <javaModelGenerator targetPackage="com.hsy.furn.bean"
                            targetProject="./src/main/java">

            <property name="enableSubPackages" value="true"/>
            <property name="filesuperType" value="BaseModel"/>
        </javaModelGenerator>

        <!-- SQL映射文件生成配置 -->
        <sqlMapGenerator targetPackage="mapper"
                         targetProject="./src/main/resources">
            <property name="enableSubPackages" value="true"/>
        </sqlMapGenerator>

        <!-- DAO接口生成配置 -->
        <javaClientGenerator type="XMLMAPPER"
                             targetPackage="com.hsy.furn.dao"
                             targetProject="src/main/java">
            <property name="enableSubPackages" value="true"/>
        </javaClientGenerator>

        <!-- 表配置 -->
        <table tableName="furn" domainObjectName="Furn"/>
    </context>
</generatorConfiguration>
这里留一个tips:我们配置的路径由两部分组成 targetProject + targetPackage,保证这两部分拼接起来能出现你那个资源就行、
逆向生成的启动代码:
public class mbgTest1 {

    @Test
    public void generate() throws Exception {
       List<String> warnings = new ArrayList<>();
       boolean overwrite = true;

       // 加载配置文件,这里要写你实际的配置文件
       File configFile = new File("mbg.xml");
       ConfigurationParser cp = new ConfigurationParser(warnings);
       Configuration config = cp.parseConfiguration(configFile);

       // 创建 MyBatis Generator
       DefaultShellCallback callback = new DefaultShellCallback(overwrite);
       MyBatisGenerator myBatisGenerator = new MyBatisGenerator(config, callback, warnings);

       // 执行生成
       myBatisGenerator.generate(null);

       // 打印任何警告
       for (String warning : warnings) {
          System.out.println(warning);
       }
    }
} -
targetProject: 目标项目
-
targetPackage: 目标包
通过逆向生成的pojo类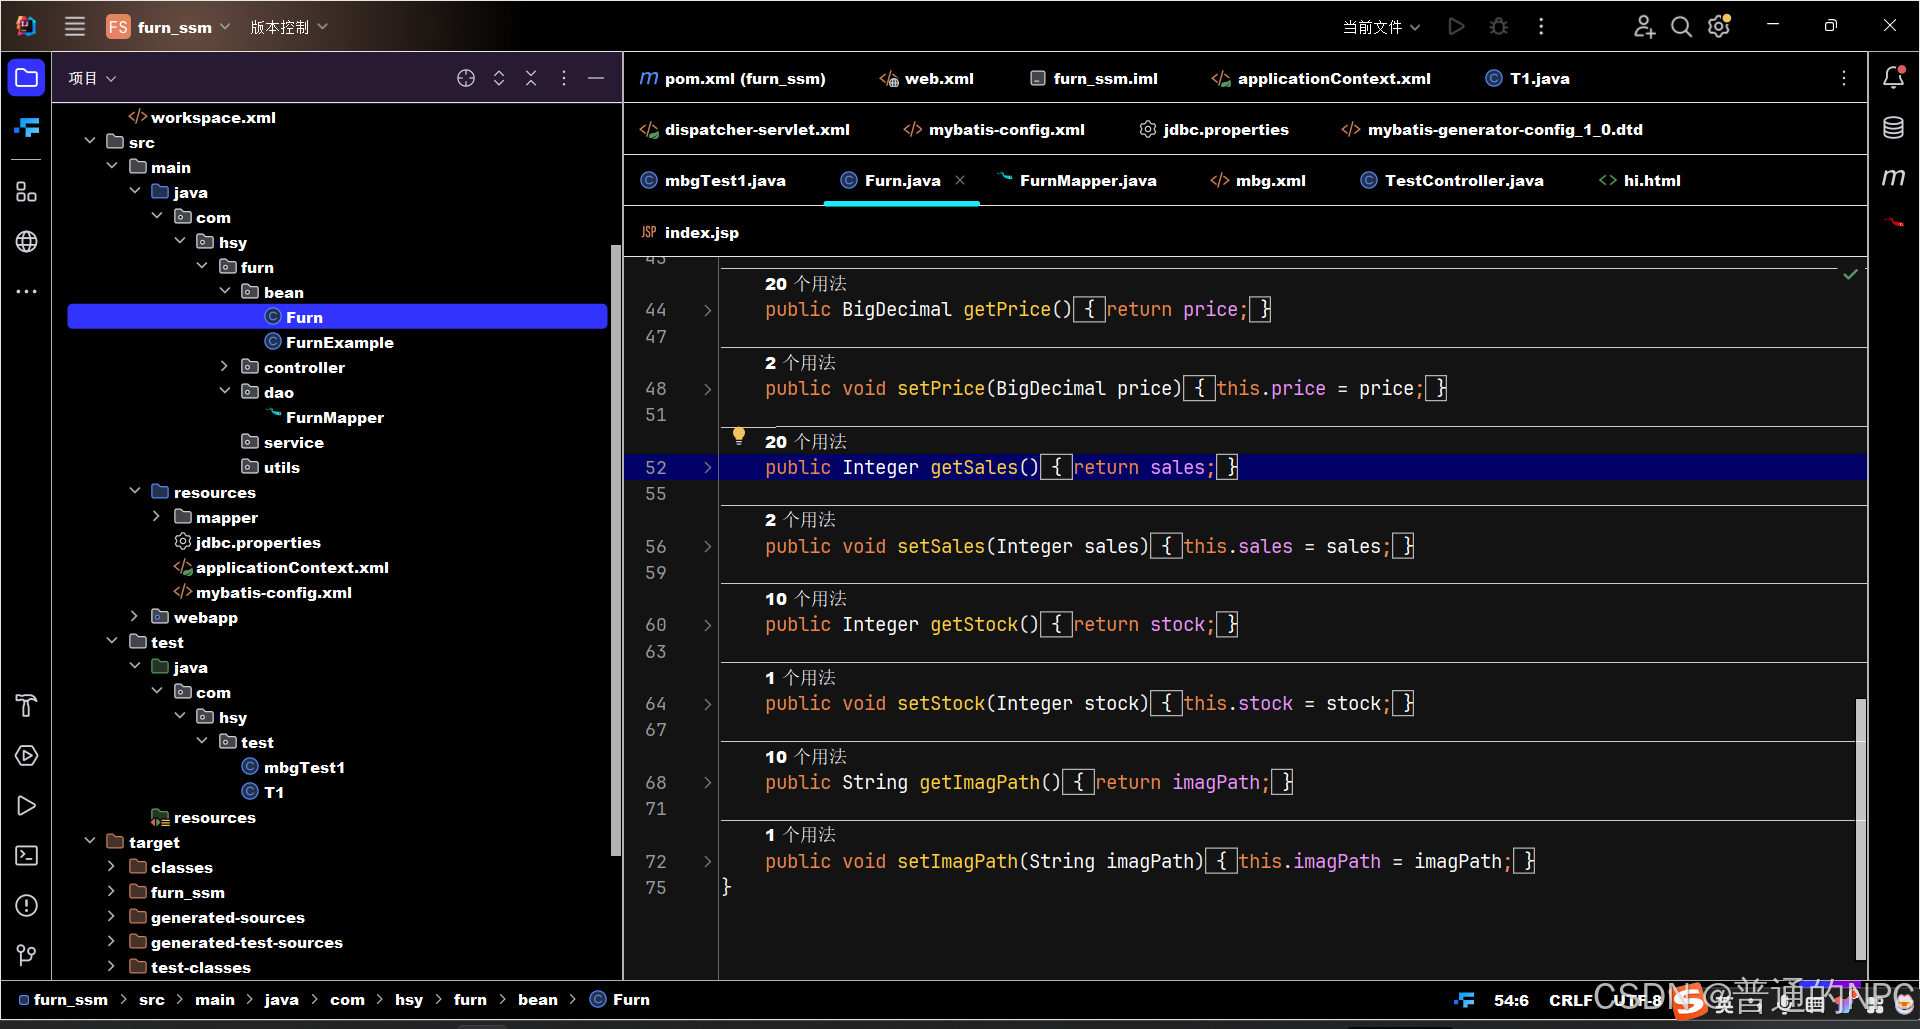 mapper接口:
提示:上面的bean生成了之后并不会有全参或者无参构造器。
新的发现:idea里面当前窗口的快捷键 "alt" + “字母“ 例如:无参构造器,先用快捷键打开构造器,在选择全参还是无参,全参:Ctrl + a ,无参 : alt + n
这里我idea为了方便复制文件名字设置了: Ctrl+鼠标右键 ----------来复制文件名字
3.3总结:逆向工程的4个步骤:
-
1.引入逆向的pom依赖,以及配置好
-
2.mgb.xml(逆向依赖的文件)
-
3.配置好application.xml文件, 保证扫描到mapper或者其他的bean
-
4.逆向生成的启动代码
4.搭建Vue前端工程
4.1安装node.js文件:
这里我是官网下载的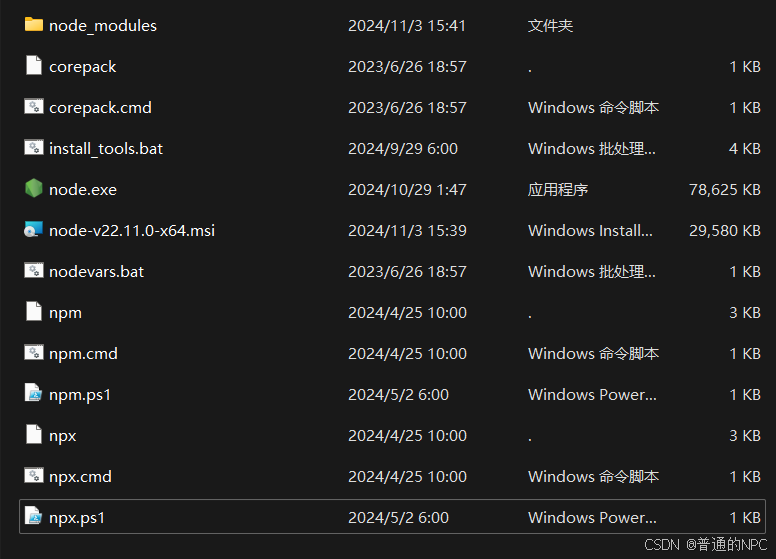
4.2cmd里面运行这个进行安装:
npm install -g @vue/cli
安装成功了就。
因为我们现在的开发采用的是前后端分离,上面的内容负责后端数据。现在我们需要创建一个前端项目:
4.3现在E盘创一个前端项目文件:
4.4然后进入对应的cmd: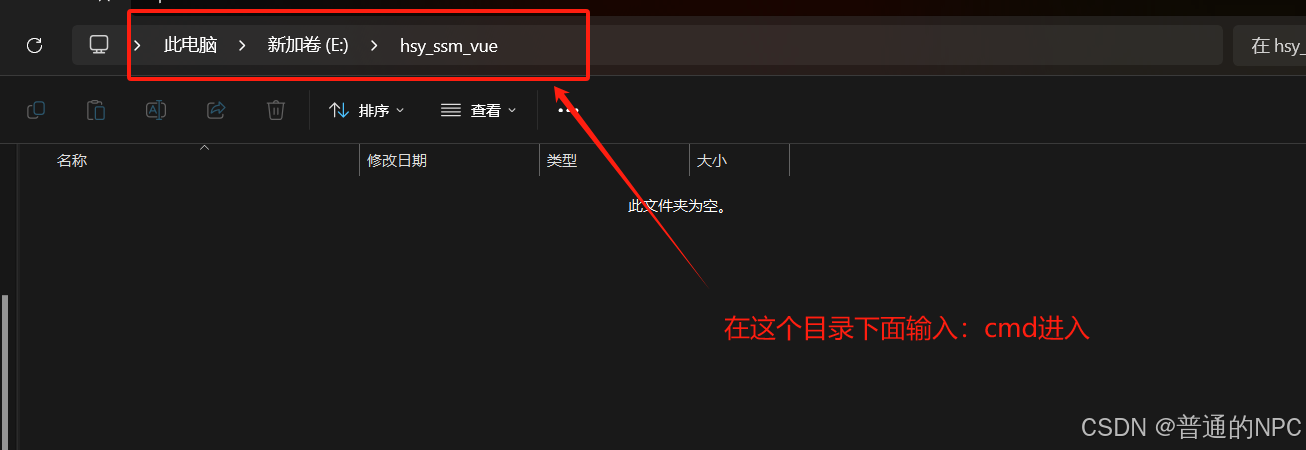
4.5创建我们vue项目的指令: vue create 项目名字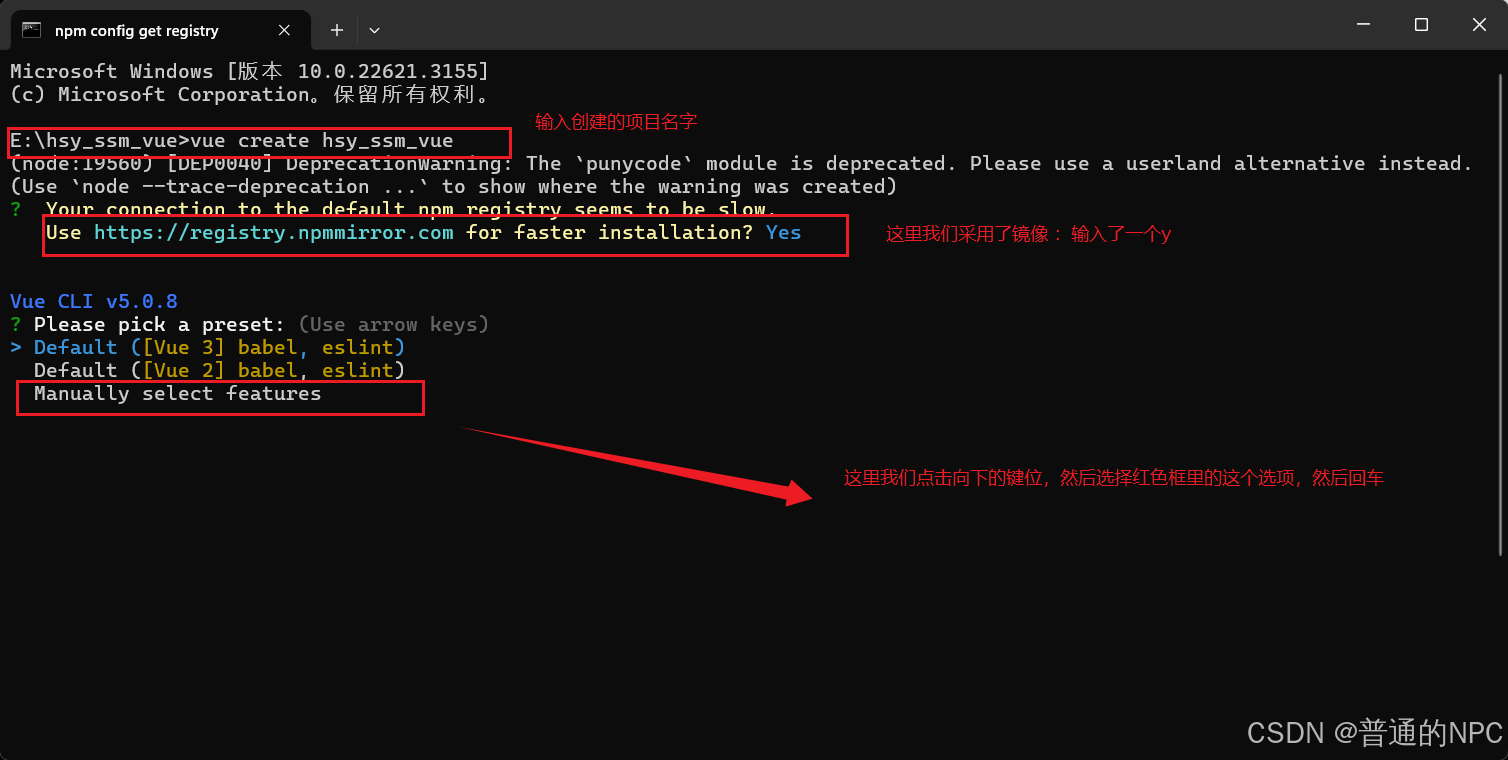 然后进去之后选择
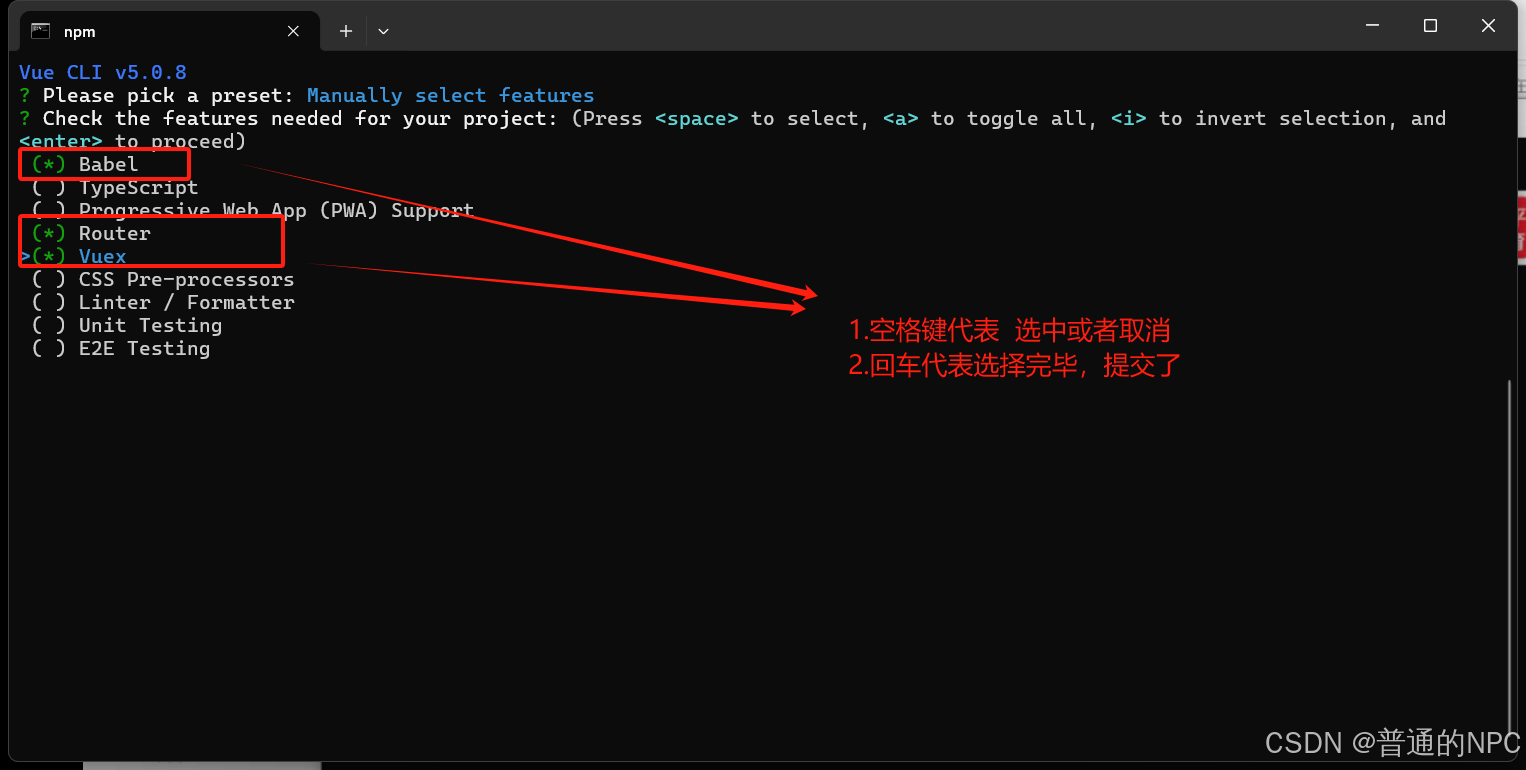
选择功能:
-
使用 箭头键(↑ 或 ↓)在选项之间移动。
-
使用 空格键(Space)来选择或取消选择某个功能。选中后,会看到选项前面出现一个
(*)标记。 -
一旦选中所需的功能,您可以按 Enter 键继续。
选择结束之后,回车提交:
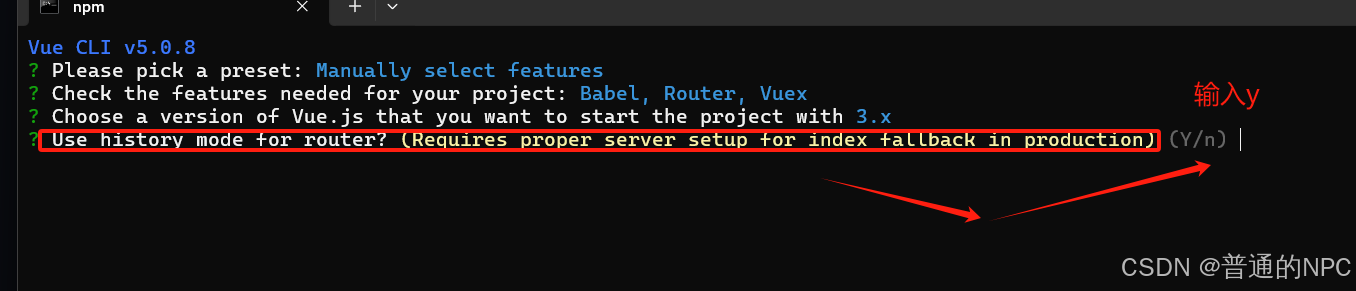
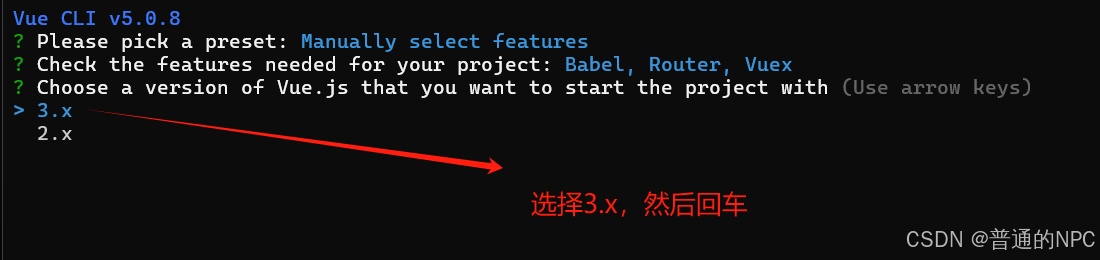 下一步:配置路由设置:
 下一步:选择项目依赖管理包管理方式
 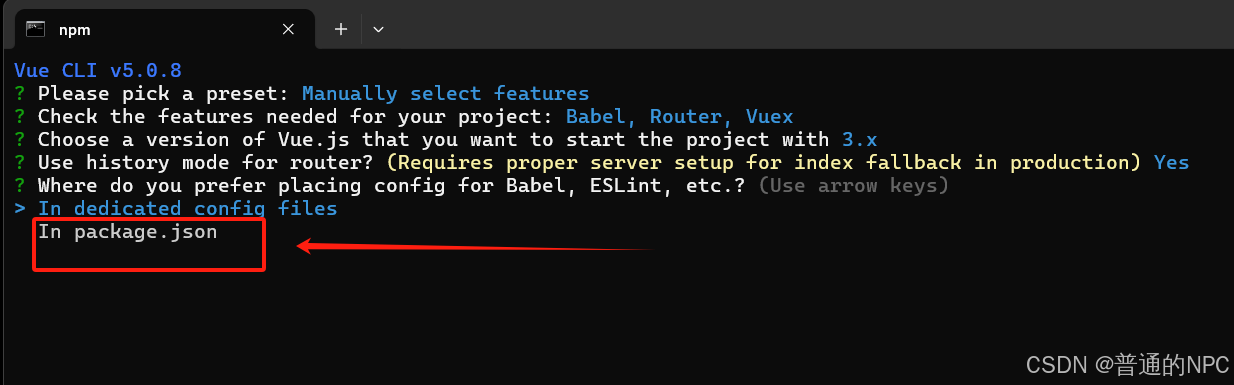 下一步: 这个提示询问您是否希望将当前项目的配置保存为一个预设,以便在将来的项目中快速使用。
  下一步:"Save preset as:": 这是让你输入一个名称来标识这个预设的地方。你可以给预设取一个容易记住的名称,比如“my-vue-preset”。这样,日后在创建项目时,您只需选择这个预设即可自动应用之前保存的配置。
  创建成功:
创建成功: 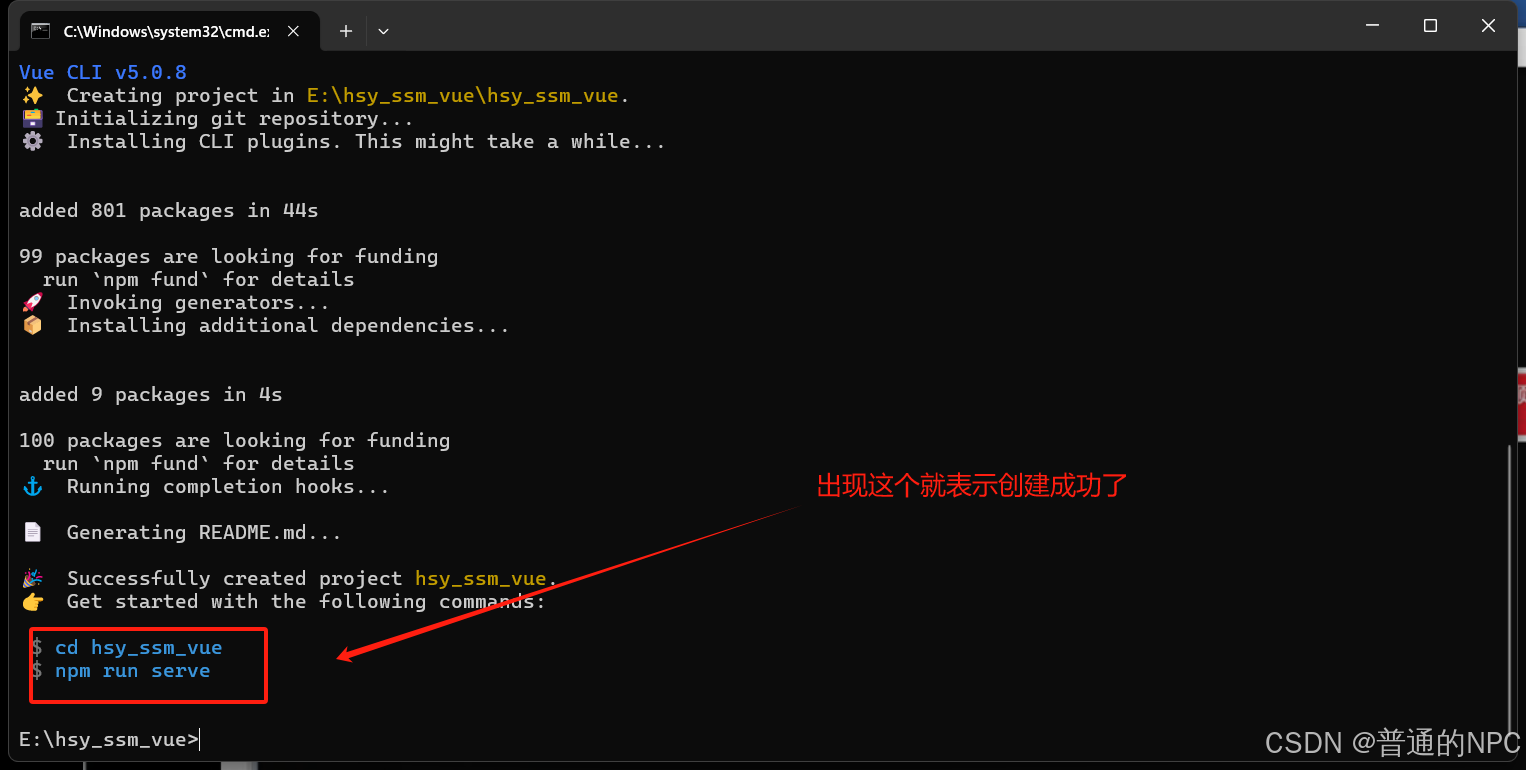 按照蓝色字体输入:
 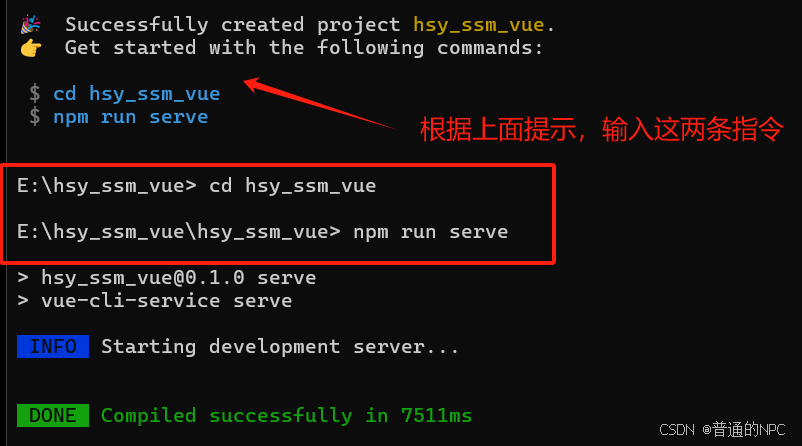 最终显示:
最终显示: 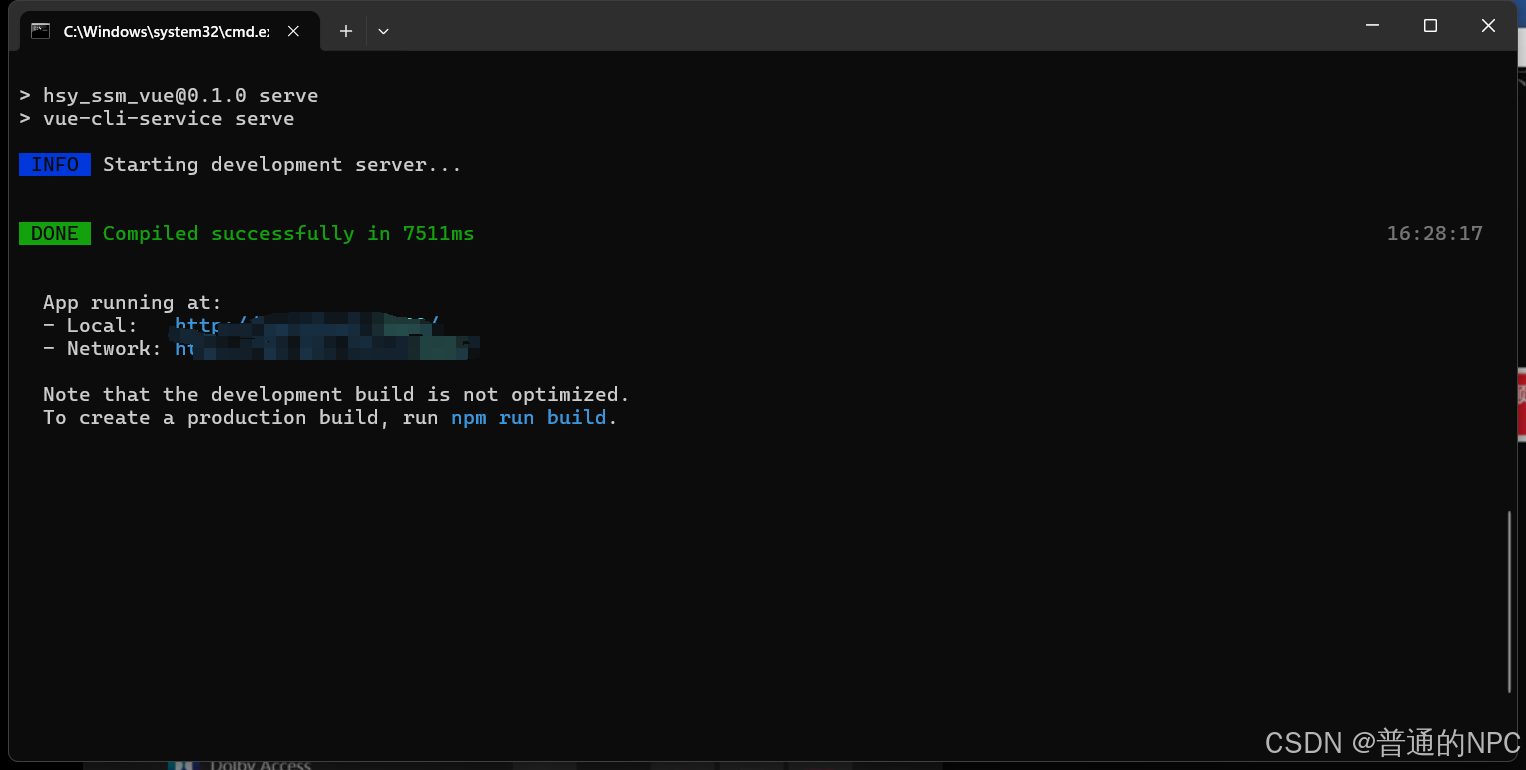 然后根据上面显示的local端口号去浏览器去搜索:
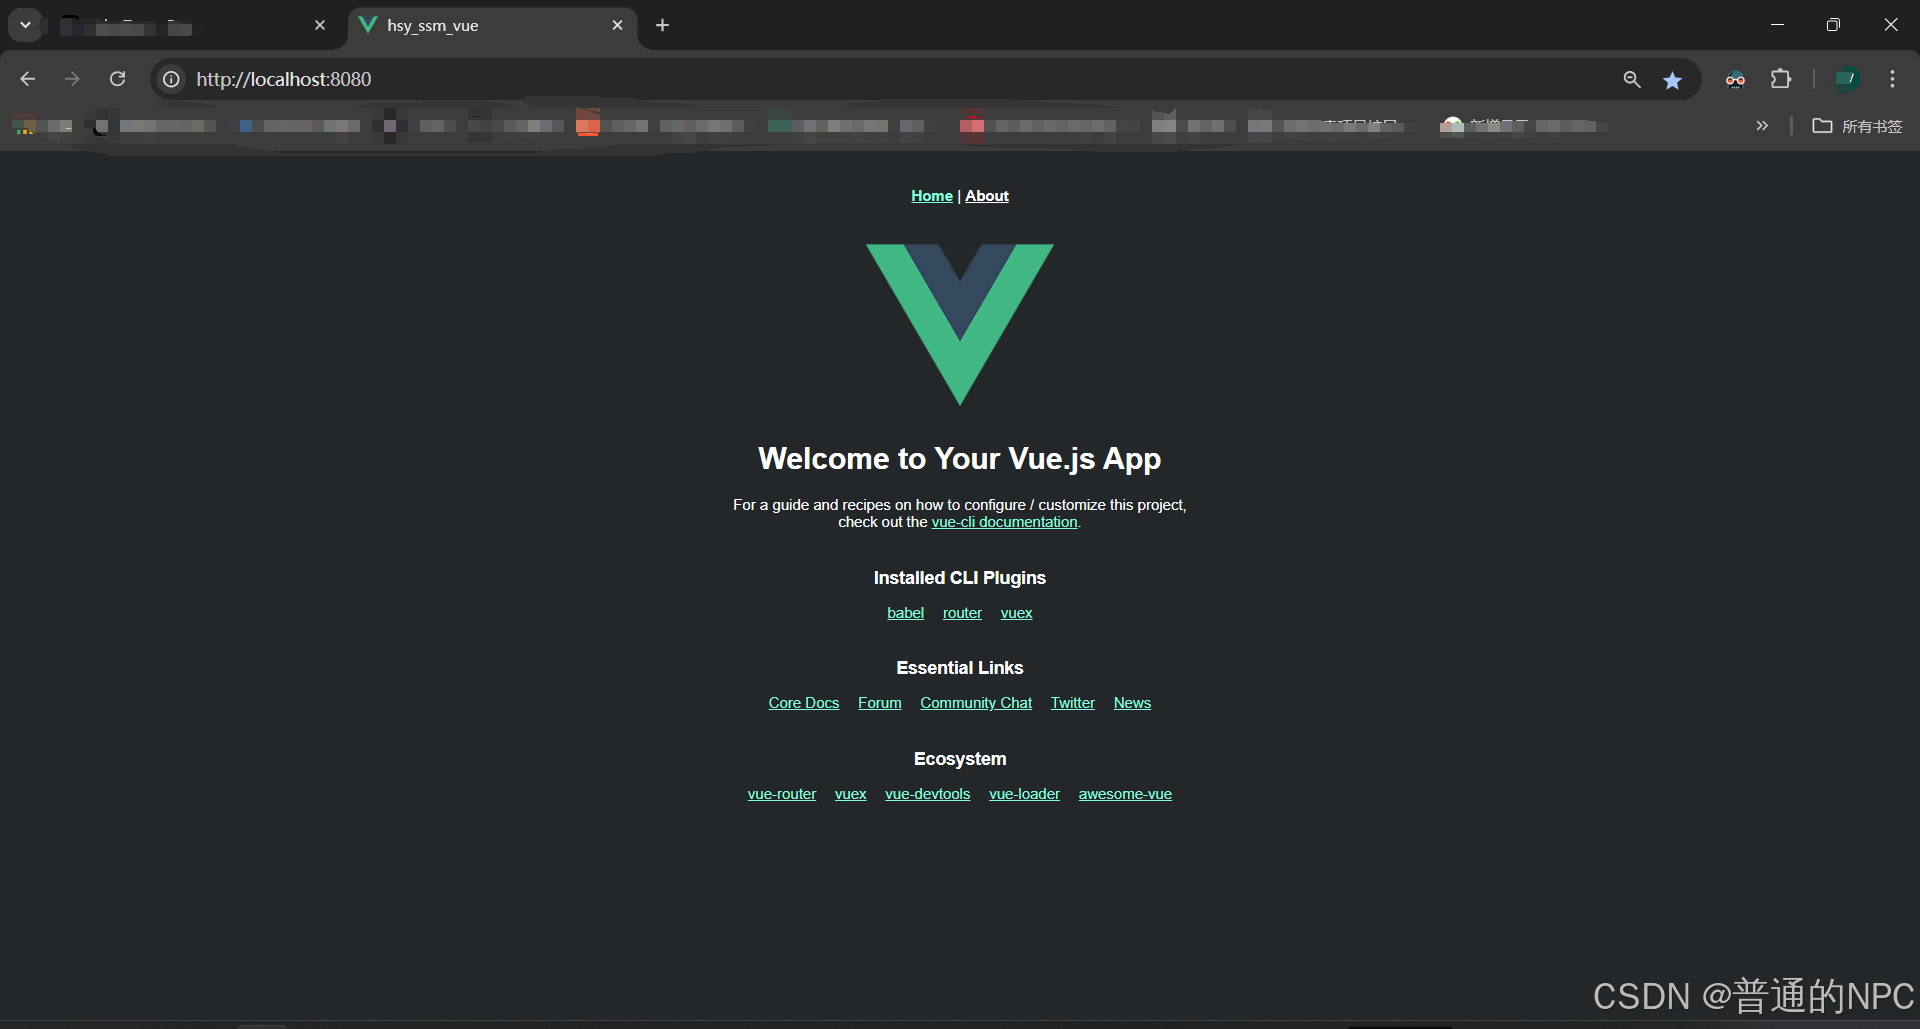
4.6前端Vue项目基本结构到这就搭建好了。
4.7用idea打开这个前端vue的项目: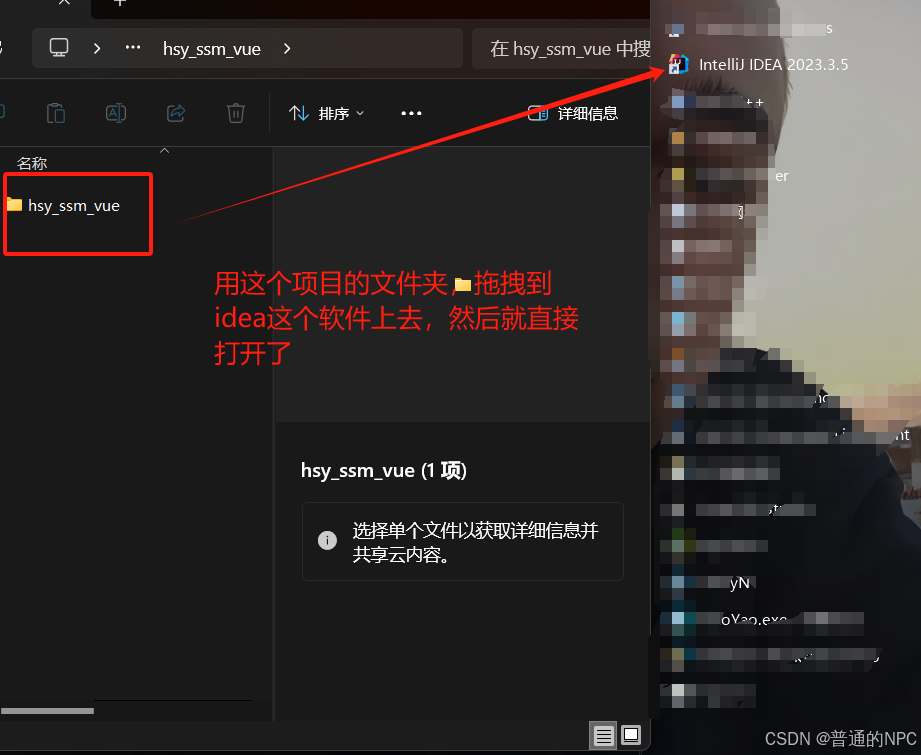
打开之后编辑配置: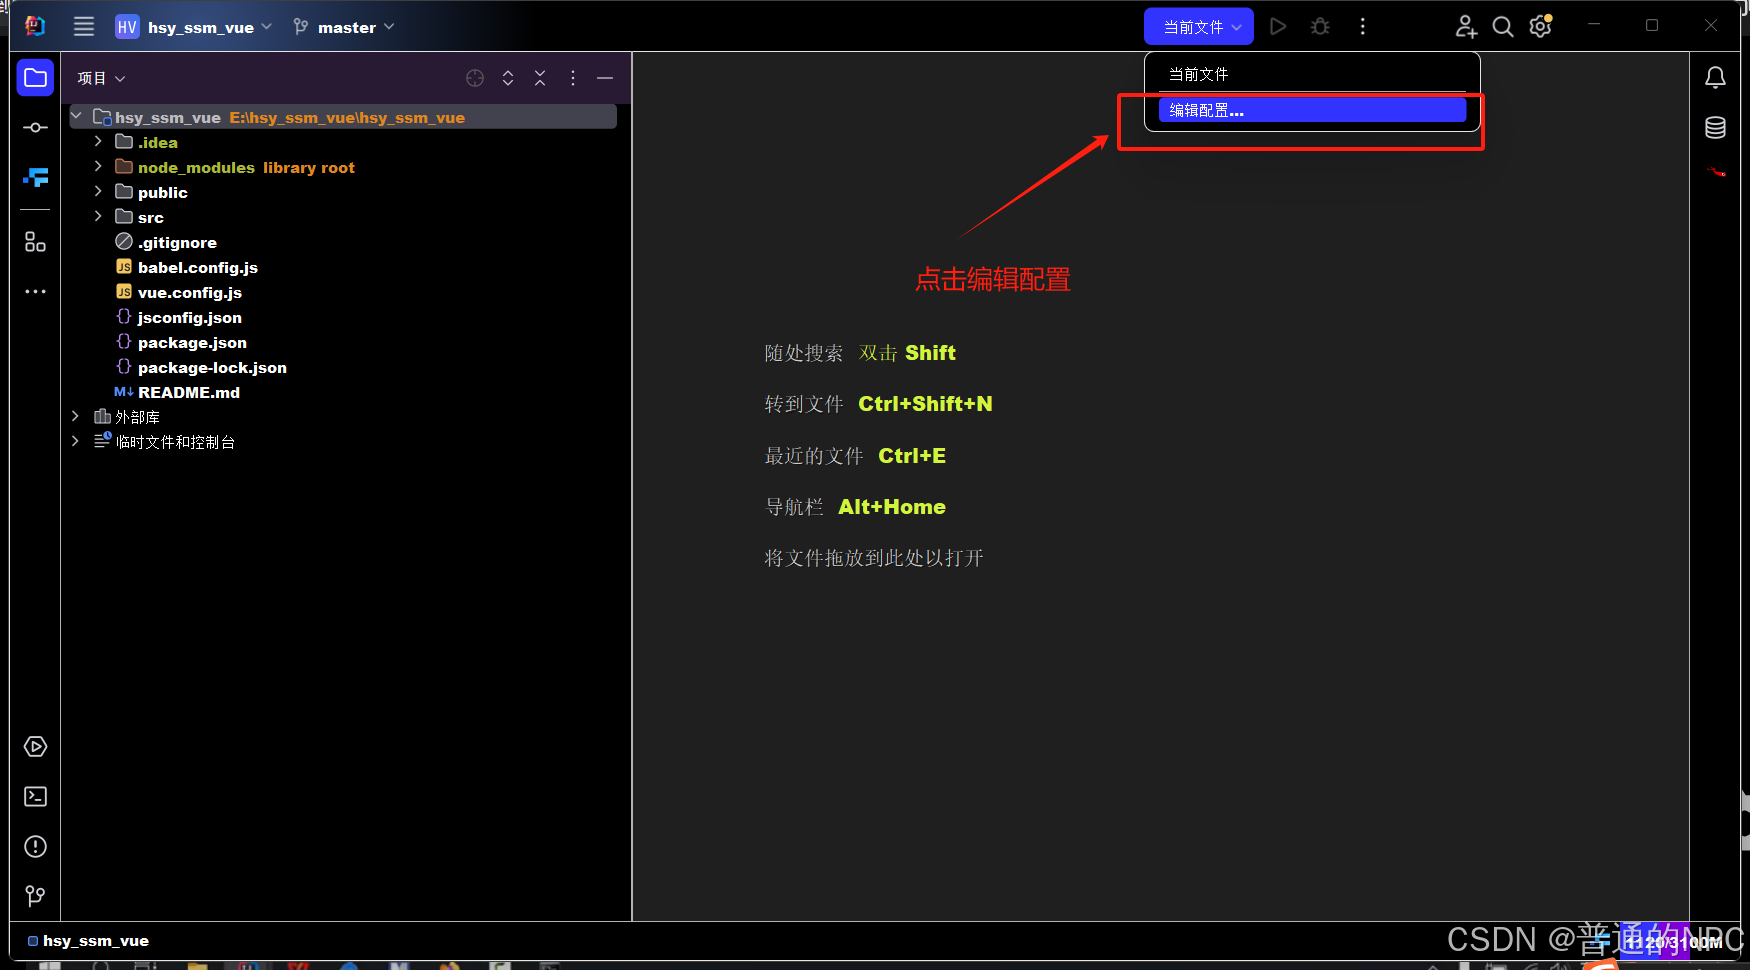 下载一个插件:
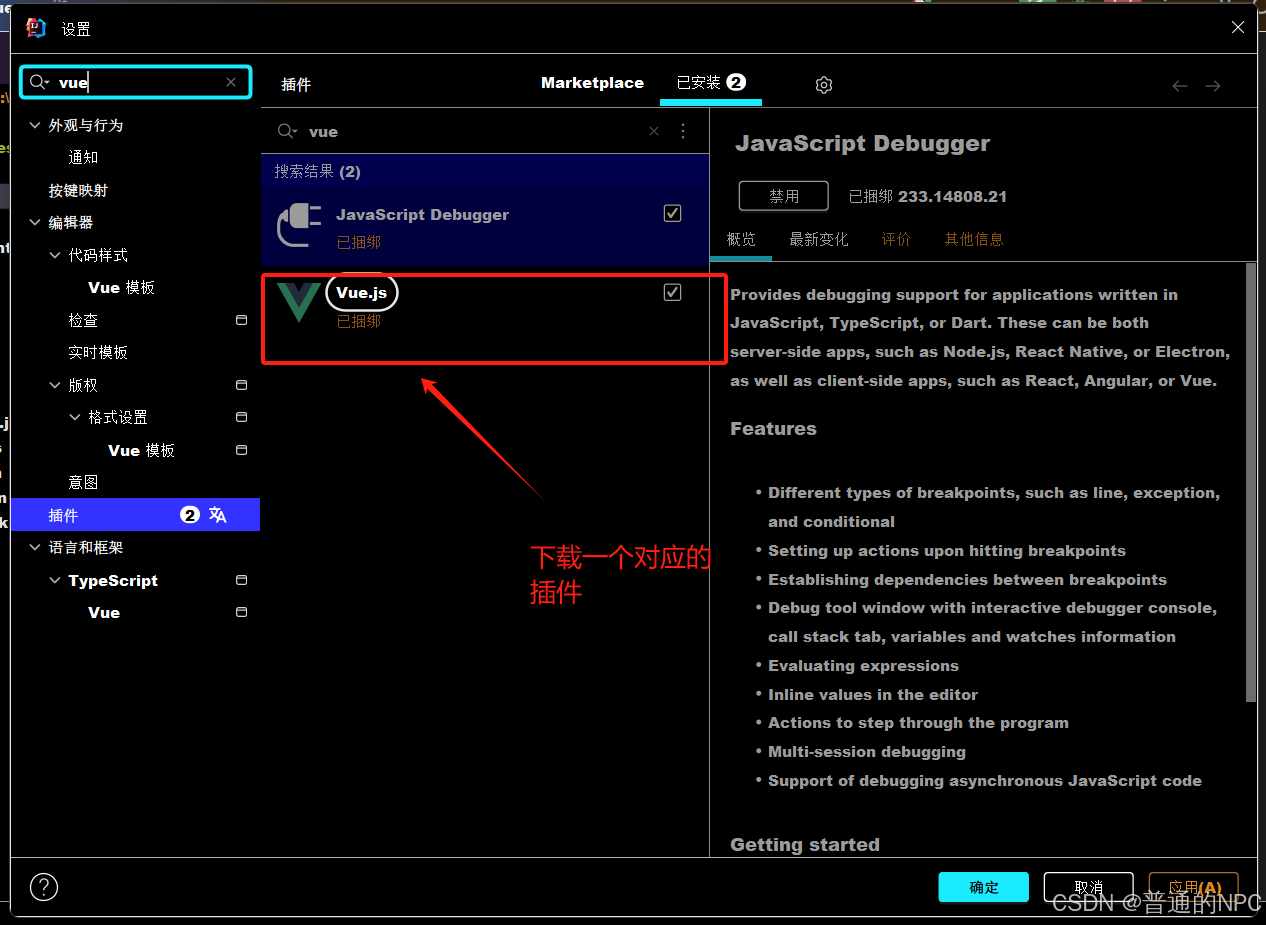
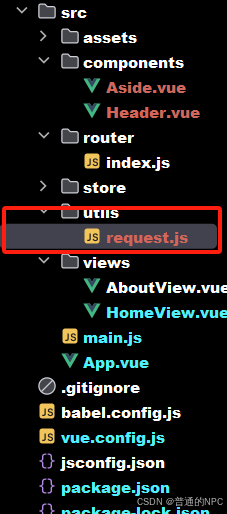
梳理vue3的项目结构:
src:
-
这是项目的源代码文件夹,包含了所有的应用逻辑和组件。
assets:-
存放项目中使用的静态资源,如图片、字体、样式文件等。
components:-
这个文件夹用于存放 Vue 组件。组件是 Vue 应用的基本构建块,每个组件通常负责一个特定的功能或界面部分。
router:-
存放与路由相关的文件。通常会有一个
index.js文件,定义应用的路由规则,配置不同页面的组件。
store:-
用于状态管理的文件夹。如果项目使用 Vuex 进行状态管理,这里会包含与 Vuex 相关的文件,如状态、变更和动作的定义。
views:-
存放应用的视图组件,通常对应于不同的路由。每个视图组件可能由多个子组件组成,负责显示特定的页面内容。
-
main.js:
-
应用的入口文件。在这里,您会创建 Vue 实例,配置路由、状态管理,并将应用挂载到 DOM 中。
package.json:-
项目描述文件,包含项目的基本信息、依赖项、脚本命令等。它定义了项目的依赖关系和运行配置。
-
App.vue:
-
应用的根组件。通常包含应用的整体布局和结构,其他组件会在此组件中被渲染。
更改Vue的服务端口: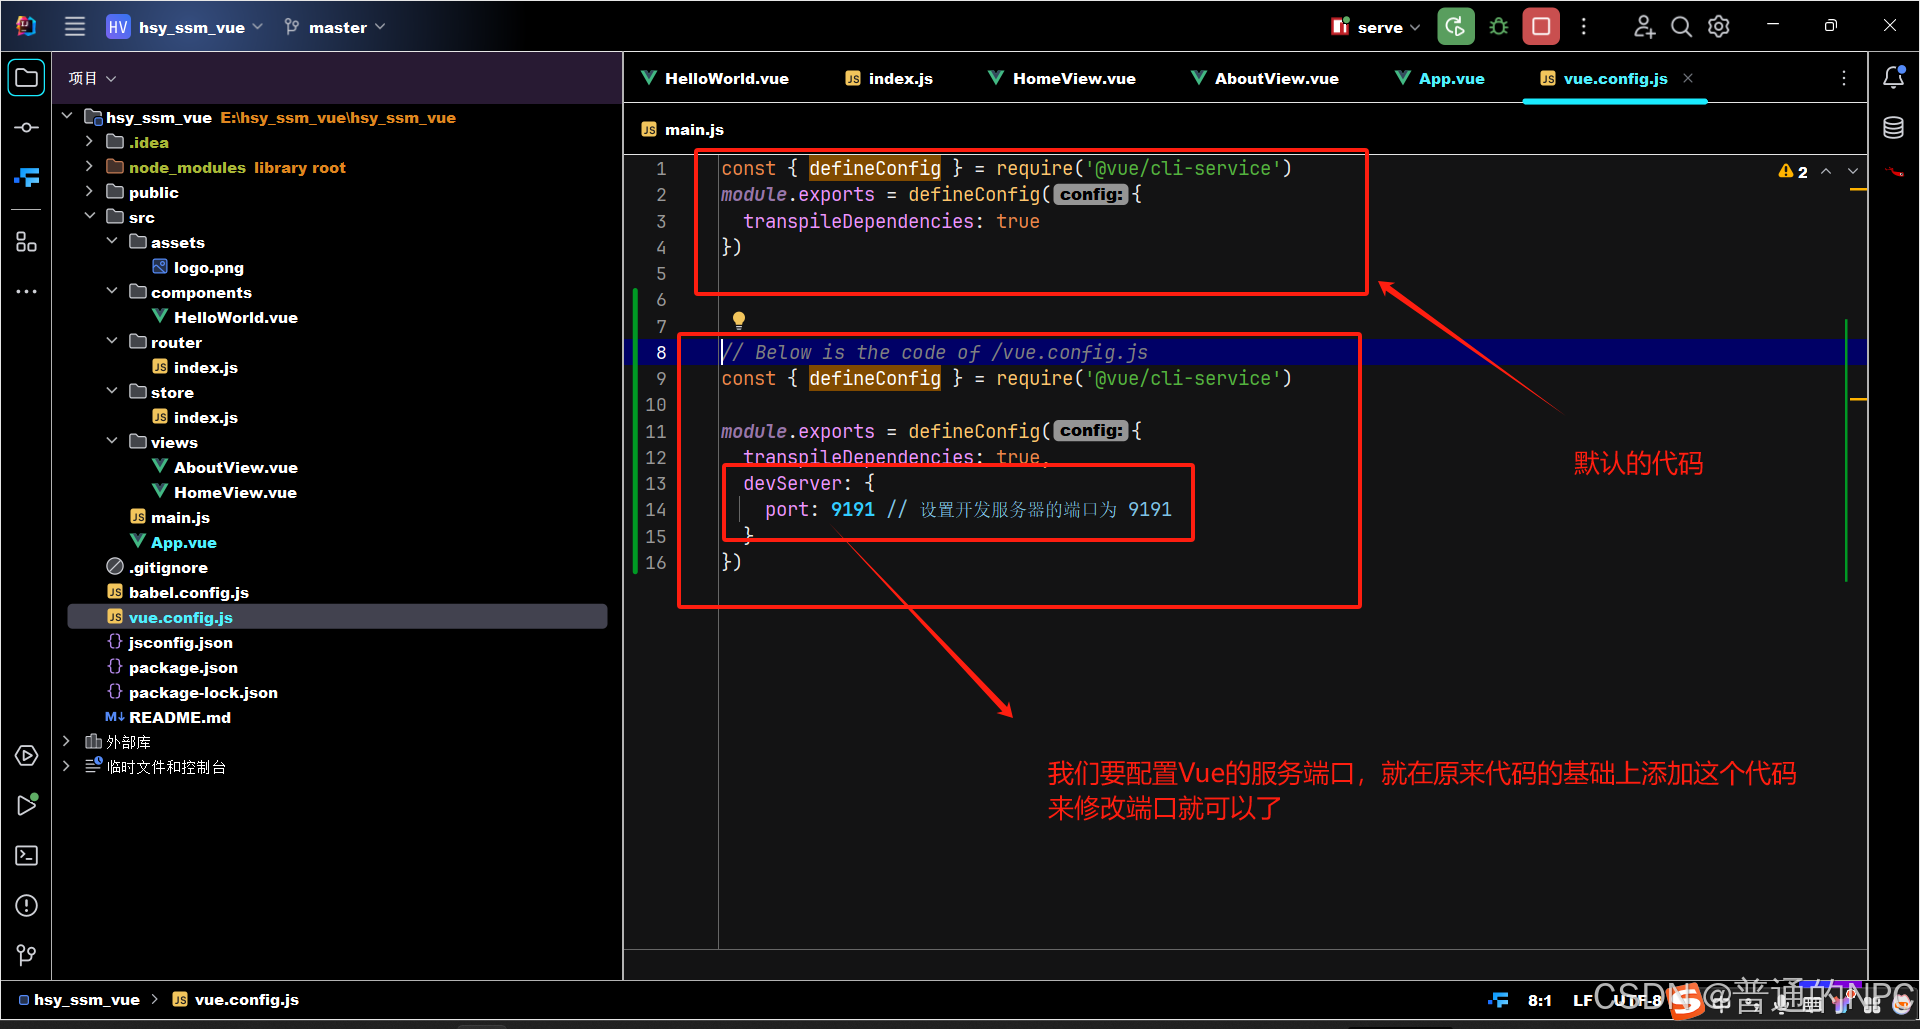
ElmentUI对应的是Vue2
4.8现在我们上面使用的是Vue3 所以要使用 ElementUI-plus
使用ElementUI-plus :安装这个相关的包,终端的执行命令 :npm install element-plus --save
**这里一定要注意,这里的cmd必须切换到你的项目目录的根目录下面再去执行下载Element-Plus的命令:
下载成功了: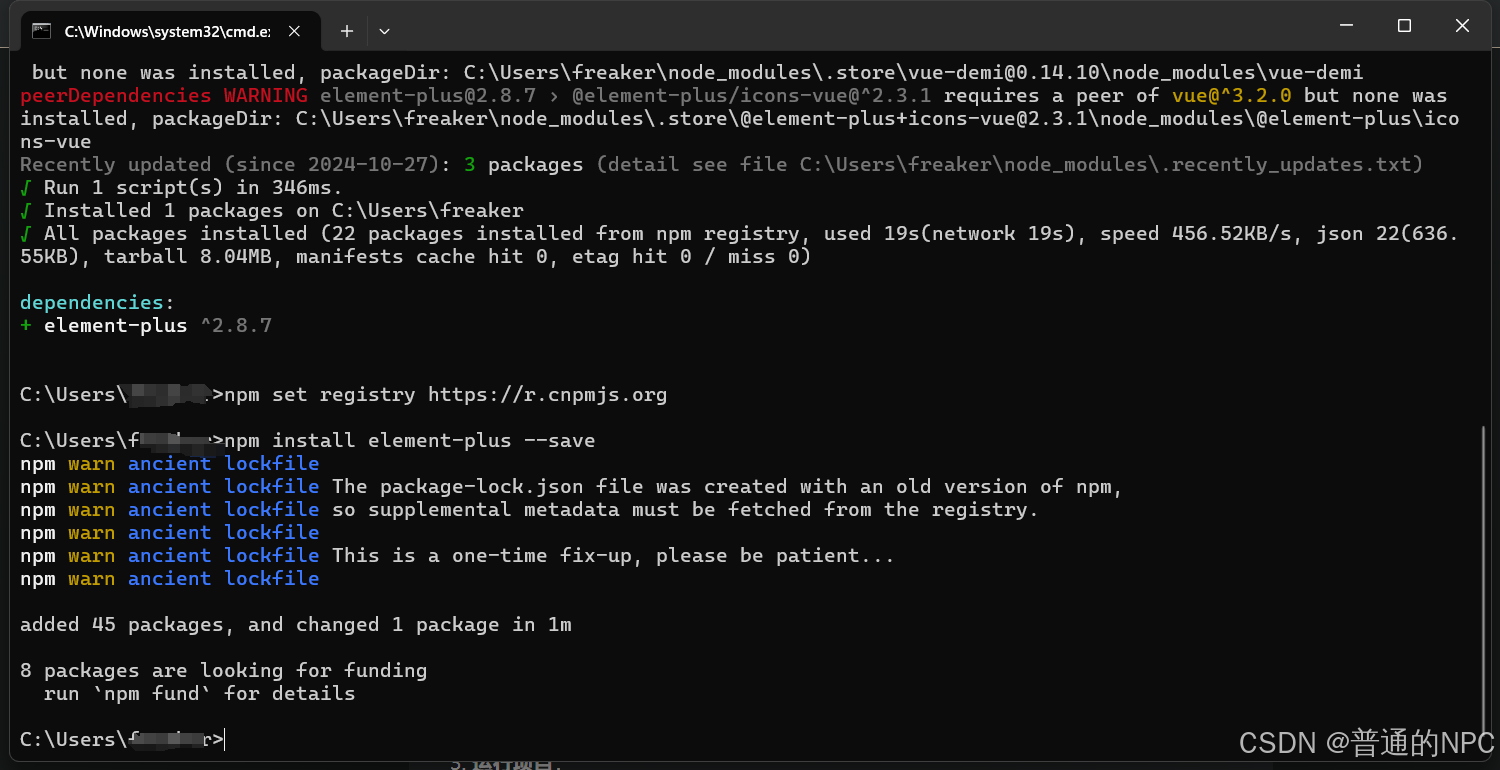
到这里就完成ElementPlus了。
4.9下面就是创建我们的家具页面的前端Vue页面的过程
使用Vue3和ElementUI-Plus完成一个简单的功能:
1.修改App.vue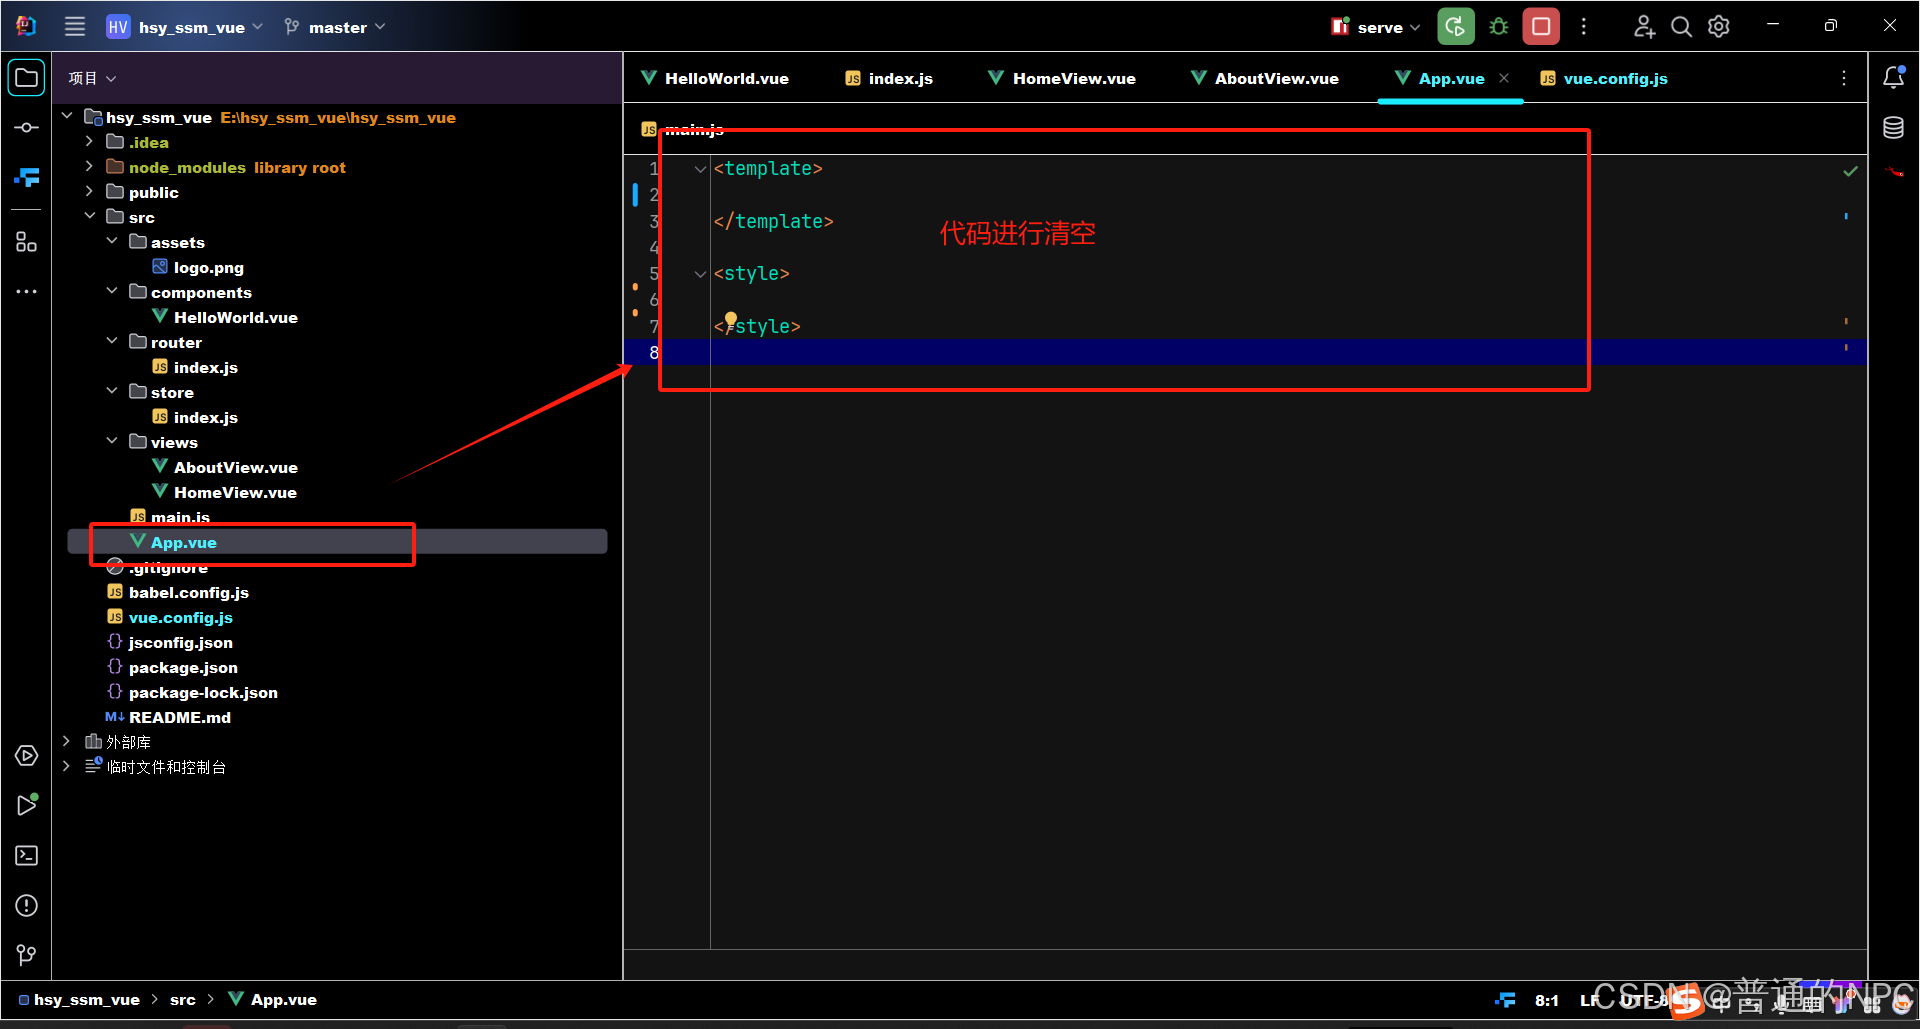 2.修改homeView.vue:
 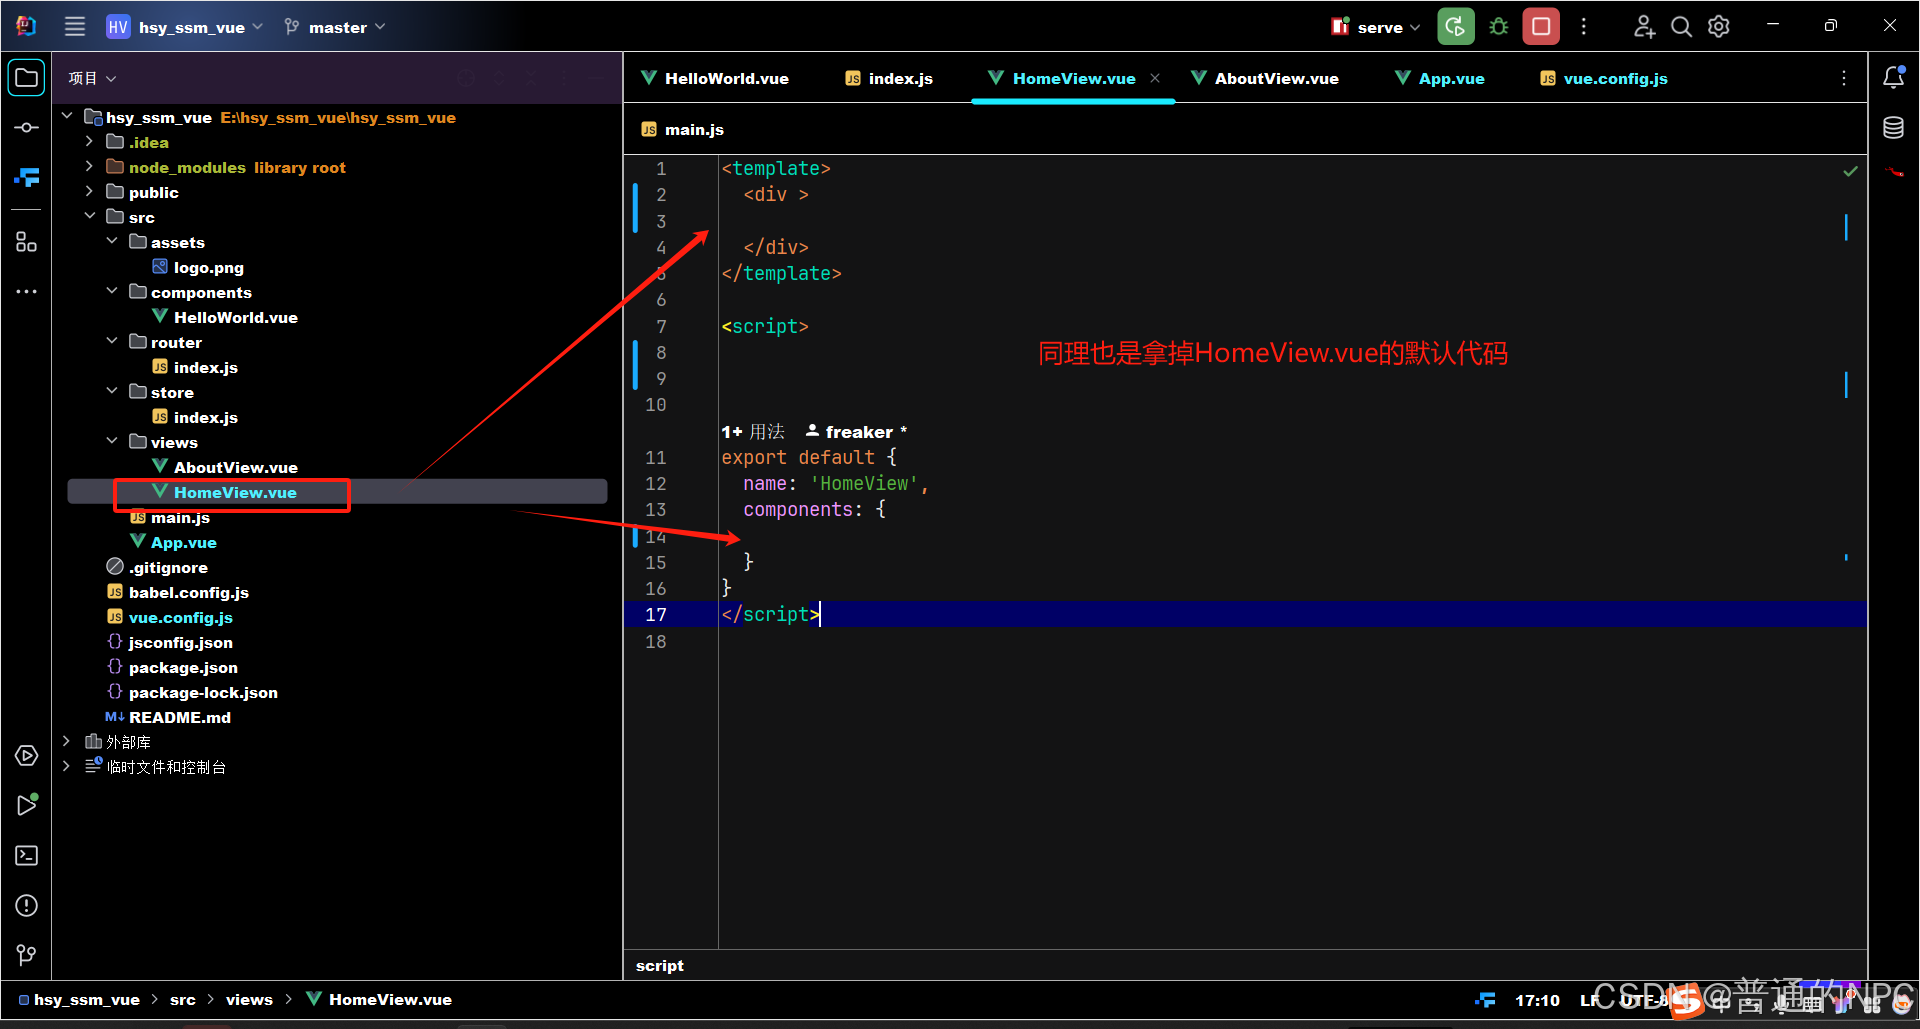 3.删除组件Helloword:
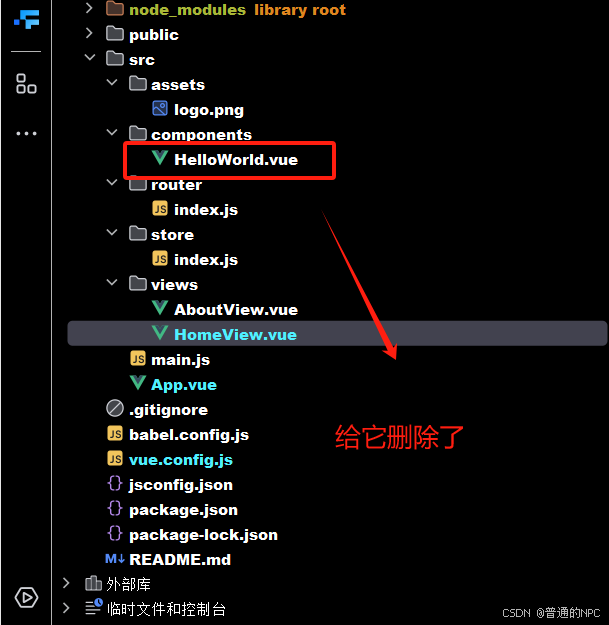
4.在组件components下面创建一个Header.vue:
<script setup>
// 在这里可以引入所需的依赖或定义响应式数据
</script>

<template>
  <div style="height: 50px; line-height: 50px; border-bottom: 1px solid #ccc; display: flex"><!-- 主容器,设置高度为 50px,行高为 50px,以确保内容垂直居中;添加底部边框,并使用 flexbox 布局使子元素横向排列 -->
    <div style="width: 200px; padding-left: 30px; font-weight: bold; color: dodgerblue">后台管理</div>  <!-- 左侧标题,设置宽度、内边距、字体加粗和颜色 -->
    <div style="flex: 1"></div>  <!-- 占位的 div,使用 flex 属性使其占据剩余空间 -->
    <div style="width: 100px">下拉框</div>  <!-- 右侧下拉框,设置固定宽度 -->
  </div>
</template>

<style scoped>
/* 这里可以添加样式,scoped 确保样式只作用于当前组件 */
</style>
这里我要提一下注册多个子组件的模版代码:
<!-- App.vue -->
<template>
  <div>
    <MyHeader />  <!-- 使用 Header 组件 -->
    <MyFooter />  <!-- 使用 Footer 组件 -->
    <MySidebar />  <!-- 使用 Sidebar 组件 -->
  </div>
</template>

<script setup>
import Header from "@/components/Header.vue";  // 导入 Header 组件
import Footer from "@/components/Footer.vue";  // 导入 Footer 组件
import Sidebar from "@/components/Sidebar.vue";  // 导入 Sidebar 组件

// 注册组件
export default {
  name: "layout",
  components: {
    MyHeader: Header,  // 使用别名 MyHeader 注册 Header 组件
    MyFooter: Footer,  // 使用别名 MyFooter 注册 Footer 组件
    MySidebar: Sidebar // 使用别名 MySidebar 注册 Sidebar 组件
  }
}
</script>

<style>
/* 这里可以添加样式 */
</style>
所以我们要在App.vue里面使用上面的Header.vue组件,代码如下
<!-- App.vue -->
<template>
  <div>
    <Header />
  </div>
</template>


<script >
import Header from "@/components/Header.vue";
 export default {
   name:"layout",
    components: {
      Header
    }
 }// 根据实际文件路径引入组件
</script>


<style>
/* 这里可以添加样式 */
</style>
创建一个全局的global.css文件(先准备着,后面有用),以后有全局样式就可以写在这里: 修改我们的main.js文件,导入刚刚我们的global.css:
 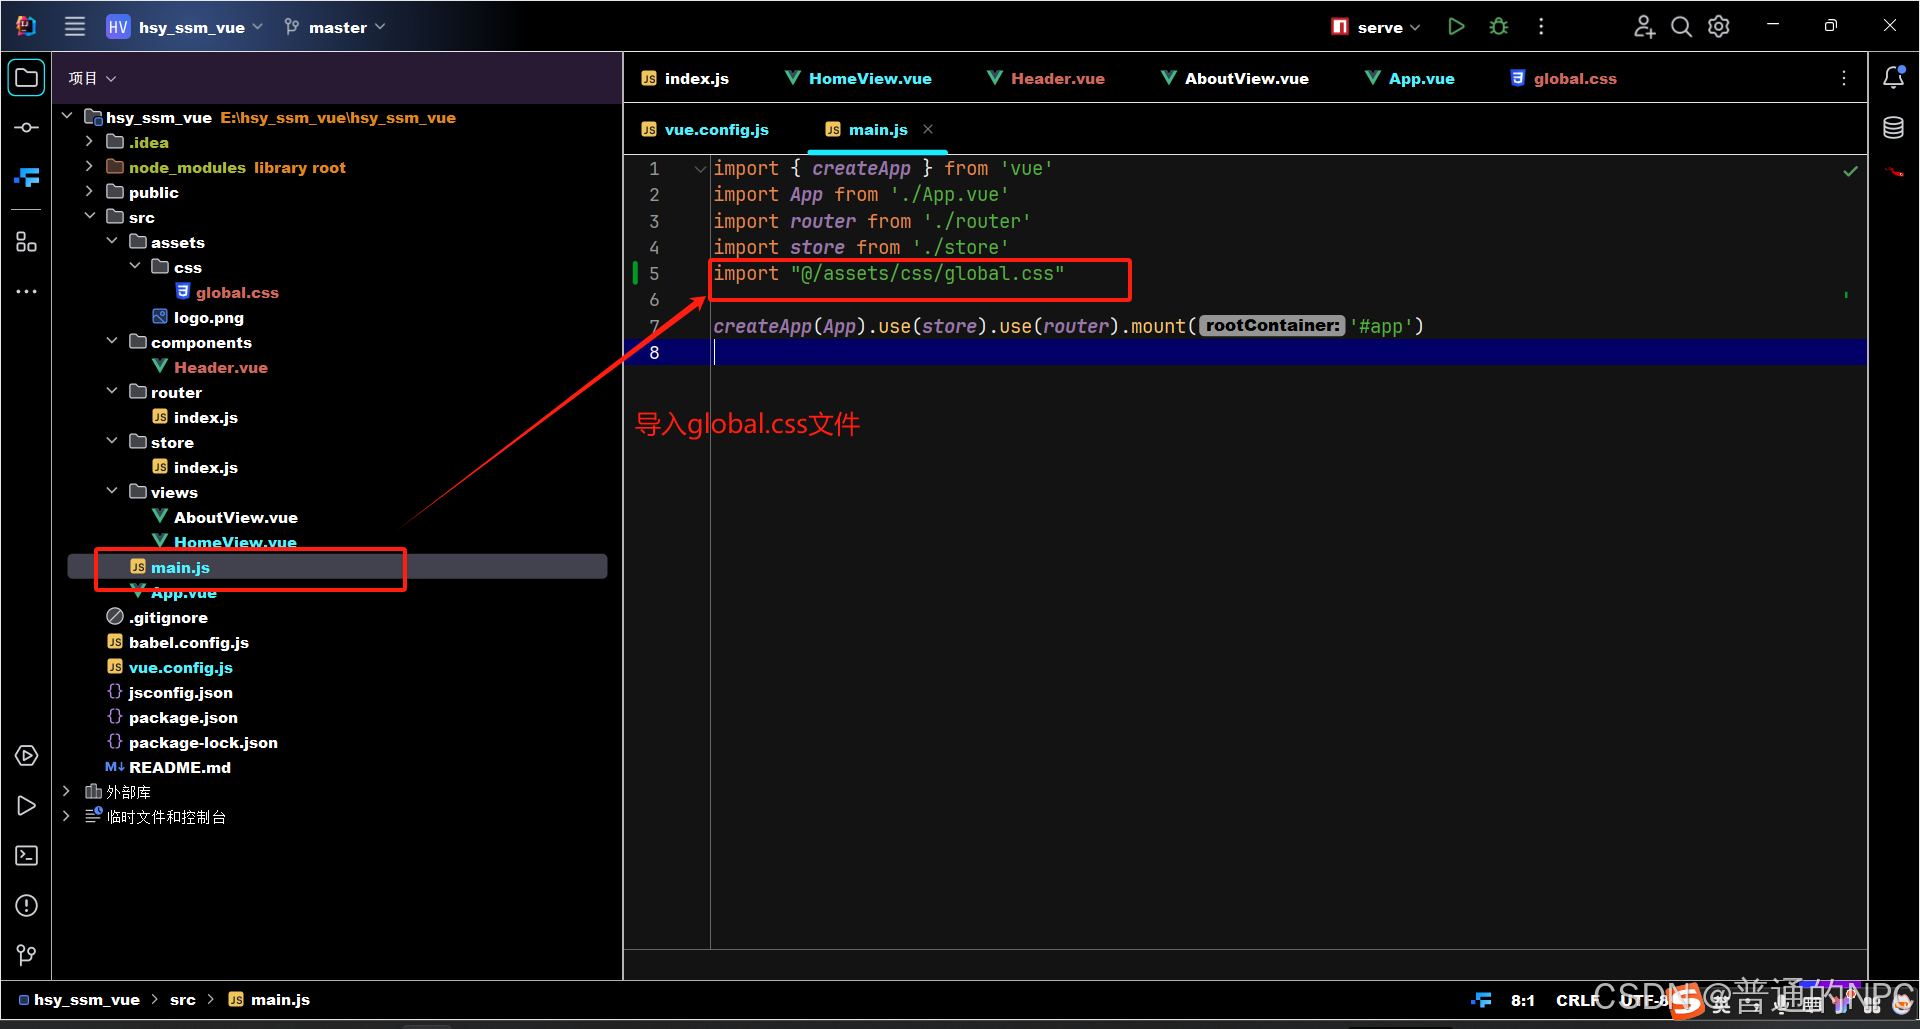 在main.js文件引入Element-Plus ,并测试:
import ElementPlus from 'element-plus'

import'element-plus/dist/index.css/'


修改这句代码:
createApp(App).use(store).use(router).mount('#app')
修改为:
createApp(App).use(store).use(router).use(ElementPlus).mount('#app')
代码如图所示: 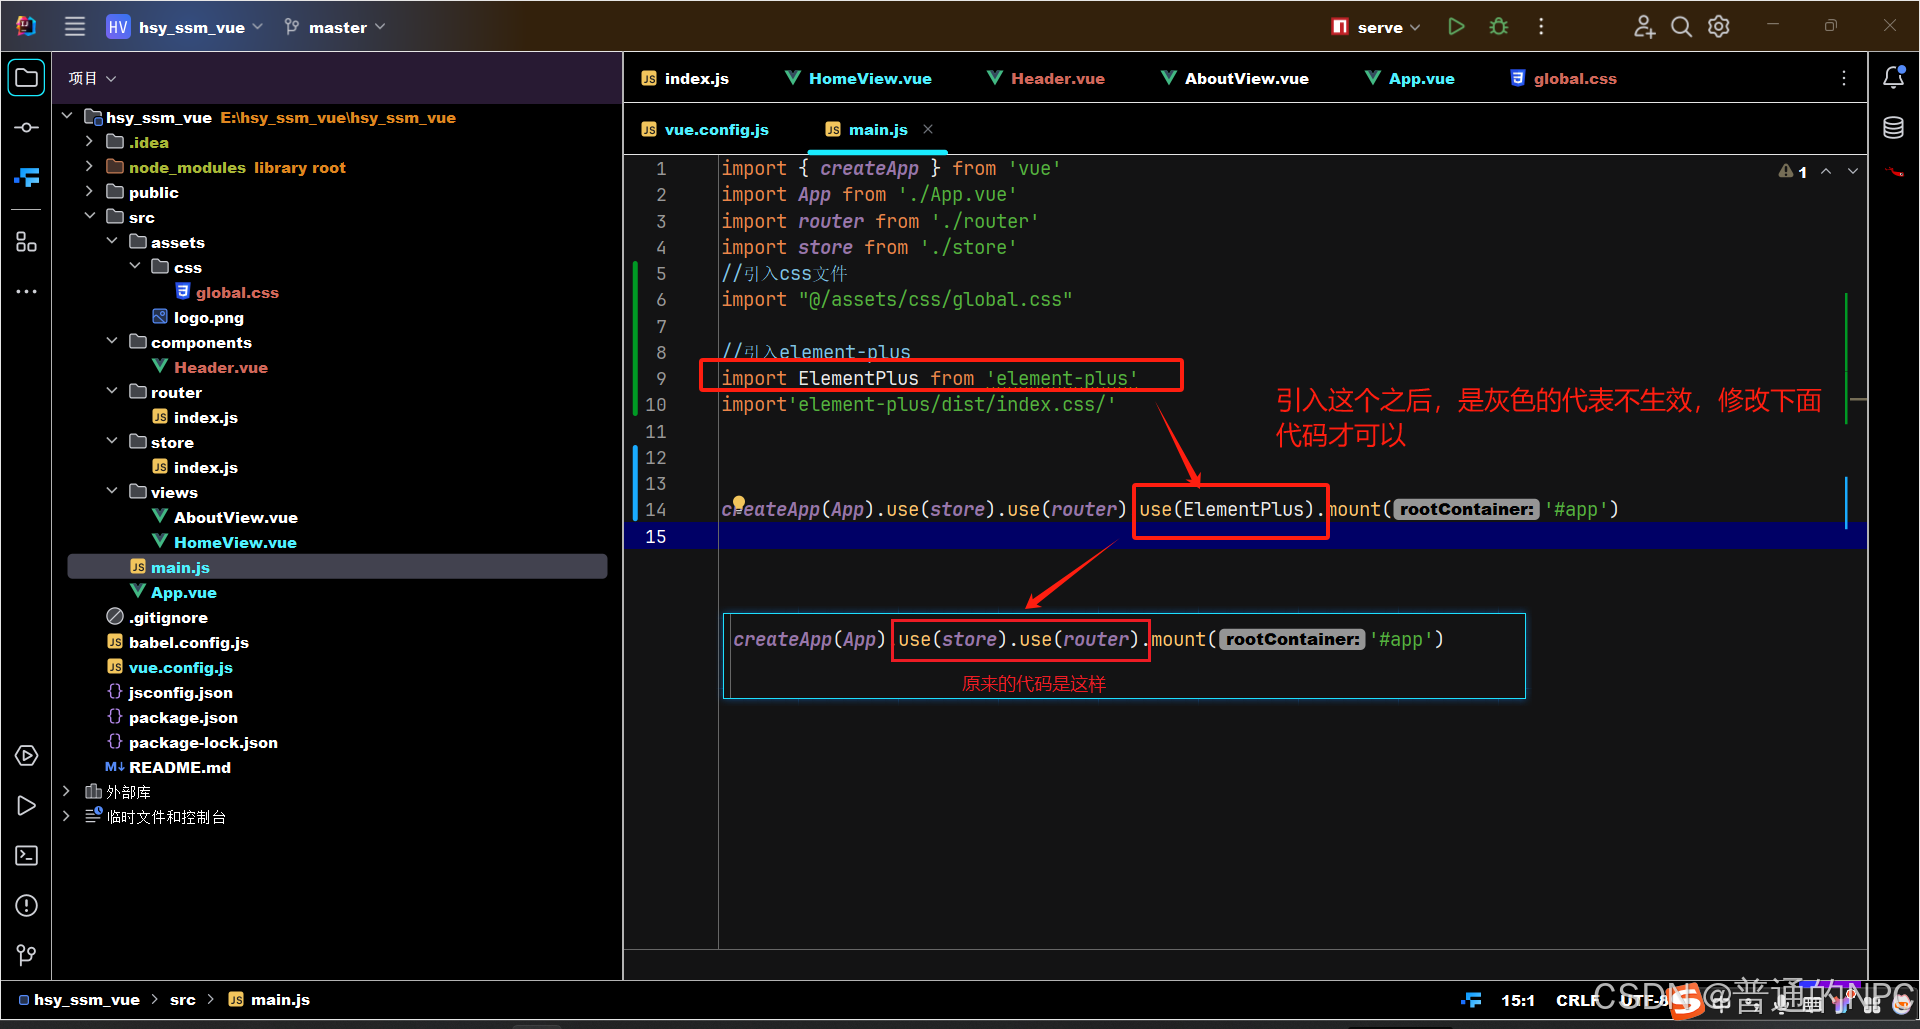 现在开始引入一个el-button,看看是否生效:
 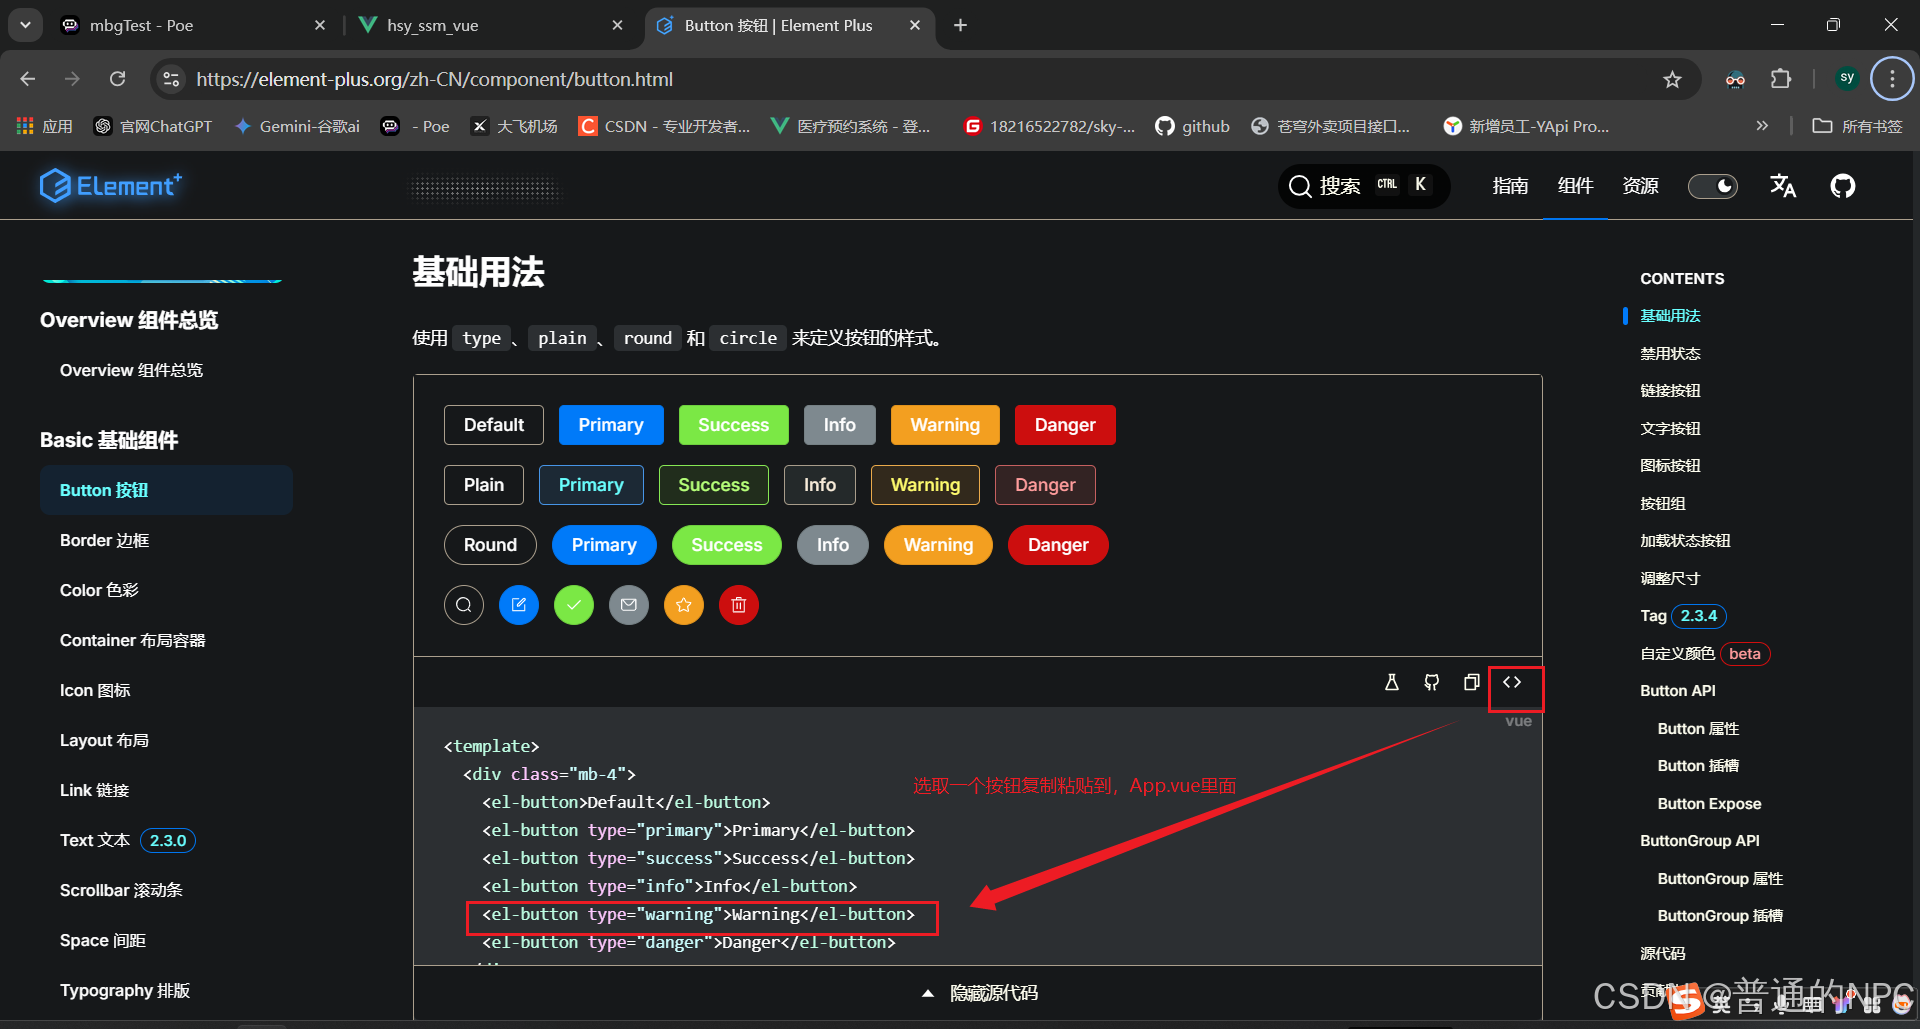 Header.vue组件引入Dropdown下拉框:
  粘贴复制里面的代码:
 <el-dropdown>
    <span class="el-dropdown-link">
      Dropdown List
      <el-icon class="el-icon--right">
        <arrow-down />
      </el-icon>
    </span>
    <template #dropdown>
      <el-dropdown-menu>
        <el-dropdown-item>Action 1</el-dropdown-item>
        <el-dropdown-item>Action 2</el-dropdown-item>
        <el-dropdown-item>Action 3</el-dropdown-item>
        <el-dropdown-item disabled>Action 4</el-dropdown-item>
        <el-dropdown-item divided>Action 5</el-dropdown-item>
      </el-dropdown-menu>
    </template>
  </el-dropdown>
放入到我们的Hdeader.vue组件里面: 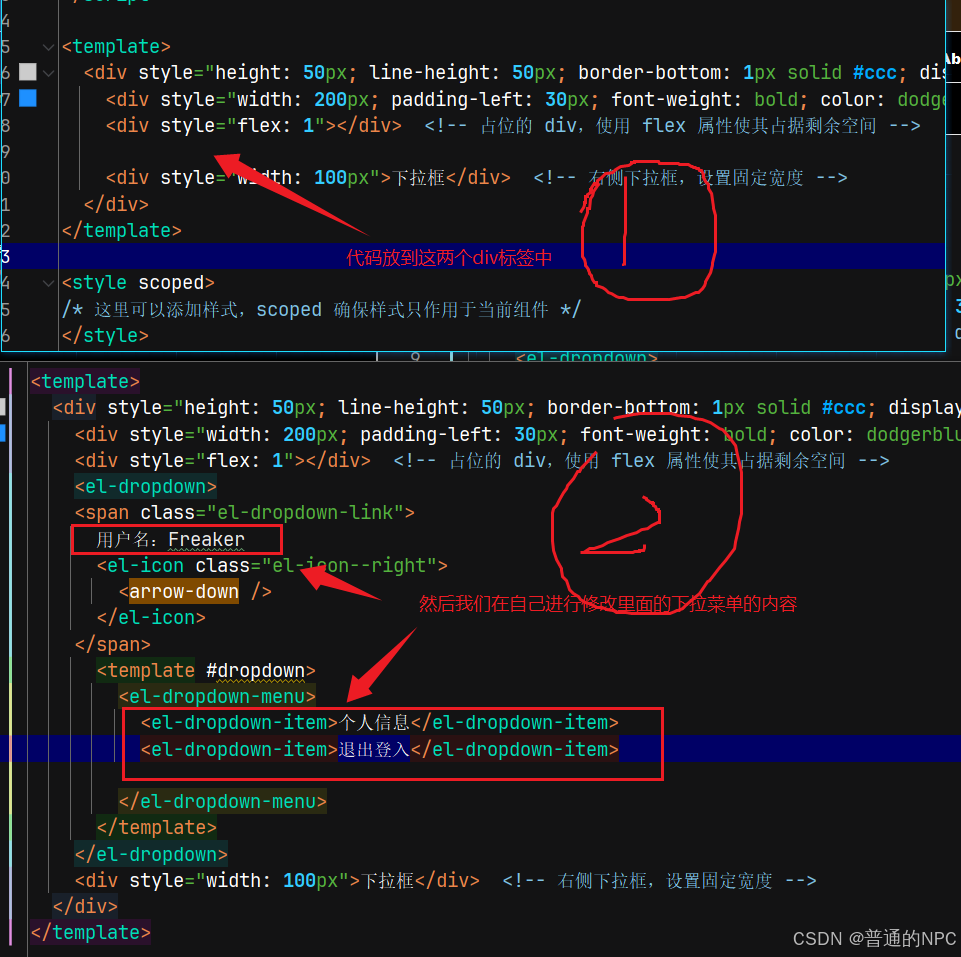 效果展示:
效果展示: 
创建侧边栏组件Aside.Vue ,并引入导航栏组件:
Aside.vue代码
<template>
  <div>
    <!--引入导航栏-->
    <el-menu
        default-active="2"
        class="el-menu-vertical-demo"
        @open="handleOpen"
        @close="handleClose"
    >
      <el-sub-menu index="1">
        <template #title>
          <el-icon><location /></el-icon>
          <span>Navigator One</span>
        </template>
        <el-menu-item-group title="Group One">
          <el-menu-item index="1-1">item one</el-menu-item>
          <el-menu-item index="1-2">item two</el-menu-item>
        </el-menu-item-group>
        <el-menu-item-group title="Group Two">
          <el-menu-item index="1-3">item three</el-menu-item>
        </el-menu-item-group>
        <el-sub-menu index="1-4">
          <template #title>item four</template>
          <el-menu-item index="1-4-1">item one</el-menu-item>
        </el-sub-menu>
      </el-sub-menu>
      <el-menu-item index="2">
        <el-icon><icon-menu /></el-icon>
        <span>Navigator Two</span>
      </el-menu-item>
      <el-menu-item index="3" disabled>
        <el-icon><document /></el-icon>
        <span>Navigator Three</span>
      </el-menu-item>
      <el-menu-item index="4">
        <el-icon><setting /></el-icon>
        <span>Navigator Four</span>
      </el-menu-item>
    </el-menu>
  </div>

</template>

<script >
export default {
  name: 'Aside',
}
</script>


<style scoped>

</style>
现在我们需要将App.vue这个页面分为2个大部分,实际上是3个部分 :头部,主体(侧边栏,内容区)
<!-- App.vue -->
<template>
  <div>
    <!--头部-->
    <Header />
    <!--主体-->
    <div style ="display: flex">
      <!--侧边栏-->
      <Aside />
      <!--内容区域,这部分通过路由展示,我们就路由到HomeView.vue-->

        <router-view style="flex:1" />
      </div>
    </div>


</template>


<script >
import Header from "@/components/Header.vue";
import Aside from "@/components/Aside.vue";


 export default {
   name:"layout",
    components: {
      Header,
      Aside
    }
 }// 根据实际文件路径引入组件
</script>


<style>
/* 这里可以添加样式 */
</style>
在我们的HomeView.vue里面加入一个el-button,进行测试,看我们的主体里面的内容区能够使用不:

添加了一个button, 我们的App.vue默认路由是http://localhost:9191/,且访问的是HomeView页面,所以我们直接在HomeView里面创建一个 表格,用来显示数据:
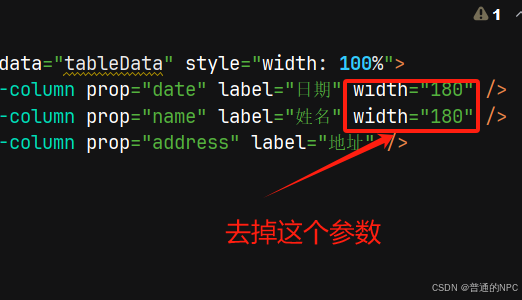
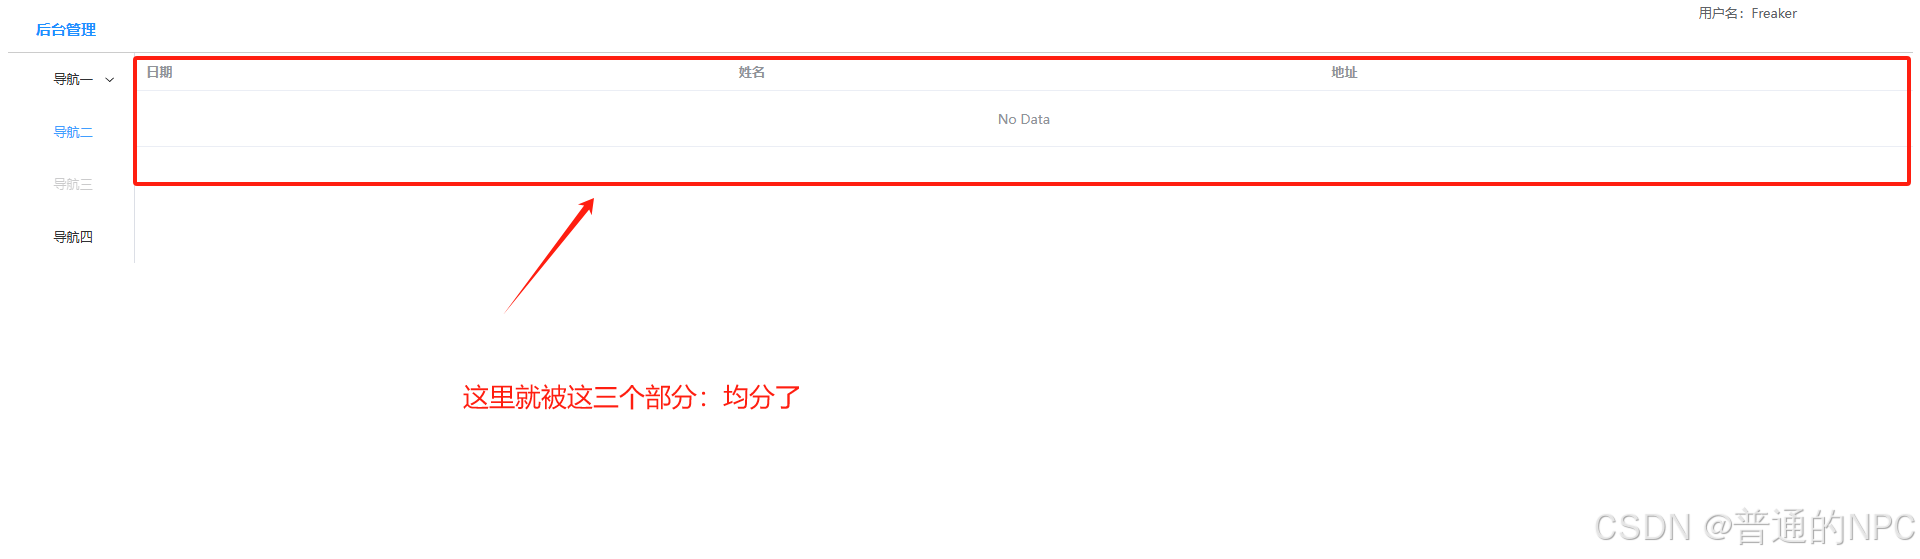
 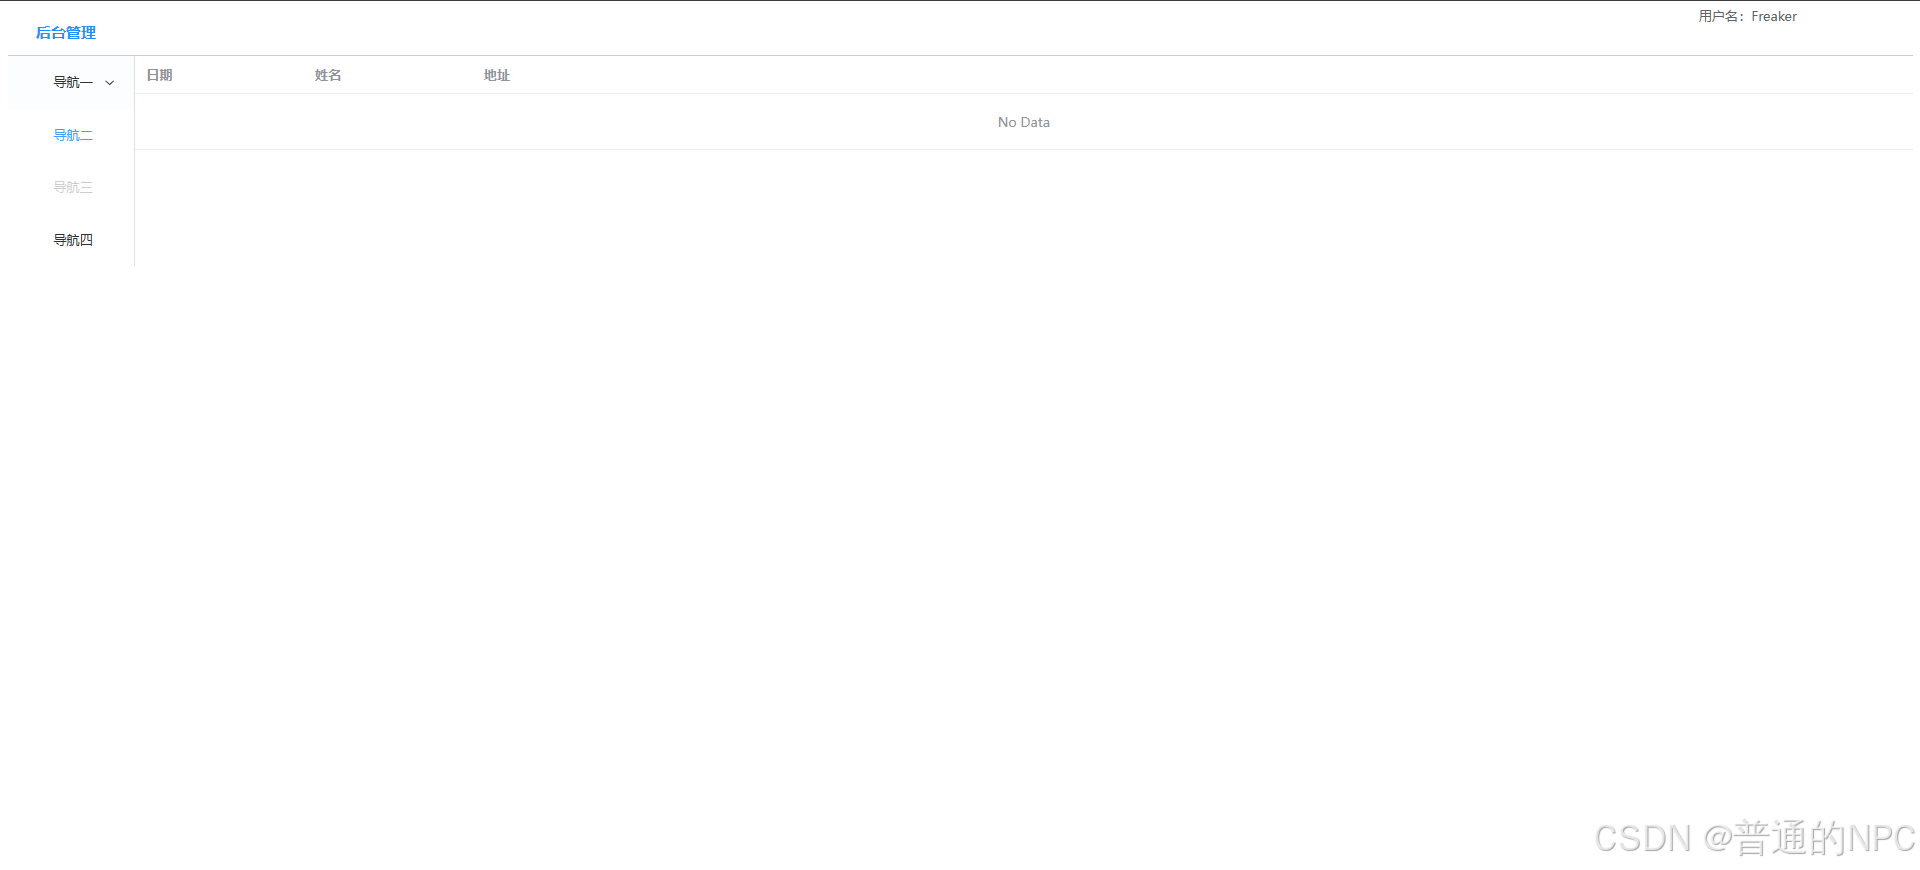 我们发现表格的内容并没有撑满,所以我们需要去掉原来代码的这几个参数,让它自适应:
 ,然后为我们的HomeView的表格对象,创建一个数组属性,进行数据的响应式交互:
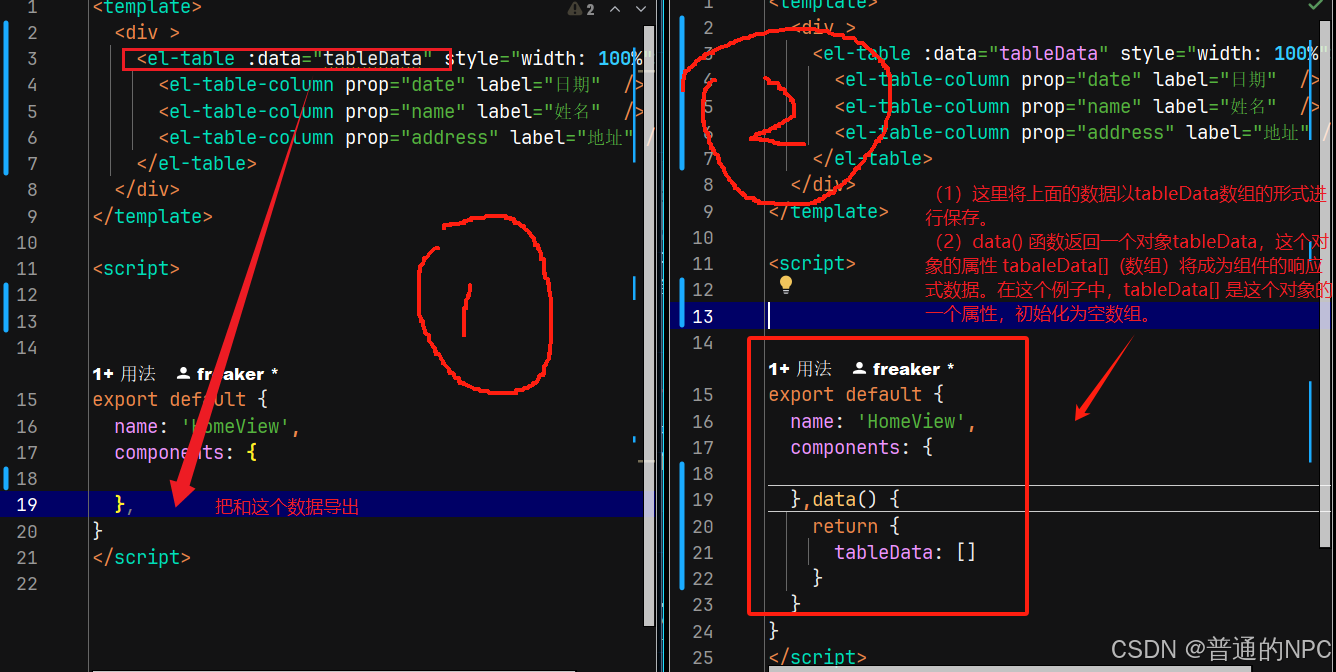 因为我这里数组是空的,如果这里数据从某个地方能拿到值,那么就能在前端进行展示,我现在直接写死一个数组,进行数据展示:
<script>
export default {
  name: 'HomeView',
  components: {

  },data() {
    return {
      tableData: [
        {
          date: '2016年5月3日',
          name: '汤姆',
          address: '洛杉矶市格罗夫街189号',
        },
        {
          date: '2016年5月2日',
          name: '汤姆',
          address: '洛杉矶市格罗夫街189号',
        },
        {
          date: '2016年5月4日',
          name: '汤姆',
          address: '洛杉矶市格罗夫街189号',
        },
        {
          date: '2016年5月1日',
          name: '汤姆',
          address: '洛杉矶市格罗夫街189号',
        },
      ]
    }
  }
}
</script>
前端页面显示:  进行国际化设置:因为我们用这些组件默认就是显示英文,所以我们需要调整然后进行显示
 将我们原来的全局配置的main.js代码修改成这样:
import { createApp } from 'vue'
import App from './App.vue'
import router from './router'
import store from './store'
//引入css文件
import "@/assets/css/global.css"

//引入element-plus
import ElementPlus from 'element-plus'
import'element-plus/dist/index.css'

//处理中文
import zhCn from 'element-plus/es/locale/lang/zh-cn'


    createApp(App).use(store).use(router).use(ElementPlus, {locale: zhCn,}).mount('#app')
效果展示:  将我们上面的测试数据,支持日期排序:
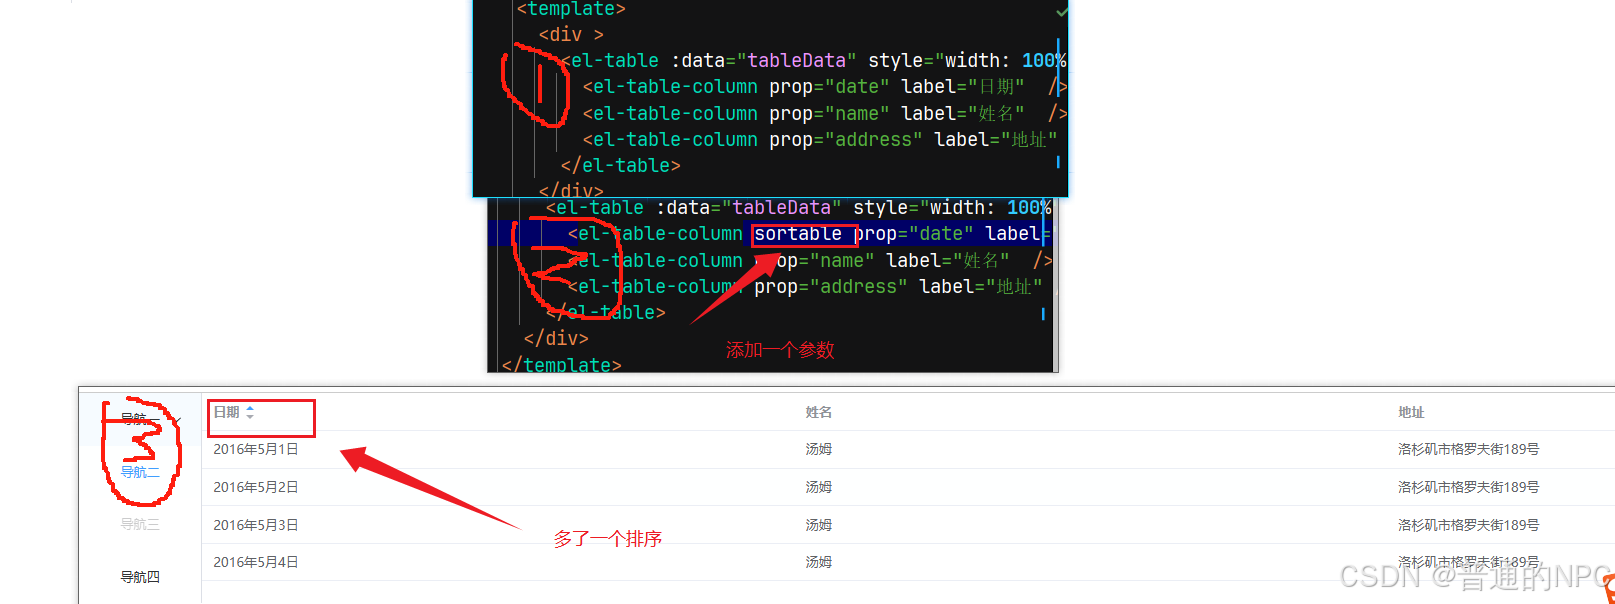
给我们的页面增加相关的操作按钮和搜索框:
代码
<template>
  <div>
  <!--表格部分-->

    <div >

    <!--增加按钮和搜索框-->
    <div style="margin: 10px 5px">
      <el-button type="primary" >新增</el-button >
      <el-button>其他</el-button>
    </div>

    <div style="margin: 10px 5px">
      <el-input v-model="search" style="width: 30%" placeholder="请输入关键字"></el-input>
      <el-button style="margin-left: 10px" type="primary">搜索</el-button>
    </div>

    <el-table :data="tableData" style="width: 100%">
      <el-table-column sortable prop="date" label="日期"  />
      <el-table-column prop="name" label="姓名"  />
      <el-table-column prop="address" label="地址" />

      <el-table-column fixed="right" label="操作" min-width="100">
        <template #default = "scope">
          <el-button type="text" >删除</el-button>
          <el-button type="text" @click="handleEdit(scope.row)" >编辑</el-button>
        </template>
      </el-table-column>
    </el-table>
  </div>


  </div>
</template>

<script>


export default {
  name: 'HomeView',
  components: {

  },data() {
    return {
      search: '',

      tableData: [
        {
          date: '2016年5月3日',
          name: '汤姆',
          address: '洛杉矶市格罗夫街189号',
        },
        {
          date: '2016年5月2日',
          name: '汤姆',
          address: '洛杉矶市格罗夫街189号',
        },
        {
          date: '2016年5月4日',
          name: '汤姆',
          address: '洛杉矶市格罗夫街189号',
        },
        {
          date: '2016年5月1日',
          name: '汤姆',
          address: '洛杉矶市格罗夫街189号',
        },
      ]
    }
  }
}
</script>
界面展示: 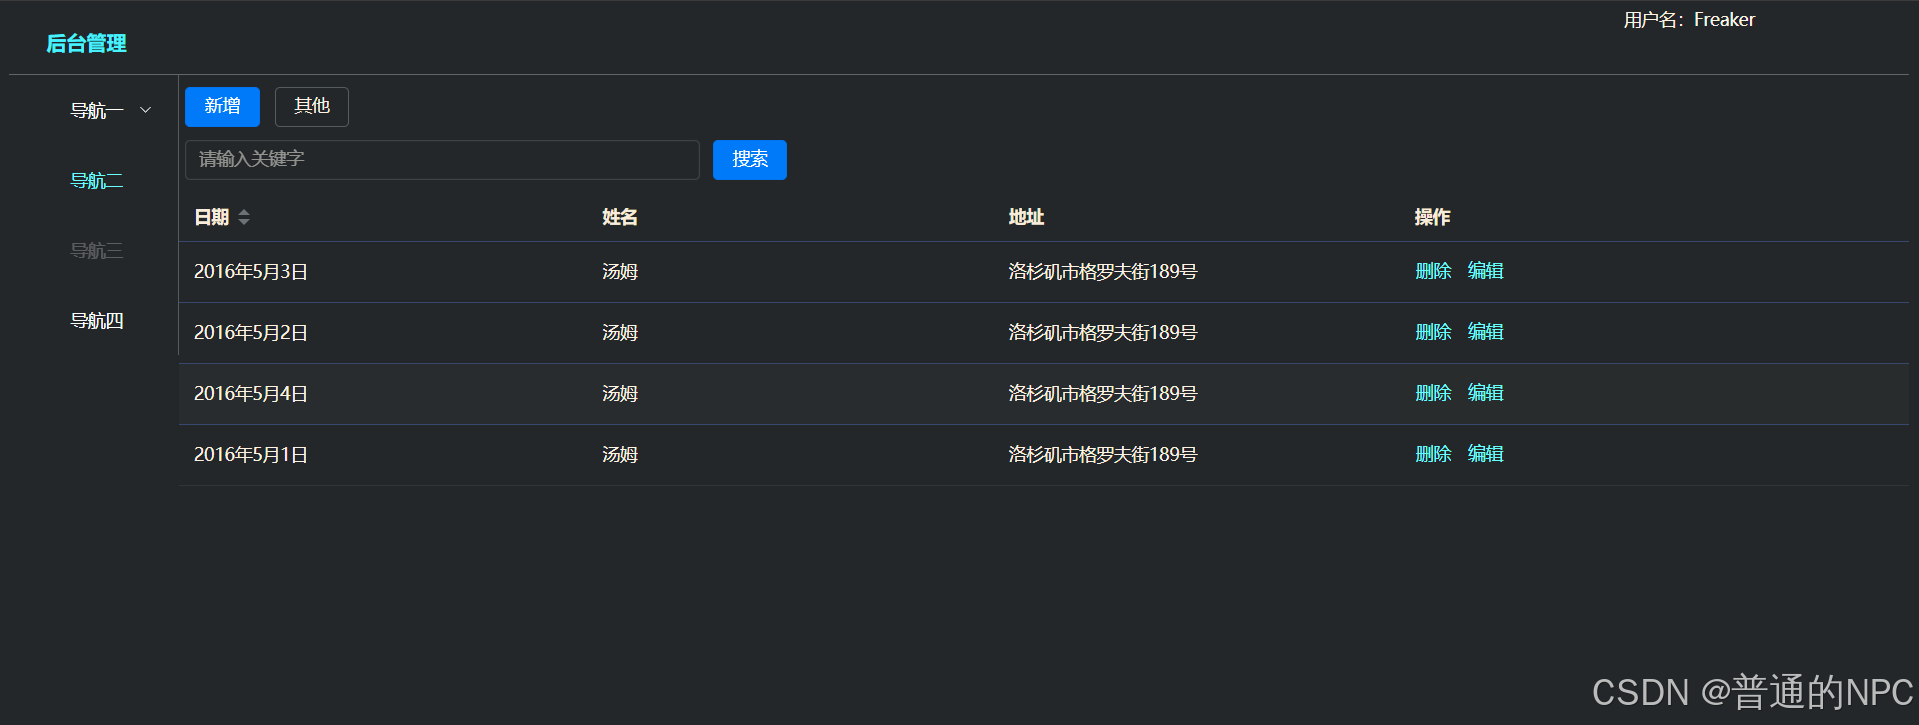
4.10到这里简单的前端页面就做好了。
5.家具项目ssm:
5.1.需求:实现添加家具信息
完成后台代码从 dao->serivce -> controller,并对每层代码进行测试,到controlleri使用Postman 发送http post请求完成测试完成前端代码,使用axios 发送ajax(json数据)后台,实现添加家居信息
区别: 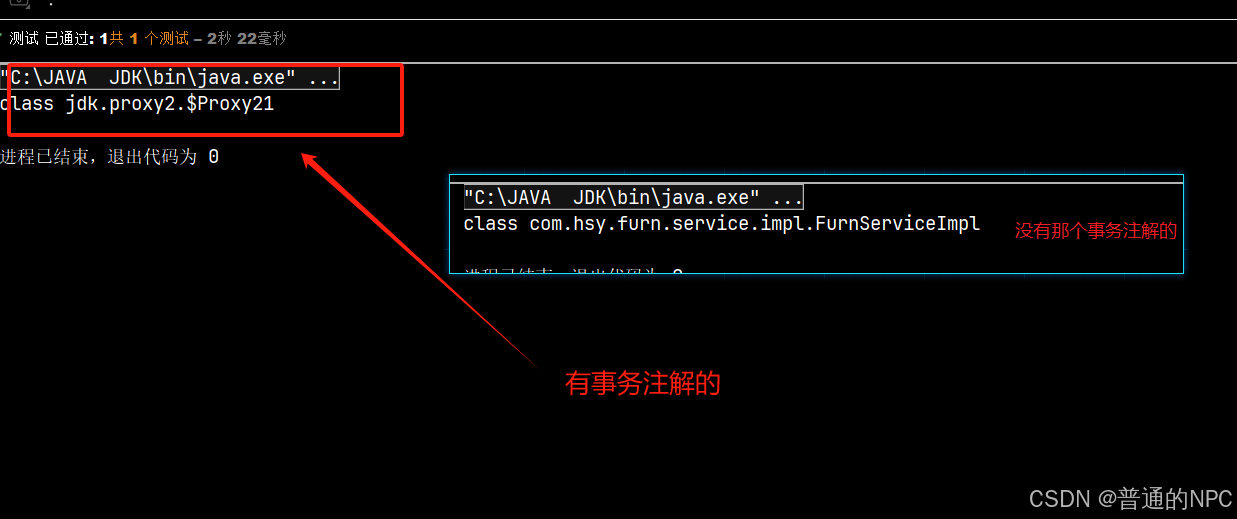
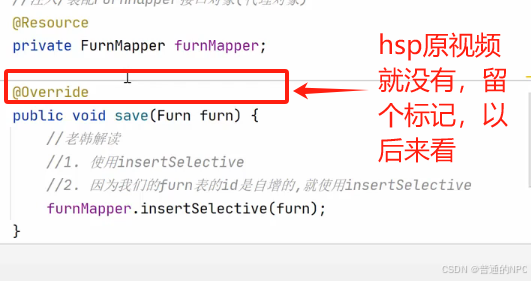
5.2事务注解的代码:
后边视频知道了:老韩当时这里使用的切面编程,进行了事务管理增强,对所有的方法得“切入”,进行事务管理,我选择了前者,使用注解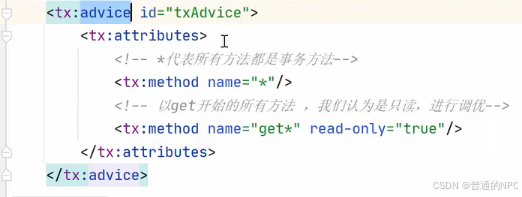
设置我们图片如果为null就采用默认,有的话就用有的路径
   //这个方法是判断字符串是否为空,如果不为空,则设置图片路径
        //这个方法很重要,后边用的很多
        //要求imgPath不能为: null, "", " ", "   "(第三个这个代表全是空格)

        if (StringUtils.hasText(imgPath)) {
            this.imgPath = imgPath;
        }
当我们“组装”好一个前端vue页面之后: 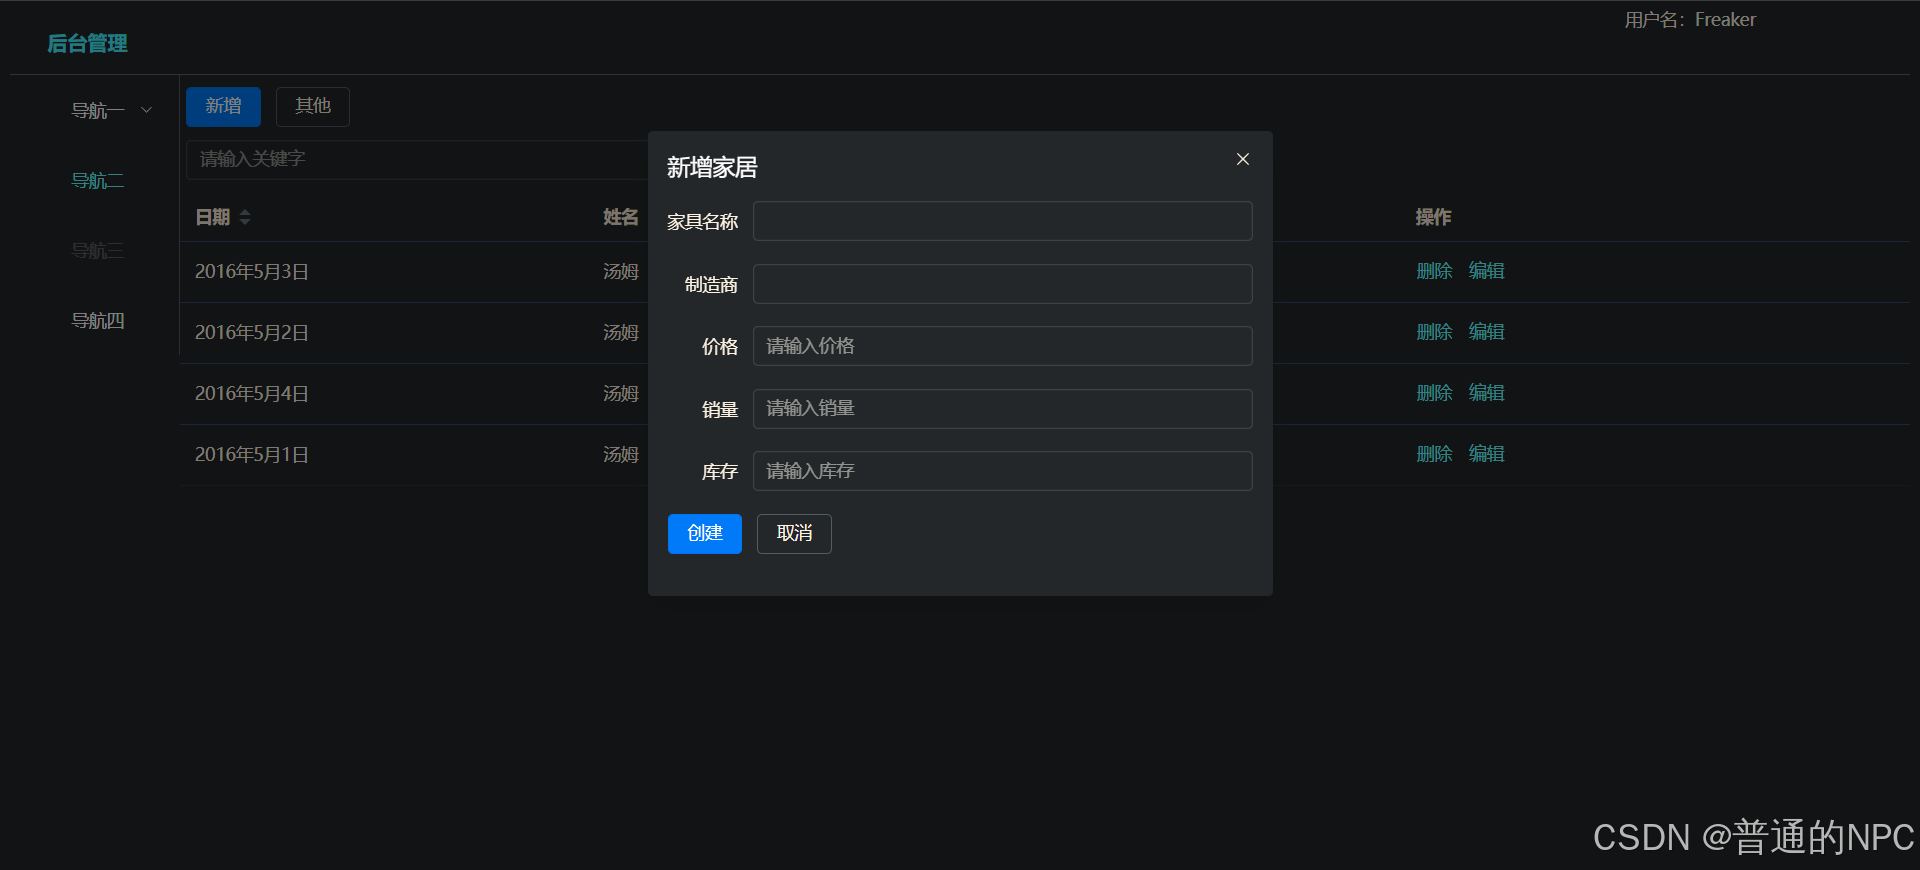 确保后端代码也完毕,那么就在项目前端 安装axios用于发送Ajax请求给后台
npm i axios -S我们的idea打开了vue项目,直接在那个:idea里面的项目终端下面运行上面这个代码,就可以安装了 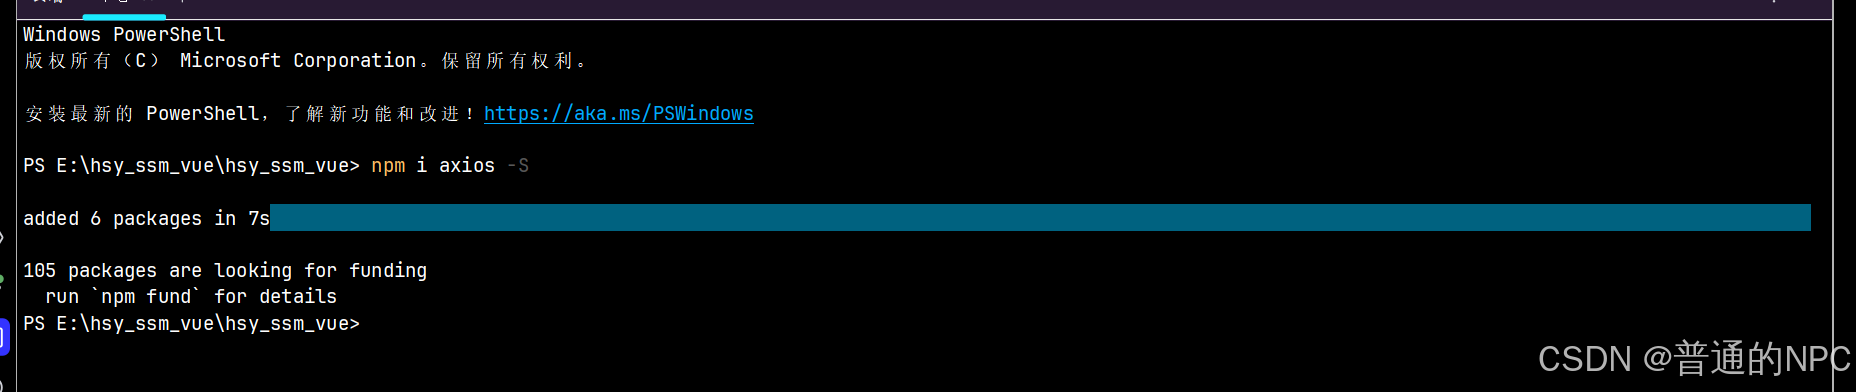
在我们的idea前端Vue项目里面:创建工具文件 src\utils\request.js,用于创建axios request对象:
代码:
//引入axios库,用于发送请求
import axios from 'axios';
//通过axios创建对象-request对象,用于发送请求到后端服务器
const request = axios.create({
timeout: 5000 //超时时间为5秒
});
//请求拦截器,在发送请求之前做一些处理,比如统一添加一些Token,Conent-Type等信息.
request.interceptors.request.use(config => {
config.headers['Content-Type'] = 'application/json;charset=utf-8';
return config;
}, error => { //请求错误时做一些处理
return Promise.reject(error);
});
//导出对象,其他文件可以通过import { request } from '../utils/request';来使用
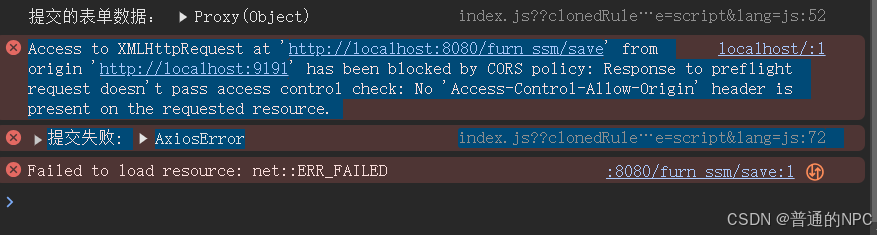
export default request;5.3修改HomeView.vue,在methods 编写save方法,并测试 会出现跨域问题:
 修改Vue里面的vue.config.js文件代码:启动代理
const { defineConfig } = require('@vue/cli-service')


module.exports = defineConfig({
  transpileDependencies: true,
  devServer: {
    port: 9191, // 设置开发服务器的端口为 10000
    proxy: {
      '/api': { // 拦截器,拦截以 /api 开头的请求
        target: 'http://localhost:8080/furn_ssm', // 代理的目标地址
        changeOrigin: true, // 是否改变源
        pathRewrite: { // 路径重写
          '^/api': '' // 将 /api 前缀重写为 ''
        }
      }
    }
  }
});
修改homeview里面的save方法
    save() {
      request.post("/api/save", this.form)
          .then(res => {
            console.log(res);
            this.dialogVisible = false; // 提交后关闭对话框
            this.resetForm(); // 提交后重置表单
          })
          .catch(error => {
            console.error('提交失败:', error);
          });
    }
  }
}
然后就解决了跨域的问题了: 
网上查询的资料理解了一下这个跨越:
1.为什么会有跨越这一说法:
跨域问题其实可以理解为浏览器为了保护用户数据安全设置的“隔离墙”。当你的网站想从另一个网站拿数据,浏览器会“警惕”地问:“这个数据是从我们自己的网站来的吗?” 如果不是,它就会拒绝访问。这就像你在家里,如果你想从邻居家拿个东西,出于安全考虑,邻居可能不会直接让你拿,而是会问你要一些证明,确保你不是陌生人。这种限制是为了防止一些恶意网站在用户不知情的情况下,偷偷去访问其他网站的敏感数据,比如个人隐私、账户信息等。所以,如果你的网站想安全地“跨过这堵墙”去获取数据,就要得到对方网站的许可,证明你是个“可信任的邻居”。这种许可通常通过“跨域资源共享”(CORS)来设置,对方网站可以在响应头里加上允许的标识,比如允许哪些域名访问,这样你的请求就能顺利通过。
2.跨域问题触发的条件:
“跨域”问题只在“浏览器发起的跨站请求”中才会触发,主要是针对JavaScript、AJAX请求等动态内容,而普通的页面跳转和图片加载并不受限制。
简单来说,如果你直接点击一个链接或访问一个图片,它们是以直接访问的方式请求资源,而不是用JavaScript的方式去获取数据。浏览器在这种情况下不会担心数据的安全性,就像是你自己去访问邻居家,它没有自动“帮你取东西”的风险。
返回家居信息进行前端展示踩的坑:
图片上红色圈里的名字,是对应我java代码里面设置的 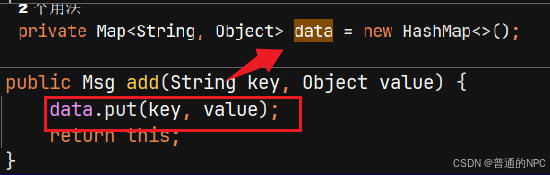
所以,确定前端取值的时候一定要保证确认,或者从控制条输出我们后端返回给前端的数据结构,从而取值,这样也不会错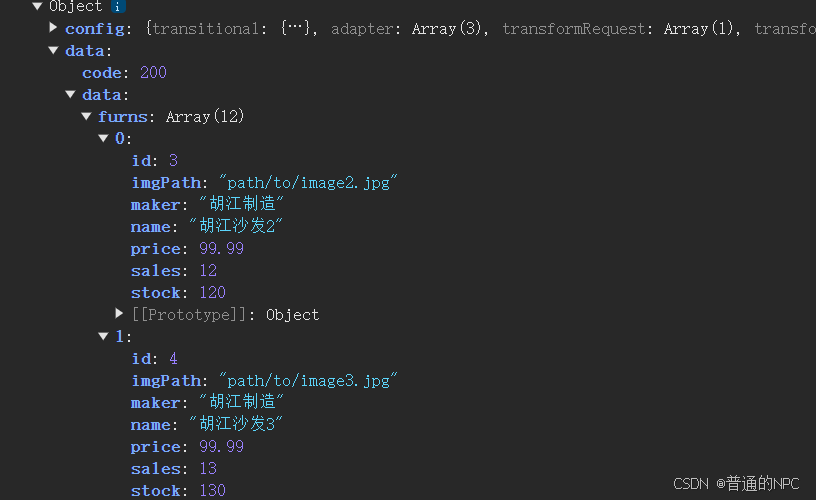
5.4修改了控制器的代码,必须重启后端服务器,
*还有一个困扰我半个多小时的点:修改了后端的代码,一定要重启服务器,不要点热加载里面的更新类和资源,没有用那个**。
5.5前端Vue的,request.js文件里面的统一拦截处理:
// 响应拦截器:对响应数据进行处理
request.interceptors.response.use(response => {
    // 获取响应数据
    let res = response.data;

    // 如果响应类型为blob,直接返回响应数据
    if (response.config.responseType === 'blob') {
        return res;
    }

    // 如果响应数据是字符串,则尝试将其解析为JSON对象
    if (typeof res === 'string') {
        res = res ? JSON.parse(res) : res; // 解析字符串,若无内容则返回原值
    }

    return res; // 返回处理后的响应数据
}, error => {
    // 响应错误时的处理
    return Promise.reject(error); // 返回错误的Promise
});

// 导出request对象,其他文件可以通过import { request } from '../utils/request';来使用
export default request;
这里进行统一拦截处理,我们在HomeView里面取出来对象的时候就不需要在多取出一次data了。
统一的拦截器使得请求和响应的处理逻辑集中在一个地方,便于维护和修改。如果你需要更改请求格式或响应解析,只需在拦截器中进行更改即可,而不需要在每个请求的代码中修改
  methods: {
    fetchFurns() {
      request.post("/api/furns")
          .then(res => {
            console.log(res); // 打印整个响应以确认结构

            //因为我们在request.js文件里面设置了拦截处理,直接res.data.furns就可以拿到数据了
            // this.tableData = res.data.data.furns; // 确保使用正确的键名
            this.tableData = res.data.furns; // 确保使用正确的键名

          })
          .catch(error => {
            console.error('获取家居列表失败:', error);
          });
    },
。
5.6前端scope.row代码的笔记:
    handleEdit(row) {
      this.form = { ...row }; // 将选中行的数据放入表单
      this.dialogVisible = true; // 打开对话框
    }
上面的代码里面,只要在 el-table标签内部的,这一“组”数据,会被绑定在 这个tableData数组上,然后tableData数组有几个对象(这里存的是Furn对象),然后就有一个el-table表,给你循环展示出来。别问问就是黑箱,别管底层了。
现在在解释一下前端的 socpe.row这个参数也厉害, 它能够直接将当前行的所有数据 取出来,什么是当前行?怎么样才能算当前行? 比如这里来说,这个furn对象当前在 el-table标签里面包含的信息都算是当前行,如果换成UI界面上,就是字面上的当前行的所有数据了
 这个furn对象在前端展示,你
<el-button type="text" @click="handleEdit(scope.row)">编辑</el-button>就代表点击编辑这个按钮的时候,获取了这一行的数据。(这里就可以用来进行信息的回显)
拿到这个scope.row对象之后,进行表单回显:
    handleEdit(row) {
      this.form = { ...row }; // 将选中行的数据放入表单
      this.dialogVisible = true; // 打开对话框
    }
这种回显是浅拷贝,还有
    handleEdit(row) {
      this.form = JSON.parse(JSON.stringify(row));
      this.dialogVisible = true; // 打开对话框
    }
另外一种韩顺平老师教的
-
目的和效果
-
this.form = { ...row };:-
这个语法使用了扩展运算符,它直接复制
row对象的所有可枚举属性到this.form中。 -
这是一个浅拷贝(shallow copy),意味着如果
row中有嵌套对象(如数组或对象),这些嵌套对象的引用会被共享。
-
-
this.form = JSON.parse(JSON.stringify(row));:-
这个方式首先将
row转换为 JSON 字符串,然后再将其解析回一个新的 JavaScript 对象。 -
这是一个深拷贝(deep copy),意味着所有嵌套对象都会被复制,原始对象和新对象之间没有引用关系。
-
2.数据类型限制:
-
JSON.stringify只支持有限的数据类型(字符串、数字、布尔值、数组和null)。如果row包含函数、undefined或 Symbol 等类型,这些数据在转换过程中会丢失。 -
使用扩展运算符
{ ...row }不会有这种限制,所有可枚举属性(包括函数和其他类型)都会被复制。
Ajax异步机制注意:
这里提示一下Ajax的异步机制,我们家居列表的刷新,或者其他数据的刷新不要尽量不要放到对应的Ajax请求外边,因为到达这个请求我们需要先执行修改数据,然后在执行刷新,如果将刷新放到Ajax请求外边,可能先刷新再修改了,因为Ajax请求一旦发送,就会执行外部的代码,而不是等待Ajax请求里面的代码执行完了才执行外部的代码。
5.7完成分页功能:
1.引入插件的依赖pom.xml
<dependency>
    <groupId>com.github.pagehelper</groupId>
    <artifactId>pagehelper-spring-boot-starter</artifactId>
    <version>1.4.3</version> <!-- 请检查最新版本 -->
</dependency>
2.在 applicationContext.xml 中配置 PageHelper:
<bean id="pageHelper" class="com.github.pagehelper.PageHelper">
    <property name="properties">
        <props>
            <prop key="helperDialect">mysql</prop>
            <prop key="reasonable">true</prop>
        </props>
    </property>
</bean>
5.8分页BeanSpring对象的配置文件装配位置
困扰了我接近2个多小时的情况:上面第二步,之前我是引入applicationContext.xml这个配置文件里面,就导致分页插件始终不能生效,我debug前端和我后端的逻辑代码,一直没查出来,把我弄恶心了,结果发现是引入applicationContext.xml这个文件不起作用,要引入到mybatis-config.xml这个配置文件
<?xml version="1.0" encoding="UTF-8"?>
<!DOCTYPE configuration
        PUBLIC "-//mybatis.org//DTD Config 3.0//EN"
        "http://mybatis.org/dtd/mybatis-3-config.dtd">
<configuration>
    <settings>
        <setting name="mapUnderscoreToCamelCase" value="true"/> <!-- 驼峰命名 -->
    </settings>


<!--    自动生成别名: 当您使用 <package> 标签时,
MyBatis 将为该包下的每个类生成一个默认别名。默认别名是类名的简单形式(不包括包名)。-->
    <typeAliases>
       <package name="com.hsy.furn.bean"/>
    </typeAliases>

    <plugins>
        <!-- com.github.pagehelper为PageHelper类所在包名 -->
        <plugin interceptor="com.github.pagehelper.PageInterceptor">
            <property name="reasonable" value="true" />
        </plugin>
    </plugins>
</configuration>


 533
533

 被折叠的 条评论
为什么被折叠?
被折叠的 条评论
为什么被折叠?
 到【灌水乐园】发言


