


 本文详细介绍了Vue.js路由的高级用法,包括命名路由、重定向和别名、HTML5 History模式以及导航守卫的使用,涵盖了全局前置和后置钩子、路由独享和组件内守卫。同时,讲解了Vue中Axios的使用,包括GET和POST请求,并展示了如何封装 Axios 实例。最后,讨论了跨域请求的处理,提供了后端和前端的解决方案。
一、路由进一步
1. 命名路由
给url路径起个名字。路由有名字了就可以使用路由的名字来实现跳转,这样更方便(尤其对于长路径名url)。
//定义路由
const routes = [
  {
    path:"/",
    name:"Home", //命名路由应当与组件名保持一致
    component:Home
  },
  {
    path:"/user/:userId/:name/:age",
    name:"User", //命名路由应当与组件名保持一致
    component:User
  },
  {
    path:"/bee",
    name:"Bee", //命名路由应当与组件名保持一致
    component:Bee,
    children:[
      {
        path:"bigbee",
        component:BigBee
      },
      {
        path:"smallbee",
        component:SmallBee
      }
    ]
  }
]
路径跳转使用命名路由
页面跳转:
<template>
  <div id="app">
    <router-link :to="{name:'Home'}">首页</router-link> |
    <router-link :to="{name:'User',params:{userId:'8888',name:'beeworkshop',age:'31'}}">用户</router-link> |
    <router-link :to="{name:'Bee'}">Bee主分类</router-link>
    <router-view></router-view>
  </div>
</template>
-------------------------------------------------------------
编程式导航:
this.$router.push({name:'Home'})
this.$router.push({name:'User',params:{userId:'8888',name:'beeworkshop',age:'31'}})
2. 重定向和别名
- 重定向
在路由嵌套中通过重定向产生一个默认的显示
//定义路由
const routes = [
  {
    path:"/bee",
    name:"Bee",
    redirect: "/bee/bigbee", //需要写全路径
    component:Bee,
    children:[
      {
        path:"bigbee",
        component:BigBee
      },
      {
        path:"smallbee",
        component:SmallBee
      }
    ]
  }
]
3. HTML5 History模式

默认我们的SPA页面URL中是有#符号的,有时候不想要这个#号。
//创建路由对象
const router = new VueRouter({
  mode:"history", //默认是mode:"hash"
  routes
})
完了变成了:

不过这种模式要玩好,还需要后台配置支持。因为我们的应用是个单页客户端应用,如果后台没有正确的配置,当用户在浏览器直接访问 http://oursite.com/user/id 就会返回 404,这就不好看了。
比如使用nginx做调整:
location / {
  try_files $uri $uri/ /index.html;
}
4. 导航守卫
导航守卫就是Vue为我们提供了很多的钩子函数——事件拦截处理函数。
4.1 全局前置守卫
在路由跳转之前就被拦截并处理。
在创建路由对象之后定义:
//创建路由对象
const router = new VueRouter({
  mode:"history",
  routes
})
//在路由跳转之前就被拦截并处理
router.beforeEach((to, from, next) => {
  console.log(from)
  console.log(to)
  next(); //允许跳转
})
在认证时避免next()被调用2次
router.beforeEach((to, from, next) => {
  if (to.name !== 'Login' && !isAuthenticated) next({ name: 'Login' })
  else next()
})
4.2 全局后置钩子
在路由跳转之后被拦截并处理的钩子。它也是在创建路由对象之后定义:
router.afterEach((to, from) => {
  console.log(from)
  console.log(to)
})
4.3 路由独享的守卫
只在路由定义过程中,当某一个路由发生时拦截并处理。
//定义路由
const routes = [
  {
    path:"/",
    name:"Home",
    component:Home,
    beforeEnter: (to, from, next) => { //为Home路由所独享。当路由Home发生时调用
      console.log(from);
      console.log(to);
      next();
    }
  }
]
4.4 组件内的守卫
在组件内部对路由事件进行拦截并处理。
<template>
  <div>
    <h3>小蜜蜂</h3>
  </div>
</template>

<script>
export default {
  //在进入路由前拦截并处理
  beforeRouteEnter (to, from, next) {
    console.log("beforeRouteEnter");
    console.log(to,from);
    next();
  },
  //当页面的参数发生改变时触发
  beforeRouteUpdate(to, from, next) {
    console.log("beforeRouteUpdate");
    console.log(to,from);
    next();
  },
  //在离开路由前拦截并处理
  beforeRouteLeave (to, from, next) {
    console.log("beforeRouteLeave");
    console.log(to,from);
    next();
  }
}
</script>
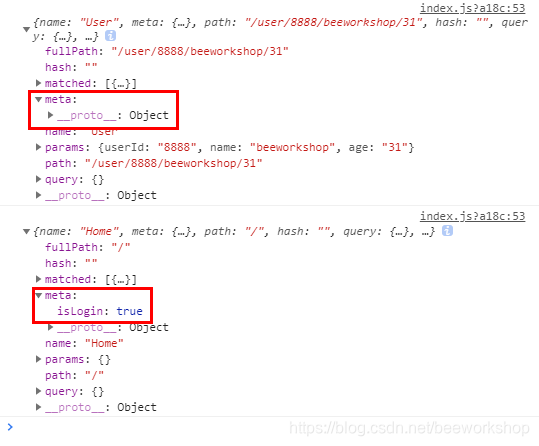
4.5 路由元信息
在定义路由的时候可以多定义一个meta字段,以携带更多的自定义信息。而导航守卫可以获得这些自定义信息。
//定义路由
const routes = [
  {
    path:"/",
    name:"Home",
    component:Home,
    meta:{
      isLogin:true
    }
  }
]

//创建路由对象
const router = new VueRouter({
  mode:"history",
  routes
})

router.beforeEach((to, from, next) => {
  console.log(to);
  //判断用户登陆
  if(to.meta.isLogin){ //访问的URL需要认证
    //用户是否已经登陆
    const token = false
    if(token){
      next();
    }else{ //用户没有登陆
      next("/login");
    }
  }
  next();//允许跳转
})

//导出路由对象
export default router
meta字段携带的自定义信息:
4.6 路由懒加载
路由组件的按需加载。不需要一上来就import组件,以节省资源。
//定义路由
const routes = [
  {
    path:"/bee",
    name:"Bee",
    redirect: "/bee/bigbee", //需要写全路径
    component:Bee,
    children:[ //路由嵌套
      {
        path:"bigbee",
        //路由的懒加载
        component:()=>import("../pages/bee/BigBee")

      },
      {
        path:"smallbee",
        //路由的懒加载
        component:()=>import("../pages/bee/SmallBee")
      }
    ]
  }
]
二、几个需要说明的问题
1. src/main.js
这个文件主要用于生成Vue实例,挂载路由,引入css等。
引入css可以如下进行:
import "./assets/css/common.css"
import "./assets/font/iconfont.css"
一旦用上述方式引入css,则vue的所有组件页面都会生效。
2. @ is an alias to /src
import BottomNav from '@/components/BottomNav';
此外,如果import一个目录(比如,BottomNav),则默认会导入目录下的index.vue组件。导入组件的.vue扩展名也可以省略。

3. 让vue-cli为我们自动生成路由配置
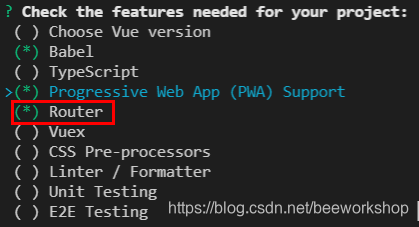
注意,不选择Choose Vue version表示启用Vue2版本。
4. 让样式只在当前组件生效
加上scoped关键字,避免样式的冲突。
<style scoped>
......
</style>
5. 初始化样式
给一个模版common.css
* {
    margin: 0;
    padding: 0;
    -webkit-tap-highlight-color: rgba(0, 0, 0, 0);
    -webkit-text-size-adjust: none;
    -webkit-user-select: none;
    -ms-user-select: none;
    user-select: none;
    font-family: "微软雅黑";
}
img {
    border: none;
    max-width: 100%;
    vertical-align: middle;
}
body,
p,
form,
input,
button,
dl,
dt,
dd,
ul,
ol,
li,
h1,
h2,
h3,
h4,
h5,
h6 {
    margin: 0;
    padding: 0;
    list-style: none;
    overflow-x: hidden;
}
h1,
h2,
h3,
h4,
h5,
h6 {
    font-size: 100%;
}
input,
textarea {
    -webkit-user-select: text;
    -ms-user-select: text;
    user-select: text;
    -webkit-appearance: none;
    font-size: 1em;
    line-height: 1.5em;
}
table {
    border-collapse: collapse;
}
input,
select,
textarea {
    outline: none;
    border: none;
    background: none;
}
a {
    outline: 0;
    cursor: pointer;
}
a:link,
a:active {
    text-decoration: none;
}
a:visited {
    text-decoration: none;
}
a {
    text-decoration: none;
    -webkit-touch-callout: none;
}
em,
i {
    font-style: normal;
}
li,
ol {
    list-style: none;
}
html {
    font-size: 16px;
}
.clear {
    clear: both;
    height: 0;
    font-size: 0;
    line-height: 0;
    visibility: hidden;
    overflow: hidden;
}
.fl {
    float: left;
}
.fr {
    float: right;
}
body {
    margin: 0 auto;
    max-width: 750px;
    min-width: 320px;
    background-color: #f1f1f1;
    color: #555;
    height: 100%;
}
a {
    color: #555;
    text-decoration: none;
}
.clearfix {
    overflow: hidden;
    clear: both;
}

.clearfix:before {
    content: " ";
    display: table;
}

.active{
    color: red;
}
6. 修改router-link标签的激活样式
router-link标签最后将被渲染为a标签,且带上样式class=“router-link-exact-active router-link-active”。显然这个样式的名字太长。可以如下修改:
const router = new VueRouter({
  linkActiveClass:"active", //改成这样,包含active
  routes
})
样式变为class=“router-link-exact-active active”。看到啦,现在一个“.active”类选择器就可以设置样式了。
还要注意的是“/find”这样的路径被激活,则路径“/”也会被激活。所以,需要对router-link标签增加属性exact来精确匹配“/”这样的路径。
<router-link exact to="/"><span class="iconfont icon-icon_homepage"></span>首页</router-link>
三、Ajax请求
Vue使用Axios来实现Ajax请求。
参考手册:https://www.kancloud.cn/yunye/axios/234845
Axios 是一个基于 promise 的 HTTP 库,可以用在浏览器和 node.js 中。
1. 安装依赖
npm install axios --save
2. 一个get方法的使用实例
通过一个简单实例感受一下用法
<template>
  <div class="hello">
    <h3>Axios学习</h3>
    <ul>
      <li v-for="(item,index) in banner" :key="index">
        <p>{{item.title}}</p>
      </li>
    </ul>
  </div>
</template>

<script>
import axios from "axios";

export default {
  name: "HelloWorld",
  data(){
    return{
      banner:[]
    }
  },
  mounted() {
    axios.get("http://test.demo.cn/banner.jsp?type=3").then(res=>{
      console.log(res.data);
      this.banner=res.data.banner;
    })
  },
};
</script>
3. post的使用
axios.post("http://test.bed.cn/login.jsp",{
  username:"bee",
  password:"123456",
  online:"sos"
}).then(res=>{
  console.log(res.data)
});
如何将一个json对象 {a:“1314”,b:“baby”,c:“male”} 转换成形如 “a=1314&b=baby&c=male” 的字符串?
这里:
json对象位于请求头的Request Payload部分。
字符串位于请求头中的Form Data部分。
转换方法如下:<script> import qs from "querystring" //nodejs提供 ...... qs.stringify({ a:"1314", b:"baby", c:"male" }) </script>
4. Axios网络请求的封装
在实际应用中是使用封装了Axios网络请求的对象来发送Ajax请求。主要演示封装拦截器。
src/utils/request.js
import axios from "axios";
import qs from "querystring";

/**
 * 创建Axios的实例对象
 */
var instance = axios.create({
    timeout: 5000, //5秒
});

/**
 * 拦截器错误信息处理函数
 */
 const errorsHandler = (status,info) =>{
  switch(status){
      case 400:
          console.log("语义有误,当前请求无法被服务器理解。除非进行修改,否则客户端不应该重复提交这个请求。")
          break;
      case 401:
          // token:令牌
          console.log("服务器认证失败")
          break;
      case 403:
          console.log("服务器已经理解请求,但是拒绝执行它");
          break;
      case 404:
          console.log("请检查网络请求地址")
          break;
      case 500:
          console.log("服务器遇到了一个未曾预料的状况,导致了它无法完成对请求的处理。一般来说,这个问题都会在服务器的程序码出错时出现。")
          break;
      case 502:
          console.log("作为网关或者代理工作的服务器尝试执行请求时,从上游服务器接收到无效的响应。")
          break;
      default:
          console.log(info)
          break;
  }
}

/**
 * 拦截器
 */
//定义请求拦截
instance.interceptors.request.use(
  config=>{ //function(config){return config;},加上()表示函数名。
    if(config.method === "post"){
      config.data=qs.stringify(config.data) //统一处理请求的数据
    }
    return config;
  },
  error=>{ //function(error){return Promise.reject(error);},加上()表示函数名。
    return Promise.reject(error);
  }
)
//定义响应拦截
instance.interceptors.response.use(
  response=>response.status === 200 ? Promise.resolve(response) : Promise.reject(response),
  error=>{
      const { response } = error;
      if(response){
        errorsHandler(response.status,response.info);
      }else{
          console.log("请求被中断了");
      }
  }
)

// 封装get 和 post请求(optional)

export default instance
封装后的使用演示,文件组织如下:
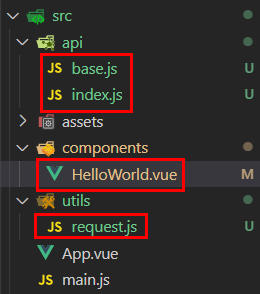
src/api/base.js
/**
 * 存储网络请求路径
 */
 const base = {
  baseUrl:"http://xxx.com",
  banner:"/api/xxx/xxx.jsp",
  login:"/api/xxx/xxx.jsp",
}

export default base;
src/api/index.js
/**
 * 提供网络请求方法
 */

import axios from "../utils/request" //注意这里引入的是封装后的axios
import base from "./base"

const api = {
    getBanner(){
        return axios.get(base.baseUrl + base.banner)
    },
    getLogin(params){  // params = {},是个对象
        return axios.post(base.baseUrl + base.login,params)
    }
}

export default api;
src/components/HelloWorld.vue
<template>
  <div class="hello">
    <h3>Axios学习</h3>
    <ul>
      <li v-for="(item,index) in banner" :key="index">
        <p>{{item.title}}</p>
      </li>
    </ul>
  </div>
</template>

<script>
import api from "../api" //默认导入index.js

export default {
  name: "HelloWorld",
  data(){
    return{
      banner:[]
    }
  },
  mounted() {
    api.getBanner().then((res) => {
      this.banner = res.data.banner;
    });

    api.getLogin({
      username:"bee",
      password:"123456",
      online:"sos"
    }).then(res =>{
      console.log(res.data);
    }).catch(error =>{ //捕获错误
      console.log(error);
    });
  }
};
</script>
四、跨域请求的处理
跨域的错误提示:
Access to XMLHttpRequest at 'http://xxx' from origin 'http://localhost:8080' has been blocked by CORS policy: No 'Access-Control-Allow-Origin' header is present on the requested resource.
跨域保护是浏览器的安全策略——同源策略。
1. 后端解决方案
比如在Springboot中使用@CrossOrigin注解。
或者参考这里
2. 前端解决方案
本法只能在开发环境中使用,而在生产环境下无法解决跨域。
在项目的根目录下创建vue.config.js。
module.exports = {
    devServer: {
        proxy: {
            '/api': { //这里/api表示target的url
                target: 'http://localhost:8091/', //url:跨域的访问目标。写到端口即可。
                changeOrigin: true,
                pathRewrite:{
                    '^/api':"" //空表示不做任何操作
                }
            }
        }
    }
}
这样axios中的请求url,比如,http://localhost:8091/getinfo,应该对应改为/api/getinfo
axios.get("http://localhost:8091/getinfo").then(res=>{
	console.log(res.data)
})
↓↓↓↓↓↓ 对应改为 ↓↓↓↓↓↓
axios.get("/api/getinfo").then(res=>{
	console.log(res.data)
})


 被折叠的 条评论
为什么被折叠?
被折叠的 条评论
为什么被折叠?
 到【灌水乐园】发言


