


 本文深入探讨Nginx的高级配置技巧,包括备份和宕机处理、动静分离、虚拟主机配置以及结合Keepalived避免单点故障。通过实例演示如何优化Nginx性能和可靠性。
1. nginx的备份和宕机配置
- 备份 backup配置
其他非backup机器挂掉后,才会请求backup机器,使其投入运行。
配置实例:
 upstream www.fangfang.com{
         server 172.17.0.2:8080 ;
         server 172.17.0.3:8089 backup ;
}
- 停止down配置
配置down的服务器不参与负载均衡,不承担工作。
配置实例:
upstream www.feng.com{
         server 172.17.0.2:8080 ;
         server 172.17.0.3:8089 down ;
}
上述两种配置多见于维护web服务器期间使用——比如对处于down的服务器进行升级等维护操作。
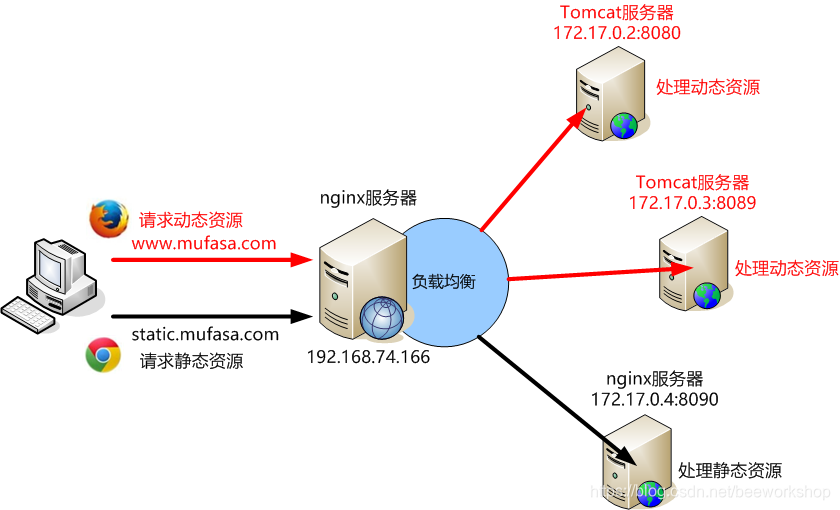
2. nginx动静分离
动静分离是指在web服务器架构中,将静态页面与动态页面或者静态内容接口和动态内容接口分开,放在不同系统中处理。这种设计方法可以提升整个服务访问性能和可维护性。
我们可将静态html页面,css,js,图片,文件,这些静态资源放nginx服务器中,然后把动态页面,比如jsp文件放到tomcat服务器中。这样设计方便维护,也可以提高系统性能。
- 处理静态资源的nginx服务器配置
配置 /etc/nginx/conf.d/default.conf
server {
    listen       8090;
    server_name  static.mufasa.com;

    #charset koi8-r;
    #access_log  /var/log/nginx/host.access.log  main;

    location / {
        root /usr/share/nginx/html;
        index  index.html index.htm;
    }

    #error_page  404              /404.html;

    # redirect server error pages to the static page /50x.html
    #
    error_page   500 502 503 504  /50x.html;
    location = /50x.html {
        root   /usr/share/nginx/html;
    }

}
配置 /etc/nginx/nginx.conf
user  nginx;
worker_processes  1;

error_log  /var/log/nginx/error.log warn;
pid        /var/run/nginx.pid;


events {
    worker_connections  1024;
}


http {
    include       /etc/nginx/mime.types;
    default_type  application/octet-stream;

    log_format  main  '$remote_addr - $remote_user [$time_local] "$request" '
                      '$status $body_bytes_sent "$http_referer" '
                      '"$http_user_agent" "$http_x_forwarded_for"';

    access_log  /var/log/nginx/access.log  main;

    sendfile        on;
    #tcp_nopush     on;

    keepalive_timeout  65;

    #gzip  on;

    include /etc/nginx/conf.d/*.conf;
}
- 实现负载均衡的nginx服务器配置
配置 /etc/nginx/nginx.conf
user  nginx;
worker_processes  1;

error_log  /var/log/nginx/error.log warn;
pid        /var/run/nginx.pid;


events {
    worker_connections  1024;
}


http {
    include       /etc/nginx/mime.types;
    default_type  application/octet-stream;

    log_format  main  '$remote_addr - $remote_user [$time_local] "$request" '
                      '$status $body_bytes_sent "$http_referer" '
                      '"$http_user_agent" "$http_x_forwarded_for"';

    access_log  /var/log/nginx/access.log  main;

    sendfile        on;
    #tcp_nopush     on;

    keepalive_timeout  65;

    #gzip  on;

	# 动态资源分离
    upstream www.mufasa.com{
         server 172.17.0.2:8080 weight=5;
         server 172.17.0.3:8089 weight=10;
    }
    # 静态资源分离
    upstream static.mufasa.com{
         server 172.17.0.4:8090;
    }

    include /etc/nginx/conf.d/*.conf;
}
配置 /etc/nginx/conf.d/default.conf
server {
    listen       80;
    server_name  www.mufasa.com;

    #charset koi8-r;
    #access_log  /var/log/nginx/host.access.log  main;

    location / {
        proxy_pass   http://www.mufasa.com;
        index  index.html index.htm;
    }

	# 通过匹配正则表达式(匹配特定的后缀名)分离静态资源到特定服务器处理
    location ~* \.(gif|jpg|jpeg|png|bmp|swf)$ { # ~ 区分大小写正则匹配
        proxy_pass   http://static.mufasa.com;
    }

    location ~* \.(js|css)$ { # ~* 不区分大小写正则匹配
        proxy_pass   http://static.mufasa.com;
    }

    location ~* \.(htm|html)$ {
        proxy_pass   http://static.mufasa.com;
    }

    #error_page  404              /404.html;

    # redirect server error pages to the static page /50x.html
    #
    error_page   500 502 503 504  /50x.html;
    location = /50x.html {
        root   /usr/share/nginx/html;
    }

}
3. 虚拟主机
Nginx可以通过反向代理来实现虚拟主机。
- 配置nginx.conf
    upstream www.mufasa.com {
         server 172.17.0.2:8080;
    }


    upstream www.xinba.com {
         server 172.17.0.3:9090;
    }


    upstream www.daoba.com {
         server 172.17.0.4:7070;
    }
- 配置default.conf
在一个配置文件中加入三个server配置
server {
    listen 80;
    server_name www.mufasa.com;

    location / {
        proxy_pass http://www.mufasa.com;
        index index.html index.htm;
    }
}

server {
    listen 80;
    server_name www.xinba.com;

    location / {
        proxy_pass http://www.xinba.com;
        index index.html index.htm;
    }
}

server {
    listen 80;
    server_name www.daoba.com;

    location / {
        proxy_pass http://www.daoba.com;
        index index.html index.htm;
    }
}
4. 使用keepalived避免nginx单点故障
keepalived本质上就是做一个VRRP部署。
具体概念如下:
keepalived是以VRRP协议为基础实现的。主要包括三个模块。分别是core、check和vrrp。core模块为keepalived的核心,负责主进程的启动、维护以及全局配置文件的加载和解析。check负责健康检查,包括常见的各种检查方式。vrrp模块是来实现VRRP协议。
一般使用两台真机来部署keepalived+nginx。
4.1 真机安装nginx
- yum方式安装nginx
rpm -Uvh http://nginx.org/packages/centos/7/noarch/RPMS/nginx-release-centos-7-0.el7.ngx.noarch.rpm
yum install -y nginx
systemctl start nginx.service
systemctl enable nginx.service
- 验证nginx
# 查看版本
nginx -v
curl -i localhost | grep 'Welcome to nginx!'
- 配置文件
| 目录/文件 | 说明 |
|---|---|
| /etc/nginx/ | 主配置目录 |
| /etc/nginx/nginx.conf/ | nginx配置文件 |
| /etc/nginx/conf.d/default.conf | server配置文件 |
| /var/log/nginx | 日志目录 |
| /usr/share/nginx/html | web项目目录,即Document Root |
- 常用命令
# 重新加载配置
nginx -s reload
# 停止服务
nginx –s stop
# 检查配置文件
nginx -t
# 强制关闭
pkill nginx
4.2 真机安装keepalived
- keepalived的安装
yum install -y keepalived
- keepalived常用命令
systemctl start keepalived.service
systemctl stop keepalived.service
systemctl enable keepalived.service
systemctl restart keepalived.service
- keepalived查看日志
tail -f /var/log/messages # keepalived日志默认的输出文件
如何修改keepalived的日志输出到指定文件?
vim /etc/sysconfig/keepalived
修改为
KEEPALIVED_OPTIONS="-D -S 0"
这里的“-S 0”表示local0.*
修改/etc/rsyslog.conf的日志配置信息,添加
local0.* /var/log/keepalived.log
这样就好了。
- keepalived配置文件
/etc/keepalived/keepalived.conf
其中主要是“global_defs { }” 和 “vrrp_instance VI_1 { }”两个部分的配置。
4.3 keepalived + nginx 联合部署
- 配置 /etc/keepalived/keepalived.conf
! Configuration File for keepalived

global_defs {
   router_id KEEPALIVED_NGINX
   vrrp_skip_check_adv_addr
   vrrp_garp_interval 0
   vrrp_gna_interval 0
}

# 监控https端口使用 chk_https_port
vrrp_script chk_http_port {
       # 监听https使用 script "</dev/tcp/127.0.0.1/443"
       # 使用shell脚本形如 script "/root/shell/nginx_check.sh"
       script "</dev/tcp/127.0.0.1/80"
       interval 2 # 轮询间隔
       weight -20 # 使 priority-=20
}

vrrp_instance VI_1 {
    state MASTER # 备机是BACKUP
    interface eth0
    virtual_router_id 10 # vrid
    priority 110 # 备机是100
    advert_int 1
    authentication {
        auth_type PASS
        auth_pass 123456
    }
    virtual_ipaddress {
        192.168.74.168 # vip
    }
    track_script {
       # 对于https是chk_https_port
       chk_http_port
    }
}
详细配置可参考文件 /usr/share/doc/keepalived-1.3.5/samples/keepalived.conf.vrrp.localcheck
注意:
① vrrp_strict必须删掉。
② 网卡如果 NAME=ens33,DEVICE=eth0,那么vrrp_instance中的interface要取网卡的DEVICE=eth0。

配置完后,重启keepalived服务。服务重启完毕后查看网卡信息:
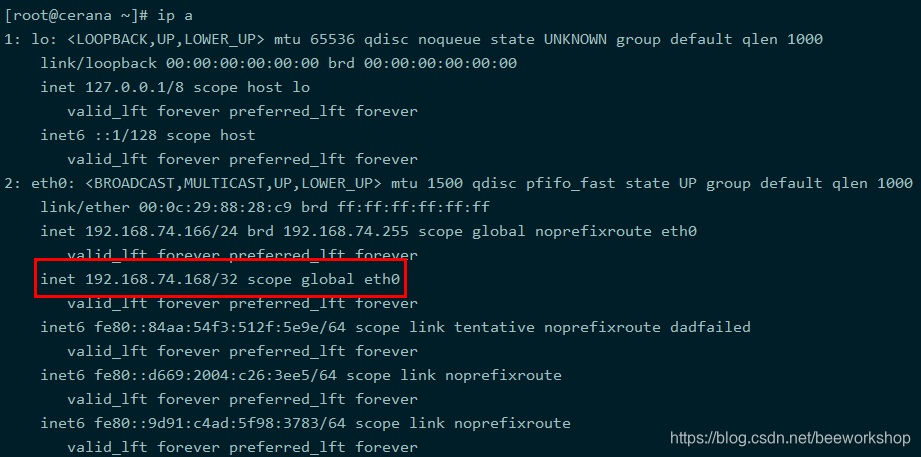
可以看到多了VRRP的虚网关地址192.168.74.168。注意,使用ifconfig命令是看不到的,需要使用 “ip a” 命令。 而且,备机是看不到VRRP虚网关地址的,VRRP虚网关地址只会在MASTER主机的接口卡上生效,因此只能在MASTER主机上看到。
此时模拟MASTER挂掉可以停止keepalived服务
systemctl stop keepalived.service
VRRP虚网关地址192.168.74.168将跑到BACKUP主机上。可以使用 ip a | grep ‘/32’ 命令查看虚拟网关地址跑到哪台主机上了。
- 将nginx的状态与keepalived的状态关联
本质上主备状态实际上是由keepalived的进程状态来决定的。前面我们测试的情况是 keepalived挂掉的情况。实际情况是keepalived不容易挂掉,容易挂掉的是nginx。如果nginx挂了但keepavlied没挂,这时,可以ping通虚网关地址,但却访问不了nginx提供的服务。所以这里需要借助keepalived的vrrp_script配置,调用脚本设法将nginx的服务也与keepalived控制的主备状态关联起来。
脚本nginx_check.sh如下:
#!/bin/bash
count_pid=`ps -C nginx --no-header | wc -l`
if [ $count_pid -eq 0 ];then
    systemctl start nginx.service
    logger -i -t nginx_check "restarting nginx again..."
    sleep 2
    count_pid=`ps -C nginx --no-header | wc -l`
    if [ $count_pid -eq 0 ];then
        systemctl stop keepalived.service
        logger -i -t nginx_check "stop keepalived, nginx failover..."
    fi
fi
keepalived.conf的配置参照上边的配置示例。
或者可以直接使用shell script脚本关联nginx和keepalived的状态(当然也可以借助cron来实现)。下边的shell脚本只需要布置在Master主机上即可。
#!/bin/bash
# nginx_check.sh
while :
do
    count_pid=`ps -C nginx --no-header | wc -l`
    if [ $count_pid -eq 0 ]; then
        systemctl start nginx.service
        logger -i -t nginx_check "restarting nginx again..."
        sleep 2
        count_pid=`ps -C nginx --no-header | wc -l`
        if [ $count_pid -eq 0 ]; then
           systemctl stop keepalived.service
           logger -i -t nginx_check "stop keepalived, nginx failover..."
        fi
    fi
    sleep 2
done
在后台执行上边的脚本即可。
nohup /bin/sh /root/nginx_check.sh &

# 停止
ps -ef | grep nginx_check.sh
kill 数字(上边命令的第二列:pid)


 1113
1113

 被折叠的 条评论
为什么被折叠?
被折叠的 条评论
为什么被折叠?
 到【灌水乐园】发言


