


一、多线程有多少种实现方式
我们要了解多线程,首先就要知道多线程有多少种实现方式,这个问题的答案有许多中类,有说是3种的,有说是4种的,接下来我们就详细研究一下多线程到底有多少种实现方式;
不卖关子,答案是:2种;
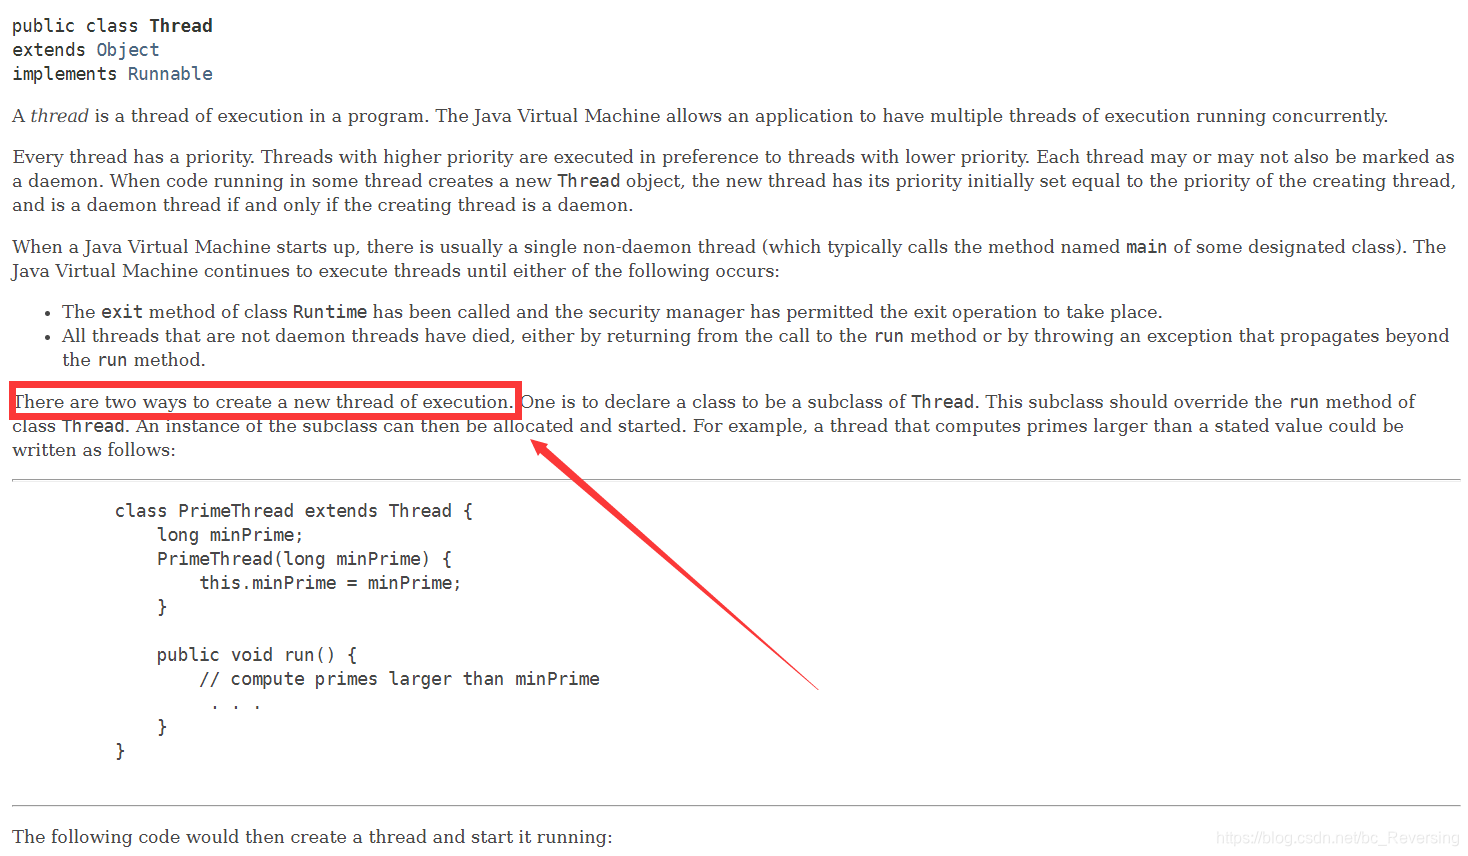

我们可以直接去查询Oracle提供JDK API文档可知:There are two ways to create a new thread of execution;翻译过来就是,有两种方式可以创建新的执行线程,也都给出了实例程序。
方法一:实现Runnable接口;
方法二:继承Thread类;
二、多线程两种实现方式比较:
多线程的这两种方式有什么不同,各自有什么特点,在我们日常开发过程中,如何选择呢?
两种方法本质上的不同是:
方法一:最终调用的是target.run();使用该方法,我们会创建一个实现了Runnable接口的实现类,在创建线程的时候,会将这个实现类的实例传给Thread对象,为Thread对象中的Target赋值,我们启动线程执行run方法中的逻辑时,实际上是调用的target中的run方法中逻辑;
/**
 * If this thread was constructed using a separate
 * <code>Runnable</code> run object, then that
 * <code>Runnable</code> object's <code>run</code> method is called;
 * otherwise, this method does nothing and returns.
 * <p>
 * Subclasses of <code>Thread</code> should override this method.
 *
 * @see     #start()
 * @see     #stop()
 * @see     #Thread(ThreadGroup, Runnable, String)
 */
@Override
public void run() {
    if (target != null) {
        target.run();
    }
}
实例代码:
public class RunnableStyle implements Runnable{

    public static void main(String[] args) {
        Thread thread = new Thread(new RunnableStyle());
        thread.start();
    }

    @Override
    public void run(){
        System.out.println("用Runnable方法实现线程!");
    }

}
方法二:run()整个都被重写;这种方法是通过集成Thread类,并重写Thread中run方法,在线程启动的时候,执行子类中的run方法;
实例代码:
public class ThreadStyle extends Thread{

    public static void main(String[] args) {
        new ThreadStyle().start();
    }

    @Override
    public void run(){
        System.out.println("用Thread类实现线程!");
    }
}
在我们的开发中,我们应该尽可能使用方法一(Runnable),实现Runnable接口的方法更好,这种方式应该使我们优先考虑的,除非迫不得已的情况下;
首先,从代码架构的角度去考虑,具体执行的这个任务也就是run方法,它应该和我们的线程的创建和运行也就是Tread的类得是解耦的,所以我们不能把两个事情混为一谈,从解耦的角度方法一更好。
其次,使用继承Thread类这种方法,每次我们想新建一个任务,我们每次只能独立的新建一个线程,而新建一个独立的线程的损耗是比较大的。它需要创建执行,执行完成之后又要销毁。而如果我们使用runnable,我们就可以利用后续的线程池工具,利用这些工具我们就能大大减少创建销、毁线程的损耗。所以使用runnable好就好在资源的节约上。
最后,由于java中的继承是单继承的,使用继承Thread方式的话,实现类就不能再继承其他类了,大大限制了其可扩展性。
由于以上三点的存在,我们得出结论实现runnable接口是更可取的方法。
三、如果我们同时使用上面的两种方法会怎么样呢?
如果我们同时使用上面的方法一和方法二,其实只有方法二能起作用;
/**
 * 描述:  同时使用Runnable和Tread两种实现线程的方式
 * */
public class BothRunnableTread {

    public static void main(String[] args) {
        new Thread(new Runnable() {
            @Override
            public void run() {
                System.out.println("我来自Runable!");
            }
        }) {
            @Override
            public void run(){
                System.out.println("我来自Thread!");
            }
        }.start();
    }

}
其实很好理解,方法一实际上是借助的Thread中的run方法来实现,上面我们也说了,通过方法一新建运行线程,实际上是运行的Thread的本身的run方法,在这个run方法中通过target.run()运行我们自己的逻辑,但是本质上运行的还是Thread自己的run(),如果我们同时使用了方法二,重写了Thread的run(),我们再启动执行这个线程,运行的是重写后的run()方法,所以方法一不会起作用;
四、常见的其他创建线程的观点:
(一)线程池创建线程:
线程池创建线程的方式本质上不能称为一种单独的创建线程的方式,这种方式应该属于方法一(Runnable)的一种延伸,它的底层源码的实现与callable类似。线程池创建线程是通过ThreadFactory来实现的,在这个线程工厂中使用的Runnable方法实现的;
源码分析:
/**
 * The default thread factory
 */
static class DefaultThreadFactory implements ThreadFactory {
    private static final AtomicInteger poolNumber = new AtomicInteger(1);
    private final ThreadGroup group;
    private final AtomicInteger threadNumber = new AtomicInteger(1);
    private final String namePrefix;

    DefaultThreadFactory() {
        SecurityManager s = System.getSecurityManager();
        group = (s != null) ? s.getThreadGroup() :
                              Thread.currentThread().getThreadGroup();
        namePrefix = "pool-" +
                      poolNumber.getAndIncrement() +
                     "-thread-";
    }

    public Thread newThread(Runnable r) {
        Thread t = new Thread(group, r,
                              namePrefix + threadNumber.getAndIncrement(),
                              0);//通过传入Runnable实现类来实现的
        if (t.isDaemon())
            t.setDaemon(false);
        if (t.getPriority() != Thread.NORM_PRIORITY)
            t.setPriority(Thread.NORM_PRIORITY);
        return t;
    }
}
通过翻看上述源码,发现ThreadFactory是通过方法一来实现的;
我们详细的看一下这块的流程,我们通过java提供的Executors工具类的newCachedThreadPool()来获取ExecutorService类型的实例,ExecutorService是一个接口类,这个接口类的具体的实现类是ThreadPoolExecutor,也就是我们获取的实例是ThreadPoolExecutor类型的。
/**
 * Creates a thread pool that creates new threads as needed, but
 * will reuse previously constructed threads when they are
 * available.  These pools will typically improve the performance
 * of programs that execute many short-lived asynchronous tasks.
 * Calls to {@code execute} will reuse previously constructed
 * threads if available. If no existing thread is available, a new
 * thread will be created and added to the pool. Threads that have
 * not been used for sixty seconds are terminated and removed from
 * the cache. Thus, a pool that remains idle for long enough will
 * not consume any resources. Note that pools with similar
 * properties but different details (for example, timeout parameters)
 * may be created using {@link ThreadPoolExecutor} constructors.
 *
 * @return the newly created thread pool
 */
public static ExecutorService newCachedThreadPool() {
    return new ThreadPoolExecutor(0, Integer.MAX_VALUE,
                                  60L, TimeUnit.SECONDS,
                                  new SynchronousQueue<Runnable>());
}
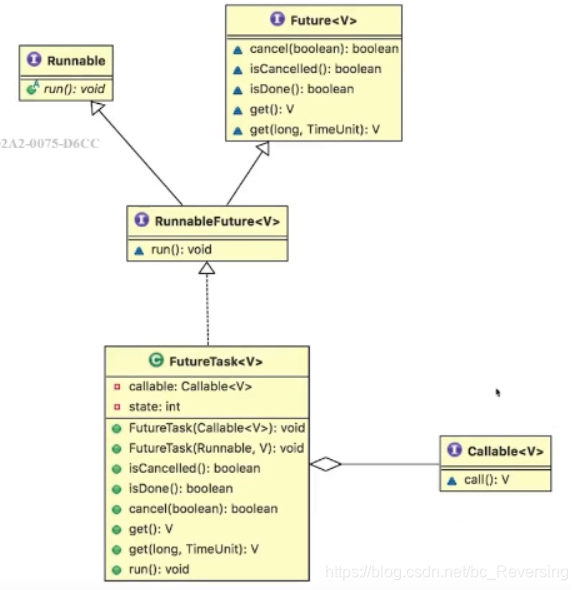
创建完executorService之后,调用submit()方法,传入任务对象(Task)的实例,首先我们创建一个RunnableFuture类型的任务对象,RunnableFuture也是一个接口类,但是这个接口类继承了Runnable和Future接口,RunnableFuture的具体实现类为FutureTask,大家看到这个类就应该很眼熟了,这个类就是Callable方式创建线程的支持类;这一块逻辑实际上是应用callable创建线程的方式,我们虽然传入的是Runnable类型的任务,java内部会将这个任务转化为Callable类型的。
/**
 * @throws RejectedExecutionException {@inheritDoc}
 * @throws NullPointerException       {@inheritDoc}
 */
public Future<?> submit(Runnable task) {
    if (task == null) throw new NullPointerException();
    RunnableFuture<Void> ftask = newTaskFor(task, null);
    execute(ftask);
    return ftask;
}
/**
 * Returns a {@code RunnableFuture} for the given runnable and default
 * value.
 *
 * @param runnable the runnable task being wrapped
 * @param value the default value for the returned future
 * @param <T> the type of the given value
 * @return a {@code RunnableFuture} which, when run, will run the
 * underlying runnable and which, as a {@code Future}, will yield
 * the given value as its result and provide for cancellation of
 * the underlying task
 * @since 1.6
 */
protected <T> RunnableFuture<T> newTaskFor(Runnable runnable, T value) {
    return new FutureTask<T>(runnable, value);
}
在创建FutureTask实例的过程中,实际上有一步Runnable类型的任务转callable类型任务的过程,当我们创建一个FutureTask实例的时候,我们传入的Runnable类型的实例,但是java内部通过Executors工具类提供的callable()方法,将传入的Runnable类型的任务封装到Callable任务中,并返回一个Callable类型的实例;
/**
 * Creates a {@code FutureTask} that will, upon running, execute the
 * given {@code Runnable}, and arrange that {@code get} will return the
 * given result on successful completion.
 *
 * @param runnable the runnable task
 * @param result the result to return on successful completion. If
 * you don't need a particular result, consider using
 * constructions of the form:
 * {@code Future<?> f = new FutureTask<Void>(runnable, null)}
 * @throws NullPointerException if the runnable is null
 */
public FutureTask(Runnable runnable, V result) {
    this.callable = Executors.callable(runnable, result);
    this.state = NEW;       // ensure visibility of callable
}
Runnable类型的任务向Callable类型的任务转化的过程如下:
/**
 * Returns a {@link Callable} object that, when
 * called, runs the given task and returns the given result.  This
 * can be useful when applying methods requiring a
 * {@code Callable} to an otherwise resultless action.
 * @param task the task to run
 * @param result the result to return
 * @param <T> the type of the result
 * @return a callable object
 * @throws NullPointerException if task null
 */
public static <T> Callable<T> callable(Runnable task, T result) {
    if (task == null)
        throw new NullPointerException();
    return new RunnableAdapter<T>(task, result);
}
/**
 * A callable that runs given task and returns given result
 */
static final class RunnableAdapter<T> implements Callable<T> {
    final Runnable task;
    final T result;
    RunnableAdapter(Runnable task, T result) {
        this.task = task;
        this.result = result;
    }
    public T call() {
        task.run();
        return result;
    }
}
以上的步骤处理完成之后,调用ThreadPoolExecutor中的execute的方法,执行该线程;
/**
 * Executes the given task sometime in the future.  The task
 * may execute in a new thread or in an existing pooled thread.
 *
 * If the task cannot be submitted for execution, either because this
 * executor has been shutdown or because its capacity has been reached,
 * the task is handled by the current {@code RejectedExecutionHandler}.
 *
 * @param command the task to execute
 * @throws RejectedExecutionException at discretion of
 *         {@code RejectedExecutionHandler}, if the task
 *         cannot be accepted for execution
 * @throws NullPointerException if {@code command} is null
 */
public void execute(Runnable command) {
    if (command == null)
        throw new NullPointerException();
    /*
     * Proceed in 3 steps:
     *
     * 1. If fewer than corePoolSize threads are running, try to
     * start a new thread with the given command as its first
     * task.  The call to addWorker atomically checks runState and
     * workerCount, and so prevents false alarms that would add
     * threads when it shouldn't, by returning false.
     *
     * 2. If a task can be successfully queued, then we still need
     * to double-check whether we should have added a thread
     * (because existing ones died since last checking) or that
     * the pool shut down since entry into this method. So we
     * recheck state and if necessary roll back the enqueuing if
     * stopped, or start a new thread if there are none.
     *
     * 3. If we cannot queue task, then we try to add a new
     * thread.  If it fails, we know we are shut down or saturated
     * and so reject the task.
     */
    int c = ctl.get();
    if (workerCountOf(c) < corePoolSize) {
        if (addWorker(command, true))
            return;
        c = ctl.get();
    }
    if (isRunning(c) && workQueue.offer(command)) {
        int recheck = ctl.get();
        if (! isRunning(recheck) && remove(command))
            reject(command);
        else if (workerCountOf(recheck) == 0)
            addWorker(null, false);
    }
    else if (!addWorker(command, false))
        reject(command);
}
通过Worker方法创建线程,这里我们就能看到这个地方就是通过ThreadFactory新建线程的了,通过new Thread()传入一个Runnable的任务。
/**
 * Creates with given first task and thread from ThreadFactory.
 * @param firstTask the first task (null if none)
 */
Worker(Runnable firstTask) {
    setState(-1); // inhibit interrupts until runWorker
    this.firstTask = firstTask;
    this.thread = getThreadFactory().newThread(this);
}
实例程序:
public class ThreadPoolCase {

    public static void main(String[] args){
        ExecutorService executorService = Executors.newCachedThreadPool();
        for(int i = 0;i < 1000;i++){
            executorService.submit(new Task() {
            });
        }
    }
}

class Task implements Runnable{
    @Override
    public void run(){
        try {
            Thread.sleep(500);
        } catch (InterruptedException e) {
            e.printStackTrace();
        }
        System.out.println(Thread.currentThread().getName());
    }
}
总结:线程池类型创建线程的方式,实际上还是使用了方法一的方式,捎带着我们也看到了所谓callable方式创建线程的方式实际上是java底层对Runnable方式做了进一步的优化封装本质上是没变的;
(二)通过Callable和FutureTask创建线程:
从上面分析的源码我们也可以看到,Callable创建线程的方式,只不过是针对Runnable接口的进一步封装优化,核心并未有改变,这里就赘述了,大家可以看一下Callable的底层结构;
实例程序:
public class ThreadCallable {

    public static void main(String[] args) {
        Callable<String> callable = new CallableStyle<String>();
        FutureTask<String> futureTask = new FutureTask<String>(callable);
        Thread thread = new Thread(futureTask);
        System.out.println(Thread.currentThread().getName());
        thread.start();
        try {
            System.out.println(futureTask.get());
        } catch (InterruptedException e) {
            e.printStackTrace();
        } catch (ExecutionException e) {
            e.printStackTrace();
        }
    }
}

class CallableStyle<V> implements Callable<V>{

    @Override
    public V call() throws Exception {
        System.out.println(Thread.currentThread().getName()+"-->通过实现Callable接口借助FutureTask包装器来实现的线程!");
        return (V) "有返回值";
    }
}
(三)定时器
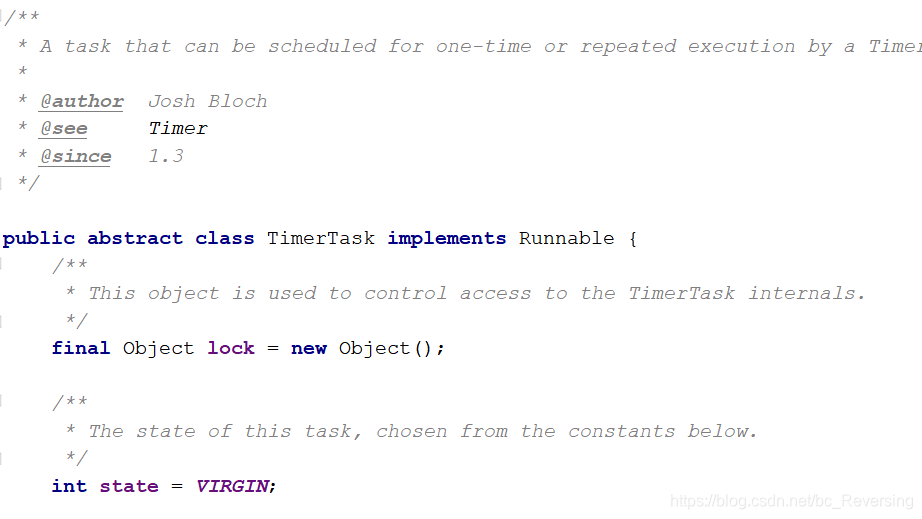
定时器创建线程也一样,TimerTask实现了Runnable接口来实现的;
实例代码:
public class ThreadTimmerTask {

    public static void main(String[] args){
        Timer timer = new Timer();
        timer.scheduleAtFixedRate(new TimerTask() {
            @Override
            public void run() {
                System.out.println(Thread.currentThread().getName());
            }
        }, 1000, 10000);
    }

}
(四)匿名内部类
public class AnonymousInnerThread {

    public static void main(String[] args) {
        new Thread(){
            @Override
            public void run() {
                System.out.println(Thread.currentThread().getName());
            }
        }.start();
        new Thread(new Runnable() {
            @Override
            public void run() {
                System.out.println(Thread.currentThread().getName());
            }
        }).start();
    }

}
(五)Lambda表达式
public class LambdaThread {

    public static void main(String[] args) {
        new Thread(() -> System.out.println(
          Thread.currentThread().getName()
        )).start();
    }

}
总结:
综上所述,多线程的实现方式从根上来讲就两种,只不过表现形式各不相同;
准确的来讲,创建线程只有一种方式就是构造Tread类,而实现线程的执行单元有两种:
方法一:实现Runnable接口的run方法,并把Runnable实例传给Thread类
方法二:重写Thread的run方法(继承Thread类)
补充知识:
1、在java中类的继承是单继承的,但是接口的继承是多继承的,比如说:RunnableFuture接口;
/**
 * A {@link Future} that is {@link Runnable}. Successful execution of
 * the {@code run} method causes completion of the {@code Future}
 * and allows access to its results.
 * @see FutureTask
 * @see Executor
 * @since 1.6
 * @author Doug Lea
 * @param <V> The result type returned by this Future's {@code get} method
 */
public interface RunnableFuture<V> extends Runnable, Future<V> {
    /**
     * Sets this Future to the result of its computation
     * unless it has been cancelled.
     */
    void run();
}
上述有错误的地方欢迎评论指正!


 被折叠的 条评论
为什么被折叠?
被折叠的 条评论
为什么被折叠?
 到【灌水乐园】发言


