


 本文详细介绍Rsync命令的使用方法,包括备份选项、参数说明、常见错误及其解决办法等内容,帮助读者掌握高效的数据备份与恢复技巧。
目录
备份在本机/mnt/os_back目录
#前提
1,关闭selinux
执行getenforce 返回的是0,如果不是就做下面的操作,然后重启
vim /etc/selinux/config 设置为SELINUX=disabled
或执行
sed -r -i "s/(SELINUX=).*/\1disabled/" /etc/selinux/config &&reboot
也可以通过grubby设置:
grubby --update-kernel ALL --args selinux=0
2 将服务端rsyncd.conf配置文件的uid和gid分别修改成root
安装后很多版本没有rsyncd.conf,自己在/etc/下新建一个,复制下面的内容直接拷贝,按回车生成:
cat >/etc/rsyncd.conf << 'EOF'
# /etc/rsyncd: configuration file for rsync daemon mode
# See rsyncd.conf man page for more options.
# configuration example:
uid=root
gid=root
# use chroot = yes
# max connections = 4
# pid file = /var/run/rsyncd.pid
# exclude = lost+found/
# transfer logging = yes
# timeout = 900
# ignore nonreadable = yes
# dont compress = *.gz *.tgz *.zip *.z *.Z *.rpm *.deb *.bz2
# [ftp]
# path = /home/ftp
# comment = ftp export area
EOF
备份和恢复
备份
BACKUP_DIR="/mnt/os_back"
mkdir -p ${BACKUP_DIR}
rsync -PpavAHX / ${BACKUP_DIR} --exclude=/media --exclude=/sys --exclude=/proc --exclude=/mnt --exclude=/tmp
恢复
BACKUP_DIR="/mnt/os_back"
for dir in $(ls ${BACKUP_DIR}/);do rsync -PpavAHXW --delete ${BACKUP_DIR}/${dir}/ /${dir}/;done
常用备份选项
(摘自:完全解析Rsync命令的17个备份选项 | https://www.linuxprobe.com/rsync-backup.html)
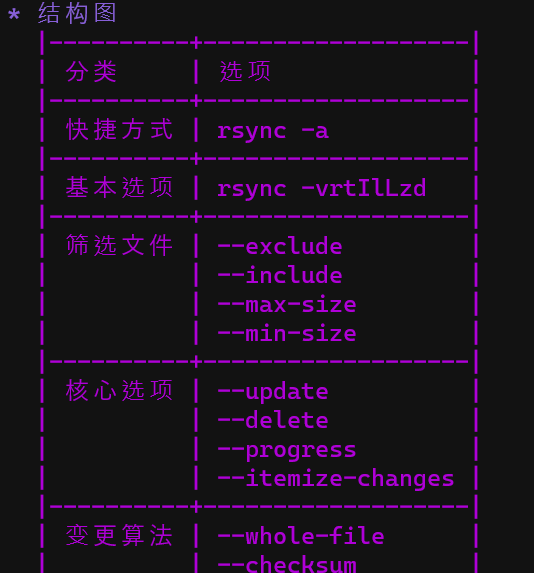
1)便捷却不简单的--Archive 选项
rsync -a #等价于 -rlptgoD 相当于添加了-rlptgoD七个options
-p  --perms # 保留权限
-o  --owner # 保留owner
-g  --group # 同步组
上面的三个选项,分别同步文件的额权限,属主和属组;后果是,我们只能用当前的用户查看所有备份的资料。切换用户之后,则没有对应权限查看。
因此,重装系统备份所有资料的时候,要慎用-a 选项。
2)常用的基本选项
rsync 的基础选项有:
-v  --verbose # 在终端中报告当前的进度
-r  --recursive # 递归模式
-t  --times # 同步时间戳
-I --ignore-times # 不同步时间戳
-l --links # 创建软连接
-L, --copy-links  # 复制软连接所指向的位置
-z, --compress  # 允许压缩
-d, --dirs  # 只备份目录树结构
以上8个option是rsync命令的基础部分。
3)排除和包含特定的文件与目录
指定排除
指定排除的文件类型
--exclude={.ssh,.git,.config}-exclude-from=FILE #我们可以将经常要排除掉的目录写进专门的文件。此文件中,我们可以应用#和;备注,rsync命令会自动忽略,同时也会跳过空白行。
指定包含
与‘exclude’相对应的是 ‘include’。如果不使用 {},我们可以写成多行的模式:
rsync -av ~/Documents  \
--include=~/Public \
--include=~/Music \
--include=~/Videos \
--include=~/Downloads \
/media/spiritme/disk/
除了include 和exclude 之外,rsync还准备了根据文件的大小实施筛选的选项:
--max-size=SIZE # 筛选掉大于此SIZE的文件
--min-size=SIZE # 排除掉小于此SIZE的文件
4)rsync 命令的核心
--update :destination 中时间戳晚于source中的文件不会被覆盖掉。
(实例:https://blog.youkuaiyun.com/whatday/article/details/105007775)
--delete:将删除掉destination中多余的目录与文件。
--existing :只同步在目标位置存在的文件,而不创建新的文件。
以上三个选项乃是rsync命令的核心部分。
--progress:打印档期的进度
782448 63% 110.64kB/s 0:00:04 # 与 -h 搭配使用
-i, --itemize-changes将生成所有变更的报告。
5)改变 rsync 算法的选项
-W, --whole-file :改变rsync的算法。关闭其默认的 delta-transfer algorithm,而将文件整体移动。当然如果是在本地执行rsync,-W 则是默认行为。
-c, --checksum选项将改变rsync默认的‘quick-check’算法。
6)收尾总结
我们从具体问题‘rsync-a' 命令导致的权限问题出发,遵循循序渐进的逻辑分别探讨了:
1)快捷方式 rsync -a2)常用的8个基本选项3)排除和包含特定的文件与目录的方法4)rsync 命令的核心5)改变 rsync 算法的选项
参数说明
| 参数 | 详解说明 |
| -v, --verbose | 详细模式输出。 |
| -q, --quiet | 精简输出模式。 |
| -c, --checksum | 打开校验开关,强制对文件传输进行校验。 |
| -a, --archive | 归档模式,表示以递归方式传输文件,并保持所有文件属性,等于-rlptgoD。 谨慎用 -a 选项。因为如果在新系统上换了新的用户名,会导致你打不开用 -a 选型备份的所有资料。 -a这一个option,相当于添加了-rlptgoD这七个options -p --perms # 保留权限 -o --owner # 保留owner -g --group # 同步组 上面的三个选项,分别同步文件的额权限,属主和属组;后果是,我们只能用当前的用户查看所有备份的资料。切换用户之后,则没有对应权限查看。 因此,我们重装系统备份所有资料的时候,要慎用-a 选项。 |
| -r, --recursive | 对子目录以递归模式处理。 |
| -R, --relative | 使用相对路径信息。 |
| -b, --backup | 创建备份,也就是对于目的已经存在有同样的文件名时,将老的文件重新命名为~filename。可以使用–suffix选项来指定不同的备份文件前缀。 |
| –backup-dir | 将备份文件(如~filename)存放在在目录下。 |
| -suffix=SUFFIX | 定义备份文件前缀。 |
| -u, --update | 仅仅进行更新,也就是跳过所有已经存在于DST,并且文件时间晚于要备份的文件,不覆盖更新的文件。 |
| -l, --links | 保留软链结。 |
| -L, --copy-links | 想对待常规文件一样处理软链结。 |
| –copy-unsafe-links | 仅仅拷贝指向SRC路径目录树以外的链结。 |
| –safe-links | 忽略指向SRC路径目录树以外的链结。 |
| -H, --hard-links | 保留硬链结。 |
| -p, --perms | 保持文件权限。 |
| -o, --owner | 保持文件属主信息。 |
| -g, --group | 保持文件属组信息。 |
| -D, --devices | 保持设备文件信息。 |
| -t, --times | 保持文件时间信息。 |
| -S, --sparse | 对稀疏文件进行特殊处理以节省DST的空间。 |
| -n, --dry-run | 现实哪些文件将被传输。 |
| -w, --whole-file | 拷贝文件,不进行增量检测。 |
| -x, --one-file-system | 不要跨越文件系统边界。 |
| -B, --block-size=SIZE | 检验算法使用的块尺寸,默认是700字节。 |
| -e, --rsh=command | 指定使用rsh、ssh方式进行数据同步。 |
| –rsync-path=PATH | 指定远程服务器上的rsync命令所在路径信息。 |
| -C, --cvs-exclude | 使用和CVS一样的方法自动忽略文件,用来排除那些不希望传输的文件。 |
| –existing | 仅仅更新那些已经存在于DST的文件,而不备份那些新创建的文件。 |
| –delete | 删除那些DST中SRC没有的文件。 |
| –delete-excluded | 同样删除接收端那些被该选项指定排除的文件。 |
| –delete-after | 传输结束以后再删除。 |
| –ignore-errors | 及时出现IO错误也进行删除。 |
| –max-delete=NUM | 最多删除NUM个文件。 |
| –partial | 保留那些因故没有完全传输的文件,以是加快随后的再次传输。 |
| –force | 强制删除目录,即使不为空。 |
| –numeric-ids | 不将数字的用户和组id匹配为用户名和组名。 |
| –timeout=time ip | 超时时间,单位为秒。 |
| -I, --ignore-times | 不跳过那些有同样的时间和长度的文件。 |
| –size-only | 当决定是否要备份文件时,仅仅察看文件大小而不考虑文件时间。 |
| –modify-window=NUM | 决定文件是否时间相同时使用的时间戳窗口,默认为0。 |
| -T --temp-dir=DIR | 在DIR中创建临时文件。 |
| –compare-dest=DIR | 同样比较DIR中的文件来决定是否需要备份。 |
| -P 等同于 --partial。 | 保留那些因故没有完全传输的文件,以是加快随后的再次传输。 |
| –progress | 显示备份过程。 |
| -z, --compress | 对备份的文件在传输时进行压缩处理。 |
| –exclude=PATTERN | 指定排除不需要传输的文件模式。 |
| –include=PATTERN | 指定不排除而需要传输的文件模式。 |
| –exclude-from=FILE | 排除FILE中指定模式的文件。 |
| –include-from=FILE | 不排除FILE指定模式匹配的文件。 |
| –version | 打印版本信息。 |
| –address | 绑定到特定的地址。 |
| –config=FILE | 指定其他的配置文件,不使用默认的rsyncd.conf文件。 |
| –port=PORT | 指定其他的rsync服务端口。 |
| –blocking-io | 对远程shell使用阻塞IO。 |
| -stats | 给出某些文件的传输状态。 |
| –progress | 在传输时现实传输过程。 |
| –log-format=formAT | 指定日志文件格式。 |
| –password-file=FILE | 从FILE中得到密码。 |
| –bwlimit=KBPS | 限制I/O带宽,KBytes per second。 |
| -h, --help | 显示帮助信息。 |
inplace参数:实现块文件/镜像文件增量备份与复制
点击展开官方描述
简而言之就是:
1. rsync默认情况下是将更新的文件复制到目标路径后替换旧文件
default method of creating a new copy of the file and moving it into place when it is complete
2. 加上这个参数之后,rsync会将更新的部分直接写入目标路径对应的位置
writes the updated data directly to the destination file
3. 适合的情况是当源文件一直在变动或者源文件是一个块文件的情况
实例
在我们实际使用中,如果需要将一个正在运行的虚拟机镜像进行复制同步,那么就必须使用这个参数。否则当虚拟机在写入的时候复制就会出现文件损坏了。
命令(其中r操作目录 v显示更多信息 progress显示进度):
- [root@KVM-FSN1-M103 /]# rsync -r -v --progress --inplace --no-whole-file /storage/data/ /storage-new/data/
错误记录
rsync:错误 some files/attrs were not transferred (see previous errors) (code 23) at main.c(1518)
1、问题
在使用rsync同步操作时,rsync报错
rsync error: some files/attrs were not transferred (see previous errors) (code 23) at main.c(1518) [generator=3.0.9]
2、解决办法
原因是有文件没有写的权限,导致备份权限不够,两种解决办法:
1、将服务端rsyncd.conf配置文件的uid和gid分别修改成root,重载下,/etc/rc.d/init.d/xinetd reload,再次执行同步,同步成功
2、将需要同步的文件夹及下属文件赋予777权限(chmod -R 777 xxx),再次执行同步,同步成功
原文链接:https://blog.youkuaiyun.com/panjiapengfly/article/details/109160000
| sed -i "/uid = nobody/ s/^#//" /etc/rsyncd.conf sed -i "/gid = nobody/ s/^#//" /etc/rsyncd.conf sed -r -i "s/(uid =).*/\1root/" /etc/rsyncd.conf sed -r -i "s/(gid =).*/\1root/" /etc/rsyncd.conf cat /etc/rsyncd.conf /etc/rc.d/init.d/xinetd reload
把selinux disabled 掉
安装后很多版本就是没有rsyncd.conf,自己在/etc/下新建一个就好了。按照网上的rsyncd.conf的规则写,我这里有一个:
//vi /etc/rsyncd.conf uid=root gid=root max connections=50000 use chroot=no log file=/var/log/rsyncd.log pid file=/var/run/rsyncd.pid lock file=/var/run/rsyncd.lock //这是模块名 [tongbu] path=/opt/tongbu comment = xoyo video files ignore errors read only = no hosts allow = 192.168.8.40/26 192.168.138.94/24 hosts deny = *
cat >/etc/rsyncd.conf << 'EOF'
# /etc/rsyncd: configuration file for rsync daemon mode
# See rsyncd.conf man page for more options.
# configuration example:
uid=root gid=root # use chroot = yes # max connections = 4 # pid file = /var/run/rsyncd.pid # exclude = lost+found/ # transfer logging = yes # timeout = 900 # ignore nonreadable = yes # dont compress = *.gz *.tgz *.zip *.z *.Z *.rpm *.deb *.bz2
# [ftp] # path = /home/ftp # comment = ftp export area EOF |
rsync同步出错以及解决办法。
1、@ERRPR:chdir failed
错误原因:
服务器端没有提供访问的目录 /backup
处理方法:
需要在服务器端创建,并赋予权限rsync管理权限
mkdir /backup
chown -R rsync.rsync /backup/
2、@ERROR: auth failed on module backup
查看 服务端/etc/rsync.password 配置文件是否有问题
比如:
多余的空格 空行
rsync error: error startingclient-serverprotocol (code 5) at main.c(1503) [sender=3.0.6]
错误原因
1> 客户端密码文件的权限不是600
2> 服务端密码文件不是600
3> 服务端密码文件不存在(名字写错了/没有创建/配置文件参数写错了)
4> 服务端密码文件里保存的用户名和密码不正确
3、@ERROR:invalid uid rsync
不可用的uid
useradd rsync -s /sbin/nologin -M
4、@ERROR: chroot failed
@ERROR:chroot failed
rsyncerror: error starting client-server protocol (code 5) at main.c(1522)[receiver=3.0.3]
服务器端的目录不存在或无权限,创建目录并修正权限可解决问题。
5、@ERROR: auth failed on module tee
rsync error: error starting client-serverprotocol (code 5) at main.c(1522) [receiver=3.0.3]
服务器端该模块(tee)需要验证用户名密码,但客户端没有提供正确的用户名密码,认证失败。
提供正确的用户名密码解决此问题。
6、@ERROR: Unknown module ‘tee_nonexists'
rsync error: error starting client-serverprotocol (code 5) at main.c(1522) [receiver=3.0.3]
服务器不存在指定模块。提供正确的模块名或在服务器端修改成你要的模块以解决问题。
1> 推送/拉取命令写错了
2> 服务端模块名字写错了
7、rsync: --passwork-file=/etc/rsync.password: unknown option
rsync: --passwork-file=/etc/rsync.password:unknown option
rsync error: syntax or usage error (code 1)at main.c(1422) [client=3.0.6]
错误原因:
/etc/rsync.password文件名称写错
解决方法:
更正/etc/rsync.password文件名称
8、rsync: ERROR:cannot stat destination
sending incremental file list
rsync: ERROR: cannot stat destination"." (in backup): Permission denied (13)
rsync error: errors selecting input/outputfiles, dirs (code 3) at main.c(554) [receiver=3.0.6]
rsync: connection unexpectedly closed (5bytes received so far) [sender]
rsync error: error in rsync protocol datastream (code 12) at io.c(600) [sender=3.0.6]
错误原因:
服务端rsync对目录操作权限不足
解决方法:
修改对应目录权限755
[root@oldboy~]# chmod 755 /backup/
[root@oldboy~]# ll -ld /backup/
drwxr-xr-x.12 rsync rsync 4096 Sep 23 19:17 /backup/
9、rsync: write failed on "/home/backup2010/ ": No space lefton device (28)
rsync:write failed on "/home/backup2010/wensong": No space left on device(28)
rsyncerror: error in file IO (code 11) at receiver.c(302) [receiver=3.0.7]
rsync:connection unexpectedly closed (2721 bytes received so far) [generator]
rsyncerror: error in rsync protocol data stream (code 12) at io.c(601) [generator=3.0.7]
问题原因:
磁盘空间不够,所以无法操作。
解决方法:
可以通过df /home/backup2010 来查看可用空间和已用空间
10、rsync: opendir "/kexue" (in dtsChannel) failed: Permissiondenied (13)
注意查看同步的目录权限是否为755
11、rsync: failed to connect to 203.100.192.66: Connection timed out(110)
rsync:failed to connect to 203.100.192.66: Connection timed out (110)
rsyncerror: error in socket IO (code 10) at clientserver.c(124) [receiver=3.0.5]
检查服务器的端口netstat ?tunlp,远程telnet测试。
可能因为客户端或者服务端的防火墙开启 导致无法通信,可以设置规则放行 rsync(873端口) 或者直接关闭防火墙。
关服务端selinux 和iptabs 防火墙
还有一种在同步过程中可能会提示没有权限 (将同步目录加上SvcwRsync全部权限即可,更简单的方法就是将SvcwRsync设为管理员即可)
需要给/etc/rsync.password 600权限
[root@backup backup]# ll -ld/etc/rsync.password
-rw-------. 1 root root 20 Sep 22 21:16/etc/rsync.password
12、rsync: failed to connect to 10.10.10.170: Connection refused (111)
rsync:failed to connect to 10.10.10.170: Connection refused (111)
rsyncerror: error in socket IO (code 10) at clientserver.c(124) [receiver=3.0.5]
启动服务:rsync --daemon--config=/etc/rsyncd.conf
13 、rsync:recv_generator: mkdir "/teacherclubBackup/rsync……" failed: No spaceleft on device (28)
*** Skipping any contents from this faileddirectory ***
磁盘空间满
14、rsync error: received SIGINT, SIGTERM, orSIGHUP (code 20) at rsync.c(544) [receiver=3.0.5]
rsyncerror: received SIGINT, SIGTERM, or SIGHUP (code 20) at rsync.c(544)[generator=3.0.5]
Ctrl+C或者大量文件
15、rsync: read error: Connection reset by peer (104)
rsync:read error: Connection reset by peer (104)
rsync error: error in rsync protocol datastream (code 12) at io.c(759) [receiver=3.0.5]
xnetid启动
查看rsync日志
rsync: unable to open configuration file"/etc/rsyncd.conf": No such file or directory
xnetid查找的配置文件位置默认是/etc下,根据具体情况创建软链接。例如:
ln -s /etc/rsyncd/rsyncd.conf /etc/rsyncd.conf
或者更改指定默认的配置文件路径,在/etc/xinetd.d/rsync配置文件中。
16、rsync:recv_generator: mkdir"nfs01_172.16.1.31" (in backup) failed:Permission denied (13)
sendingincremental file list
./
rsync:failed to set times on"." (in backup): Operation not permitted (1)
nfs01_172.16.1.31/
rsync:recv_generator: mkdir"nfs01_172.16.1.31" (in backup) failed:Permission denied (13)
***Skipping any contents fromthis failed directory ***
sent 106bytes received 15 bytes 80.67 bytes/sec
totalsize is 655 speedup is 5.41
rsyncerror: some files/attrs were not transferred (see previous errors) (code 23) atmain.c(1039) [sender=3.0.6]
错误原因:
1、服务端配置文件中指定的用户和模块指定的目录的属主属组不同
2、服务端模块指定的目录属组属组没有权限
解决方法:
将模块指定目录的属主属组修改为 配置文件中指定的 uid gid
[root@nfs01 ~]# chown rsync.rsync/backup 配置文件中指定的用户和组
17、skippingnon-regular file “vendor/bin/doctrine”
receivingincremental file list
skippingnon-regular file “vendor/bin/doctrine”
skippingnon-regular file “vendor/bin/doctrine.php”
sent1990 bytes received 489209 bytes 327466.00 bytes/sec total size is 182515746speedup is 371.57
原因:
source源文件有软链接。
解决方法:
修改为 rsync -va,其中 -a== -rlptgoD (no -H,-A,-X) 或者 rsync -rvltOD 也可以。
解决后:
receiving incremental file list
vendor/bin/doctrine ->../doctrine/orm/bin/doctrine
vendor/bin/doctrine.php ->../doctrine/orm/bin/doctrine.php
sent 1998 bytes received 489279 bytes327518.00 bytes/sec total size is 182515746 speedup is 371.51
18、@ERROR: module is read only
sendingincremental file list
ERROR:module is read only
rsyncerror: syntax or usage error (code 1) at main.c(866) [receiver=3.0.6]
rsync:read error: Connection reset by peer (104)
rsyncerror: error in rsync protocol data stream (code 12) at io.c(759)[sender=3.0.6]
原因:
source源服务器端权限设置read为only只读权限。
解决方法:
read only = false
19、password file must not be other-accessible
passwordfile must not be other-accessible
passwordfile must not be other-accessible
continuingwithout password file
Password:
原因:
这是因为rsyncd.pwd rsyncd.secrets的权限不对,应该设置为600。
解决方法:
chmod 600 rsyncd.pwd
20、rsync error: error starting client-server protocol
rsyncerror: error starting client-server protocol
rsyncerror: error starting client-server protocol (code 5) at main.c(1524)[Receiver=3.0.6]
原因:
/etc/rsyncd.conf配置文件内容有错误。请正确核对配置文件。
21、 rsync: chown “” failed: Invalid argument (22)
rsync:chown “” failed: Invalid argument (22)
原因:
权限无法复制。去掉同步权限的参数即可。(这种情况多见于Linux向Windows的时候)
22、@ERROR: daemon security issue — contactadmin
@ERROR:daemon security issue — contact admin rsync error: error starting client-serverprotocol (code 5) at main.c(1530) [sender=3.0.6]
原因:
同步的目录里面有权限不足的软连接文件,需要服务器端的/etc/rsyncd.conf打开use chroot = yes。
23、rsync: read error: Connection reset by peer (104)
rsync: read error: Connection reset by peer(104) rsync error: error in rsync protocol data stream (code 12) at io.c(794) [receiver=3.0.6]
解决:
很大可能是服务器端没有开启 rsync 服务,开启服务。
24、@ERROR: failed to openlock file
@ERROR:failed to open lock file rsync error: error starting client-server protocol(code 5) at main.c(1495) [receiver=3.0.6]
解决:
配置文件 rsync.conf 中添加lock file = rsyncd.lock 即可解决
原文链接:https://www.cnblogs.com/jokerxtr/p/14915683.html
文章标题:rsync同步出错以及解决办法。
文章链接:https://www.dianjilingqu.com/268130.html


 1045
1045

 被折叠的 条评论
为什么被折叠?
被折叠的 条评论
为什么被折叠?
 到【灌水乐园】发言


