


 本文详细介绍AutoPy库的安装及6个核心模块:alert、bitmap、color、key、mouse和screen的功能。提供了丰富的示例代码,展示了如何使用这些模块进行GUI自动化操作,如显示警报、图像处理、颜色转换、键盘鼠标控制及屏幕操作。
Python 游戏辅助基础之 AutoPy
AutoPy 的安装
- 通过
pip安装就好了 pip install autopy
AutoPy 的6个功能模块
AutoPy有6个功能模块- 为什么有
6个 - 因为官方文档里面就介绍了
6个 - 当然从
__init__.py中也可以看出来# -*- coding: utf-8 -*- """ AutoPy is a simple, cross-platform GUI automation library for Python. """ from . import alert, bitmap, color, key, mouse, screen __author__ = "Michael Sanders" __version__ = "4.0.0" __all__ = ["alert", "bitmap", "color", "key", "mouse", "screen"] - AutoPy is a simple, cross-platform GUI automation library for Python.
- 官方是这么介绍的 刘叔表示英语不行看不明白 用谷歌翻译了一下
- AutoPy是一个适用于Python的简单,跨平台的GUI自动化库。
- 可以看出一共有
6个模块alertbitmapcolorkeymousescreen
- 下面一个模块一个模块的介绍吧
alert 模块
-
官方是这么介绍的
- This module contains functions for displaying alerts.
- 该模块包含用于显示警报的功能。
-
官方文档只给出了
1个函数def alert(msg: str, title: str=None, default_button: str=None, cancel_button: str=None) -
Displays alert with the given attributes. If
cancel_buttonis not given, only the default button is displayed. ReturnsTrueif the default button was pressed, orFalseif cancelled. Note that the arguments are keywords, and can be passed as named parameters (e.g.,alert(msg='bar', title='foo')). -
显示具有给定属性的警报。 如果未提供
cancel_button,则仅显示默认按钮。 如果按下默认按钮,则返回True;如果取消,则返回False。 请注意,参数是关键字,可以作为命名参数传递(例如alert(msg ='bar',title ='foo'))。 -
简单的说 有
4参数 有返回值True或False当有第4个参数的时候会有俩按钮 -
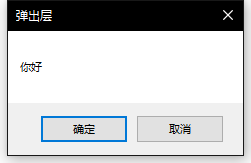
让我们调用一下康康
from autopy import alert def main(): alert.alert("你好", "弹出层", cancel_button="不") if __name__ == '__main__': main() -
cancel_button存在有两个按钮
-
但是
cancel_button的值和按钮上的文字没有关系…from autopy import alert def main(): alert.alert("你好") if __name__ == '__main__': main() -
直接这样
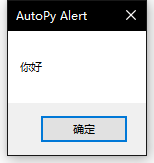
-
就一个按钮
bitmap 模块
-
官方是这么介绍的
- This module defines the class
Bitmapfor accessing bitmaps and searching for bitmaps on-screen. - It also defines functions for taking screenshots of the screen.
- 该模块定义了类
Bitmap,用于访问位图和搜索屏幕上的位图。 - 它还定义了获取屏幕截图的功能。
- This module defines the class
-
官方文档给出了
1个类和1个函数 -
类
class autopy.bitmap.Bitmap-
首先说一下该类的一些字段吧
bounds- 边界
((x, y), (width, height)) - 应该是这样吧 官方没解释啊
- 边界
size- 大小
(width, height)
- 大小
width- 宽度
float
- 宽度
height- 高度
float
- 高度
scale- 屏幕缩放的倍数
- 现在有些笔记本默认是
1.25
-
对象方法
@classmethod def open(path: str) → Bitmap-
Open the image located at the path specified. The image’s format is determined from the path’s file extension.
-
打开位于指定路径的图像。 图片的格式取决于路径的文件扩展名。
-
可以看出这是个
classmethod -
让我们调用一下康康
from autopy import bitmap


def main():
    bmp = bitmap.Bitmap.open("./image/bmp.png")
    print(bmp.bounds)
    print(bmp.size)
    print(bmp.width)
    print(bmp.height)
    print(bmp.scale)


if __name__ == '__main__':
    main()
((0.0, 0.0), (153.0, 299.0))
(153.0, 299.0)
153.0
299.0
1.0 -
可以看出成功输出的图片的基本数据
def save(path: str, format: str=None)-
Saves image to absolute path in the given format. The image type is determined from the filename if possible, unless format is given. If the file already exists, it will be overwritten. Currently only
jpegandpngfiles are supported. -
以给定格式将图像保存到绝对路径。 图像类型是根据文件名确定的,除非给出了格式。 如果文件已经存在,它将被覆盖。 当前仅支持
jpeg和png文件。 -
IOErroris thrown if the file could not be saved. -
ValueErroris thrown if image couldn’t be parsed. -
如果无法保存文件,则抛出
IOError。 -
如果无法解析图像,则抛出
ValueError。 -
把图片保存到文件嘛
-
让我们调用一下康康
from autopy import bitmap


def main():
    bmp = bitmap.Bitmap.open("./image/bmp.png")
    bmp.save("./image/bmp1.png")


if __name__ == '__main__':
    main()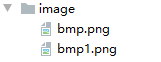
-
可以看出成功保存了新的文件
bmp1.png
def copy_to_pasteboard()- Copies image to pasteboard. Currently only supported on macOS.
- 将图像复制到粘贴板。 当前仅在macOS上受支持。
IOErroris thrown if the image could not be copied.ValueErroris thrown if the image was too large or small.- 如果无法复制图像,则抛出
IOError。 - 如果图像太大或太小,则抛出
ValueError。 - 刘叔用的
Windows这个就没法子试了
def point_in_bounds(x: float, y: float) → bool-
Returns
Trueif the given point is contained inbmp.bounds. -
如果给定点包含在
bmp.bounds中,则返回True。 -
判断给定坐标点是否在图片中
-
让我们调用一下康康
from autopy import bitmap


def main():
    bmp = bitmap.Bitmap.open("./image/bmp.png")
    print(bmp.point_in_bounds(100, 100))
    print(bmp.point_in_bounds(600, 600))


if __name__ == '__main__':
    main()
True
False -
可以看出第一个点在图片中 第二个点不在图片中
def rect_in_bounds(rect: Tuple[Tuple[float, float], Tuple[float, float]]) → bool-
Returns
Trueif the givenrectof the form((x, y), (width, height))is contained inbmp.bounds. -
如果
bmp.bounds中包含形式((x,y), (width,height))的给定rect,则返回True。 -
判断给定矩形是否在图片中
-
让我们调用一下康康
from autopy import bitmap


def main():
    bmp = bitmap.Bitmap.open("./image/bmp.png")
    print(bmp.rect_in_bounds(((50, 50), (100, 100))))
    print(bmp.rect_in_bounds(((100, 100), (600, 600))))


if __name__ == '__main__':
    main()
True
False -
可以看出第一个矩形在图片中 第二个矩形不在图片中
def get_color(x: float, y: float) → Tuple[int, int, int]- Returns hexadecimal value describing the color at a given point.
- 返回描述给定点颜色的十六进制值。
ValueErroris thrown if the point out of bounds.- 如果该点超出范围,则抛出
ValueError。 - 得到指定点颜色值
- 让我们调用一下康康
from autopy import bitmap


def main():
    bmp = bitmap.Bitmap.open("./image/bmp.png")
    color = bmp.get_color(100, 100)
    print(hex(color))


if __name__ == '__main__':
    main()
0x75788f
- 可以看出成功得到了一个十六进制颜色值
def find_color(color: Tuple[int, int, int], tolerance: float=None, rect: Tuple[Tuple[float, float], Tuple[float, float]]=None, start_point: Tuple[float, float]=None) → Tuple[float, float]- Attempts to find
colorinsiderectof the form((x, y), (width, height))inbmpfrom the givenstart_point. Returns coordinates if found, orNoneif not. IfrectisNone,bmp.boundsis used instead. Ifstart_pointisNone, the origin ofrectis used. Toleranceis defined as a float in the range from0to1, where0is an exact match and1matches anything.- 尝试从给定的
start_point在bmp中((x, y), (width, height))的rect内部查找颜色。 如果找到,则返回坐标Tuple[float, float];否则,返回None。 如果rect为None,则使用bmp.bounds。 如果start_point为None,则使用rect的原点。 tolerance定义为介于0到1之间的浮点数,其中0是完全匹配,而1则匹配任何东西。- 指定区域找颜色
- 参数有
颜色值相似度范围起始点返回None或者坐标Tuple[float, float] - 让我们调用一下康康
- 先准备一张图片
bmp.png

- 现在我们就尝试一下在
bmp.png中找到0x75788ffrom autopy import bitmap def main(): bmp = bitmap.Bitmap.open("./image/bmp.png") result = bmp.find_color(0x75788f) print(result) if __name__ == '__main__': main()(4.0, 117.0)
- 这个颜色值是我们之前获取坐标
(100, 100)的颜色值 但是这里给出的是(4, 117) - 毕竟这一张图片上不可能只有那一点是这个颜色嘛
- 想要找到图片中所有的颜色 就要用到下面这个函数
def find_every_color(color: Tuple[int, int, int], tolerance: float=None, rect: Tuple[Tuple[float, float], Tuple[float, float]]=None, start_point: Tuple[float, float]=None) → List[Tuple[float, float]]- Returns list of all
(x, y)coordinates insiderectinbmpmatchingcolorfrom the givenstart_point. IfrectisNone,bmp.boundsis used instead. Ifstart_pointisNone, the origin ofrectis used. - 从给定的
start_point开始返回bmp中rect内部所有匹配的颜色的(x, y)坐标的列表。 如果rect为None,则使用bmp.bounds。 如果start_point为None,则使用rect的原点。 - 其实就是
find_color()只不过这个函数返回一个list存放所有符合的点 - 让我们调用一下康康
- 结果会有很多 因此就不输出的 康康
(100, 100)在不在里面就好from autopy import bitmap def main(): bmp = bitmap.Bitmap.open("./image/bmp.png") result = bmp.find_every_color(0x75788f) print("number:", len(result)) index = result.index((100.0, 100.0)) print("(100, 100):", index) if __name__ == '__main__': main()number: 470
(100, 100): 253 - 可以看出一共到了
470个结果(100, 100)在253
def count_of_color(color: Tuple[int, int, int], tolerance: float=None, rect: Tuple[Tuple[float, float], Tuple[float, float]]=None, start_point: Tuple[float, float]=None) → int- Returns count of color in bitmap. Functionally equivalent to:
len(find_every_color(color, tolerance, rect, start_point))- 返回位图中的颜色计数。 功能等同于:
len(find_every_color(color, tolerance, rect, start_point))- 就是上面代码统计个数的语句
- 让我们调用一下康康
from autopy import bitmap


def main():
    bmp = bitmap.Bitmap.open("./image/bmp.png")
    print(bmp.count_of_color(0x75788f))


if __name__ == '__main__':
    main()
470
- 可以看出和上面的结果是一样的
def find_bitmap(needle: Bitmap, tolerance: float=None, rect: Tuple[Tuple[float, float], Tuple[float, float]]=None, start_point: Tuple[float, float]=None) → Tuple[float, float]- Attempts to find
needleinsiderectinbmp fromthe givenstart_point. Returns coordinates if found, orNoneif not. IfrectisNone,bmp.boundsis used instead. Ifstart_pointisNone, the origin ofrectis used. Toleranceis defined as a float in the range from0to1, where0is an exact match and1matches anything.- 尝试从给定的
start_point在bmp中的rect内找到图片。 如果找到,则返回坐标Tuple[float, float];否则,返回None。 如果rect为None,则使用bmp.bounds。 如果start_point为None,则使用rect的原点。 tolerance定义为介于0到1之间的浮点数,其中0是完全匹配,而1则匹配任何东西。- 在指定区域找图
- 准备两张图片
bmp.png和tim.png

- 第一张
bmp.png包含六个图片 第二张图片tim.png是Tim的一小块 - 接下来就尝试一下从
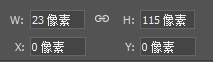
bmp.png中找到tim.png的位置from autopy import bitmap def main(): bmp = bitmap.Bitmap.open("./image/bmp.png") tim = bitmap.Bitmap.open("./image/tim.png") result = bmp.find_bitmap(tim) print(result) if __name__ == '__main__': main()(23.0, 115.0)
- 得到了
(23, 115)用ps看一下结果对不对
-
-
在图层上放一个
(23, 115)左上角在(0, 0)点的框 -
框的右下角在
Tim图标上 说明成功找到了def find_every_bitmap(needle: Bitmap, tolerance: float=None, rect: Tuple[Tuple[float, float], Tuple[float, float]]=None, start_point: Tuple[float, float]=None) → [Tuple[float, float]]- Returns list of all
(x, y)coordinates insiderectinbmpmatchingneedlefrom the givenstart_point. IfrectisNone,bmp.boundsis used instead. Ifstart_pointisNone, the origin ofrectis used. - 从给定的
start_point返回bmp中rect内部的所有与图片匹配的(x, y)坐标的列表。 如果rect为None,则使用bmp.bounds。 如果start_point为None,则使用rect的原点。 - 没错 这就是找到所有的图片返回一个
list - 让我们调用一下康康
from autopy import bitmap


def main():
    bmp = bitmap.Bitmap.open("./image/bmp.png")
    tim = bitmap.Bitmap.open("./image/tim.png")
    result = bmp.find_every_bitmap(tim)
    print(len(result))
    print(result)


if __name__ == '__main__':
    main()
1
[(23.0, 115.0)] - 没有错 就是这样
def count_of_bitmap(needle: Bitmap, tolerance: float=None, rect: Tuple[Tuple[float, float], Tuple[float, float]]=None, start_point: Tuple[float, float]=None) → int- Returns count of occurrences of
needleinbmp. Functionally equivalent to: len(find_every_bitmap(color, tolerance, rect, start_point))- 返回
bmp中出现图片的次数。 功能等同于: len(find_every_bitmap(color, tolerance, rect, start_point))- 就是找到图片的数量
- 让我们调用一下康康
from autopy import bitmap


def main():
    bmp = bitmap.Bitmap.open("./image/bmp.png")
    tim = bitmap.Bitmap.open("./image/tim.png")
    print(bmp.count_of_bitmap(tim))


if __name__ == '__main__':
    main()
1
- 没有错啊
def cropped(rect: Tuple[Tuple[float, float], Tuple[float, float]]) → Bitmap- Returns new bitmap object created from a portion of another.
- 返回从另一个对象的一部分创建的新位图对象。
ValueErroris thrown if the portion was out of bounds.- 如果该部分超出范围,则抛出
ValueError。 - 图片裁剪
- 有个这个函数我们就能把之前找到的图片裁剪下来 就不需要用
ps了 - 让我们调用一下康康
from autopy import bitmap


def main():
    bmp = bitmap.Bitmap.open("./image/bmp.png")
    tim = bitmap.Bitmap.open("./image/tim.png")
    result = bmp.find_bitmap(tim)
    if result:
        result_bmp = bmp.cropped((result, tim.size))
        result_bmp.save("./image/result.png")
    else:
        print("Not found!")


if __name__ == '__main__':
    main()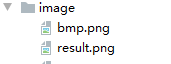

- 可以看出成功截取出了图片
def is_bitmap_equal(bitmap: Bitmap, tolerance: float=None) → bool- Returns
Trueif bitmap is equal to receiver with the given tolerance. - 如果位图与给定的图片相等,则返回
True。 - 比较两张图片是否一致
- 正好我们有两张一样的图片
- 一张是之前用于找图的
tim.png一张是找到后截取出来的result.png - 让我们调用比较一下康康
from autopy import bitmap


def main():
    tim = bitmap.Bitmap.open("./image/tim.png")
    result = bitmap.Bitmap.open("./image/result.png")
    print(tim.is_bitmap_equal(result))


if __name__ == '__main__':
    main()
True
- 结果为
True说明两张图片是一样的
- Returns list of all
-
-
类结束了 还有一个函数
def capture_screen(rect: Tuple[Tuple[float, float], Tuple[float, float]]) → autopy.bitmap.Bitmap- Returns a screengrab of the given portion of the main display, or the entire display if
rectisNone. Therectparameter is in the form of((x, y), (width, height)). - 返回主显示给定部分的屏幕抓图,如果
rect为None,则返回整个显示。rect参数的形式为((x, y), (width, height))。 ValueErroris thrown if the rect is out of bounds.IOErroris thrown if the image failed to parse.- 如果rect超出范围,则抛出
ValueError。 - 如果图像解析失败,则抛出
IOError。
- Returns a screengrab of the given portion of the main display, or the entire display if
color 模块
-
官方是这么介绍的
- This module provides functions for converting between the hexadecimal format used by autopy methods and other more readable formats (e.g., RGB tuples).
- 该模块提供用于在自动方法使用的十六进制格式和其他可读性更高的格式(例如RGB元组)之间转换的功能。
-
官方文档给出了
2个函数def rgb_to_hex(red: int, green: int, blue: int) → int-
Returns hexadecimal value of given RGB tuple.
r,g, andbmust be in the range 0 - 255. -
返回给定RGB元组的十六进制值。
r,g和b必须在0-255的范围内。 -
RGB转十六进制
-
让我们调用一下康康
from autopy import color


def main():
    h = color.rgb_to_hex(100, 100, 100)
    print(hex(h))


if __name__ == '__main__':
    main()
0x646464
-
可以看出成功将RGB转换成为了十六进制
def hex_to_rgb(hex: int) → Tuple[int, int, int]- Returns a tuple
(r, g, b)of the RGB integer values equivalent to the given RGB hexadecimal value.r,g, andbare in the range 0 - 255. - 返回等于给定RGB十六进制值的RGB整数值的元组
(r, g, b)。r,g和b的范围是0-255。 - 十六进制转RGB
- 让我们调用一下康康
from autopy import color


def main():
    r = color.hex_to_rgb(0x646464)
    print(r)


if __name__ == '__main__':
    main()
(100, 100, 100)
- 可以看出成功的将十六进制转换成了RGB
-
key 模块
-
官方是这么介绍的
- This module contains functions for controlling the keyboard.
- 该模块包含用于控制键盘的功能。
-
官方文档给出了
3个函数 -
都是控制键盘的 没有监听键盘的 监听键盘还需要用到其他的库 会在之后的文章中介绍
def toggle(key: Any, down: bool, modifiers: List[Modifier]=[], modifier_delay: float=None)- Holds down the given key or keycode if
downisTrue, or releases it if not. Integer keycodes and modifiers should be taken from module constants (e.g.,Code.DELETEorModifier.META). If the given key is a character, it is automatically converted to a keycode corresponding to the current keyboard layout. - 如果
down为True,则按住给定的键或键码;否则,则释放它。 整数键码和修饰符应从模块常量中获取(例如Code.DELETE或Modifier.META)。 如果给定的键是一个字符,它将自动转换为与当前键盘布局相对应的键代码。 - 按下或抬起某键
- 这个就不实验了 直接实验下面的
def tap(key: Any, modifiers: List[Modifier]=[], delay: float=None)- Convenience wrapper around
toggle()that holds down and then releases the given key and modifiers. - 对
toggle()进行封装,按住并释放给定的键和修饰符。 - 按下并抬起某键
- 让我调用一下康康
from autopy import key
import time
import threading


def tap():
    time.sleep(2)
    for i in range(9):
        key.tap('*')
        if (i + 1) % 3 == 0:
            key.tap(key.Code.SPACE)


def main():
    threading.Thread(target=tap).start()
    input("Please input: ")


if __name__ == '__main__':
    main()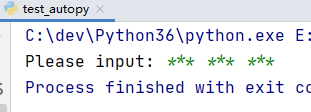
- 可以看出成功在控制台输出了想要的字符
def type_string(string: str, wpm: float=None)- Attempts to simulate typing a string at the given
WPM, or as fast as possible if theWPMis0. - 尝试模拟以给定的
WPM键入字符串,如果WPM为0,则尝试尽快键入。 - 直接输入字符串
- 让我们调用一下康康
from autopy import key
import time
import threading


def tap():
    time.sleep(2)
    key.type_string("|=> *** <=|")


def main():
    threading.Thread(target=tap).start()
    input("Please input: ")


if __name__ == '__main__':
    main()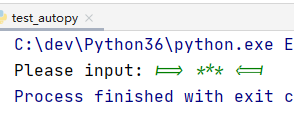
- 可以看出直接在控制台输出的想要的字符串
按键 Code.F1 Code.F2 Code.F3 Code.F4 Code.F5 Code.F6 Code.F7 Code.F8 Code.F9 Code.F10 Code.F11 Code.F12 Code.F13 Code.F14 Code.F15 Code.F16 Code.F17 Code.F18 Code.F19 Code.F20 Code.F21 Code.F22 Code.F23 Code.F24 Code.ALT Code.BACKSPACE Code.CAPS_LOCK Code.CONTROL Code.DELETE Code.DOWN_ARROW Code.END Code.ESCAPE Code.HOME Code.LEFT_ARROW Code.META Code.PAGE_DOWN Code.PAGE_UP Code.RETURN Code.RIGHT_ARROW Code.SHIFT Code.SPACE Code.UP_ARROW Modifier.META Modifier.ALT Modifier.CONTROL Modifier.SHIFT - Holds down the given key or keycode if
mouse 模块
-
官方是这么介绍的
- This module contains functions for getting the current state of and controlling the mouse cursor.
- Unless otherwise stated, coordinates are those of a screen coordinate system, where the origin is at the top left.
- 该模块包含用于获取和控制鼠标光标的当前状态的功能。
- 除非另有说明,否则坐标是屏幕坐标系的坐标,其中原点位于左上方。
-
官方文档给出了
5个函数def location() -> (float, float)-
Returns a tuple
(x, y)of the current mouse position. -
返回当前鼠标位置的元组
(x, y)。 -
让我们调用一下康康
from autopy import mouse


def main():
    print(mouse.location())


if __name__ == '__main__':
    main()
(686.4, 128.8)
-
输出的鼠标的当前位置
def toggle(button: Button=None, down: bool)- Holds down or releases the given mouse button in the current position. Button can be
LEFT,RIGHT,MIDDLE, orNoneto default to the left button. - 在当前位置按住或释放给定的鼠标按钮。 按钮可以是
LEFT,RIGHT,MIDDLE或None,默认为左按钮。 - 调用下面的函数
def click(button: Button=None, delay: float=None)- Convenience wrapper around toggle() that holds down and then releases the given mouse button. By default, the left button is pressed.
- 对
toggle()进行封装,按住并释放给定的鼠标按钮。 默认情况下,按下左按钮。 - 调用一下 这回没法康康了
from autopy import mouse


def main():
    mouse.click()


if __name__ == '__main__':
    main()
def move(x: float, y: float)- Moves the mouse to the given
(x, y)coordinate. - 将鼠标移动到给定的
(x, y)坐标。 ValueErroris thrown if the point is out of index.- 如果该点超出索引,则抛出
ValueError。 - 调用一下
from autopy import mouse def main(): mouse.move(100, 100) if __name__ == '__main__': main() - 这个就是闪现 鼠瞬间消失 出现在指定的坐标点
def smooth_move(x: float, y: float)- Smoothly moves the mouse to the given
(x, y)coordinate in a straight line. - 将鼠标平滑地直线移动到给定的
(x, y)坐标。 ValueErroris thrown if the point is out of index.- 如果该点超出索引,则抛出
ValueError。 - 调用一下
from autopy import mouse def main(): mouse.smooth_move(100, 100) if __name__ == '__main__': main() - 鼠标成直线平滑的移动到指定坐标点 疾跑 不是闪现了
按键 LEFT RIGHT MIDDLE -
screen 模块
-
官方是这么介绍的
- This module contains functions for working with the screen.
- 该模块包含用于处理屏幕的功能。
-
官方文档给出了
4个函数def scale() → float- Returns the scale of the main screen, i.e. how many pixels are in a point.
- 返回主屏幕的比例,即一个点有多少像素。
def size() -> (float, float)- Returns a tuple
(width, height)of the size of the main screen in points. - 返回以磅为单位的主屏幕大小的元组
(width, height)。
def is_point_visible(x: float, y: float) → bool- Returns
Trueif the given point is inside the main screen boundaries. - 如果给定点在主屏幕边界内,则返回
True。
def get_color(x: float, y: float) -> (int, int, int)- Returns hexadecimal value describing the color at a given point.
- 返回描述给定点颜色的十六进制值。
-
让我们统一调用一下康康
from autopy import screen


def main():
    print(screen.scale())
    print(screen.size())
    print(screen.is_point_visible(100, 100))
    print(hex(screen.get_color(100, 100)))


if __name__ == '__main__':
    main()
1.25
(1536.0, 864.0)
True
0xffffff
小结
AutoPy就介绍到这里了- 这里介绍的只是用法 基本功能
- 要是想做一个游戏脚本 这些是不够的
- 还需要配合其他的库
- 比如果找图 每一次屏幕截图截到的都不一样
AutoPy找图就会找不到 - 需要进行一下灰度处理啥的 才能找到
- 所以想要像按键精灵一样使用需要对这些库进行一次封装
- 以后会介绍的


 2万+
2万+

 被折叠的 条评论
为什么被折叠?
被折叠的 条评论
为什么被折叠?
 到【灌水乐园】发言


