


 本文介绍如何通过修改Flume配置文件实现FlumeNG与Kafka集群的整合。具体包括配置Flume源、通道及sink到Kafka的具体参数,并提供集群测试步骤。最终实现Flume+Kafka+SparkStreaming的实时日志分析系统。
Flume NG集群+Kafka集群整合:
修改Flume配置文件(flume-kafka-server.conf),让Sink连上Kafka
hadoop1:
#set Agent name
a1.sources = r1
a1.channels = c1
a1.sinks = k1
#set channel
a1.channels.c1.type = memory
a1.channels.c1.capacity = 1000
a1.channels.c1.transactionCapacity = 100
# other node,nna to nns
a1.sources.r1.type = avro
a1.sources.r1.bind = hadoop1
a1.sources.r1.port = 52020
a1.sources.r1.interceptors = i1
a1.sources.r1.interceptors.i1.type = static
a1.sources.r1.interceptors.i1.key = Collector
a1.sources.r1.interceptors.i1.value = hadoop1
a1.sources.r1.channels = c1
#set sink to hdfs
a1.sinks.k1.type=org.apache.flume.sink.kafka.KafkaSink
a1.sinks.k1.topic = ScalaTopic
a1.sinks.k1.brokerList = hadoop1:9092
a1.sinks.k1.requiredAcks = 1
a1.sinks.k1.batchSize = 20
a1.sinks.k1.channel=c1
hadoop2:
#set Agent name
a1.sources = r1
a1.channels = c1
a1.sinks = k1
#set channel
a1.channels.c1.type = memory
a1.channels.c1.capacity = 1000
a1.channels.c1.transactionCapacity = 100
# other node,nna to nns
a1.sources.r1.type = avro
a1.sources.r1.bind = hadoop2
a1.sources.r1.port = 52020
a1.sources.r1.interceptors = i1
a1.sources.r1.interceptors.i1.type = static
a1.sources.r1.interceptors.i1.key = Collector
a1.sources.r1.interceptors.i1.value = hadoop2
a1.sources.r1.channels = c1
#set sink to hdfs
a1.sinks.k1.type=org.apache.flume.sink.kafka.KafkaSink
a1.sinks.k1.topic = ScalaTopic
a1.sinks.k1.brokerList = hadoop2:9092
a1.sinks.k1.requiredAcks = 1
a1.sinks.k1.batchSize = 20
a1.sinks.k1.channel=c1
集群测试:
- 启动zookeeper(hadoop1,hadoop2,hadoop3)
- 启动kafka server和consumer(hadoop1,hadoop2)
- 启动Flume server(hadoop1,hadoop2):flume-ng agent --conf conf --conf-file /usr/local/flume/conf/flume-kafka-server.conf --name a1 -Dflume.root.logger=INFO,console
- 启动Flume client(hadoop3):flume-ng agent --conf conf --conf-file /usr/local/flume/conf/flume-client.conf --name agent1 -Dflume.root.logger=INFO,console
- 在hadoop3上追加一条日志记录
- kafka consumer收到记录,从则测试完毕。
hadoop3:

hadoop1:
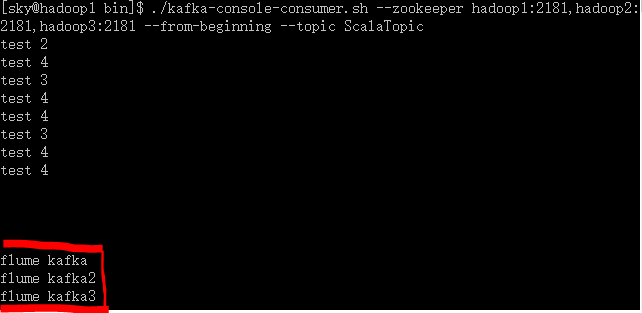
测试完毕,这样Flume+kafka就整合起来了,即Flume+Kafka+Spark Streaming的实时日志分析系统就孕育而生了。


 1133
1133

 被折叠的 条评论
为什么被折叠?
被折叠的 条评论
为什么被折叠?
 到【灌水乐园】发言


