


 本文介绍利用Dubbo构建远程会话,实现两个客户端通过服务端通信的实验。先介绍Dubbo,阐述其实现远程方法调用原理,接着搭建Windows单机版Zookeeper,编程实现两个客户端通信,包括创建工程框架、配置项目、定义接口、编写代码等,最后给出运行结果并总结配置要点。
利用Dubbo构建远程会话实验报告目录
- 1、引言
- 2、实验环境
- 3、实验过程
- 3.1 Dubbo介绍
- 3.2 Dubbo实现远程方法调用的原理
- 3.3 Dubbo实现两个客户端通信
- 3.3.1 搭建windows单机版zookeeper
- 3.3.2 编程实现两个客户端通信
- 3.3.2.1 创建工程框架
- 3.3.2.2 进行基本的配置
- 3.3.2.3 dubbo_api模块定义服务接口
- 3.3.2.4 在dubbo_server子模块中实现上述接口
- 3.3.2.5 在dubbo_server子模块中添加配置文件
- 3.3.2.6 在dubbo_server子模块中编写服务端代码
- 3.3.2.7 在dubbo_client子模块中添加配置文件,因为两个项目配置相同,所以此处只介绍dubbo_client模块的配置
- 3.3.2.8 在dubbo_client子模块中编写一个客户端代码
- 3.3.2.9 在dubbo_client_another子模块中编写另一个客户端代码
- 3.3.3 运行结果
- 4、总结
1、引言
本文介绍拓展内容:利用Dubbo构建远程会话,实现两个客户端通过服务端进行通信。
2、实验环境
- 操作系统:Windows 10
- 实验工具:IntelliJ IDEA
- 环境:Java jdk 1.8
3、实验过程
3.1 Dubbo介绍
- Dubbo是阿里巴巴公司开源的一个高性能优秀的服务框架,使得应用可通过高性能的 RPC 实现服务的输出和输入功能,可以和Spring框架无缝集成。
- Dubbo是一款高性能、轻量级的开源Java RPC框架,它提供了三大核心能力:面向接口的远程方法调用,智能容错和负载均衡,以及服务自动注册和发现。
- 本次实验使用的是Dubbo面向接口的远程方法调用,dubbo透明化的远程方法调用,就像调用本地方法一样调用远程方法,只需简单配置,没有任何API侵入。。
3.2 Dubbo实现远程方法调用的原理
Dubbo框架结构如下图所示:
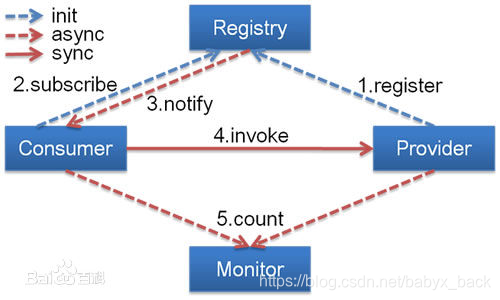
节点角色说明:
- Provider:暴露服务的服务提供方;
- Consumer:调用远程服务的服务消费方;
- Registry:服务注册与发现的注册中心;
- Monitor:统计服务的调用次数和调用实践的监控中心;
调用关系说明:
- 服务提供者在启动时,向注册中心注册自己提供的服务;
- 服务消费者在启动时,向注册中心订阅自己所需的服务;
- 注册中心返回服务提供者地址列表给消费者,如果有变更,注册中心将基于长连接变更数据给消费者;
- 服务消费者,从提供者地址列表中,基于软负载均衡算法,选一台提供者进行调用,如果调用失败,再选另一台调用;
3.3 Dubbo实现两个客户端通信
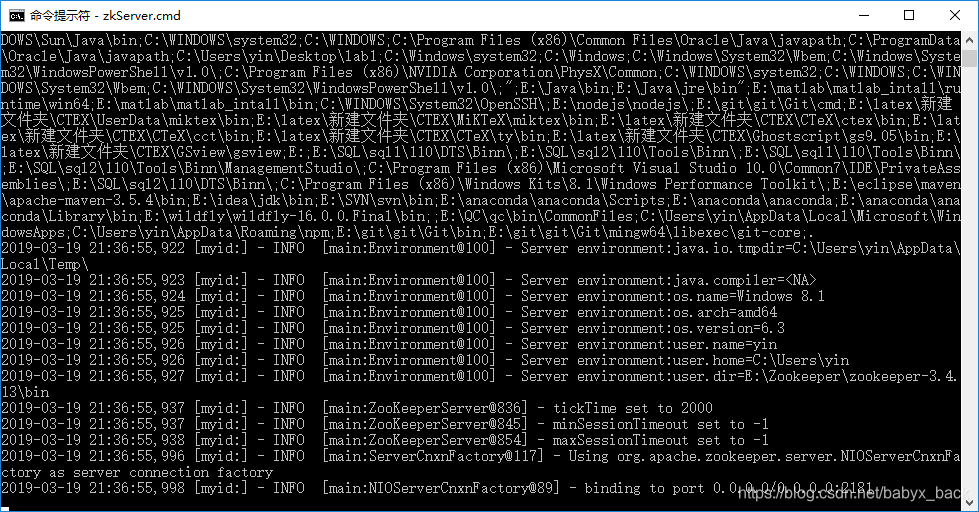
3.3.1 搭建windows单机版zookeeper
Zookeeper是dubbo的注册中心,dubbo服务的生产者和消费者都需要在Zookeeper进行注册,所以需要先搭建Windows单机版zookeeper。
步骤:
1、下载zookeeper压缩包并解压;
本人下载的版本是3.4.13;
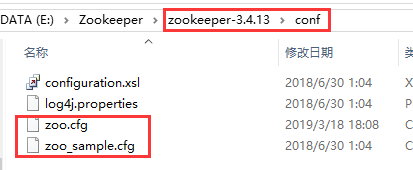
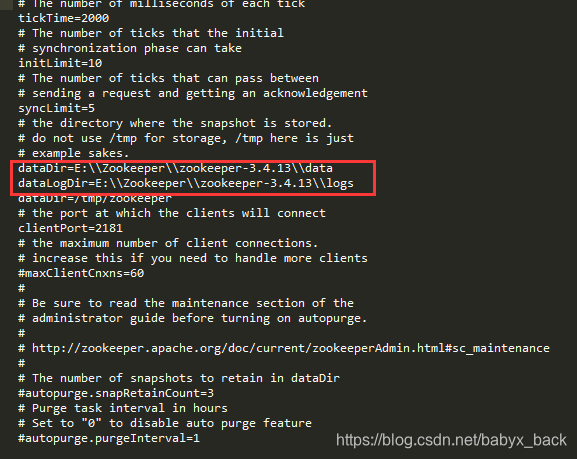
2、进入conf目录,将zoo_sample.cfg复制一份到当前文件夹,并命名为zoo.cfg;
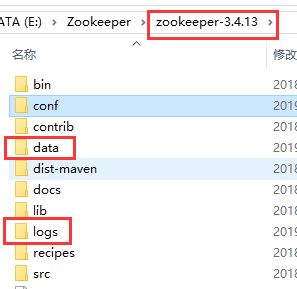
3、在zookeeper安装文件夹中创建data和logs目录,用于存放数据和日志,并在zoo_cfg中添加配置;
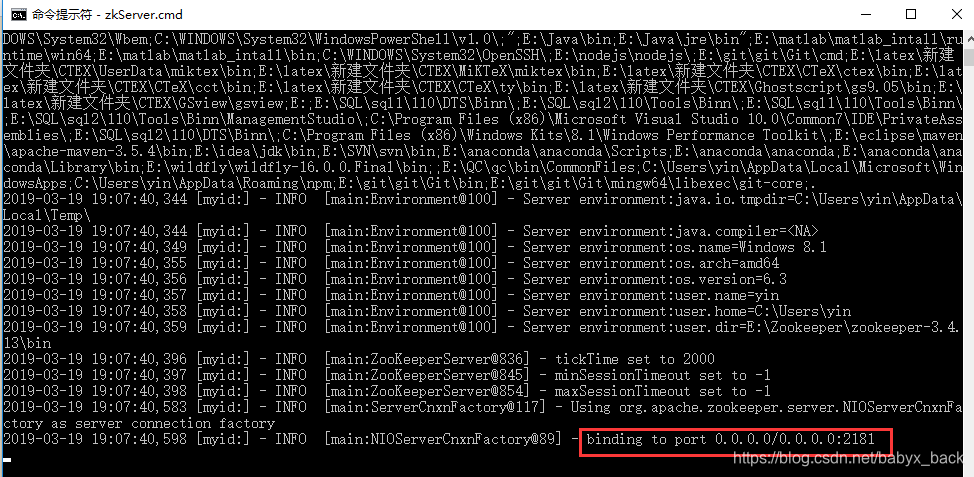
4、进入bin目录启动zkServer.cmd,若启动成功,则Windows单机版zookeeper搭建成功。
截图说明成功启动,并绑定2181端口;
3.3.2 编程实现两个客户端通信
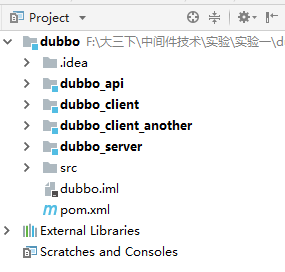
3.3.2.1 创建工程框架
- 使用IntelliJ IEDA创建一个maven项目dubbo作为项目的父工程
- 在创建的dubbo项目下创建一个Module:dubbo_api作为服务接口子模块
- 在创建的dubbo项目下创建一个Module:dubbo_server作为服务端模块
- 在创建的dubbo项目下创建一个Module:dubbo_client作为一个客户端子模块
- 在创建的dubbo项目下创建一个Module:dubbo_client_another作为另一个客户端子模块
最后项目结构如下图所示:
3.3.2.2 进行基本的配置
-
对dubbo父项目进行配置
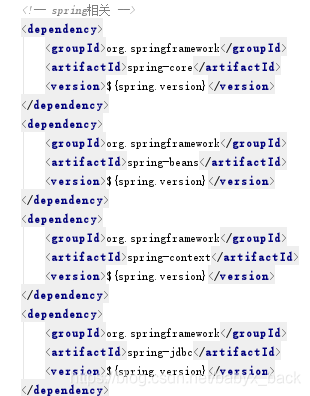
在父项目的pom.xml文件中添加dubbo相关依赖:

在父项目的pom.xml文件中添加spring相关依赖(截图只展示部分):
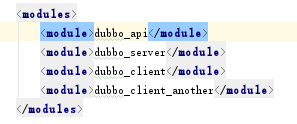
在父项目的pom.xml文件中添加子模块信息:
-
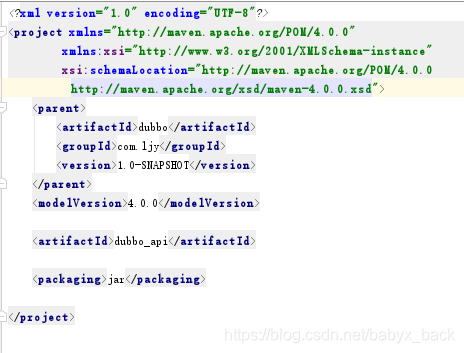
对dubbo_api子模块进行配置
-
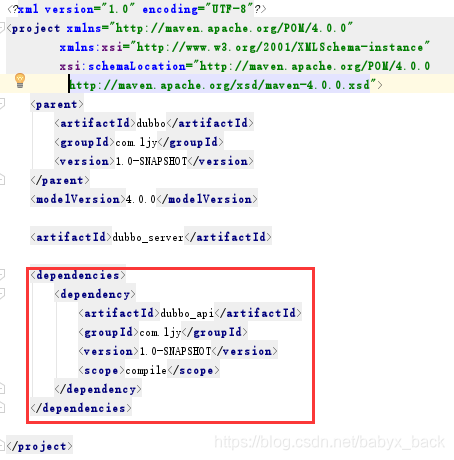
进行dubbo_server子项目的配置
pom文件配置:添加对dubbo_api子模块的依赖,方便对dubbo_api子模块中定义的接口使用。
-
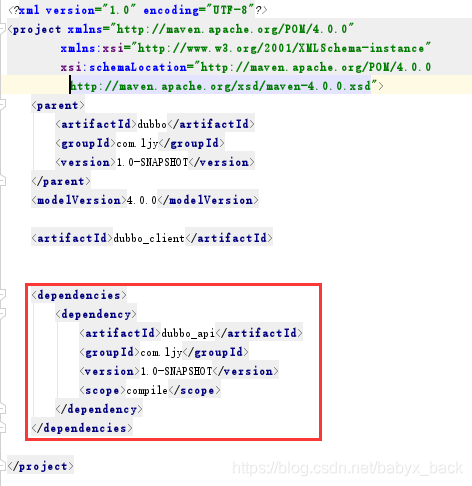
进行dubbo_client和dubbo_client_another子项目的配置,因为两个项目配置相同,所以此处只介绍dubbo_client模块的配置
pom文件配置:和配置dubbo_server文件一样,也要添加对dubbo_api模块的依赖;
3.3.2.3 dubbo_api模块定义服务接口
服务接口的定义跟使用rmi实现通讯的相同;
package com.api;

public interface Hello {
    //String sayHello(String name);
    String getMessage();
    void setMessage(String receiveMessage);
    void setOne(boolean one);
    boolean getOne();
    void setTwo(boolean two);
    boolean getTwo();
}
3.3.2.4 在dubbo_server子模块中实现上述接口
package com.server;
import com.api.Hello;

public class HelloImpl implements Hello {

//    //public String sayHello(String name)
//    {
//        return "hello "+name;
//    }
    String message;
    boolean one;
    boolean two;
    public HelloImpl(){
        message=null;
        one=false;
        two=false;
    }
    public void setOne(boolean one)
    {
        this.one=one;
    }
    public boolean getOne()
    {
        return one;
    }
    public void setTwo(boolean two)
    {
        this.two=two;
    }
    public boolean getTwo()
    {
        return two;
    }
    public String getMessage()
    {
        return message;
    }
    public void setMessage(String m)
    {
        message=m;
    }
}
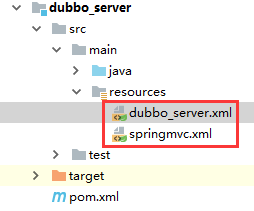
3.3.2.5 在dubbo_server子模块中添加配置文件
在resources目录下创建dubbo_server.xml和springmvc.xml两个配置文件;
dubbo_server.xml配置文件内容如下:
其中,各标签含义在代码中标注。
<?xml version="1.0" encoding="UTF-8"?>
<beans xmlns="http://www.springframework.org/schema/beans"
       xmlns:xsi="http://www.w3.org/2001/XMLSchema-instance"
       xmlns:dubbo="http://code.alibabatech.com/schema/dubbo"
       xsi:schemaLocation="http://www.springframework.org/schema/beans
       http://www.springframework.org/schema/beans/spring-beans.xsd
       http://code.alibabatech.com/schema/dubbo
    http://code.alibabatech.com/schema/dubbo/dubbo.xsd">
	<!--设置应用的名字-->
    <dubbo:application name="dubbo_server"/>
	<!--使用zookeeper注册中心暴露服务地址-->
    <dubbo:registry address="zookeeper://127.0.0.1:2181"/>
    <!--用dubbo协议在20880端口暴露服务-->
    <dubbo:protocol name="dubbo" port="20880"/>
    <!--我们暴露的提供服务接口,对应dubbo_api模块定义的Hello接口-->
    <dubbo:service interface="com.api.Hello" ref="hello"/>
	<!--接口实现类-->
    <bean id="hello" class="com.server.HelloImpl"/>

</beans>
dubbo_server.xml配置文件内容如下:
<?xml version="1.0" encoding="UTF-8"?>
<beans xmlns="http://www.springframework.org/schema/beans"
       xmlns:aop="http://www.springframework.org/schema/aop"
       xmlns:context="http://www.springframework.org/schema/context"
       xmlns:util="http://www.springframework.org/schema/util"
       xmlns:xsi="http://www.w3.org/2001/XMLSchema-instance"
       xsi:schemaLocation="http://www.springframework.org/schema/aop
        http://www.springframework.org/schema/aop/spring-aop-4.0.xsd
        http://www.springframework.org/schema/beans http://www.springframework.org/schema/beans/spring-beans.xsd
        http://www.springframework.org/schema/context
        http://www.springframework.org/schema/context/spring-context-4.0.xsd
        http://www.springframework.org/schema/util
        http://www.springframework.org/schema/util/spring-util-4.0.xsd" default-autowire="byName">

    <aop:aspectj-autoproxy/>
    <context:component-scan base-package="com"/>
    <import resource="classpath:dubbo_server.xml"/>

</beans>
3.3.2.6 在dubbo_server子模块中编写服务端代码
package com.server;

import org.springframework.context.support.ClassPathXmlApplicationContext;

public class server {
    public static void main(String[] args)
    {
        ClassPathXmlApplicationContext context=new ClassPathXmlApplicationContext("classpath:springmvc.xml");
        context.start();

        System.out.println("dubbo server start...");
        try
        {
            System.in.read();
        }
        catch (Exception e)
        {
            e.printStackTrace();
        }
    }
}
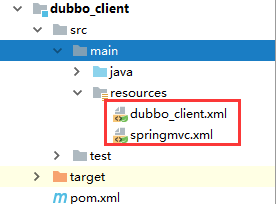
3.3.2.7 在dubbo_client子模块中添加配置文件,因为两个项目配置相同,所以此处只介绍dubbo_client模块的配置
在resources目录下创建dubbo_client.xml和springmvc.xml两个配置文件;
dubbo_client.xml配置文件内容如下:
其中,各标签含义在代码中标注。
<?xml version="1.0" encoding="UTF-8"?>
<beans xmlns="http://www.springframework.org/schema/beans"
       xmlns:xsi="http://www.w3.org/2001/XMLSchema-instance"
       xmlns:dubbo="http://code.alibabatech.com/schema/dubbo"
       xsi:schemaLocation="http://www.springframework.org/schema/beans
      http://www.springframework.org/schema/beans/spring-beans.xsd
      http://code.alibabatech.com/schema/dubbo
      http://code.alibabatech.com/schema/dubbo/dubbo.xsd">

	<!--设置应用的名字-->
    <dubbo:application name="dubbo_client"/>
    <!--使用multicast广播注册中心暴露发现服务地址-->
    <dubbo:registry protocol="zookeeper" address="zookeeper://127.0.0.1:2181"/>
     <!--生成远程服务代理,可以和本地bean一样使用hello-->
    <dubbo:reference interface="com.api.Hello" id="hello"/>
</beans>
springmvc.xml配置文件内容如下:
<?xml version="1.0" encoding="UTF-8"?>
<beans xmlns="http://www.springframework.org/schema/beans"
       xmlns:aop="http://www.springframework.org/schema/aop"
       xmlns:context="http://www.springframework.org/schema/context"
       xmlns:util="http://www.springframework.org/schema/util"
       xmlns:xsi="http://www.w3.org/2001/XMLSchema-instance"
       xsi:schemaLocation="http://www.springframework.org/schema/beans
      http://www.springframework.org/schema/beans/spring-beans.xsd
      http://www.springframework.org/schema/aop
      http://www.springframework.org/schema/aop/spring-aop-4.0.xsd
      http://www.springframework.org/schema/context
      http://www.springframework.org/schema/context/spring-context-4.0.xsd
      http://www.springframework.org/schema/util
      http://www.springframework.org/schema/util/spring-util-4.0.xsd" default-autowire="byName">

    <aop:aspectj-autoproxy/>
    <context:component-scan base-package="com"/>
    <import resource="classpath:/dubbo_client.xml"/>
</beans>
3.3.2.8 在dubbo_client子模块中编写一个客户端代码
package com.client;

import com.api.Hello;
import java.util.Scanner;
import org.springframework.context.support.ClassPathXmlApplicationContext;

public class client {
    public static void main(String[] args)
    {
        ClassPathXmlApplicationContext context=new ClassPathXmlApplicationContext(new String[]{"classpath:springmvc.xml"});
        context.start();
        Hello hello=(Hello) context.getBean("hello");

       // System.out.println(hello.sayHello("world!"));
        while(true)
        {
            Scanner scanner=new Scanner(System.in);
            String message=scanner.nextLine();
            hello.setMessage(message);
            hello.setOne(true);
            hello.setTwo(false);
            while(hello.getTwo()==false)
                ;
            if(hello.getTwo()==true) {
                String receive = hello.getMessage();

                System.out.println("Client2 send message: " + receive);
            }
        }
    }
}
3.3.2.9 在dubbo_client_another子模块中编写另一个客户端代码
package com.client_another;

import com.api.Hello;
import org.springframework.context.support.ClassPathXmlApplicationContext;

import java.util.Scanner;

public class client_another {
    public static void main(String[] args)
    {
        ClassPathXmlApplicationContext context=new ClassPathXmlApplicationContext(new String[]{"classpath:springmvc.xml"});
        context.start();
        Hello hello=(Hello) context.getBean("hello");

        //System.out.println(hello.sayHello("world!"));
        while(true)
        {
            while(hello.getOne()==false)
                ;
            if(hello.getOne()==true) {
                String receive = hello.getMessage();
                System.out.println("Client1 send message: " + receive);
            }
            Scanner scanner=new Scanner(System.in);
            String message=scanner.nextLine();
            hello.setMessage(message);
            hello.setTwo(true);
            hello.setOne(false);
        }
    }
}
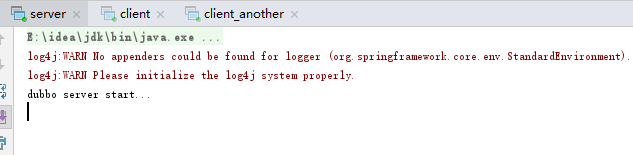
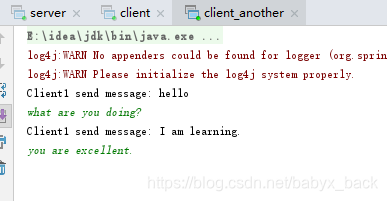
3.3.3 运行结果
首先启动zkServer.cmd
服务端结果:
客户端1结果:
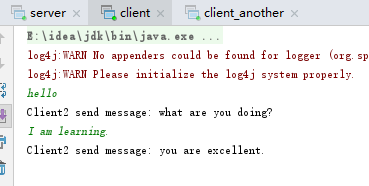
客户端2结果:
4、总结
- dubbo实现远程通讯,服务端和客户端的配置都需要在xml配置文件中进行配置;


 732
732

 被折叠的 条评论
为什么被折叠?
被折叠的 条评论
为什么被折叠?
 到【灌水乐园】发言


