1.获取所有日程
const getAllSchedules = async () => {
  let res = await axios.get("calendar/get");
  state.schedules = res.data;
};

2.计算属性同步更新日程
const getOneSchedule = computed(() => {
  return function (data) {
    let theDay = [];
    state.schedules.find((item) => {
      if (item.date === data.day) {
        theDay.push(item);
      }
    });
    return theDay;
  };
});
3.通过popover插入日历
<el-calendar v-model="state.value"
    ><template #dateCell="{ data }">
      <el-popover
        placement="top-start"
        trigger="hover"
        v-if="getOneSchedule(data).length"
        width="auto"
      >
        <li v-for="item in getOneSchedule(data)">
          <span>{{ item.event }}</span>
          <span v-if="item.completed" style="margin-left: 8px">—{{ item.completed }}%</span>
        </li>
        <template #reference>
          <div class="hasSchedule">
            {{ data.day.split("-").slice(2).join("") }}
          </div>
        </template>
      </el-popover>
      <div v-else>
        {{ data.day.split("-").slice(2).join("") }}
      </div>
    </template></el-calendar
  >
4.伪元素显示有日程的日期
.hasSchedule::before {
  content: "";
  position: absolute;
  width: 18px;
  height: 2px;
  background: #409eff;
  margin-top: 36px;
  margin-left: 0;
}
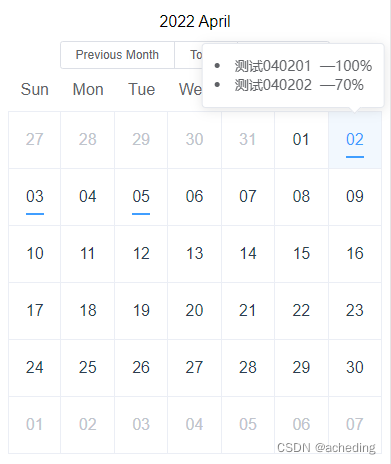
5.最终效果及完整代码如下
<script setup>
import axios from "axios";
import { computed, onMounted, reactive } from "vue";

const state = reactive({
  schedules: [],
});

onMounted(async () => {
  getAllSchedules();
});

const getAllSchedules = async () => {
  let res = await axios.get("calendar/get");
  state.schedules = res.data;
};

const getOneSchedule = computed(() => {
  return function (data) {
    let theDay = [];
    state.schedules.find((item) => {
      if (item.date === data.day) {
        theDay.push(item);
      }
    });
    return theDay;
  };
});
</script>

<template>
  <el-calendar v-model="state.value"
    ><template #dateCell="{ data }">
      <el-popover
        placement="top-start"
        trigger="hover"
        v-if="getOneSchedule(data).length"
        width="auto"
      >
        <li v-for="item in getOneSchedule(data)">
          <span>{{ item.event }}</span>
          <span v-if="item.completed" style="margin-left: 8px"
            >—{{ item.completed }}%</span
          >
        </li>
        <template #reference>
          <div class="hasSchedule">
            {{ data.day.split("-").slice(2).join("") }}
          </div>
        </template>
      </el-popover>
      <div v-else>
        {{ data.day.split("-").slice(2).join("") }}
      </div>
    </template></el-calendar
  >
</template>

<style scoped lang="scss">
.el-calendar {
  --el-calendar-header-border-bottom: transparent;
  :deep(.el-calendar__header) {
    flex-direction: column;
    height: 56px;
    padding: 0;
  }
  :deep(.el-calendar__body) {
    padding: 0;
    .el-calendar-day {
      height: 56px;
      div {
        height: 100%;
        width: 100%;
        line-height: 40px;
      }
      .hasSchedule::before {
        content: "";
        position: absolute;
        width: 18px;
        height: 2px;
        background: #409eff;
        margin-top: 36px;
        margin-left: 0;
      }
    }
  }
}
</style>


 本文介绍了如何使用Vue.js和axios库获取日程数据,并通过el-calendar组件展示。通过计算属性实现实时过滤和计算显示特定日期的日程,同时利用Popover插件在鼠标悬停时弹出详细事件信息。代码展示了前端开发者如何处理日程管理和UI交互。


 2092
2092

 被折叠的 条评论
为什么被折叠?
被折叠的 条评论
为什么被折叠?
 到【灌水乐园】发言


