 Spring Boot 跨域配置详解与安全问题


 本文总结了Spring Boot中处理跨域的三种方法:@CrossOrigin注解、全局配置及Spring Security整合,并讨论了CORS带来的CSRF安全问题。详细介绍了配置过程及其原理。
Access to XMLHttpRequest at 'http://localhost:8080/hello' from origin 'http://localhost:8081' has been blocked by CORS policy: No 'Access-Control-Allow-Origin' header is present on the requested resource.
可以看到,由于同源策略的限制,请求无法发送成功。
使用 CORS 可以在前端代码不做任何修改的情况下,实现跨域,那么接下来看看在 provider 中如何配置。首先可以通过 @CrossOrigin 注解配置某一个方法接受某一个域的请求,如下:
@RestController
public class HelloController {
@CrossOrigin(value = "http://localhost:8081")
@GetMapping("/hello")
public String hello() {
return "hello";
}
@CrossOrigin(value = "http://localhost:8081")
@PostMapping("/hello")
public String hello2() {
return "post hello";
}
}
这个注解表示这两个接口接
接受来 《一线大厂 Java 面试题解析+后端开发学习笔记+最新架构讲解视频+实战项目源码讲义》,配置完成后,重启 provider ,再次发送请求,浏览器控制台就不会报错了,consumer 也能拿到数据了。
此时观察浏览器请求网络控制台,可以看到响应头中多了如下信息:
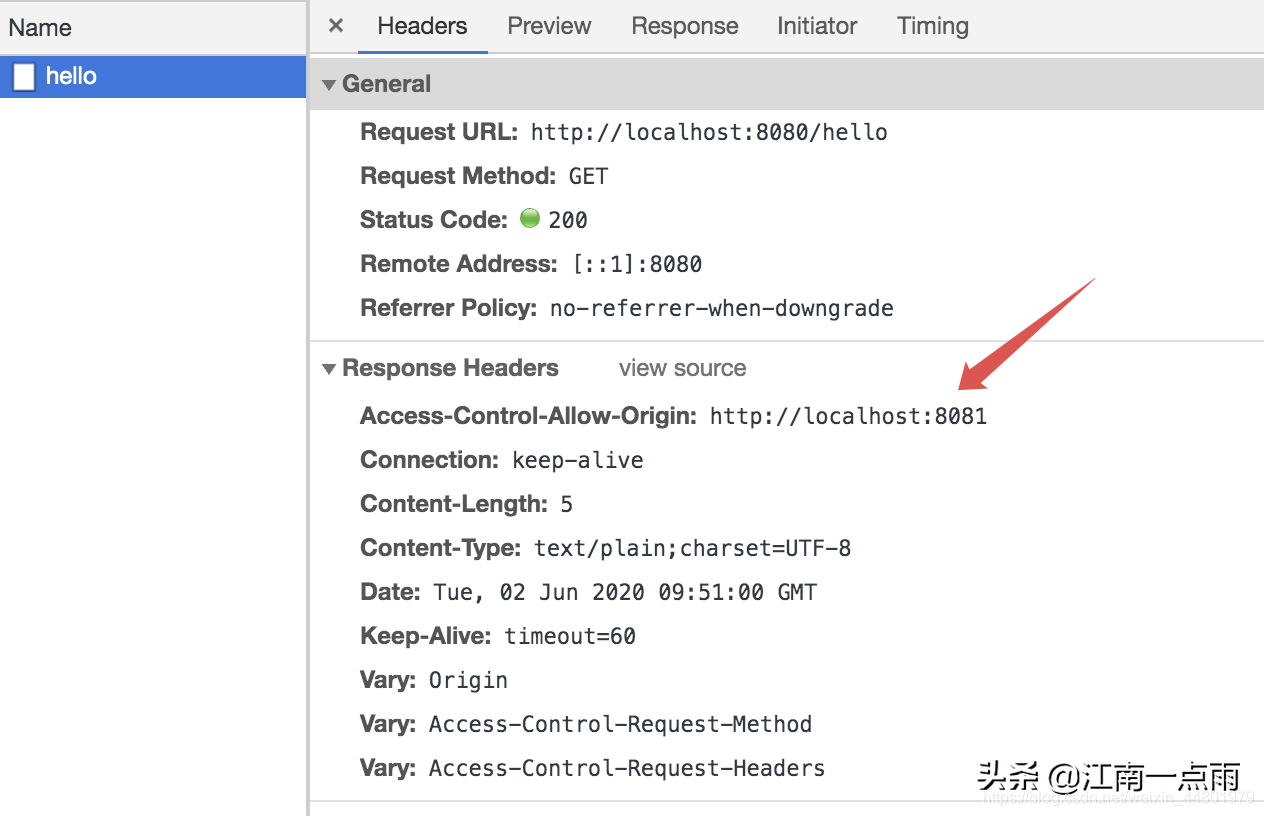
这个表示服务端愿意接收来自 http://localhost:8081 的请求,拿到这个信息后,浏览器就不会再去限制本次请求的跨域了。
provider 上,每一个方法上都去加注解未免太麻烦了,有的小伙伴想到可以讲注解直接加在 Controller 上,不过每个 Controller 都要加还是麻烦,在 Spring Boot 中,还可以通过全局配置一次性解决这个问题,全局配置只需要在 SpringMVC 的配置类中重写 addCorsMappings 方法即可,如下:
@Configuration
public class WebMvcConfig implements WebMvcConfigurer {
@Override
public void addCorsMappings(CorsRegistry registry) {
registry.addMapping("/**")
.allowedOrigins("http://localhost:8081")
.allowedMethods("*")
.allowedHeaders("*");
}
}
/** 表示本应用的所有方法都会去处理跨域请求,allowedMethods 表示允许通过的请求数,allowedHeaders 则表示允许的请求头。经过这样的配置之后,就不必在每个方法上单独配置跨域了。
2.1 存在的问题
了解了整个 CORS 的工作过程之后,我们通过 Ajax 发送跨域请求,虽然用户体验提高了,但是也有潜在的威胁存在,常见的就是 CSRF(Cross-site request forgery)跨站请求伪造。跨站请求伪造也被称为 one-click attack 或者 session riding,通常缩写为 CSRF 或者 XSRF,是一种挟制用户在当前已登录的 Web 应用程序上执行非本意的操作的攻击方法。
3.SpringSecurity
如果使用了 Spring Security,上面的跨域配置会失效,因为请求被 Sp Java 开源项目【ali1024.coding.net/public/P7/Java/git】 ring Security 拦截了。
当引入了 Spring Security 的时候,我们有两种办法开启 Spring Security 对跨域的支持。
3.1 方式一
方式一就是在上一小节的基础上,添加 Spring Security 对于 CORS 的支持,只需要添加如下配置即可:
@Configuration
public class SecurityConfig extends WebSecurityConfigurerAdapter {
@Override
protected void configure(HttpSecurity http) throws Exception {
http
.authorizeRequests()
.anyRequest().authenticated()
.and()
.formLogin()
.permitAll()
.and()
.httpBasic()
.and()
.cors()
.and()
.csrf()
.disable();
}
}
一个 .cors 就开启了 Spring Security 对 CORS 的支持。
3.2 方式二
方式二则是去除第二小节的跨域配置,直接在 Spring Security 中做全局配置,如下:
@Configuration
public class SecurityConfig extends WebSecurityConfigurerAdapter {
@Override
protected void configure(HttpSecurity http) throws Exception {
http
.authorizeRequests()
.anyRequest().authenticated()
.and()
.formLogin()
.permitAll()
.and()
.httpBasic()
.and()
.cors()
.configurationSource(corsConfigurationSource())
.and()
.csrf()
.disable();
}
@Bean
CorsConfigurationSource corsConfigurationSource() {
UrlBasedCorsConfigurationSource source = new UrlBasedCorsConfigurationSource();
CorsConfiguration configuration = new CorsConfiguration();
configuration.setAllowCredentials(true);
configuration.setAllowedOrigins(Arrays.asList("*"));
configuration.setAllowedMethods(Arrays.asList("*"));
configuration.setAllowedHeaders(Arrays.asList("*"));
configuration.setMaxAge(Duration.ofHours(1));
最后
分享一些资料给大家,我觉得这些都是很有用的东西,大家也可以跟着来学习,查漏补缺。
《Java 高级面试》

《Java 高级架构知识》

《算法知识》

需要领取的三联后私信我免费领取


 1162
1162

 被折叠的 条评论
为什么被折叠?
被折叠的 条评论
为什么被折叠?
 到【灌水乐园】发言


