


 本文介绍了Vue中插槽的使用,包括默认插槽、具名插槽和作用域插槽的区别,以及如何在父组件中动态分配内容。重点讲解了如何在子组件中定义插槽位置,以及如何通过slot-scope或v-slot来访问子组件的数据。
为什么要用插槽?
为了实现父组件每次使用组件时,有不一样的呈现
设置的时候比我们props传值更简单
子组件引用时可以写更加复杂的结构
简单地说就是你自定义的组件在被父组件引用时,本身是有一部分是给你开放的,里面是可以添加其他内容的,而不是完全由子组件内部做所有实现,如:
<child> 这里可以添加其他其它内容 </child>
例如:
<child> 🤩 </child>
🤩在的位置就是插槽的位置,我们可以在子组件中去规定,这个🤩要在内部的那个地方呈现。
匿名插槽:
子组件:child.vue
<template>
  <div>
    <!--  默认插槽的位置在这 -->
    <slot></slot>
    <el-button type="success">相柳</el-button>
    <el-button type="info">檀健次</el-button>
  </div>
</template>
父组件:
<template>
<div>
<child>🤩</child>
<upload-image></upload-image>
</div>
</template>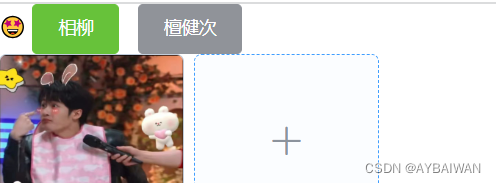
solt其实并不是真的标签,它只是引用了父组件在使用该组件时,所设置的一个默认插槽内容,比如:
子组件:
<template>
  <div>
    <!--  默认插槽的位置在这 -->
    <slot>长相思</slot>
    <el-button type="success">相柳</el-button>
    <el-button type="info">檀健次</el-button>
  </div>
</template>
父组件:
<template>
<div>
<child>🤩</child>
<!-- 默认没有填写内容的子组件 -->
<child></child>
<upload-image></upload-image>
</div>
</template>
当你在自定义子组件中多处位置放了插槽,那父组件中写入的内容要怎么区分是放在哪里的呢?
这时候就可以通过name属性给这些插槽做一个标记,这个插槽就叫具名插槽
具名插槽:
子组件:
<template>
  <div>
    <!--  默认插槽的位置在这 -->
    <slot>长相思</slot>
    <el-button type="success">相柳</el-button>
    <!--  具名插槽  -->
    <slot name="handsome">毒药</slot>
    <el-button type="info">檀健次</el-button>
  </div>
</template>
父组件:
<template>
<div>
<child></child>
<upload-image></upload-image>
</div>
</template> 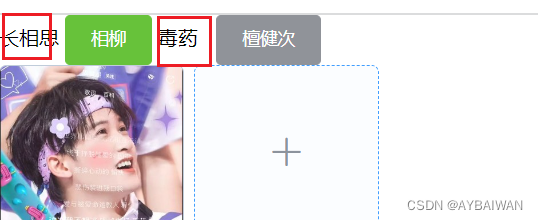
slot写在每个指定插槽的外层时,选择template标签,因为 template 标签不会被解析,结构更清晰不多余
使用: 父组件在要分发的标签里添加
- slot=”插槽名”(取值用slot-scope,或者直接使用 scope,注意2.6.0.版本开始,已被废弃,我们可以使用v-slot)
- v-slot:插槽名(不写插槽名时,为默认插槽,相当于:v-slot:default),取值用 v-slot:插槽名=obj , 这里的obj就是对应插槽取到的数据
- #代替v-slot: 例如:v-slot:footer,可以写成#footer
父组件:
<template>
  <div>
    <child>🤩</child>
    <!--  默认没有填写内容的子组件  -->
    <child>
      <!--  <template slot="handsome">好好看!</template>  -->
      <!--  <template #handsome>好好看!</template>  -->
      <template v-slot:handsome>好好看!</template>
    </child>
    <upload-image></upload-image>
  </div>
</template> 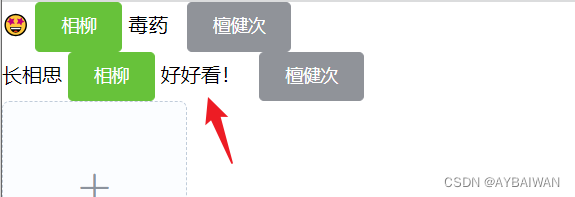
除了上面两种插槽的使用,我们还可以在插槽里面使用子组件的一些数据,注意区分!!!子组件被引用时,双标签里面的内容仍然属于子组件的内容,不是父组件的内容。
如果子组件双标签里面的内容想要使用子组件的数据,就要用到作用域插槽啦
注意:默认的插槽和具名插槽、作用域插槽不能混合使用,使用的话,具名插槽、作用域插槽内容不会显示:
父组件:
<template>
  <div>
   <child>
        <!--v-slot相当于v-slot:default-->
        <template v-slot="obj">
            <h2>{{obj}}</h2>
            <!--下面的内容不会显示-->
            <template v-slot:handsome="obj2">
                <h2>{{obj2}}</h2>
            </template>
        </template>
    </child>
  </div>
</template>作用域插槽(带有数据的插槽):
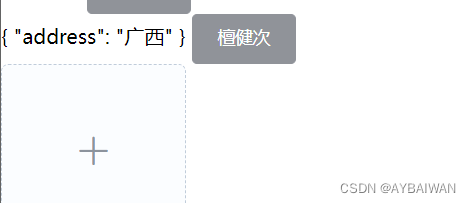
<template>
  <div>
    <!--  作用域插槽
    设置了一个属性address,绑定了子组件中的address值
    注意:这里只有在handsome插槽里面才可以使用这个数据-->
    <slot name="handsome" :address="address" >毒药</slot>
    <el-button type="info">檀健次</el-button>
  </div>
</template>
父组件:
<template>
<div>
<child>
//也可用slot-scope属性获取子组件插槽handsome的数据 如slot-scope="obj"
//下面三行代码意思一样
<template slot="handsome" slot-scope="obj">{{obj}}</template>
<template v-slot:handsome="obj">{{obj}}</template>
<template #handsome="obj">{{obj}}</template>
</child>
<upload-image></upload-image>
</div>
</template>slot和v-solt的区别:
v-slot 只能添加在 template 上 (或者独占默认插槽的缩写语法 v-slot:default="{ 插槽名 }")
接收到的是一个对象
可以利用对象.属性方式获取具体值,这里说一下解构赋值方式吧:
带不带引号都可以
<template #handsome="{address}">{{address}}</template>
这篇博客也有详细使用说明
vue中slot插槽的使用_vue slot用法_苏苏哇哈哈的博客-优快云博客
Vuejs——(11)组件——slot内容分发_barnett_y的博客-优快云博客q
slot-scope简单了解


 680
680

 被折叠的 条评论
为什么被折叠?
被折叠的 条评论
为什么被折叠?
 到【灌水乐园】发言


