


A:导入需要的jar包
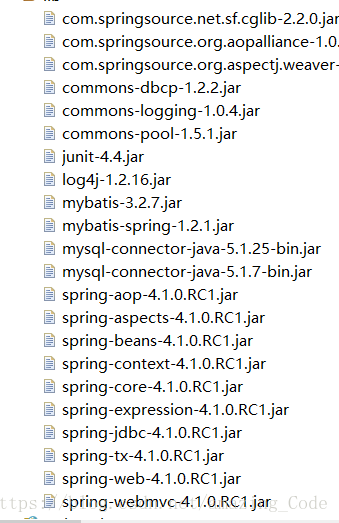
配置web.xml文件
<?xml version="1.0" encoding="UTF-8"?>
<web-app xmlns:xsi="http://www.w3.org/2001/XMLSchema-instance"
	xmlns="http://xmlns.jcp.org/xml/ns/javaee"
	xsi:schemaLocation="http://xmlns.jcp.org/xml/ns/javaee http://xmlns.jcp.org/xml/ns/javaee/web-app_3_1.xsd"
	id="WebApp_ID" version="3.1">
	<display-name>SpringMVC_MyBatisDemo01</display-name>

	<filter>
		<filter-name>CharacterEncodingFilter</filter-name>
		<filter-class>org.springframework.web.filter.CharacterEncodingFilter</filter-class>
		<init-param>
			<param-name>encoding</param-name>
			<param-value>utf-8</param-value>
		</init-param>
	</filter>

	<filter-mapping>
		<filter-name>CharacterEncodingFilter</filter-name>
		<url-pattern>/*</url-pattern>
	</filter-mapping>

	<!-- 配置前端控制器 -->
	<servlet>
		<servlet-name>DispatcherServlet</servlet-name>
		<servlet-class>org.springframework.web.servlet.DispatcherServlet</servlet-class>
		<init-param>
			<param-name>contextConfigLocation</param-name>
			<param-value>classpath:springmvc.xml</param-value>
		</init-param>
	</servlet>

	<servlet-mapping>
		<servlet-name>DispatcherServlet</servlet-name>
		<url-pattern>*.action</url-pattern>
	</servlet-mapping>
	<!-- 配置使用application对象读取的参数信息 -->
	<context-param>
		<param-name>contextConfigLocation</param-name>
		<param-value>classpath:spring/beans-*.xml</param-value>
	</context-param>
	<!-- 当tomcat服务器启动就会实例化application对象,当监听到application对象实例化后就初始化spring容器 ApplicationContext
		act=new ClassPathXmlApplicatonContext("classpath:spring/beans-*.xml"); -->
	<listener>
		<listener-class>org.springframework.web.context.ContextLoaderListener</listener-class>
	</listener>
	<welcome-file-list>
		<welcome-file>index.html</welcome-file>
		<welcome-file>index.htm</welcome-file>
		<welcome-file>index.jsp</welcome-file>
		<welcome-file>default.html</welcome-file>
		<welcome-file>default.htm</welcome-file>
		<welcome-file>default.jsp</welcome-file>
	</welcome-file-list>
</web-app>
配置springmvc的xml文件 springmvc.xml(放在了src目录下)
<?xml version="1.0" encoding="UTF-8"?>
<beans xmlns="http://www.springframework.org/schema/beans"
	xmlns:context="http://www.springframework.org/schema/context"
	xmlns:mvc="http://www.springframework.org/schema/mvc"
    xmlns:xsi="http://www.w3.org/2001/XMLSchema-instance"
    xsi:schemaLocation="http://www.springframework.org/schema/beans
        http://www.springframework.org/schema/beans/spring-beans-4.1.xsd

        http://www.springframework.org/schema/context
        http://www.springframework.org/schema/context/spring-context-4.1.xsd

        http://www.springframework.org/schema/mvc
        http://www.springframework.org/schema/mvc/spring-mvc-4.1.xsd">

	<context:component-scan base-package="com.xu"></context:component-scan>

	<bean id="conversionService" class="org.springframework.format.support.FormattingConversionServiceFactoryBean">
	   <property name="converters">
	      <set>
	        <!-- 注入自定义的日期类型转换器 -->
	        <bean class="com.xu.convertor.DateTypeConvertor"></bean>
	      </set>
	    </property>
	</bean>
        <!-- 配置类型转换器 -->
	   <mvc:annotation-driven conversion-service="conversionService"></mvc:annotation-driven>
	   <mvc:annotation-driven/>
</beans>
准备好连接数据库的资源文件和log4j文件,将它们放入了一个资源文件夹下

下面对单表进行操作
t_item表

将mybaits逆向工程生成的mapper和model文件夹复制到整合的项目中
添加两个扩展类
public class ItemCustom extends Item {


}

public class ItemQueryVo {

	  private ItemCustom itemCustom;

	public ItemCustom getItemCustom() {
		return itemCustom;
	}

	public void setItemCustom(ItemCustom itemCustom) {
		this.itemCustom = itemCustom;
	}

}
添加Itemdao和Itemdao.xml
public interface ItemDao {

	List<ItemCustom> getItemList(ItemQueryVo itemQueryVo) throws Exception;


}

ItemDao.xml
<?xml version="1.0" encoding="UTF-8" ?>
<!DOCTYPE mapper PUBLIC "-//mybatis.org//DTD Mapper 3.0//EN" "http://mybatis.org/dtd/mybatis-3-mapper.dtd" >
<mapper namespace="com.xu.dao.ItemDao" >

    <sql id="item_where">
     <if test="itemCustom!=null">
        <if test="itemCustom.name!=null and itemCustom.name.length()>0">
          name like '%' #{itemCustom.name} '%'
        </if>
     </if>
  </sql>

     <select id="getItemList" parameterType="ItemQueryVo" resultType="ItemCustom">
         select * from t_item
           <where>
                <include refid="item_where"></include>
           </where>
       </select>

</mapper>
对ItemDao进行测试
public class ItemDaoTest {
  private ItemDao itemDao;
	@Before
	public void setUp() throws Exception {
		ApplicationContext applicationContext=new ClassPathXmlApplicationContext("classpath:spring/beans-*.xml");
		this.itemDao=(ItemDao) applicationContext.getBean("itemDao");
	}
    @Test
	public void testGetItemList() throws Exception {
		List<ItemCustom> items= this.itemDao.getItemList(null);
		System.out.println(items);
	}

}
添加ItemService和ItemServiceBean
public interface ItemService {
          //獲得商品列表
	    List<ItemCustom> getItemList(ItemQueryVo itemQueryVo) throws Exception;
          //根據id查商品
        public ItemCustom findItemById(int itemId) throws Exception;
           //更新商品
       public boolean updateItem(ItemCustom itemCustom) throws Exception;
}

ItemServiceBean
@Service("itemService")
  public class ItemServiceBean implements ItemService {
	@Resource
    private ItemDao itemDao;
	@Resource
	private ItemMapper itemMapper;
	@Override
	public List<ItemCustom> getItemList(ItemQueryVo itemQueryVo) throws Exception {
		  return itemDao.getItemList(itemQueryVo);
	}
	@Override
	public ItemCustom findItemById(int itemId) throws Exception {
		 Item item=this.itemMapper.selectByPrimaryKey(itemId);
		 ItemCustom itemCustom=new ItemCustom();
		  //BeanUtils.copyProperties(item, itemCustom);这个方法可以完成对象复制,将第一个对象的内容复制到第二个对象当中
		 //将item对象的属性值复制到itemCustom对象的属性值中,类似itemCustom.setName(item.getName());
		 BeanUtils.copyProperties(item, itemCustom);
		 return itemCustom;
	}
	@Override
	public boolean updateItem(ItemCustom itemCustom) throws Exception {
		Item item=new Item();
		BeanUtils.copyProperties(itemCustom, item);
		int count=itemMapper.updateByPrimaryKeyWithBLOBs(item);
		return count>0;
	 }
 }


ItemServiceBeanTest 对ItemService进行测试
public class ItemServiceBeanTest {
    private ItemService itemService;
	@Before
	public void setUp() throws Exception {
		ApplicationContext applicationContext=new ClassPathXmlApplicationContext("classpath:spring/beans-*.xml");
		this.itemService=(ItemService) applicationContext.getBean("itemService");
	}
	@Test
	public void testGetItemList() throws Exception {

		 ItemQueryVo itemQueryVo=new ItemQueryVo();
		 ItemCustom itemCustom=new ItemCustom();
		 itemCustom.setName("i");
		 itemQueryVo.setItemCustom(itemCustom);
		 List<ItemCustom> items=this.itemService.getItemList(itemQueryVo);
		 System.out.println(items);
	 }
}
添加controller类 (Handler处理器)
@Controller
@RequestMapping("/item")
public class ItemController {

	@Resource
	private ItemService itemService;

	/**
	 * http://localhost:8080/SpringMVCAndMybatisDemo04/item/item_list.action
	 * @return
	 * @throws Exception
	 */
	@RequestMapping("/item_list.action")
	public ModelAndView findItems()throws Exception{
		ItemQueryVo itemQueryVo=new ItemQueryVo();
		ItemCustom itemCustom=new ItemCustom();
		itemCustom.setName("机");
		itemQueryVo.setItemCustom(itemCustom);
		List<ItemCustom> itemCustomList=itemService.findItemList(itemQueryVo);
		ModelAndView modelAndView=new ModelAndView();
		modelAndView.addObject("itemList", itemCustomList);
		modelAndView.setViewName("/WEB-INF/item/item_list.jsp");


		return modelAndView;
	}


          @RequestMapping("/findItemById.action")
          public String findItemById(HttpServletRequest request,HttpServletResponse response,int itemId) throws Exception{
        	   request.setCharacterEncoding("utf-8");
        	   response.setContentType("text/html;charset=utf-8");
        	  ItemCustom itemCustom=this.itemService.findItemById(itemId);
        	  System.out.println("========点击修改跳转到更新页面:"+itemCustom.getName());
			  request.setAttribute("itemCustom", itemCustom);

        	  return "forward:/WEB-INF/item/item_update_input.jsp";


          }

          @RequestMapping("/updateItem.action")
          public String updateItem(HttpServletRequest request,HttpServletResponse response,ItemCustom itemCustom) throws Exception{
        	   request.setCharacterEncoding("utf-8");
        	   response.setContentType("text/html;charset=utf-8");
        	  boolean bool= itemService.updateItem(itemCustom);
        	  if(!bool){
        		  System.out.println("修改失败");
        		  return "forward:/WEB-INF/item_update_input.jsp";
        	  }
        	  System.out.println("======="+itemCustom);
        	  return "forward:item_list.action";


          }

}
日期转换类型的类
public class DateTypeConvertor  implements Converter<String,Date> {

	@Override
	public Date convert(String source) {
		try {
			return DateFormat.getDateInstance().parse(source);
		} catch (ParseException e) {
			// TODO Auto-generated catch block
			e.printStackTrace();
		}
		return null;
	}
}
以上,SpringMVC和Mybatis整合之后,对单表的简单操作

 1490


 扫一扫


 被折叠的 条评论
为什么被折叠?
 到【灌水乐园】发言


