


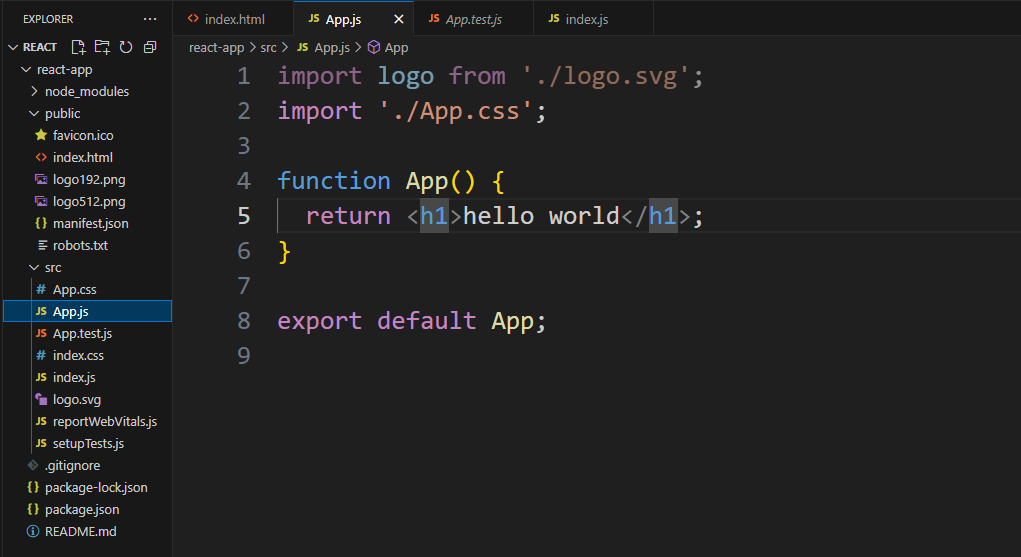
React框架
1.前端展示解释
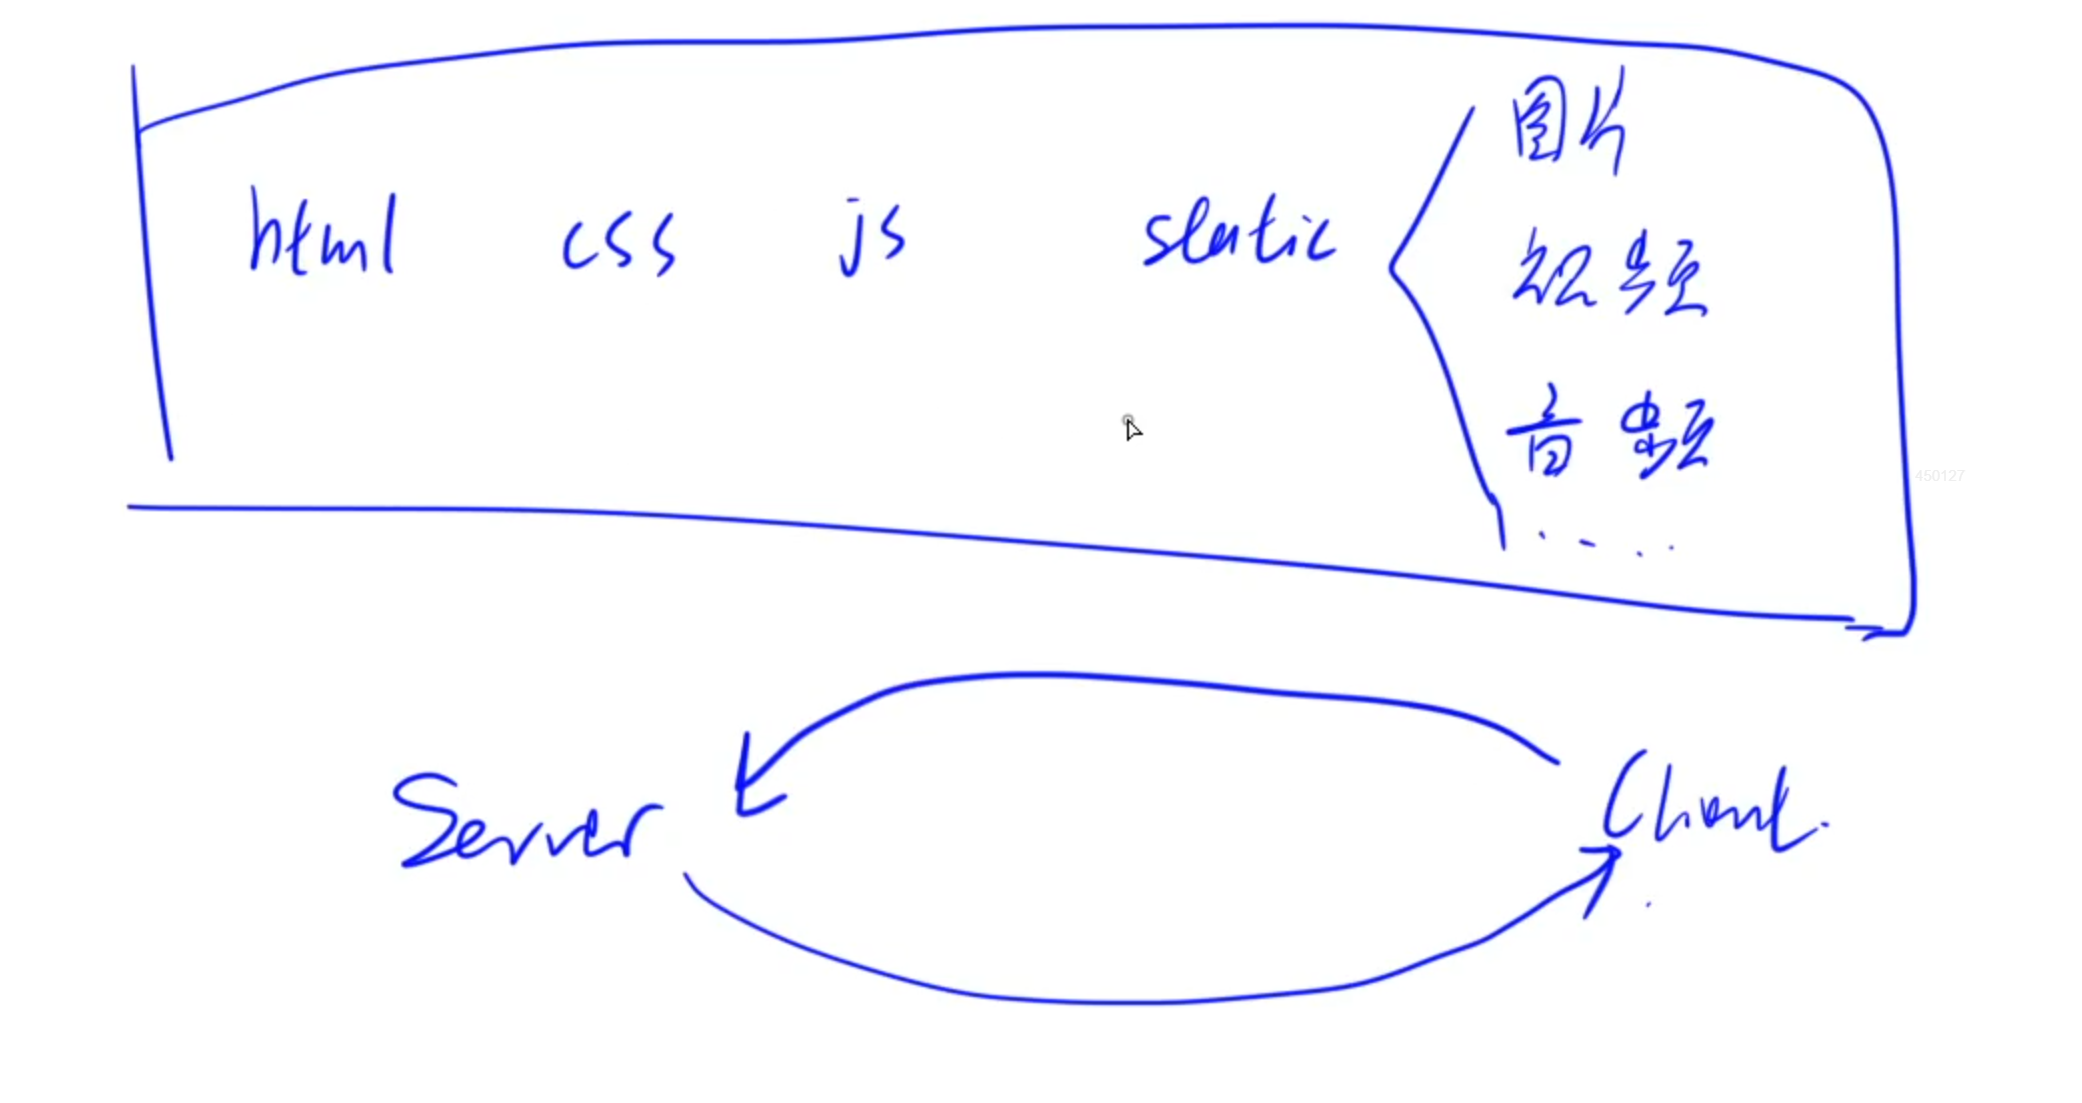
当客户端访问服务器时,会从服务器中下载很多静态文件到本地,比如css、js等前端渲染文件
下载完成之后浏览器会将这些文件组合形成前端页面渲染出来。
2.React概述
React是一个专注于构建用户界面的JavaScript库,它采用声明式编程范式,使得代码更加易于阅读和理解。React的核心思想是组件化,即将用户界面划分为独立的、可复用的组件。每个组件都有自己的状态和生命周期,方便开发者进行维护和复用。
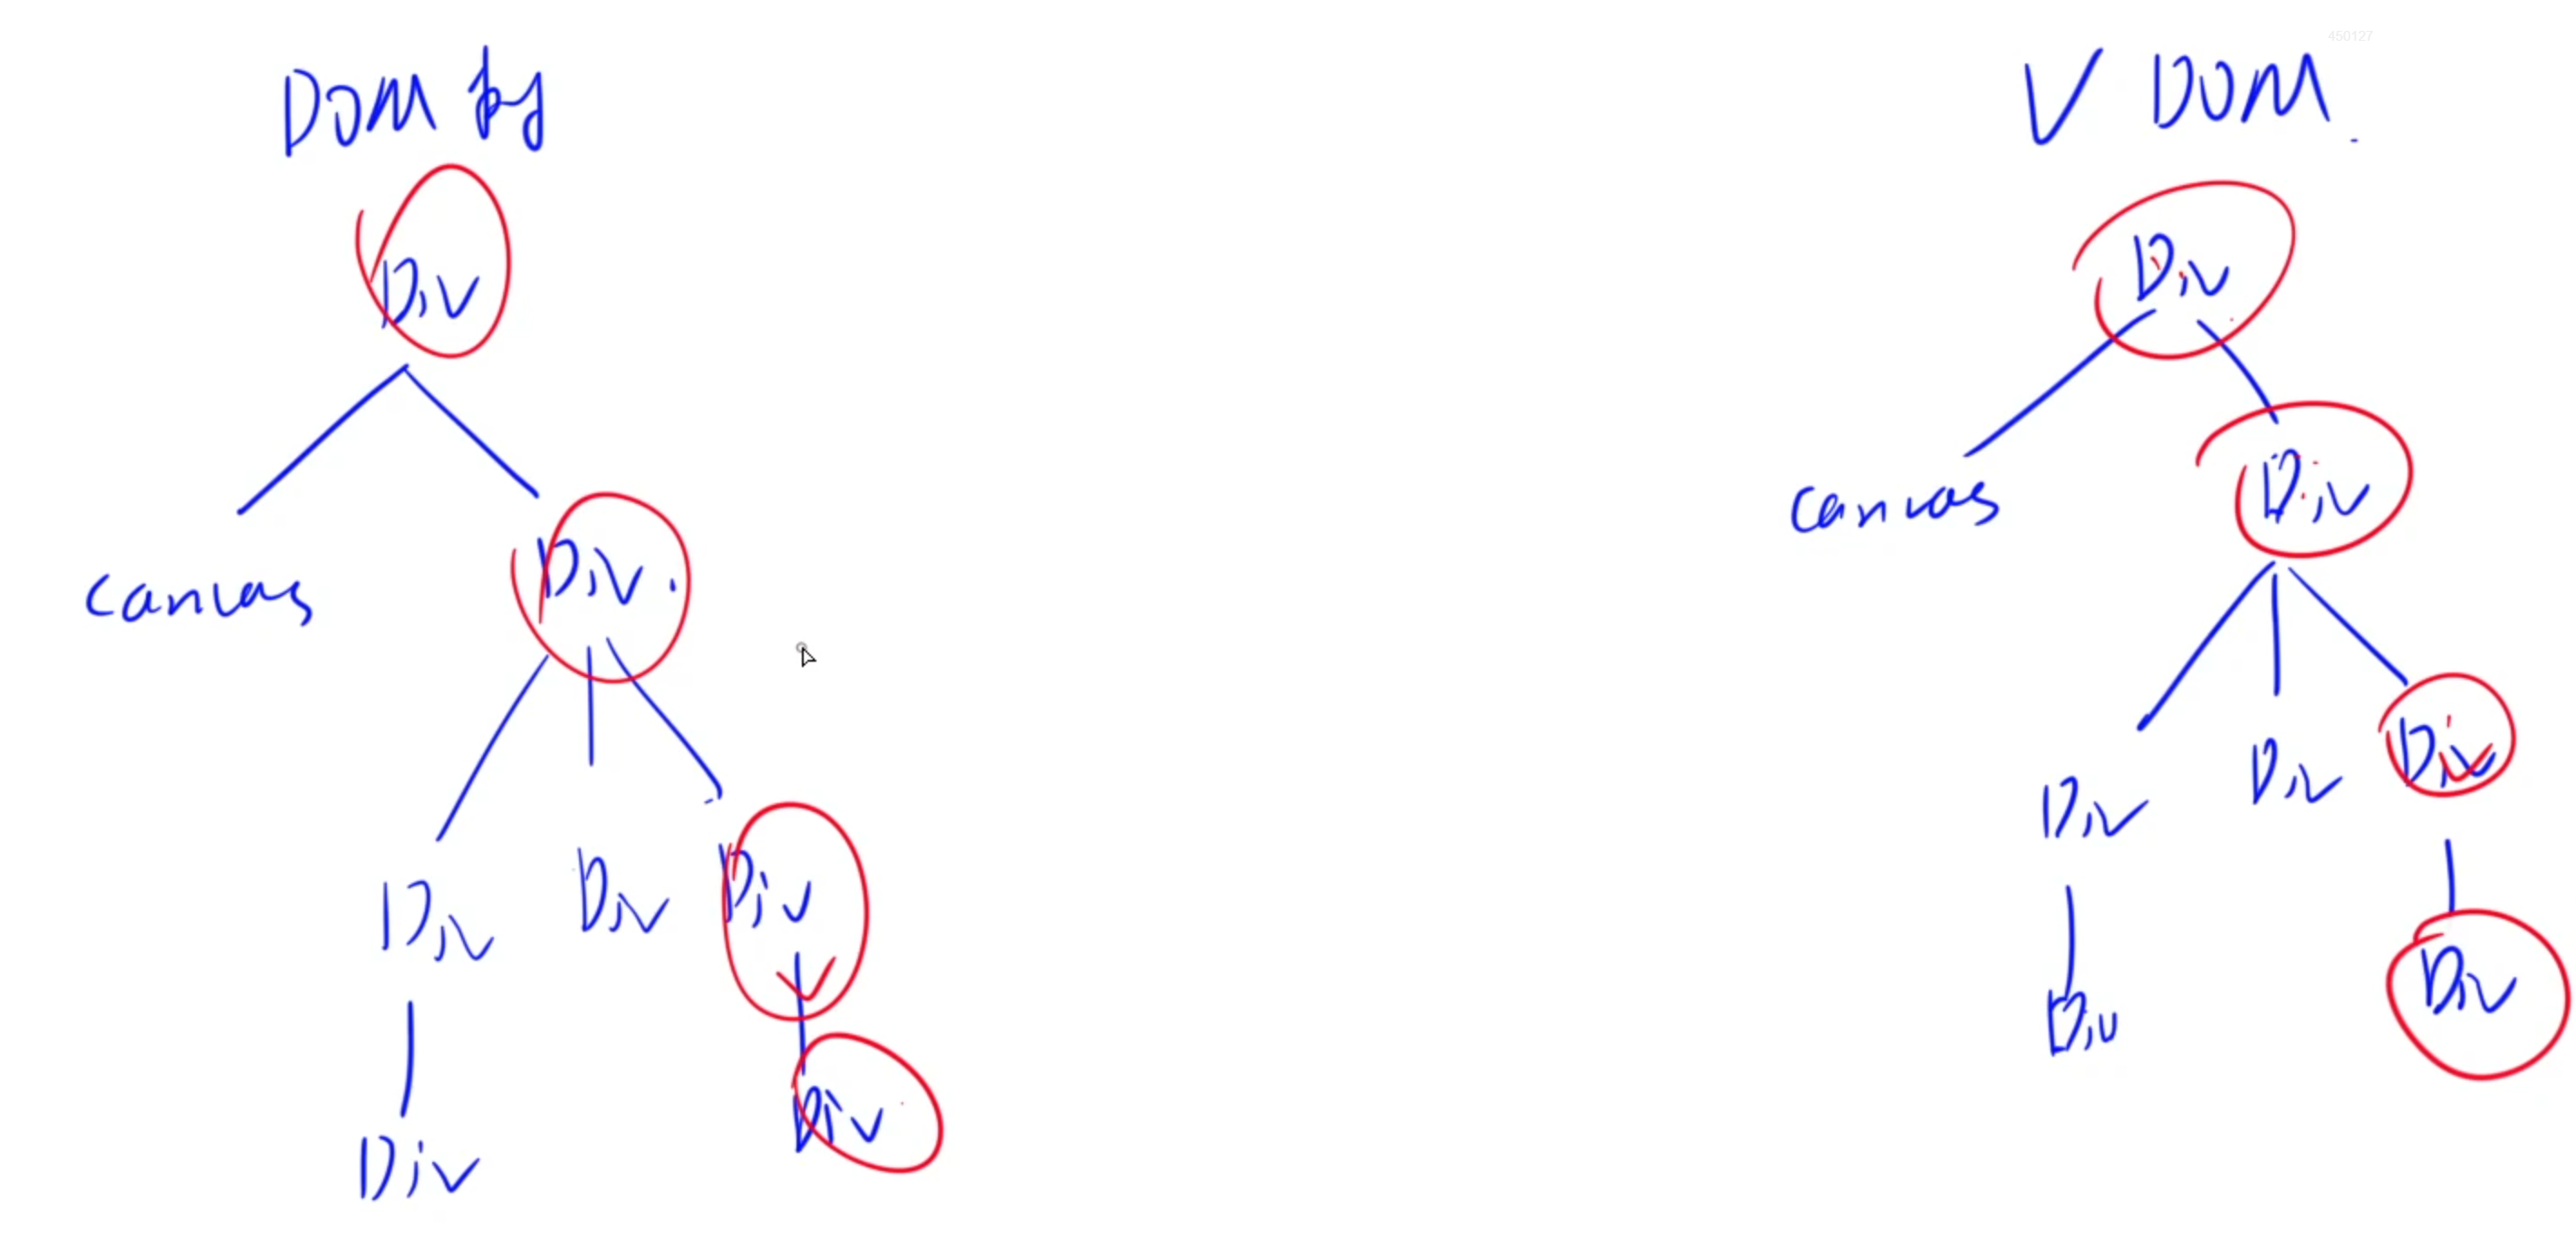
React特性1:虚拟DOM树
DOM树:是集中保存一个网页中所有内容的树形结构
而React框架会在内存中维护一个虚拟的DOM树,它是实际DOM的轻量级内存表示。当网页源代码中网页内容状态或者属性发生变化时,React会重新计算虚拟DOM树,并通过比较新旧虚拟DOM树的差异(Diffing),找出需要更新的部分。最后,将这些变化批量应用到实际DOM上,从而减少不必要的重绘和回流,提高性能。
React特性2:JSX语法扩展
React引入了JSX(JavaScript XML)语法扩展,允许在JavaScript中编写类似HTML的结构。这种语法使得开发者可以更加直观地描述用户界面,同时保持代码的灵活性和可维护性。
JSX编译成JS,编写JSX的语法更加简单灵活。
编译通过React提供的Babel编译器将JSX代码编译成JS代码。

3.环境配置
1.按照终端Git Bash
安装地址:Git Bash官网(windows)
2.安装Nodejs
安装地址:Nodejs
3.安装create-react-app
打开Git Bash,执行:
npm i -g create-react-app
4.安装VSCode插件
Simple React Snippets:提供一些react常用命令的自动补全Prettier - Code formatter:代码高亮
5.创建React App
当需要使用React开发一个App时
在目标目录下打开Git Bash,执行:
create-react-app react-app #可以替换为其他名称

cd react-app
npm start #启动应用
4.React初始项目结构
1.node_modules
负责维护JS库:各种JS相关的轮子
2.public
index.html:主页面的渲染
以及一些静态文件
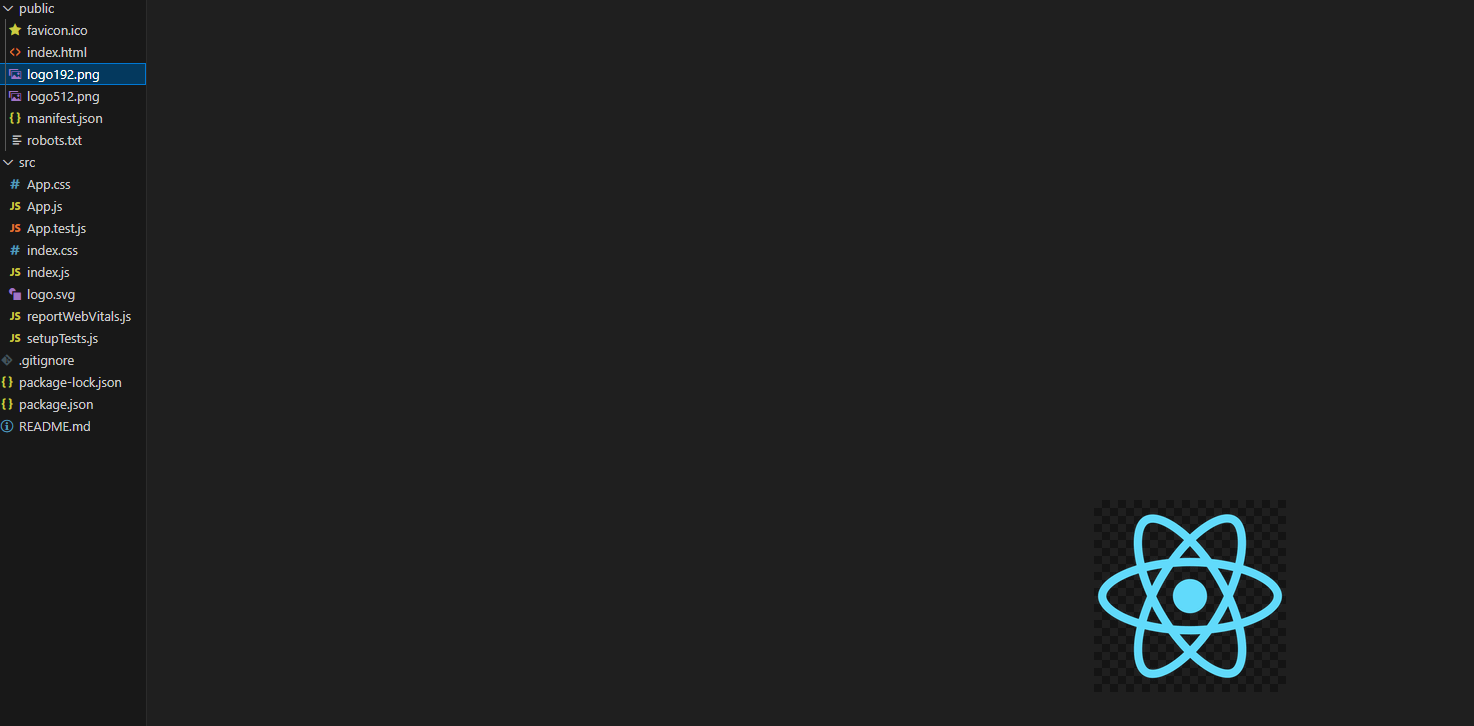
3.src
主界面以及其他组件内容的css和js文件
5.ES6语法
1.使用bind()函数绑定this取值
在JavaScript中,函数里的this指向的是执行时的调用者,而不是定义时所在的对象。
例如:
const animal = {


  name: "dog",
  talk: function() {


    console.log(this);
  }
}

animal.talk();


const talk = animal.talk;
talk();
运行结果是:
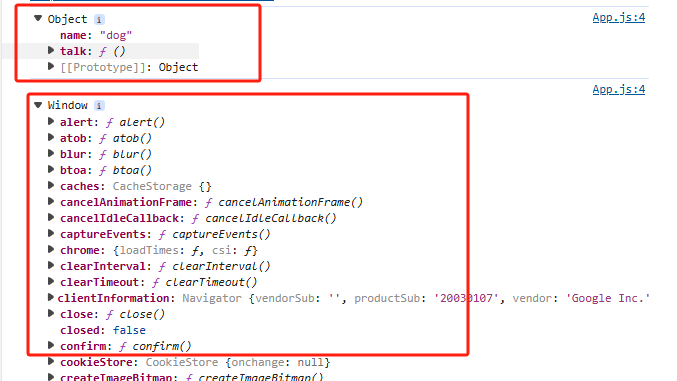
animal.talk()它会根据调用的对象来给talk()里面的this赋值
而将animal.talk()赋值给当前文件的成员,再执行该成员调用talk()方法时,由于当前文件是由window调用的,那么talk()里面的this就变成了Window。
而为了避免这种情况,使用bind()函数,可以绑定this的取值,例如:
const talk = animal.talk.bind(animal);
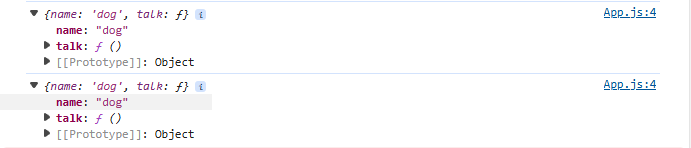
就可以将该对象绑定到重新赋值的成员上,不会导致错误的取值。
2.箭头函数的简写
const f = (x) => {


  return x * x;
}
const f1 = x => x * x;

console.log(f(3), f1(3));
运行结果:
9 9
3.通过箭头函数绑定this的取值
const animal = {


  talk: function() {


    setTimeout(function() {


      console.log(this);
    }, 1000);
  }
};

animal.talk();
在上述代码中虽然talk()函数是由animal调用的,但是里面的function函数其实还是Window执行的,所以里面的函数取的this是当前Window。

为避免这种情况,一般的写法是:
const animal = {


  talk: function() {


    let outer = this;
    setTimeout(function() {


      console.log(outer);
    }, 1000);
  }
};

animal.talk();
让里层的outer指向外层的animal对象。
而使用箭头函数可以直接规避这种情况:
const animal = {


  talk: function() {


    setTimeout(() => {


      console.log(this);
    }, 1000);
  }
};

animal.talk();
运行结果:

4.对象的解构
例如:
const animal = {


  name: "dog",
  age: 12,
  height: 100,
};

const {

   name : new_name, age} = animal; //new_name是name的别名

console.log(new_name, age);
打印结果:

5.数组和对象的展开
let a = [1, 2, 3];
let b = [4, 5, 6];
let c = [...a]; //c是a的复制

let d = [...c, ...b]; //将c和b展开放到d中

console.log(d);


const A = {

   name: "dog"};
const B = {

   age: 12};
const C = {

   ...A, ...B, heigth: 100};  //将对象元素展开并放入C中

console.log(C);
打印结果:

6.Named 与 Default exports
- Named Export:可以export多个,import的时候需要加大括号,名称需要匹配
- Default Export: 最多export一个,import的时候不需要加大括号,可以直接定义别名
export default class Player {


    constructor() {


        console.log("new Player");
    }
}
import MyPlayer from './Player' //默认值不能加大括号

let player = new MyPlayer();

console.log(player);
打印结果:

6.Component
示例项目:实现两个按钮控制一个box左右移动
1)创建box-app项目:
crete-react-app box-app
cd box-app
npm start //启动box-app
2)安装bootstrap库:
npm i bootstrap
在项目中导入bootstrap库:
import 'bootstrap/dist/css/bootstarp.css'
3)创建Component
一般将组件全部维护在一个component文件夹下
先创建component文件夹,然后创建box.jsx文件。
4)创建按钮
当子节点数量大于1个时,需要用<div>或<React.Fragment>将其括起来。
同时整个部分用()括起来return
import React, {

    Component } from 'react'

class Box extends Component {


    state = {

     }
    render() {


        return (
            /* <div>
                   <h1>hello world</h1>
                   <button>left</button>
                   <button>right</button>
               </div> */
               <React.Fragment>
                    <h1>hello world</h1>
                    <button>left</button>
                    <button>right</button>
                </React.Fragment>
        );
    }
}

export default Box;
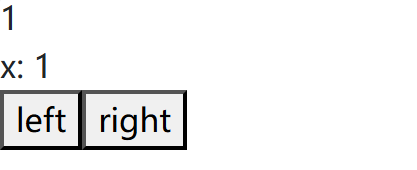
5)内嵌表达式
JSX中使用{}嵌入表达式:
import React, {

    Component } from 'react'

class Box extends Component {


    state = {


        x: 1,
    };
    render() {


        return (
            /* <div>
                   <h1>hello world</h1>
                   <button>left</button>
                   <button>right</button>
               </div> */
               <React.Fragment>
                    <div>{

   this.state.x}</div>
                    <div>{

   this.toString()}</div>
                    <button>left</button>
                    <button>right</button>
                </React.Fragment>
        );
    }

    toString() {


        return `x: ${

     this.state.x}`;
    }
}

export default Box;
页面展示:
6) 设置属性
- 通过设置
className来对应属性
通过bootstrap找到已经设计好的属性类进行渲染。
bootstrap官网搜索需要的示例样式:
- CSS属性:不同于普通css,React中要求:中间使用
-连接的属性需要改成驼峰命名,比如:background-color:backgrounColor,其他属性类似。
设置属性:
import React, {

    Component } from 'react'

class Box extends Component {


    state = {


        x: 1,
    };

    styles = {


        width: "50px",
        height: "50px",
        backgroundColor: "lightblue"
    }
    render() {


        return (
            /* <div>
                   <h1>hello world</h1>
                   <button>left</button>
                   <button>right</button>
               </div> */
               <React.Fragment>
                    <div style={

   this.styles}>{

   this.toString()}</div>
                    <button className='btn btn-primary m-2'>left</button>
                    <button className='btn btn-success m-2'>right</button>
                </React.Fragment>
        );
    }

    toString() {


        const x = this.state.x;
        return `x: ${

     x}`;
    }
}

export default Box;
简写方式:将属性以数组的形式传入style中
import React, {

    Component } from 'react'

class Box extends Component {


    state = {


        x: 1,
    };


    render() {


        return (
            /* <div>
                   <h1>hello world</h1>
                   <button>left</button>
                   <button>right</button>
               </div> */
               <React.Fragment>
                    <div style={

   {


                        width: "50px",
                        height: "50px",
                        color: "white",
                        textAlign: "center",
                        lineHeight: "50px",
                        borderRadius: "5px",
                        backgroundColor: "lightblue"
                    }}>{

   this.toString()}</div>
                    <button className='btn btn-primary m-2'>left</button>
                    <button className='btn btn-success m-2'>right</button>
                </React.Fragment>
        );
    }
    toString() {


        const x = this.state.x;
        return `x: ${

     x}`;
    }
}
export default Box;
页面展示:
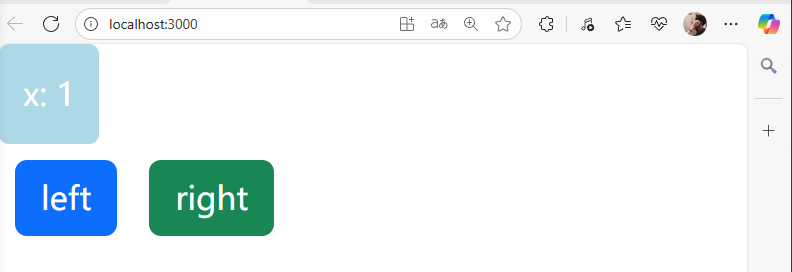
7)数据驱动改变Style
通过改变一个变量的值从而改变组件的style样式:
import React, {

    Component } from 'react'

class Box extends Component {


    state = {


        x: 0,
    };
    render() {


        return (
            /* <div>
                   <h1>hello world</h1>
                   <button>left</button>
                   <button>right</button>
               </div> */
               <React.Fragment>
                    <div style={

   this.getStyles()}>{

   this.toString()}</div>
                    <button className='btn btn-primary m-2'>left</button>
                    <button className='btn btn-success m-2'>right</button>
                </React.Fragment>
        );
    }
    getStyles() {


        let styles = {


            width: "50px",
            height: "50px",
            color: "white",
            textAlign: "center",
            lineHeight: "50px",
            borderRadius: "5px",
            backgroundColor: "lightblue"
        }
        if (this.state.x === 0) {


            styles.backgroundColor = "orange";
        }
        return styles;
    }
    toString() {


        const x = this.state.x;
        return `x: ${

     x}`;
    }
}
export default Box;
页面展示: 当改变x的值时,<div>对应的样式会发生改变。
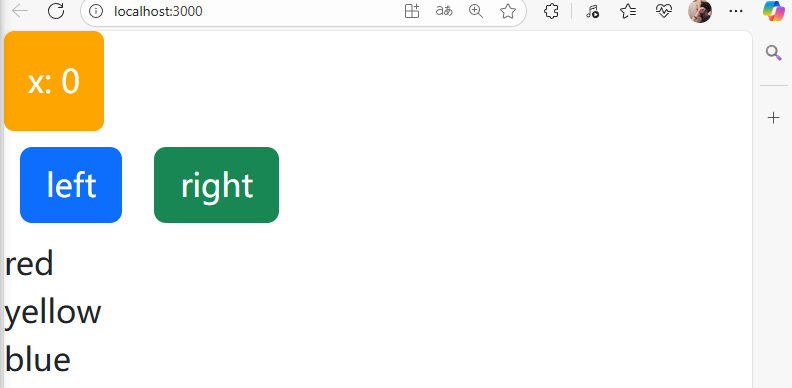
8)渲染列表
- 使用map函数
- 每个元素需要具有唯一的
key属性,用来帮助React快速找到被修改的DOM元素。
关于key的面试题:
面试题:react、vue中的key有什么作用?(key的内部原理)
虚拟DOM中key的作用:
key是虚拟DOM对象的标识,当数据发生变化时,Vue会根据【新数据】生成【新的虚拟DOM】
随后Vue进行【新虚拟DOM】与【旧虚拟DOM】的差异比较,比较规则如下:
在旧虚拟DOM中找到与新虚拟DOM相同的key:
若虚拟DOM元素内容没变, 直接使用之前的真实DOM元素!
若虚拟DOM元素内容变了, 则生成新的真实DOM元素,随后替换掉页面中之前的真实DOM元素。
列表渲染示例: 使用map函数将列表中的元素内容渲染依次渲染出来。
import React, {

    Component } from 'react'

class Box extends Component {


    state = {


        x: 0,
        colors: ['red', 'yellow', 'blue'],
    };
    render() {


        return (
            /* <div>
                   <h1>hello world</h1>
                   <button>left</button>
                   <button>right</button>
               </div> */
               <React.Fragment>
                    <div style={

   this.getStyles()}>{

   this.toString()}</div>
                    <button className='btn btn-primary m-2'>left</button>
                    <button className='btn btn-success m-2'>right</button>
                    {

   this.state.colors.map(color => (
                        <div key={

   color}>{

   color}</div>
                    ))}
                </React.Fragment>
        );
    }
    getStyles() {


        let styles = {


            width: "50px",
            height: "50px",
            color: "white",
            textAlign: "center",
            lineHeight: "50px",
            borderRadius: "5px",
            backgroundColor: "lightblue"
        }
        if (this.state.x === 0) {


            styles.backgroundColor = "orange";
        }
        return styles;
    }
    toString() {


        const x = this.state.x;
        return `x: ${

     x}`;
    }
}
export default Box;
页面展示:
9)绑定事件
在添加绑定事件时需要注意:
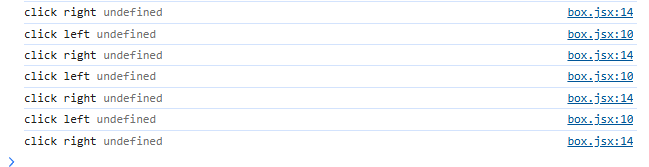
这里同样会发生this的值变成其他不明的指代,这就导致我们无法知道React在实现的时候是在什么东西调用的click函数,但是我们希望它在调用click时指向的是当前的结构体(box class).
于是跟之前补充的ES6语法一致,要么通过箭头函数(推荐),因为箭头函数不会重新给this赋值,也就是说在调用箭头函数实现的click函数时,它指向的this就是原本我们赋给它的this。
另外一种方法就是利用bind函数绑定this。
import React, {

    Component } from 'react'

class Box extends Component {


    state = {


        x: 0,
        colors: ['red', 'yellow', 'blue'],
    };

    handleClickLeft() {


        console.log("click left", this);
    }

    handleClickRight() {


        console.log("click right", this);
    }

    render() {


        return (
            /* <div>
                   <h1>hello world</h1>
                   <button>left</button>
                   <button>right</button>
               </div> */
               <React.Fragment>
                    <div style={

   this.getStyles()}>{

   this.toString()}</div>
                    <button onClick={

   this.handleClickLeft} className='btn btn-primary m-2'>left</button>
                    <button onClick={

   this.handleClickRight} className='btn btn-success m-2'>right</button>
                    {

   this.state.colors.map(color => (
                        <div key={

   color}>{

   color}</div>
                    ))}
                </React.Fragment>
        );
    }
    getStyles() {


        let styles = {


            width: "50px",
            height: "50px",
            color: "white",
            textAlign: "center",
            lineHeight: "50px",
            borderRadius: "5px",
            backgroundColor: "lightblue"
        }
        if (this.state.x === 0) {


            styles.backgroundColor = "orange";
        }
        return styles;
    }
    toString() {


        const x = this.state.x;
        return `x: ${

     x}`;
    }
}
export default Box;
这里打印this值会发现当前的this值是未定义的,也就是说确实不是当前结构体(box class)
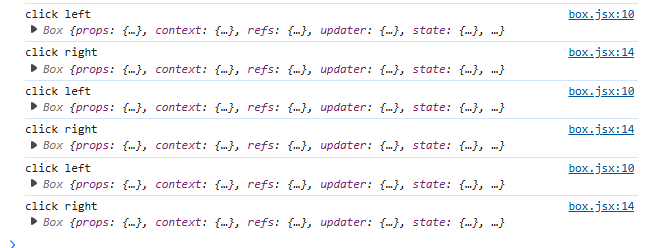
两种方式绑定this值不发生改变:
import React, {

    Component } from 'react'

class Box extends Component {


    state = {


        x: 0,
        colors: ['red', 'yellow', 'blue'],
    };

    handleClickLeft = () => {


        console.log("click left", this);
    }

    handleClickRight() {


        console.log("click right", this);
    }

    render() {


        return (
            /* <div>
                   <h1>hello world</h1>
                   <button>left</button>
                   <button>right</button>
               </div> */
               <React.Fragment>
                    <div style={

   this.getStyles()}>{

   this.toString()}</div>
                    <button onClick={

   this.handleClickLeft} className='btn btn-primary m-2'>left</button>
                    <button onClick={

   this.handleClickRight.bind(this)} className='btn btn-success m-2'>right</button>
                    {

   this.state.colors.map(color => (
                        <div key={

   color}>{

   color}</div>
                    ))}
                </React.Fragment>
        );
    }
    getStyles() {


        let styles = {


            width: "50px",
            height: "50px",
            color: "white",
            textAlign: "center",
            lineHeight: "50px",
            borderRadius: "5px",
            backgroundColor: "lightblue"
        }
        if (this.state.x === 0) {


            styles.backgroundColor = "orange";
        }
        return styles;
    }
    toString() {


        const x = this.state.x;
        return `x: ${

     x}`;
    }
}
export default Box;
打印展示:
10)修改state
- 需要使用
this.setState()函数 - 每次调用
this.setState()函数后,会重新调用this.render()函数,用来修改虚拟机DOM树。React只会修改不同步的实际DOM树节点。
当我们直接修改state里面的某个变量值时,虽然该变量确实发生改变,但是react无法将该变量的改变同步渲染,只有通过调用this.setState()函数来修改,react才会重新调用this.render()函数来修改虚拟DOM树,从而修改不同步的实际DOM树节点。
** 不调用this.setState()函数时:**
import React, {

    Component } from 'react'

class Box extends Component {


    state = {


        x: 0,
        colors: ['red', 'yellow', 'blue'],
    };

    handleClickLeft = () => {


        this.state.x--;
        console.log("click left", this.state.x);
    }

    handleClickRight = () => {


        this.state.x++;
        console.log("click right", this.state.x);
    }

    render() {


        return (
            /* <div>
                   <h1>hello world</h1>
                   <button>left</button>
                   <button>right</button>
               </div> */
               <React.Fragment>
                    <div style={

   this.getStyles()}>{

   this.toString()}</div>
                    <button onClick={

   this.handleClickLeft} className='btn btn-primary m-2'>left</button>
                    <button onClick={

   this.handleClickRight} className='btn btn-success m-2'>right</button>
                    {

   this.state.colors.map(color => (
                        <div key={

   color}>{

   color}</div>
                    ))}
                </React.Fragment>
        );
    }
    getStyles() {


        let styles = {


            width: "50px",
            height: "50px",
            color: "white",
            textAlign: "center",
            lineHeight: "50px",
            borderRadius: "5px",
            backgroundColor: "lightblue"
        }
        if (this.state.x === 0) {


            styles.backgroundColor = "orange";
        }
        return styles;
    }
    toString() {


        const x = this.state.x;
        return `x: ${

     x}`;
    }
}
export default Box;
通过调用this.setState()函数来修改state:
import React, {

    Component } from 'react'

class Box extends Component {


    state = {


        x: 0,
        colors: ['red', 'yellow', 'blue'],
    };

    handleClickLeft = () => {


        this.setState({


            x: this.state.x - 1,
        });
        console.log("click left", this.state.x);
    }

    handleClickRight = () => {


        this.setState({


            x: this.state.x + 1,
        });
        console.log("click right", this.state.x);
    }

    render() {


        return (
            /* <div>
                   <h1>hello world</h1>
                   <button>left</button>
                   <button>right</button>
               </div> */
               <React.Fragment>
                    <div style={

   this.getStyles()}>{

   this.toString()}</div>
                    <button onClick={

   this.handleClickLeft} className='btn btn-primary m-2'>left</button>
                    <button onClick={

   this.handleClickRight} className='btn btn-success m-2'>right</button>
                    {

   this.state.colors.map(color => (
                        <div key={

   color}>{

   color}</div>
                    ))}
                </React.Fragment>
        );
    }
    getStyles() {


        let styles = {


            width: "50px",
            height: "50px",
            color: "white",
            textAlign: "center",
            lineHeight: "50px",
            borderRadius: "5px",
            backgroundColor: "lightblue"
        }
        if (this.state.x === 0) {


            styles.backgroundColor = "orange";
        }
        return styles;
    }
    toString() {


        const x = this.state.x;
        return `x: ${

     x}`;
    }
}
export default Box;

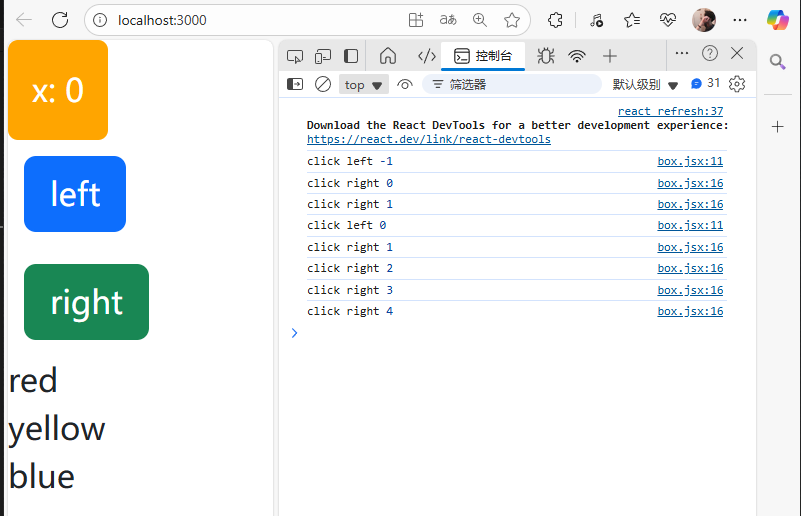
将marginLeft设置为当前this.state.x,这样每次点击左右就会改变this.state.x的值,通过this.setState()就会每次改变都会重新调用this.render()函数,而此时marginLeft的值与this.state.x相关,就能实现点击right按钮时,box块往右移动(marginLeft变大),点击left按钮时,box块往左移动(marginLeft变小)。
import React, {

    Component } from 'react'

class Box extends Component {


    state = {


        x: 0,
        colors: ['red', 'yellow', 'blue'],
    };

    handleClickLeft = () => {


        this.setState({


            x: this.state.x - 1,
        });
        console.log("click left", this.state.x);
    }

    handleClickRight = () => {


        this.setState({


            x: this.state.x + 1,
        });
        console.log("click right", this.state.x);
    }

    render() {


        return (
            /* <div>
                   <h1>hello world</h1>
                   <button>left</button>
                   <button>right</button>
               </div> */
               <React.Fragment>
                    <div style={

   this.getStyles()}>{

   this.toString()}</div>
                    <button onClick={

   this.handleClickLeft} className='btn btn-primary m-2'>left</button>
                    <button onClick={

   this.handleClickRight} className='btn btn-success m-2'>right</button>
                    {

   this.state.colors.map(color => (
                        <div key={

   color}>{

   color}</div>
                    ))}
                </React.Fragment>
        );
    }
    getStyles() {


        let styles = {


            width: "50px",
            height: "50px",
            color: "white",
            textAlign: "center",
            lineHeight: "50px",
            borderRadius: "5px",
            backgroundColor: "lightblue",
            marginLeft: this.state.x,
        }
        if (this.state.x === 0) {


            styles.backgroundColor = "orange";
        }
        return styles;
    }
    toString() {


        const x = this.state.x;
        return `x: ${

     x}`;
    }
}
export <
最低0.47元/天 解锁文章


 4520
4520

 被折叠的 条评论
为什么被折叠?
被折叠的 条评论
为什么被折叠?
 到【灌水乐园】发言


