How to Avoid Multiple Instances of Your Windows Application

本文介绍了一个C++单实例守护类,用于确保应用程序只有一个运行实例,并能在多个实例间共享数据。通过使用内存映射文件和事件对象,实现了跨进程的数据同步和通知机制。

Introduction

This is one of the most oft asked questions and different solutions are given to it. I had earlier published this little tip/trick about this. With the simple class shown there, it is no doubt possible to maintain just one instance but that is just part of the desired behavior. Have you noticed how Firefox keeps adding tabs to its running instance whenever you open more pages from the disk? That happens because the other instances, before closing, tell the running instance to open those files. Similar behavior can be incorporated into any application with some extension to the class shown in the tip/trick. The extension is a bit involved and warranted a full fledged article.

In this day when C# on .NET is the number one choice for Windows UI programming, I don’t know if this C++ class that uses Win32 API holds any value; nonetheless, I want to share it. All the development was done on MSVC6 and tested on WinXP SP 3, but I suppose this must be able to run on all Win32 platforms.

In the course of this article, I might come across as wordy and pedantic. I choose to be so because there is a lot of stuff dealing with system programming with which most people might not be familiar. Yet, I don’t intend to replace any book or MSDN. I'll just briefly explain things relevant to the subject and leave the rest to be got from MSDN or the web. If you happen to be at ease with these concepts, you may skim through.

The Usage

The class SingleInstanceGuard provides a simple and intuitive interface.

Collapse
class
 SingleInstanceGuard
{
public :
       class Exception
       {
       public :
              enum REASON
              {
                     DIFFERENT_GUARDS,
                     UNABLE_TO_CHECK,
                     UNABLE_TO_READ,
                     UNABLE_TO_WRITE,
                     UNABLE_TO_ALERT,
                     SHARING_WITH_SELF,
                     DATA_TOO_BIG,
                     OPERATION_NOT_SUPPORTED
              };
              REASON m_r;
              Exception(REASON r):m_r(r){}
       };

       // This is the alert message that would be sent to the
       // running instance by the other instances
       static UINT SIGM_ALERT;

       SingleInstanceGuard(const char *pID, long nSharedDataSize=-1 );
       ~SingleInstanceGuard();

       void SetTargetWindow(HWND h);
       bool AlreadyRunning();
       template < class DATA> SingleInstanceGuard& operator < <
(const DATA &d){return Write((void *)&d, sizeof (d));}
       SingleInstanceGuard& operator < < (const std::string &s);
       template < class DATA> bool operator > > (DATA &d){return Read((void *)&d, sizeof (d));}
       bool operator > > (std::string &s);
       void AlertTheRunningInstance();

private :
       SingleInstanceGuard& Write(void *pData, int nize);
       bool Read(void *pData, int nize);
};

The first parameter of the constructor is the ID for the guard. You have to make sure it is unique. The rest of the interface must be pretty much self explanatory. The points of interest here, which are new, are the overloaded operators and AlertTheRunningInstance() , which together help the other instances communicate with the running one. To demonstrate this, three different examples are included. One is a console application, one is a Win32 application and one is an MFC application.

I have to make this very clear at the outset that any application that wishes to incorporate the said behavior must be either an event driven one or a multi threaded one. This is because the application must be capable of queuing or interrupting its jobs so that the alert message issued by other instances may be processed. Among the examples given, Win32 and MFC are inherently event driven while the console is not, so the console is made into a multi threaded application. Note that what the running instance of an application does with the shared data and/or alert message is left to the application logic. Each of these examples does something different.

I’ll begin explaining the usage with Console application.

Collapse
#define
 TAG "
05B6DEE0-D3BB-11DF-9F2A-3D55DFD72085"


struct P{int n;char **params;};

HANDLE hStay = NULL;

unsigned long _stdcall Monitor(void *p);
BOOL WINAPI Handler(DWORD d);

void main(int n, char ** params)
{
SetConsoleCtrlHandler(Handler, TRUE);
hStay = CreateEvent(NULL, FALSE, FALSE, NULL);
P *p = new P;
p-> n = n;
p-> params = params;
DWORD tid;
CreateThread(NULL, 0 , Monitor, p, 0 , &tid);
WaitForSingleObject(hStay, INFINITE);
}

unsigned long _stdcall Monitor(void *p)
{
P *pp = (P*)p;

SingleInstanceGuard sig(TAG);
if (sig.AlreadyRunning())
{
for (int k = 1 ; k< pp-> n; k++)
{
string s = pp-> params[k];
sig < < s;
}
sig.AlertTheRunningInstance();
SetEvent(hStay);
delete pp;
return 0 ;
}

MSG msg;
while (::GetMessage(&msg, NULL, 0 , 0 ))
{
if (SingleInstanceGuard::SIGM_ALERT == msg.message)
{
cout < < " Received these from other instance: " ;
string s;
while (sig > > s)
cout < < s.c_str() < < " " ;
cout < < endl;
}
}
delete pp;
return 0 ;
}

BOOL WINAPI Handler(DWORD d)
{
if (d == CTRL_C_EVENT)
{
cout < < " Press 'c' to continue and any other key to exit: " ;
char c;
cin > > c;
if (' c' !=c) SetEvent(hStay);
return TRUE;
}
return FALSE;
}

The parameters received by main() are packed into a structure and passed on to the Monitor thread as its parameter. The function WaitForSingleObject(...) used by main() ensures that it doesn’t return immediately causing the application to end. After unpacking the parameters, the Monitor thread checks to see if there is a running instance. If there is, it writes the parameters into the guard, requests for the running instance to be alerted and returns. Before returning, it sets the event which causes main() to come out of the wait state there by closing the application. This is OK since we don’t need the second (or any other) instance to run any more, now that the data is shared. If however there was no running instance, making this the first one, it is going to go into message loop. Upon receiving the message SingleInstanceGuard::SIGM_ALERT , which would be posted by other instances through a call to AlertTheRunningInstance() , the running instance reads back the shared data and prints them. Then it goes on to wait for other possible alerts. This instance will keep running until either the console window is closed or main() comes out of the waiting. To achieve the latter, a handler for the Ctrl+c is installed, which will be called when the key combination is hit. This handler is necessary in order to extract some kind of input from the user. Upon typing anything other than ‘c ’, the event is set which causes main() to come out of the waiting and the application ends. A small batch file is provided with the example to test the scenario where multiple instances open up.

The key thing that you must have got out of this example is to be able to imagine which code is for the running instance and which code is for the others. This is going to remain important irrespective of the application model.

The Win32 example is a simple one. There is no data to be shared and the running instance is just going to flash and come to front.

Collapse
#define
 TAG "
SingleInstanceGuardTest_Win32"


LRESULT CALLBACK WndProc (HWND hwnd, UINT message, WPARAM wParam, LPARAM lParam)
{
if (SingleInstanceGuard::SIGM_ALERT == message)
{
FlashWindow(hwnd, TRUE);
::SetForegroundWindow(hwnd);
return 0 ;
}

switch (message)
{
case WM_DESTROY:
PostQuitMessage (0 ) ;
return 0 ;
}

return DefWindowProc (hwnd, message, wParam, lParam) ;
}
int WINAPI WinMain (HINSTANCE hInstance, HINSTANCE hPrevInstance,
                    PSTR szCmdLine, int iCmdShow)
{
SingleInstanceGuard sig(TAG);
if (sig.AlreadyRunning())
{
sig.AlertTheRunningInstance();
return 0 ;
}

static TCHAR szAppName[] = TEXT (" HelloWin" ) ;
HWND         hwnd ;
MSG          msg ;
WNDCLASS     wndclass ;

wndclass.style         = CS_HREDRAW | CS_VREDRAW ;
wndclass.lpfnWndProc   = WndProc  ;
wndclass.cbClsExtra    = 0 ;
wndclass.cbWndExtra    = 0 ;
wndclass.hInstance     = hInstance ;
wndclass.hIcon         = LoadIcon (NULL, IDI_APPLICATION) ;
wndclass.hCursor       = LoadCursor (NULL, IDC_ARROW) ;
wndclass.hbrBackground = (HBRUSH) GetStockObject (WHITE_BRUSH) ;
wndclass.lpszMenuName  = NULL ;
wndclass.lpszClassName = szAppName ;

if (!RegisterClass (&wndclass))
{
MessageBox (NULL, TEXT (" This program requires Windows NT!" ),
szAppName, MB_ICONERROR) ;
return 0 ;
}
hwnd = CreateWindow (szAppName,                  // window class name
TEXT (" The Hello Program" ), // window caption
WS_OVERLAPPEDWINDOW,        // window style
CW_USEDEFAULT,              // initial x position
CW_USEDEFAULT,              // initial y position
CW_USEDEFAULT,              // initial x size
CW_USEDEFAULT,              // initial y size
NULL,                       // parent window handle
NULL,                       // window menu handle
hInstance,                  // program instance handle
NULL) ;                     // creation parameters

ShowWindow (hwnd, iCmdShow) ;
UpdateWindow (hwnd) ;
sig.SetTargetWindow(hwnd);

while (GetMessage (&msg, NULL, 0 , 0 ))
{
TranslateMessage (&msg) ;
DispatchMessage (&msg) ;
}
return msg.wParam ;
}

The SetTargetWindow(...) takes as its parameter the window in the running instance that is supposed to receive the alert message. This function is relevant to GUI applications and must be used without fail. The importance of this function is explained later.

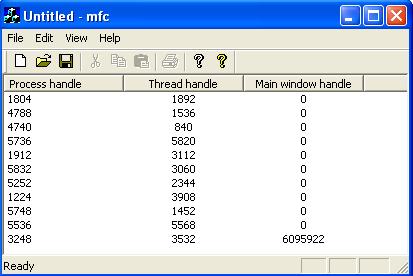
The MFC example follows along the same lines as the other two. However, in order to make it a bit interesting, the MFC application logs (latest one first) the process id, the thread id and the active window handle shared by other instances. Because of the nature of the MFC application source code, only those relevant to the discussion are shown below:

Collapse
///
//////////////////////////////////////////////////////////////////////////
// CMfcApp initialization

#define TAG " SingleInstanceGuardTest_MFC"

// ** IMPORTANT **
// This must be a non local object. If otherwise, say when local to InitInstance(),
// after the function returns this object will destroyed which removes the guard event,
// effectively rendering the whole effort worthless since every instance IS going to
// create a brand new event.

SingleInstanceGuard g_sig(TAG);

void Fill(DWORD dwProcess, DWORD dwThread, DWORD window)
{
       CListView *pView  = (CListView*)((CFrameWnd*)theApp.m_pMainWnd)-> GetActiveView();
       CListCtrl &listCtrl = pView-> GetListCtrl();
       CString str;
       str.Format(" %d" , dwProcess);
       listCtrl.InsertItem(0 , str);
       str.Format(" %d" , dwThread);
       listCtrl.SetItem(0 , 1 , LVIF_TEXT, str, 0 , 0 , 0 , 0 );
       str.Format(" %d" , window);
       listCtrl.SetItem(0 , 2 , LVIF_TEXT, str, 0 , 0 , 0 , 0 );
}

BOOL CMfcApp::OnSIGAlert(WPARAM, LPARAM)
{
       DWORD dwProcess, dwThread, window;
       g_sig > > dwProcess;
       g_sig > > dwThread;
       g_sig > > window;
       Fill(dwProcess, dwThread, window);
       m_pMainWnd-> SetForegroundWindow();
       return TRUE;
}

BOOL CMfcApp::InitInstance()
{
       DWORD dwProcess = ::GetCurrentProcessId();
       DWORD dwThread = ::GetCurrentThreadId();
       if (g_sig.AlreadyRunning())
       {
              HWND h = m_pMainWnd-> GetSafeHwnd();
              g_sig < < dwProcess < < dwThread < < (DWORD)h;
              g_sig.AlertTheRunningInstance();
              return FALSE;
       }

       // other code

       HWND h = m_pMainWnd-> GetSafeHwnd();
       g_sig.SetTargetWindow(h);
       Fill(dwProcess, dwThread, (DWORD)h);
       return TRUE;
}

/// //////////////////////////////////////////////////////////////////////////
// CMainFrame

IMPLEMENT_DYNCREATE(CMainFrame, CFrameWnd)

BEGIN_MESSAGE_MAP(CMainFrame, CFrameWnd)
         // {{AFX_MSG_MAP(CMainFrame)
                 // NOTE - the ClassWizard will add and remove mapping macros here.
                 //     DO NOT EDIT what you see in these blocks of generated code !
         ON_WM_CREATE()
         // }}AFX_MSG_MAP
         ON_REGISTERED_MESSAGE(SingleInstanceGuard::SIGM_ALERT, OnSIGAlert)
END_MESSAGE_MAP()

BOOL CMainFrame::OnSIGAlert(WPARAM w, LPARAM l)
{
    return ((CMfcApp*)AfxGetApp())-> OnSIGAlert(w, l);
}

This is a simple SDI application with a CListView derived class for the view. The ON_REGISTERED_MESSAGE macro takes care of calling the OnSIGAlert(...) function when the alert message is issued by the other instances. The rest of the snippet is just about logging the shared information. The following screen shot shows what it looks like:

How Does It Work?

There are two aspects to the SingleInstanceGuard class. One is checking if an instance is already running and the other is sharing data with the running instance.

The checking is done in essentially the same way as described in that tip/trick.

Collapse
bool
 IsAlreadyRunning(const
 char
*pid)
{
            g_hGuardEvent = CreateEvent(NULL, FALSE, FALSE, pid);
            return ERROR_ALREADY_EXISTS==GetLastError();;
}
bool SingleInstanceGuard::AlreadyRunning()
{
            return g_bRunning;
}

The flag g_bRunning is initialized in the constructor.

The sharing part can be divided into two aspects. One is sharing the data and the other is alerting the running instance. The second parameter the constructor takes is the desired size of the data to be shared. It is a minimum of 4KB by default, which should be more than sufficient to fulfill almost all scenarios. To understand how the sharing is done, we need to dig a bit into the details.

You have to know that each process will get its own virtual memory space in which to run. What this means is, in normal circumstances, although any two processes might have the exact same addresses within their memory space, the data present there will be not accessible to the other. This applies to multiple instances of one application as well (for the OS, it hardly matters if more than one process was created from the same .exe file on the disk). So the only way to share data across processes would be to put data in some place form where all the processes can access it. A simple and naïve way would be to put in a file, say in the temporary folder, but that is not good as the file could be deleted from there or even get corrupted, for a variety of reasons. One way to avoid this would be to lock the file. This however leads to no other process but the one that locked it having permission to access it, effectively failing the purpose.

This is where a memory mapped file helps us. Memory mapped file (MMF) is a kernel object that deals with memory. MMF is what serves as the base most implementation of all cross process data sharing techniques, including WM_COPYDATA . As the name suggests, MMF is a file that is mapped into a memory location. Once the file is mapped, its contents can be accessed as a stream of bytes, much like that of an array. This greatly simplifies data manipulation. Also, this file could be locked by a process (usually the one that creates it) and yet, other processes can map its contents into memory and access it. This implies that we would have to first create a disk file and then map it. But when the size of the data to be shared is not very big, like in this case, we can avoid the chore of creating (and later deleting) a separate disk file and use the system paging file instead. Paging file is the disk file maintained by the OS to implement virtual memory.

Any kernel object can be created named or unnamed and the named ones could be shared across processes if the name is known to all the processes. So a named MMF is what we will be using to share the data. Although the data is successfully shared using MMF, there still is a chance of corruption due to simultaneous reading and writing by several instances. Like any other shared data, this must be protected against that. The obvious way to achieve this is through a mutex, but I am going to use two event objects. I’ll tell the reason in a bit. Note that even these event objects must be shared across the instances.

There are some ground rules to access our MMF. The first instance only reads the data and the other instances only write the data. Writing or reading can happen only when the MMF is free. At any given point of time when the MMF is in use, either a write operation or a read operation will be taking place.

Before I add more words, let us look at the constructor that will elucidate.

Collapse
SingleInstanceGuard::SingleInstanceGuard(const
 char
 *pID, long
 nSharedDataSize/*
-1*/
)
{
    g_pid = pID;

            if (nSharedDataSize > MINIMUM_MMF_SIZE)
                        g_nSharedDataSize = nSharedDataSize;
            g_bRunning = IsAlreadyRunning(g_pid);

            /* create/open the other kernel objects */

            string strMMF = g_pid;
            strMMF += " MMF" ;

            string strCanRead = g_pid;
            strCanRead += " CanRead" ;

            string strCanWrite = g_pid;
            strCanWrite += " CanWrite" ;

            string strAlert = g_pid;
            strAlert += " AlertMessage" ;

            if (g_bRunning)
            {
                        /* Open the MMF */

                        g_hMMF = OpenFileMapping(FILE_MAP_READ |
FILE_MAP_WRITE, FALSE, strMMF.c_str());

                        /* Read out the communication information */

                        char *pBytes = (char *)MapViewOfFile(g_hMMF,
FILE_MAP_ALL_ACCESS, 0 , 0 , 0 );

                        if (0==pBytes)
                                    throw Exception(Exception::UNABLE_TO_CHECK);

                        long nSize;
                        memcpy((void *)&nSize, pBytes, sizeof (long ));

                        if (nSize != g_nSharedDataSize)
                                    throw Exception(Exception::DIFFERENT_GUARDS);

                        g_nBytesRW += sizeof (long );

                        UnmapViewOfFile(pBytes);

                        /* open the control kernel objects */

                        g_hCanReadData = CreateEvent(NULL, FALSE,
FALSE, strCanRead.c_str());
                        g_hCanWriteData = CreateEvent(NULL, FALSE,
FALSE, strCanWrite.c_str());
            }
            else
            {
                        /* register the alert message */

                        SIGM_ALERT = ::RegisterWindowMessage(strAlert.c_str());

                        /* Create the control kernel objects */

                        g_hCanReadData = CreateEvent(NULL, FALSE,
FALSE, strCanRead.c_str());

                        g_hCanWriteData = CreateEvent(NULL, FALSE,
                                    TRUE,  // allow the first copy to proceed
      // to write without waiting
                                    strCanWrite.c_str());

                        /* create the MMF (backed by the system paging file) */

                        long nMMFSize = sizeof (long ) // space for the said size
                                                     // value itself, to verify later
                                    + sizeof (long )// size of data actually shared
                                    + g_nSharedDataSize;// the said size itself

                        g_hMMF = CreateFileMapping(INVALID_HANDLE_VALUE,
NULL, PAGE_READWRITE, 0 , nMMFSize, strMMF.c_str());

                        /* Write out the communication information */

                        char *pBytes = (char *)MapViewOfFile
(g_hMMF, FILE_MAP_ALL_ACCESS, 0 , 0 , 0 );

                        if (0==pBytes)
                                    throw Exception(Exception::UNABLE_TO_CHECK);

                        memcpy(pBytes+g_nBytesRW, (void *)&g_nSharedDataSize,
sizeof (g_nSharedDataSize));
                        g_nBytesRW += sizeof (g_nSharedDataSize);

                        long W = 0 ;// written size
                        memcpy(pBytes+g_nBytesRW, (void *)&W, sizeof (W));
                        g_nBytesRW += sizeof (W);

                        UnmapViewOfFile(pBytes);

                        /* mark the thread id and create the alert monitor */

                        g_dwFirstInstanceThreadId = GetCurrentThreadId();

                        DWORD tid;
                        CreateThread(NULL, 0 , AlertMonitor, NULL, 0 , &tid);
            }

            g_nBytesRW = 0 ;
}

The variable g_bRunning holds a flag indicating whether an instance is already running. This check is needed throughout and this flag helps reduce multiple calls to CreateEvent(…) . If an instance is running, it (the other instance) is going to open the events and the MMF. If not, the first instance will create them. There are two events namely g_hCanWriteData and g_hCanReadData which guard the writing and reading of the MMF respectively. The first parameter CreateFileMapping(…) takes is the disk file handle. Passing INVALID_HANDLE_VALUE indicates that we intend to use the paging file. The size of our MMF is more than just the data size. Apart from the data, it also contains the intended size of the data and the size of the data actually written. The former is a check to avoid using a different guard’s MMF. This is not particularly useful in regular cases but when you need to share data above 4KB in some apps and use the same name mistakenly in more than one app, this will come in handy. The latter, the size of data actually written, is useful in extracting data from MMF. This is how the MMF stream looks like:

The functions MapViewOfFile(...) and UnmapViewOfFile(...) do the mapping and unmapping of the file respectively. It is important to unmap the file when the job is done. The first instance also registers the alert message, marks the thread id and creates the monitor thread. As you notice, appropriate exceptions are thrown when things fail, so it is advisable to use this class within a try /catch block (although I haven’t done so in the simple examples).

Collapse
unsigned
 long
 _stdcall AlertMonitor(void
*)
{
            while (1 )
            {
                        WaitForSingleObject(g_hCanReadData, INFINITE);

                        g_nBytesRW = 0 ;
                        g_nWrittenDataSize = -1 ;

                        if (NULL != g_hWndFirstInstanceWindow)
                          PostMessage(g_hWndFirstInstanceWindow,
SingleInstanceGuard::SIGM_ALERT, 0 , 0 );
                        else
                          PostThreadMessage(g_dwFirstInstanceThreadId,
SingleInstanceGuard::SIGM_ALERT, 0 , 0 );
            }
            return 0 ;
}

The function WaitForSingleObject(...) is a very crucial function in the implementation of this class and must be understood. The first parameter is the handle of any kernel object and the second parameter is the time in milliseconds. This function causes the calling thread to wait until at least the specified number of milliseconds. INFINITE indicates the thread has to wait until the kernel object is signaled. There are other reasons for a thread to come out of the wait state but those won’t apply here.

This thread is very simple. It waits till it is allowed to read from the MMF. It then resets the size of data read and the size of data to be read. The variable g_nBytesRW might indicate the bytes read or the bytes written depending on the instance. The variable g_nWrittenDataSize is valid only in the reading instance, the first one, and helps in reading data from the MMF. It then posts the alert message. Remember, we are with the first instance here. It is in response to this message that the first instance reads data.

The window handle g_hWndFirstInstanceWindow is set by the first instance through SetTargetWindow(...) . There is a reason why the message is posted to the window if it is set. When a message is posted to a GUI thread as opposed to a window, it can be lost while a window owned by the thread is being moved, resized, etc. or when in a modal loop. The former case is less likely to happen in a single user session than the latter. Even if a GUI client is not going to have any modal loops, it is best to set the target window to avoid subtle bugs.

Collapse
void
 SingleInstanceGuard::SetTargetWindow(HWND h)
{
    if (g_bRunning)// only the first instance needs this
        throw Exception(Exception::OPERATION_NOT_SUPPORTED);
    g_hWndFirstInstanceWindow = h;
}

The overloaded operators used to read and write data simply call the Read(...) and Write(...) functions.

Collapse
bool
 SingleInstanceGuard::Read(void
 *pData, int
 nSize)
{
            // This is called only after successful wait on g_hCanRead
            // from the monitor thread.
            // So no need to wait here

            if (g_bRunning)// only first instance must read
                        throw Exception(Exception::SHARING_WITH_SELF);

            if (g_nBytesRW == g_nWrittenDataSize)
                        return false ;// no more read

            if (g_nBytesRW + nSize > g_nSharedDataSize)
                        throw Exception(Exception::DATA_TOO_BIG);

            char *pBytes = (char *)MapViewOfFile(g_hMMF, FILE_MAP_ALL_ACCESS, 0 , 0 , 0 );

            if (0==pBytes)
                        throw Exception(Exception::UNABLE_TO_READ);

            if (g_nWrittenDataSize < 0 )
            {
                        g_nWrittenDataSize = *(long *)(pBytes+sizeof(long ));
                        // reset so that an empty alert after a shared
                        // data alert won't read wrong data
                        *(long *)(pBytes+sizeof(long )) = 0 ;
            }

            if (0 == g_nWrittenDataSize)
            {
                        SetEvent(g_hCanWriteData);// let others write
                        return false ;
            }

            memcpy(pData, pBytes+sizeof(long )+sizeof(long )+g_nBytesRW, nSize);
            g_nBytesRW += nSize;
            UnmapViewOfFile(pBytes);

            if (g_nBytesRW == g_nWrittenDataSize)

                        SetEvent(g_hCanWriteData);// let others write

            return true ;
}

This function returns true /false to indicate if further read can happen. This makes the operator >> while loop compliant. When it is found that there is no data to be read or all the data has been read, it signals that the MMF is free for writing. Any waiting instance will then go on to write.

Collapse
SingleInstanceGuard& SingleInstanceGuard::Write(void
 *pData, int
 nSize)
{
            if (!g_bRunning)// first instance needn't write anything
                        throw Exception(Exception::SHARING_WITH_SELF);

            if (!g_bHasWrittenPreviously)
                        WaitForSingleObject(g_hCanWriteData, INFINITE);

            g_bHasWrittenPreviously = true ;

            if (g_nBytesRW + nSize > g_nSharedDataSize)
                        throw Exception(Exception::DATA_TOO_BIG);

            char *pBytes = (char *)MapViewOfFile(g_hMMF, FILE_MAP_ALL_ACCESS, 0 , 0 , 0 );

            if (0==pBytes)
                        throw Exception(Exception::UNABLE_TO_WRITE);

            memcpy(pBytes+sizeof(long )+sizeof(long )+g_nBytesRW, pData, nSize);
            g_nBytesRW += nSize;
            UnmapViewOfFile(pBytes);

            return *this ;
}

It waits until it is allowed to write. Note here that, as per rules, this will happen only in the other instances. You might have noticed in the first instance part of the constructor that the event g_hCanWriteData is created signaled unlike g_hCanReadData . This is done so that the second instance need not wait for any signal to write. If it has to wait, it will wait forever since the only time this event will be signaled is when a read operation was attempted and completed by the first instance. That would lead to a deadlock if instances have to share data. Note that even if you start more instances at the exact same time, one of them as chosen by the OS will end up becoming the second one. The others will be queued.

This brings me to explain why I chose events over mutex. It isn’t sufficient to just allow access to the MMF in sequence but it is also important to allow it when it is appropriate. Mutex just helps queuing the access but events help timing them. With judicious usage of events, a mutex like queuing can also be achieved. The variable g_bHasWrittenPreviously helps in this regard.

The alerting is simple. It sets the g_hCanRead event which wakes the AlertMonitor(...) of the first instance. But before that, it updates the actual data size written if any writing was attempted.

Collapse
void
 SingleInstanceGuard::AlertTheRunningInstance()
{
            if (!g_bHasWrittenPreviously)
                        WaitForSingleObject(g_hCanWriteData, INFINITE);
            else
            {
                        // write the number of bytes written into the MMF into the MMF
                        char *pBytes = (char *)MapViewOfFile
(g_hMMF, FILE_MAP_ALL_ACCESS, 0 , 0 , 0 );
                        if (0==pBytes)
                                    throw Exception(Exception::UNABLE_TO_ALERT);
                        *(long *)(pBytes + sizeof (long )) = g_nBytesRW;
                        UnmapViewOfFile(pBytes);
            }
            g_bHasWrittenPreviously = false ;
            // alert
            SetEvent(g_hCanReadData);
}

The destructor closes all the handles. Any kernel object created/opened must be closed when no longer needed. Every kernel object has a usage counter which is incremented on every creation/opening and every closing will decrement it. Only when the counter reaches zero will the object be destroyed, so these kernel objects will be destroyed only after the first instance exits. Within other instances, when there was no data shared, it also sets the g_hCanWriteData that allows the queued instances to write their data.

Collapse
SingleInstanceGuard::~SingleInstanceGuard()
{
            // This is necessary when other instances won't share data and simply alert.
            // g_nBytesRW is the written bytes wrt other instance
            if (g_bRunning && (0==g_nBytesRW))
                        SetEvent(g_hCanWriteData);

            CloseHandle(g_hGuardEvent);
            CloseHandle(g_hCanWriteData);
            CloseHandle(g_hCanReadData);
            CloseHandle(g_hMMF);
}

Notes

  • There are a total of three event objects involved in the implementation. One is a dummy object and the other two actually serve the original purpose of events, timing a thread’s resumption.
  • Both overloaded operators are explicitly disabled for char* . I have forced the clients to use std::string as it would be a chore to, especially, read back the char* which might lead to unsuspecting memory leaks.
  • You may incorporate overloads for other data structures like vector, map, etc. if your application demands it. The implementation of std::string must be able to serve as an idea.
  • Each application must incorporate its own data format for sharing. In simple terms, the read and write must match.
  • It is extremely important to make sure the name you pass as the first parameter is unique. It would be a disaster if more than one application uses the same name, say "MyApp ". Use a GUID for the name.
  • Although globals are used for the implementation, it must be alright as each of these would be in separate processes.
  • If you inspect the code a bit closely, you will realize that a class was not necessary. This could as well have been done with just a couple of C style functions, as even the implementation itself depends on global variables and functions. True, but I chose a C++ style class mainly for the ease of use, especially for the convenience of the overloaded operators. With C style functions, one would have had to use “ugly” syntax similar to the Read(...) and Write(...) but with the operators, things look clean and simple. I tend to mix these two programming paradigms in situations like these.
  • Use this class within a try /catch block just to be safe (although I haven’t done so in these simple examples).

Changes in Version 1.1

Added a public function void SetTargetWindow(HWND h) to fix a nasty bug. In version 1.0, the alert message was always posted to the thread of the first instance. That mechanism would crash and burn in a GUI app, especially when the app was in a modal loop and data was supposed to be shared across the instances. When a GUI app would be in a modal loop, the messages that have no target window (like when posted to the thread) would be eaten and not delivered. Other instances waiting to write data would go into limbo because the permission is never set. This is because when data is shared, the write permission would be given by the first instance after it has finished reading in response to the alert message but the message is never delivered to the thread. The instances would remain in the memory (although they won't appear on screen).

Thanks to Victor Nijegorodov for pointing out that PostThreadMesage(...) must not be used with GUI threads.

You may test this scenario with the updated MFC app. It has a white colored question mark button on the toolbar and clicking it would open a modal message box. Modify the source code and compare. In the app class, comment the SetTargetWindow(...) and add ON_REGISTERED_MESSAGE(SingleInstanceGuard::SIGM_ALERT, OnSIGAlert) to the message map. When the modal box is on and you attempt to fire up another instance, the instance won't appear but it will remain in memory waiting for the never to be got write permission. Open the Windows Task Manager while testing and you will see how the app name keeps adding to the list in the Process tab. However, not sharing any data (with the modified code) won't cause this but, as I said, it is best to set the target window in GUI apps.

History

  • 12th October, 2010: Version 1.0
  • 20th October, 2010: Version 1.1

License

This article, along with any associated source code and files, is licensed under The Code Project Open License (CPOL)

About the Author:bleedingfingers

I am Vinay MS. (male).I am from Bangalore,yup,the (in)famous city that has lent its name to that (in)famous verb that helped a half-Kenyan become the world's most powerful man.

protected-mode no port 6379 tcp-backlog 511 timeout 0 tcp-keepalive 300 daemonize no pidfile /var/run/redis_6379.pid loglevel notice logfile "" databases 16 always-show-logo no set-proc-title yes proc-title-template "{title} {listen-addr} {server-mode}" stop-writes-on-bgsave-error yes rdbcompression yes rdbchecksum yes dbfilename dump.rdb rdb-del-sync-files no dir ./ replica-serve-stale-data yes replica-read-only yes repl-diskless-sync no repl-diskless-sync-delay 5 repl-diskless-load disabled repl-disable-tcp-nodelay no replica-priority 100 acllog-max-len 128 requirepass Guyuan@2021 # New users are initialized with restrictive permissions by default, via the # equivalent of this ACL rule 'off resetkeys -@all'. Starting with Redis 6.2, it # is possible to manage access to Pub/Sub channels with ACL rules as well. The # default Pub/Sub channels permission if new users is controlled by the # acl-pubsub-default configuration directive, which accepts one of these values: # # allchannels: grants access to all Pub/Sub channels # resetchannels: revokes access to all Pub/Sub channels # # To ensure backward compatibility while upgrading Redis 6.0, acl-pubsub-default # defaults to the 'allchannels' permission. # # Future compatibility note: it is very likely that in a future version of Redis # the directive's default of 'allchannels' will be changed to 'resetchannels' in # order to provide better out-of-the-box Pub/Sub security. Therefore, it is # recommended that you explicitly define Pub/Sub permissions for all users # rather then rely on implicit default values. Once you've set explicit # Pub/Sub for all existing users, you should uncomment the following line. # # acl-pubsub-default resetchannels # Command renaming (DEPRECATED). # # ------------------------------------------------------------------------ # WARNING: avoid using this option if possible. Instead use ACLs to remove # commands from the default user, and put them only in some admin user you # create for administrative purposes. # ------------------------------------------------------------------------ # # It is possible to change the name of dangerous commands in a shared # environment. For instance the CONFIG command may be renamed into something # hard to guess so that it will still be available for internal-use tools # but not available for general clients. # # Example: # # rename-command CONFIG b840fc02d524045429941cc15f59e41cb7be6c52 # # It is also possible to completely kill a command by renaming it into # an empty string: # # rename-command CONFIG "" # # Please note that changing the name of commands that are logged into the # AOF file or transmitted to replicas may cause problems. ################################### CLIENTS #################################### # Set the max number of connected clients at the same time. By default # this limit is set to 10000 clients, however if the Redis server is not # able to configure the process file limit to allow for the specified limit # the max number of allowed clients is set to the current file limit # minus 32 (as Redis reserves a few file descriptors for internal uses). # # Once the limit is reached Redis will close all the new connections sending # an error 'max number of clients reached'. # # IMPORTANT: When Redis Cluster is used, the max number of connections is also # shared with the cluster bus: every node in the cluster will use two # connections, one incoming and another outgoing. It is important to size the # limit accordingly in case of very large clusters. # # maxclients 10000 ############################## MEMORY MANAGEMENT ################################ # Set a memory usage limit to the specified amount of bytes. # When the memory limit is reached Redis will try to remove keys # according to the eviction policy selected (see maxmemory-policy). # # If Redis can't remove keys according to the policy, or if the policy is # set to 'noeviction', Redis will start to reply with errors to commands # that would use more memory, like SET, LPUSH, and so on, and will continue # to reply to read-only commands like GET. # # This option is usually useful when using Redis as an LRU or LFU cache, or to # set a hard memory limit for an instance (using the 'noeviction' policy). # # WARNING: If you have replicas attached to an instance with maxmemory on, # the size of the output buffers needed to feed the replicas are subtracted # from the used memory count, so that network problems / resyncs will # not trigger a loop where keys are evicted, and in turn the output # buffer of replicas is full with DELs of keys evicted triggering the deletion # of more keys, and so forth until the database is completely emptied. # # In short... if you have replicas attached it is suggested that you set a lower # limit for maxmemory so that there is some free RAM on the system for replica # output buffers (but this is not needed if the policy is 'noeviction'). # # maxmemory <bytes> # MAXMEMORY POLICY: how Redis will select what to remove when maxmemory # is reached. You can select one from the following behaviors: # # volatile-lru -> Evict using approximated LRU, only keys with an expire set. # allkeys-lru -> Evict any key using approximated LRU. # volatile-lfu -> Evict using approximated LFU, only keys with an expire set. # allkeys-lfu -> Evict any key using approximated LFU. # volatile-random -> Remove a random key having an expire set. # allkeys-random -> Remove a random key, any key. # volatile-ttl -> Remove the key with the nearest expire time (minor TTL) # noeviction -> Don't evict anything, just return an error on write operations. # # LRU means Least Recently Used # LFU means Least Frequently Used # # Both LRU, LFU and volatile-ttl are implemented using approximated # randomized algorithms. # # Note: with any of the above policies, when there are no suitable keys for # eviction, Redis will return an error on write operations that require # more memory. These are usually commands that create new keys, add data or # modify existing keys. A few examples are: SET, INCR, HSET, LPUSH, SUNIONSTORE, # SORT (due to the STORE argument), and EXEC (if the transaction includes any # command that requires memory). # # The default is: # # maxmemory-policy noeviction # LRU, LFU and minimal TTL algorithms are not precise algorithms but approximated # algorithms (in order to save memory), so you can tune it for speed or # accuracy. By default Redis will check five keys and pick the one that was # used least recently, you can change the sample size using the following # configuration directive. # # The default of 5 produces good enough results. 10 Approximates very closely # true LRU but costs more CPU. 3 is faster but not very accurate. # # maxmemory-samples 5 # Eviction processing is designed to function well with the default setting. # If there is an unusually large amount of write traffic, this value may need to # be increased. Decreasing this value may reduce latency at the risk of # eviction processing effectiveness # 0 = minimum latency, 10 = default, 100 = process without regard to latency # # maxmemory-eviction-tenacity 10 # Starting from Redis 5, by default a replica will ignore its maxmemory setting # (unless it is promoted to master after a failover or manually). It means # that the eviction of keys will be just handled by the master, sending the # DEL commands to the replica as keys evict in the master side. # # This behavior ensures that masters and replicas stay consistent, and is usually # what you want, however if your replica is writable, or you want the replica # to have a different memory setting, and you are sure all the writes performed # to the replica are idempotent, then you may change this default (but be sure # to understand what you are doing). # # Note that since the replica by default does not evict, it may end using more # memory than the one set via maxmemory (there are certain buffers that may # be larger on the replica, or data structures may sometimes take more memory # and so forth). So make sure you monitor your replicas and make sure they # have enough memory to never hit a real out-of-memory condition before the # master hits the configured maxmemory setting. # # replica-ignore-maxmemory yes # Redis reclaims expired keys in two ways: upon access when those keys are # found to be expired, and also in background, in what is called the # "active expire key". The key space is slowly and interactively scanned # looking for expired keys to reclaim, so that it is possible to free memory # of keys that are expired and will never be accessed again in a short time. # # The default effort of the expire cycle will try to avoid having more than # ten percent of expired keys still in memory, and will try to avoid consuming # more than 25% of total memory and to add latency to the system. However # it is possible to increase the expire "effort" that is normally set to # "1", to a greater value, up to the value "10". At its maximum value the # system will use more CPU, longer cycles (and technically may introduce # more latency), and will tolerate less already expired keys still present # in the system. It's a tradeoff between memory, CPU and latency. # # active-expire-effort 1 ############################# LAZY FREEING #################################### # Redis has two primitives to delete keys. One is called DEL and is a blocking # deletion of the object. It means that the server stops processing new commands # in order to reclaim all the memory associated with an object in a synchronous # way. If the key deleted is associated with a small object, the time needed # in order to execute the DEL command is very small and comparable to most other # O(1) or O(log_N) commands in Redis. However if the key is associated with an # aggregated value containing millions of elements, the server can block for # a long time (even seconds) in order to complete the operation. # # For the above reasons Redis also offers non blocking deletion primitives # such as UNLINK (non blocking DEL) and the ASYNC option of FLUSHALL and # FLUSHDB commands, in order to reclaim memory in background. Those commands # are executed in constant time. Another thread will incrementally free the # object in the background as fast as possible. # # DEL, UNLINK and ASYNC option of FLUSHALL and FLUSHDB are user-controlled. # It's up to the design of the application to understand when it is a good # idea to use one or the other. However the Redis server sometimes has to # delete keys or flush the whole database as a side effect of other operations. # Specifically Redis deletes objects independently of a user call in the # following scenarios: # # 1) On eviction, because of the maxmemory and maxmemory policy configurations, # in order to make room for new data, without going over the specified # memory limit. # 2) Because of expire: when a key with an associated time to live (see the # EXPIRE command) must be deleted from memory. # 3) Because of a side effect of a command that stores data on a key that may # already exist. For example the RENAME command may delete the old key # content when it is replaced with another one. Similarly SUNIONSTORE # or SORT with STORE option may delete existing keys. The SET command # itself removes any old content of the specified key in order to replace # it with the specified string. # 4) During replication, when a replica performs a full resynchronization with # its master, the content of the whole database is removed in order to # load the RDB file just transferred. # # In all the above cases the default is to delete objects in a blocking way, # like if DEL was called. However you can configure each case specifically # in order to instead release memory in a non-blocking way like if UNLINK # was called, using the following configuration directives. lazyfree-lazy-eviction no lazyfree-lazy-expire no lazyfree-lazy-server-del no replica-lazy-flush no # It is also possible, for the case when to replace the user code DEL calls # with UNLINK calls is not easy, to modify the default behavior of the DEL # command to act exactly like UNLINK, using the following configuration # directive: lazyfree-lazy-user-del no # FLUSHDB, FLUSHALL, and SCRIPT FLUSH support both asynchronous and synchronous # deletion, which can be controlled by passing the [SYNC|ASYNC] flags into the # commands. When neither flag is passed, this directive will be used to determine # if the data should be deleted asynchronously. lazyfree-lazy-user-flush no ################################ THREADED I/O ################################# # Redis is mostly single threaded, however there are certain threaded # operations such as UNLINK, slow I/O accesses and other things that are # performed on side threads. # # Now it is also possible to handle Redis clients socket reads and writes # in different I/O threads. Since especially writing is so slow, normally # Redis users use pipelining in order to speed up the Redis performances per # core, and spawn multiple instances in order to scale more. Using I/O # threads it is possible to easily speedup two times Redis without resorting # to pipelining nor sharding of the instance. # # By default threading is disabled, we suggest enabling it only in machines # that have at least 4 or more cores, leaving at least one spare core. # Using more than 8 threads is unlikely to help much. We also recommend using # threaded I/O only if you actually have performance problems, with Redis # instances being able to use a quite big percentage of CPU time, otherwise # there is no point in using this feature. # # So for instance if you have a four cores boxes, try to use 2 or 3 I/O # threads, if you have a 8 cores, try to use 6 threads. In order to # enable I/O threads use the following configuration directive: # # io-threads 4 # # Setting io-threads to 1 will just use the main thread as usual. # When I/O threads are enabled, we only use threads for writes, that is # to thread the write(2) syscall and transfer the client buffers to the # socket. However it is also possible to enable threading of reads and # protocol parsing using the following configuration directive, by setting # it to yes: # # io-threads-do-reads no # # Usually threading reads doesn't help much. # # NOTE 1: This configuration directive cannot be changed at runtime via # CONFIG SET. Aso this feature currently does not work when SSL is # enabled. # # NOTE 2: If you want to test the Redis speedup using redis-benchmark, make # sure you also run the benchmark itself in threaded mode, using the # --threads option to match the number of Redis threads, otherwise you'll not # be able to notice the improvements. ############################ KERNEL OOM CONTROL ############################## # On Linux, it is possible to hint the kernel OOM killer on what processes # should be killed first when out of memory. # # Enabling this feature makes Redis actively control the oom_score_adj value # for all its processes, depending on their role. The default scores will # attempt to have background child processes killed before all others, and # replicas killed before masters. # # Redis supports three options: # # no: Don't make changes to oom-score-adj (default). # yes: Alias to "relative" see below. # absolute: Values in oom-score-adj-values are written as is to the kernel. # relative: Values are used relative to the initial value of oom_score_adj when # the server starts and are then clamped to a range of -1000 to 1000. # Because typically the initial value is 0, they will often match the # absolute values. oom-score-adj no # When oom-score-adj is used, this directive controls the specific values used # for master, replica and background child processes. Values range -2000 to # 2000 (higher means more likely to be killed). # # Unprivileged processes (not root, and without CAP_SYS_RESOURCE capabilities) # can freely increase their value, but not decrease it below its initial # settings. This means that setting oom-score-adj to "relative" and setting the # oom-score-adj-values to positive values will always succeed. oom-score-adj-values 0 200 800 #################### KERNEL transparent hugepage CONTROL ###################### # Usually the kernel Transparent Huge Pages control is set to "madvise" or # or "never" by default (/sys/kernel/mm/transparent_hugepage/enabled), in which # case this config has no effect. On systems in which it is set to "always", # redis will attempt to disable it specifically for the redis process in order # to avoid latency problems specifically with fork(2) and CoW. # If for some reason you prefer to keep it enabled, you can set this config to # "no" and the kernel global to "always". disable-thp yes ############################## APPEND ONLY MODE ############################### # By default Redis asynchronously dumps the dataset on disk. This mode is # good enough in many applications, but an issue with the Redis process or # a power outage may result into a few minutes of writes lost (depending on # the configured save points). # # The Append Only File is an alternative persistence mode that provides # much better durability. For instance using the default data fsync policy # (see later in the config file) Redis can lose just one second of writes in a # dramatic event like a server power outage, or a single write if something # wrong with the Redis process itself happens, but the operating system is # still running correctly. # # AOF and RDB persistence can be enabled at the same time without problems. # If the AOF is enabled on startup Redis will load the AOF, that is the file # with the better durability guarantees. # # Please check https://redis.io/topics/persistence for more information. appendonly yes # The name of the append only file (default: "appendonly.aof") appendfilename "appendonly.aof" # The fsync() call tells the Operating System to actually write data on disk # instead of waiting for more data in the output buffer. Some OS will really flush # data on disk, some other OS will just try to do it ASAP. # # Redis supports three different modes: # # no: don't fsync, just let the OS flush the data when it wants. Faster. # always: fsync after every write to the append only log. Slow, Safest. # everysec: fsync only one time every second. Compromise. # # The default is "everysec", as that's usually the right compromise between # speed and data safety. It's up to you to understand if you can relax this to # "no" that will let the operating system flush the output buffer when # it wants, for better performances (but if you can live with the idea of # some data loss consider the default persistence mode that's snapshotting), # or on the contrary, use "always" that's very slow but a bit safer than # everysec. # # More details please check the following article: # http://antirez.com/post/redis-persistence-demystified.html # # If unsure, use "everysec". # appendfsync always appendfsync everysec # appendfsync no # When the AOF fsync policy is set to always or everysec, and a background # saving process (a background save or AOF log background rewriting) is # performing a lot of I/O against the disk, in some Linux configurations # Redis may block too long on the fsync() call. Note that there is no fix for # this currently, as even performing fsync in a different thread will block # our synchronous write(2) call. # # In order to mitigate this problem it's possible to use the following option # that will prevent fsync() from being called in the main process while a # BGSAVE or BGREWRITEAOF is in progress. # # This means that while another child is saving, the durability of Redis is # the same as "appendfsync none". In practical terms, this means that it is # possible to lose up to 30 seconds of log in the worst scenario (with the # default Linux settings). # # If you have latency problems turn this to "yes". Otherwise leave it as # "no" that is the safest pick from the point of view of durability. no-appendfsync-on-rewrite no # Automatic rewrite of the append only file. # Redis is able to automatically rewrite the log file implicitly calling # BGREWRITEAOF when the AOF log size grows by the specified percentage. # # This is how it works: Redis remembers the size of the AOF file after the # latest rewrite (if no rewrite has happened since the restart, the size of # the AOF at startup is used). # # This base size is compared to the current size. If the current size is # bigger than the specified percentage, the rewrite is triggered. Also # you need to specify a minimal size for the AOF file to be rewritten, this # is useful to avoid rewriting the AOF file even if the percentage increase # is reached but it is still pretty small. # # Specify a percentage of zero in order to disable the automatic AOF # rewrite feature. auto-aof-rewrite-percentage 100 auto-aof-rewrite-min-size 64mb # An AOF file may be found to be truncated at the end during the Redis # startup process, when the AOF data gets loaded back into memory. # This may happen when the system where Redis is running # crashes, especially when an ext4 filesystem is mounted without the # data=ordered option (however this can't happen when Redis itself # crashes or aborts but the operating system still works correctly). # # Redis can either exit with an error when this happens, or load as much # data as possible (the default now) and start if the AOF file is found # to be truncated at the end. The following option controls this behavior. # # If aof-load-truncated is set to yes, a truncated AOF file is loaded and # the Redis server starts emitting a log to inform the user of the event. # Otherwise if the option is set to no, the server aborts with an error # and refuses to start. When the option is set to no, the user requires # to fix the AOF file using the "redis-check-aof" utility before to restart # the server. # # Note that if the AOF file will be found to be corrupted in the middle # the server will still exit with an error. This option only applies when # Redis will try to read more data from the AOF file but not enough bytes # will be found. aof-load-truncated yes # When rewriting the AOF file, Redis is able to use an RDB preamble in the # AOF file for faster rewrites and recoveries. When this option is turned # on the rewritten AOF file is composed of two different stanzas: # # [RDB file][AOF tail] # # When loading, Redis recognizes that the AOF file starts with the "REDIS" # string and loads the prefixed RDB file, then continues loading the AOF # tail. aof-use-rdb-preamble yes ################################ LUA SCRIPTING ############################### # Max execution time of a Lua script in milliseconds. # # If the maximum execution time is reached Redis will log that a script is # still in execution after the maximum allowed time and will start to # reply to queries with an error. # # When a long running script exceeds the maximum execution time only the # SCRIPT KILL and SHUTDOWN NOSAVE commands are available. The first can be # used to stop a script that did not yet call any write commands. The second # is the only way to shut down the server in the case a write command was # already issued by the script but the user doesn't want to wait for the natural # termination of the script. # # Set it to 0 or a negative value for unlimited execution without warnings. lua-time-limit 5000 ################################ REDIS CLUSTER ############################### # Normal Redis instances can't be part of a Redis Cluster; only nodes that are # started as cluster nodes can. In order to start a Redis instance as a # cluster node enable the cluster support uncommenting the following: # # cluster-enabled yes # Every cluster node has a cluster configuration file. This file is not # intended to be edited by hand. It is created and updated by Redis nodes. # Every Redis Cluster node requires a different cluster configuration file. # Make sure that instances running in the same system do not have # overlapping cluster configuration file names. # # cluster-config-file nodes-6379.conf # Cluster node timeout is the amount of milliseconds a node must be unreachable # for it to be considered in failure state. # Most other internal time limits are a multiple of the node timeout. # # cluster-node-timeout 15000 # A replica of a failing master will avoid to start a failover if its data # looks too old. # # There is no simple way for a replica to actually have an exact measure of # its "data age", so the following two checks are performed: # # 1) If there are multiple replicas able to failover, they exchange messages # in order to try to give an advantage to the replica with the best # replication offset (more data from the master processed). # Replicas will try to get their rank by offset, and apply to the start # of the failover a delay proportional to their rank. # # 2) Every single replica computes the time of the last interaction with # its master. This can be the last ping or command received (if the master # is still in the "connected" state), or the time that elapsed since the # disconnection with the master (if the replication link is currently down). # If the last interaction is too old, the replica will not try to failover # at all. # # The point "2" can be tuned by user. Specifically a replica will not perform # the failover if, since the last interaction with the master, the time # elapsed is greater than: # # (node-timeout * cluster-replica-validity-factor) + repl-ping-replica-period # # So for example if node-timeout is 30 seconds, and the cluster-replica-validity-factor # is 10, and assuming a default repl-ping-replica-period of 10 seconds, the # replica will not try to failover if it was not able to talk with the master # for longer than 310 seconds. # # A large cluster-replica-validity-factor may allow replicas with too old data to failover # a master, while a too small value may prevent the cluster from being able to # elect a replica at all. # # For maximum availability, it is possible to set the cluster-replica-validity-factor # to a value of 0, which means, that replicas will always try to failover the # master regardless of the last time they interacted with the master. # (However they'll always try to apply a delay proportional to their # offset rank). # # Zero is the only value able to guarantee that when all the partitions heal # the cluster will always be able to continue. # # cluster-replica-validity-factor 10 # Cluster replicas are able to migrate to orphaned masters, that are masters # that are left without working replicas. This improves the cluster ability # to resist to failures as otherwise an orphaned master can't be failed over # in case of failure if it has no working replicas. # # Replicas migrate to orphaned masters only if there are still at least a # given number of other working replicas for their old master. This number # is the "migration barrier". A migration barrier of 1 means that a replica # will migrate only if there is at least 1 other working replica for its master # and so forth. It usually reflects the number of replicas you want for every # master in your cluster. # # Default is 1 (replicas migrate only if their masters remain with at least # one replica). To disable migration just set it to a very large value or # set cluster-allow-replica-migration to 'no'. # A value of 0 can be set but is useful only for debugging and dangerous # in production. # # cluster-migration-barrier 1 # Turning off this option allows to use less automatic cluster configuration. # It both disables migration to orphaned masters and migration from masters # that became empty. # # Default is 'yes' (allow automatic migrations). # # cluster-allow-replica-migration yes # By default Redis Cluster nodes stop accepting queries if they detect there # is at least a hash slot uncovered (no available node is serving it). # This way if the cluster is partially down (for example a range of hash slots # are no longer covered) all the cluster becomes, eventually, unavailable. # It automatically returns available as soon as all the slots are covered again. # # However sometimes you want the subset of the cluster which is working, # to continue to accept queries for the part of the key space that is still # covered. In order to do so, just set the cluster-require-full-coverage # option to no. # # cluster-require-full-coverage yes # This option, when set to yes, prevents replicas from trying to failover its # master during master failures. However the replica can still perform a # manual failover, if forced to do so. # # This is useful in different scenarios, especially in the case of multiple # data center operations, where we want one side to never be promoted if not # in the case of a total DC failure. # # cluster-replica-no-failover no # This option, when set to yes, allows nodes to serve read traffic while the # the cluster is in a down state, as long as it believes it owns the slots. # # This is useful for two cases. The first case is for when an application # doesn't require consistency of data during node failures or network partitions. # One example of this is a cache, where as long as the node has the data it # should be able to serve it. # # The second use case is for configurations that don't meet the recommended # three shards but want to enable cluster mode and scale later. A # master outage in a 1 or 2 shard configuration causes a read/write outage to the # entire cluster without this option set, with it set there is only a write outage. # Without a quorum of masters, slot ownership will not change automatically. # # cluster-allow-reads-when-down no # In order to setup your cluster make sure to read the documentation # available at https://redis.io web site. ########################## CLUSTER DOCKER/NAT support ######################## # In certain deployments, Redis Cluster nodes address discovery fails, because # addresses are NAT-ted or because ports are forwarded (the typical case is # Docker and other containers). # # In order to make Redis Cluster working in such environments, a static # configuration where each node knows its public address is needed. The # following four options are used for this scope, and are: # # * cluster-announce-ip # * cluster-announce-port # * cluster-announce-tls-port # * cluster-announce-bus-port # # Each instructs the node about its address, client ports (for connections # without and with TLS) and cluster message bus port. The information is then # published in the header of the bus packets so that other nodes will be able to # correctly map the address of the node publishing the information. # # If cluster-tls is set to yes and cluster-announce-tls-port is omitted or set # to zero, then cluster-announce-port refers to the TLS port. Note also that # cluster-announce-tls-port has no effect if cluster-tls is set to no. # # If the above options are not used, the normal Redis Cluster auto-detection # will be used instead. # # Note that when remapped, the bus port may not be at the fixed offset of # clients port + 10000, so you can specify any port and bus-port depending # on how they get remapped. If the bus-port is not set, a fixed offset of # 10000 will be used as usual. # # Example: # # cluster-announce-ip 10.1.1.5 # cluster-announce-tls-port 6379 # cluster-announce-port 0 # cluster-announce-bus-port 6380 ################################## SLOW LOG ################################### # The Redis Slow Log is a system to log queries that exceeded a specified # execution time. The execution time does not include the I/O operations # like talking with the client, sending the reply and so forth, # but just the time needed to actually execute the command (this is the only # stage of command execution where the thread is blocked and can not serve # other requests in the meantime). # # You can configure the slow log with two parameters: one tells Redis # what is the execution time, in microseconds, to exceed in order for the # command to get logged, and the other parameter is the length of the # slow log. When a new command is logged the oldest one is removed from the # queue of logged commands. # The following time is expressed in microseconds, so 1000000 is equivalent # to one second. Note that a negative number disables the slow log, while # a value of zero forces the logging of every command. slowlog-log-slower-than 10000 # There is no limit to this length. Just be aware that it will consume memory. # You can reclaim memory used by the slow log with SLOWLOG RESET. slowlog-max-len 128 ################################ LATENCY MONITOR ############################## # The Redis latency monitoring subsystem samples different operations # at runtime in order to collect data related to possible sources of # latency of a Redis instance. # # Via the LATENCY command this information is available to the user that can # print graphs and obtain reports. # # The system only logs operations that were performed in a time equal or # greater than the amount of milliseconds specified via the # latency-monitor-threshold configuration directive. When its value is set # to zero, the latency monitor is turned off. # # By default latency monitoring is disabled since it is mostly not needed # if you don't have latency issues, and collecting data has a performance # impact, that while very small, can be measured under big load. Latency # monitoring can easily be enabled at runtime using the command # "CONFIG SET latency-monitor-threshold <milliseconds>" if needed. latency-monitor-threshold 0 ############################# EVENT NOTIFICATION ############################## # Redis can notify Pub/Sub clients about events happening in the key space. # This feature is documented at https://redis.io/topics/notifications # # For instance if keyspace events notification is enabled, and a client # performs a DEL operation on key "foo" stored in the Database 0, two # messages will be published via Pub/Sub: # # PUBLISH __keyspace@0__:foo del # PUBLISH __keyevent@0__:del foo # # It is possible to select the events that Redis will notify among a set # of classes. Every class is identified by a single character: # # K Keyspace events, published with __keyspace@<db>__ prefix. # E Keyevent events, published with __keyevent@<db>__ prefix. # g Generic commands (non-type specific) like DEL, EXPIRE, RENAME, ... # $ String commands # l List commands # s Set commands # h Hash commands # z Sorted set commands # x Expired events (events generated every time a key expires) # e Evicted events (events generated when a key is evicted for maxmemory) # t Stream commands # d Module key type events # m Key-miss events (Note: It is not included in the 'A' class) # A Alias for g$lshzxetd, so that the "AKE" string means all the events # (Except key-miss events which are excluded from 'A' due to their # unique nature). # # The "notify-keyspace-events" takes as argument a string that is composed # of zero or multiple characters. The empty string means that notifications # are disabled. # # Example: to enable list and generic events, from the point of view of the # event name, use: # # notify-keyspace-events Elg # # Example 2: to get the stream of the expired keys subscribing to channel # name __keyevent@0__:expired use: # # notify-keyspace-events Ex # # By default all notifications are disabled because most users don't need # this feature and the feature has some overhead. Note that if you don't # specify at least one of K or E, no events will be delivered. notify-keyspace-events "" ############################### GOPHER SERVER ################################# # Redis contains an implementation of the Gopher protocol, as specified in # the RFC 1436 (https://www.ietf.org/rfc/rfc1436.txt). # # The Gopher protocol was very popular in the late '90s. It is an alternative # to the web, and the implementation both server and client side is so simple # that the Redis server has just 100 lines of code in order to implement this # support. # # What do you do with Gopher nowadays? Well Gopher never *really* died, and # lately there is a movement in order for the Gopher more hierarchical content # composed of just plain text documents to be resurrected. Some want a simpler # internet, others believe that the mainstream internet became too much # controlled, and it's cool to create an alternative space for people that # want a bit of fresh air. # # Anyway for the 10nth birthday of the Redis, we gave it the Gopher protocol # as a gift. # # --- HOW IT WORKS? --- # # The Redis Gopher support uses the inline protocol of Redis, and specifically # two kind of inline requests that were anyway illegal: an empty request # or any request that starts with "/" (there are no Redis commands starting # with such a slash). Normal RESP2/RESP3 requests are completely out of the # path of the Gopher protocol implementation and are served as usual as well. # # If you open a connection to Redis when Gopher is enabled and send it # a string like "/foo", if there is a key named "/foo" it is served via the # Gopher protocol. # # In order to create a real Gopher "hole" (the name of a Gopher site in Gopher # talking), you likely need a script like the following: # # https://github.com/antirez/gopher2redis # # --- SECURITY WARNING --- # # If you plan to put Redis on the internet in a publicly accessible address # to server Gopher pages MAKE SURE TO SET A PASSWORD to the instance. # Once a password is set: # # 1. The Gopher server (when enabled, not by default) will still serve # content via Gopher. # 2. However other commands cannot be called before the client will # authenticate. # # So use the 'requirepass' option to protect your instance. # # Note that Gopher is not currently supported when 'io-threads-do-reads' # is enabled. # # To enable Gopher support, uncomment the following line and set the option # from no (the default) to yes. # # gopher-enabled no ############################### ADVANCED CONFIG ############################### # Hashes are encoded using a memory efficient data structure when they have a # small number of entries, and the biggest entry does not exceed a given # threshold. These thresholds can be configured using the following directives. hash-max-ziplist-entries 512 hash-max-ziplist-value 64 # Lists are also encoded in a special way to save a lot of space. # The number of entries allowed per internal list node can be specified # as a fixed maximum size or a maximum number of elements. # For a fixed maximum size, use -5 through -1, meaning: # -5: max size: 64 Kb <-- not recommended for normal workloads # -4: max size: 32 Kb <-- not recommended # -3: max size: 16 Kb <-- probably not recommended # -2: max size: 8 Kb <-- good # -1: max size: 4 Kb <-- good # Positive numbers mean store up to _exactly_ that number of elements # per list node. # The highest performing option is usually -2 (8 Kb size) or -1 (4 Kb size), # but if your use case is unique, adjust the settings as necessary. list-max-ziplist-size -2 # Lists may also be compressed. # Compress depth is the number of quicklist ziplist nodes from *each* side of # the list to *exclude* from compression. The head and tail of the list # are always uncompressed for fast push/pop operations. Settings are: # 0: disable all list compression # 1: depth 1 means "don't start compressing until after 1 node into the list, # going from either the head or tail" # So: [head]->node->node->...->node->[tail] # [head], [tail] will always be uncompressed; inner nodes will compress. # 2: [head]->[next]->node->node->...->node->[prev]->[tail] # 2 here means: don't compress head or head->next or tail->prev or tail, # but compress all nodes between them. # 3: [head]->[next]->[next]->node->node->...->node->[prev]->[prev]->[tail] # etc. list-compress-depth 0 # Sets have a special encoding in just one case: when a set is composed # of just strings that happen to be integers in radix 10 in the range # of 64 bit signed integers. # The following configuration setting sets the limit in the size of the # set in order to use this special memory saving encoding. set-max-intset-entries 512 # Similarly to hashes and lists, sorted sets are also specially encoded in # order to save a lot of space. This encoding is only used when the length and # elements of a sorted set are below the following limits: zset-max-ziplist-entries 128 zset-max-ziplist-value 64 # HyperLogLog sparse representation bytes limit. The limit includes the # 16 bytes header. When an HyperLogLog using the sparse representation crosses # this limit, it is converted into the dense representation. # # A value greater than 16000 is totally useless, since at that point the # dense representation is more memory efficient. # # The suggested value is ~ 3000 in order to have the benefits of # the space efficient encoding without slowing down too much PFADD, # which is O(N) with the sparse encoding. The value can be raised to # ~ 10000 when CPU is not a concern, but space is, and the data set is # composed of many HyperLogLogs with cardinality in the 0 - 15000 range. hll-sparse-max-bytes 3000 # Streams macro node max size / items. The stream data structure is a radix # tree of big nodes that encode multiple items inside. Using this configuration # it is possible to configure how big a single node can be in bytes, and the # maximum number of items it may contain before switching to a new node when # appending new stream entries. If any of the following settings are set to # zero, the limit is ignored, so for instance it is possible to set just a # max entries limit by setting max-bytes to 0 and max-entries to the desired # value. stream-node-max-bytes 4096 stream-node-max-entries 100 # Active rehashing uses 1 millisecond every 100 milliseconds of CPU time in # order to help rehashing the main Redis hash table (the one mapping top-level # keys to values). The hash table implementation Redis uses (see dict.c) # performs a lazy rehashing: the more operation you run into a hash table # that is rehashing, the more rehashing "steps" are performed, so if the # server is idle the rehashing is never complete and some more memory is used # by the hash table. # # The default is to use this millisecond 10 times every second in order to # actively rehash the main dictionaries, freeing memory when possible. # # If unsure: # use "activerehashing no" if you have hard latency requirements and it is # not a good thing in your environment that Redis can reply from time to time # to queries with 2 milliseconds delay. # # use "activerehashing yes" if you don't have such hard requirements but # want to free memory asap when possible. activerehashing yes # The client output buffer limits can be used to force disconnection of clients # that are not reading data from the server fast enough for some reason (a # common reason is that a Pub/Sub client can't consume messages as fast as the # publisher can produce them). # # The limit can be set differently for the three different classes of clients: # # normal -> normal clients including MONITOR clients # replica -> replica clients # pubsub -> clients subscribed to at least one pubsub channel or pattern # # The syntax of every client-output-buffer-limit directive is the following: # # client-output-buffer-limit <class> <hard limit> <soft limit> <soft seconds> # # A client is immediately disconnected once the hard limit is reached, or if # the soft limit is reached and remains reached for the specified number of # seconds (continuously). # So for instance if the hard limit is 32 megabytes and the soft limit is # 16 megabytes / 10 seconds, the client will get disconnected immediately # if the size of the output buffers reach 32 megabytes, but will also get # disconnected if the client reaches 16 megabytes and continuously overcomes # the limit for 10 seconds. # # By default normal clients are not limited because they don't receive data # without asking (in a push way), but just after a request, so only # asynchronous clients may create a scenario where data is requested faster # than it can read. # # Instead there is a default limit for pubsub and replica clients, since # subscribers and replicas receive data in a push fashion. # # Both the hard or the soft limit can be disabled by setting them to zero. client-output-buffer-limit normal 0 0 0 client-output-buffer-limit replica 256mb 64mb 60 client-output-buffer-limit pubsub 32mb 8mb 60 # Client query buffers accumulate new commands. They are limited to a fixed # amount by default in order to avoid that a protocol desynchronization (for # instance due to a bug in the client) will lead to unbound memory usage in # the query buffer. However you can configure it here if you have very special # needs, such us huge multi/exec requests or alike. # # client-query-buffer-limit 1gb # In the Redis protocol, bulk requests, that are, elements representing single # strings, are normally limited to 512 mb. However you can change this limit # here, but must be 1mb or greater # # proto-max-bulk-len 512mb # Redis calls an internal function to perform many background tasks, like # closing connections of clients in timeout, purging expired keys that are # never requested, and so forth. # # Not all tasks are performed with the same frequency, but Redis checks for # tasks to perform according to the specified "hz" value. # # By default "hz" is set to 10. Raising the value will use more CPU when # Redis is idle, but at the same time will make Redis more responsive when # there are many keys expiring at the same time, and timeouts may be # handled with more precision. # # The range is between 1 and 500, however a value over 100 is usually not # a good idea. Most users should use the default of 10 and raise this up to # 100 only in environments where very low latency is required. hz 10 # Normally it is useful to have an HZ value which is proportional to the # number of clients connected. This is useful in order, for instance, to # avoid too many clients are processed for each background task invocation # in order to avoid latency spikes. # # Since the default HZ value by default is conservatively set to 10, Redis # offers, and enables by default, the ability to use an adaptive HZ value # which will temporarily raise when there are many connected clients. # # When dynamic HZ is enabled, the actual configured HZ will be used # as a baseline, but multiples of the configured HZ value will be actually # used as needed once more clients are connected. In this way an idle # instance will use very little CPU time while a busy instance will be # more responsive. dynamic-hz yes # When a child rewrites the AOF file, if the following option is enabled # the file will be fsync-ed every 32 MB of data generated. This is useful # in order to commit the file to the disk more incrementally and avoid # big latency spikes. aof-rewrite-incremental-fsync yes # When redis saves RDB file, if the following option is enabled # the file will be fsync-ed every 32 MB of data generated. This is useful # in order to commit the file to the disk more incrementally and avoid # big latency spikes. rdb-save-incremental-fsync yes # Redis LFU eviction (see maxmemory setting) can be tuned. However it is a good # idea to start with the default settings and only change them after investigating # how to improve the performances and how the keys LFU change over time, which # is possible to inspect via the OBJECT FREQ command. # # There are two tunable parameters in the Redis LFU implementation: the # counter logarithm factor and the counter decay time. It is important to # understand what the two parameters mean before changing them. # # The LFU counter is just 8 bits per key, it's maximum value is 255, so Redis # uses a probabilistic increment with logarithmic behavior. Given the value # of the old counter, when a key is accessed, the counter is incremented in # this way: # # 1. A random number R between 0 and 1 is extracted. # 2. A probability P is calculated as 1/(old_value*lfu_log_factor+1). # 3. The counter is incremented only if R < P. # # The default lfu-log-factor is 10. This is a table of how the frequency # counter changes with a different number of accesses with different # logarithmic factors: # # +--------+------------+------------+------------+------------+------------+ # | factor | 100 hits | 1000 hits | 100K hits | 1M hits | 10M hits | # +--------+------------+------------+------------+------------+------------+ # | 0 | 104 | 255 | 255 | 255 | 255 | # +--------+------------+------------+------------+------------+------------+ # | 1 | 18 | 49 | 255 | 255 | 255 | # +--------+------------+------------+------------+------------+------------+ # | 10 | 10 | 18 | 142 | 255 | 255 | # +--------+------------+------------+------------+------------+------------+ # | 100 | 8 | 11 | 49 | 143 | 255 | # +--------+------------+------------+------------+------------+------------+ # # NOTE: The above table was obtained by running the following commands: # # redis-benchmark -n 1000000 incr foo # redis-cli object freq foo # # NOTE 2: The counter initial value is 5 in order to give new objects a chance # to accumulate hits. # # The counter decay time is the time, in minutes, that must elapse in order # for the key counter to be divided by two (or decremented if it has a value # less <= 10). # # The default value for the lfu-decay-time is 1. A special value of 0 means to # decay the counter every time it happens to be scanned. # # lfu-log-factor 10 # lfu-decay-time 1 ########################### ACTIVE DEFRAGMENTATION ####################### # # What is active defragmentation? # ------------------------------- # # Active (online) defragmentation allows a Redis server to compact the # spaces left between small allocations and deallocations of data in memory, # thus allowing to reclaim back memory. # # Fragmentation is a natural process that happens with every allocator (but # less so with Jemalloc, fortunately) and certain workloads. Normally a server # restart is needed in order to lower the fragmentation, or at least to flush # away all the data and create it again. However thanks to this feature # implemented by Oran Agra for Redis 4.0 this process can happen at runtime # in a "hot" way, while the server is running. # # Basically when the fragmentation is over a certain level (see the # configuration options below) Redis will start to create new copies of the # values in contiguous memory regions by exploiting certain specific Jemalloc # features (in order to understand if an allocation is causing fragmentation # and to allocate it in a better place), and at the same time, will release the # old copies of the data. This process, repeated incrementally for all the keys # will cause the fragmentation to drop back to normal values. # # Important things to understand: # # 1. This feature is disabled by default, and only works if you compiled Redis # to use the copy of Jemalloc we ship with the source code of Redis. # This is the default with Linux builds. # # 2. You never need to enable this feature if you don't have fragmentation # issues. # # 3. Once you experience fragmentation, you can enable this feature when # needed with the command "CONFIG SET activedefrag yes". # # The configuration parameters are able to fine tune the behavior of the # defragmentation process. If you are not sure about what they mean it is # a good idea to leave the defaults untouched. # Enabled active defragmentation # activedefrag no # Minimum amount of fragmentation waste to start active defrag # active-defrag-ignore-bytes 100mb # Minimum percentage of fragmentation to start active defrag # active-defrag-threshold-lower 10 # Maximum percentage of fragmentation at which we use maximum effort # active-defrag-threshold-upper 100 # Minimal effort for defrag in CPU percentage, to be used when the lower # threshold is reached # active-defrag-cycle-min 1 # Maximal effort for defrag in CPU percentage, to be used when the upper # threshold is reached # active-defrag-cycle-max 25 # Maximum number of set/hash/zset/list fields that will be processed from # the main dictionary scan # active-defrag-max-scan-fields 1000 # Jemalloc background thread for purging will be enabled by default jemalloc-bg-thread yes # It is possible to pin different threads and processes of Redis to specific # CPUs in your system, in order to maximize the performances of the server. # This is useful both in order to pin different Redis threads in different # CPUs, but also in order to make sure that multiple Redis instances running # in the same host will be pinned to different CPUs. # # Normally you can do this using the "taskset" command, however it is also # possible to this via Redis configuration directly, both in Linux and FreeBSD. # # You can pin the server/IO threads, bio threads, aof rewrite child process, and # the bgsave child process. The syntax to specify the cpu list is the same as # the taskset command: # # Set redis server/io threads to cpu affinity 0,2,4,6: # server_cpulist 0-7:2 # # Set bio threads to cpu affinity 1,3: # bio_cpulist 1,3 # # Set aof rewrite child process to cpu affinity 8,9,10,11: # aof_rewrite_cpulist 8-11 # # Set bgsave child process to cpu affinity 1,10,11 # bgsave_cpulist 1,10-11 # In some cases redis will emit warnings and even refuse to start if it detects # that the system is in bad state, it is possible to suppress these warnings # by setting the following config which takes a space delimited list of warnings # to suppress # # ignore-warnings ARM64-COW-BUG 在里面那边加上bind 0.0.0.0
05-24
评论
添加红包

请填写红包祝福语或标题

红包个数最小为10个

红包金额最低5元

当前余额3.43前往充值 >
需支付:10.00
成就一亿技术人!
领取后你会自动成为博主和红包主的粉丝 规则
hope_wisdom
发出的红包
实付
使用余额支付
点击重新获取
扫码支付
钱包余额 0

抵扣说明:

1.余额是钱包充值的虚拟货币,按照1:1的比例进行支付金额的抵扣。
2.余额无法直接购买下载,可以购买VIP、付费专栏及课程。

余额充值