


目录
1.1 Android Automotive与整个Android生态系统的关系
一,背景介绍
Android Automotive OS 定义了标准的硬件抽象层HAL(Hardware Abstraction Layer)来规范各个子系统与Framework的调用接口, 并且通过CarService以及相关的Car API对上层应用提供标准编程接口。
1.1 Android Automotive与整个Android生态系统的关系
-
Android Automotive是Android的一部分。 Android Automotive不是Android的分支或并行开发,它与手机,平板电脑等安卓设备上的Android具有相同的代码库,并且位于相同的存储库中。它基于经过10多年开发的强大平台和功能集,可利用现有的安全模型,兼容性程序,开发人员工具和基础架构,同时继续具有高度可定制性和可移植性,完全免费和开源的特点。
-
Android Automotive扩展了Android 。在将Android打造为功能齐全的信息娱乐平台的过程中,我们添加了对汽车特定要求,功能和技术的支持。就像今天用于移动设备的Android一样,Android Automotive将是一个完整的汽车信息娱乐平台。
1.2 Android Automotive架构
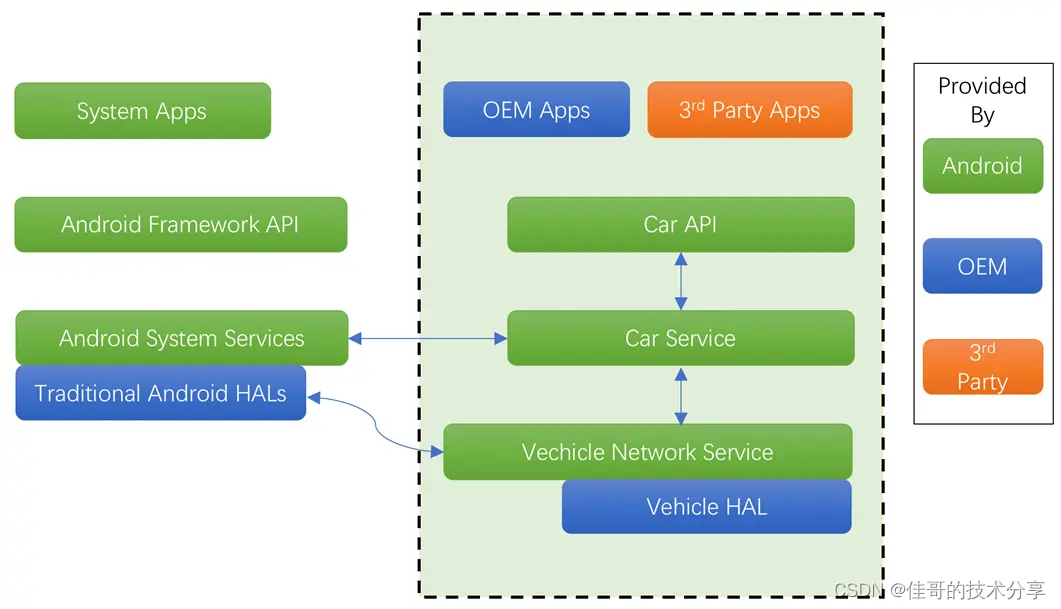
Android Automative是在原先Android的系统架构上增加了一些与车相关的(图中虚线框中绿色背景的)模块。
- Car App :包括OEM和第三方开发的App
- Car API :提供给汽车App特有的接口
- Car Service :系统中与车相关的服务,主要是基于CarProperty实现Vechile相关的一些策略
- Vehicle Network Service :汽车的网络服务
- Vehicle HAL :汽车的硬件抽象层描述,定义 OEM 可以实现的车辆属性的接口
二,CarService启动流程
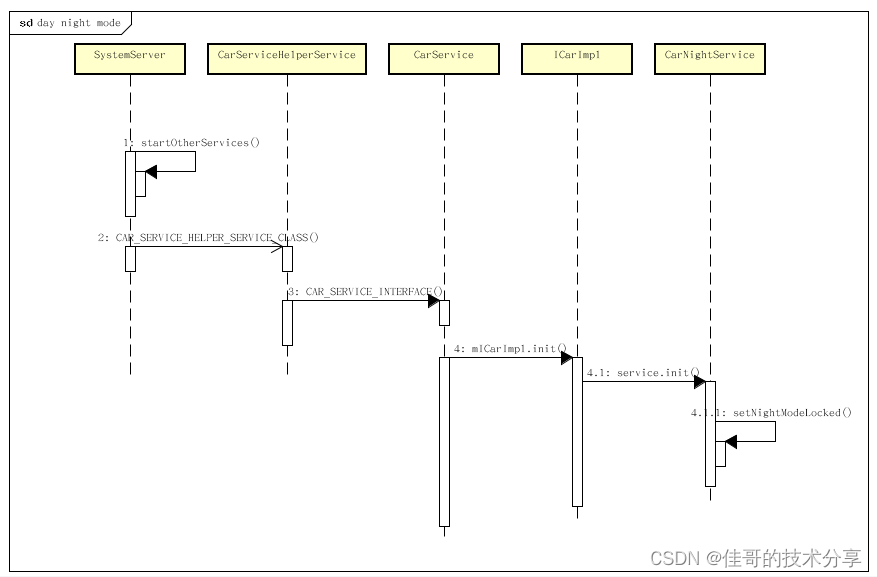
细节代码如下:
路径:/frameworks/base/services/java/com/android/server/SystemServer.java
 if (mPackageManager.hasSystemFeature(PackageManager.FEATURE_AUTOMOTIVE)) {
                t.traceBegin("StartCarServiceHelperService");
                mSystemServiceManager.startService(CAR_SERVICE_HELPER_SERVICE_CLASS);
                t.traceEnd();
            }
后跳转到SystemServiceManager.java文件中的startService方法
frameworks/base/services/core/java/com/android/server/SystemServiceManager.java
public SystemService startService(String className) {
        final Class<SystemService> serviceClass;
        try {
            serviceClass = (Class<SystemService>)Class.forName(className);
        } catch (ClassNotFoundException ex) {
            Slog.i(TAG, "Starting " + className);
            throw new RuntimeException("Failed to create service " + className
                    + ": service class not found, usually indicates that the caller should "
                    + "have called PackageManager.hasSystemFeature() to check whether the "
                    + "feature is available on this device before trying to start the "
                    + "services that implement it", ex);
        }
        return startService(serviceClass);
    }

 public <T extends SystemService> T startService(Class<T> serviceClass) {

     final String name = serviceClass.getName();
     ....
      try {     //注释1
                Constructor<T> constructor = serviceClass.getConstructor(Context.class);
                service = constructor.newInstance(mContext);
     ....
     startService(service);
     return service;
...
}

public void startService(@NonNull final SystemService service) {
        // Register it.
        mServices.add(service);
        // Start it.
        long time = SystemClock.elapsedRealtime();
        try {
            //注释2 启动CarService
            service.onStart();
.....
}
注释1处, 通过SystemServiceManager封装的方法来创建服务, 此处SystemServiceManager通过反射创建了CarServiceHelperService对象, 并调用其onStart方法, 进入到CarServiceHelperService.java文件中
public void onStart() {
        Intent intent = new Intent();
        intent.setPackage("com.android.car");
        intent.setAction(CAR_SERVICE_INTERFACE);
        if (!getContext().bindServiceAsUser(intent, mCarServiceConnection, Context.BIND_AUTO_CREATE,
                UserHandle.SYSTEM)) {
            Slog.wtf(TAG, "cannot start car service");
        }
        System.loadLibrary("car-framework-service-jni");
    }
注释二处 在onStart方法中, 创建了一个Intent 设置包名 和 Action 并调用bindServiceAsUser创建和绑定关联CarService, 同时加载了相关的JNI库(car-framework-service-jni).
通过以上的源码片段, 我们知道Intent的目标包名为"com.android.car", action为"android.car.ICar", 源码全局搜索与之相匹配的Service
packages/services/Car/service/src/com/android/car/CarService.java
<manifest xmlns:android="http://schemas.android.com/apk/res/android"
        xmlns:androidprv="http://schemas.android.com/apk/prv/res/android"
        package="com.android.car"
        coreApp="true"
        android:sharedUserId="android.uid.system">


 <service android:name=".CarService"
                android:singleUser="true">
            <intent-filter>
                <action android:name="android.car.ICar" />
            </intent-filter>
        </service>
三,CarService源码分析
当服务启动之后, 首先调用其onCreate方法. CarService的onCreate方法实现如下:
 @Override
    public void onCreate() {
        Log.i(CarLog.TAG_SERVICE, "Service onCreate");
        //获取通知管理NotificationManager对象
        mCanBusErrorNotifier = new CanBusErrorNotifier(this /* context */);
        mVehicle = getVehicle();

        if (mVehicle == null) {
            throw new IllegalStateException("Vehicle HAL service is not available.");
        }
        try {
            mVehicleInterfaceName = mVehicle.interfaceDescriptor();
        } catch (RemoteException e) {
            throw new IllegalStateException("Unable to get Vehicle HAL interface descriptor", e);
        }

        Log.i(CarLog.TAG_SERVICE, "Connected to " + mVehicleInterfaceName);

        mICarImpl = new ICarImpl(this,
                mVehicle,
                SystemInterface.Builder.defaultSystemInterface(this).build(),
                mCanBusErrorNotifier,
                mVehicleInterfaceName);
        mICarImpl.init();

        linkToDeath(mVehicle, mVehicleDeathRecipient);

        ServiceManager.addService("car_service", mICarImpl);
        //设置SystemProperty属性  carService已创建
        SystemProperties.set("boot.car_service_created", "1");
        super.onCreate();
    }
主要做了两件事情:
1. 获取mVehicle 车辆相关的HIDL Binder远程对象;
2. 创建了mICarImpl对象, 并将其添加到ServiceManager管理的服务列表中.
这里的 ICarImpl起着创建并管理各个服务的作用. 在它的构造函数中,创建了各个服务的实例,并添加到服务列表中,源码如下:
packages/services/Car/service/src/com/android/car/ICarImpl.java
public ICarImpl(Context serviceContext, IVehicle vehicle, SystemInterface systemInterface,
            CanBusErrorNotifier errorNotifier, String vehicleInterfaceName) {
        mContext = serviceContext;
        mSystemInterface = systemInterface;
        mHal = new VehicleHal(vehicle);
        mVehicleInterfaceName = vehicleInterfaceName;
        //创建各种重要的服务
        mUserManagerHelper = new CarUserManagerHelper(serviceContext);
        final Resources res = mContext.getResources();
        final int maxRunningUsers = res.getInteger(
                com.android.internal.R.integer.config_multiuserMaxRunningUsers);
        mCarUserService = new CarUserService(serviceContext, mUserManagerHelper,
                ActivityManager.getService(), maxRunningUsers);
        mSystemActivityMonitoringService = new SystemActivityMonitoringService(serviceContext);
        mCarPowerManagementService = new CarPowerManagementService(mContext, mHal.getPowerHal(),
                systemInterface, mUserManagerHelper);
        mCarPropertyService = new CarPropertyService(serviceContext, mHal.getPropertyHal());
        ....

        //将重要的服务缓存到 CarLocalServices
        CarLocalServices.addService(CarPowerManagementService.class, mCarPowerManagementService);
        CarLocalServices.addService(CarUserService.class, mCarUserService);
        CarLocalServices.addService(CarTrustedDeviceService.class, mCarTrustedDeviceService);


         // 将创建的服务对象依次添加到一个list中保存起来
         List<CarServiceBase> allServices = new ArrayList<>();
         allServices.add(mFeatureController);
         allServices.add(mCarUserService);

.....
}
这些创建的服务就是上文介绍的汽车服务.
四. Car API 使用方式
在上面的介绍中,我们提到CarService中各个服务本质上是AIDL接口的实现类,属于Server端,而对应的Client端就需要一个IBinder对象来访问Server端的方法,这些IBinder对象在Car API中被封装在一个个XXXManager类中。
4.1 编译 Car API
在使用Car API之前,我们需要先将Car API编译成jar也就是CarLib,这样才能让其它的系统应用使用, 命令如下
make android.car android.car-system-stubs android.car-stubs编译成功后的 android.car.jar 的输出路径为:
/out/soong/.intermediates/packages/services/Car/car-lib/android.car/android_common/javac/android.car.jar
4.2 使用 Car API
获取Car对象的方法:
if (getPackageManager().hasSystemFeature(PackageManager.FEATURE_AUTOMOTIVE)) {
    Car carClient = Car.createCar(context);
    CarHvacManager manager = (CarHvacManager) carClient.getCarManager(Car.HVAC_SERVICE);
}
如果要获取车辆的相关信息,如车速, 车内空调温度,诊断信息, 或对车辆进行相关的控制,如升高和降低空调温度,控制座椅和车窗, 调节音量等,就要通过具体的Manager中的API和对应的服务来实现了.


 被折叠的 条评论
为什么被折叠?
被折叠的 条评论
为什么被折叠?
 到【灌水乐园】发言


