


 本文介绍如何使用Maven构建SpringBoot与MyBatis整合的项目,包括配置pom.xml、创建实体类、Mapper接口及XML文件、实现CRUD操作,并通过Thymeleaf展示数据。
1. 使用maven构建SpringBoot的名叫spring-boot-mybatis项目

2. pom.xml
<project xmlns="http://maven.apache.org/POM/4.0.0"
	xmlns:xsi="http://www.w3.org/2001/XMLSchema-instance"
	xsi:schemaLocation="http://maven.apache.org/POM/4.0.0 http://maven.apache.org/xsd/maven-4.0.0.xsd">

	<modelVersion>4.0.0</modelVersion>
	<groupId>com.bjbs</groupId>
	<artifactId>spring-boot-mybatis</artifactId>
	<version>0.0.1-SNAPSHOT</version>

	<parent>
		<groupId>org.springframework.boot</groupId>
		<artifactId>spring-boot-starter-parent</artifactId>
		<version>1.5.13.RELEASE</version>
	</parent>

	<!-- 修改jdk版本 -->
	<properties>
		<java.version>1.8</java.version>
		<!-- 指定thymeleaf和thymeleaf-layout-dialect高版本可以防止html标签不规范报错 -->
		<thymeleaf.version>3.0.2.RELEASE</thymeleaf.version>
		<thymeleaf-layout-dialect.version>2.0.4</thymeleaf-layout-dialect.version>
	</properties>

	<dependencies>
		<!-- springBoot的启动器 -->
		<dependency>
			<groupId>org.springframework.boot</groupId>
			<artifactId>spring-boot-starter-web</artifactId>
		</dependency>
		<dependency>
			<groupId>org.springframework.boot</groupId>
			<artifactId>spring-boot-starter-thymeleaf</artifactId>
		</dependency>
		<!-- Mybatis启动器 -->
		<dependency>
			<groupId>org.mybatis.spring.boot</groupId>
			<artifactId>mybatis-spring-boot-starter</artifactId>
			<version>1.1.1</version>
		</dependency>
		<!-- https://mvnrepository.com/artifact/mysql/mysql-connector-java -->
		<dependency>
			<groupId>mysql</groupId>
			<artifactId>mysql-connector-java</artifactId>
			<version>8.0.27</version>
		</dependency>
		<!-- https://mvnrepository.com/artifact/com.mchange/c3p0 -->
		<dependency>
			<groupId>com.mchange</groupId>
			<artifactId>c3p0</artifactId>
			<version>0.9.2</version>
		</dependency>
	</dependencies>
</project>
3. 在src/main/resources下创建全局配置文件application.properties
spring.datasource.driverClassName=com.mysql.cj.jdbc.Driver
spring.datasource.url=jdbc:mysql://192.168.25.138:3306/StudyMybatis?useSSL=true&useUnicode=true&characterEncoding=utf-8&serverTimezone=Asia/Shanghai
spring.datasource.username=root
spring.datasource.password=lyw123456

spring.datasource.type=com.mchange.v2.c3p0.ComboPooledDataSource
4. 数据库表设计

5. 新建User.java
package com.bjbs.pojo;

import java.io.Serializable;
import java.util.Date;
import org.springframework.format.annotation.DateTimeFormat;

public class User implements Serializable {
	private static final long serialVersionUID = 1L;

	private Integer id;
	private String name;
	private String sex;
	@DateTimeFormat(pattern="yyyy-MM-dd HH:mm:ss")
	private Date birthday;
	private String address;

	public User() {
	}

	public User(String name, String sex, Date birthday, String address) {
		this.name = name;
		this.sex = sex;
		this.birthday = birthday;
		this.address = address;
	}

	public User(Integer id, String name, String sex, Date birthday, String address) {
		this.id = id;
		this.name = name;
		this.sex = sex;
		this.birthday = birthday;
		this.address = address;
	}

	public Integer getId() {
		return id;
	}

	public void setId(Integer id) {
		this.id = id;
	}

	public String getName() {
		return name;
	}

	public void setName(String name) {
		this.name = name;
	}

	public String getSex() {
		return sex;
	}

	public void setSex(String sex) {
		this.sex = sex;
	}

	public Date getBirthday() {
		return birthday;
	}

	public void setBirthday(Date birthday) {
		this.birthday = birthday;
	}

	public String getAddress() {
		return address;
	}

	public void setAddress(String address) {
		this.address = address;
	}

	@Override
	public String toString() {
		return "User [id=" + id + ", name=" + name + ", sex=" + sex + ", birthday=" + birthday + ", address=" + address
				+ "]";
	}

}
6. 新建UserMapper.java
package com.bjbs.mapper;

import java.util.List;
import com.bjbs.pojo.User;

public interface UserMapper {
	public List<User> findAllUser();

	void saveUser(User user);

	User findUserById(Integer id);

	void updateUser(User user);

	void deleteUserById(Integer id);
}
7. 新建UserMapper.xml
<?xml version="1.0" encoding="UTF-8"?>
<!DOCTYPE mapper PUBLIC "-//mybatis.org//DTD Mapper 3.0//EN" "http://mybatis.org/dtd/mybatis-3-mapper.dtd">

<mapper namespace="com.bjbs.mapper.UserMapper">
	<select id="findAllUser" resultType="com.bjbs.pojo.User">
		select * from user
	</select>

	<insert id="saveUser" parameterType="com.bjbs.pojo.User">
		insert into user values(null, #{name}, #{sex}, #{birthday}, #{address})
	</insert>

	<select id="findUserById" resultType="com.bjbs.pojo.User">
		select * from user where id = #{value}
	</select>

	<update id="updateUser" parameterType="com.bjbs.pojo.User">
		update user set name=#{name}, sex = #{sex}, birthday = #{birthday}, address = #{address} where id=#{id}
	</update>

	<delete id="deleteUserById">
		delete from user where id = #{value}
	</delete>

</mapper>
8. 新建UserService.java
package com.bjbs.service;

import java.util.List;
import com.bjbs.pojo.User;

public interface UserService {
	List<User> findAllUser();

	void saveUser(User user);

	User findUserById(Integer id);

	void updateUser(User user);

	void deleteUserById(Integer id);
}
9. 新建UserServiceImpl.java
package com.bjbs.service.impl;

import java.util.List;
import org.springframework.beans.factory.annotation.Autowired;
import org.springframework.stereotype.Service;
import org.springframework.transaction.annotation.Transactional;
import com.bjbs.mapper.UserMapper;
import com.bjbs.pojo.User;
import com.bjbs.service.UserService;

@Service
@Transactional
public class UserServiceImpl implements UserService {
	@Autowired
	private UserMapper userMapper;

	@Override
	public List<User> findAllUser() {
		return userMapper.findAllUser();
	}

	@Override
	public void saveUser(User user) {
		userMapper.saveUser(user);
	}

	@Override
	public User findUserById(Integer id) {
		return userMapper.findUserById(id);
	}

	@Override
	public void updateUser(User user) {
		userMapper.updateUser(user);
	}

	@Override
	public void deleteUserById(Integer id) {
		userMapper.deleteUserById(id);
	}

}
10. 新建App.java
package com.bjbs;

import org.mybatis.spring.annotation.MapperScan;
import org.springframework.boot.SpringApplication;
import org.springframework.boot.autoconfigure.SpringBootApplication;

/**
 * SpringBoot启动类
 */
@SpringBootApplication
@MapperScan("com.bjbs.mapper") //@MapperScan 用户扫描MyBatis的Mapper接口
public class App {
	public static void main(String[] args) {
		SpringApplication.run(App.class, args);
	}
}
11. 在src/main/resources/templates下, 新建allUser.html
<!DOCTYPE html>
<html>
	<head>
		<meta charset="UTF-8" />
		<title>展示用户数据</title>
		<style type="text/css">
			th {
				width: 100px;
			}
		</style>
	</head>
	<body>
		<table border="1">
			<tr>
				<th>用户ID</th>
				<th>用户姓名</th>
				<th>用户性别</th>
				<th style="width: 300px;">用户生日</th>
				<th>用户地址</th>
				<th style="width: 300px;">操作</th>
			</tr>
			<tr th:each="user : ${list}">
				<td th:text="${user.id}"></td>
				<td th:text="${user.name}"></td>
				<td th:text="${user.sex}"></td>
				<td th:text="${#dates.format(user.birthday, 'yyyy-MM-dd HH:mm:ss')}"></td>
				<td th:text="${user.address}"></td>
				<td>
					<a th:href="@{/findUserById(id=${user.id})}">更新用户</a>
					<a th:href="@{/delUser(id=${user.id})}">删除用户</a>
					<a th:href="@{/addUser}">添加用户</a>
				</td>
			</tr>
		</table>
	</body>
</html>
12. 在src/main/resources/templates下, 新建addUser.html
<!DOCTYPE html>
<html>
	<head>
		<meta charset="UTF-8" />
		<title>添加用户</title>
	</head>
	<body>
		<form th:action="@{/saveUser}" method="post">
			用户姓名: <input type="text" name="name"/><br/>
			用户性别: <input type="text" name="sex"/><br/>
			用户生日: <input type="text" name="birthday"/><br/>
			用户地址: <input type="text" name="address"/><br/>
			<input type="submit" value="确定"/><br/>
		</form>
	</body>
</html>
13. 在src/main/resources/templates下, 新建editUser.html
<!DOCTYPE html>
<html>
	<head>
		<meta charset="UTF-8" />
		<title>更新用户信息</title>
	</head>
	<body>
		<form th:action="@{/updateUser}" method="post">
			<input type="hidden" name="id" th:field="${user.id}"/>
			用户姓名: <input type="text" name="name" th:field="${user.name}"/><br/>
			用户性别: <input type="text" name="sex" th:field="${user.sex}"/><br/>
			用户生日: <input type="text" name="birthday" th:field="${user.birthday}"/><br/>
			用户地址: <input type="text" name="address" th:field="${user.address}"/><br/>
			<input type="submit" value="确定"/><br/>
		</form>
	</body>
</html>
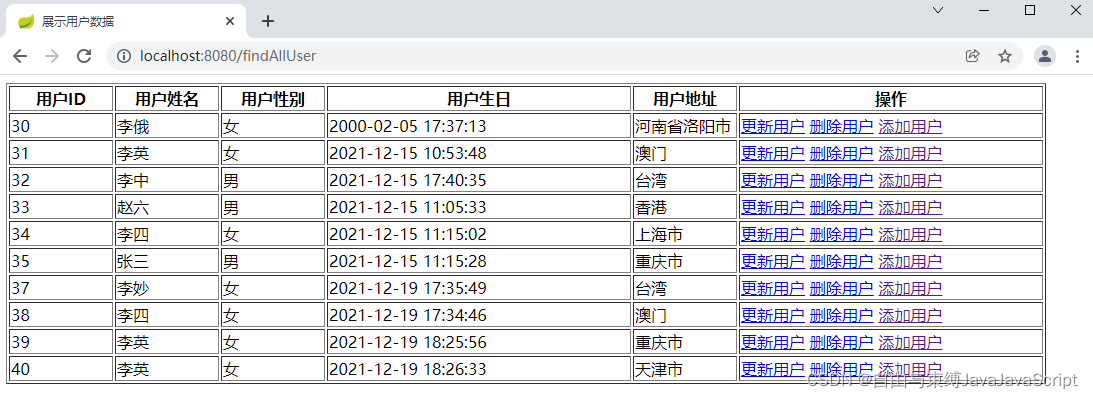
14. 运行项目并使用浏览器访问
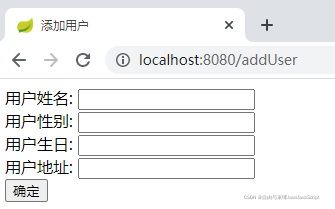
15. 点击添加用户链接, 跳转到添加用户页面
16. 添加一个ID为41的用户

17. 点击ID为40的更新用户链接, 跳转到更新用户页面
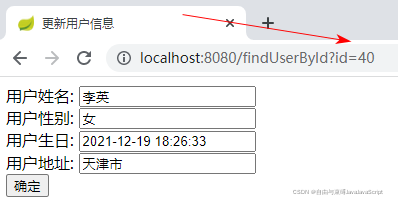
18. 修改用户信息

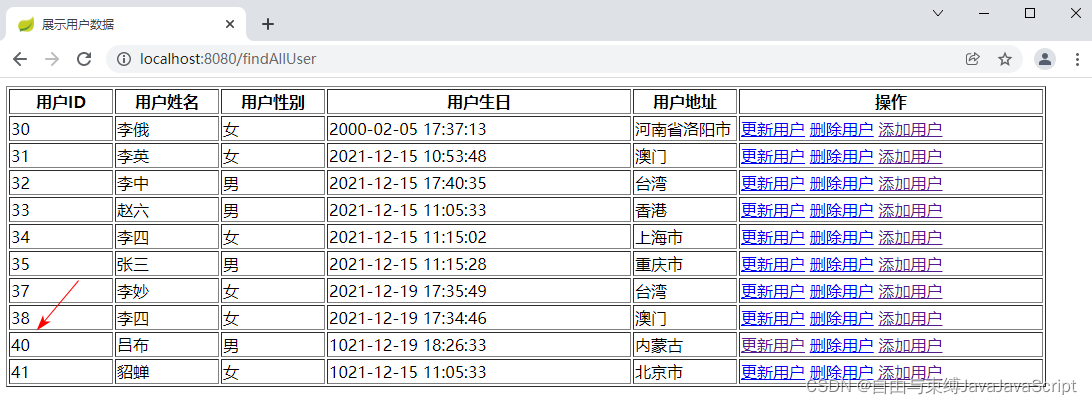
19. 点击确定按钮, 保存用户信息

20. 点击ID为39的删除用户链接, 删除用户成功


 848
848

 被折叠的 条评论
为什么被折叠?
被折叠的 条评论
为什么被折叠?
 到【灌水乐园】发言


