


1.backend
1.1.添加依赖
<?xml version="1.0" encoding="UTF-8"?>
<project xmlns="http://maven.apache.org/POM/4.0.0" xmlns:xsi="http://www.w3.org/2001/XMLSchema-instance"
xsi:schemaLocation="http://maven.apache.org/POM/4.0.0 https://maven.apache.org/xsd/maven-4.0.0.xsd">
<modelVersion>4.0.0</modelVersion>
<parent>
<groupId>org.springframework.boot</groupId>
<artifactId>spring-boot-starter-parent</artifactId>
<version>3.5.0</version>
<relativePath/> <!-- lookup parent from repository -->
</parent>
<groupId>com.example</groupId>
<artifactId>my-project-backend</artifactId>
<version>0.0.1-SNAPSHOT</version>
<name>my-project-backend</name>
<description>my-project-backend</description>
<url/>
<licenses>
<license/>
</licenses>
<developers>
<developer/>
</developers>
<scm>
<connection/>
<developerConnection/>
<tag/>
<url/>
</scm>
<properties>
<java.version>17</java.version>
</properties>
<dependencies>
<dependency>
<groupId>org.springframework.boot</groupId>
<artifactId>spring-boot-starter-security</artifactId>
</dependency>
<dependency>
<groupId>org.springframework.boot</groupId>
<artifactId>spring-boot-starter-web</artifactId>
</dependency>
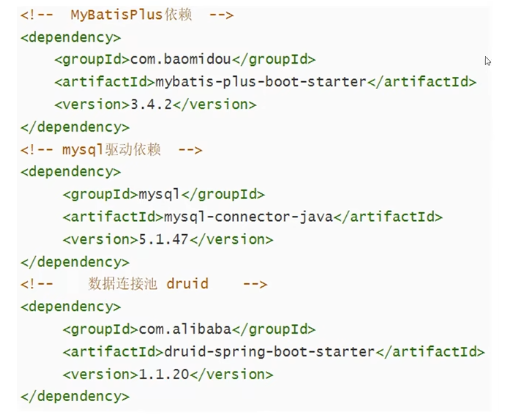
<!-- Mybatis-Plus框架 -->
<dependency>
<groupId>com.baomidou</groupId>
<artifactId>mybatis-plus-spring-boot3-starter</artifactId>
<version>3.5.7</version>
</dependency>
<!-- MySQL驱动 -->
<dependency>
<groupId>com.mysql</groupId>
<artifactId>mysql-connector-j</artifactId>
<scope>runtime</scope>
</dependency>
<dependency>
<groupId>org.projectlombok</groupId>
<artifactId>lombok</artifactId>
<optional>true</optional>
</dependency>
<dependency>
<groupId>org.springframework.boot</groupId>
<artifactId>spring-boot-starter-test</artifactId>
<scope>test</scope>
</dependency>
<dependency>
<groupId>org.springframework.security</groupId>
<artifactId>spring-security-test</artifactId>
<scope>test</scope>
</dependency>
</dependencies>
<build>
<plugins>
<plugin>
<groupId>org.apache.maven.plugins</groupId>
<artifactId>maven-compiler-plugin</artifactId>
<configuration>
<annotationProcessorPaths>
<path>
<groupId>org.projectlombok</groupId>
<artifactId>lombok</artifactId>
</path>
</annotationProcessorPaths>
</configuration>
</plugin>
<plugin>
<groupId>org.graalvm.buildtools</groupId>
<artifactId>native-maven-plugin</artifactId>
</plugin>
<plugin>
<groupId>org.springframework.boot</groupId>
<artifactId>spring-boot-maven-plugin</artifactId>
<configuration>
<excludes>
<exclude>
<groupId>org.projectlombok</groupId>
<artifactId>lombok</artifactId>
</exclude>
</excludes>
</configuration>
</plugin>
</plugins>
</build>
</project>
1.2.全局配置
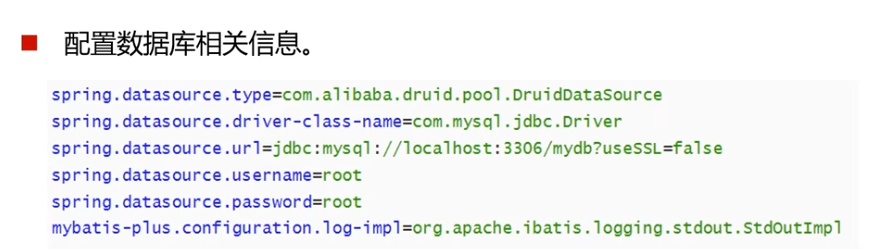
spring.application.name=my-project-backend
spring.datasource.url=jdbc:mysql://192.168.9.73:3306/pvfforecast?useSSL=false
spring.datasource.username=root
spring.datasource.password=INT@4001093999
spring.datasource.driver-class-name=com.mysql.cj.jdbc.Driver
mybatis-plus.configuration.log-impl=org.apache.ibatis.logging.stdout.StudOutImpl
mybatis-plus.mapper-locations=classpath:mapper/*.xml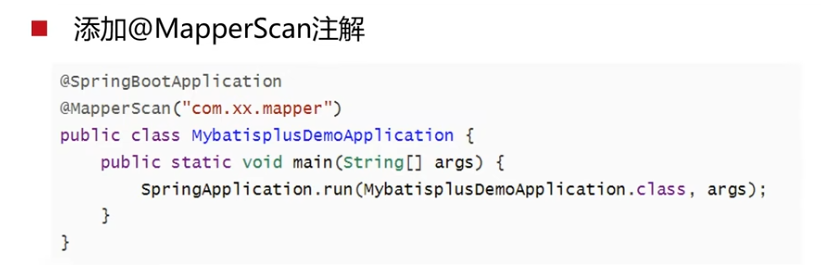
package com.myproject;
import org.mybatis.spring.annotation.MapperScan;
import org.springframework.boot.SpringApplication;
import org.springframework.boot.autoconfigure.SpringBootApplication;

@SpringBootApplication
@MapperScan("com.myproject.mapper") // 指定Mapper接口所在的包
public class MyProjectBackendApplication {

    public static void main(String[] args) {
        SpringApplication.run(MyProjectBackendApplication.class, args);
    }

}
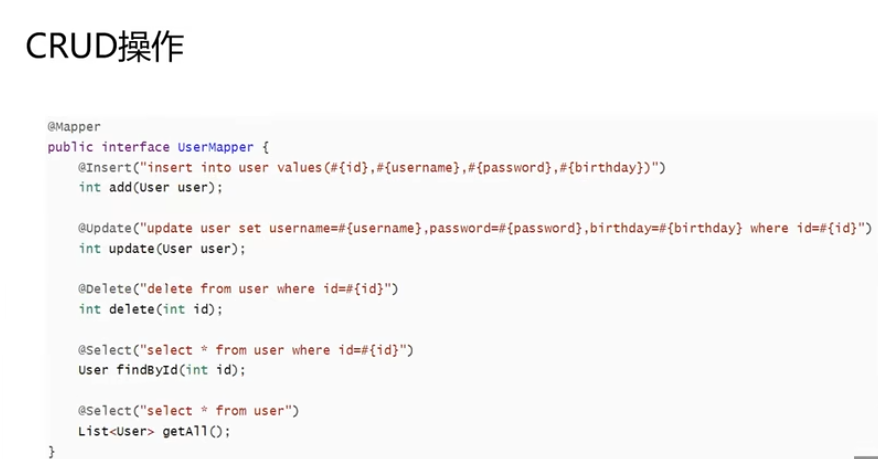
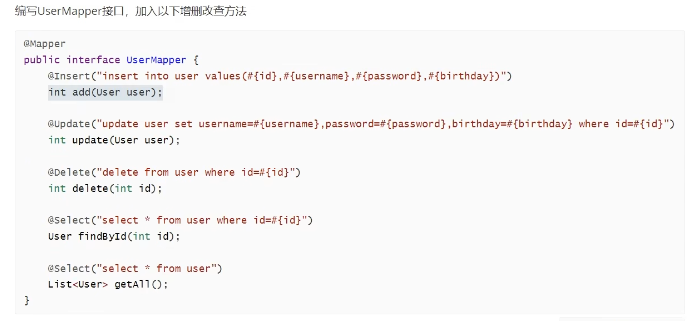
控制器实现

1.主程序添加mapper扫描:注解 @MapperScan("com.myproject.mapper")
2.mapper处理数据库操作:表名+mapper
不需要去写实现的内容
3.controller处理浏览器的访问
4.entity实体类:每个表对应一个类
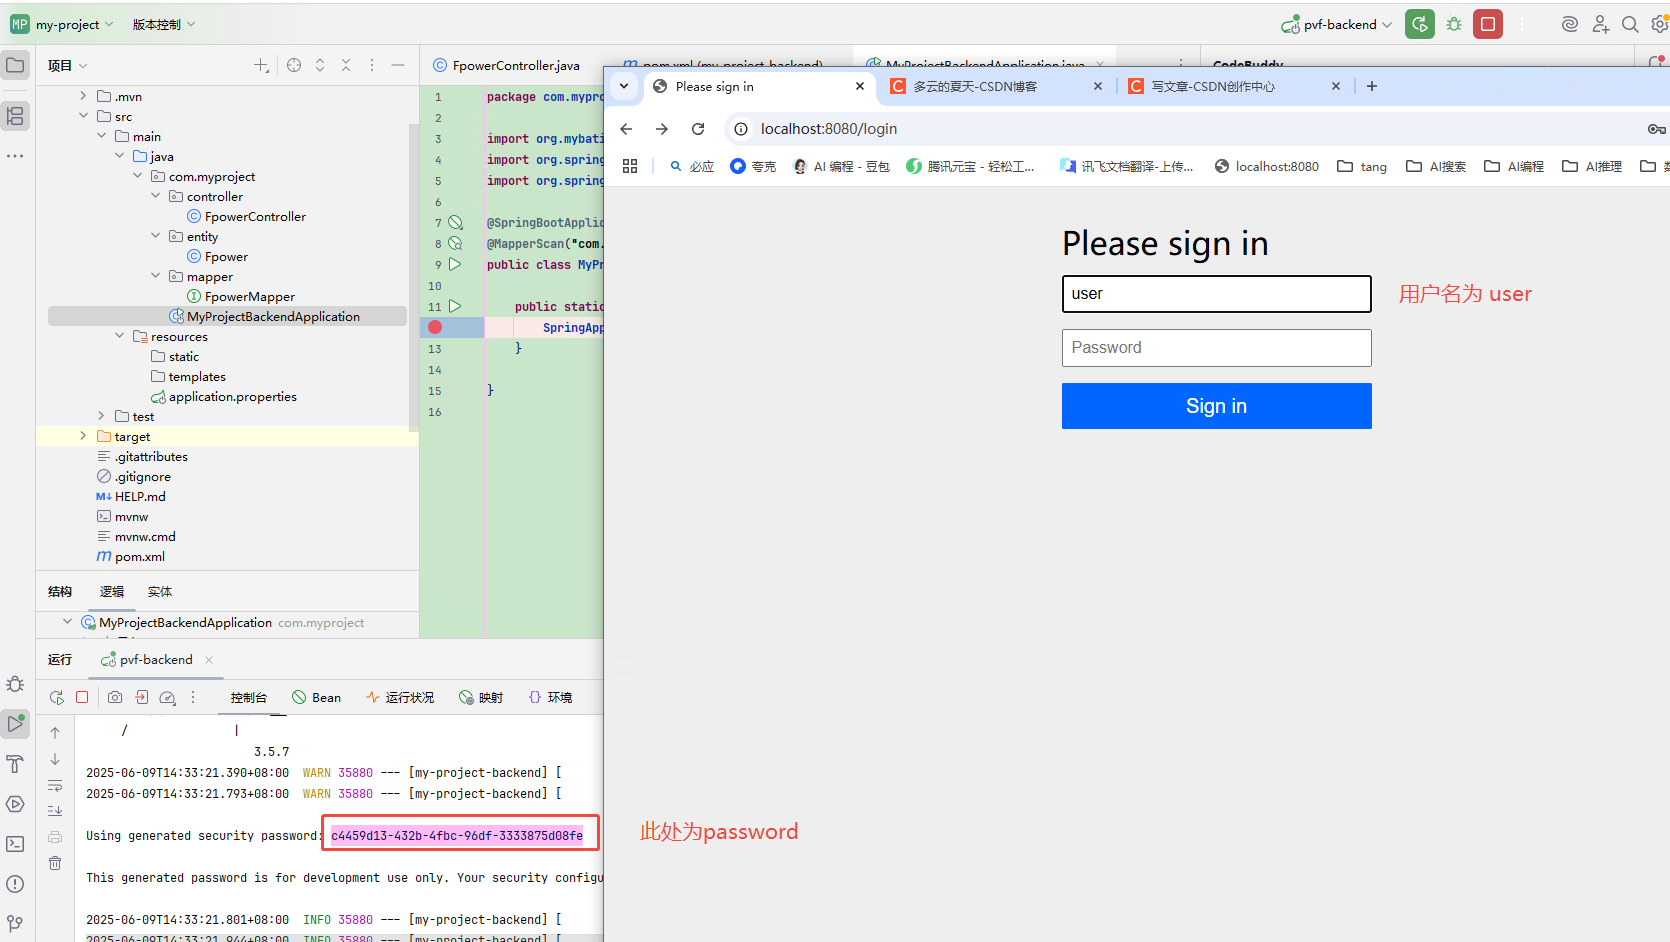
浏览器访问:
https://localhost:8080/login
user:
password:
1.3.通过config实现数据库用户名密码登录
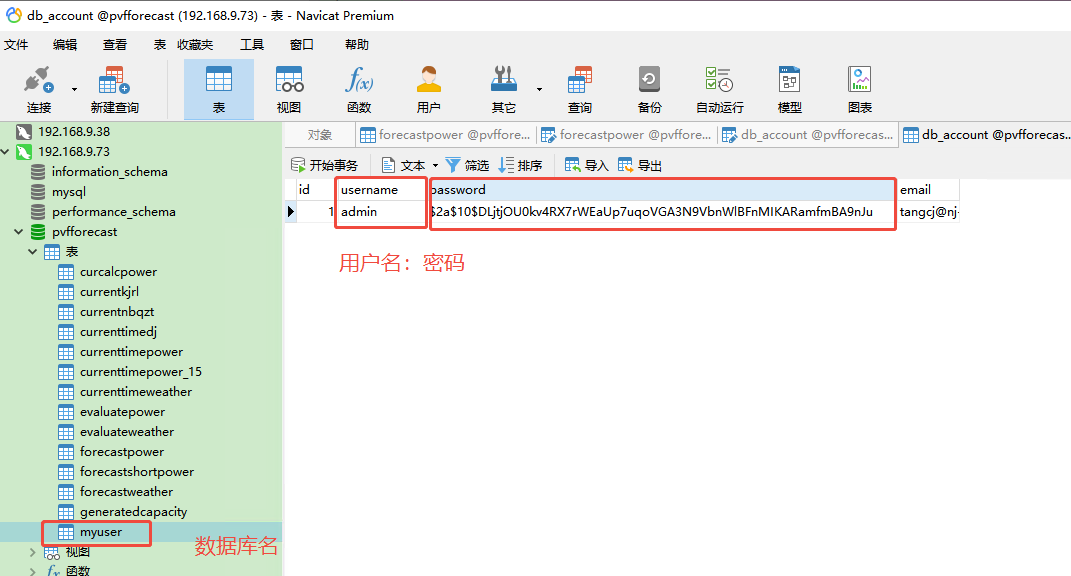
1.config中添加 service
//注入2个类 密码在数据库里是加密的,浏览器中不加密的
//admin:123456
//自定义的服务类:myauthorizeService
//
 @Bean
    public AuthenticationManager authenticationManager(HttpSecurity security)  throws Exception{
        return  security
                .userDetailsService(myauthorizeService)
                .getSharedObject(AuthenticationManagerBuilder.class)
                .build();
    }
  @Bean
  public BCryptPasswordEncoder passwordEncoder(){
      return new BCryptPasswordEncoder();
  }
2.service中添加mapper和entity 用于数据库操作
MyuserMapper.java
@Service
public class MyAuthorizeService implements UserDetailsService {

    @Resource
    MyuserMapper myuserMapper;

    @Override
    public UserDetails loadUserByUsername(String username)   throws UsernameNotFoundException {
            if(username == null)
                throw new UsernameNotFoundException("用户名不能为空");
            Myuser myuser = myuserMapper.getuserbyusername(username);
            if(myuser == null)
                throw new UsernameNotFoundException("用户名或密码错误");
            //User 这是一个库里的类
            return User
                    .withUsername(myuser.getUsername())
                    .password(myuser.getPassword())
                    .roles("user")
                    .build();
    }
}
MyuserMapper.java
package com.myproject.mapper;

import com.myproject.entity.Myuser;
import org.apache.ibatis.annotations.Mapper;
import org.apache.ibatis.annotations.Select;

@Mapper
public interface MyuserMapper {

    @Select("select * from myuser where username = #{username} ")
    Myuser getuserbyusername(String username);
}
Myuser.java
import lombok.Data;

@Data
public class Myuser {
    int id;
    String email;
    String username;
    String password;


}
2.frontend
2.1系统搭建
1.package.json
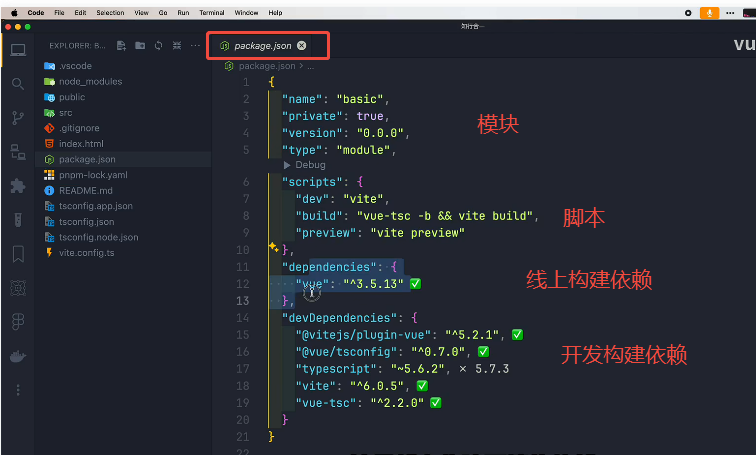
名称
私有
版本
模块化规范
端口:5173-4173
2.index.html 入口文件
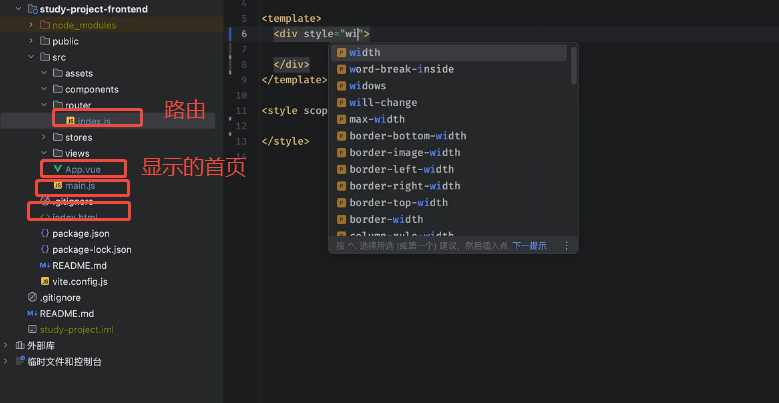
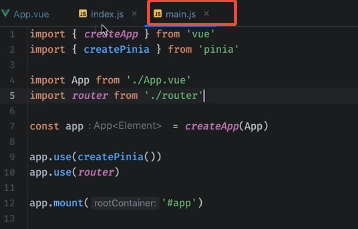
2.main.js
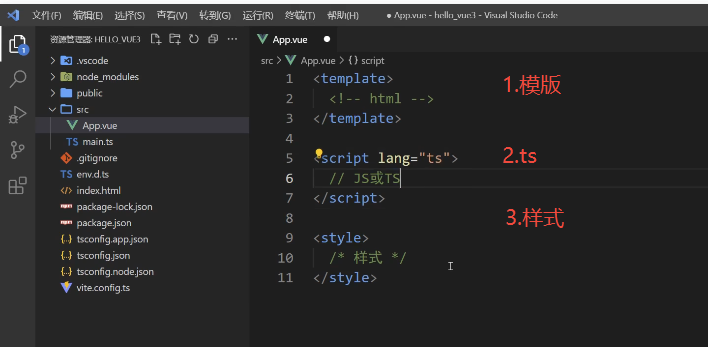
3.App.vue 3个
添加组件
设计 | Element Plus
npm install vue-axios --save
npm install vue-router
npm install pinia
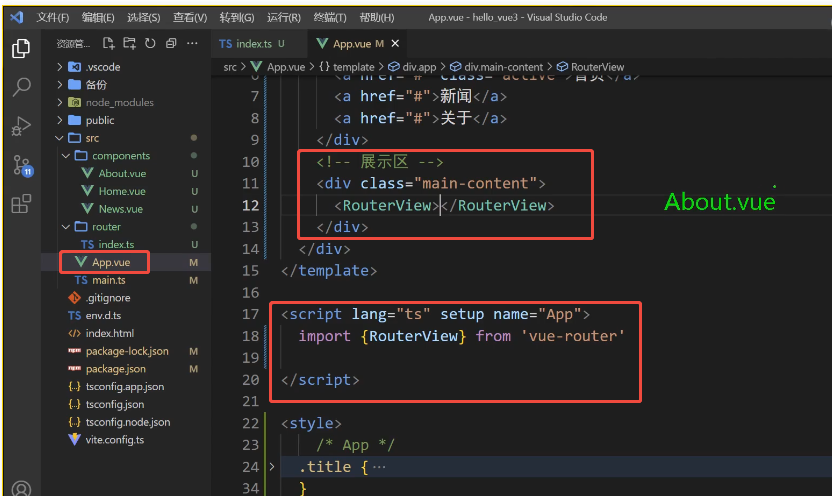
1.写App.vue
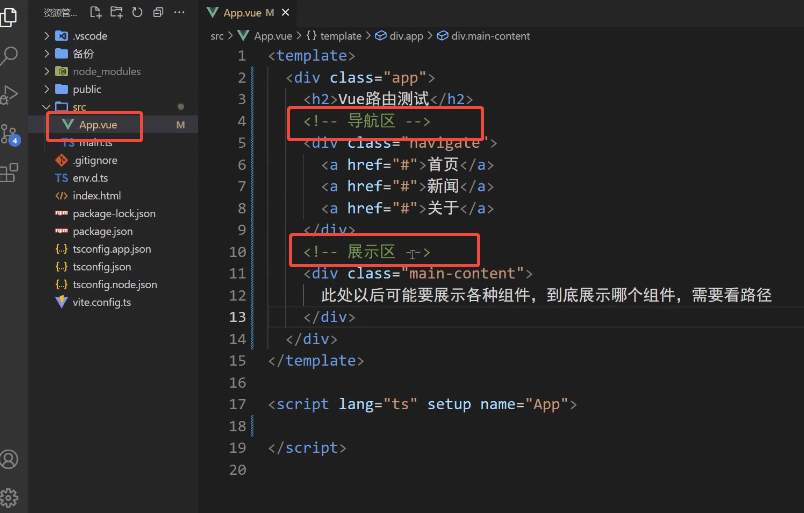
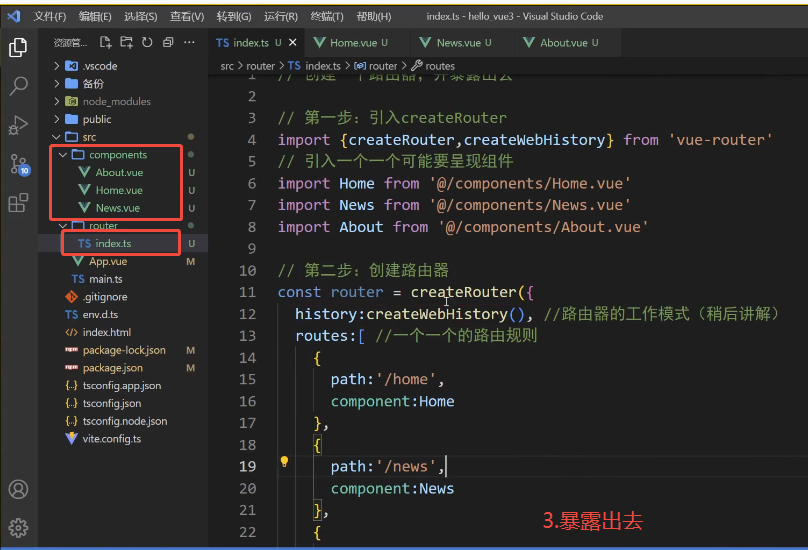
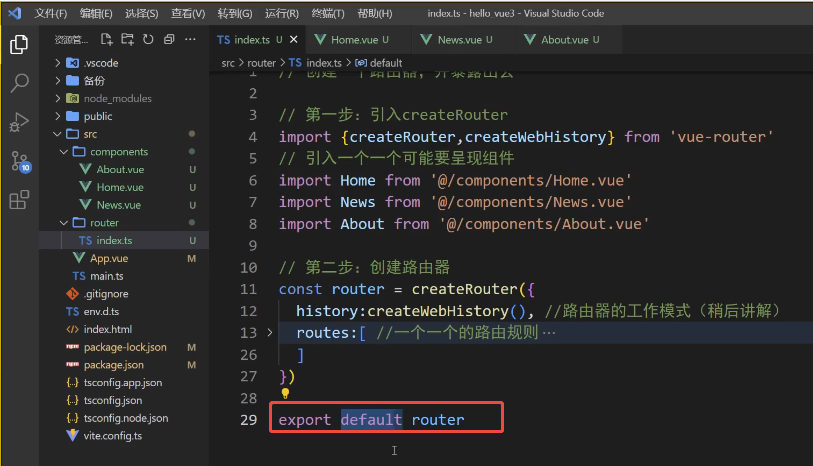
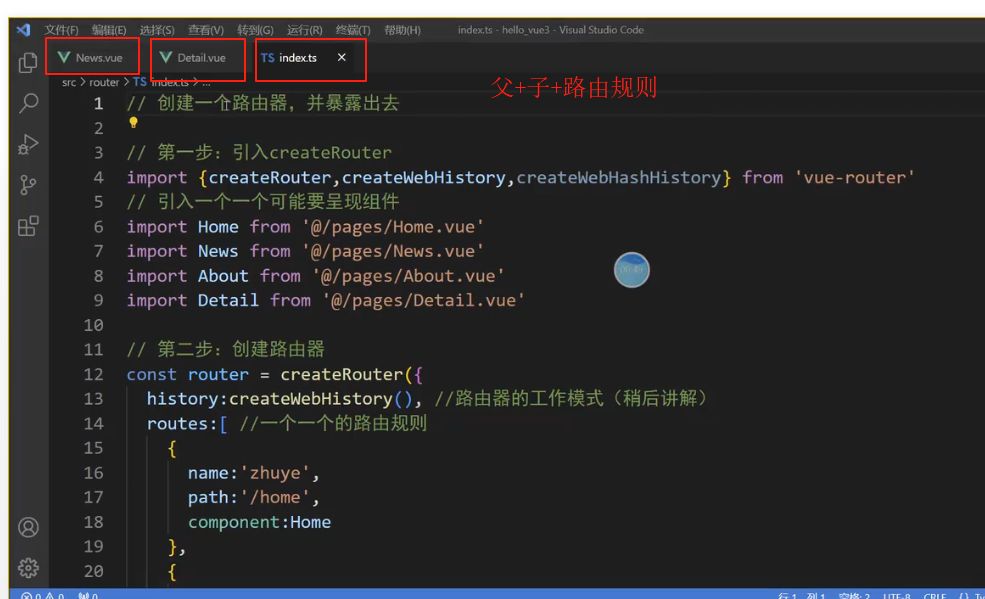
2.写router: index.ts 并暴露出去
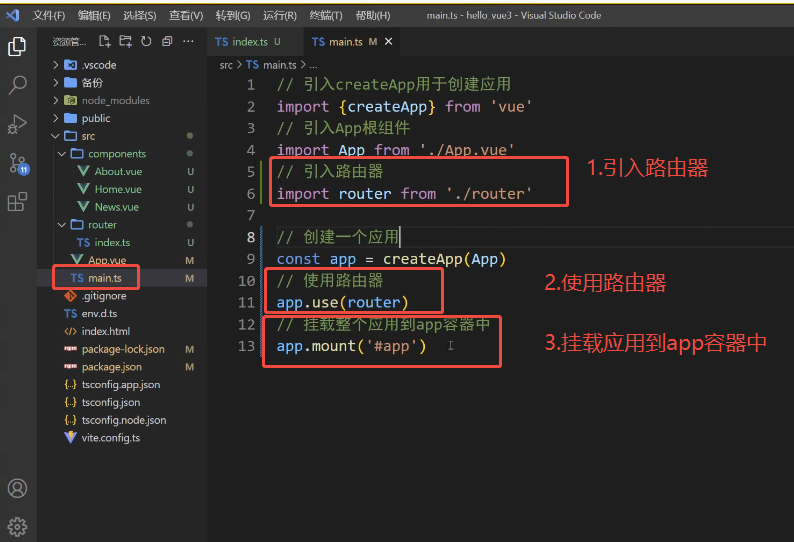
3.加载进项目里 main.ts
浏览器插件下载:
修改App.vue
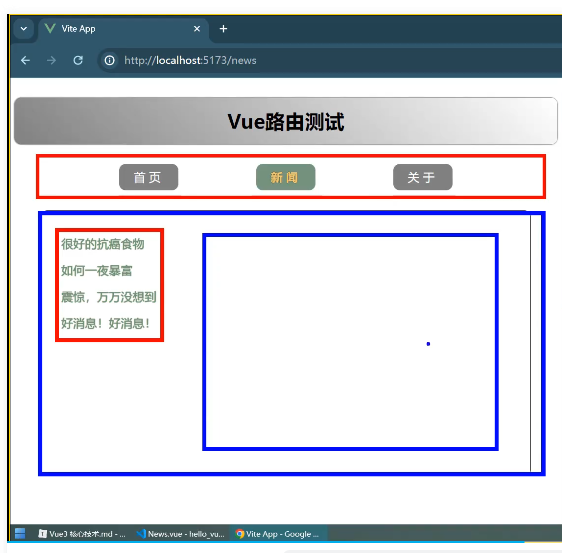
验证:
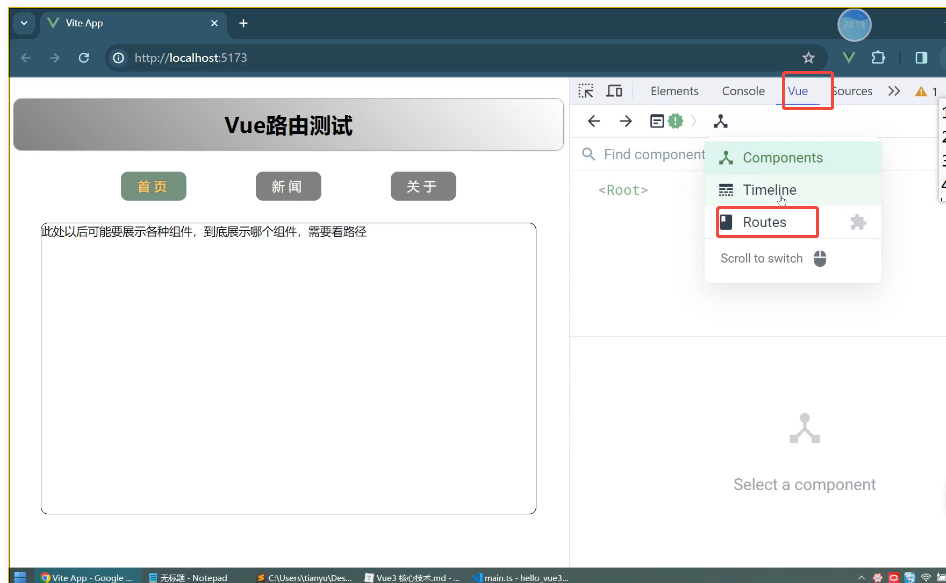
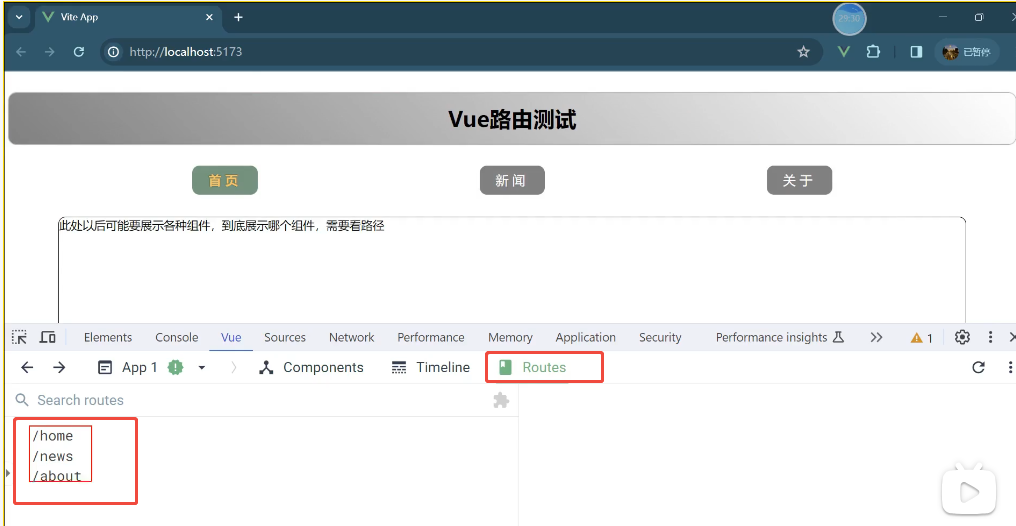
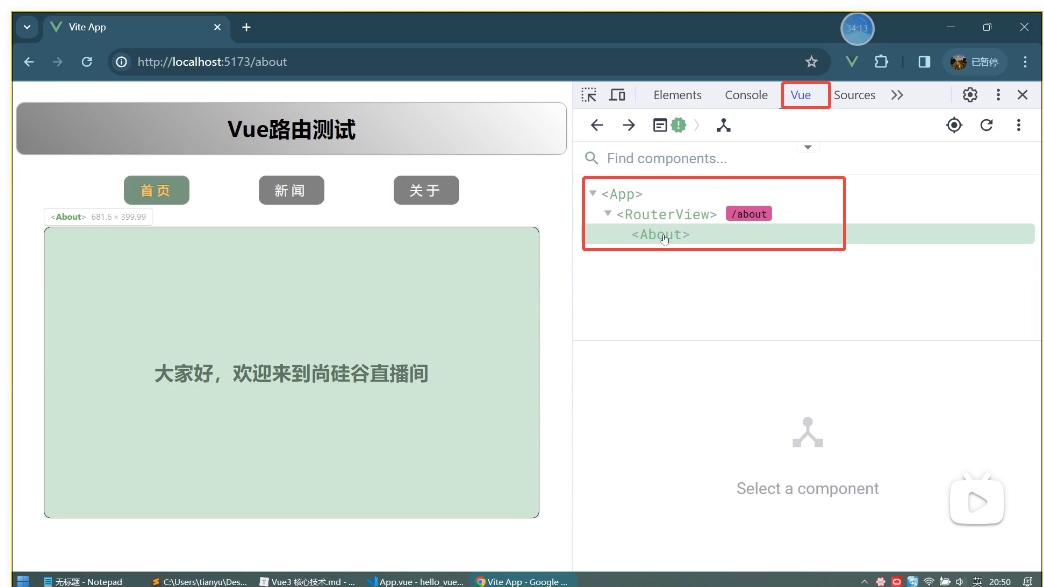
localhost:5173/home
2.2 路由及路由器
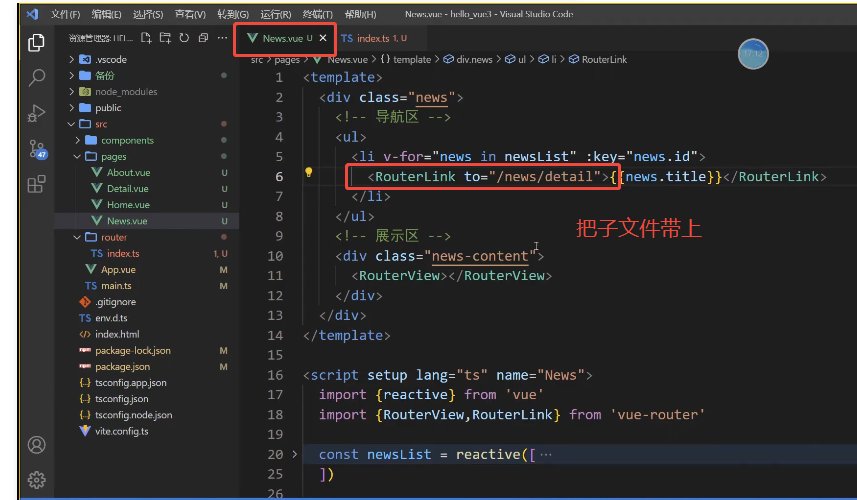
<routerlink>
响应鼠标点击:添加RouterLink
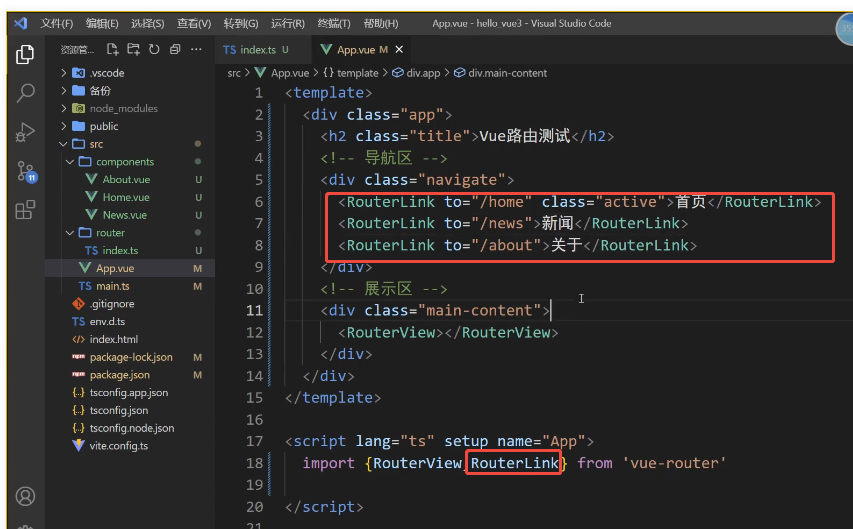

hash模式
组件分类 route components
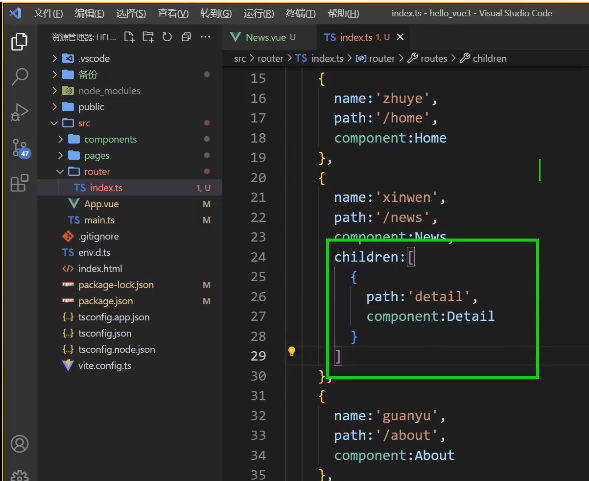
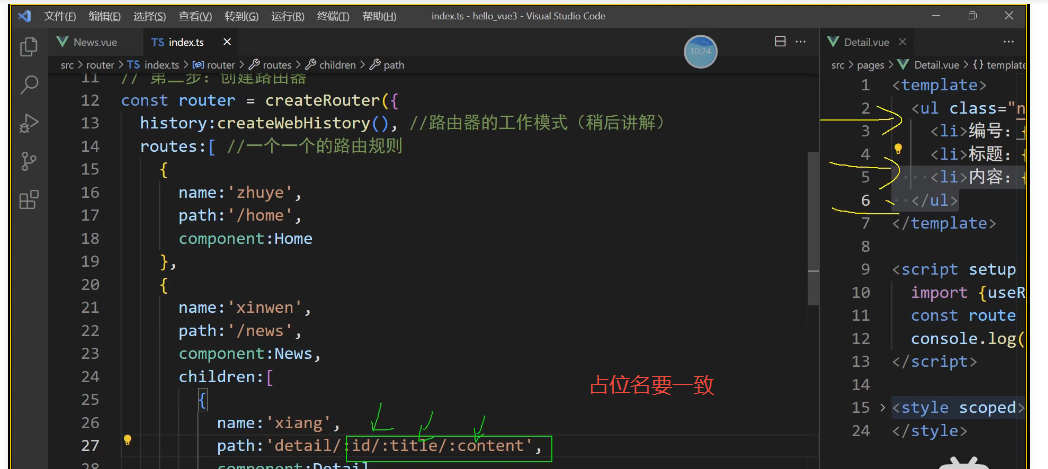
2.3.嵌套路由
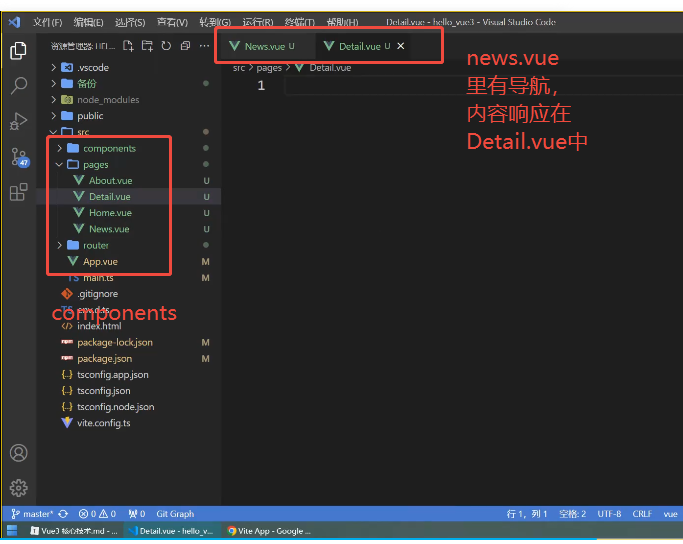
修改index.ts
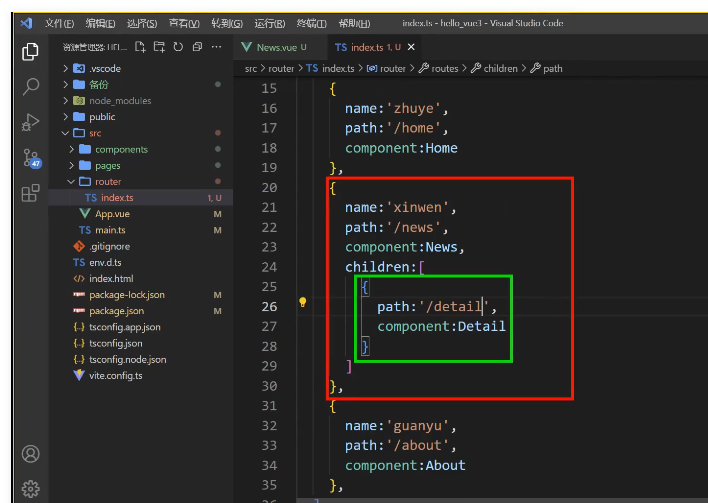
子集不需要写/
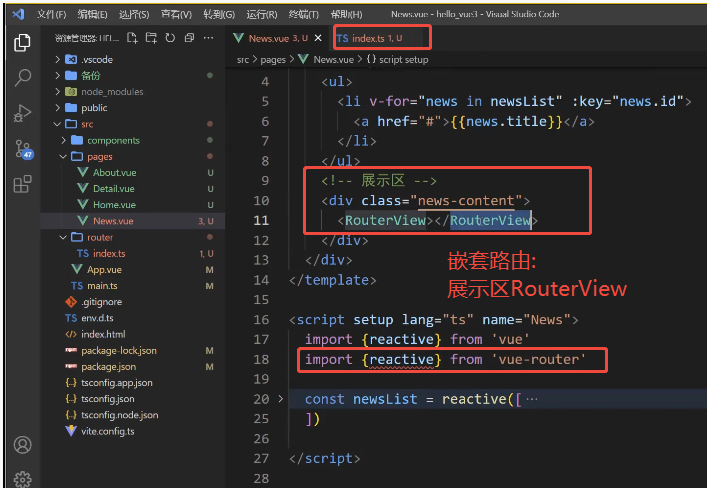
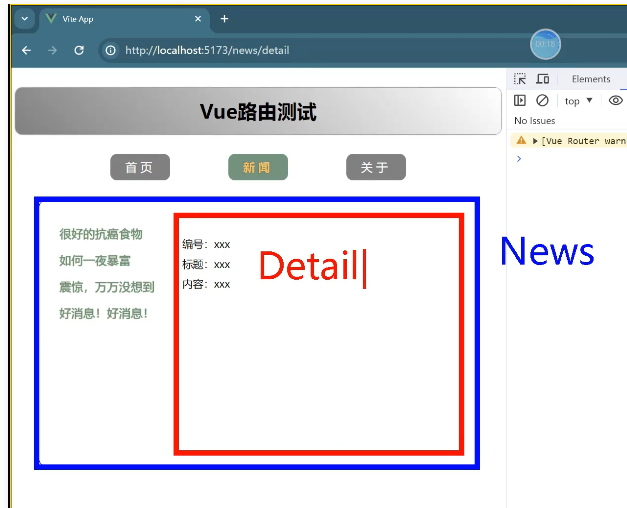
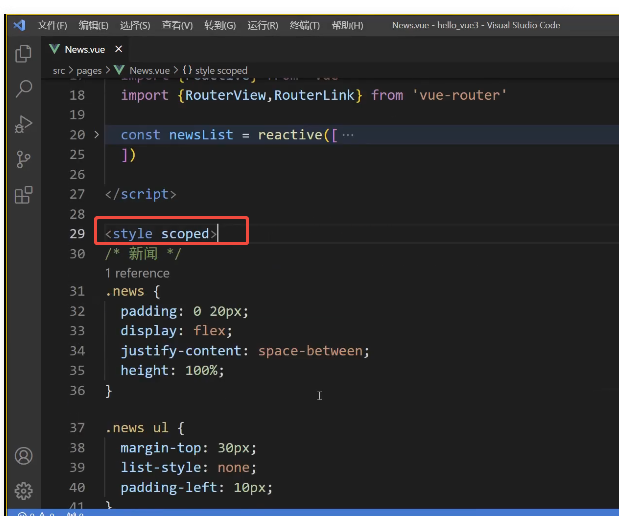
调整样式在
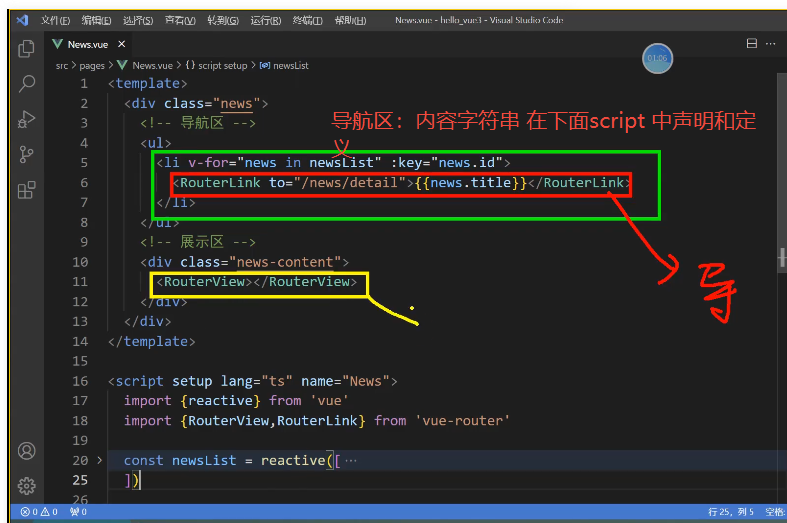
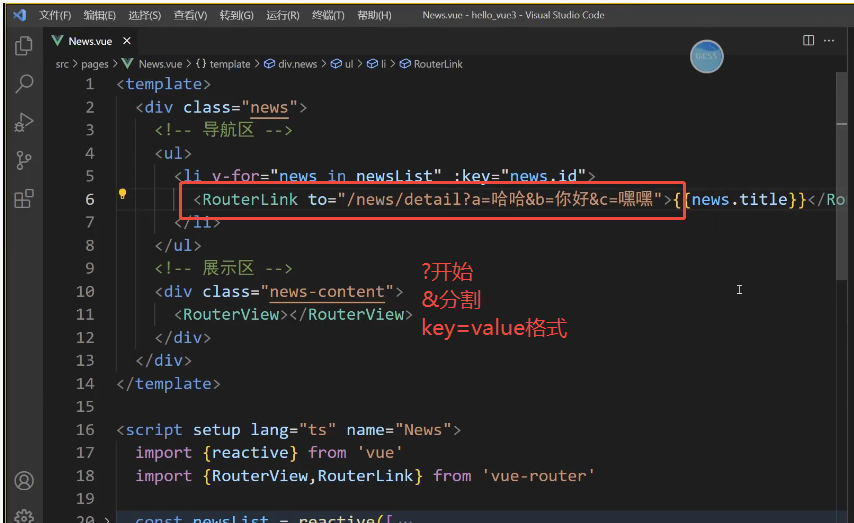
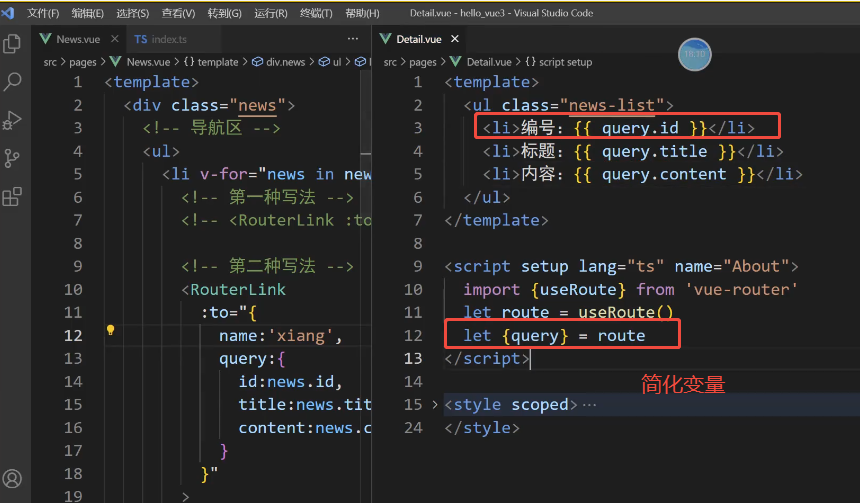
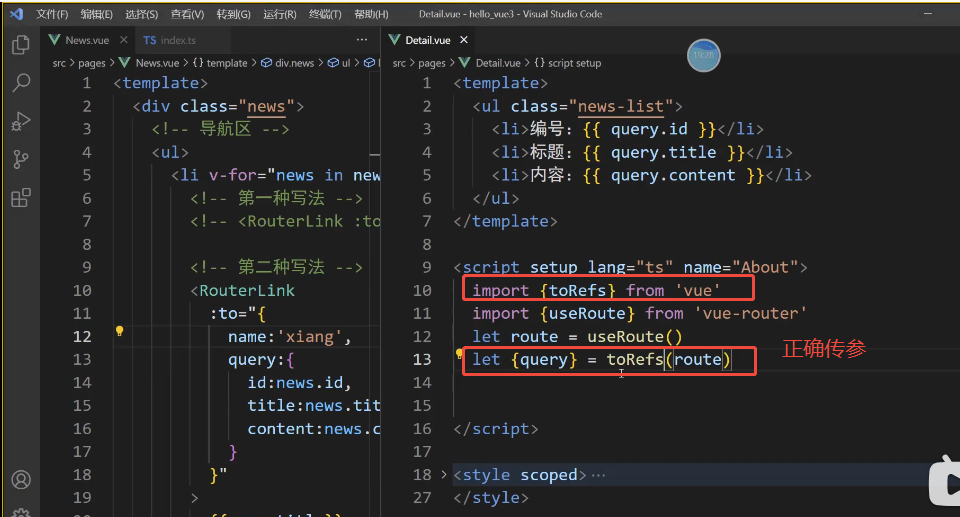
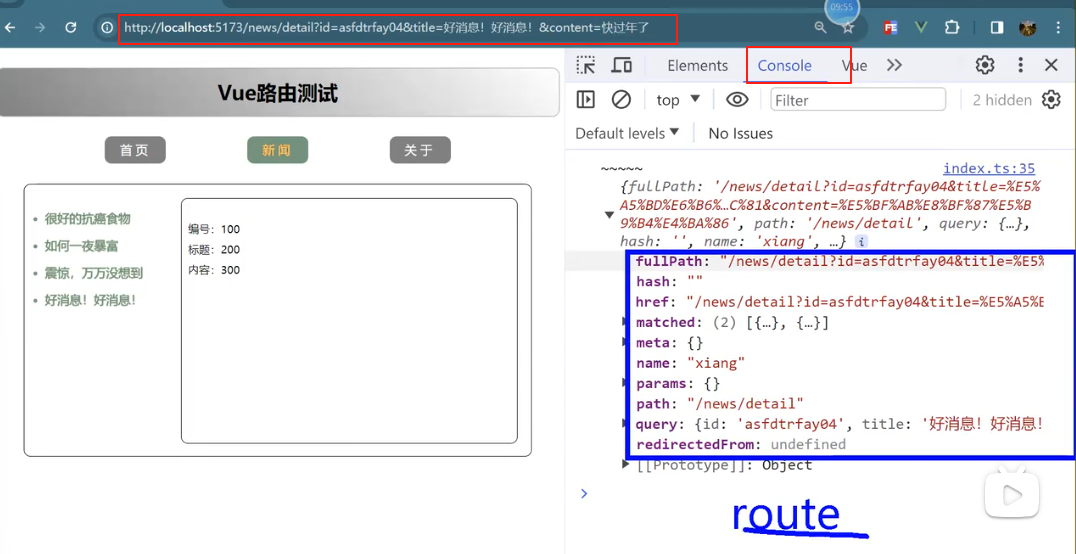
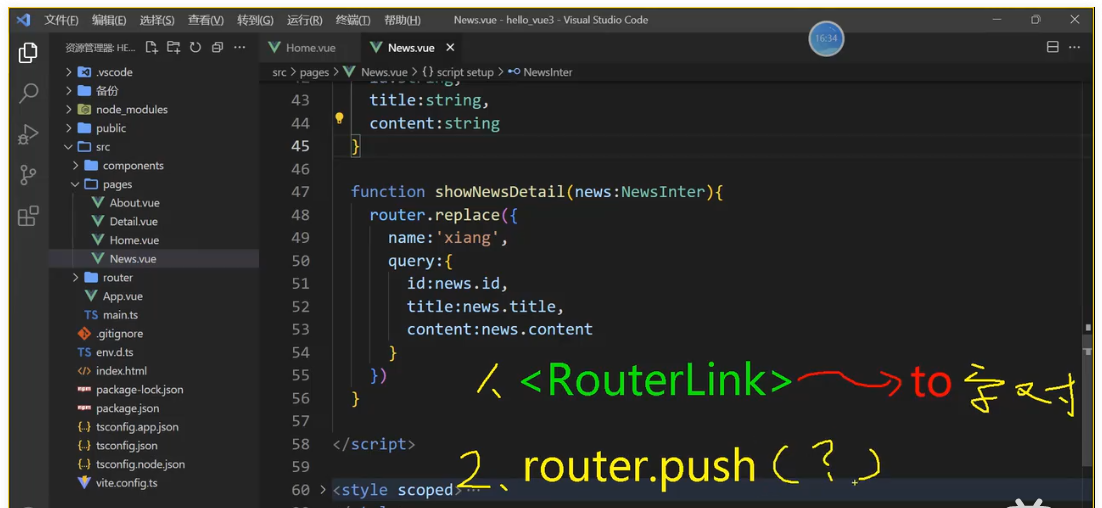
2.4 传参query
: news.vue
details.vue
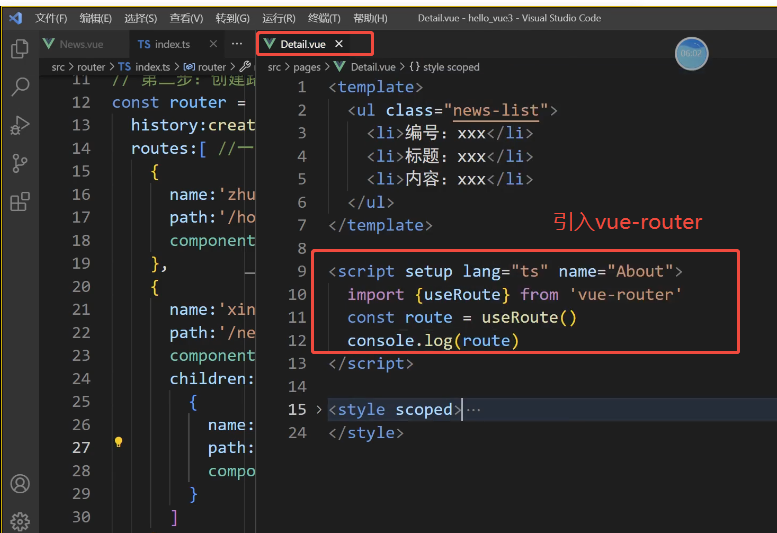
route 获取变量
console.log(‘@’,route);打印变量
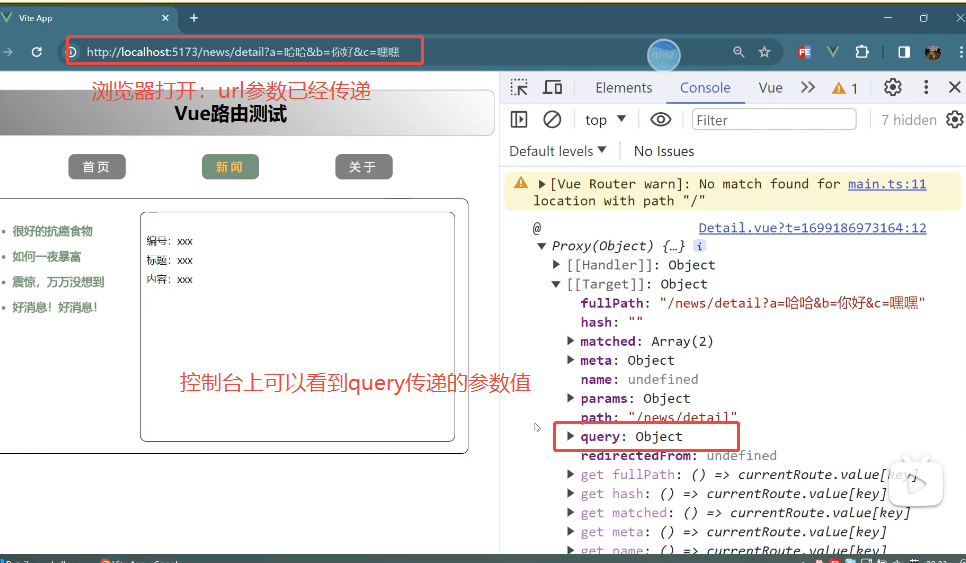
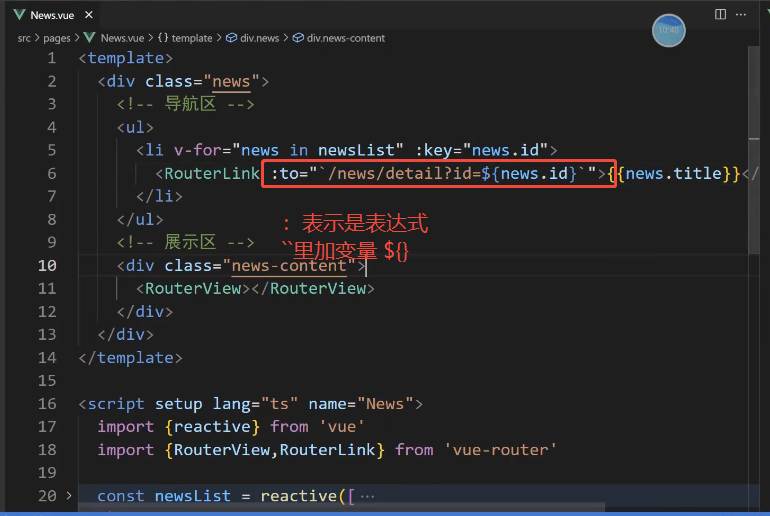
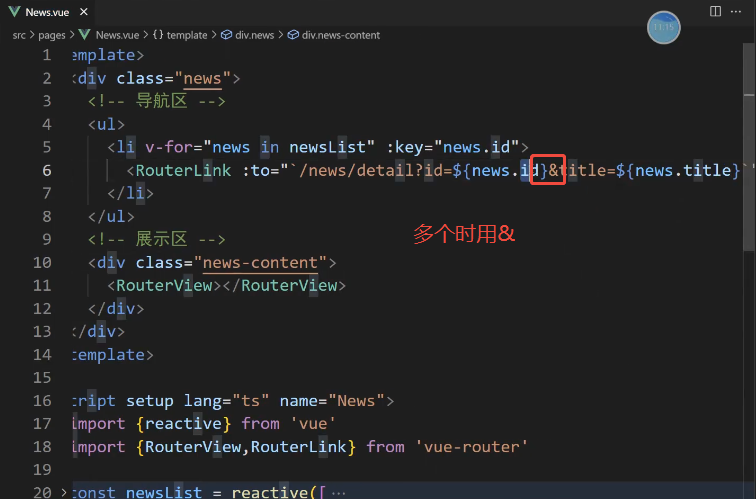
内容已传递

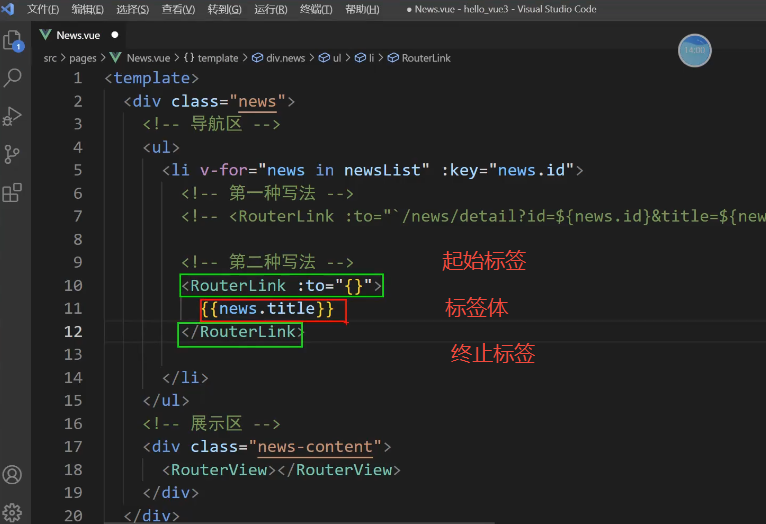
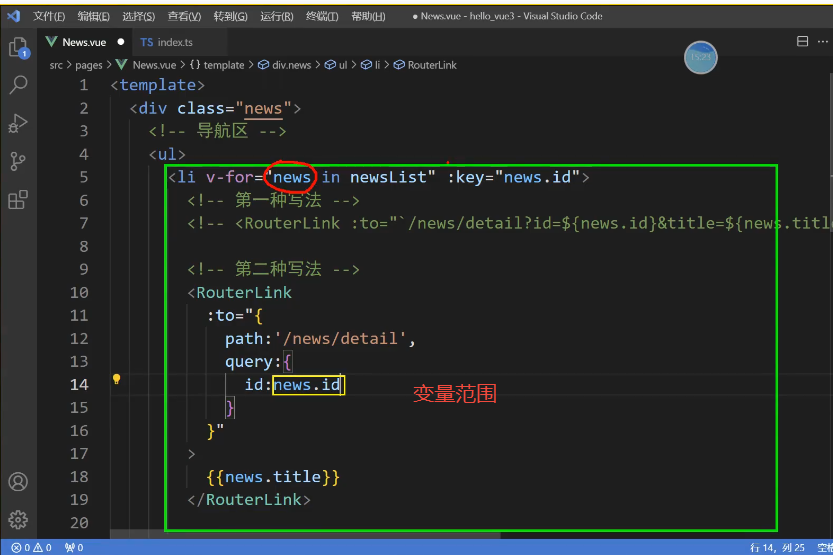
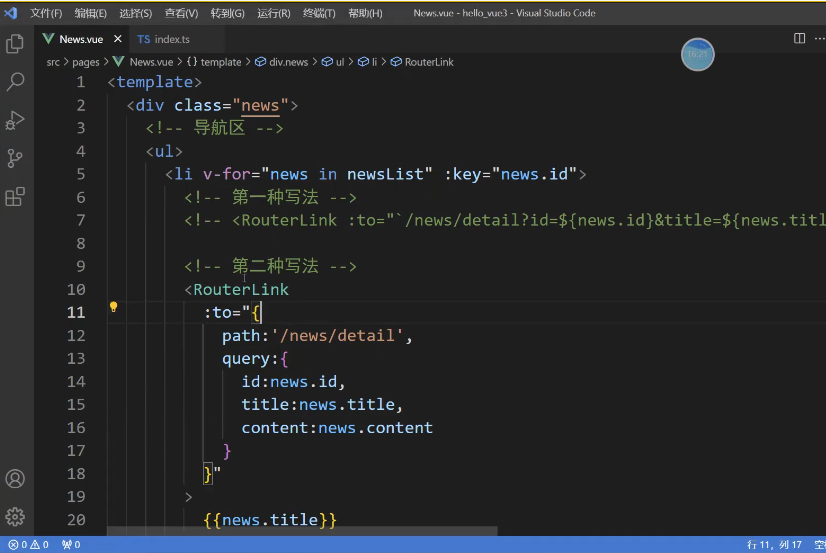
上面写法只能传一次。
2.5传参params

这不是子路由,是参数
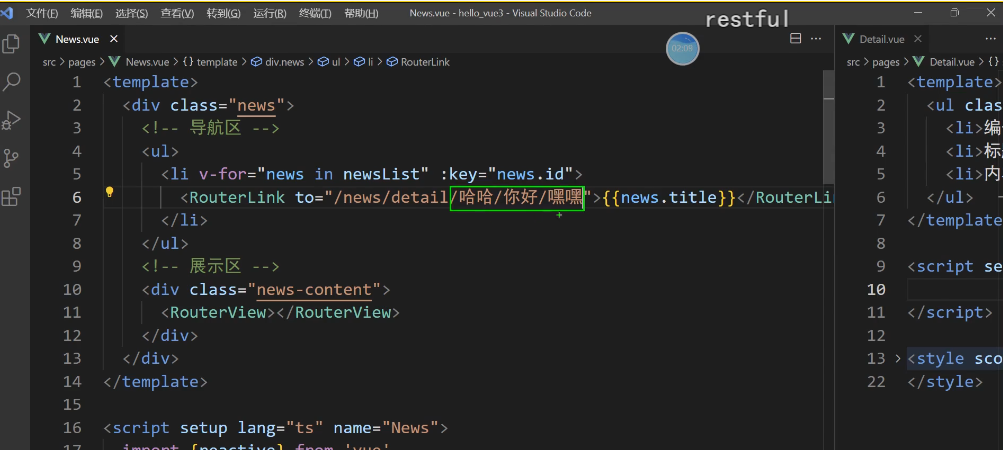
要去index.ts修改文件
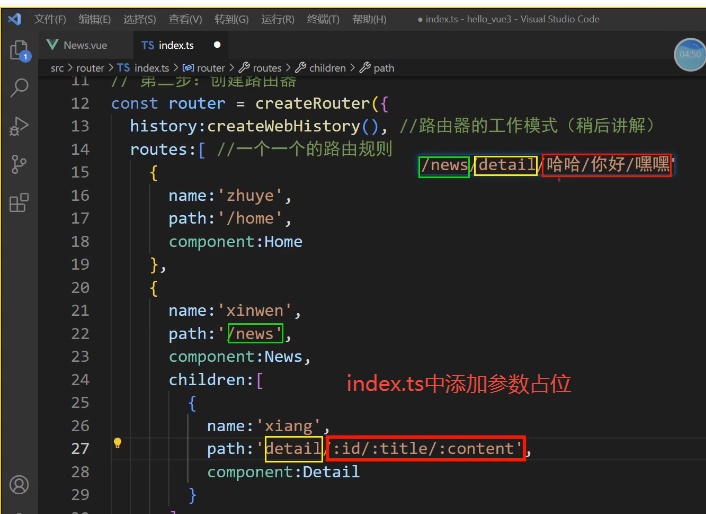
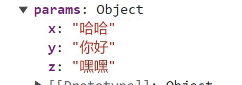
参数任意命名 x y z
打开浏览器
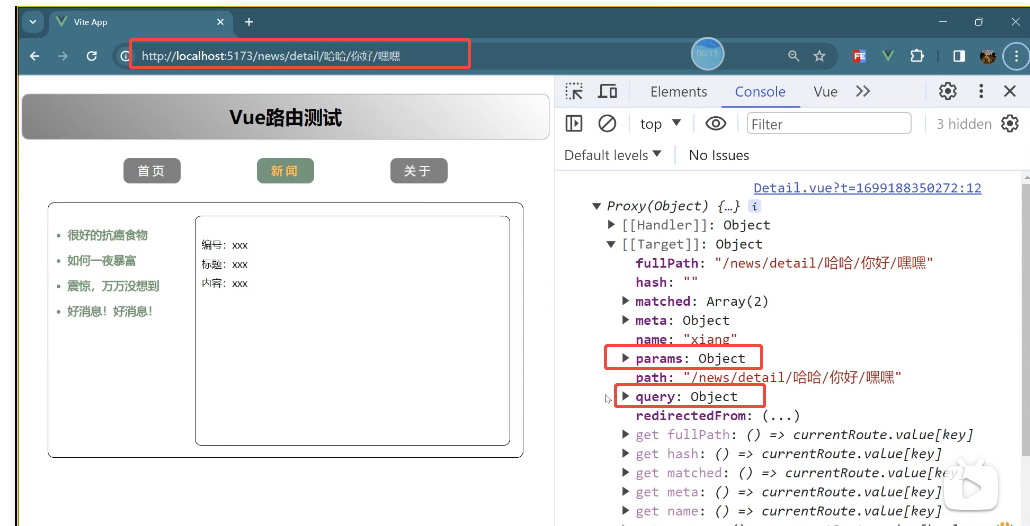
第一种字符串
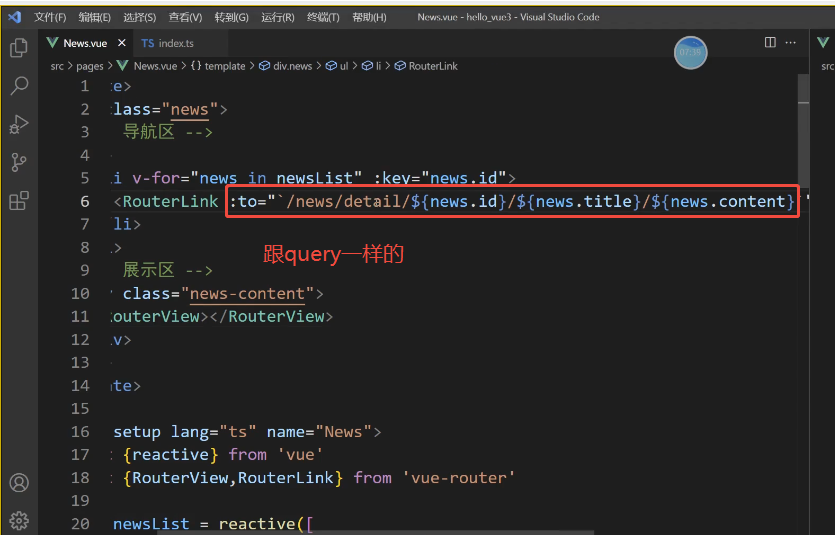
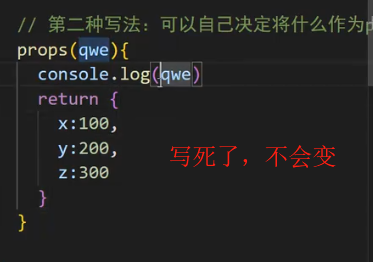
第二种写法 对象写法
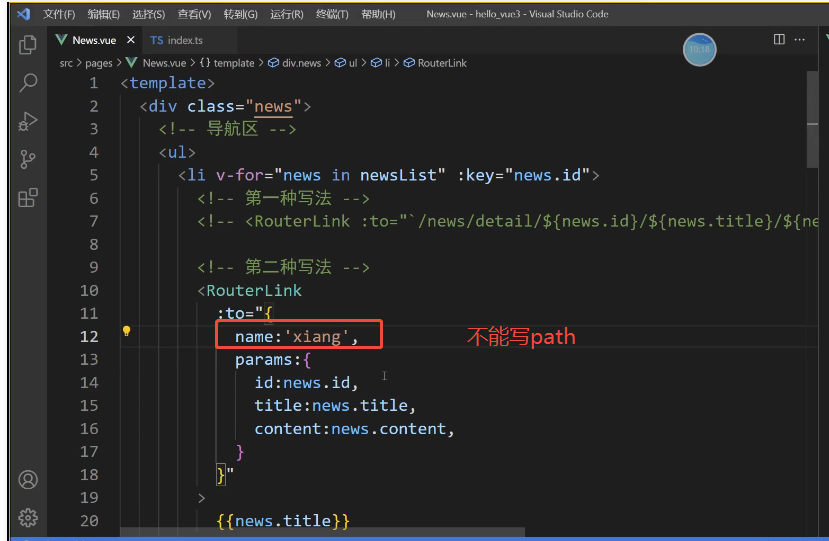
1.用name 不能是path
不能传对象和数组
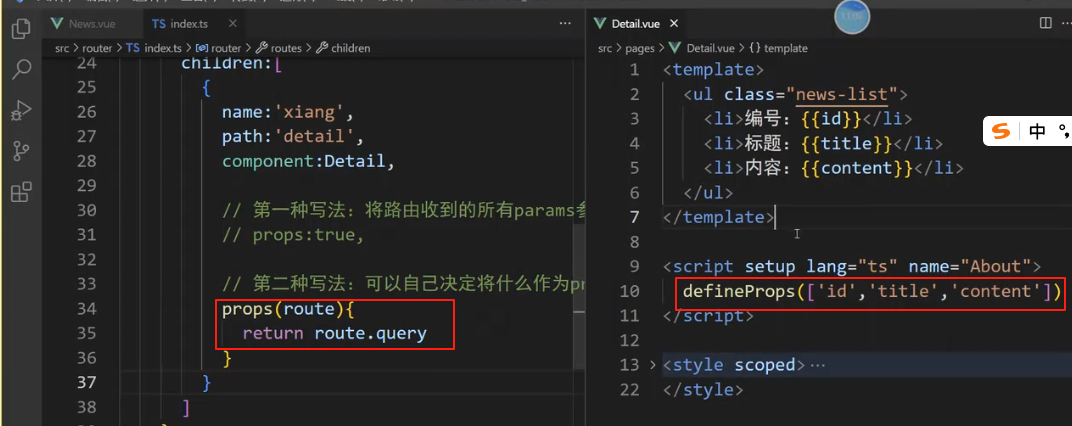
2.6路由的props
1.修改规则
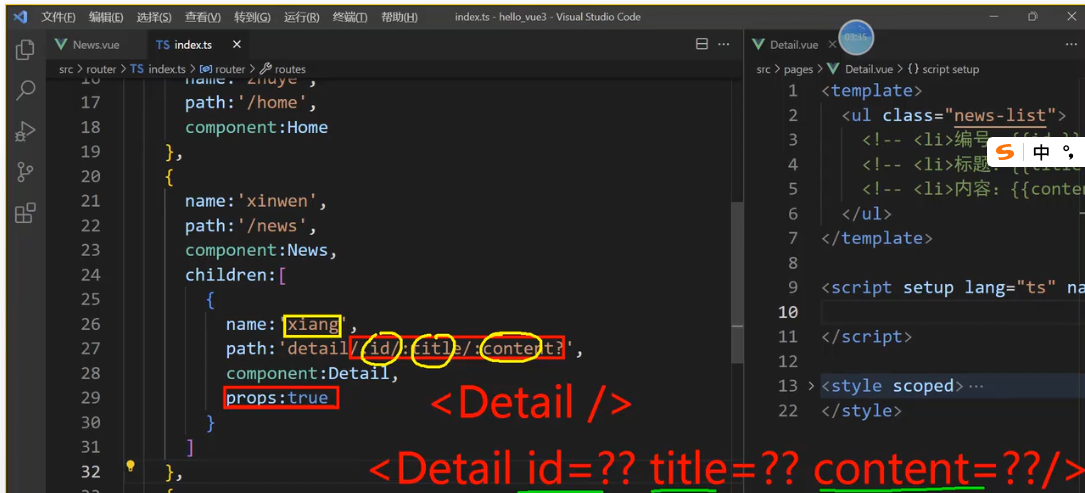
details 支持 props
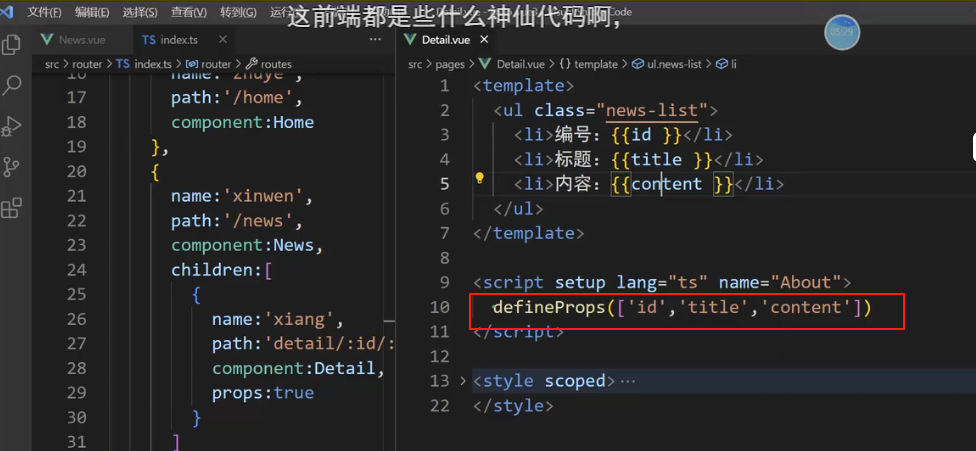
运行后看
引用route变量
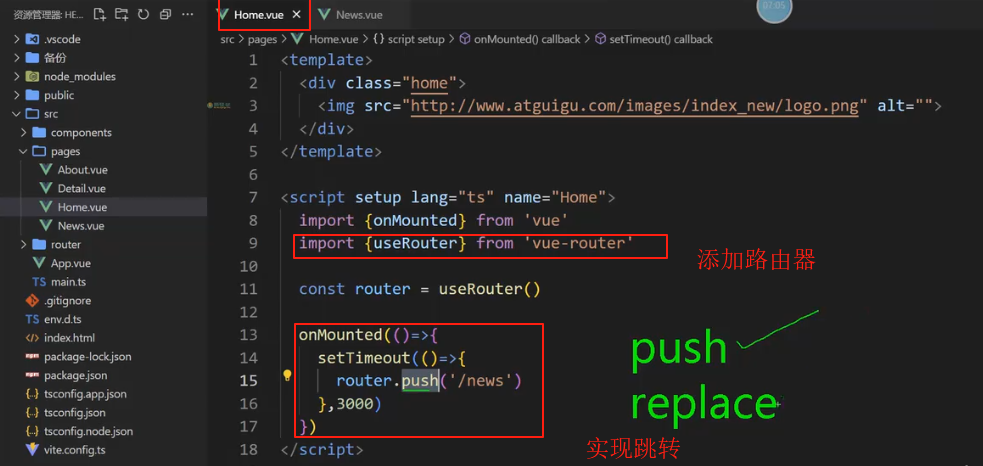
2.7路由-编程式导航


 460
460

 被折叠的 条评论
为什么被折叠?
被折叠的 条评论
为什么被折叠?
 到【灌水乐园】发言


