


ConfigFileApplicationListener
这里假设你对 Spring Boot 的执行流程及事件机制已经有一定的了解, ConfigFileApplicationListener 是在环境准备阶段触发 ApplicationEnvironmentPreparedEvent 事件首先执行的 ApplicationListener。先看看 ConfigFileApplicationListener 中的如下一段代码。
@Override
public boolean supportsEventType(Class<? extends ApplicationEvent> eventType) {
	// ConfigFileApplicationListener支持的时间类型,支持ApplicationEnvironmentPreparedEvent 和 ApplicationPreparedEvent
	return ApplicationEnvironmentPreparedEvent.class.isAssignableFrom(eventType)
			|| ApplicationPreparedEvent.class.isAssignableFrom(eventType);
}

@Override
public void onApplicationEvent(ApplicationEvent event) {
	if (event instanceof ApplicationEnvironmentPreparedEvent) {
		// 触发 ApplicationEnvironmentPreparedEvent 事件执行的方法
		onApplicationEnvironmentPreparedEvent((ApplicationEnvironmentPreparedEvent) event);
	}
	if (event instanceof ApplicationPreparedEvent) {
		// 触发 ApplicationPreparedEvent 事件执行的方法
		onApplicationPreparedEvent(event);
	}
}
从上面的代码可以看出在触发 ApplicationEnvironmentPreparedEvent 时,执行了 onApplicationEnvironmentPreparedEvent() 方法,其入参为当前事件对象。
private void onApplicationEnvironmentPreparedEvent(ApplicationEnvironmentPreparedEvent event) {
	// 实例化所有 spring.factories 中 EnvironmentPostProcessor 接口实现类
	List<EnvironmentPostProcessor> postProcessors = loadPostProcessors();
	// 加入当前类ConfigFileApplicationListener对象,因为ConfigFileApplicationListener也实现了EnvironmentPostProcessor接口
	postProcessors.add(this);
	// 按优先级排序
	AnnotationAwareOrderComparator.sort(postProcessors);
	for (EnvironmentPostProcessor postProcessor : postProcessors) {
		// 在环境准备完毕后,循环执行环境后置处理器
		postProcessor.postProcessEnvironment(event.getEnvironment(), event.getSpringApplication());
	}
}

List<EnvironmentPostProcessor> loadPostProcessors() {
	// 调用 SpringFactoriesLoader.loadFactories() 方法完成对spring.factories文件中配置的EnvironmentPostProcessor接口实现类的实例化
	return SpringFactoriesLoader.loadFactories(EnvironmentPostProcessor.class, getClass().getClassLoader());
}
这里 SpringFactoriesLoader.loadFactories() 方法的介绍可以看这篇博文: Spring 源码之 SpringFactoriesLoader 类简介-优快云博客
在添加完 this 及排序后,断点可以看到有如下5个EnvironmentPostProcessor,依次执行它们。
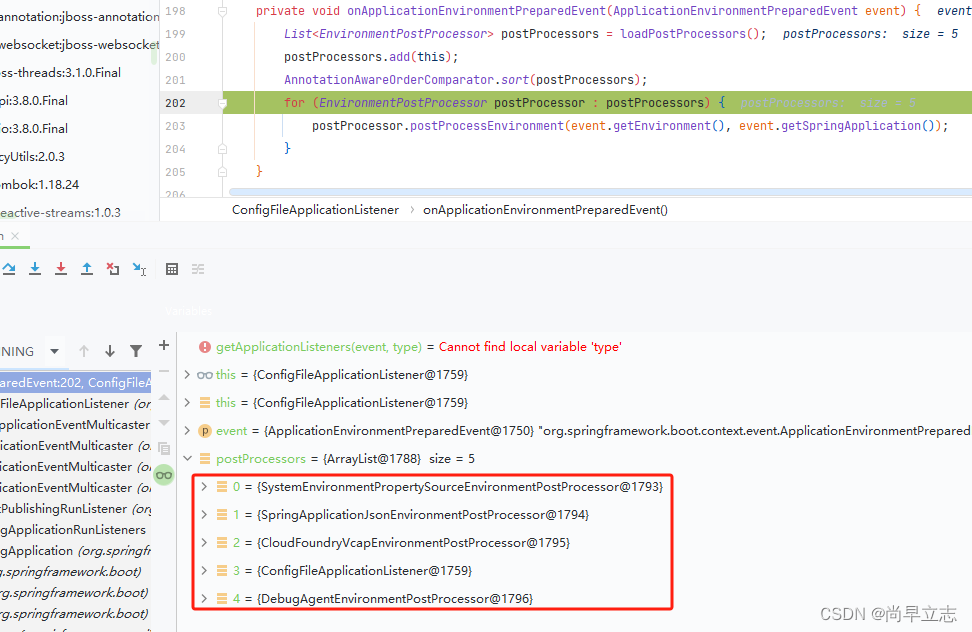
SystemEnvironmentPropertySourceEnvironmentPostProcessor
该后置处理器首先会从环境对象中读取系统环境变量配置(对于windows系统而言包含 用户环境变量 和 系统环境变量),如果读取到了就进行包装替换,replacePropertySource() 方法主要逻辑就是包装替换成 OriginAwareSystemEnvironmentPropertySource,这里就大家自己看看源码。
@Override
public void postProcessEnvironment(ConfigurableEnvironment environment, SpringApplication application) {
	String sourceName = StandardEnvironment.SYSTEM_ENVIRONMENT_PROPERTY_SOURCE_NAME;
	//从环境对象获取名称systemEnvironment的属性配置
	PropertySource<?> propertySource = environment.getPropertySources().get(sourceName);
	if (propertySource != null) {
		//读取到了则进行包装
		replacePropertySource(environment, sourceName, propertySource);
	}
}
SpringApplicationJsonEnvironmentPostProcessor
该后置处理器的主要作用是获取json格式的配置数据并将其添加到环境对象environment中,让我一起看看源码。
@Override
public void postProcessEnvironment(ConfigurableEnvironment environment, SpringApplication application) {
	//获取属性资源map
	MutablePropertySources propertySources = environment.getPropertySources();
	//从属性资源map获取指定key的json value值,如果找到了则调用processJson()方法进行json配置解析并合并到environment对象中
	propertySources.stream().map(JsonPropertyValue::get).filter(Objects::nonNull).findFirst()
			.ifPresent((v) -> processJson(environment, v));
}
此处指定的 key 为 spring.application.json 或者 SPRING_APPLICATION_JSON。JsonPropertyValue::get 为内部类 JsonPropertyValue 的 get() 方法。其源码如下,就是从各个类型的配置中查找对应的属性配置,如果找到了则构建一个 JsonPropertyValue 对象返回。
static JsonPropertyValue get(PropertySource<?> propertySource) {
	for (String candidate : CANDIDATES) {
		Object value = propertySource.getProperty(candidate);
		if (value instanceof String && StringUtils.hasLength((String) value)) {
			return new JsonPropertyValue(propertySource, candidate, (String) value);
		}
	}
	return null;
}
打断点可以看到,默认情况下 Spring Boot 项目并没有配置对应的key属性,则就没有可合并的 json 属性,如下所示:
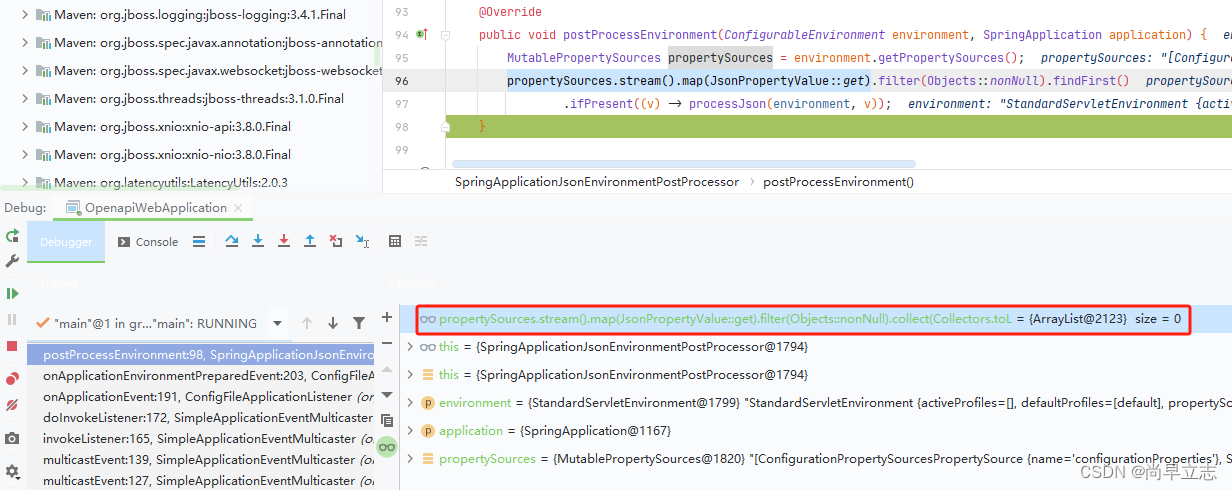
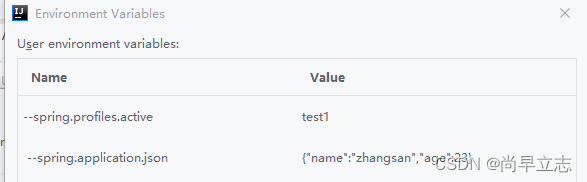
如果我们在启动命令中增加对应的配置 spring.application.json,再次断点进入项目,可以看到在name=configurationProperties 类型的属性配置中找到了 key 为 spring.application.json 的属性配置。后续就是调用 processJson() 方法处理配置合并。

private void processJson(ConfigurableEnvironment environment, JsonPropertyValue propertyValue) {
// 从json解析器工厂中获取json解析器。这里点进去看主要有四种类型的解析器:JacksonJsonParser()、GsonJsonParser()、YamlJsonParser()、BasicJsonParser()
JsonParser parser = JsonParserFactory.getJsonParser();
//将json转成map
Map<String, Object> map = parser.parseMap(propertyValue.getJson());
if (!map.isEmpty()) {
// 将map中的所有属性解析出来,并合并到environment中。注意:这里面有个合并的优先级。
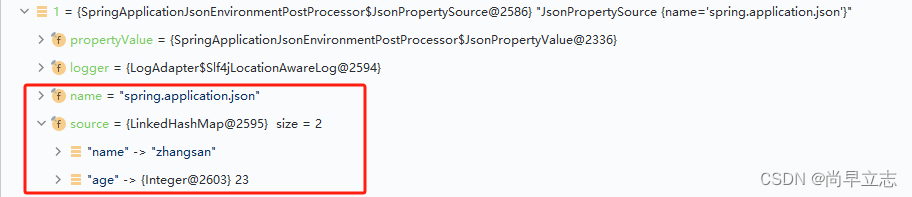
addJsonPropertySource(environment, new JsonPropertySource(propertyValue, flatten(map)));
}
}合并的属性类型 name 为 spring.application.json,其位置会在 jndiProperties、servletContextInitParams、servletConfigInitParams、systemProperties 等类型的配置之前,优先级关系为:
configurationProperties >> spring.application.json >> jndiProperties >> servletContextInitParams >> servletConfigInitParams >> systemProperties >> systemEnvironment
断点如下图所示

CloudFoundryVcapEnvironmentPostProcessor
看名称该后置处理可能跟 Spring Cloud 相关。由于其内部也是把相关的配置属性合并到 environment 对象中,且 Spring Boot 未进行加载,这里就不做过多的介绍,后续如果有机会遇到再单独说明。
ConfigFileApplicationListener
ConfigFileApplicationListener 既实现了 ApplicationListener 接口,又实现了 EnvironmentPostProcessor 接口,由于其自身在触发 ApplicationEnvironmentPreparedEvent 事件时,将自身又添加到了需要处理的 EnvironmentPostProcessor 列表中,所以就又会执行其内部的 postProcessEnvironment() 方法。
@Override
public void postProcessEnvironment(ConfigurableEnvironment environment, SpringApplication application) {
	addPropertySources(environment, application.getResourceLoader());
}

protected void addPropertySources(ConfigurableEnvironment environment, ResourceLoader resourceLoader) {
	// 添加一个随机器属性配置到环境对象中
	RandomValuePropertySource.addToEnvironment(environment);
	// 定义一个Loader 对象加载配置到 environment
	new Loader(environment, resourceLoader).load();
}
这里我们需要重点看下 Loader 对象的创建及其 load() 方法,看看做了哪些事情?
Loader(ConfigurableEnvironment environment, ResourceLoader resourceLoader) {
	// 内部环境对象赋值
	this.environment = environment;
	// 构建一个占位符解析器对象,主要用于解析 ${xxx:default} 格式的值
	this.placeholdersResolver = new PropertySourcesPlaceholdersResolver(this.environment);
	// 资源加载对象,不存在则创建一个默认的
	this.resourceLoader = (resourceLoader != null) ? resourceLoader : new DefaultResourceLoader(null);
	// 获取 META-INFO/spring.factories 中所有 PropertySourceLoader 接口实现类进行实例化对象的创建
	this.propertySourceLoaders = SpringFactoriesLoader.loadFactories(PropertySourceLoader.class,
			getClass().getClassLoader());
}
从上面代码可以看出,构造函数主要做了这几件事:
- 给内部environment对象赋值;
- 构建一个占位符解析对象;
- 构建resourceLoader对象;
- 扫描PropertySourceLoader接口实现类并构建实例化对象。
load() 方法内部是直接调用 FilteredPropertySource.apply() 方法,入参为:environment环境对象、默认的属性类型defaultProperties、需要过滤的属性(主要就是 spring.profiles.active 和 spring.profiles.include)以及一个consumer接口实现类。让我们再看看 apply() 方法源码。
static void apply(ConfigurableEnvironment environment, String propertySourceName, Set<String> filteredProperties,
		Consumer<PropertySource<?>> operation) {
	// 获取环境对象中的所有属性配置
	MutablePropertySources propertySources = environment.getPropertySources();
	// 获取名称为defaultProperties的属性配置
	PropertySource<?> original = propertySources.get(propertySourceName);
	if (original == null) {
		//如果不存在defaultProperties类型的属性配置,以null为入参调用consumer
		operation.accept(null);
		return;
	}
	// 如果不为null,则构建一个FilteredPropertySource替换原来的defaultProperties类型
	propertySources.replace(propertySourceName, new FilteredPropertySource(original, filteredProperties));
	try {
		//调用consumer进行处理
		operation.accept(original);
	}
	finally {
		//用处理后original替换原来的defaultProperties类型的属性配置
		propertySources.replace(propertySourceName, original);
	}
}
让我们再看看整个load()方法。主要作用就是加载项目激活的配置文件到环境对象中。
void load() {
	// 这里调用FilteredPropertySource.apply()方法,入参为当前环境对象、默认的属性配置类型名defaultProperties、属性过滤(按profile)、Consumer处理器
	FilteredPropertySource.apply(this.environment, DEFAULT_PROPERTIES, LOAD_FILTERED_PROPERTY,
			(defaultProperties) -> {
				this.profiles = new LinkedList<>();
				this.processedProfiles = new LinkedList<>();
				this.activatedProfiles = false;
				this.loaded = new LinkedHashMap<>();
				// 初始化profile
				initializeProfiles();
				while (!this.profiles.isEmpty()) {
					Profile profile = this.profiles.poll();
					if (isDefaultProfile(profile)) {
						addProfileToEnvironment(profile.getName());
					}
					load(profile, this::getPositiveProfileFilter,
							addToLoaded(MutablePropertySources::addLast, false));
					this.processedProfiles.add(profile);
				}
				//从指定的目录中加载指定名称的配置文件。这里有点绕,大家知道主要就是用来加载application.yaml或者application.properties文件
				//目录可以被spring.config.additional-location 和 spring.config.location 属性指定,如果未指定则按 file:./config/ >> file:./config/*/ >> file:./ >> classpath:/config/ >> classpath:/ 顺序查找
				//名称可以通过 spring.config.name 属性指定;如果未指定,则默认文件名为application,文件扩展名可为 yaml、yml、xml、properties
				load(null, this::getNegativeProfileFilter, addToLoaded(MutablePropertySources::addFirst, true));
				//将上一步加载的配置合并到 environment对象中。
				addLoadedPropertySources();
				//设置已经激活的profile,即对应的配置已经加载到environment中
				applyActiveProfiles(defaultProperties);
			});
}
DebugAgentEnvironmentPostProcessor
看源码逻辑这里根据配置的 spring.reactor.debug-agent.enabled 是否为 true 来加载 reactor.tools.agent.ReactorDebugAgent 类并调用其 init 方法,看名字表示 reactor debug 代理。由于断点看 ClassUtils.isPresent(REACTOR_DEBUGAGENT_CLASS, null) 为false,默认不执行 if 内部逻辑,这里就不再深究这个后置处理器的作用,以后如有机会遇到再说。
	public void postProcessEnvironment(ConfigurableEnvironment environment, SpringApplication application) {
		if (ClassUtils.isPresent(REACTOR_DEBUGAGENT_CLASS, null)) {
			Boolean agentEnabled = environment.getProperty(DEBUGAGENT_ENABLED_CONFIG_KEY, Boolean.class);
			if (agentEnabled != Boolean.FALSE) {
				try {
					Class<?> debugAgent = Class.forName(REACTOR_DEBUGAGENT_CLASS);
					debugAgent.getMethod("init").invoke(null);
				}
				catch (Exception ex) {
					throw new RuntimeException("Failed to init Reactor's debug agent", ex);
				}
			}
		}
	}
总结
至此 ConfigFileApplicationListener 触发 ApplicationEnvironmentPreparedEvent 事件执行了哪些逻辑基本就明确了,主要就两件事:
- 读取spring.application.json属性值并解析放到environment中
- 读取项目application.yaml等配置文件属性并装载到environment中
注:spring boot 版本为2.3.10


 被折叠的 条评论
为什么被折叠?
被折叠的 条评论
为什么被折叠?
 到【灌水乐园】发言


