前言:之前做Angular项目的时候,都是自己创建一个自己设置一个端口登录的,那么 如何自己创建一个服务器没呢?下面和大家分享一下angualr中自己创建服务器的步骤。
1.初始化文件夹
cnpm -y
2.引入node类型定义文件
在typescript中可以使用javascript中已有的库
cnpm i @types/node --save
3.将typescript编译成javascript
{
    "compilerOptions": {  //编译配置器
        "target":"es5",     //目标是编译成es5规范的脚本,也就是js
        "module": "commonjs", //模块的规范是commonjs
        "emitDecoratorMetadata":true,
        "experimentalDecorators":true,//这来给你个是要保存呢装饰器的源数据
        "outDir":"build",//编译后文件默认放在build文件夹下
        "lib":["es6"]//开发时使用es6的语法
    },
    "exclude": [
        "node_moudles"
    ]
}
3.使用vs code每次编译之后都要使用tsc-w
4.建立一个hello_server.js的服务器
import * as http from 'http'

const server = http.createServer((request, response) => {
        response.end("Hello Node!");
});
server.listen(8000);
5.在终端输入以下内容
node build/hello_server.js启动服务器
cnpm install express --save
cnpm install @types/express --save
cnpm install -g nodemon
加载时,自动重启服务器,加载最新的代码
nodemon build/auction_server.js
6.服务器auction_server.js代码如下:
import * as express from "express";
import {Server} from 'ws';


const app = express();


export class Product  {

    constructor(public id: number,
      public title:string,
      public price:number,
      public rating:number,
      public desc:string,
      public categories:Array<string>) {

    }
  }


const products: Product[] = [
    new Product(1,"第一个商品",1.99,3.5,"这是第一个商品",["化妆品","口红"]),
    new Product(2,"第二个商品",2.99,2.5,"这是第二个商品",["化妆品","眼影"]),
    new Product(3,"第三个商品",3.99,4.5,"这是第三个商品",["服装","汉服"]),
    new Product(4,"第四个商品",4.99,1.5,"这是第四个商品",["包包","香奈儿"]),
    new Product(5,"第五个商品",5.99,3.5,"这是第五个商品",["化妆品","口红"]),
    new Product(6,"第六个商品",6.99,2.5,"这是第六个商品",["化妆品","口红"])

];


app.get('/',(req, res) =>{
    res.send("Hello Express");
});

app.get('products',(req,res) =>{
    res.json(products);
});
app.get('product/:id',(req, res) => {
    res.json(products.find((product) => product.id == req.params.id));
});


const server =app.listen(8000, "localhost", () => {
    console.log("服务器已启动,地址是:http://localhost:8000");
});

const wsServer = new Server({port:8085});
wsServer.on("connection", websocket => {
    websocket.send("这个消息是服务器主动推送的");
    websocket.on("message", message =>{
        console.log("接收到消息:" + message)
    })
});

setInterval(()=> {
    if(wsServer.clients){
        wsServer.clients.forEach(client =>{
            client.send("这是定时推送")
        })
    }
},2000);
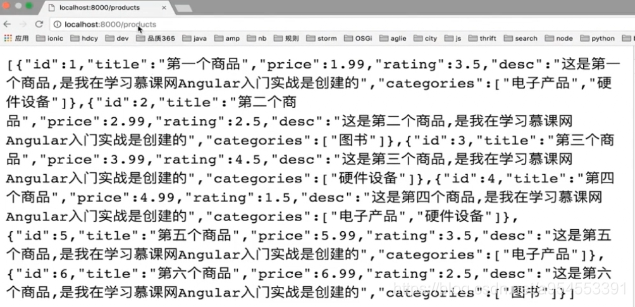
效果:

当为id为2时,界面如下:

总结:到这里angular的基本内容,就结束了。开始的时候非常困惑,不过随着学习的深入,对于angualr的了解越来越多,感觉还是挺有意思的。学习也不是一遍就可以的,在以后的学习中,多总结,多成长吧。


 504
504

 被折叠的 条评论
为什么被折叠?


