


 本文介绍了Android中高级UI组件的三大类:进度条类,包括ProgressBar、SeekBar和RatingBar;图像类组件,如ImageView、ImageSwitcher和GridView;以及列表类组件,如Spinner和ListView。通过实例展示了这些组件的使用,帮助开发者更好地理解和应用在实际项目中。
进度条类组件
在 Android 中,提供了进度条、拖动条和星级评分条等进度类组件。
ProgressBar 类:进度条组件,用于显示某个耗时操作完成的百分比的组件。
SeekBar 类:允许用户通过拖动滑块来改变值的组件。
RatingBar 类:允许用户通过拖动改变星星图案的进度组件。
举例说明:进度条
核心代码如下
public class MainActivity extends AppCompatActivity {
    private ProgressBar horizonP;       //水平进度条
    private int mProgressStatus = 0;    //完成进度
    private Handler mHandler;           //声明一个用于处理消息的 Handler 类的对象

    @Override
    protected void onCreate(Bundle savedInstanceState) {
        super.onCreate(savedInstanceState);
        setContentView(R.layout.activity_main);
        //设置全屏显示
        getWindow().setFlags(WindowManager.LayoutParams.FLAG_FULLSCREEN,
                WindowManager.LayoutParams.FLAG_FULLSCREEN);

        //获得水平进度条
        horizonP = (ProgressBar) findViewById(R.id.progressBar1);
        mHandler = new Handler(){
            @Override
            public void handleMessage(Message msg){
                //更新进度
                if(msg.what == 0x111){
                    horizonP.setProgress(mProgressStatus);
                }
                else{
                    Toast.makeText(MainActivity.this, "耗时操作已经完成",
                            Toast.LENGTH_LONG).show();
                    //进度条不显示,并且不占用空间
                    horizonP.setVisibility(View.GONE);
                }
            }
        };

        //开启一个线程,模拟一个耗时操作
        new Thread(new Runnable(){
            //模拟一个耗时操作
            private int doWork() {
                //改变完成进度
                mProgressStatus += Math.random() * 10;
                try {
                    //线程休眠 200 毫秒
                    Thread.sleep(200);
                } catch (InterruptedException e) {
                    //输出异常信息
                    e.printStackTrace();
                }
                return mProgressStatus;
            }

            public void run(){
                //循环获取耗时操作完成的百分比,直到耗时操作结束
                while(true){
                    //获取耗时操作完成的百分比
                    mProgressStatus = doWork();
                    //创建实例化一个消息对象
                    Message m = new Message();
                    //当完成进度不到 100 时表示耗时任务未完成
                    if(mProgressStatus < 100){
                        //设置代表耗时操作未完成的消息代码
                        m.what = 0x111;
                        //发送消息
                        mHandler.sendMessage(m);
                    } else {
                        //设置代表耗时操作已经完成的消息代码
                        m.what = 0x110;
                        //发送消息
                        mHandler.sendMessage(m);
                        break;
                    }
                }
            }
        }).start();
    }
}
<?xml version="1.0" encoding="utf-8"?>
<RelativeLayout xmlns:android="http://schemas.android.com/apk/res/android"
    xmlns:app="http://schemas.android.com/apk/res-auto"
    xmlns:tools="http://schemas.android.com/tools"
    android:layout_width="match_parent"
    android:layout_height="match_parent"
    android:background="@drawable/backgound"
    tools:context=".MainActivity">

    <!-- 水平进度条 -->
    <ProgressBar
        android:id="@+id/progressBar1"
        style="@style/Widget.AppCompat.ProgressBar.Horizontal"
        android:layout_width="match_parent"
        android:layout_height="120dp"
        android:layout_alignParentBottom="true"
        android:layout_alignParentLeft="true"
        android:layout_alignParentStart="true"
        android:max="100"
        />
</RelativeLayout>
结果

图像类组件
在 Android 中,提供了比较丰富的图像类组件。
ImageView 类:用于显示图像的组件称为图像视图组件。ImageSwitcher 类:用于在图片切换时添加动画效果的组件称为图像切换器。
GridView 类:用于按照行、列的方式来显示多个元素(如图片、文字等)的组件称为网格视图。
举例说明:图像切换器
<?xml version="1.0" encoding="utf-8"?>
<RelativeLayout xmlns:android="http://schemas.android.com/apk/res/android"
    xmlns:app="http://schemas.android.com/apk/res-auto"
    xmlns:tools="http://schemas.android.com/tools"
    android:layout_width="match_parent"
    android:layout_height="match_parent"
    tools:context=".MainActivity">

    <!-- 图像切换器 -->
    <ImageSwitcher
        android:layout_width="match_parent"
        android:layout_height="match_parent"
        android:id="@+id/imageswitch"
        />

</RelativeLayout>
<?xml version="1.0" encoding="utf-8"?>
<manifest xmlns:android="http://schemas.android.com/apk/res/android"
    package="com.example.example55">

    <application
        android:allowBackup="true"
        android:icon="@mipmap/ic_launcher"
        android:label="@string/app_name"
        android:roundIcon="@mipmap/ic_launcher_round"
        android:supportsRtl="true"
        android:theme="@style/Theme.AppCompat">
        <activity
            android:name=".MainActivity"
            android:exported="true">
            <intent-filter>
                <action android:name="android.intent.action.MAIN" />

                <category android:name="android.intent.category.LAUNCHER" />
            </intent-filter>
        </activity>
    </application>

</manifest>
public class MainActivity extends Activity {
    //声明并初始化一个保存要显示图像的 ID 的数组
    private int[] arrayPictures = new int[]{R.drawable.qtz, R.drawable.a};
    //声明一个图像切换器对象
    private ImageSwitcher imageSwitcher;
    //要显示的图片在图片数组中的 Index
    private int pictureIndex;
    //左右滑动时手指按下的 X 坐标
    private float touchDownX;
    //左右华东时手指抬起的 X 坐标
    private  float touchUpX;

    @Override
    protected void onCreate(Bundle savedInstanceState) {
        super.onCreate(savedInstanceState);
        setContentView(R.layout.activity_main);
        //全屏显示
        getWindow().setFlags(WindowManager.LayoutParams.FLAG_FULLSCREEN,
                WindowManager.LayoutParams.FLAG_FULLSCREEN);

        //为 ImageSwitch 设置 Factory,用来为 ImageSwitcher 制造 ImageView
        imageSwitcher = (ImageSwitcher) findViewById(R.id.imageswitch);
        imageSwitcher.setFactory(new ViewSwitcher.ViewFactory() {
            @Override
            public View makeView() {
                //实例化一个 ImageView 类的对象
                ImageView imageView = new ImageView(MainActivity.this);
                //根据 id 加载默认显示图片
                imageView.setImageResource(arrayPictures[pictureIndex]);
                //返回 imageView 对象
                return imageView;
            }
        });

        //创建触摸事件
        imageSwitcher.setOnTouchListener(new View.OnTouchListener() {
            @Override
            public boolean onTouch(View v, MotionEvent event) {
                if(event.getAction() == MotionEvent.ACTION_DOWN) {
                    //取得左右滑动时手指按下的 X 坐标
                    touchDownX = event.getX();
                    if(touchDownX - touchUpX > 100) {
                        //取得当前要显示的图片 index,循环显示
                        pictureIndex = pictureIndex == arrayPictures.length-1 ?
                                0 : pictureIndex+1;
                        //设置图片切换的动画
                        imageSwitcher.setOutAnimation(AnimationUtils.loadAnimation(MainActivity.this,
                                R.anim.slide_out_left));
                        imageSwitcher.setInAnimation(AnimationUtils.loadAnimation(MainActivity.this,
                                R.anim.slide_in_right));
                        imageSwitcher.setImageResource(arrayPictures[pictureIndex]);
                    }
                    return true;
                } else if(event.getAction() == MotionEvent.ACTION_UP) {
                    //取得左右滑动时手指抬起的 X 坐标
                    touchUpX = event.getX();
                    //从左往右切换
                    if(touchUpX - touchDownX > 100) {
                        //取得当前要显示的图片 index,循环显示
                        pictureIndex = pictureIndex == 0 ?
                                arrayPictures.length-1 : pictureIndex-1;
                        //设置图片切换的动画
                        imageSwitcher.setInAnimation(AnimationUtils.loadAnimation(MainActivity.this,
                                R.anim.slide_in_left));
                        imageSwitcher.setOutAnimation(AnimationUtils.loadAnimation(MainActivity.this,
                                R.anim.slide_out_right));
                        imageSwitcher.setImageResource(arrayPictures[pictureIndex]);
                    }
                    return true;
                }
                return false;
            }
        });

    }
}
结果:可实现图片切换

列表类组件
在 Android 中,提供了两种列表类组件。
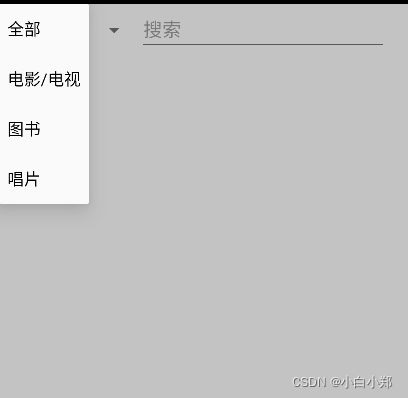
Spinner类:下拉列表框,通常用于弹出一个下拉菜单供用户选择。
ListView类:列表视图,通常用于实现在一个窗口中只显示一个列表。
举例说明:下拉列表框
public class MainActivity extends Activity {

    @Override
    protected void onCreate(Bundle savedInstanceState) {
        super.onCreate(savedInstanceState);
        setContentView(R.layout.activity_main);

        //获取下拉列表
        Spinner spinner = (Spinner) findViewById(R.id.spinner);
        //为下拉列表创建监听器,匿名内部类
        spinner.setOnItemSelectedListener(new AdapterView.OnItemSelectedListener() {
            @Override
            public void onItemSelected(AdapterView<?>parent, View view, int position, long id) {
                //获取选项的值,转换为字符串
                String result = parent.getItemAtPosition(position).toString();
                //显示被选中的值
                Toast.makeText(MainActivity.this, result, Toast.LENGTH_SHORT).show();
            }
                @Override
                public void onNothingSelected(AdapterView<?> parent) {

                }
        });
    }
}
<?xml version="1.0" encoding="utf-8"?>
<LinearLayout xmlns:android="http://schemas.android.com/apk/res/android"
    xmlns:app="http://schemas.android.com/apk/res-auto"
    xmlns:tools="http://schemas.android.com/tools"
    android:layout_width="match_parent"
    android:layout_height="match_parent"
    android:orientation="horizontal"
    android:background="#A6A6A6A6"
    tools:context=".MainActivity">

    <!-- 列表选择框 -->
    <Spinner
        android:layout_width="wrap_content"
        android:layout_height="50dp"
        android:id="@+id/spinner"
        android:entries="@array/ctype"
        />
    <!-- 搜索文本框 -->
    <EditText
        android:layout_width="match_parent"
        android:layout_height="wrap_content"
        android:layout_marginRight="20dp"
        android:hint="搜索"
        android:textColor="#F8F8FF"
        />
</LinearLayout>
//在values文件夹创建arrays.xml
<?xml version="1.0" encoding="utf-8"?>
<resources>
<string-array name="ctype">
    <item>全部</item>
    <item>电影/电视</item>
    <item>图书</item>
    <item>唱片</item>
</string-array>
</resources>
结果
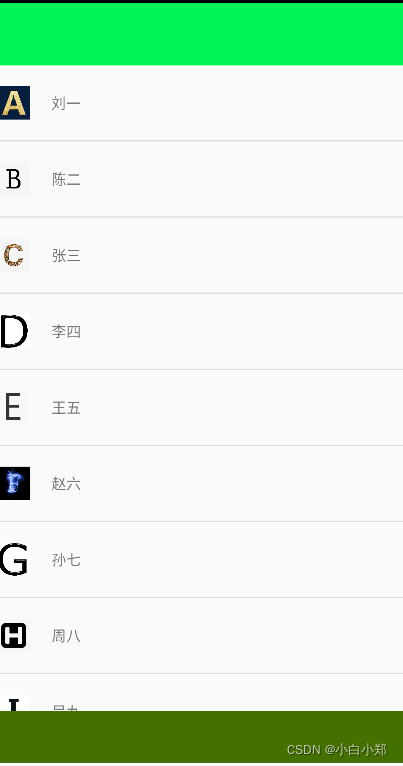
举例说明:列表视图
public class MainActivity extends Activity {

    @Override
    protected void onCreate(Bundle savedInstanceState) {
        super.onCreate(savedInstanceState);
        setContentView(R.layout.activity_main);

        //获取列表视图
        ListView listView = (ListView) findViewById(R.id.listview);
        //定义并初始化保存图片 id 的数组
        int[] imageId = new int[]{R.drawable.img01,R.drawable.img02, R.drawable.img03,
                R.drawable.img04, R.drawable.img05, R.drawable.img06, R.drawable.img07,
                R.drawable.img08, R.drawable.img09};
        //定义并初始化保存列表项文字的数组
        String[] title = new String[]{"刘一","陈二","张三","李四","王五","赵六",
                "孙七", "周八","吴九",};

        //创建一个 list 集合
        List<Map<String, Object>> listItems = new ArrayList<Map<String, Object>>();
        //通过 for 循环将图片 od 和列表项文字放到 Map 中,并添加到 list 集合中
        for(int i=0; i<imageId.length; i++) {
            //实例化 Map 对象
            Map<String, Object> map = new HashMap<String, Object>();
            map.put("image", imageId[i]);
            map.put("名字", title[i]);
            //将 map 对象添加到 List 集合中
            listItems.add(map);
        }
        SimpleAdapter adapter = new SimpleAdapter(this, listItems,
                R.layout.main, new String[] {"名字", "image"}, new int[] {
                R.id.title, R.id.image});
        //将适配器与 ListView 关联
        listView.setAdapter(adapter);
        listView.setOnItemClickListener(new AdapterView.OnItemClickListener() {
            @Override
            public void onItemClick(AdapterView<?> parent, View view, int position, long id) {
                //获取选择项的值
                Map<String, Object> map = (Map<String, Object>) parent.getItemAtPosition(position);
                Toast.makeText(MainActivity.this, map.get("名字").toString(), Toast.LENGTH_LONG).show();
            }
        });
    }
}
<!-- activity_main -->
<?xml version="1.0" encoding="utf-8"?>
<LinearLayout xmlns:android="http://schemas.android.com/apk/res/android"
    xmlns:app="http://schemas.android.com/apk/res-auto"
    xmlns:tools="http://schemas.android.com/tools"
    android:layout_width="match_parent"
    android:layout_height="match_parent"
    android:orientation="vertical"
    tools:context=".MainActivity">

    <!-- 标题栏 -->
    <ImageView
        android:layout_width="match_parent"
        android:layout_height="60dp"
        android:src="#00F355"
        />

    <!-- 列表视图 -->
    <ListView
        android:id="@+id/listview"
        android:layout_width="match_parent"
        android:layout_height="620dp" />

    <!-- 下标题选择框 -->
    <ImageView
        android:layout_width="match_parent"
        android:layout_height="50dp"
        android:src="#447000"/>
</LinearLayout>
<!-- 创建 main.xml -->
<?xml version="1.0" encoding="utf-8"?>
<LinearLayout xmlns:android="http://schemas.android.com/apk/res/android"
    android:orientation="horizontal"
    android:layout_width="match_parent"
    android:layout_height="match_parent">
    <!-- 存放图片 -->
    <ImageView
        android:layout_width="wrap_content"
        android:layout_height="wrap_content"
        android:id="@+id/image"
        android:paddingRight="10dp"
        android:paddingTop="20dp"
        android:paddingBottom="20dp"
        android:adjustViewBounds="true"
        android:maxWidth="72dp"
        android:maxHeight="72dp"
        />
    <!-- 存放名字 -->
    <TextView
        android:layout_width="wrap_content"
        android:layout_height="wrap_content"
        android:padding="10dp"
        android:layout_gravity="center"
        android:id="@+id/title"
        />

</LinearLayout>
结果:可实现滚动列表


 被折叠的 条评论
为什么被折叠?
被折叠的 条评论
为什么被折叠?
 到【灌水乐园】发言


