


 本文详细介绍了Spring IOC容器的工作原理,包括不同ApplicationContext实现类的使用场景,配置文件加载方式,以及bean的管理、作用域、生命周期和懒加载机制。深入探讨了Spring如何简化Java应用程序的开发。
文章目录
什么是SpringIOC
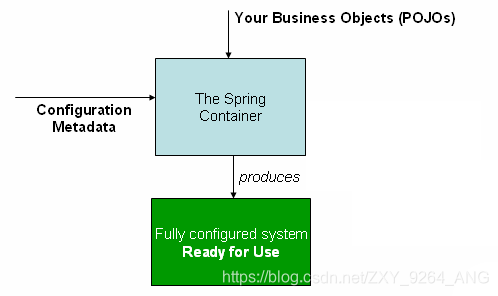
SpringIOC(Inversion of Control)是一个容器,也就是我们通常所说的控制反转。 IOC容器将我们的javabean和一些用于描述这些bean应该如何初始化、组装的配置信息进行整合。提供给我们开发人员一个配置、组装完成的上下文给我们使用,我们可以方便的通过IOC容器将繁杂的对象创建、管理工作托管给IOC容器。所以称之为控制反转。(由原来的开发人员自己控制对象的创建、组装改为交由Spring IOC容器负责)
常用applicationContext实现类
一、ClassPathXmlApplicationContext
用于加载类路径下的spring配置文件,通常用于控制台程序
使用方法:
ApplicationContext ctx = new ClassPathXmlApplicationContext("applicationContext.xml");
StudentService ss = ctx.getBean(StudentService.class);
System.out.println(ss);
二、AnnotationConfigApplicationContext
用于初始化通过注解方式配置的ioc容器
@Configuration
public class AppConfig {

    @Bean
    public MyService myService() {
        return new MyServiceImpl();
    }

  	public static void main(String[] args) {
      ApplicationContext ctx = new AnnotationConfigApplicationContext(AppConfig.class);
      MyService myService = ctx.getBean(MyService.class);
      myService.doStuff();
		}
}
三、XmlWebApplicationContext
XmlWebApplicatoinContext用于在Web工程中初始化SpringIOC容器,不过我们一般不会手动通过它来初始化IOC容器,Spring针对Web工程专门给我们提供了一个监听器来完成IOC容器的初始化工作,用法如下:
在项目的web.xml中配置
<!-- 通过Spring提供的ContextLoaderListener监听器完成Spring容器初始化 -->
<context-param>
    <param-name>contextConfigLocation</param-name>
    <param-value>/WEB-INF/daoContext.xml /WEB-INF/applicationContext.xml</param-value>
</context-param>

<listener>
    <listener-class>org.springframework.web.context.ContextLoaderListener</listener-class>
</listener>
在ContextLoaderListener中Spring会优先判断用户是否在web.xml中配置了名为contextClass的<context-param>参数,如果配置了优先使用用户制定的ApplicationContext实现类来初始化IOC,反之则使用默认的ApplicationContext实现类:org.springframework.web.context.support.XmlWebApplicationContext来完成IOC容器的初始化工作。
【注】:XmlWebApplicationContext默认加载路径是/WEB-INF/applicationContext.xml,如果我们的配置spring文件是放在这里的,并且只有这一个,我们可以不配置contextConfigLocation参数。
Application初始化路径
路径前缀
//	前缀classpath:表示的是项目的classpath下相对路径
ApplicationContext ac = new ClassPathXmlApplicationContext("classpath:applicationContext.xml");
路径中的通配符
//	使用通配符加载所有符合要求的文件
ApplicationContext ac = new ClassPathXmlApplicationContext("classpath*:applicationContext.xml");
管理bean的三种方式
通过xml配置方式管理bean
- 优点:
对代码没有任何侵入性, 改了配置不需要重新编译、打包 - 缺点:
配置相比注解的方式要繁琐很多,工程量比较大
<?xml version="1.0" encoding="UTF-8"?>
<beans xmlns="http://www.springframework.org/schema/beans"
    xmlns:xsi="http://www.w3.org/2001/XMLSchema-instance"
    xsi:schemaLocation="http://www.springframework.org/schema/beans
        http://www.springframework.org/schema/beans/spring-beans.xsd">

    <bean id="..." class="...">
        <!-- 这个bean的协作者和配置就在这里 -->
    </bean>

    <bean id="..." class="...">
        <!-- 这个bean的协作者和配置就在这里 -->
    </bean>

    <!-- 更多的bean定义在这里 -->

</beans>
id属性代表该bean在Spring容器中的唯一标识
class属性指定该bean的类型,需要指定类的全名
【注意】schema约束地址不能用https,否则每次运行都要从spring网上加载,无网不能运行,把https改为http就会先从本地寻找所需依赖,找不到才会从网上加载
通过注解方式管理bean
注解配置的优缺点:
- 优点:
配置简单。由于Java类中已经包含很上下文信息,所有在Java类上直接加注解可以省略很多属性。 - 缺点:
对代码有侵入性,如果改了是基于注解的配置信息改变了,需要重新编译、打包
注解的要先与xml配置方式注入,这也就意味着如果你在注解和xml中都配置了某项配置,那么xml中的>配置会覆盖掉注解中的配置。
开启注解支持
我们可以通过下面方式开启注解扫描支持(非web工程推荐这种方式)
- 通过注解的方式开启注解配置支持
@Configuration
@ComponentScan("com.lanou3g.spring")
public class App  {

  	@Bean
    public StudentDao studentDao() {
       return new StudentDao();
    }
  	// 其他bean配置....

    public static void main(String[] args) {
      // 如果在非web工程中使用这种方式开启注解支持,需要使用下面的方式初始化ioc容器,否则@ComponentScan注解会被忽略
      ConfigurableApplicationContext ctx = new AnnotationConfigApplicationContext(App.class);
    }
}
一个用@Configuration注解标注的类就相当于一个xml配置文件,我们可以给其添加一个@ComponentScan注解来开启注解扫描支持,同时指定扫描包根路径
如果是在非web工程中,通过这种方式开启注解支持,需要使用new AnnotationConfigApplicationContext(Application.class); 来初始化ioc容器
注解扫描过滤(一般用不到)
Spring默认会扫描componentScan配置的basePackages包下所有带有扩展自@Component注解(如:@Repository、@Service、@Controller)的类。我们可以通过给componentscan添加filter来进一步控制扫描哪些注解、忽略哪些注解
如:下面展示了如何忽略@Repository注解,而用含Stub关键字前缀的自定义Repository注解代替
@Configuration
@ComponentScan(basePackages = "org.example",
        includeFilters = @Filter(type = FilterType.REGEX, pattern = ".*Stub.*Repository"),
        excludeFilters = @Filter(Repository.class))
public class AppConfig {
    ...
}
对应的xml配置方法
<beans>
    <context:component-scan base-package="org.example">
        <context:include-filter type="regex"
                expression=".*Stub.*Repository"/>
        <context:exclude-filter type="annotation"
                expression="org.springframework.stereotype.Repository"/>
    </context:component-scan>
</beans>
@Bean注解的name属性
@Bean注解允许我们通过注解的方式定义在Java代码中定义bean的配置元数据,相当于xml配置文件中的<bean />标签
@Configuration  // 相当于xml配置的<beans>
public class MyConf {
    @Bean(name="testBean")   // 相当于xml配置的<bean id="testBean">,如果不指定name属性,默认取值为方法名 <bean id="方法名">
    public Frult bigPear(){
        return new Pear();
    }   // 相当于xml配置的</bean>
}   // 相当于xml配置的</beans>
xml和注解两种方式混合使用
Spring提供@Configuration、@Bean等注解的方式并不是为了要完全取代xml配置方式, 而是要看使用场合,比如数据源的配置, 就不适合通过注解来配置。否则数据源配置一发生变化就得改代码。
下面是一种典型的混合配置示范:
- 在xml中配置数据源
<beans>
    <!-- 开启注解配置支持 -->
    <!-- <context:annotation-config/> -->
	  <!-- 扫描注解的包路径,配置了这个后无需再配置上面那个 -->
  	<context:component-scan base-package="com.lanou3g.spring"/>
    <!-- 读取properties配置文件,用于替换spring配置中的${}占位符 -->
  	<context:property-placeholder location="classpath:jdbc.properties"/>

    <bean class="com.acme.App"/>

    <bean class="org.springframework.jdbc.datasource.DriverManagerDataSource">
        <property name="url" value="${jdbc.url}"/>
        <property name="user" value="${jdbc.username}"/>
        <property name="password" value="${jdbc.password}"/>
    </bean>
</beans>
jdbc.url=jdbc:mysql://localhost:3306/XXXX(数据库名)?characterEncoding=utf8
jdbc.user=root
jdbc.password=root
- 通过java注解配置bean和依赖注入
@Configuration
public class App {

    @Autowired
    private DataSource dataSource;

    @Bean
    public Student student() {
        return new Student(dataSource);
    }

    @Bean
    public People people() {
        return new People(student());
    }
}
- 启动入口
public static void main(String[] args) {
    ApplicationContext ctx = new ClassPathXmlApplicationContext("classpath:applicationContext.xml");
    People people = ctx.getBean(People.class);
    // ...
}
在一个配置中导入另一个配置
xml配置中导入其他xml配置
applicationContext.xml
<beans xmlns="http://www.springframework.org/schema/beans"
       xmlns:xsi="http://www.w3.org/2001/XMLSchema-instance"
       xsi:schemaLocation="http://www.springframework.org/schema/beans
       http://www.springframework.org/schema/beans/spring-beans.xsd">

    <!-- 导入其他spring配置xml文件 -->
    <!-- 导入XXXXX.xml配置文件 -->
    <import resource="classpath:XXXXX.xml" />

</beans>
XXXXX.xml
<beans xmlns="http://www.springframework.org/schema/beans"
       xmlns:xsi="http://www.w3.org/2001/XMLSchema-instance"
       xsi:schemaLocation="http://www.springframework.org/schema/beans
       http://www.springframework.org/schema/beans/spring-beans.xsd">

</beans>
注解方式导入
通过@ImportResource注解导入spring配置xml文件
applicationContext.xml配置
<beans xmlns="http://www.springframework.org/schema/beans"
       xmlns:context="http://www.springframework.org/schema/context"
       xmlns:xsi="http://www.w3.org/2001/XMLSchema-instance"
       xsi:schemaLocation="
        http://www.springframework.org/schema/beans
        http://www.springframework.org/schema/beans/spring-beans.xsd
        http://www.springframework.org/schema/context
        http://www.springframework.org/schema/context/spring-context.xsd">

    <!-- 开启注解支持 -->
  	<context:annotation-config/>
  	<!-- 开启注解支持,同时指定扫描的包路径(指定了这个就不用指定上面的) -->
  	<context:component-scan base-package="com.lanou3g.spring" />
</beans>
java代码中注解配置
@Configuration	//(配置)注解的类相当于xml配置文件中的<beans />
//@ComponentScan(basePackages = "com.lanou3g.spring")	//扫描路径下的所有组件
【上面那条注解被注释掉,无法完成组件扫描,这时需要导入xml配置文件(其指定了扫描的包路径)】
@ImportResource("applicationContext.xml")
public class App {
	@Autowired
    @Qualifier("p")
    Frult frult;
    public void getFrult(){
        frult.eatFrult();
    }
    public static void main( String[] args ) {
        ApplicationContext ac = new AnnotationConfigApplicationContext(App.class);

        App app = ac.getBean(App.class);
        app.getFrult();

    }
通过@Import注解导入其他注解配置
一个注解配置
@Configuration
@ComponentScan(basePackages = "com.lanou3g.spring")
@Import(MyConf.class)   // 导入另一个注解配置,相当于xml配置中的<import resource="" />
public class App {
	@Autowired
    Frult frult;
    public void getFrult(){
        frult.eatFrult();
    }
    public static void main( String[] args ) {
        ApplicationContext ac = new AnnotationConfigApplicationContext(App.class);

        App app = ac.getBean(App.class);
        app.getFrult();

    }
另一个注解配置
@Configuration  // <beans>
public class MyConf {
    @Bean   // <bean id="bigPear">   // 默认 <bean id="方法名">
    public Frult bigPear(){
        return new Pear();
    }   // </bean>
}   // </beans>
Bean的作用域
bean的作用域:当在 Spring 中定义一个 bean 时,你必须声明该 bean 的作用域的选项。
作用域属性:scope
| Scope | Description |
|---|---|
| singleton | 单例。在整个ioc容器中只有一个此类型的示例。(默认值) |
| prototype | 原型。每次使用都用创建一个新的对象。 |
| request | 对象的实例仅在一个request请求周期内有效,仅限在web环境中使用。 |
| session | 对象的实例仅在一个session会话周期内有效,仅限在web环境中使用。 |
| application | 对象的实例在整个application生命周期内有效,仅限在web环境中使用。 |
| websocket | 对象的实例仅在一个websocket生命周期内有效,仅限在web环境中使用。 |
【注】后四种仅限于Web环境(WebApplicationContext容器)
singleton(单例)
在每个Spring IoC容器中,一个bean定义只有一个对象实例。
applicationContext.xml配置文件
<?xml version="1.0" encoding="UTF-8"?>
<beans xmlns="http://www.springframework.org/schema/beans"
       xmlns:context="http://www.springframework.org/schema/context"
       xmlns:xsi="http://www.w3.org/2001/XMLSchema-instance"
       xsi:schemaLocation="http://www.springframework.org/schema/beans
       		http://www.springframework.org/schema/beans/spring-beans.xsd">

	<!-- 我们可以通过scope指定bean的作用域,singleton(默认值,所以scope="singleton"可不写): 单例 -->
	<bean id="messageDao" class="com.lanou3g.spring.dao.MessageDaoImpl" />

</beans>
spring的java类
public class Launcher {
    public static void main(String[] args) {
        ClassPathXmlApplicationContext cpxac = new ClassPathXmlApplicationContext("applicationContext.xml");
        cpxac.registerShutdownHook();

		MessageDao messageDao1 = cpxac.getBean("messageDao", MessageDao.class);
        System.out.println(messageDao1);

        MessageDao messageDao2 = cpxac.getBean("messageDao", MessageDao.class);
        System.out.println(messageDao2);

        MessageDao messageDao3 = cpxac.getBean("messageDao", MessageDao.class);
        System.out.println(messageDao3);
	}
}
控制台打印的三个对象地址是相同的,证实了默认情况下这个bean交给Spring容器管理之后,这个bean就是一个单实例(单例模式)的,即每次调用getBean()方法,获取到的都是同一个bean实例。
prototype(非单例)
每次调用getBean()方法,获取到的都是一个新的bean实例
applicationContext.xml配置文件
<?xml version="1.0" encoding="UTF-8"?>
<beans xmlns="http://www.springframework.org/schema/beans"
       xmlns:context="http://www.springframework.org/schema/context"
       xmlns:xsi="http://www.w3.org/2001/XMLSchema-instance"
       xsi:schemaLocation="http://www.springframework.org/schema/beans
       		http://www.springframework.org/schema/beans/spring-beans.xsd">

	<!-- 我们可以通过scope指定bean的作用域,prototype: 非单例 -->
	<bean id="messageDao" class="com.lanou3g.spring.dao.MessageDaoImpl" scope="prototype" />

</beans>
spring的java类
public class Launcher {
    public static void main(String[] args) {
        ClassPathXmlApplicationContext cpxac = new ClassPathXmlApplicationContext("applicationContext.xml");
        cpxac.registerShutdownHook();

		MessageDao messageDao1 = cpxac.getBean("messageDao", MessageDao.class);
        System.out.println(messageDao1);

        MessageDao messageDao2 = cpxac.getBean("messageDao", MessageDao.class);
        System.out.println(messageDao2);

        MessageDao messageDao3 = cpxac.getBean("messageDao", MessageDao.class);
        System.out.println(messageDao3);
	}
}
控制台打印的三个对象地址都互不相同,这就证实了若bean的作用域置为prototype,那么每次从Spring容器获取bean都将是新的对象。
Bean的生命周期
通过xml中给bean配置init-method、destroy-method属性
java代码创建init和destroy方法:
public class Pear  implements  Frult{
    public void myInit(){
        System.out.println("Pear init");
    }

    public void myDestroy(){
        System.out.println("Pear destroy");
    }
}
applicationContext.xml配置
<?xml version="1.0" encoding="UTF-8"?>
<beans xmlns="http://www.springframework.org/schema/beans"
       xmlns:xsi="http://www.w3.org/2001/XMLSchema-instance"
       xsi:schemaLocation="
        http://www.springframework.org/schema/beans
        http://www.springframework.org/schema/beans/spring-beans.xsd">

	<!-- 通过init-method、destroy-method指定bean的生命周期方法 -->
    <bean id="p" class="com.lanou3g.spring.bean.Pear" init-method="myInit" destroy-method="myDestroy"  />

</beans>
程序运行入口
public class App {
	public static void main( String[] args ) {
		ClassPathXmlApplicationContext cpxac = new ClassPathXmlApplicationContext("applicationContext.xml");
		cpxac.registerShutdownHook();
	}
}
控制台输出结果
Pear init
Pear destroy
id和name命名bean
使用id属性命名bean
id属性的值只能指定一个,不建议含有特殊字符(虽然自spring3.1开始id属性的值可以包含任意字符)。
使用name属性命名bean
使用name属性可以给一个bean指定多个名称,多个值之间可以用","、";"或空格分开
【注】: 无论是id属性还是name属性都需要保证整个IOC容器内唯一,并且id属性的值和name属性的值也不能重复
我们可以同时指定id和name属性。 也可以都不指定,如果都不指定,IOC容器会为该bean生成一个唯一的名称。
实例化bean的方式
通过构造方法实例化
这种方式是最常用的方式,适合绝大多数的javabean,因为我们的java类无需继承任何父类或实现任何接口。但是我们通常需要提供一个无参的构造方法。
<bean id="people" class="com.lanou3g.People"/>

<bean name="people" class="com.lanou3g.People"/>
通过有参数的构造方法实例化对象,参见DI注入方式,自动装配
通过静态工厂方法实例化
<bean id="clientService" class="examples.ClientService" factory-method="createInstance">
	<!-- 如果工厂方法需要参数,通过此标签传参 -->
  <constructor-arg name="cname" value="TestService" />
</bean>
public class People{
    private static People people = null;
  	private String pname;
    private People() {}
  	private People(String pname) {
  		this.pname = pname;
  	}

    public synchronized static People createInstance(String pname) {
        if(people == null) {
           people = new People(pname);
        }
      return people;
    }

  	public synchronized static People createInstance() {
        if(people == null) {
           people = new People();
        }
      return people;
    }
}
这种方式适合需要让Spring管理自己实现的单例类,用的很少。因为通过Spring IOC容器我们只需配置一下scope="singleton"就可以实现单例了。
通过对象工厂方法实例化
<!-- the factory bean, which contains a method called createClientServiceInstance() -->
<bean id="serviceLocator" class="examples.DefaultServiceLocator">
    <!-- inject any dependencies required by this locator bean -->
</bean>

<!-- the bean to be created via the factory bean -->
<bean id="clientService"
    factory-bean="serviceLocator"
    factory-method="createClientServiceInstance"/>

<!-- the bean to be created via the factory bean -->
<bean id="accountService"
    factory-bean="serviceLocator"
      factory-method="createAccountServiceInstance">

  	<!-- 如果工厂方法需要参数,通过此标签传参 -->
  	<!-- <constructor-arg name="cname" value="TestService" /> -->

</bean>
public class DefaultServiceLocator {

    private static ClientService clientService = new ClientServiceImpl();

  	private static AccountService accountService = new AccountServiceImpl();

    public ClientService createClientServiceInstance() {
        return clientService;
    }

  	public AccountService createAccountServiceInstance() {
        return accountService;
    }
}
这种方式用的也不多,只有特定场合才会用到
在非web应用中优雅的关闭SpringIOC容器
我们可以通过registerShutdownHook()实现在JVM停止的同时优雅的关闭IOC容器
public class Boot {

    public static void main(final String[] args) {
        ConfigurableApplicationContext ctx = new ClassPathXmlApplicationContext("beans.xml");

        // 给上面初始化的IOC容器添加一个基于JVM的关闭回调,
        ctx.registerShutdownHook();

        // 其他业务代码...

   		// 在main方法运行结束后,IOC容器会在JVM的关闭回调中正常关闭
    }
}
懒加载
什么是懒加载
我们在spring容器启动的时候先不把所有的bean都加载到spring容器中,而是在需要用的时候,才把这个对象实例化到容器中
实现方式
给bean添加一个init-lazy="true"延迟初始化的时机到getBean的时候。
<bean lazy-init="true"></bean>
用lazy-init。告诉spring容器是否以懒加载的方式创造对象。用的时候才加载构造,不用的时候不加载
取值:true(懒,真正调用到的时候再加载)、false(非懒,已启动spring容器就创建对象)、default(懒)
懒加载的优缺点
对象使用的时候才去创建,节省资源,但是不利于提前发现错误。
全局懒加载
如果很多的bean都不想在IOC容器启动的时候就加载, 我们只要在beans的头里面加上default-lazy-init就ok 了
<?xml version="1.0" encoding="UTF-8"?>
<beans xmlns="http://www.springframework.org/schema/beans"
       xmlns:xsi="http://www.w3.org/2001/XMLSchema-instance"
       xsi:schemaLocation="http://www.springframework.org/schema/beans
        http://www.springframework.org/schema/beans/spring-beans.xsd"
        default-lazy-init ="true" >
		<!-- 配置全局懒加载,上一行为所需配置 -->
</beans>


 391
391

 被折叠的 条评论
为什么被折叠?
被折叠的 条评论
为什么被折叠?
 到【灌水乐园】发言


