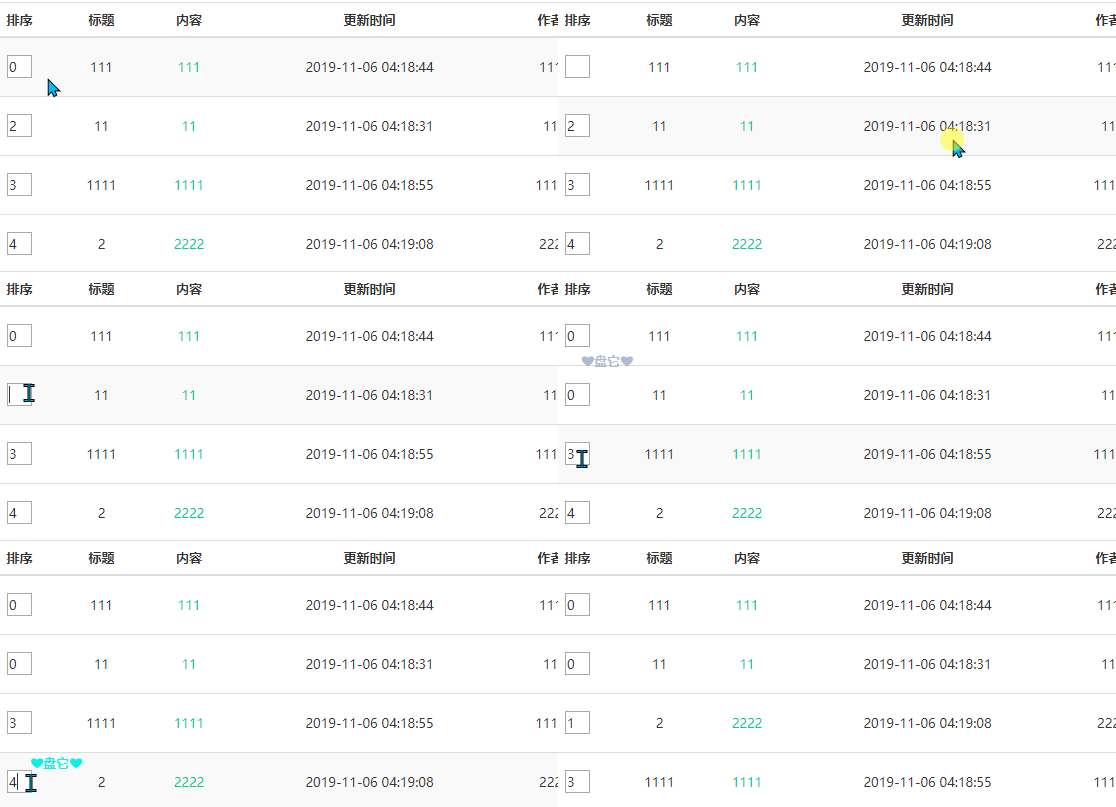
项目需求: 在文本框中填写序号,让显示的顺序根据序号的变换而更改。
效果图(用的blur触发事件,看起来不太舒服):

图片中可以看到,当我删除序号后,会自动填充0.(在添加内容的时候没有序号这一项,添加完成后默认为空,为空后会在第一个显示)。当我把4改1后自动向上移动。
不足: 更改后是通过刷新页面来展示效果的,不圆润。触发方式不太合适。
代码介绍: 首先数据库中要有相应的字段来存储用来排序的字段。两种解决方案,一种是根据id进行单个字段的更改,更改后并按照该字段进行排序显示。另一种是使用全局的修改,先根据id查询出全部内容,在将更改后的序号替换原来的序号,其他字段使用查询出内容。第一种方法好理解,但是代码多。第二种理解起来想对第一种难一点,但是代码可以重复使用。里面因为需求原因,包含一些分页代码,但是不全面。需要的话我的其它文章中有详细介绍分页的(代码全面)
前端代码
<tr v-for="(ne,key) in news"><!-- news 是我查出全部数据后保存数据的数组(key是关键字,可以理解为数组的下标) -->
<td>
 	<input type="text"
 	v-model="ne.px" v-on:blur="findSort(ne.nid,ne.px)"
 	style="width: 25px; line-height: 17px; display: inline-block" />
 	<!-- 这里调用方法传的两个参数,第一个是内容的id;另一个是序号 -->
</td>
</tr>
这就是那个要输入序号的文本框,没什么需要注意的,就那个v-model的值px是数据库中的字段名
data:{
	news:[],
},
methods:{
	//排序	点击排序触发方法
		//方法需要获取id、更新后的序号	控制层:根据id修改要更改的字段,改且只改一个字段,其他字段禁止更改
	findSort:function(id,px){
		if(px==null || px==""){//如果px没有值,就给他赋值为0,避免保存
			px=0;
		}
		$.post("/news/sorts",{nid:id,px:px},function(data){
			//alert(data);
			window.location.href="/admin/news";//news方法是写在controller中查询全部数据的方法
		});
	},
}
controller代码
//排序,这里我用的是第一个方法,第二个没有测试,但是代码是那样写的
	@RequestMapping("sorts")
	@ResponseBody
	public String sorts(HttpServletRequest req) {
		String nid = req.getParameter("nid");
		String px = req.getParameter("px");
		if(px==null||px=="") {//在这里判断意义不大,但是还是加上好
			px="0";
		}
		newsServicel.sorts(nid, px);//service层代码下面有
		return "success";//返回值随意写,唯一的用处就是可以在js中判断一下是否执行了,意义不大
	}
	//排序方法二
	public String sort2(HttpServletRequest req) {
		String nid = req.getParameter("nid");
		String px = req.getParameter("px");
		if(px==null||px=="") {
			px="0";
		}
		News news = newsServicel.findId(nid);//findId是通过id查询所有的方法,代码就不单独贴出来了
		news.setNid(nid);
		news.setPx(px);
		newsServicel.save(news);//save是添加的方法
		return "succell";
	}
//排序完成后就是要显示了,下面代码就是根据px字段进行排序显示的
//这是分页的代码,如果不使用分页的话可以在sql语句中添加order by px ASC
@RequestMapping("findLikeTitle")
@ResponseBody
public Page<List<Map>> findLikeTitle(HttpServletRequest req) {
	//接收当前页
	Integer page = Integer.parseInt(req.getParameter("page"));
	//需要根据title、id进行迷糊查询
	String title = req.getParameter("title");
	String id = req.getParameter("id");
	Sort sort = null;
	//括号中出来“px”,其他都是关键字
	sort = new Sort(Sort.Direction.ASC, "px");
	//为了前端效果,页面显示是从1开始,但是分页默认是从0开始,所有这里page要-1.4是没页显示的条数,sort关键字
	Pageable pageable = PageRequest.of(page - 1, 4, sort);
	Page<List<Map>> data = newsServicel.findeLikeTitle(pageable, title, id);
	return data;
	}
service代码
//排序
@Transactional//别问为什么写这个注解,我只知道不写不对
public void sorts(String nid,String px){
	 newsDAO.sorts(nid,px);
}

//模糊查询、分页。
	public Page<List<Map>> findeLikeTitle(Pageable page,String title,String id){
		return newsDAO.findBytitleLike(page,"%"+title+"%","%"+id+"%");
	}
DAO层代码
//排序
@Query(value="update news set px = :px where nid=:nid",nativeQuery = true)//不使用分页查询可以在value中追加order by px ASC实现根据px排序
@Modifying//单个修改必须写的注解
void sorts(String nid,String px);


//分页模糊查询表连接
@Query(value="select * from news n join type t on n.t_id=t.tid where title like concat('%',:title,'%') and t_id like concat('%',:id,'%')",nativeQuery = true)
Page<List<Map>> findBytitleLike(Pageable page,String title,String id);
到这里排序就完成了。不足之处就是需要刷新以下页面才能查看到效果,不太圆润。还有什么不足之处,欢迎指正。


 本文介绍了一种在前端文本框中输入序号,使列表按序号动态排序的方法。使用Vue.js和后端交互,实现了列表项的实时排序更新,但刷新页面以查看效果的方式有待改进。


 22万+
22万+

 被折叠的 条评论
为什么被折叠?


