


 本文详细记录了在Ubuntu16.04系统上为espnet语音工具包配置CUDA10环境的过程,包括内核版本降级、显卡驱动更新、CUDA与Cudnn安装等关键步骤。
由于毕设要做关键词识别的相关课题,瞄准了espnet这个语音工具包,需要配置CUDA、Cudnn、Pytorch一系列环境,现用垃圾笔记本先踩一踩坑,必须记录下来方便下次安装。。
ubuntu版本:16.04.6 LTS,gcc5.4.0
内核版本:4.15.*(忘了),内核gcc版本7.3.0
显卡 Geforce GT 755M
一.安装显卡驱动
(1)不同版本的cuda要注意显卡驱动版本问题:
官方地址:https://docs.nvidia.com/cuda/cuda-toolkit-release-notes/index.html

这里我想安装的是cuda10,所以显卡驱动版本要>=410.48
到官方网址:https://www.geforce.cn/drivers
选择适合自己的显卡驱动,我选择的是NVIDIA-Linux-x86_64-418.88.run
(2)不同版本的cuda版本要注意ubuntu版本、内核版本、以及gcc版本的兼容问题
这个是cuda10和各个版本的兼容关系,其他版本的cuda可以在官网中找到。
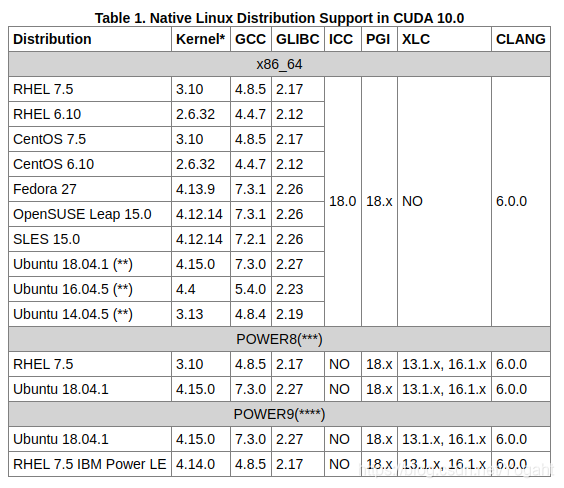
可以看到cuda10对于ubuntu16.04要求的内核版本是4.4,gcc版本是5.4.0,但是我目前的内核版本是4.15,因此需要降低内核版本。
因此第一步就是更新内核。
1.更新内核
(1)安装内核
到官方网址查找适用的内核版本:http://kernel.ubuntu.com/~kernel-ppa/mainline/
可以看到内核4.4有很多版本,这里我选择的是4.4.20,我第一次找的是4.4.12,结果在安装显卡驱动的时候报错内核gcc版本是4.3.×还是多少。
下载这几个文件:
linux-image-4.4.20-040420-generic_4.4.20-040420.201609070334_amd64.deb
linux-headers-4.4.20-040420_4.4.20-040420.201609070334_all.deb
linux-headers-4.4.20-040420-generic_4.4.20-040420.201609070334_amd64.deb
然后cd 到下载所在目录安装(确保目录中就几个deb文件):
sudo dpkg -i *.deb
(2)修改启动项
然后查看可用的内核:
grep menuentry /boot/grub/grub.cfg
然后编辑/etc/default/grub,这里实际是修改启动项
sudo gedit /etc/default/grub
默认为GRUB_DEFAULT=0,改为如下代码
GRUB_DEFAULT="Advanced options for Ubuntu > Ubuntu, with Linux 4.4.20-040420-generic"
然后sudo reboot 重启进入ubuntu高级选项。然后选择新的内核版本下启动
启动后查看内核版本:uname -r
![]()
(3)删除旧版本内核(可选)
为了避免以后都要这样启动,可以将之前版本的内核删掉。
查看系统所有内核:
dpkg --get-selections| grep linux
删除内核:
sudo apt-get remove linux-headers-4.15.0-45
sudo dpkg -P linux-image-4.15.0-54-generic
至此,内核更新结束,下一步是安装显卡驱动。
2.安装显卡驱动
我选择的显卡驱动版本是NVIDIA-Linux-x86_64-418.88.run
(1)卸载原有的NVIDIA驱动
一般方法:
sudo apt-get remove –purge nvidia*
如果使用.run文件安装,使用--uninstall卸载(具体方法百度)
(2)禁用nouveau
安装NVIDIA需要把系统自带的驱动禁用,打开文件:
sudo gedit /etc/modprobe.d/blacklist.conf
在文本最后添加以下内容:
blacklist nouveau
option nouveau modeset=0
保存退出,执行以下命令生效:
sudo update-initramfs -u
然后reboot重启后测试
lsmod | grep nouveau
如果无输出则说明禁用成功
(3)安装显卡驱动
首先禁用X服务(最好有一台备用电脑,因为这一步会黑屏...):
sudo service lightdm stop
按Ctrl+Alt+F1进入命令行,输入用户名密码登录(通过Ctrl+Alt+F7可返回界面)
下载的是.run文件,首先给文件赋予执行权限,首先cd到下载目录:(重要的事情说三遍:注意参数、注意参数、注意参数)
sudo chmod a+x NVIDIA-Linux-x86_64-384.130.run
然后安装:
sudo ./NVIDIA-Linux-x86_64-375.20.run –no-opengl-files
- –no-opengl-files 只安装驱动文件,不安装OpenGL文件。这个参数最重要
- –no-x-check 安装驱动时不检查X服务
- –no-nouveau-check 安装驱动时不检查nouveau
后面两个参数可不加。
安装过程中的选项:(这是copy别人的,自己的没记住,我也是尝试选择了好多遍才安装好)
The distribution-provided pre-install script failed! Are you sure you want to continue? 选择 yes 继续。
Would you like to register the kernel module souces with DKMS? This will allow DKMS to automatically build a new module, if you install a different kernel later? 选择 No 继续。
问题没记住,选项是:install without signing
问题大概是:Nvidia's 32-bit compatibility libraries? 选择 No 继续。
Would you like to run the nvidia-xconfigutility to automatically update your x configuration so that the NVIDIA x driver will be used when you restart x? Any pre-existing x confile will be backed up. 选择 Yes 继续
安装完成后重启验证是否安装成功
nvidia-smi
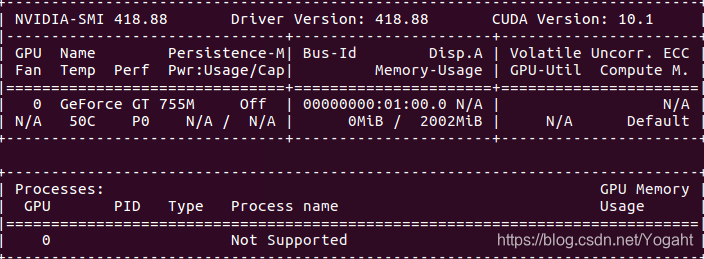
类似这种的就说明安装成功
3.安装过程的两个坑
(1)安装中提示ubuntu内核的gcc版本不匹配,就是上文我说的选择内核4.4.12版本是遇到的坑,这时候就重新更新4.4.20内核就可以了。

The CC version check failed:
The kernel was built with gcc version 5.3.1 20160413 (Ubuntu 5.3.1-14ubuntu2) , but the current compiler version is cc (Ubuntu 5.4.0-6ubuntu1~16.04.11) 5.4.0 20160609.
This may lead to subtle problems; if you are not certain whether the mismatched compiler will be compatible with your kernel, you may wish to abort installation, set the CC environment variable to the name of the compiler used to
compile your kernel, and restart installation.
Ignore CC version check Abort installation
(2)显卡驱动安装完成重启后发现分辨率变低了
而且命令xrandr发现可设置的最高分辨率就是当前分辨率:
解决方法:https://www.douban.com/note/262885853/
至此,显卡驱动安装完成,下面安装CUDA和CUDNN都是很简单的,就只放一下参考博客啦
https://blog.youkuaiyun.com/Ding19950107/article/details/89538228
https://blog.youkuaiyun.com/wanzhen4330/article/details/81699769


 被折叠的 条评论
为什么被折叠?
被折叠的 条评论
为什么被折叠?
 到【灌水乐园】发言


