


大致来看,mybatis是通过配置文件来实现对数据的操作,主要工作就是在解析配置文件
1. 配置文件
- 配置文件中的声明
<!DOCTYPE configuration PUBLIC "-//mybatis.org//DTD Config 3.0//EN"
       "http://mybatis.org/dtd/mybatis-3-config.dtd">
- DOCTYPE configuration: 声明
<configuration>是根标签 - http://mybatis.org/dtd/mybatis-3-config.dtd 文件中规范了该配置文件中可以使用哪些标签,并且规定了这些标签的顺序
- 顺序要求:① properties, ②settings, ③typeAliases, ④typeHandlers,⑤ objectFactory, ⑥objectWrapperFactory, ⑦reflectorFactory, ⑧plugins, ⑨environments, ⑩databaseIdProvider, mappers
1. properties
- 定义key:value
<properties>
	<!-- 类似定义变量,username的值是dev_user-->
	 <property name="username" value="dev_user"/>
	 <!--使用-->
	 <property name="username" value="${username}"/>
 </properties>
- 读取文件内定义的属性
- jdbc.properties文件
jdbc.driverClassName=com.mysql.cj.jdbc.Driver
jdbc.url=jdbc:mysql://localhost:3306/batis
jdbc.username=root
jdbc.password=123456
- 使用properties读取文件内容
<properties resource="jdbc.properties"/>
- 使用
 <!--  数据源的配置 -->
<dataSource type="POOLED">
  <property name="driver" value="${jdbc.driverClassName}"/>
  <property name="url" value="${jdbc.url}"/>
  <property name="username" value="${jdbc.username}"/>
  <property name="password" value="${jdbc.password}"/>
</dataSource>
2. setting 配置
1. logImpl 日志
1. 标准日志,输出到控制台
<configuration>
  <!--设置日志输出-->
  <settings>
    <!--name和value的属性值是固定的; STDOUT:输出到控制台-->
    <setting name="logImpl" value="STDOUT_LOGGING"/>
  </settings>
</configuration>
2. 开启全局懒加载
<!--    开启全局懒加载模式 ,如需要立即加载,需要在分步中设置fetchType="eager" -->
    <setting name="lazyLoadingEnabled" value="true"/>
3. logback日志
- 无需在
<setting name="logImpl">中配置日志,就可以使用logback
- 引入logback依赖
    <dependency>
      <groupId>ch.qos.logback</groupId>
      <artifactId>logback-classic</artifactId>
      <version>1.5.6</version>
      <scope>test</scope>
    </dependency>
- 在resource目录下创建一个名为
logback.xml的文件
<?xml version="1.0" encoding="UTF-8"?>
<configuration scan="true"
               scanPeriod="60 seconds"
               debug="false">

    <!-- 应用名称:和统一配置中的项目代码保持一致(小写) -->
    <property name="APP_NAME" value="app"/>
    <contextName>${APP_NAME}</contextName>
    <!--日志文件保留天数 -->
    <property name="LOG_MAX_HISTORY" value="30"/>
    <!--定义日志文件的存储地址 勿在 LogBack 的配置中使用相对路径 -->

    <!--应用日志文件保存路径 -->
    <!--在没有定义${LOG_HOME}系统变量的时候,可以设置此本地变量。 -->
    <property name="LOG_HOME" value="logs"/>
    <property name="INFO_PATH" value="${LOG_HOME}/info"/>
    <property name="DEBUG_PATH" value="${LOG_HOME}/debug"/>
    <property name="ERROR_PATH" value="${LOG_HOME}/error"/>
    <!--<property name="LOG_HOME" msg="/home/logs/${APP_NAME}" />-->

    <!--=========================== 按照每天生成日志文件:默认配置=================================== -->
    <!-- 控制台输出 -->
    <appender name="console" class="ch.qos.logback.core.ConsoleAppender">
        <encoder class="ch.qos.logback.classic.encoder.PatternLayoutEncoder">
            <!--格式化输出:%d表示日期,%c类名,%t表示线程名,%L行, %p日志级别 %msg:日志消息,%n是换行符  -->
            <pattern>%black(%contextName - %d{yyyy-MM-dd HH:mm:ss}) %green([%c][%t][%L]) %highlight(%-5level) - %gray(%msg%n)</pattern>
        </encoder>
    </appender>

    <!-- 按照每天生成日志文件:主项目日志 -->
    <appender name="APP_DEBUG" class="ch.qos.logback.core.rolling.RollingFileAppender">
        <rollingPolicy class="ch.qos.logback.core.rolling.TimeBasedRollingPolicy">
            <!--日志文件输出的文件名 -->
            <FileNamePattern>${DEBUG_PATH}/debug-%d{yyyy-MM-dd}.log</FileNamePattern>
            <!--日志文件保留天数 -->
            <MaxHistory>${LOG_MAX_HISTORY}</MaxHistory>
        </rollingPolicy>
        <encoder class="ch.qos.logback.classic.encoder.PatternLayoutEncoder">
            <!--格式化输出:%d表示日期,%c类名,%t表示线程名,%L行, %p日志级别 %msg:日志消息,%n是换行符  -->
            <pattern>%d{yyyy-MM-dd HH:mm:ss.SSS} [%c][%t][%L][%p] - %msg%n</pattern>
            <charset>UTF-8</charset>
        </encoder>
        <!-- 此日志文件只记录debug级别的 -->
        <filter class="ch.qos.logback.classic.filter.LevelFilter">
            <level>debug</level>
            <onMatch>ACCEPT</onMatch>
            <onMismatch>DENY</onMismatch>
        </filter>
    </appender>

    <!-- 按照每天生成日志文件:主项目日志 -->
    <appender name="APP_INFO" class="ch.qos.logback.core.rolling.RollingFileAppender">
        <rollingPolicy class="ch.qos.logback.core.rolling.TimeBasedRollingPolicy">
            <!--日志文件输出的文件名 -->
            <FileNamePattern>${INFO_PATH}/info-%d{yyyy-MM-dd}.log</FileNamePattern>
            <!--日志文件保留天数 -->
            <MaxHistory>${LOG_MAX_HISTORY}</MaxHistory>
        </rollingPolicy>
        <encoder class="ch.qos.logback.classic.encoder.PatternLayoutEncoder">
            <!--格式化输出:%d表示日期,%c类名,%t表示线程名,%L行, %p日志级别 %msg:日志消息,%n是换行符  -->
            <pattern>%d{yyyy-MM-dd HH:mm:ss.SSS} [%c][%t][%L][%p] - %msg%n</pattern>
            <charset>UTF-8</charset>
        </encoder>

        <!-- 此日志文件只记录info级别的 -->
        <filter class="ch.qos.logback.classic.filter.LevelFilter">
            <level>info</level>
            <onMatch>ACCEPT</onMatch>
            <onMismatch>DENY</onMismatch>
        </filter>
    </appender>

    <!-- 按照每天生成日志文件:主项目日志 -->
    <appender name="APP_ERROR" class="ch.qos.logback.core.rolling.RollingFileAppender">
        <rollingPolicy class="ch.qos.logback.core.rolling.TimeBasedRollingPolicy">
            <!--日志文件输出的文件名 -->
            <FileNamePattern>${ERROR_PATH}/error-%d{yyyy-MM-dd}.log</FileNamePattern>
            <!--日志文件保留天数 -->
            <MaxHistory>${LOG_MAX_HISTORY}</MaxHistory>
        </rollingPolicy>
        <encoder class="ch.qos.logback.classic.encoder.PatternLayoutEncoder">
            <!--格式化输出:%d表示日期,%c类名,%t表示线程名,%L行, %p日志级别 %msg:日志消息,%n是换行符  -->
            <pattern>%d{yyyy-MM-dd HH:mm:ss.SSS} [%c][%t][%L][%p] - %msg%n</pattern>
            <charset>UTF-8</charset>
        </encoder>
        <!-- 此日志文件只记录error级别的 -->
        <filter class="ch.qos.logback.classic.filter.LevelFilter">
            <level>error</level>
            <onMatch>ACCEPT</onMatch>
            <onMismatch>DENY</onMismatch>
        </filter>
    </appender>

    <!--日志输出到文件-->
    <root level="info">
        <appender-ref ref="APP_DEBUG"/>
        <appender-ref ref="APP_INFO"/>
        <appender-ref ref="APP_ERROR"/>
        <appender-ref ref="console"/>
    </root>

    <!-- mybatis 日志级别 -->
    <logger name="com.pm.health" level="debug"/>
</configuration>
2. 数据库列名与实体类属性名映射
- 数据库列名全部是小写,单词通过下划线连接
- 实体类属性名,采用驼峰命名
| 数据库列名 | 实体类属性名 |
|---|---|
| user_name | useName |
| guide_price | guidePrice |
  <settings>
    <setting name="mapUnderscoreToCamelCase" value="true"/>
  </settings>
- 作用:这样就不用在mapper.xml文件中使用as或者resultMap做列名的映射了
3. typeAliases 实体类的别名
- 优化 mapper.xml 中
resultType和parameterType使用实体类时的全限定类名 - 在
resultType和parameterType使用简化后的实体类名时,类名不区分大小写
<!--注册实体类的别名  -->
<typeAliases>
<!--最常用的方式:将整个实体类的文件夹注册,里面所有的实体类的自动注册别名为:类名的驼峰命名-->
    <package name="org.example.pojo"/>
<!--实体类org.example.pojo.car的别名为car  -->
	<typeAliase type="org.example.pojo.car" alias="car"/>
<!--可省略alias属性,功能同上,别名为实体类的类名  -->
	<typeAliase type="org.example.pojo.car" />
</typeAliases>

<!--示例 -->
<select id="getAll" resultType="Car">
    select * from t_car
</select>
9. environments 环境
配置环境
1.<environments>标签内可以有多个<environment>,id值必须不同
2.<environments>标签中的default指向默认使用哪一个环境
  <environments default="FirstDB">
    <environment id="FirstDB">
     	<!-- FirstDB的配置 -->
    </environment>
    <environment id="SecondDB">
		<!-- SecondDB的配置 -->
    </environment>
  </environments>
- 使用默认环境和使用指定环境
    InputStream in = Resources.getResourceAsStream("config.xml");
    SqlSessionFactoryBuilder sqlSessionFactoryBuilder = new SqlSessionFactoryBuilder();

    // sqlSessionFactory使用配置文件中的默认环境
    SqlSessionFactory build1 = sqlSessionFactoryBuilder.build(in);
    // sqlSessionFactory使用配置文件中id为"SecondDB"的环境
    SqlSessionFactory build2 = sqlSessionFactoryBuilder.build(in, "SecondDB");
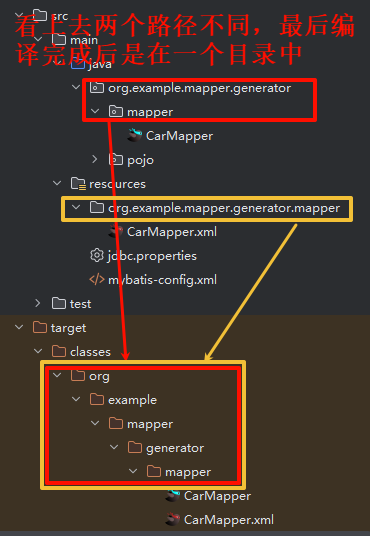
11. mappers 映射器
- 作用:引入mapper.xml文件,供sqlsessionFactroy创建出可执行的sql语句
  <mappers>
    <!-- 最常用的方式,指定包名,包下的所有接口,都会被扫描到 -->
    <!--    这样使用有个两个前提:1. 接口和mapper必须在同一个路径下,2. 接口和mapper的命名要一致,以Mapper结尾-->
    <package name="org.example.mapper.generator.mapper"/>
    <!-- 全限定接口名,使用的前提同上 -->
    <mapper class="org.example.mapper.generator.mapper.CarMapper"/>
    <!-- 引入路径下的映射文件 -->
    <mapper resource="org/example/mapper/generator/mapper/CarMapper.xml"/>
    <!--绝对路径中获取mapper -->
    <mapper url="file:///D:/CarMapper.xml"/>
  </mappers>
- 使用
<package name="org.example.mapper.generator.mapper"/>,代码编写阶段不在同一个包中,编译完成后两个路径相同的文件会归到同一个路径的目录中
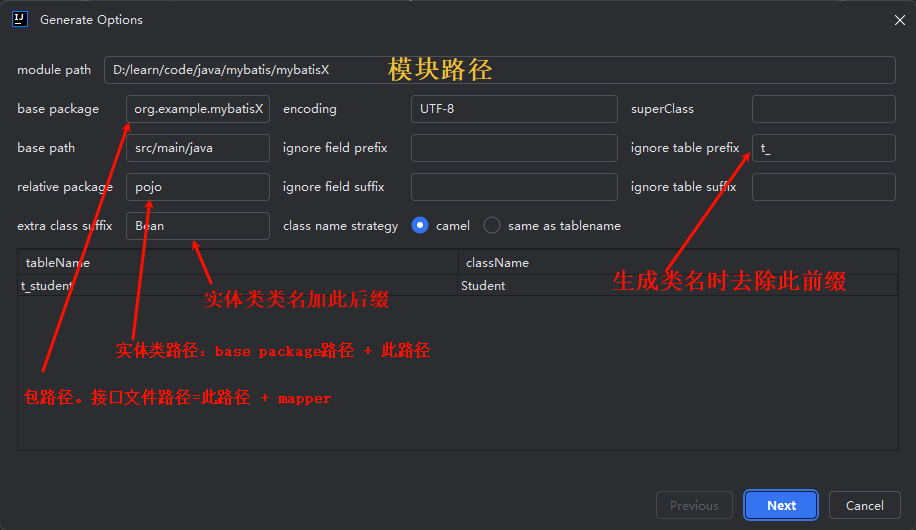
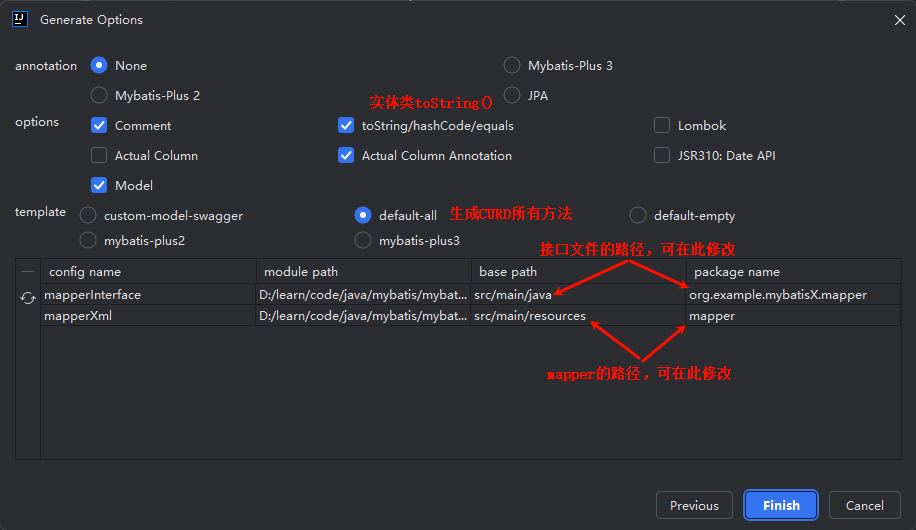
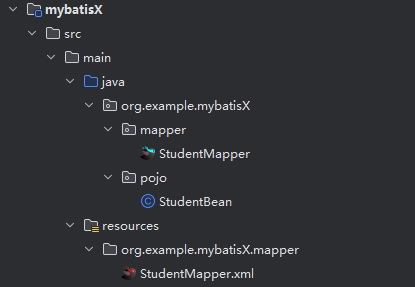
2. mybatisX 插件的使用
3. 分步查询的懒加载
- 作用:如果只用到了第一步查询的结果,则不会执行第二步查询,只有在用到第二步的结果时,才会执行第二步
- fetchType:
    <association property="..." column="..." fetchType="lazy"
                 select="..."/>
- 在实际的应用中设置全局懒加载
<!--    开启全局懒加载模式 ,如需要立即加载,需要在分步中设置fetchType="eager" -->
    <setting name="lazyLoadingEnabled" value="true"/>
- 开启全局懒加载模式,有立即执行分步查询时
    <association property="..." column="..." fetchType="eager"
                 select="..."/>
4. 多表查询
1. 一对多关联查询
需要注意的地方很多
- 一对多关联查询时,select查询语句中要使用
left join,以左表为主表。客户3没有订单,如果使用inner join关联,查询结果为null,就算客户没有订单,也应该查询到该客户的信息。- 当两个表有相同的列名时,必须取别名
- 在xml文件中做实体类的成员变量和表中列名的映射时,列名相同的必须使用别名,不然查询的结果不正确,相同列名的结果会搞混。
- 使用的标签和属性就一一对应的看。
- 数据库表
客户表:customer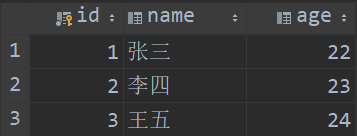
订单表:orders,列customer_id关联customer表的id列

- 实体类
customer表的成员变量有Orders的list集合
// 客户表
public class Customer {
    private Integer id;
    private String name;
    private Integer age;
    // 对应的订单,一对多,一个客户可以有多个订单
    private List<Orders> ordersList;
    }
// 订单表
public class Orders {
    private Integer id;
    private String orderNumber;
    private double orderPrice;
    // 对应的客户,多对一,每个订单只对应一个客户
    private Customer cus;
- mapper.xml
<!--    一对多查询-->
<!--        接口中的方法:List<Customer> getOneToMore(Integer id);-->
    <select id="getOneToMore" resultMap="oneToMore">
        select customer.id as cid,name,age,orders.id as oid,orderNumber,orderPrice,customer_id
        from customer left join orders on customer.id = orders.customer_id
        where customer.id=#{id};
    </select>
<!--    实体类成员变量与列名的映射关系,-->
    <resultMap id="oneToMore" type="customer">
<!--        主键绑定-->
        <id property="id" column="cid"></id>
<!--        非主键绑定-->
        <result property="name" column="name"></result>
        <result property="age" column="age"></result>
<!--        成员变量中的list集合,属性ofType的值为“多”的实体类名-->
        <collection property="ordersList" ofType="orders">
            <!--        主键绑定-->
            <id property="id" column="oid"></id>
            <!--        非主键绑定-->
            <result property="orderNumber" column="orderNumber"></result>
            <result property="orderPrice" column="orderPrice"></result>
        </collection>
    </resultMap>
输出:
Customer{id=1, name='张三', age=22, ordersList=[Orders{id=11, orderNumber='20', orderPrice=22.22, customer=null}, Orders{id=12, orderNumber='60', orderPrice=16.66, customer=null}]}
2. 一对多关联查询的分步查询
- 数据表
- 主表:班级表

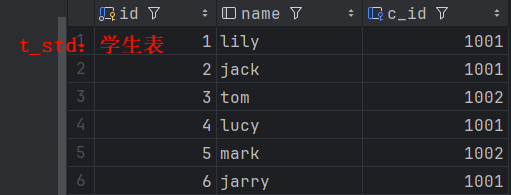
- 关联表:学生表
- 修改实体类
- 班级实体类
- 增加属性:
private List<StdBean> stdList; - 实体类中的方法:① 属性的get、set方法 ②无参构造方法
- 增加属性:
public class ClassBean {
    private Long id;
    private String className;
    private List<StdBean> stdList;
- 学生实体类
在这里插入代码片
public class StdBean  {
    private Long id;
    private String name;
    private String cId;
- mapper.xml
- classMapper.xml
    <!-- 与多对一不同的地方:
        1. 使用<collection>
        2. 返回的类型使用ofType属性,ofType="stdBean"
     -->
    <resultMap id="selectClassStudentMap" type="classBean">
        <id property="id" column="id" />
        <result property="className" column="class_name" />
        <collection property="stdList" column="id" ofType="stdBean"
                    select="org.example.moretable.mapper.StdMapper.selectByCid" />
    </resultMap>
    <select id="selectClassStudent" resultMap="selectClassStudentMap">
        select id, class_name from t_class where id=#{id}
    </select>
- stdMapper.xml
  <select id="selectByCid" resultType="stdBean">
    select id, name from t_std where c_id=#{cid}
  </select>
3. 多对一关联查询
- 与一对多最大的区别是关系映射使用的标签,引用类型为实体类使用的标签 与 引用类型为实体类的list集合所使用的标签不同,标签内的属性也不同。
- 在select语句中,多对一的联表使用
inner join,每个订单肯定对应一个客户,不可能出现客户为null的情况。- 其他需要注意的地方与一对多联表查询一样
<!--        根据订单id 查询,关联客户表,接口中的方法Orders getMoreToOne(Integer id);-->
    <select id="getMoreToOne" resultMap="moreToOne">
        select orders.id oid,orderNumber,orderPrice,customer.id cid,name,age
        from orders inner join customer on customer_id=customer.id
        where orders.id=#{id}
    </select>
<!--    // 订单表
        public class Orders {
            private Integer id;
            private String orderNumber;
            private double orderPrice;
            // 对应的客户,多对一,每个订单只对应一个客户
            private Customer cus;
    }-->
    <resultMap id="moreToOne" type="orders">
        <id property="id" column="oid"></id>
        <result property="orderNumber" column="orderNumber"></result>
        <result property="orderPrice" column="orderPrice"></result>
    <!--
        public class Customer {
            private Integer id;
            private String name;
            private Integer age;
        }-->
        <association property="cus" javaType="customer">
            <id property="id" column="cid"></id>
            <result property="name" column="name"></result>
            <result property="age" column="age"></result>
        </association>
    </resultMap>
输出:
moreToOne = Orders{id=11, orderNumber='20', orderPrice=22.22, customer=Customer{id=1, name='张三', age=22, ordersList=null}}
4. 多对一关联查询的分步查询
分步查询是最常用的查询方式:优点可复用,可懒加载
- 主表:学生表
- 关联表:班级表
- 实体类
只需要无参构造,查询后先通过无参构造实例化实体类,通过set方法赋值
- 学生表实体类
public class StdBean {
    private Long id;
    private String name;
    private String cId;
    private ClassBean classBean;
}
- 班级实体类,正常实体类
public class ClassBean {
    private Long id;
    private String className;
}
- mapper.xml
- classMapper.xml:给
StuBean属性private ClassBean classBean;提供值
<mapper namespace="org.example.moretable.mapper.ClassMapper">
 <!-- 最简单的的查询:传入id,返回结果是班级对象 -->
    <select id="selectClassById" resultType="ClassBean">
        select id, class_name from t_class where id=#{id}
        <!-- 在config配置了:<setting name="mapUnderscoreToCamelCase" value="true"/>
         查询的返回结果是实体类,所以数据库中列class_name,会自动对应到实体类的className属性-->
        <!-- select * from t_class where id=#{id} -->
    </select>
</mapper>
- stdMapper.xml
对resultMap的理解
<result property="name" column="name"/>:property是实体类中的属性,这里做了映射,才会通过set方法给实体类的这个属性赋值,column是数据库的列名
<mapper namespace="org.example.moretable.mapper.StdMapper">
<!--type:主表实体类类名-->
  <resultMap id="selectStudentByIdStepOne" type="StdBean">
    <id property="id" column="id"/>
    <result property="name" column="name"/>
    <result property="cId" column="c_id"/>
    <!-- 第二步查询:获得ClassBean 对象-->
    <!-- column="c_id":column的值必须是select语句中的列名,虽然上面已经做了映射cId,但是不能用 -->
    <!-- select:指向ClassMapper.xml中的查询方法 -->
    <association property="classBean" column="c_id" javaType="classBean"
     select="org.example.moretable.mapper.ClassMapper.selectClassById"/>
  </resultMap>
  <!-- 发起查询后,第一步会先执行下面的sql  -->
  <select id="selectByIdStepOne" resultMap="selectStudentByIdStepOne"
          >
    <!-- 查询的返回结果是自定义的map,需要在resultMap中指定列名与属性的对应关系 -->
    select id, name, c_id from t_std where id=#{id}
    <!-- select * from t_std where id=#{id} -->
  </select>
</mapper>
5. 一对一
- 实体类中关联另一个表的成员变量为另一个实体类
- xml文件中映射使用:
<association property="成员变量名" javaType="关联表的实体类名">
6. 多对多
- 数据库中的表:三张表,两个数据表,一个对应关系表
- 实体类中关联另一个表的成员变量为实体类的list集合
- xml文件中映射使用:
<collection property="成员变量名" ofType="关联表的实体类名"">
8. 缓存
- 缓存的作用:缓存是在内存中,数据库是在硬盘中,内存的读写速度远远大于硬盘,查询时会加快查询速度。
- 缓存的内容:只会缓存select查询的内容。
- 缓存的使用:查询时会先到缓存中查询该数据,如果没有则到数据库中查询,查询到的同时会将数据放入缓存,同时从缓存中读取发送给请求者。
- 数据在缓存中的生命周期:只要有
commit()方法执行,就会清空所有缓存。重点:所有
1. 一级缓存
- Mybatis默认开启一级缓存。
- 一级缓存是保存在sqlsession中的,不同的sqlsession缓存的内容也不相同
- 默认开启的缓存不需要人为管理。
- 什么情况一级缓存失效:①执行sqlsession.clearCache()手动清空缓存②执行update、inseart、delete操作
- 如何证明缓存的存在:
- 当执行下面代码时,第一次查询的结果会存入缓存中,第二次查询时直接从缓存中读取
    //    获取id的数据
    @Test
    public void testGetUser(){
        Users user= mapper.getUser(3);
        System.out.println("第一次查询 = " + user);
        Users user1= mapper.getUser(3);
        System.out.println("第二次查询 = " + user1);
    }
查询结果:
==>  Preparing: select id ,name,email,age from users where id=?
==> Parameters: 3(Integer)
<==    Columns: id, name, email, age
<==        Row: 3, 王五, wangwu@163.com, 22
<==      Total: 1
第一次查询 = Users{id=3, name='王五', email='wangwu@163.com', age=22}
第二次查询 = Users{id=3, name='王五', email='wangwu@163.com', age=22}
从查询结果中可以看到,Preparing语句只被执行了一次。
- 在两次查询中增加事务的提交
虽然没有任何需要提交的事务,但是只要有commit()方法执行,就会清空所有缓存的数据
    //    获取id的数据
    @Test
    public void testGetUser(){
        Users user= mapper.getUser(3);
        System.out.println("第一次查询 = " + user);
        sqlSession.commit();
        Users user1= mapper.getUser(3);
        System.out.println("第二次查询 = " + user1);
    }
查询的结果:
==>  Preparing: select id ,name,email,age from users where id=?
==> Parameters: 3(Integer)
<==    Columns: id, name, email, age
<==        Row: 3, 王五, wangwu@163.com, 22
<==      Total: 1
第一次查询 = Users{id=3, name='王五', email='wangwu@163.com', age=22}
==>  Preparing: select id ,name,email,age from users where id=?
==> Parameters: 3(Integer)
<==    Columns: id, name, email, age
<==        Row: 3, 王五, wangwu@163.com, 22
<==      Total: 1
第二次查询 = Users{id=3, name='王五', email='wangwu@163.com', age=22}
可以看到提交了两次select语句Preparing: select id ,name,email,age from users where id=?
2. 二级缓存
- 二级缓存保存位置是在sqlsessionFactory中
- 开启二级缓存的条件:
- 全局配置默认开启二级缓存。
<setting name="cacheEnabled" value="true"/> - 在需要二级缓存的mapper.xml文件中增加
<cache/>标签 - 在需要二级缓存对应的实体类实现
Serializable接口 - 必须在sqlsession提交或关闭后,数据才会从一级缓存写入到二级缓存
- 全局配置默认开启二级缓存。
- 二级缓存失效条件与一级缓存的失效条件一样。
- 第一次查询后没有执行关闭或者提交操作,所以数据没有写入到二级缓存
// 验证二级缓存,缓存在sqlSessionFactory
  public void testL2Cache() throws IOException{
    SqlSessionFactory build = new SqlSessionFactoryBuilder().build(Resources.getResourceAsStream("mybatis-config.xml"));
    SqlSession sqlSession1 = build.openSession();
    SqlSession sqlSession2 = build.openSession();
    StdMapper mapper1 = sqlSession1.getMapper(StdMapper.class);
    StdMapper mapper2 = sqlSession2.getMapper(StdMapper.class);
//    不同的sqlsession执行相同的查询操作,验证二级缓存缓存在sqlSessionFactory
    StdBean stdBean1 = mapper1.selectById(1L);
//  第二次查询没有使用缓存,应为sqlSession1没有关闭
    StdBean stdBean2 = mapper2.selectById(1L);
    System.out.println(stdBean1);
    System.out.println(stdBean2);
    sqlSession1.close();
    sqlSession2.close();
  }
# 执行结果
Setting autocommit to false on JDBC Connection [com.mysql.cj.jdbc.ConnectionImpl@2dc995f4]
==>  Preparing: select id, name from t_std where id=?
==> Parameters: 1(Long)
<==    Columns: id, name
<==        Row: 1, lily
<==      Total: 1
# Cahe的命中率为 0,执行了两次查询操作
Cache Hit Ratio [org.example.moretable.mapper.StdMapper]: 0.0
Opening JDBC Connection
Created connection 635611994.
Setting autocommit to false on JDBC Connection [com.mysql.cj.jdbc.ConnectionImpl@25e2ab5a]
==>  Preparing: select id, name from t_std where id=?
==> Parameters: 1(Long)
<==    Columns: id, name
<==        Row: 1, lily
<==      Total: 1
StdBean{id=1, name='lily', cId='null', classBean=null}
StdBean{id=1, name='lily', cId='null', classBean=null}
- 第一查询后sqlSession关闭,数据写入二级缓存SqlSessionFactory
  public void testL2Cache() throws IOException{
    SqlSessionFactory build = new SqlSessionFactoryBuilder().build(Resources.getResourceAsStream("mybatis-config.xml"));
    SqlSession sqlSession1 = build.openSession();
    SqlSession sqlSession2 = build.openSession();
    StdMapper mapper1 = sqlSession1.getMapper(StdMapper.class);
    StdMapper mapper2 = sqlSession2.getMapper(StdMapper.class);
//    不同的sqlsession执行相同的查询操作,验证二级缓存缓存在sqlSessionFactory
    StdBean stdBean1 = mapper1.selectById(1L);
    sqlSession1.close();
//  sqlSession1 关闭,数据写入二级缓存
    StdBean stdBean2 = mapper2.selectById(1L);
    System.out.println(stdBean1);
    System.out.println(stdBean2);
    sqlSession2.close();
  }
# sqlSession2 执行查询操作,读取的是sqlSessionFactory 中的缓存,所以两次查询只执行了一次数据库查询
Setting autocommit to false on JDBC Connection [com.mysql.cj.jdbc.ConnectionImpl@2dc995f4]
==>  Preparing: select id, name from t_std where id=?
==> Parameters: 1(Long)
<==    Columns: id, name
<==        Row: 1, lily
<==      Total: 1
Resetting autocommit to true on JDBC Connection [com.mysql.cj.jdbc.ConnectionImpl@2dc995f4]
Closing JDBC Connection [com.mysql.cj.jdbc.ConnectionImpl@2dc995f4]
Returned connection 768185844 to pool.
As you are using functionality that deserializes object streams, it is recommended to define the JEP-290 serial filter. Please refer to https://docs.oracle.com/pls/topic/lookup?ctx=javase15&id=GUID-8296D8E8-2B93-4B9A-856E-0A65AF9B8C66
# cache 的命中率为0.5
Cache Hit Ratio [org.example.moretable.mapper.StdMapper]: 0.5
StdBean{id=1, name='lily', cId='null', classBean=null}
StdBean{id=1, name='lily', cId='null', classBean=null}
3. 集成第三方缓存依赖EhCache
集成EhCache是为了代替mybatis⾃带的⼆级缓存。⼀级缓存是⽆法替代的。
mybatis对外提供了接⼝,也可以集成第三⽅的缓存组件。⽐如EhCache、Memcache等。都可以。
EhCache是Java写的。Memcache是C语⾔写的。所以mybatis集成EhCache较为常⻅,按照以下步骤操作,就可以完成集成:
- 第⼀步:引⼊mybatis整合ehcache的依赖。
<!--mybatis集成ehcache的组件-->
<dependency>
	<groupId>org.mybatis.caches</groupId>
	<artifactId>mybatis-ehcache</artifactId>
	<version>1.2.2</version>
</dependency>
<!--ehcache需要slf4j的⽇志组件,log4j不好使-->
<dependency>
	<groupId>ch.qos.logback</groupId>
	<artifactId>logback-classic</artifactId>
	<version>1.2.11</version>
	<scope>test</scope>
</dependency>
- 第⼆步:在类的根路径下新建echcache.xml⽂件,并提供以下配置信息。
<?xml version="1.0" encoding="UTF-8"?>
<ehcache xmlns:xsi="http://www.w3.org/2001/XMLSchema-instance"
 xsi:noNamespaceSchemaLocation="http://ehcache.org/ehcache.xsd"
 updateCheck="false">
 <!--磁盘存储:将缓存中暂时不使⽤的对象,转移到硬盘,类似于Windows系统的虚拟内存-->
 <diskStore path="e:/ehcache"/>

 <!--defaultCache:默认的管理策略-->
 <!--eternal:设定缓存的elements是否永远不过期。如果为true,则缓存的数据始终有
效,如果为false那么还要根据timeToIdleSeconds,timeToLiveSeconds判断-->
 <!--maxElementsInMemory:在内存中缓存的element的最⼤数⽬-->
 <!--overflowToDisk:如果内存中数据超过内存限制,是否要缓存到磁盘上-->
 <!--diskPersistent:是否在磁盘上持久化。指重启jvm后,数据是否有效。默认为false-
->
 <!--timeToIdleSeconds:对象空闲时间(单位:秒),指对象在多⻓时间没有被访问就会失
效。只对eternal为false的有效。默认值0,表示⼀直可以访问-->
 <!--timeToLiveSeconds:对象存活时间(单位:秒),指对象从创建到失效所需要的时间。
只对eternal为false的有效。默认值0,表示⼀直可以访问-->
 <!--memoryStoreEvictionPolicy:缓存的3 种清空策略-->
 <!--FIFO:first in first out (先进先出)-->
 <!--LFU:Less Frequently Used (最少使⽤).意思是⼀直以来最少被使⽤的。缓存的元
素有⼀个hit 属性,hit 值最⼩的将会被清出缓存-->
 <!--LRU:Least Recently Used(最近最少使⽤). (ehcache 默认值).缓存的元素有⼀
个时间戳,当缓存容量满了,⽽⼜需要腾出地⽅来缓存新的元素的时候,那么现有缓存元素中时间戳
离当前时间最远的元素将被清出缓存-->
 <defaultCache eternal="false" maxElementsInMemory="1000" overflowToDis
k="false" diskPersistent="false"
 timeToIdleSeconds="0" timeToLiveSeconds="600" memoryStor
eEvictionPolicy="LRU"/>
</ehcache>
- 第三步:修改SqlMapper.xml⽂件中的标签,添加type属性。
- mapper.xml
<cache type="org.mybatis.caches.ehcache.EhcacheCache"/>
- 使用。与mybatis自带的二级缓存一样
9. PageHelper插件
使⽤PageHelper插件进⾏分⻚,更加的便捷。
- 第⼀步:引⼊依赖
<dependency>
 <groupId>com.github.pagehelper</groupId>
 <artifactId>pagehelper</artifactId>
 <version>5.3.1</version>
</dependency>
- 第⼆步:在mybatis-config.xml⽂件中配置插件
<plugins>
 <plugin interceptor="com.github.pagehelper.PageInterceptor" />
</plugins>
- 第三步:接口和mapper文件
与平时查询所有信息一样
- CarMapper接⼝
List<Car> selectAll();
- CarMapper.xml
<select id="selectAll" resultType="Car">
 select * from t_car
</select>
- 第四步:使用
关键点:
- 在查询语句之前开启分⻚功能。
- 在查询语句之后封装PageInfo对象。(PageInfo对象将来会存储到request域当中。在⻚⾯上展示。)
@Test
public void testPageHelper() throws Exception{
	SqlSessionFactory sqlSessionFactory = new SqlSessionFactoryBuilder().build(Resources.getResourceAsStream("mybatis-config.xml"));
	SqlSession sqlSession = sqlSessionFactory.openSession();
	CarMapper mapper = sqlSession.getMapper(CarMapper.class);
	// 开启分⻚,从第2条开始,查询数量3
	PageHelper.startPage(2, 3);
	// 执⾏查询语句
	List<Car> cars = mapper.selectAll();
	// 获取分⻚信息对象
	// 5 :页面上有几个可以点击的导航标签。比如一共有10 页,页面只有5个可点击的导航按钮
	PageInfo<Car> pageInfo = new PageInfo<>(cars, 5);
	System.out.println(pageInfo);
}
PageInfo{
	pageNum=2, pageSize=2, size=2, startRow=3, endRow=4, total=6, pages=3,
	list=Page{count=true, pageNum=2, pageSize=2, startRow=2, endRow=4, total=6, pages=3, reasonable=false, pageSizeZero=false}[Car{id=86, carNum='1234', brand='丰⽥霸道', guidePrice=50.5, produceTime='2020-10-11', carType='燃油⻋'},Car{id=87, carNum='1234', brand='丰⽥霸道', guidePrice=50.5, produceTime='2020-10-11', carType='燃油⻋'}],
	prePage=1, nextPage=3, isFirstPage=false, isLastPage=false, hasPreviousPage=true, hasNextPage=true,navigatePages=5, navigateFirstPage=1, navigateLastPage=3, navigatepageNums=[1, 2, 3]
}
PageInfo 对象返回的信息包含了分页查询的各种详细信息。下面是对每个字段的解释:
- 主要字段
1. pageNum:当前页码。
2. pageSize:每页显示的记录数。
3. size:当前页实际返回的记录数。
4. startRow:当前页第一条记录在数据库中的位置(从 1 开始计数)。
5. endRow:当前页最后一条记录在数据库中的位置(从 1 开始计数)。
6. total:总记录数。
7. pages:总页数。
8. list:当前页的记录列表。
- 辅助字段
9. prePage:上一页的页码。
10. nextPage:下一页的页码。
11. isFirstPage:是否是第一页。
12. isLastPage:是否是最后一页。
13. hasPreviousPage:是否有上一页。
14. hasNextPage:是否有下一页。
15. navigatePages:导航分页标签数量。
16. navigateFirstPage:导航分页的第一个页码。
17. navigateLastPage:导航分页的最后一个页码。
18. navigatepageNums:导航分页的页码列表。
- 示例解释
假设总共有 6 条记录,每页显示 2 条记录,当前请求的是第 2 页:
	总记录数:6
	总页数:3(6 / 2 = 3)
	当前页码:2
	当前页记录:第 3 条和第 4 条记录
	上一页:第 1 页
	下一页:第 3 页
	是否是第一页:否
	是否是最后一页:否
	是否有上一页:是
	是否有下一页:是
	导航分页显示的页码:1、2、3


 673
673

 被折叠的 条评论
为什么被折叠?
被折叠的 条评论
为什么被折叠?
 到【灌水乐园】发言


