


 本文介绍了如何使用Java语言搭建RabbitMQ环境,创建生产者和消费者程序,并进行了测试。通过运行生产者发送消息,消费者成功接收并打印消息。同时,文章还提到了可以通过Web端进行查看验证。
RabbitMQ入门程序
使用Java语言编写两个程序。发送单个消息的生产者和消费者并打印出消费者。

1、搭建环境
使用Maven创建两个工程,并加入rabbitMQ坐标
- test-rabbitmq-producer:生产者工程
- test-rabbitmq-consumer:消费者工程
RabbitMQ的maven坐标
<dependencies>
        <dependency>
            <groupId>com.rabbitmq</groupId>
            <artifactId>amqp-client</artifactId>
            <version>4.0.3</version>
        </dependency>
        <dependency>
            <groupId>org.springframework.boot</groupId>
            <artifactId>spring-boot-starter-logging</artifactId>
        </dependency>
    </dependencies>
2、编写生产者代码
import com.rabbitmq.client.Channel;
import com.rabbitmq.client.Connection;
import com.rabbitmq.client.ConnectionFactory;

import java.time.ZonedDateTime;

/**
 * @author: Yizq
 * @data: 2020/10/11 20:21
 */
public class Producer01 {
    //队列名称
    private static final String QUEUE = "helloworld";

    public static void main(String[] args) {
        Connection connection = null;
        Channel channel = null;


        try {
            /*
                一、与RabbitMQ建立连接
            */
            ConnectionFactory connectionFactory = new ConnectionFactory();
            // 设置主机IP(如果是本地使用localhost)
            connectionFactory.setHost("192.168.174.131");
            // rabbitMq默认的端口号
            connectionFactory.setPort(5672);
            // 访问的用户名
            connectionFactory.setUsername("guest");
            // 访问的密码
            connectionFactory.setPassword("guest");
            // RabbitMQ默认的虚拟机名称为"/",虚拟机相当于一个独立的mq服务
            connectionFactory.setVirtualHost("/");
            /*
                二、创建通道
            */
            connection = connectionFactory.newConnection();
            channel = connection.createChannel();
            /*
                三、声明队列
             */
            /*
             * 参数说明:
             *  String queue: 队列名称
             *  boolean durable: 是否持久化。如果持久化,mq重启后队列还在
             *  boolean exclusive: 队列是否独占此链接,如果设置为false连接关闭队列则删除
             *  boolean autoDelete:队列不再使用时自动删除
             *  Map<String, Object> arguments:队列参数
             */
            channel.queueDeclare(QUEUE, true, false, false, null);
            /*
                四、消息发布
             */
            String message = "hello world" + ZonedDateTime.now();
            /**
             * 参数说明:
             * String exchange:交换机的名称,如果没有指定,则使用默认交换机
             * String routingKey:路由key,适用于交换机将消息转发到其他的消息队列
             * BasicProperties props:消息包含的属性
             * byte[] body:消息体
             *
             */
            channel.basicPublish("", QUEUE, null, message.getBytes());
            System.out.println("Send Message is:" + message);


        } catch (Exception e) {
            e.printStackTrace();
        } finally {
            try {
                if (channel != null) {
                    channel.close();
                }
                if (connection != null) {
                    connection.close();
                }
            } catch (Exception e) {
                e.printStackTrace();

            }

        }

    }

}
3、编写消费者代码
import com.rabbitmq.client.*;

import java.io.IOException;
import java.nio.charset.StandardCharsets;
import java.util.concurrent.TimeoutException;

/**
 * @author: Yizq
 * @data: 2020/10/11 20:34
 */
public class Consumer01 {
    //队列名称
    private static final String QUEUE = "helloworld";

    public static void main(String[] args) throws IOException, TimeoutException {
        ConnectionFactory connectionFactory = new ConnectionFactory();
        /*
            一、建立连接
         */
        // 设置主机IP(如果是本地使用localhost)
        connectionFactory.setHost("192.168.174.131");
        // rabbitMq默认的端口号
        connectionFactory.setPort(5672);
        // 访问的用户名
        /*
            二、创建通道
         */
        Connection connection = connectionFactory.newConnection();
        Channel channel = connection.createChannel();
        /*
            三、声明队列
        */
        /*
         * 参数说明:
         *  String queue: 队列名称
         *  boolean durable: 是否持久化。如果持久化,mq重启后队列还在
         *  boolean exclusive: 队列是否独占此链接,如果设置为false连接关闭队列则删除
         *  boolean autoDelete:队列不再使用时自动删除
         *  Map<String, Object> arguments:队列参数
         */
        channel.queueDeclare(QUEUE, true, false, false, null);
        DefaultConsumer defaultConsumer = new DefaultConsumer(channel) {
            /**
             * 当接收到参数后此方法将被调用
             * @param consumerTag 消费者标签,用来标识消费者,在监听队列设置channel.basicConsume
             * @param envelope 信封,通过envelope
             * @param properties 消息属性
             * @param body 消息内容
             * @throws IOException
             */
            @Override
            public void handleDelivery(String consumerTag, Envelope envelope, AMQP.BasicProperties properties, byte[] body) throws IOException {
                // 交换机
                String exchange = envelope.getExchange();
                // 路由key
                String routingKey = envelope.getRoutingKey();
                // 消息id,mq在channel中用来标识消息的id,可用于确认消息已接收
                long deliveryTag = envelope.getDeliveryTag();
                // 消息内容
                String mes = new String(body, StandardCharsets.UTF_8);
                System.out.println("receive message.. " + mes);

            }
        };
        /*
            四、监听队列
         */
        /*
         * 参数说明:
         *  String queue:队列名称
         *  boolean autoAck:自动回复,当消费者接口道消息后告诉mq消息已接收,如果将此参数设置为false要通过编程来实现回复
         *  Consumer callback:消息方法,当消费者接口到消息要执行的方法
         */
        channel.basicConsume(QUEUE, true, defaultConsumer);

    }
}
4、测试
运行Consumer01,此时的Consumer01在等待中。再Producer01运行。控制台会输出
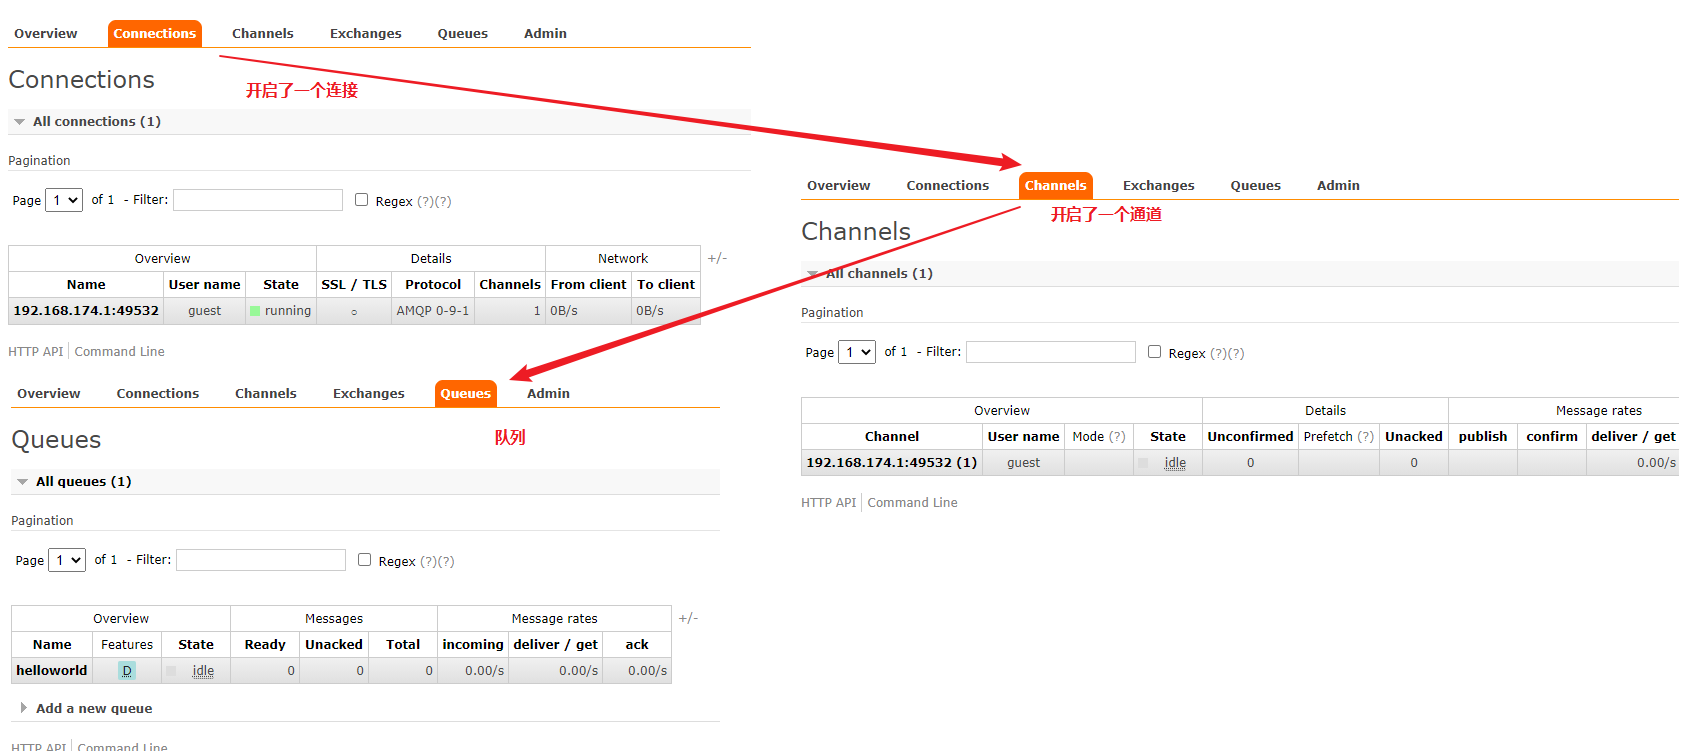
receive message.. hello world2020-10-11T20:59:15.757+08:00[Asia/Shanghai]5、Web端查看


 被折叠的 条评论
为什么被折叠?
被折叠的 条评论
为什么被折叠?
 到【灌水乐园】发言


