


spring cloud alibaba example
spring cloud alibaba nacos 配置中心、spring cloud alibaba nacos 服务注册与发现、openfeign 服务调用、spring cloud loadbalancer 负载均衡、spring cloud alibaba sentinel 限流降级、spring cloud alibaba seata 分布式事务、spring cloud gateway 服务网关、dubbo rpc 调用等。
—— 2025 年 1 月 20 日 甲辰年腊月二十一 大寒
版本
- jdk:17
- spring boot:3.3.6
- spring cloud:4.1.2
- spring cloud alibaba:2023.0.1.2
- apache dubbo:3.3.1
- zookeeper:3.9.3
注:spring cloud 相关依赖(如 spring cloud alibaba、spring boot 等)版本,存在严格对照关系,故在使用时一定要在组件对应官网查看对应版本!!!
注: 关于分布式、微服务、spring cloud、spring cloud alibaba 等概念或技术的详情介绍,请移步 分布式微服务系统简述。
目录
1 nacos 配置中心及服务注册与发现
1.1 nacos 安装
nacos 作为配置中心和服务注册发现中心时,需要安装 nacos 服务端,此时服务提供者和消费者都是 nacos 服务端对应的客户端。nacos 安装请参考 nacos 官网安装手册。
安装成功之后,进入 bin 目录执行命令(Linux/Unix/Mac:sh startup.sh -m standalone,Windows:startup.cmd -m standalone。其中 standalone 表示单机启动)启动 nacos。
启动成功之后访问 http://127.0.0.1:8848/nacos 即可打开 nacos 可视化操作界面。初始用户名密码皆为 nacos,至于怎么改,那么我忘了。
1.2 服务提供者与消费者
首先创建两个 spring boot 应用 provider 和 consumer,分别作为服务提供者和消费者。
-
服务提供者 provider:
-
除却 spring boot web 应用常用依赖外,添加以下依赖:
<!-- 解析 bootstrap.yml 文件 --> <dependency> <groupId>org.springframework.cloud</groupId> <artifactId>spring-cloud-starter-bootstrap</artifactId> <version>4.1.2</version> </dependency> <!-- nacos 配置中心 --> <dependency> <groupId>com.alibaba.cloud</groupId> <artifactId>spring-cloud-starter-alibaba-nacos-config</artifactId> <version>2023.0.1.2</version> </dependency> <!-- nacos 服务注册和发现 --> <dependency> <groupId>com.alibaba.cloud</groupId> <artifactId>spring-cloud-starter-alibaba-nacos-discovery</artifactId> <version>2023.0.1.2</version> </dependency> -
引导类:
@EnableDiscoveryClient // 当该服务作为服务提供者时需要添加(换言之 若 nacos 只用来作为配置中心时 则不需要该注解) @SpringBootApplication public class ProviderApplication { public static void main(String[] args) { SpringApplication.run(ProviderApplication.class, args); } } -
提供 restful 接口:
@RestController @RequestMapping("/user") public class UserController { @PostMapping("/getUser") public APIResponse<User> getUser(@RequestParam("username") String username) { return APIResponse.success(User.builder().username(username).nickname("影流之主").build()); } } -
bootstrap.yml 文件:
################### spring cloud 配置 ###################
spring:
  application:
    name: provider
  profiles:
    active: dev
  cloud:
    nacos:
      server-addr: localhost:8848
      username: nacos
      password: nacos
      config:
        namespace: 29e2a54b-b773-46e4-b0bf-5bc1cab94875   # 该值为服务提供者在 nacos 中的配置文件所在的命名空间的 ID
        group: DEFAULT_GROUP
        file-extension: yml   # 配置文件后缀
      discovery:
        namespace: ${spring.cloud.nacos.config.namespace}
-
-
服务消费者 consumer:
-
除却 spring boot web 应用常用依赖外,添加以下依赖:
<!-- 解析 bootstrap.yml 文件 --> <dependency> <groupId>org.springframework.cloud</groupId> <artifactId>spring-cloud-starter-bootstrap</artifactId> <version>4.1.2</version> </dependency> <!-- nacos 配置中心 --> <dependency> <groupId>com.alibaba.cloud</groupId> <artifactId>spring-cloud-starter-alibaba-nacos-config</artifactId> <version>2023.0.1.2</version> </dependency> <!-- nacos 服务注册和发现 --> <dependency> <groupId>com.alibaba.cloud</groupId> <artifactId>spring-cloud-starter-alibaba-nacos-discovery</artifactId> <version>2023.0.1.2</version> </dependency> <!-- openfeign 服务调用 --> <dependency> <groupId>org.springframework.cloud</groupId> <artifactId>spring-cloud-starter-openfeign</artifactId> <version>4.1.2</version> </dependency> <!-- loadbalancer 负载均衡 --> <dependency> <groupId>org.springframework.cloud</groupId> <artifactId>spring-cloud-starter-loadbalancer</artifactId> <version>4.1.2</version> </dependency> -
引导类:
// @EnableFeignClients 该注解的作用是解析 openfeign 客户端时指定的包(org.xgllhz.consumer.feign) @EnableFeignClients(basePackages = "org.xgllhz.consumer.feign") @SpringBootApplication public class ConsumerApplication { public static void main(String[] args) { SpringApplication.run(ConsumerApplication.class, args); } } -
在 org.xgllhz.consumer.feign 目录下创建 openfeign 接口:
// name 值为服务提供者的 spring.application.name 的值 // path 值为服务提供者的 server.servlet.context-path 的值(path 可以不配置) @FeignClient(name = "provider", path = "/provider") public interface ProviderFeign { @PostMapping("/user/getUser") // 当 path 不配置时 此处的 mapping 应为 /provider/user/getUser APIResponse<User> getUser(@RequestParam("username") String username); } -
测试:
@RestController @RequiredArgsConstructor @RequestMapping("/test") public class TestController { private final ProviderFeign providerFeign; @GetMapping("/test") public APIResponse<List<Object>> test() { List<Object> list = new ArrayList<>(); APIResponse<User> response = this.providerFeign.getUser("momo"); if (response != null && response.getCode() == 1 && response.getData() != null) { list.add(response.getData()); } return APIResponse.success(list); } } -
bootstrap.yml:
################### spring cloud 配置 ###################
spring:
  application:
    name: consumer
  profiles:
    active: dev
  cloud:
    nacos:
      server-addr: localhost:8848
      username: nacos
      password: nacos
      config:
        namespace: 29e2a54b-b773-46e4-b0bf-5bc1cab94875
        group: DEFAULT_GROUP
        file-extension: yml
      discovery:
        namespace: ${spring.cloud.nacos.config.namespace}
-
1.3 配置中心
-
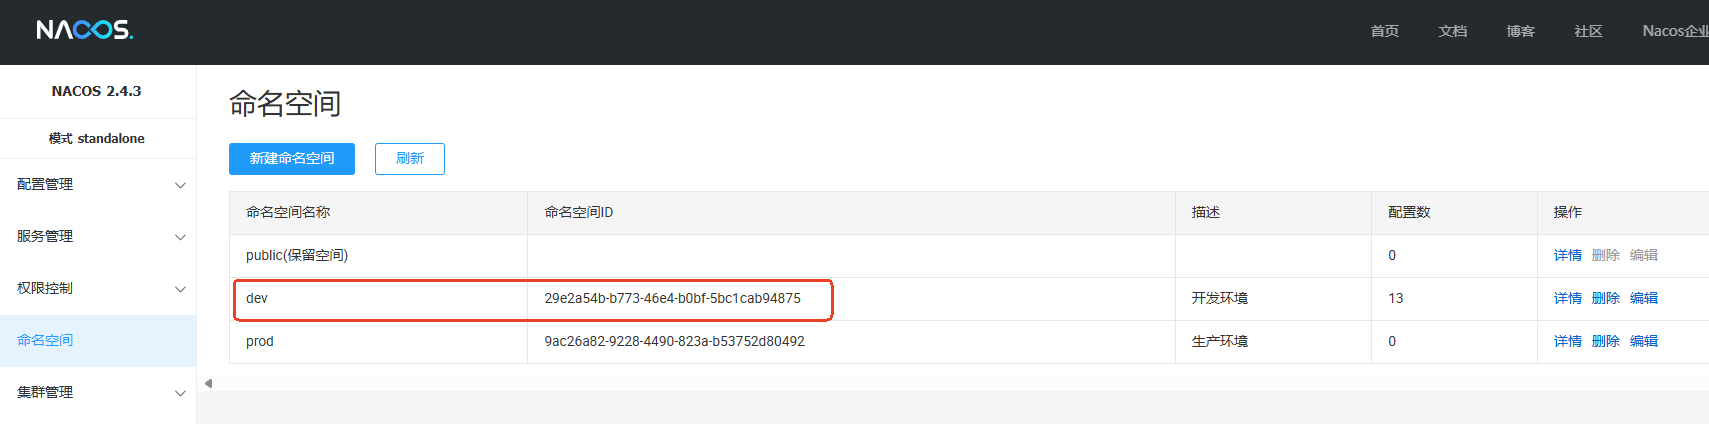
在 nacos 命名空间中创建 dev 命名空间。
-
在 nacos 配置管理目录下为服务提供者 provider 和消费者 consumer 创建配置文件。

-
服务提供者 provider 配置文件 provider-dev.yml 内容如下:
################### tomcat 配置 ################### server: port: 9641 servlet: context-path: /provider tomcat: uri-encoding: UTF-8 netty: connection-timeout: 5000 ################### spring 配置 ################### spring: main: allow-bean-definition-overriding: true cloud: loadbalancer: nacos: enabled: true # nacos & loadbalancer 同时使用时 开启后负载均衡才生效 -
服务消费者 consumer 配置文件 consumer-dev.yml 内容如下:
################### tomcat 配置 ###################
server:
  port: 9642
  servlet:
    context-path: /consumer
  tomcat:
    uri-encoding: UTF-8
  netty:
    connection-timeout: 5000

################### spring 配置 ###################
spring:
  main:
    allow-bean-definition-overriding: true
  cloud:
    loadbalancer:
      nacos:
        enabled: true   # nacos & loadbalancer 同时使用时 开启后负载均衡才生效
-
为什么要引入 spring-cloud-starter-bootstrap 依赖?
spring cloud 最开始使用 bootstrap 来配置 spring cloud,但后来从 2020 版本开始降低了 bootstrap 的优先级,故需要通过引入 spring-cloud-starter-bootstrap 依赖来解析 bootstrap.yml 以提高 bootstrap 的优先级。
-
为什么不用 nacos 官网推荐的配置方式?
spring cloud alibaba 从 2023.0.1.3 版本开始,调整了 spring cloud 的配置方式,推荐使用 spring.config.import 的方式从 nacos 加载配置,但其存在 bug。所以我们选用 2023.0.1.2 版本,改版本依旧使用 bootstrap 来加载 nacos 配置。
-
配置如何加载?
默认情况下,服务会通过 s p r i n g . a p p l i c a t i o n . n a m e − {spring.application.name}- spring.application.name−{spring.profiles.active}.${spring.cloud.nacos.config.file-extension} 为文件名,从 spring.cloud.nacos.config.namespace 对应的命名空间下加载对应配置文件。如服务消费者 consuer 的配文件名为 consumer-dev.yml,命名空间 ID 29e2a54b-b773-46e4-b0bf-5bc1cab94875 对应 dev 命名空间。
-
配置动态更新:
- @RefreshScope:该注解是 spring cloud config 提供的,直接作用在要注入属性(如通过 @Value 注入)的类上,当 nacos 中对应的配置发生变更时,该类对应 bean 会被重新初始化。
- ConfigListener:实现该接口,由 nacos 提供,可作为配置监听器,当 nacos 配置发生变更时可通过自定义逻辑来刷新配置。
- @NacosConfigurationProperties:由 nacos 提供,用来标记配置类。当 nacos 配置发生变更时,@RefreshScope 和 @ConfigurationProperties 注解会处理更新事件并重新初始化被 @NacosConfigurationProperties 注解标识的配置 bean。
- @NacosValue:由 nacos 提供,可直接作用在 bean 的属性上。当 nacos 配置发生变更时,属性值会自动更新。
1.4 服务注册与发现
若某个服务需要作为服务提供者对外提供服务,则只需要引入 spring-cloud-starter-alibaba-nacos-discovery 依赖,并在引导类上使用 @EnableDiscoveryClient(该注解由 spring cloud 提供) 注解将其标记服务提供者即可。其对外提供的服务名为 spring.application.name。此时服务消费者则可以使用 feign、openfeign 或其它方式进行调用。
2 openfeign 服务调用
2.1 使用示例
通过下面这段代码,就可以在服务消费端以极简单的方式调用服务提供者提供的接口。其中 @FeignClient 指定调用哪个服务提供者,每一个方法对应服务提供者的一个接口。这些功能有 openfeign 组件完成,其本质上是通过 http 调用,只不过 openfeign 封装了调用逻辑,使得调用方式更加简洁。
// name 值为服务提供者的 spring.application.name 的值
// path 值为服务提供者的 server.servlet.context-path 的值(path 可以不配置)
@FeignClient(name = "provider", path = "/provider")
public interface ProviderFeign {

    @PostMapping("/user/getUser")   // 当 path 不配置时 此处的 mapping 应为 /provider/user/getUser
    APIResponse<User> getUser(@RequestParam("username") String username);
}
2.2 @FeignClient 属性
- name:同 value,指定服务提供者的名称,若使用了注册中心,则会根据该名称从注册中心查找对应的服务,即 spring.application.name 的值。
- value:同 name。
- contextId:指定当前 bean 的名称。当消费端为同一个服务定义了两个 FeignClient 时,则需要指定该值。
- qualifiers:指定当前 bean 的 @Qualifer 的值。
- url:绝对的 url 或可解析的主机名,当该值不为空时,feign 会直接把请求发到该 url 对应的地址,不会再去注册中心查找服务。
- decode404:是否解码 404 错误,默认为 false。即当请求出现 404 错误时,feign 是否要对该错误解码。为 true 时表示解码,此时 404 错误不会被直接抛给消费端。
- configuration:自定义配置类,用来配置 @FeignClient 的行为。可以自定义配置 Decoder、Encoder、Contract、负载均衡策略等,会覆盖默认的配置。
- fallback:容错回调类,必须实现一个被 @FeignClient 标记且有效的接口,且必须是一个有效的 bean(即要被 @Component 等 bean 标识注解标注等)。如 ProviderFeign 为 feignclient,fallback = ProviderBack.class,则 ProviderBack 类必须实现 ProviderFeign 接口。当 ProviderFeign 中某个接口(如方法 a)调用异常(如超时、不可用或服务内部异常等)时,feign 会回调该接口(方法 a)在回调类中的实现来处理该异常,而不是直接将异常抛给调用者,以此来提高服务的可用性。
- fallbackFactory:容错回调类工厂,用来创建容错回调类。必须实现一个被 @FeignClient 标记且有效的接口,且必须是一个有效的 bean(即要被 @Component 等 bean 标识注解标注等)。和 fallback 的区别是 factory 实现的方法返回的是 fallback 指定的类类型。
- path:当前 feign client 内所有方法的路径的前缀。如 path = ‘/api’,某个方法的 @PostMapping(“/test”),则实际请求路径为 ‘/api/test’。若该 feign client 内的方法所属通过一个服务提供者,则 path 可为该服务提供者的 server.servlet.context-path 的值。
- primary:是否标记该 feign client 对应的 bean 为主 bean,默认为 true。在一些需要区分 bean 优先级的情况下会用到该属性。
注:openfeign 根据 @FeignClient 注解属性用来根据服务名查找服务提供者的优先级为 contextId > value > name。
2.3 主要特点
openfeign 作为 spring cloud 官网认证服务调用方式,其主要特点如下:
- 声明式 API:其封装了 http 调用,如请求方法、请求路径、请求头和请求参数等,且通过注解方式声明 API 接口,使服务调用更加简洁。
- 负载均衡:与 loadbalancer 负载均衡器无缝搭配,只需要引入 spring-cloud-stater-loadbalancer 依赖即可。
- 限流降级:与 sentinel 限流降级无缝搭配,只需要引入 spring-cloud-starter-alibaba-sentinel 并开启 sentinel 对 openfeign 的支持,然后配置相关规则即可。
- 支持多种编码器:支持如 json、xml、form 等多种编码器,可根据需要选择合适编码器。
3 loadbalancer 负载均衡
3.1 使用示例
spring cloud loadbalancer 与 nacos 一起使用时,只需开启负载均衡即可:
spring:
  cloud:
    loadbalancer:
      nacos:
        enabled: true   # nacos & loadbalancer 同时使用时 开启后负载均衡才生效
openfeign 可以与 loadbalancer 无缝搭配使用,只需要引入 spring cloud loadbalancer 依赖即可,切默认使用轮询策略。
当使用了 nacos 注册中心时,openfeign 发送请求时会从注册中心获取服务实例,这里也使用到了负载均衡,当然 nacos 也支持 loadbalancer,通过上述配置即可。
3.2 负载均衡策略
spring cloud loadbalancer 内置了两种策略,即轮询和随机选择,且支持自定义策略,默认使用轮询策略。
- 轮询:将请求按顺序依次分发给对应服务的每个实例。该策略适用于请求处理时间相近的场景。
- 随机选择:将请求随机分发给一个实例。
除以上实现外,常用的负载均衡策略还有加权轮询、最少选择、IP 哈希等。
3.3 自定义策略
若使用 openfeign 服务调用,则可以自定义实现负载均衡策略,然后通过 @FeignClient 的 configuration 属性指定。若使用其它方式调用,则可使用 @LoadBalancerClient 注解指定。
4 sentinel 限流降级熔断
限流降级需要配置规则,如允许某个接口多少时间内被访问多少次等等,可以将这些规则配置在 nacos 配置中心上,也可以使用 spring cloud alibaba sentinel 提供的可视化操作界面。
<!-- spring cloud alibaba sentinel 依赖 -->
<dependency>
    <groupId>com.alibaba.cloud</groupId>
    <artifactId>spring-cloud-starter-alibaba-sentinel</artifactId>
    <version>2023.0.1.2</version>
</dependency>

<!-- sentinel 数据(如限流规则、熔断规则等)若要持久化 则需要加入此依赖 -->
<dependency>
    <groupId>com.alibaba.csp</groupId>
    <artifactId>sentinel-datasource-nacos</artifactId>
    <version>1.8.8</version>   <!-- 版本需与 spring-cloud-starter-alibaba-sentinel 中 sentinel 的版本保持一致 -->
</dependency>
4.1 nacos 配置限流熔断规则
使用 spring cloud alibaba snacos 与 sentinel 进行限流降级时,其配置如下(假设对服务提供者 provider 的 /user/getUser 接口作限流操作):
spring:
    sentinel:
      log:
        dir: /Users/xgllhz/Documents/project/github/tmp/sentinel-log
      datasource:
        flow: # 数据源名称 无业务含义 此处意为 流控规则
          nacos: # 使用 nacos 配置 sentinel
            server-addr: ${spring.cloud.nacos.server-addr}
            username: ${spring.cloud.nacos.username}
            password: ${spring.cloud.nacos.password}
            namespace: ${spring.cloud.nacos.config.namespace}
            group-id: ${spring.cloud.nacos.config.group}
            data-id: ${spring.application.name}-sentinel-flow
            data-type: json
            rule-type: flow   # flow 表示限流

# 开启 sentinel 对 feign 的支持(当使用 sentinel 对 feign 调用的接口进行降级时 则需要开启)
feign:
  sentinel:
    enabled: true
在 nacos 上创建 provider-sentinel-flow 文件并添加以下规则:
[
    {
        "resource": "/user/getUser",
        "limitApp": "default",
        "grade": 1,
        "count": 5,   // 表示一秒内并发 5 个(规则的具体配置可查看 sentinel 官网)
        "clusterMode": false,
        "controlBehavior": 0,
        "strategy": 0,
        "warmUpPeriodSec": 10,
        "maxQueueingTimeMs": 500,
        "refResource": "rrr"
    }
]
在服务提供者 provider 的 /user/getUser 的接口上加上注解 @SentinelResource(value = “/user/getUser”),此时,在消费端使用 openfeign 调用 /user/getUser 接口时若并发超过 5 个,则会被抛弃。
@RestController
@RequestMapping("/user")
public class UserController {

    @SentinelResource(value = "/user/getUser")
    @PostMapping("/getUser")
    public APIResponse<User> getUser(@RequestParam("username") String username) {
        return APIResponse.success(User.builder().username(username).nickname("影流之主").build());
    }
}
4.2 限流触发后进行熔断
-
对服务提供者的接口配置限流规则,超出规则限制的请求会抛出 BlockException 异常(可以在提供者端通过配置 blockHandler 属性来捕获 BlockException 并抛出自定义异常)。总之,提供者端的接口会有以下几种非正常情况:
- 超出规则 抛出 BlockException 异常
- 超出规则 通过配置 blockHandler 来捕获 BlockException 异常然后抛出自定义异常
- 接口本身发生异常
- 捕获接口本身的异常然后抛出自定义异常
-
@SentinelResource:当限流规则触发后,可通过 blockHandler 来处理超出并发的请求。如提示 “操作频繁,请稍后再试!” 等。
@FeignClient(name = "provider", path = "/provider", fallback = ProviderFallback.class) public interface ProviderFeign { @PostMapping("/user/getUser") APIResponse<User> getUser(@RequestParam("username") String username); } @Component public class ProviderFallback implements ProviderFeign { // 当服务提供者的 /user/getUser 接口的限流规则触发后会抛出 BlockException // 消费者端捕获到这个异常后会回调该方法 返回给前端友好提示 如 “操作频繁,请稍后再试!” 而不是直接配错 @Override public APIResponse<User> getUser(String username) { throw GlobalException.error("操作频繁,请稍后再试!"); } } -
对于与客户端直接交互的接口,则可以通过 @SentinelResource 的 blockHandler 和 fallback 属性进行熔断。
@RestController
@RequiredArgsConstructor
@RequestMapping("/test")
public class TestController {

    private final ProviderFeign providerFeign;

    @SentinelResource(value = "/test/test", blockHandler = "blockHandler", fallback = "fallback")
    @GetMapping("/test")
    public APIResponse<List<Object>> test() {
        List<Object> list = new ArrayList<>();

        APIResponse<User> response = this.providerFeign.getUser("momo");
        if (response != null && response.getCode() == 1 && response.getData() != null) {
            list.add(response.getData());
        }

        return APIResponse.success(list);
    }

    public APIResponse<List<User>> blockHandler(BlockException e) {
        throw GlobalException.error("操作频繁,请稍后再试!");
    }

    public APIResponse<List<User>> fallback() {
        throw GlobalException.error();
    }
}
4.3 使用 spring cloud sentinel 提供的可视化控制面板配置限流熔断规则
-
下载并启动 sentinel 控制台:
-
从 github-sentinel-release 下载 sentinel 控制台 jar 包。
-
使用以下命令启动 jar 包(当然你用其它命令也可以 总之它只是个 jar 包而已)
nohup java -Dserver.port=8081 -Dcsp.sentinel.dashboard.server=localhost:8081 -Dproject.name=sentinel-dashboard -jar sentinel-dashboard-1.8.8.jar &
-
-
在 provider-dev.yml 中绑定服务与 sentinel 控制台:
spring: sentinel: # 限流熔断降级配置 transport: port: 8719 # 显式指定 以免忘了(控制台与应用数据传输端口 控制台启动后会绑定一个 http server 到该端口) dashboard: localhost:8081 # 控制台对外暴漏的端口(即控制台 web 端访问端口) -
使用 @SentinelResource 标识要限流降级的接口, 如:
@SentinelResource(value = "/user/getUser") // value 为接口路径 -
浏览器 http://localhost:8081/#/dashboard 登录 sentinel 控制台配置限流、熔断规则等。默认用户名密码皆为 sentinel。
5 seata 分布式事务
算了,各位还是自己看官网吧,戳我,我是 seata 官网。
6 gateway 服务网关
6.1 初始化
-
创建 spring boot 应用,并引入 spring cloud gateway 相关依赖:
<dependency>
    <groupId>org.springframework.cloud</groupId>
    <artifactId>spring-cloud-starter-gateway</artifactId>
    <version>4.1.2</version>
</dependency>
注:spring cloud gateway 基于 webflux + netty + reactor 实现,又因为 spring 中 web 与 webflux 两种模式是相斥的,故需要排除 spring-boot-starter-web 依赖。
-
引导类添加 @EnableDiscoveryClient 注解,以便与 nacos 配合使用。
-
创建 bootstrap.xml 配置文件:
################### spring cloud 配置 ###################
spring:
  application:
    name: gateway
  profiles:
    active: dev
  cloud:
    nacos:
      server-addr: localhost:8848
      username: nacos
      password: nacos
      config:
        namespace: 29e2a54b-b773-46e4-b0bf-5bc1cab94875
        group: DEFAULT_GROUP
        file-extension: yml
      discovery:
        namespace: ${spring.cloud.nacos.config.namespace}
6.2 nacos 中配置路由规则
在nacos 中创建 gateway-dev.yml 文件,并添加路由规则。
################### tomcat 配置 ###################
server:
  port: 9644   # netty 将在该端口上启动
  netty:
    connection-timeout: 5000

################### spring 配置 ###################
spring:
  main:
    allow-bean-definition-overriding: true
  cloud:
    loadbalancer:
      nacos:
        enabled: true   # nacos & loadbalancer 同时使用时 开启后负载均衡才生效
    sentinel:   # 限流熔断降级配置
      log:
        dir: /Users/xgllhz/Documents/project/github/tmp/sentinel-log
      transport:
        port: 8719   # 显式指定 以免忘了(控制台与应用数据传输端口 控制台启动后会绑定一个 http server 到该端口)
        dashboard: localhost:8081   # 控制台对外暴漏的端口(即控制台 web 端访问端口)
    gateway:
      routes:
        - id: consumer   # 对 consumer 服务配置路由规则
          uri: lb://consumer   # 这么配置是因为 spring cloud gateway 支持此配置方式 且需要引入 sc-loadbalancer 依赖
          predicates:
            - Path=/consumer/**   # 当请求路径为 '/consumer' 开头时,将请求以负载均衡的方式转发到 uri(lb://consumer)指定的服务
        - id: provider   # 对 provider 服务配置路由规则
          uri: lb://provider
          predicates:
            - Path=/provider/**   # 当请求路径为 '/provider' 开头时,将请求以负载均衡的方式转发到 uri(lb://provider)指定的服务

# 开启 sentinel 对 feign 的支持
feign:
  sentinel:
    enabled: true

logging:
  level:
    org.springframework.cloud.gateway: DEBUG
注:此处只是简单示例,spring cloud gateway 的更多配置,请移步 spring cloud gateway 官网。
7 dubbo rpc 调用
dubbo 是阿里巴巴实现的高性能 RPC 框架,其完全适配 spring cloud alibaba 生态。现已捐给 apache。众所周知,常用的服务调用协议有 http、rpc 等,又因为 dubbo 是阿里巴巴出品的,其与 spring cloud alibaba 完全适配,所以在此加上了 dubbo 示例。
注:有关 dubbo 的详情情况,请移步 dubbo 官网。
7.1 dubbo rpc demo
-
创建 dubbo-api 项目,此项目的主要作用是为服务提供者和服务消费者约定一组 api 接口,其中服务提供者负责实现 api 的具体业务,服务消费者调用。
public interface UserService {

    // 获取用户详情
    User getUser(User user);
}
这个项目只包含一组接口,不需要其它依赖,仅此而已。之所以将这批接口独立出来,是因为这些接口可能会有多个第三方实现,最终会以 jar 包的方式给到第三方以及服务消费者(即服务调用方)。
-
创建服务提供方服务,实现 dubbo-api 中的接口。
-
引入 dubbo-api 依赖和 apache dubbo 依赖。
<!-- dubbo-api 依赖--> <dependency> <groupId>org.xgllhz</groupId> <artifactId>dubbo-api</artifactId> <version>0.0.1</version> </dependency> <!-- apache dubbo 依赖 --> <dependency> <groupId>org.apache.dubbo</groupId> <artifactId>dubbo-spring-boot-starter</artifactId> <version>3.3.1</version> </dependency> -
使用 @EnableDubbo 注解标记引导类,启用 dubbo 协议。
-
实现 dubbo-api 接口。
@DubboService   // 该注解的作用是将该实现类标记为 dubbo 服务 使其可被调用
public class UserServiceImpl implements UserService {

    @Override
    public User getUser(User user) {
        user.setNickname("潮汐海灵");
        return user;
    }
}
-
-
创建服务消费者服务,调用 dubbo-api。
-
引入 dubbo-api 依赖 和 apache dubbo 依赖。
<!-- dubbo-api 依赖--> <dependency> <groupId>org.xgllhz</groupId> <artifactId>dubbo-api</artifactId> <version>0.0.1</version> </dependency> <!-- apache dubbo 依赖 --> <dependency> <groupId>org.apache.dubbo</groupId> <artifactId>dubbo-spring-boot-starter</artifactId> <version>3.3.1</version> </dependency> -
使用 @EnableDubbo 注解标记引导类,启用 dubbo 协议。
-
调用 dubbo-api 接口。
// 在需要调用的类中使用 @DubboReference 注入 dubbo-api 中的接口即可
@DubboReference
private UserService userService;

@Override
public User test(User user) {
    return this.userService.getUser(user);   // 调用 dubbo-api 中的方法
}
-
实际上到此时,还不能调用,因为 dubbo 服务需要一个注册中心来注册和发现服务,此处以 nacos 和 zookeeper 为例,请看下文。
7.2 nacos 注册中心
-
在 dubbo 服务提供者和消费者中引入 spring cloud alibaba nacos 的服务注册和发现依赖,若需要还可以引入 nacos 配置和其它依赖。
<!-- nacos 服务注册和发现 --> <dependency> <groupId>com.alibaba.cloud</groupId> <artifactId>spring-cloud-starter-alibaba-nacos-discovery</artifactId> <version>2023.0.1.2</version> </dependency> -
在配置文件中添加以下配置(此处我们以使用 nacos 配置中心配置为例,所以额外需要 nacos 相关配置)。
################### dubbo 配置 ################### dubbo: application: name: ${spring.application.name} # 注册到注册中的服务名 qos-port: 9636 registry: address: nacos://localhost:8848 # nacos 注册中心地址 其中 'nacos' 表示注册中心使用 nacos zookeeper://localhost:2181(若为 zookeeper 则注掉下方 username、password 和 parameters 配置) username: ${spring.cloud.nacos.username} password: ${spring.cloud.nacos.password} parameters: # 额外的配置使用 'parameters' 进行配置 如 namespace、group 等 namespace: ${spring.cloud.nacos.config.namespace} group: ${spring.cloud.nacos.config.group} protocol: name: dubbo # dubbo 支持多种协议(dubbo、rmi、hessian、http、webservice、thrift、rest) 此处使用 dubbo 协议 port: 9637 # 指定 dubbo 端口 -
使用 @EnableDiscoveryClient 注解标记服务提供者和消费者的引导类,然后启动服务,就可以调用啦!
7.3 zookeeper 注册中心
-
在 dubbo 服务提供者和消费者中引入 zookeeper 的相关依赖。
<!-- 截至 2024-11-22 zookeeper 稳定版本为 3.8.x 但 curator 并未提供该版本的依赖 故选择 5.7.1 版本(此版本中 zookeeper 为 3.9.2 版本) --> <dependency> <groupId>org.apache.curator</groupId> <artifactId>curator-x-discovery</artifactId> <version>5.7.1</version> </dependency> -
在配置文件中加入以下配置。
################### dubbo 配置 ################### dubbo: application: name: ${spring.application.name} qos-port: 9636 registry: address: zookeeper://localhost:2181 # zookeeper 地址 protocol: name: dubbo # dubbo 支持多种协议(dubbo、rmi、hessian、http、webservice、thrift、rest) 此处使用 dubbo 协议 port: 9637 # 指定 dubbo 端口 -
成了!
总之吧,就是这篇写的挺乱的不知道为啥。害,就这样吧,先过年!


 1万+
1万+

 被折叠的 条评论
为什么被折叠?
被折叠的 条评论
为什么被折叠?
 到【灌水乐园】发言


