


 本文介绍如何使用EasyUI datagrid结合PHP和MySQL实现数据库的增删改功能。首先,需要导入EasyUI的相关样式和JS文件,然后通过PHP编写数据库连接、数据读取、更新、保存和删除的脚本。在数据库设计中,设置了id字段为自动递增。最终实现了在datagrid中显示数据,支持双击编辑并保存,以及选择行删除的功能。虽然尝试了分页显示,但未能成功。
基于EasyUI datagrid Mysql PHP实现数据库增删改
1.首先,使用EasyUI需要导入相关包,我这里用到的是
样式文件:
icon.css
demo.css
easyui.css
Js文件:
jquery.min.js
jquery.easyui.min.js
jquery.edatagrid.js
到EasyUI官网去下文件,里面包含了需要的所有东西,包括图标等,最后一个edatagrid可能在官方下的文件里面没有,需要自己找一下
2.具体就看代码吧
Index.html代码如下(我的叫biaodan.html非常不正确的命名,因为是很早写的了,大家还是要用正确的命名规则)
<!DOCTYPEhtml>
<htmllang="en">
<head>
<metacharset="UTF-8">
<title>Full Layout - jQuery EasyUI Demo</title>
<linkrel="stylesheet"type="text/css"href="easyui/themes/default/easyui.css">
<linkrel="stylesheet"type="text/css"href="easyui/themes/icon.css">
<linkrel="stylesheet"type="text/css"href="easyui/demo/demo.css">
<scripttype="text/javascript"src="easyui/jquery.min.js"></script>
<scripttype="text/javascript"src="easyui/jquery.easyui.min.js"></script>
<scripttype="text/javascript"src="easyui/jquery.edatagrid.js"></script>
</head>
<body>
<tableid="dg"title="My Users"style="width:1000px;height:400px"
toolbar="#toolbar"idField="id"
rownumbers="true"fitColumns="true"
singleSelect="true"pagination="true">
<thead>
<tr>
<thfield="firstname"width="50"editor="{type:'validatebox',options:{required:true}}">First Name</th>
<thfield="lastname"width="50"editor="{type:'validatebox',options:{required:true}}">Last Name</th>
<thfield="phone"width="50"editor="text">Phone</th>
<thfield="email"width="50"editor="{type:'validatebox',options:{validType:'email'}}">Email</th>
</tr>
</thead>
</table>
<divid="toolbar">
<ahref="#"class="easyui-linkbutton"iconCls="icon-add"plain="true"onclick="javascript:$('#dg').edatagrid('addRow')">New</a>
<ahref="#"class="easyui-linkbutton"iconCls="icon-remove"plain="true"onclick="javascript:$('#dg').edatagrid('destroyRow')">Destroy</a>
<ahref="#"class="easyui-linkbutton"iconCls="icon-save"plain="true"onclick="javascript:$('#dg').edatagrid('saveRow')">Save</a>
<ahref="#"class="easyui-linkbutton"iconCls="icon-undo"plain="true"onclick="javascript:$('#dg').edatagrid('cancelRow')">Cancel</a>
<inputname="phonenumber"placeholder="input phone to search"style="line-height:26px;border:1px solid #ccc">
<ahref="#"class="easyui-linkbutton"iconCls="icon-search"plain="true"onclick="dosearch()">Search</a>
</div>
<scripttype="text/javascript">
$(function(){
$('#dg').edatagrid({
    url:'get_users.php',
    saveUrl:'save_user.php',
    updateUrl:'update_user.php',
    destroyUrl:'destroy_user.php'
});
});
</script>
</body>
</html>
conn.php(数据库连接php模块)
<?php
$mysql_conf = array(
'host' =>'127.0.0.1:3306',
'db' =>'fxy',
'db_user'=>'root',
'db_pwd' =>'370421',
);
$mysqli=newmysqli($mysql_conf['host'],$mysql_conf['db_user'],$mysql_conf['db_pwd']);
if($mysqli->connect_errno){
die("could not connect to the database:\n" . $mysqli->connect_errno);//诊断连接错误
}
$mysqli->query("set names 'utf8';");//编码转换
$select_db = $mysqli->select_db($mysql_conf['db']);
if(!$select_db){
die("could not connect to the db:/n" . $mysql->error);
}
?>
注意:替换成自己的数据库名称,用户,密码,这里使用mysqli进行数据库连接及操作
get_users.php(用户读取数据库所有的用户信息内容,使用include导入前面写的连接的文件)
<?php
include'conn.php';

$sql = "select * from users;";
$res = $mysqli->query($sql);
if(!$res){
die("sql error:/n" . $mysqli->error);
}
$result = array();
while ($row = $res->fetch_assoc()){
array_push($result,$row);
}
echojson_encode($result);
$res->free();
$mysqli->close();
?>
Updata_user.php
<?php
include'conn.php';

$id = intval($_REQUEST['id']);
$firstname = $_REQUEST['firstname'];
$lastname = $_REQUEST['lastname'];
$phone = $_REQUEST['phone'];
$email = $_REQUEST['email'];

$sql="update users set firstname='$firstname',lastname='$lastname',phone='$phone',email='$email' where id=$id;";
$mysqli->query($sql);
echojson_encode(array(
'id' =>$id,
'firstname' =>$firstname,
'lastname' =>$lastname,
'phone' =>$phone,
'email' =>$email
));
$mysqli->close();
?>
Sava_user.php
<?php
include'conn.php';

$firstname = $_REQUEST['firstname'];
$lastname = $_REQUEST['lastname'];
$phone = $_REQUEST['phone'];
$email = $_REQUEST['email'];
$sql = "insert into users(firstname,lastname,phone,email) values('$firstname','$lastname','$phone','$email');";
mysqli_query($mysqli,$sql);
echojson_encode(array(
'id' =>mysqli_insert_id($mysqli),
'firstname' =>$firstname,
'lastname' =>$lastname,
'phone' =>$phone,
'email' =>$email
));
$mysqli->close();
?>
Destroy.php
<?php
$id = intval($_REQUEST['id']);
include'conn.php';
$sql = "delete from users where id=$id;";
$mysqli->query($sql);
echojson_encode(array('success'=>true));
$mysqli->close();
?>
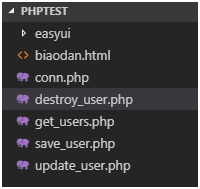
文件目录如下:
数据库表格设计如下:

第一项id要设置为递增,插入的时候才能对应生成。Datagrid可以选择要显示的列,我这里只显示了后面三列,对应的插入时就缺少一个id字段,所以要选择id可以为空,并且递增。
最后的结果如图所示:
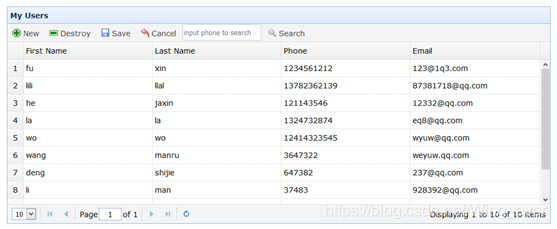
插入之后要点击保存才能成功插入,双击后可以进行编辑,编辑后也需要点击保存,退出编辑或取消插入点击cancel;删除先选中行,点击删除即可从数据库删除该条记录。分页这个我并没有做,就是加了个分页显示,不知道怎么的还失败了。


 2876
2876

 被折叠的 条评论
为什么被折叠?
被折叠的 条评论
为什么被折叠?
 到【灌水乐园】发言


