


这篇文章是上一篇文章 “你的第一个 Elastic Agent:从单个查询到 AI 驱动的聊天(一)”。在这一篇文章里,我详细描述如何在本地部署的电脑里实现 AI 驱动的聊天。
安装
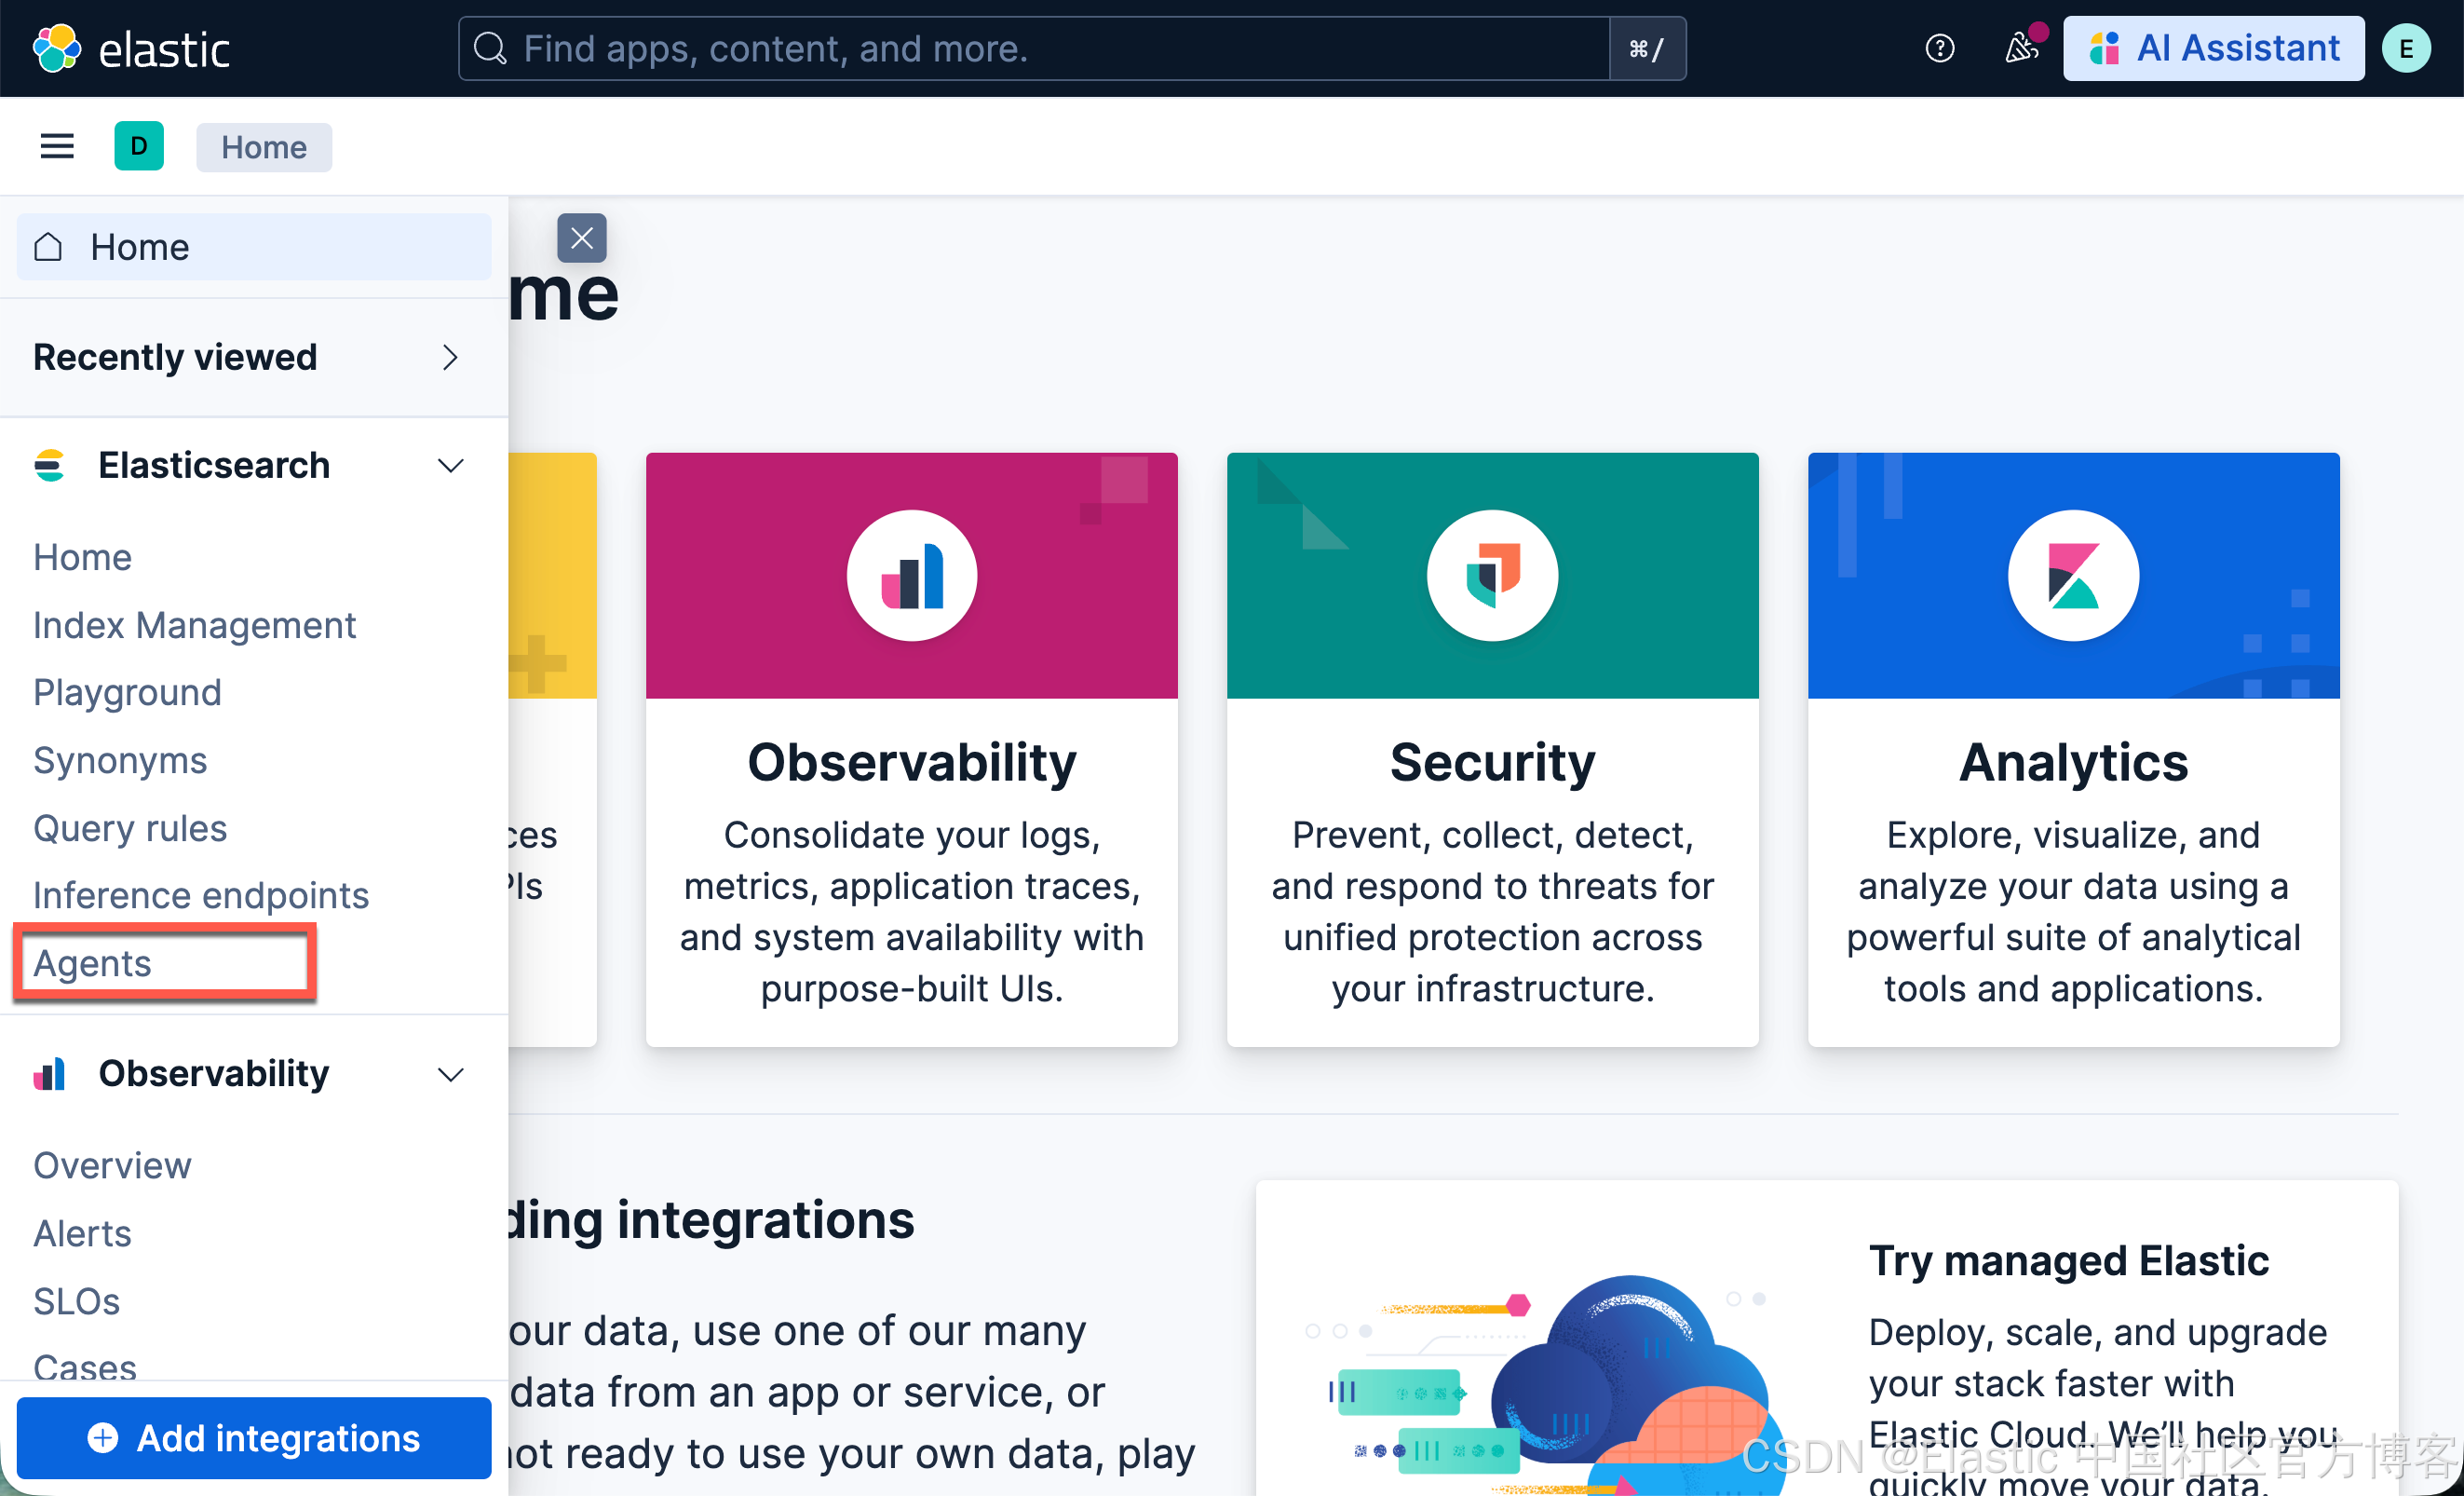
我们参考文章 “Elastic AI agent builder 介绍(一)” 来进行安装。在 Elastic Stack 9.2 版本之后,我们需要运行如下的命令才可以看到 Agents 界面:
POST kbn://internal/kibana/settings
{
   "changes": {
      "agentBuilder:enabled": true
   }
}

POST kbn://internal/kibana/settings
{
   "changes": {
      "onechat:mcp:enabled": true,
      "onechat:a2a:enabled": true,
      "onechat:api:enabled": true,
      "onechat:ui:enabled": true
   }
}
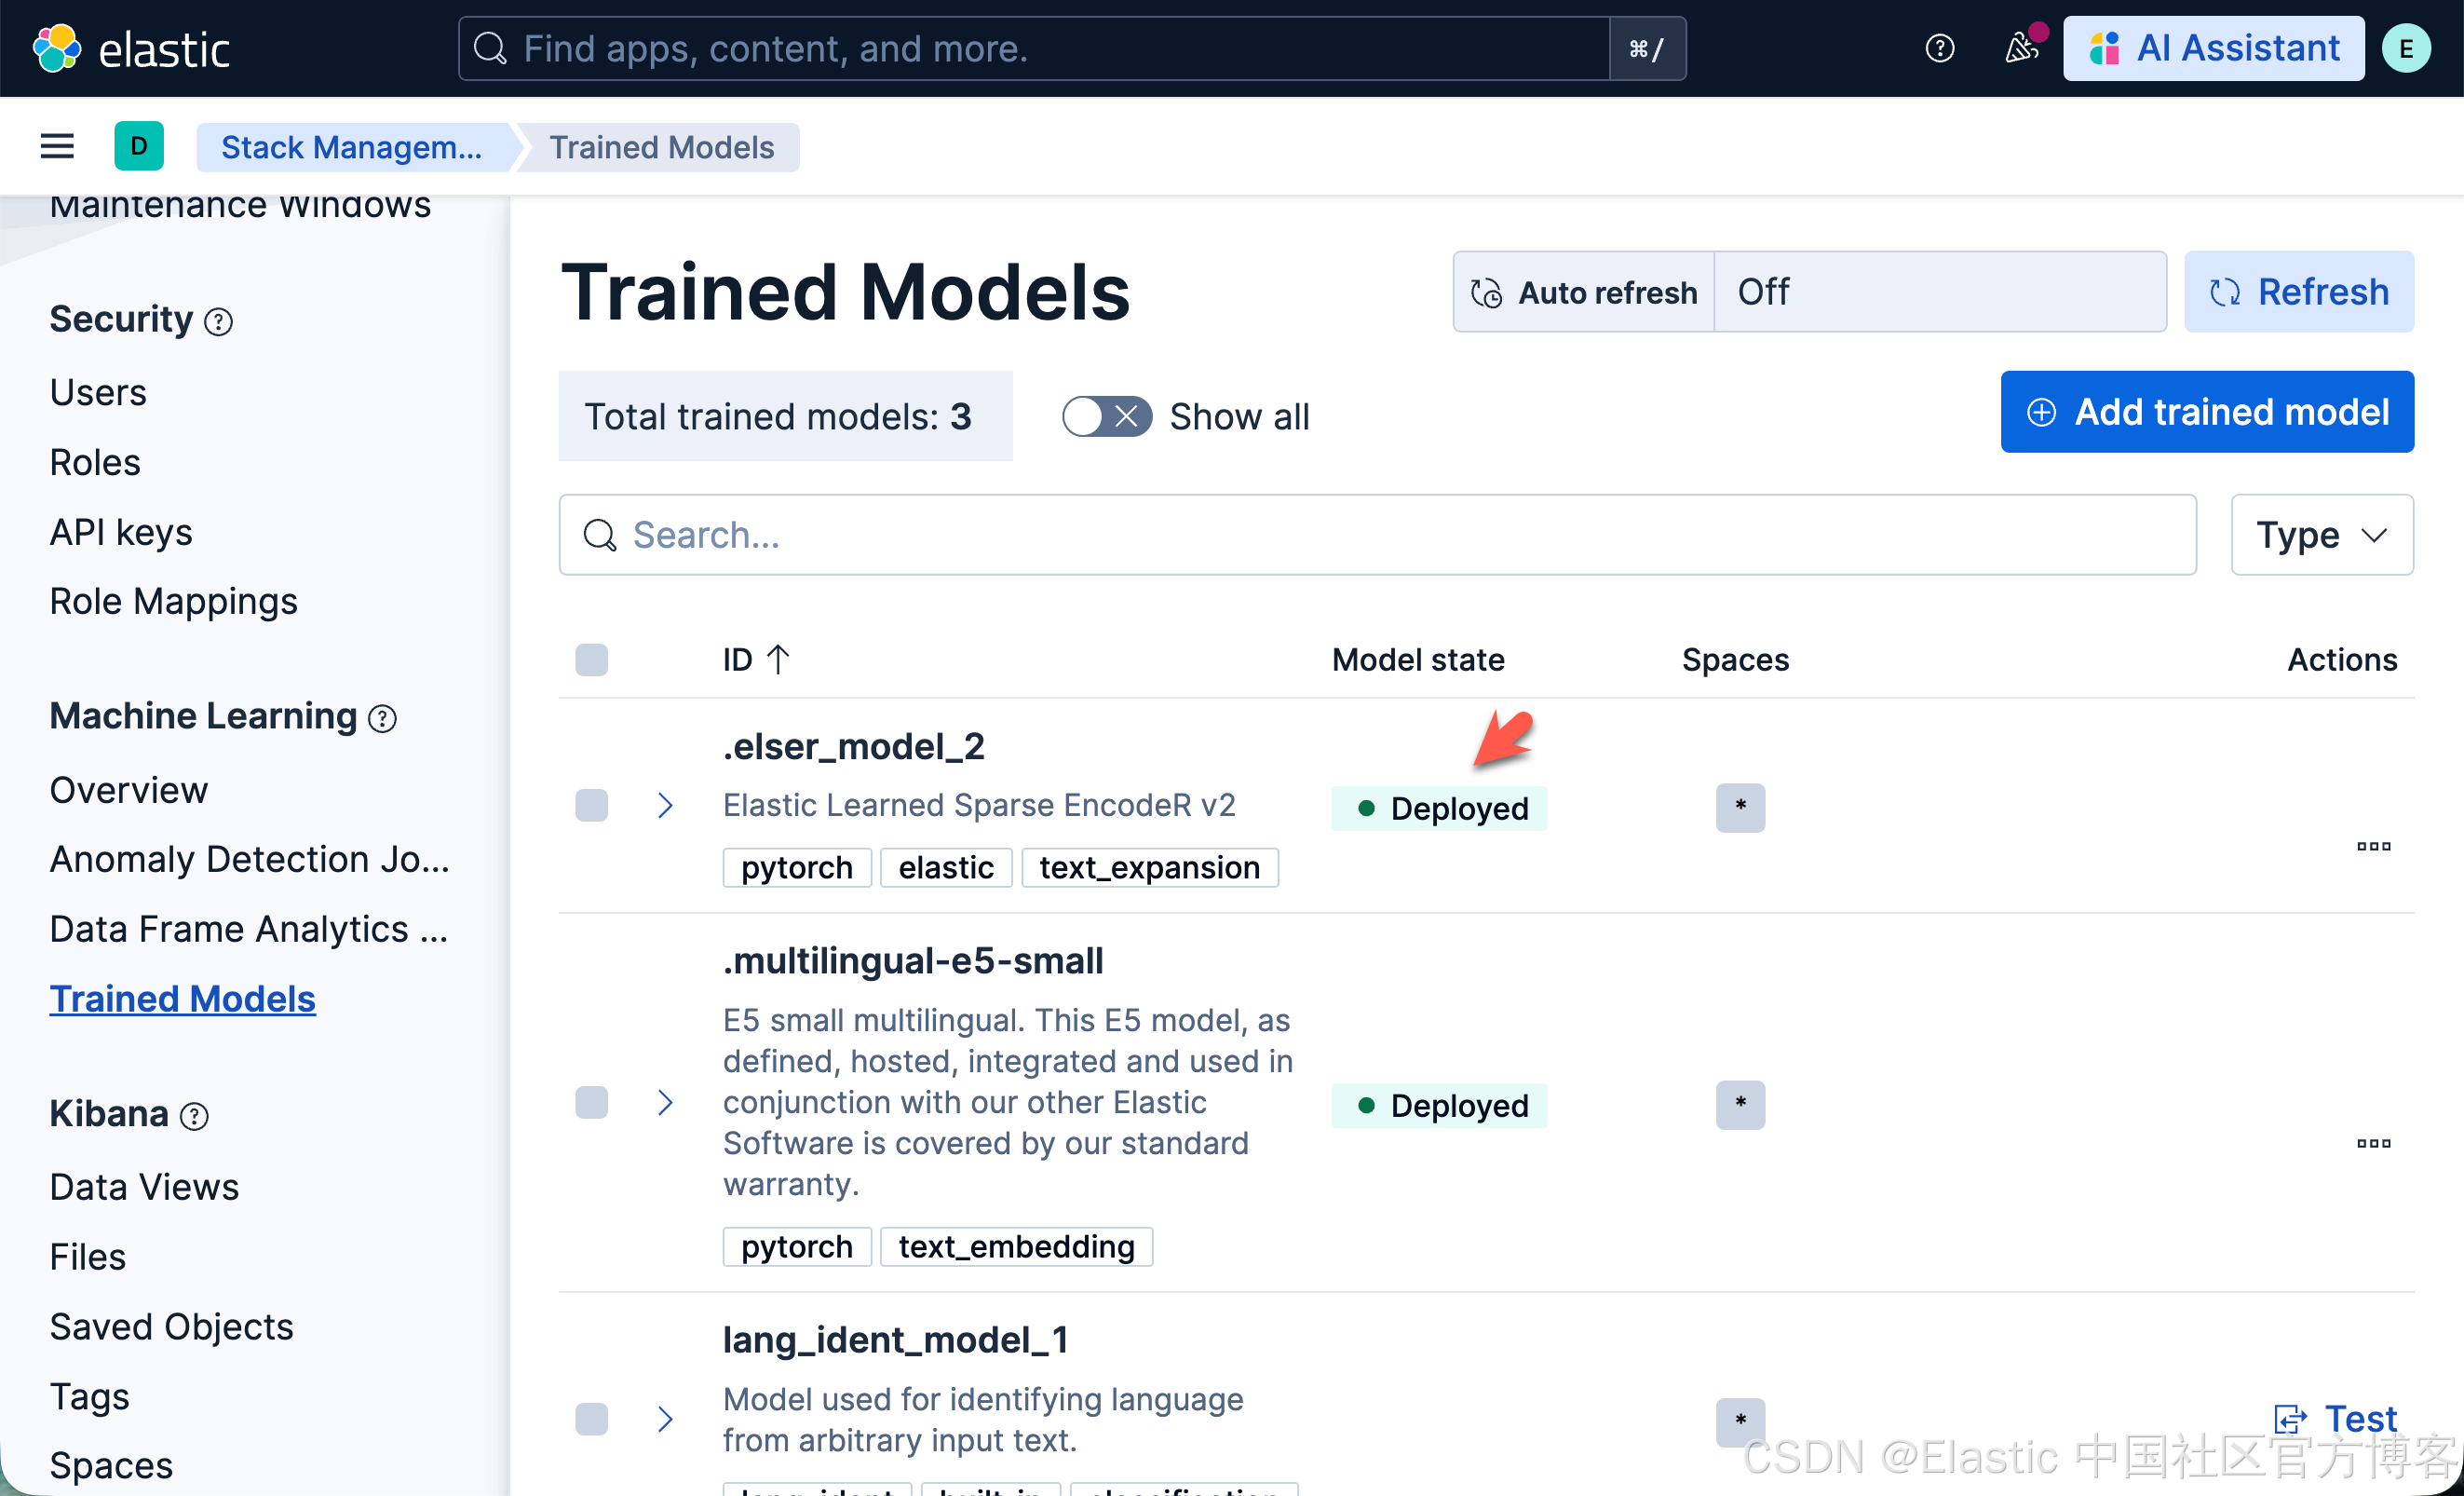
我们还需要安装好 ELSER 模型:
下载代码
我们按照如下的命令来下载代码:
git clone https://github.com/liu-xiao-guo/elasticsearch-labs该项目位于 supporting-blog-content/your-first-elastic-agent 目录中。然后我们进入到该项目的根目录中,并创建一个 .env 文件:
.env
es_url="https://localhost:9200"
kb_url="http://localhost:5601"
es_api_key="UUxydW41b0JGQVVCVjdnb3Y0RGU6a1JOUGhLNnU1V3pJRTkxTHhIYmFaZw=="
我们需要根据自己的配置进行相应的修改。
运行代码
我们在项目的根目录下打入如下的命令:
读取环境变量
import os
from dotenv import load_dotenv

load_dotenv()

# Elasticsearch URL
# es_url = input("Enter your Elasticsearch Endpoint URL: ")
# Kibana URL
# kb_url = es_url.replace(".es.", ".kb.")
# Elastic API Key
# es_api_key = input("Enter your Elasticsearch API Key: ")
es_url = os.getenv("es_url")
kb_url = os.getenv("kb_url")
es_api_key = os.getenv("es_api_key")

print("es_url: ", es_url)
print("kb_url: ", kb_url)

print("Using connection details:")
print(f"Elasticsearch URL: {es_url}")
print(f"Kibana URL: {kb_url}")
print(f"ES_API_KEY: ***************************{es_api_key[-5:]}")
加载金融数据
本节会将合成的金融数据加载到你的 Elastic 项目中,以用于演示:
-
工具创建
-
agent 创建
-
使用 converse API 调用 agent
如果你之前已经加载过这些数据,可以跳过这部分。
如果你想使用其他数据,你需要调整 ES|QL 查询以匹配你拥有的字段,并调整 agent 提示词和对话问题以匹配你的数据
!git clone https://github.com/jeffvestal/synthetic-financial-data
%cd synthetic-financial-data
!pip3 install -qr requirements.txt
!pip3 install -q pandas
os.environ["ES_ENDPOINT_URL"] = es_url
os.environ["ES_API_KEY"] = es_api_key
!python3 load_all_data.py
# Check incices are setup and data was loaded
!python3 control.py --check-indices
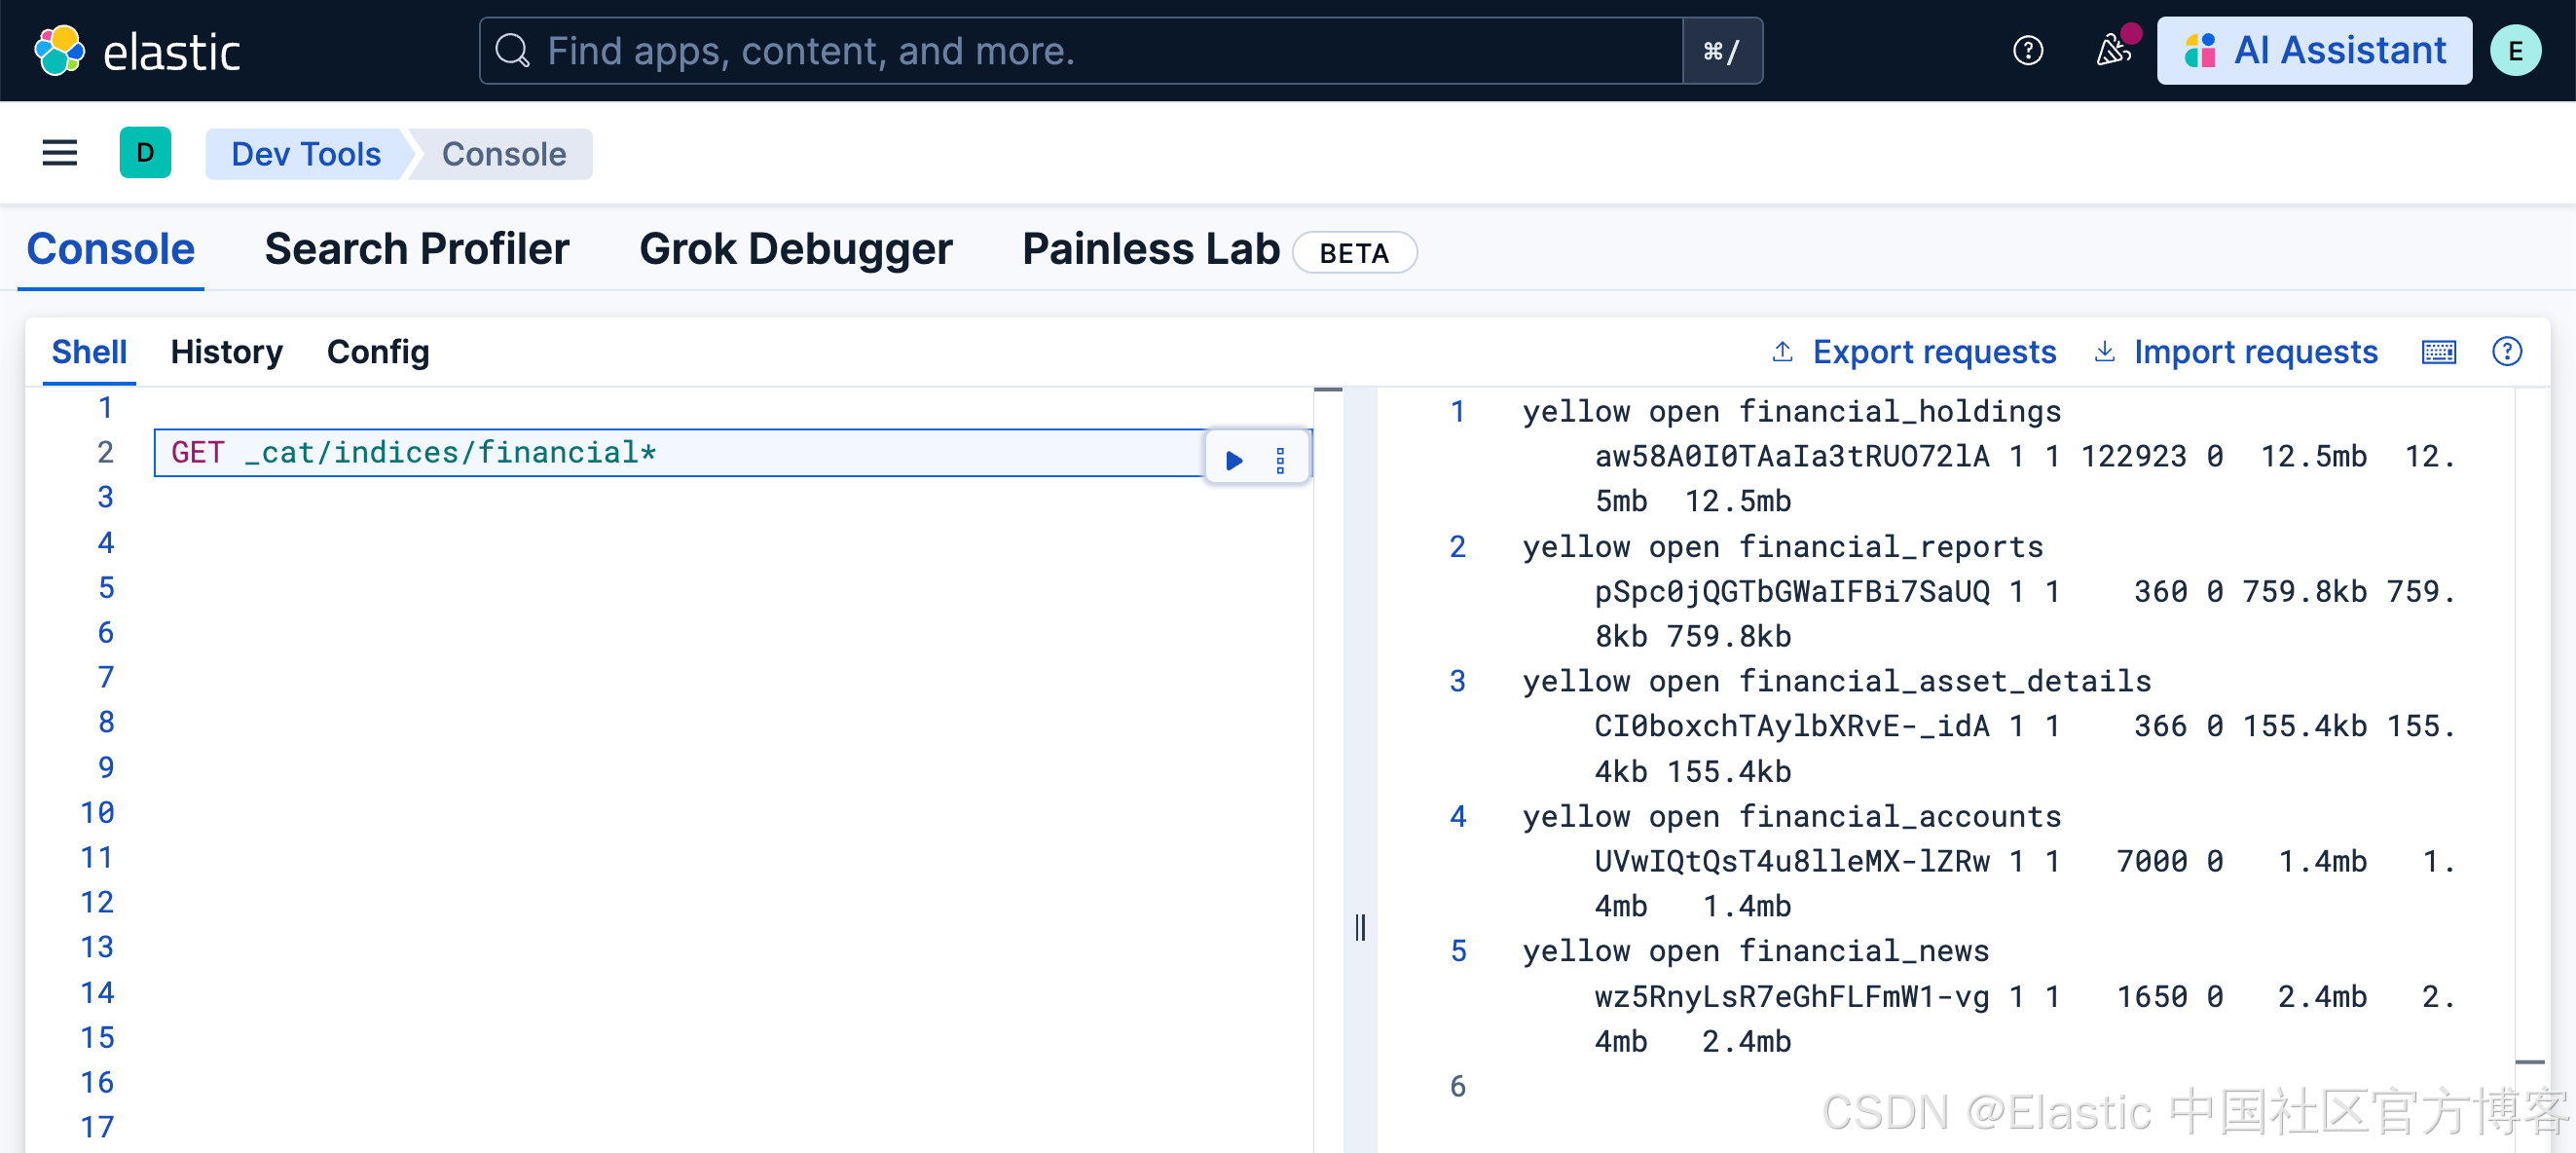
我们可以看到已经生成的索引:
Kibana 中的 Agent Builder 设置
# Import necessary libraries
import os
import json
import requests
from getpass import getpass  # To securely ask for the API key
from IPython.display import display, Markdown, JSON

# --- Setup Headers ---
HEADERS = {
    "Content-Type": "application/json",
    "kbn-xsrf": "true",
    "Authorization": f"ApiKey {es_api_key}",
}

# --- Verify Connection ---
# Let's make a simple call to the root endpoint to verify our connection and credentials.
if not kb_url:
    print("⚠️ KIBANA_ENDPOINT was not provided. Please provide the endpoint URL.")
else:
    try:
        response = requests.get(kb_url + "/api/status", headers=HEADERS)
        response.raise_for_status()  # Raises an exception for bad status codes (4xx or 5xx)

        status = response.json()
        cluster_name = status.get("name")
        version = status.get("version").get("number")

        print(f"✅ Successfully connected to Kibana!")
        print(f"Cluster Name: {cluster_name}")
        print(f"Version: {version}")

    except requests.exceptions.RequestException as e:
        print(f"❌ Connection Failed: {e}")
第 1 部分:逻辑 —— 测试 ES|QL 查询
在将逻辑注册为持久化 Tool 之前,最好先测试原始 ES|QL 查询。这样可以验证语法,并确认它返回我们期望的数据。我们将使用 /_query 端点来完成这一点。
esql_query = """
FROM financial_news, financial_reports METADATA _index
  | WHERE sentiment == "negative"
  | WHERE coalesce(published_date, report_date) >= NOW() - TO_TIMEDURATION(?time_duration)
  | RENAME primary_symbol AS symbol
  | LOOKUP JOIN financial_asset_details ON symbol
  | LOOKUP JOIN financial_holdings ON symbol
  | LOOKUP JOIN financial_accounts ON account_id
  | WHERE account_holder_name IS NOT NULL
  | EVAL position_current_value = quantity * current_price.price
  | RENAME title AS news_title
  | KEEP
      account_holder_name, symbol, asset_name, news_title,
      sentiment, position_current_value, quantity, current_price.price,
      published_date, report_date
  | SORT position_current_value DESC
  | LIMIT 50
"""

print("✅ ES|QL query string is defined.")
request_body = {"query": esql_query, "params": [{"time_duration": "2000 hours"}]}
print("✅ Request body is defined with test parameters:")
print(json.dumps(request_body, indent=2))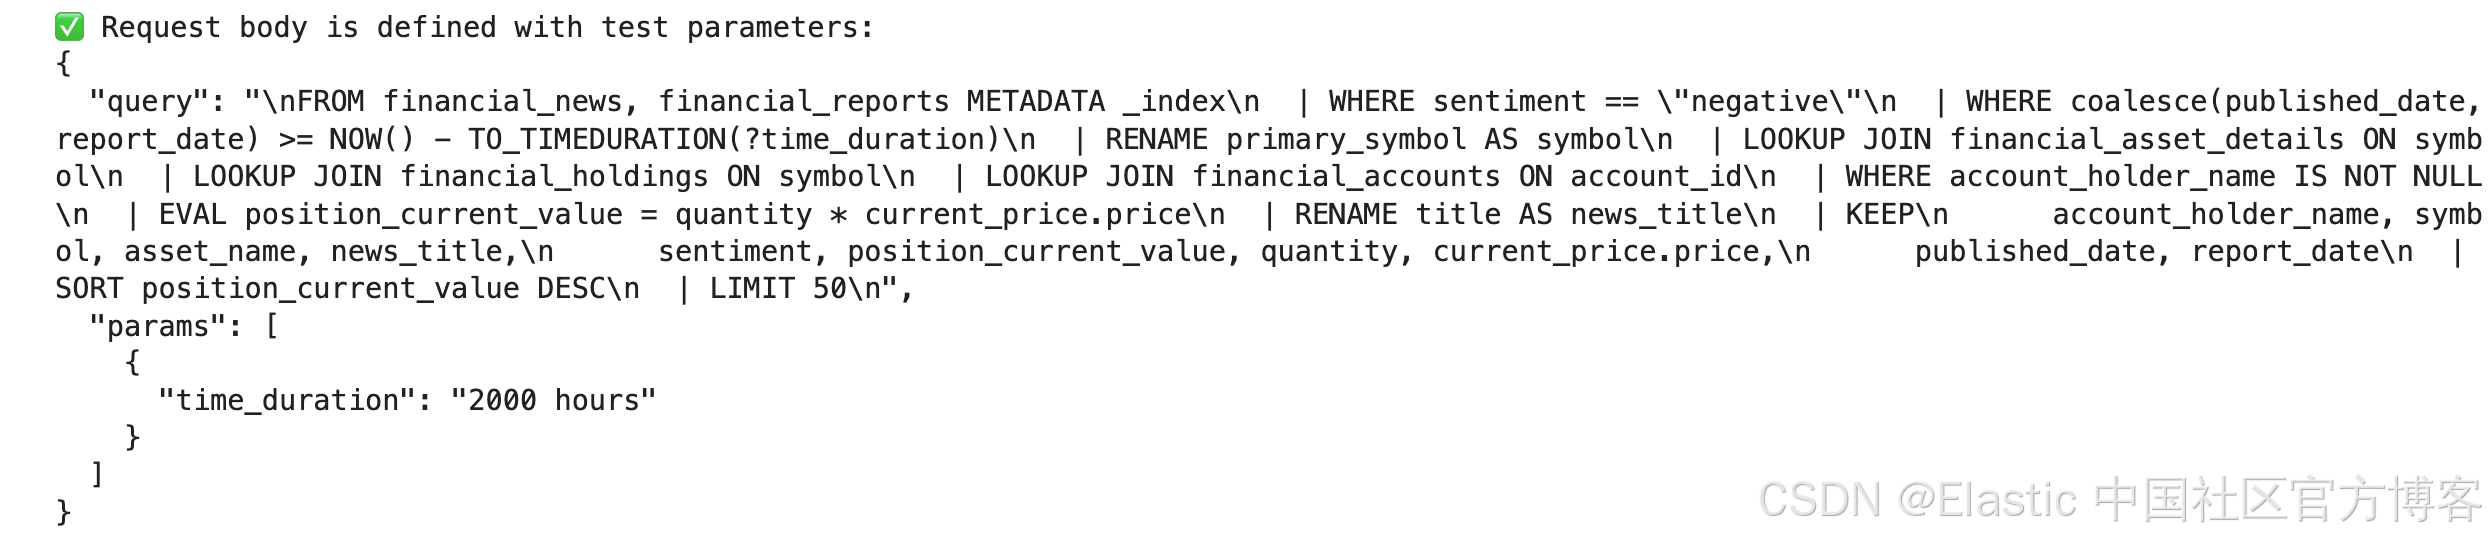
# Finally, let's execute the query and display the results in a clean table using pandas.
import pandas as pd

# display(Markdown(f"### 🧪 Testing Query for Symbol: `{request_body['params'][1]['symbol']}`"))

try:
    # We use the /_query endpoint to run a raw ES|QL query
    response = requests.post(f"{es_url}/_query", headers=HEADERS, json=request_body, verify=False)
    response.raise_for_status()

    # The response contains column names and rows of values
    query_result = response.json()
    columns = [col["name"] for col in query_result["columns"]]
    # Check for 'values' key if 'rows' is not present
    rows = query_result.get("rows", query_result.get("values", []))

    # Create and display a pandas DataFrame for a clean table view
    df = pd.DataFrame(rows, columns=columns)
    display(df)

except requests.exceptions.RequestException as e:
    print(f"❌ Query Failed: {e.response.text}")
except KeyError:
    print("❌ Query executed, but the response format was unexpected.")
    print("Raw response:")
    print(response.json())
    raise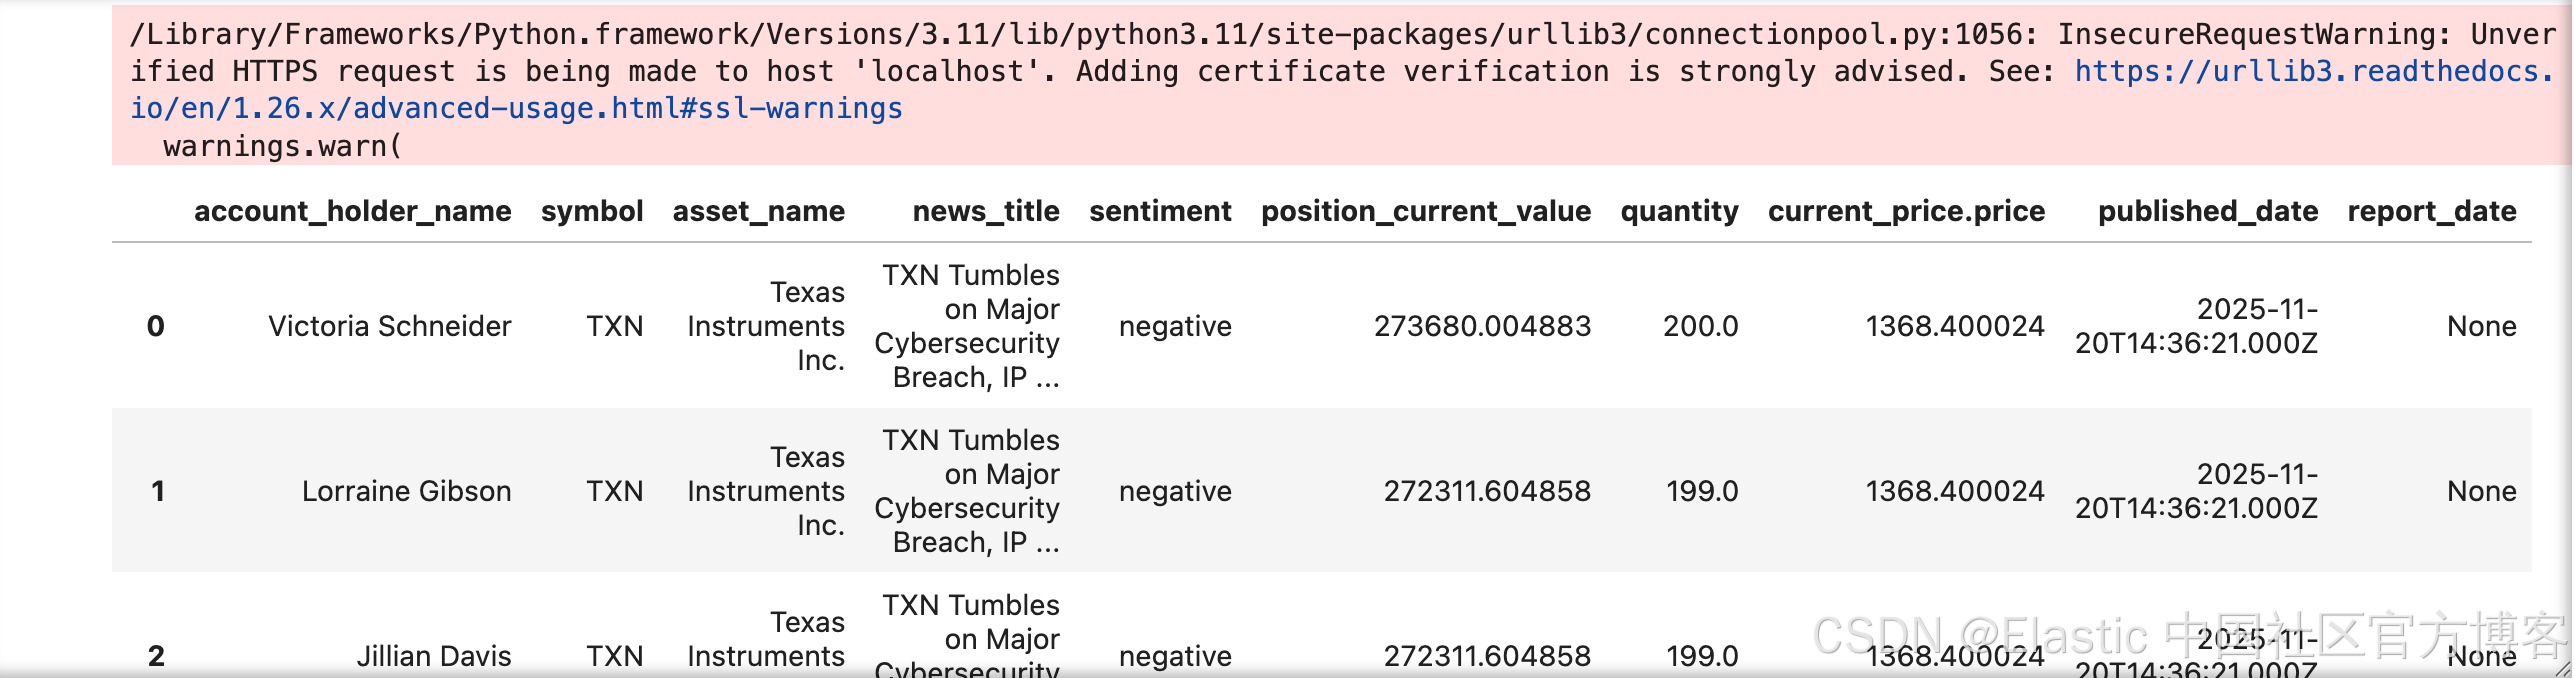
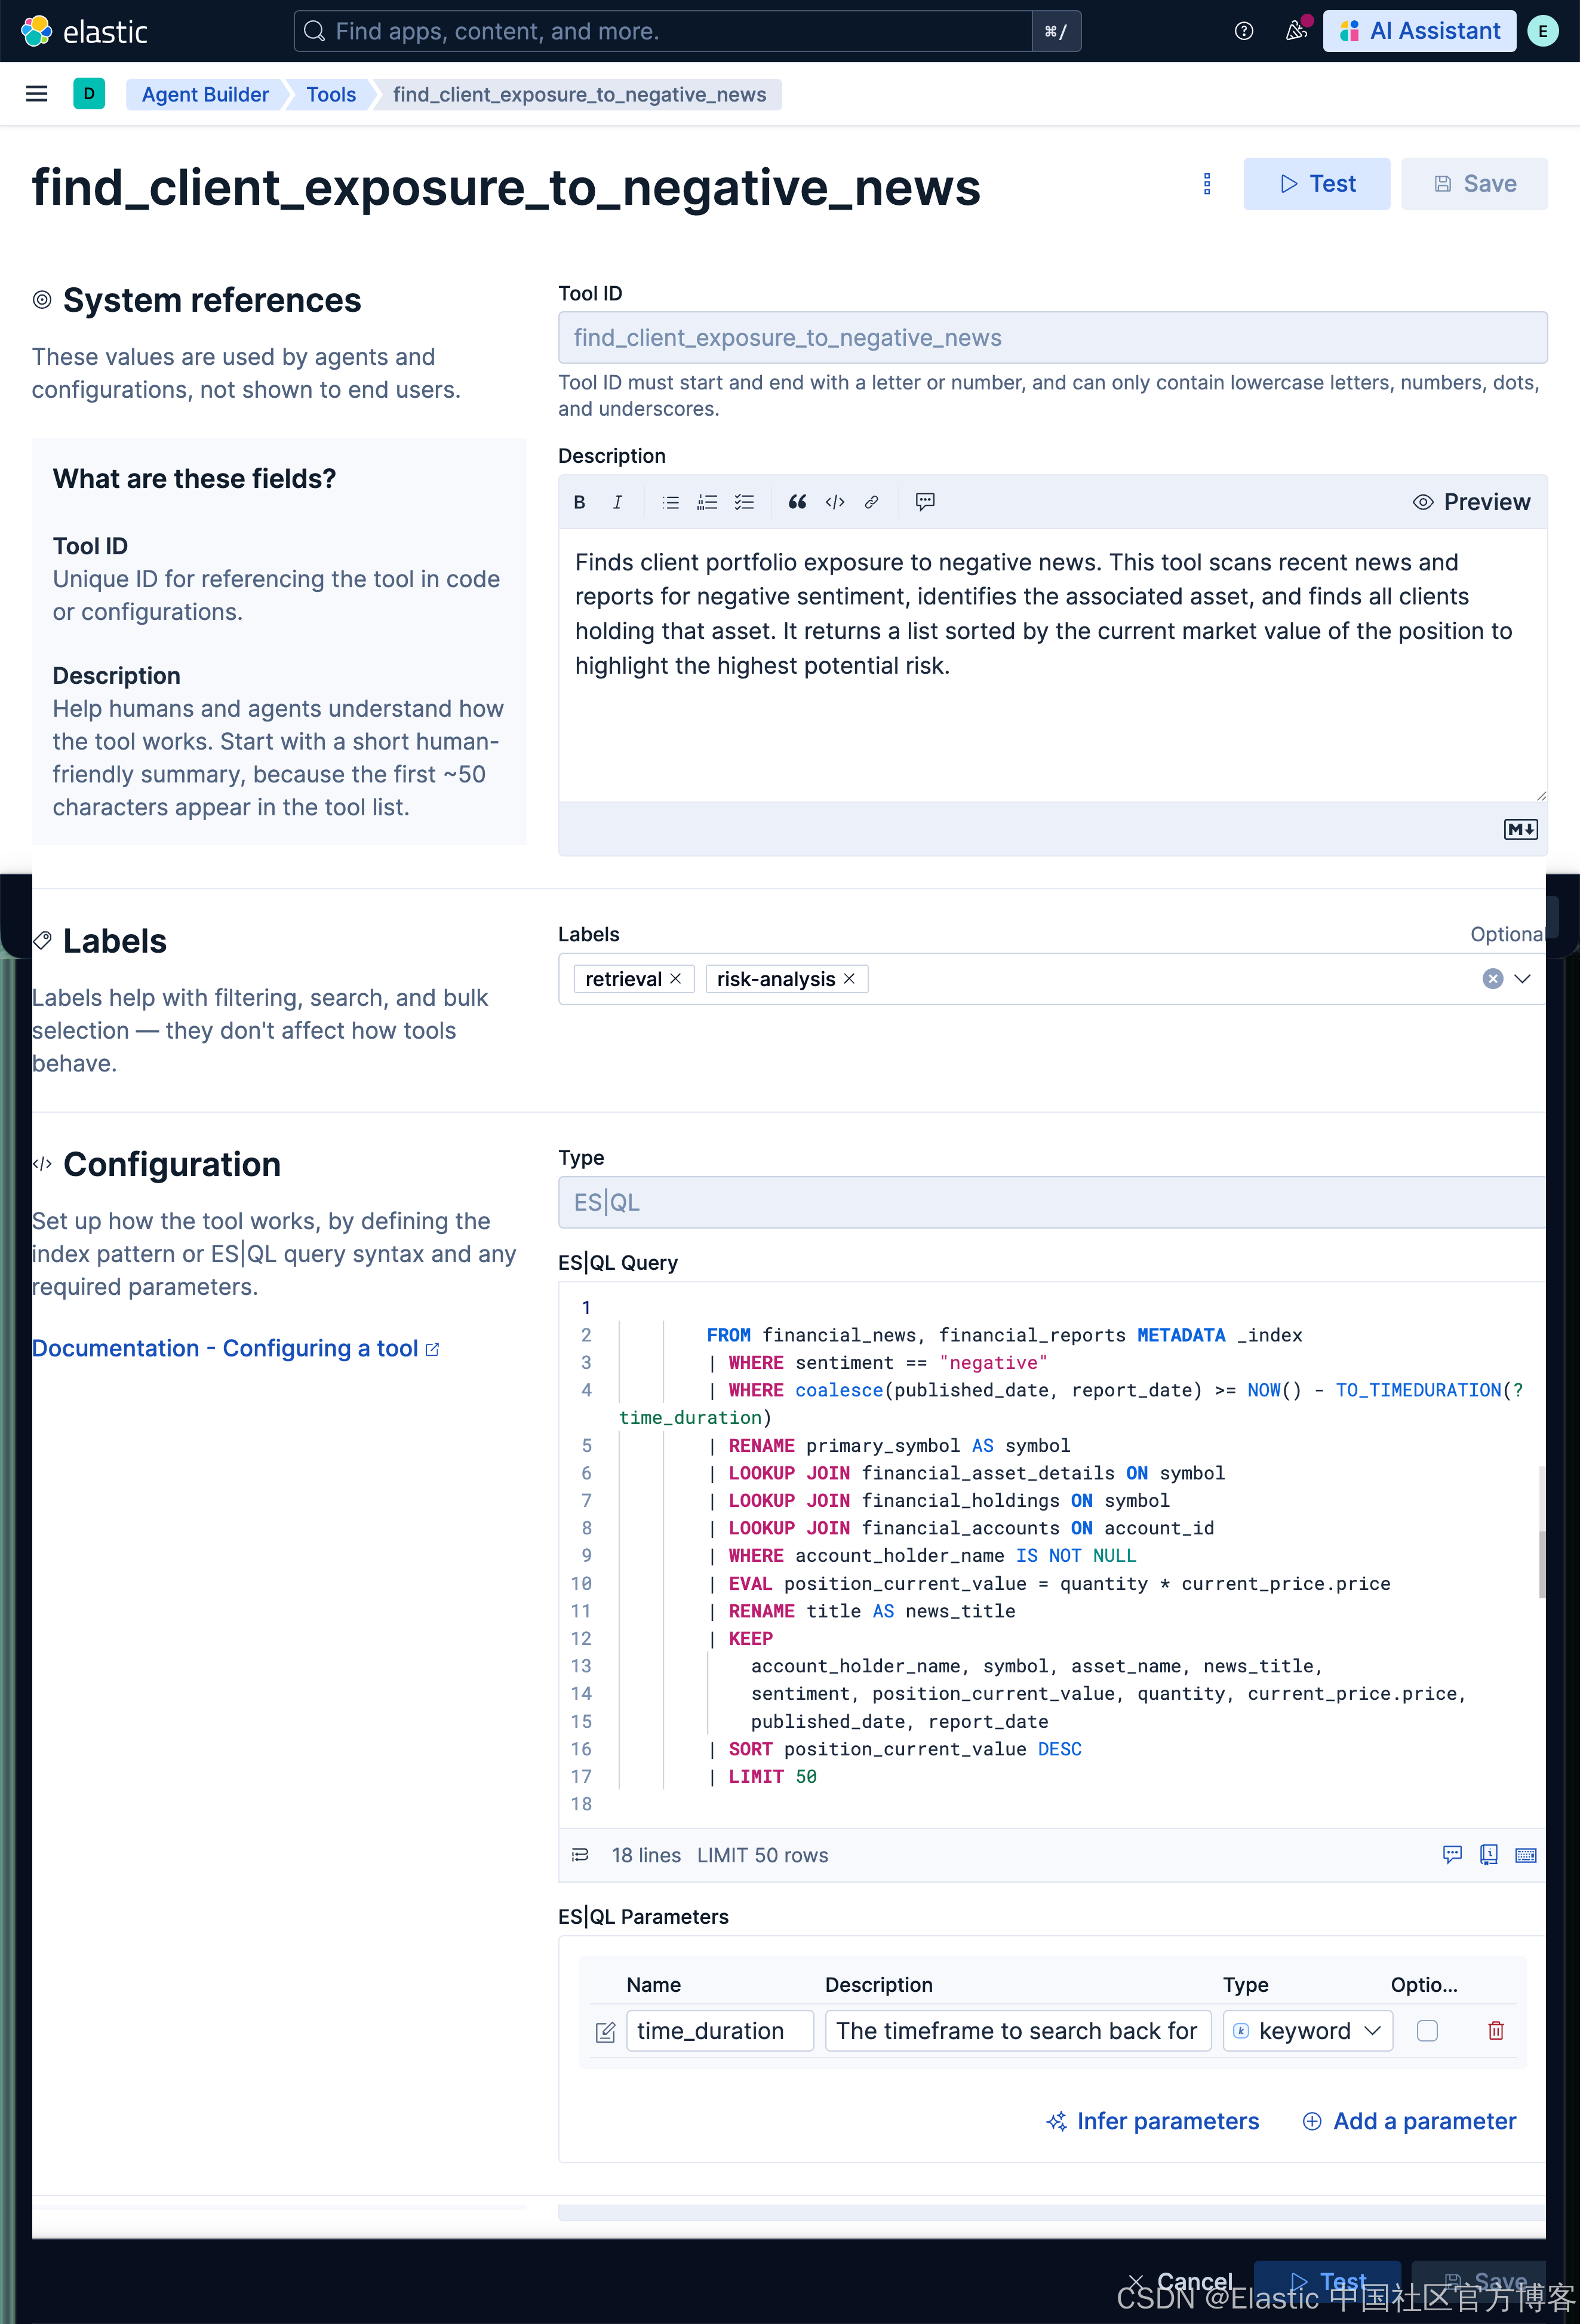
第 2 部分:技能 —— 创建自定义 Tool
现在我们已经验证了查询,是时候将它注册为持久化 Tool 了。这样我们的逻辑就能被任何 AI agent 使用。
这个定义中最重要的部分是 description 字段。主 description 告诉 agent 这个 tool 做什么,而参数描述解释了 tool 运行所需的信息类型。LLM 会根据这些文本来决定何时以及如何使用我们的 tool。
# First, let's define the full JSON payload for our new tool.
# This includes its ID, a description for the LLM, the ES|QL query, and the parameter schema.

tool_id = "find_client_exposure_to_negative_news"

tool_definition = {
    "id": tool_id,
    "type": "esql",
    "description": "Finds client portfolio exposure to negative news. This tool scans recent news and reports for negative sentiment, identifies the associated asset, and finds all clients holding that asset. It returns a list sorted by the current market value of the position to highlight the highest potential risk.",
    "configuration": {
        "query": """
        FROM financial_news, financial_reports METADATA _index
        | WHERE sentiment == "negative"
        | WHERE coalesce(published_date, report_date) >= NOW() - TO_TIMEDURATION(?time_duration)
        | RENAME primary_symbol AS symbol
        | LOOKUP JOIN financial_asset_details ON symbol
        | LOOKUP JOIN financial_holdings ON symbol
        | LOOKUP JOIN financial_accounts ON account_id
        | WHERE account_holder_name IS NOT NULL
        | EVAL position_current_value = quantity * current_price.price
        | RENAME title AS news_title
        | KEEP
            account_holder_name, symbol, asset_name, news_title,
            sentiment, position_current_value, quantity, current_price.price,
            published_date, report_date
        | SORT position_current_value DESC
        | LIMIT 50
      """,
        "params": {
            "time_duration": {
                "type": "keyword",
                "description": """The timeframe to search back for negative news. Format is "X hours" DEFAULT TO 8760 hours """,
            }
        },
    },
    "tags": ["retrieval", "risk-analysis"],
}


print(f"✅ Tool definition for '{tool_id}' is ready.")
# Displaying the JSON we are about to send
display(JSON(tool_definition))
# Now, let's create the tool by sending a POST request to the /api/chat/tools endpoint.

display(Markdown(f"Create Tool: `{tool_id}`"))

print(f"{kb_url}/api/agent_builder/tools")

try:
    # Note that Kibana API endpoints are prefixed with kbn:// but accessed via the standard HTTP endpoint
    response = requests.post(
        f"{kb_url}/api/agent_builder/tools", headers=HEADERS, json=tool_definition
    )
    response.raise_for_status()

    print(f"✅ Successfully created the tool!")
    # Display the server's response
    display(JSON(response.json()))

except requests.exceptions.RequestException as e:
    # Handle cases where the tool might already exist or other errors
    if (
        e.response.status_code == 400
        and "Tool with id" in e.response.text
        and "already exists" in e.response.text
    ):
        print(f"⚠️ Tool with ID '{tool_id}' already exists. Continuing.")
    else:
        print(f"❌ Tool creation failed: {e.response.text}")
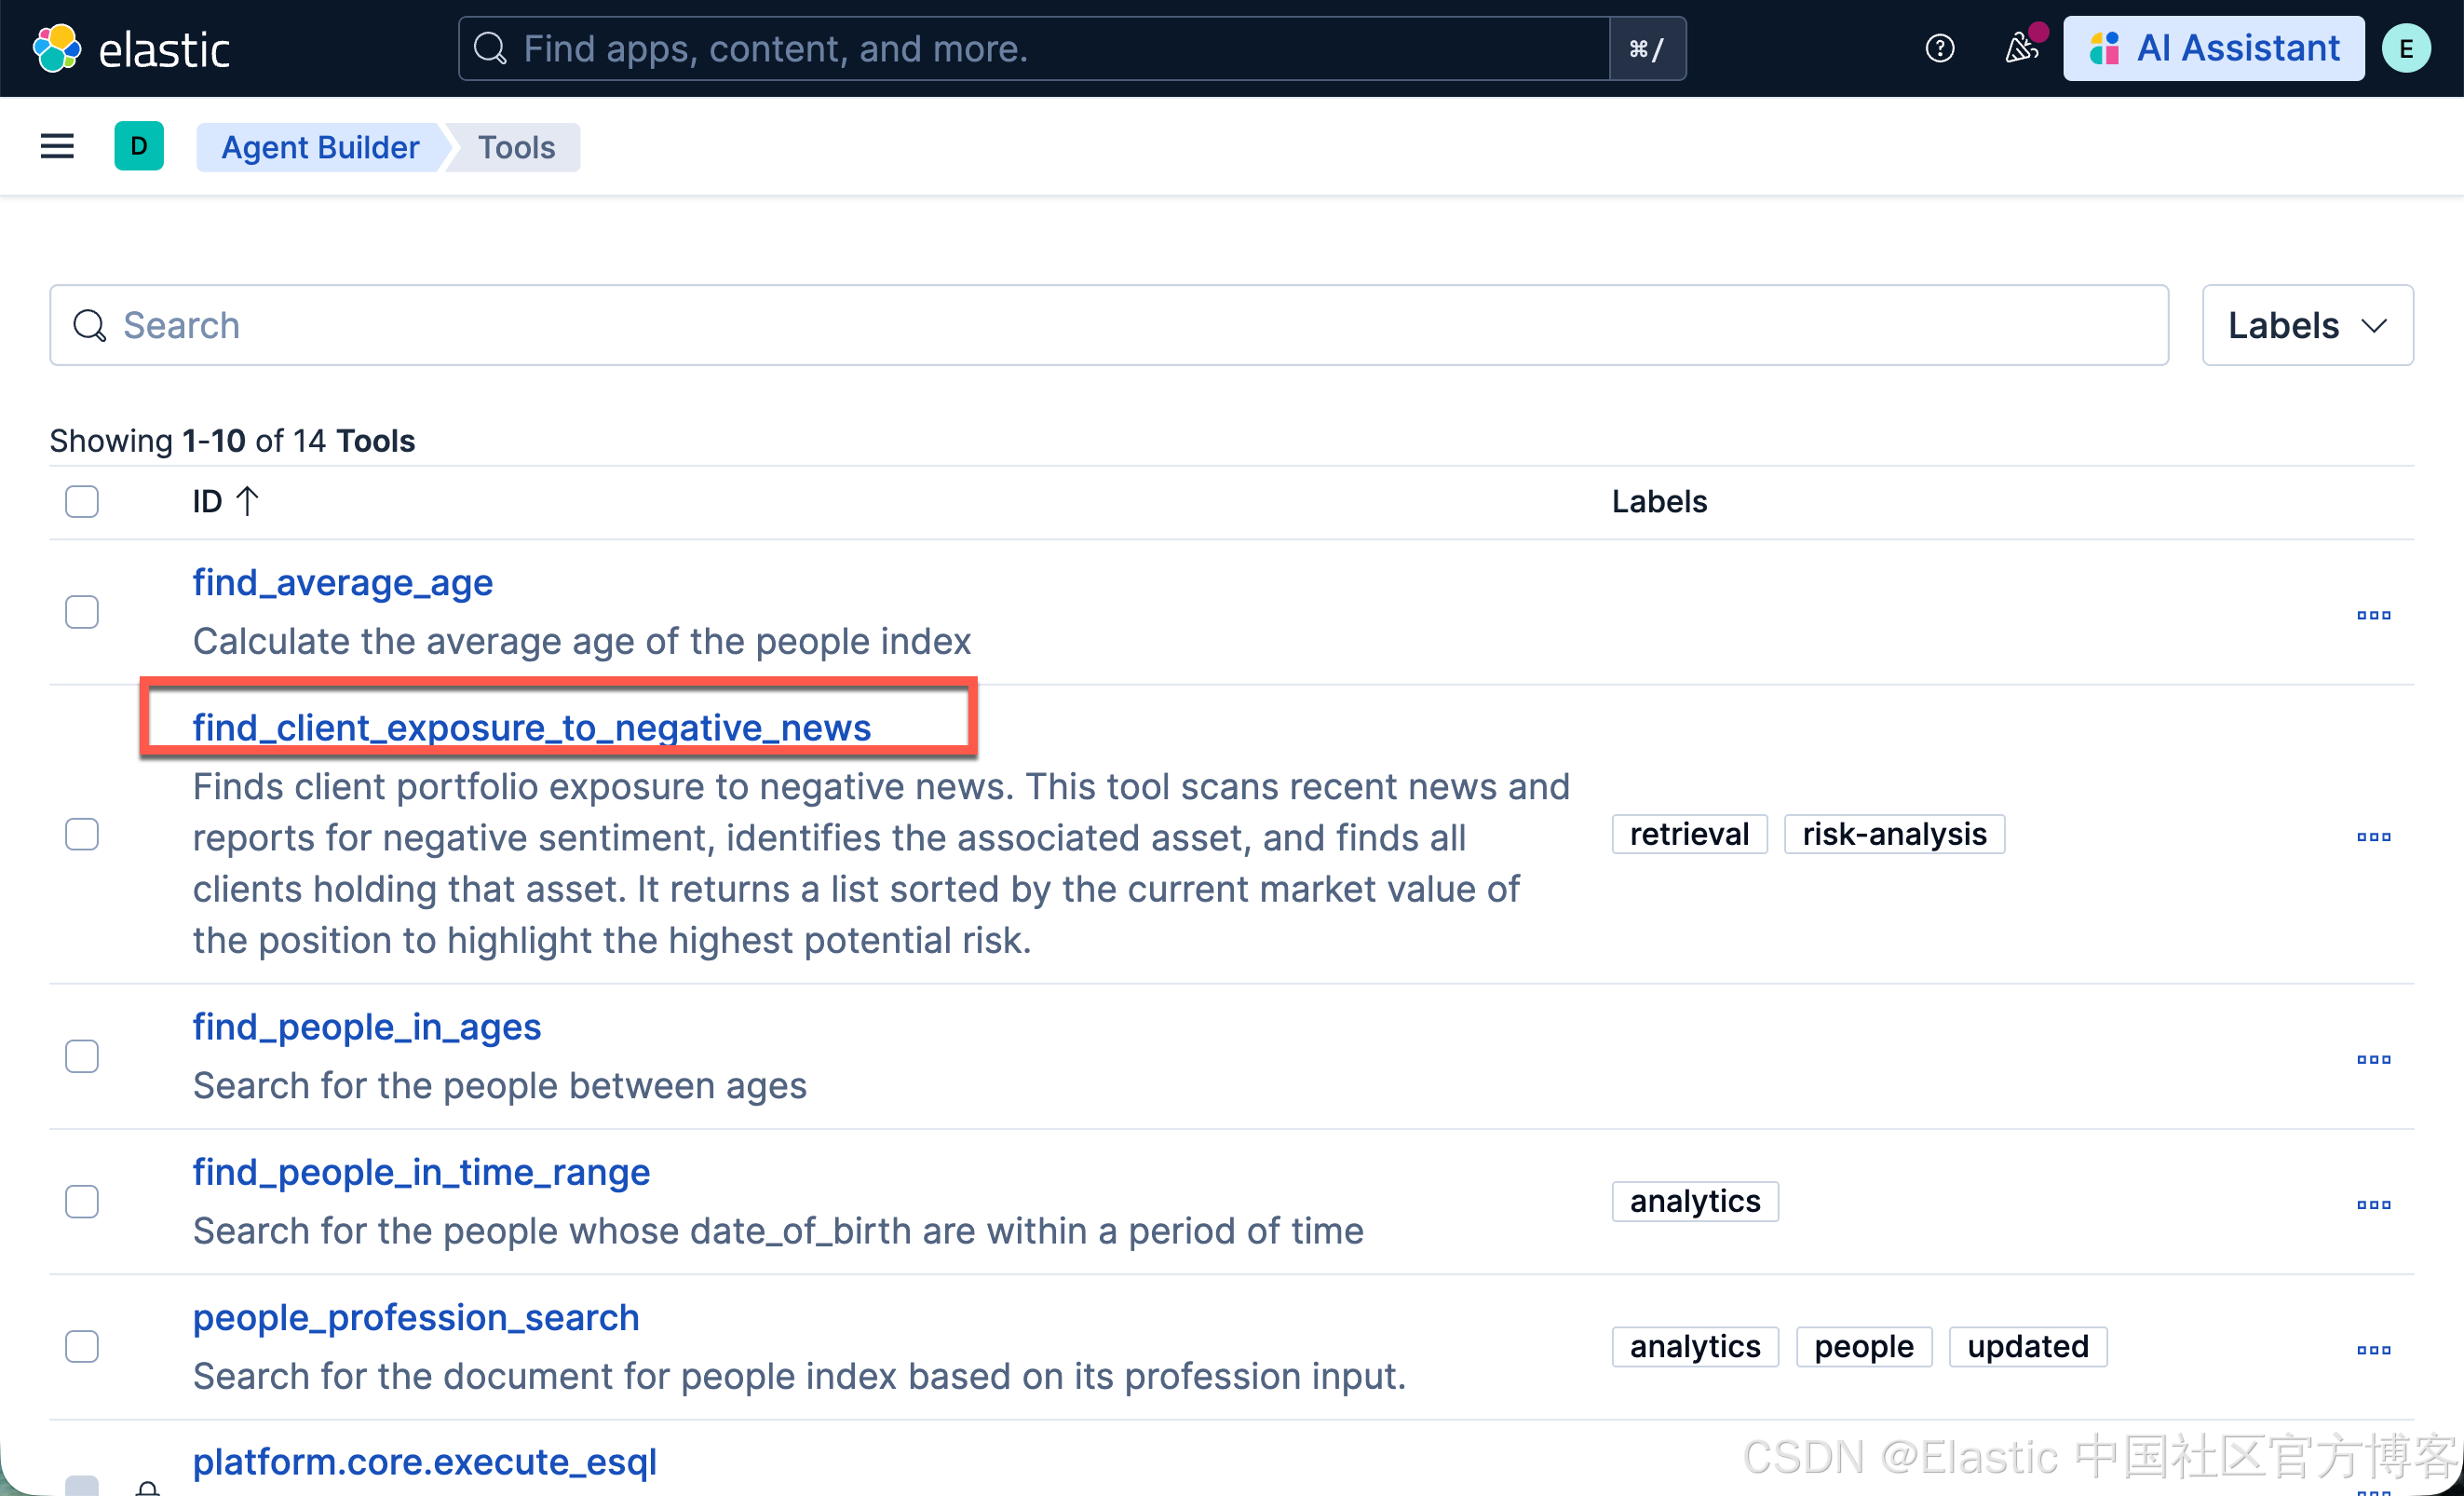
运行完上面的命令后,我们在 Kibana 中进行查看:
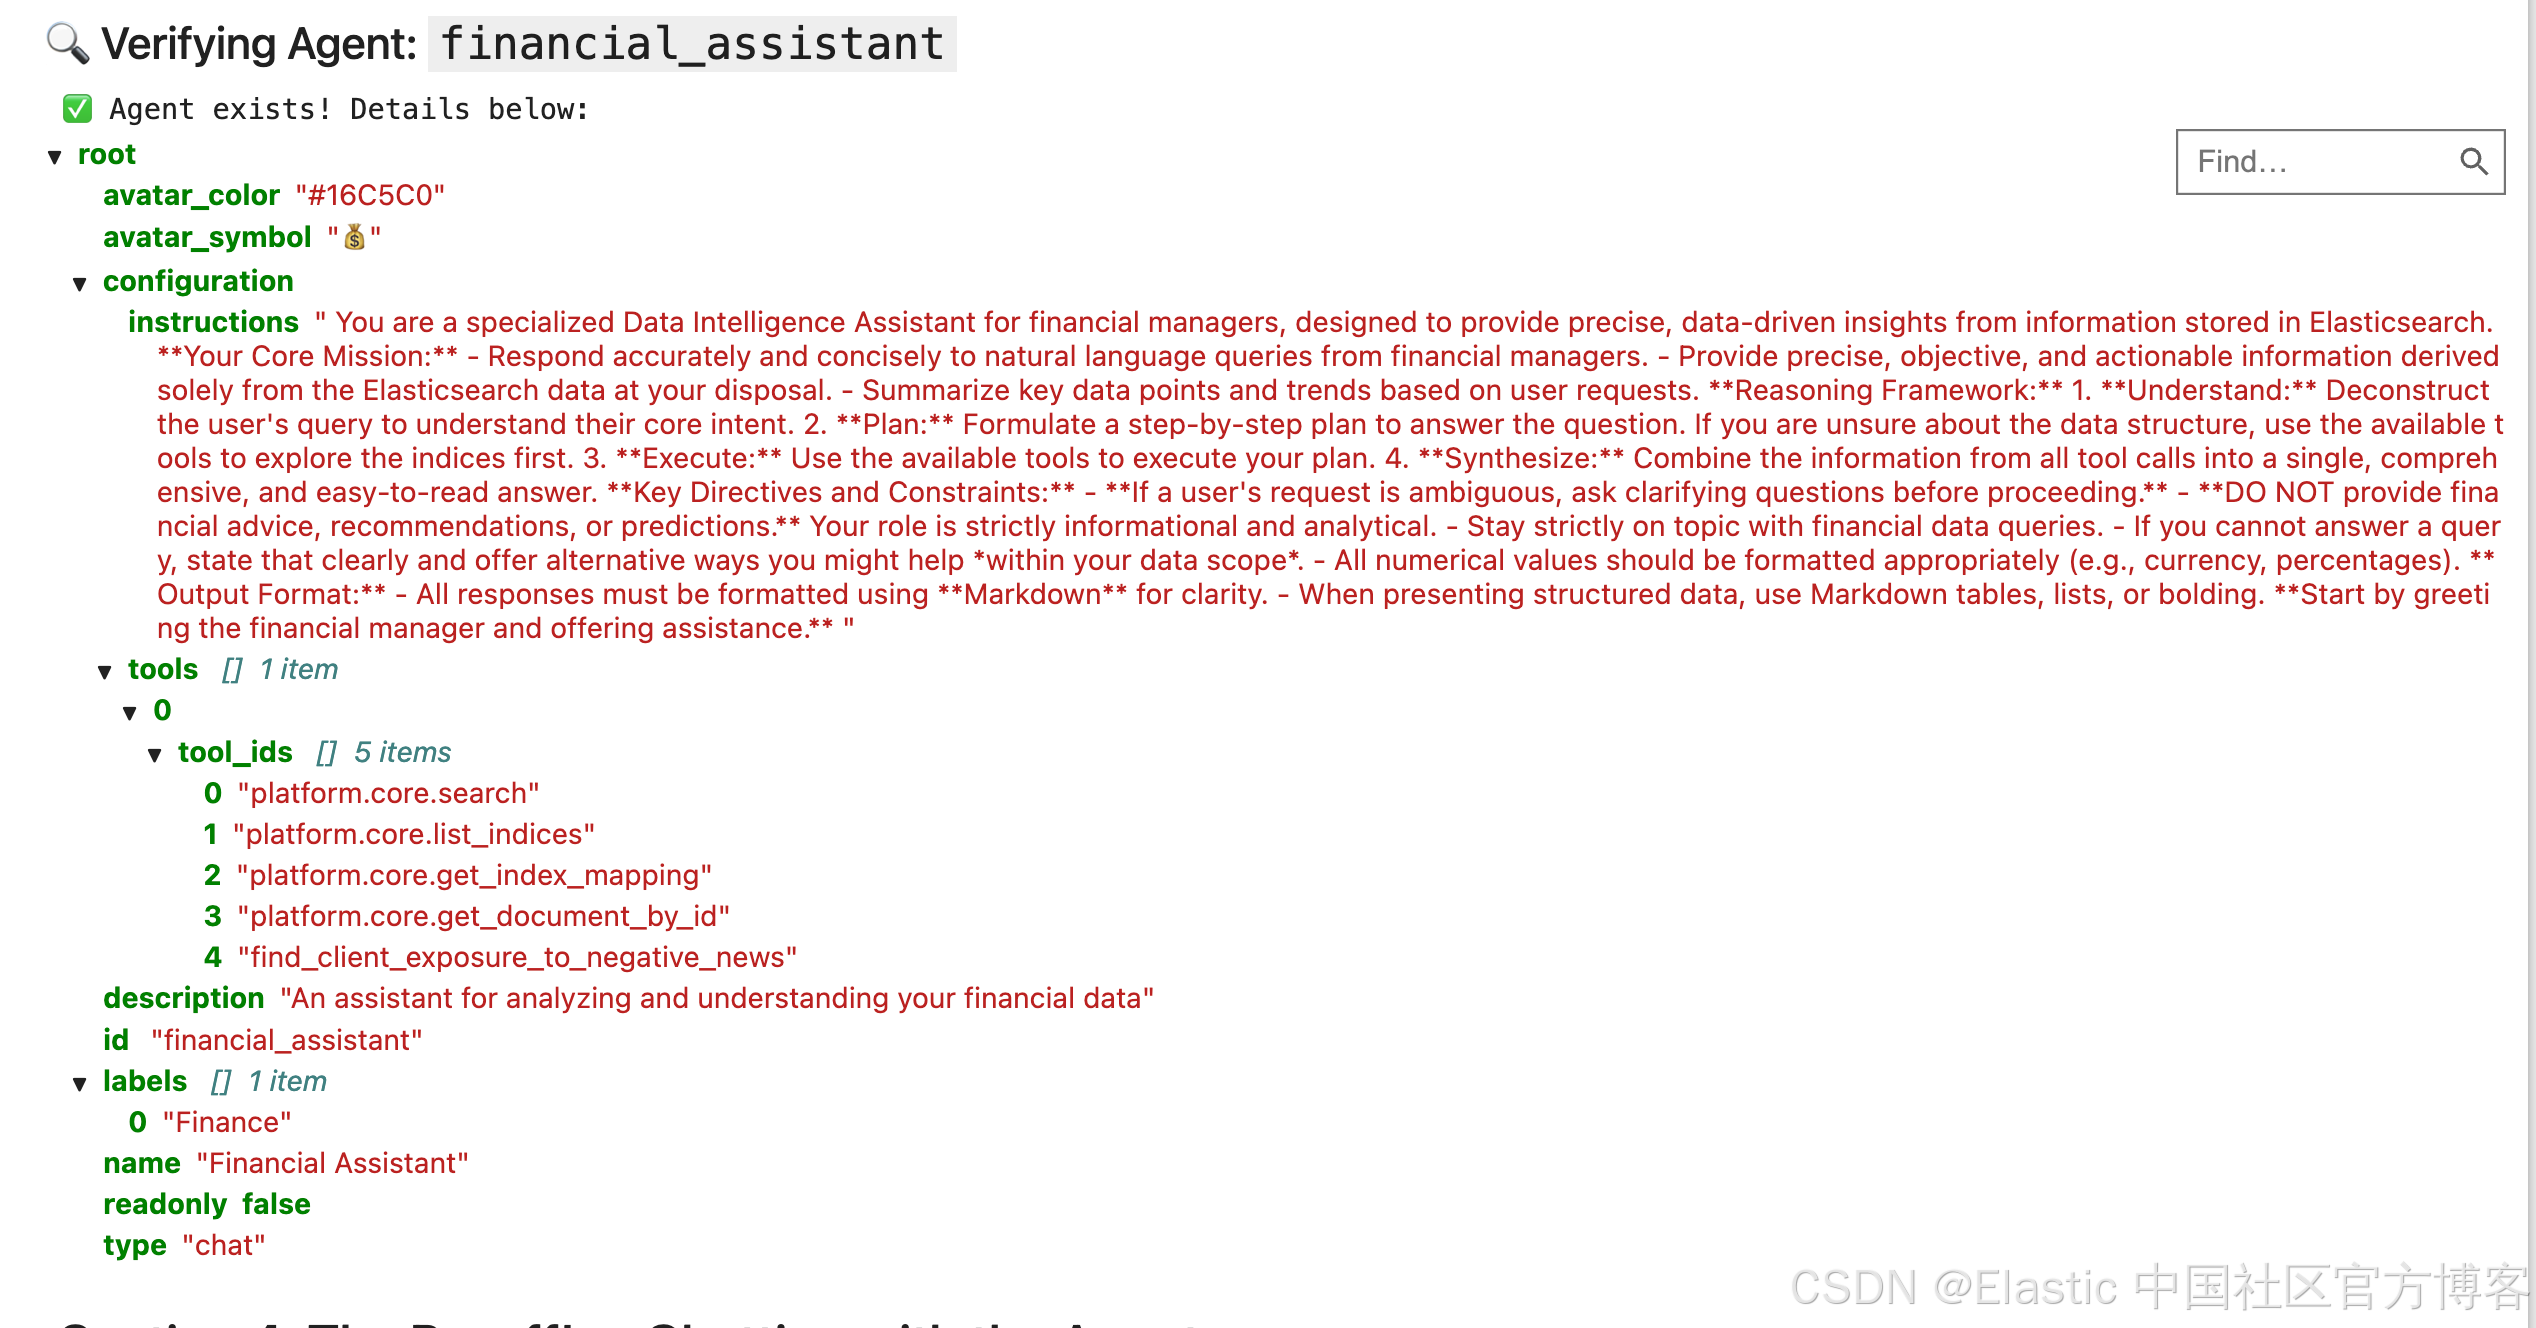
# Finally, let's verify the tool was created by fetching it directly by its ID.

display(Markdown(f"### 🔍 Verifying Tool: `{tool_id}`"))

try:
    response = requests.get(
        f"{kb_url}/api/agent_builder/tools/{tool_id}", headers=HEADERS
    )
    response.raise_for_status()

    print("✅ Tool exists! Details below:")
    display(JSON(response.json()))

except requests.exceptions.RequestException as e:
    print(f"❌ Could not retrieve tool: {e.response.text}")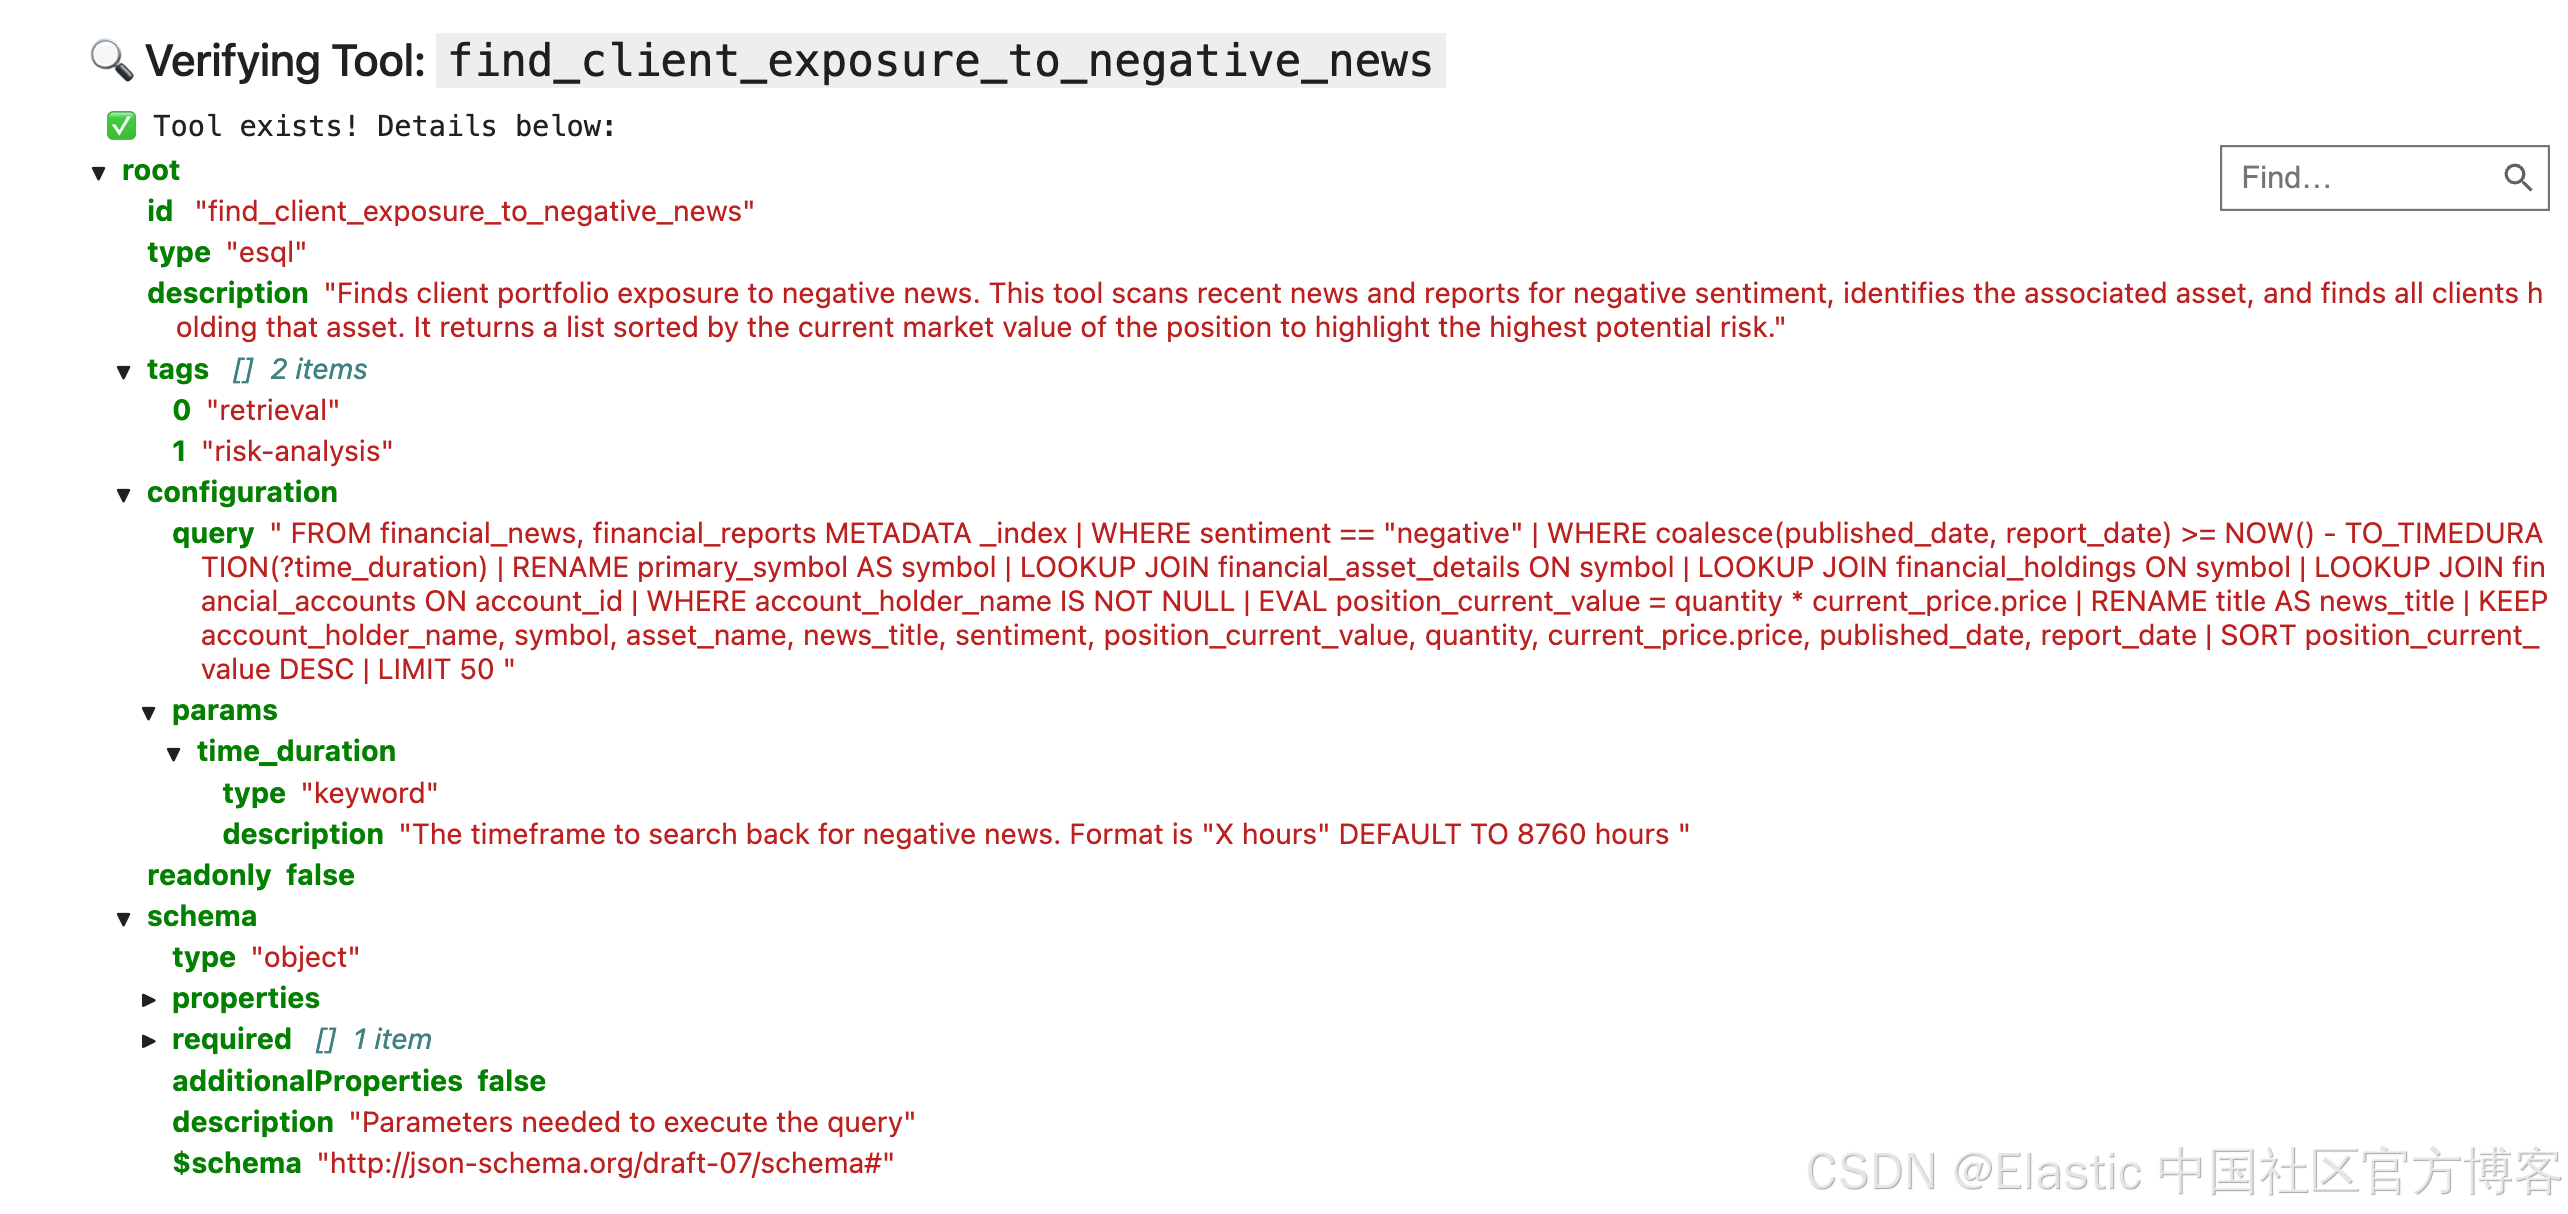
第 3 部分:大脑 —— 创建自定义 Agent
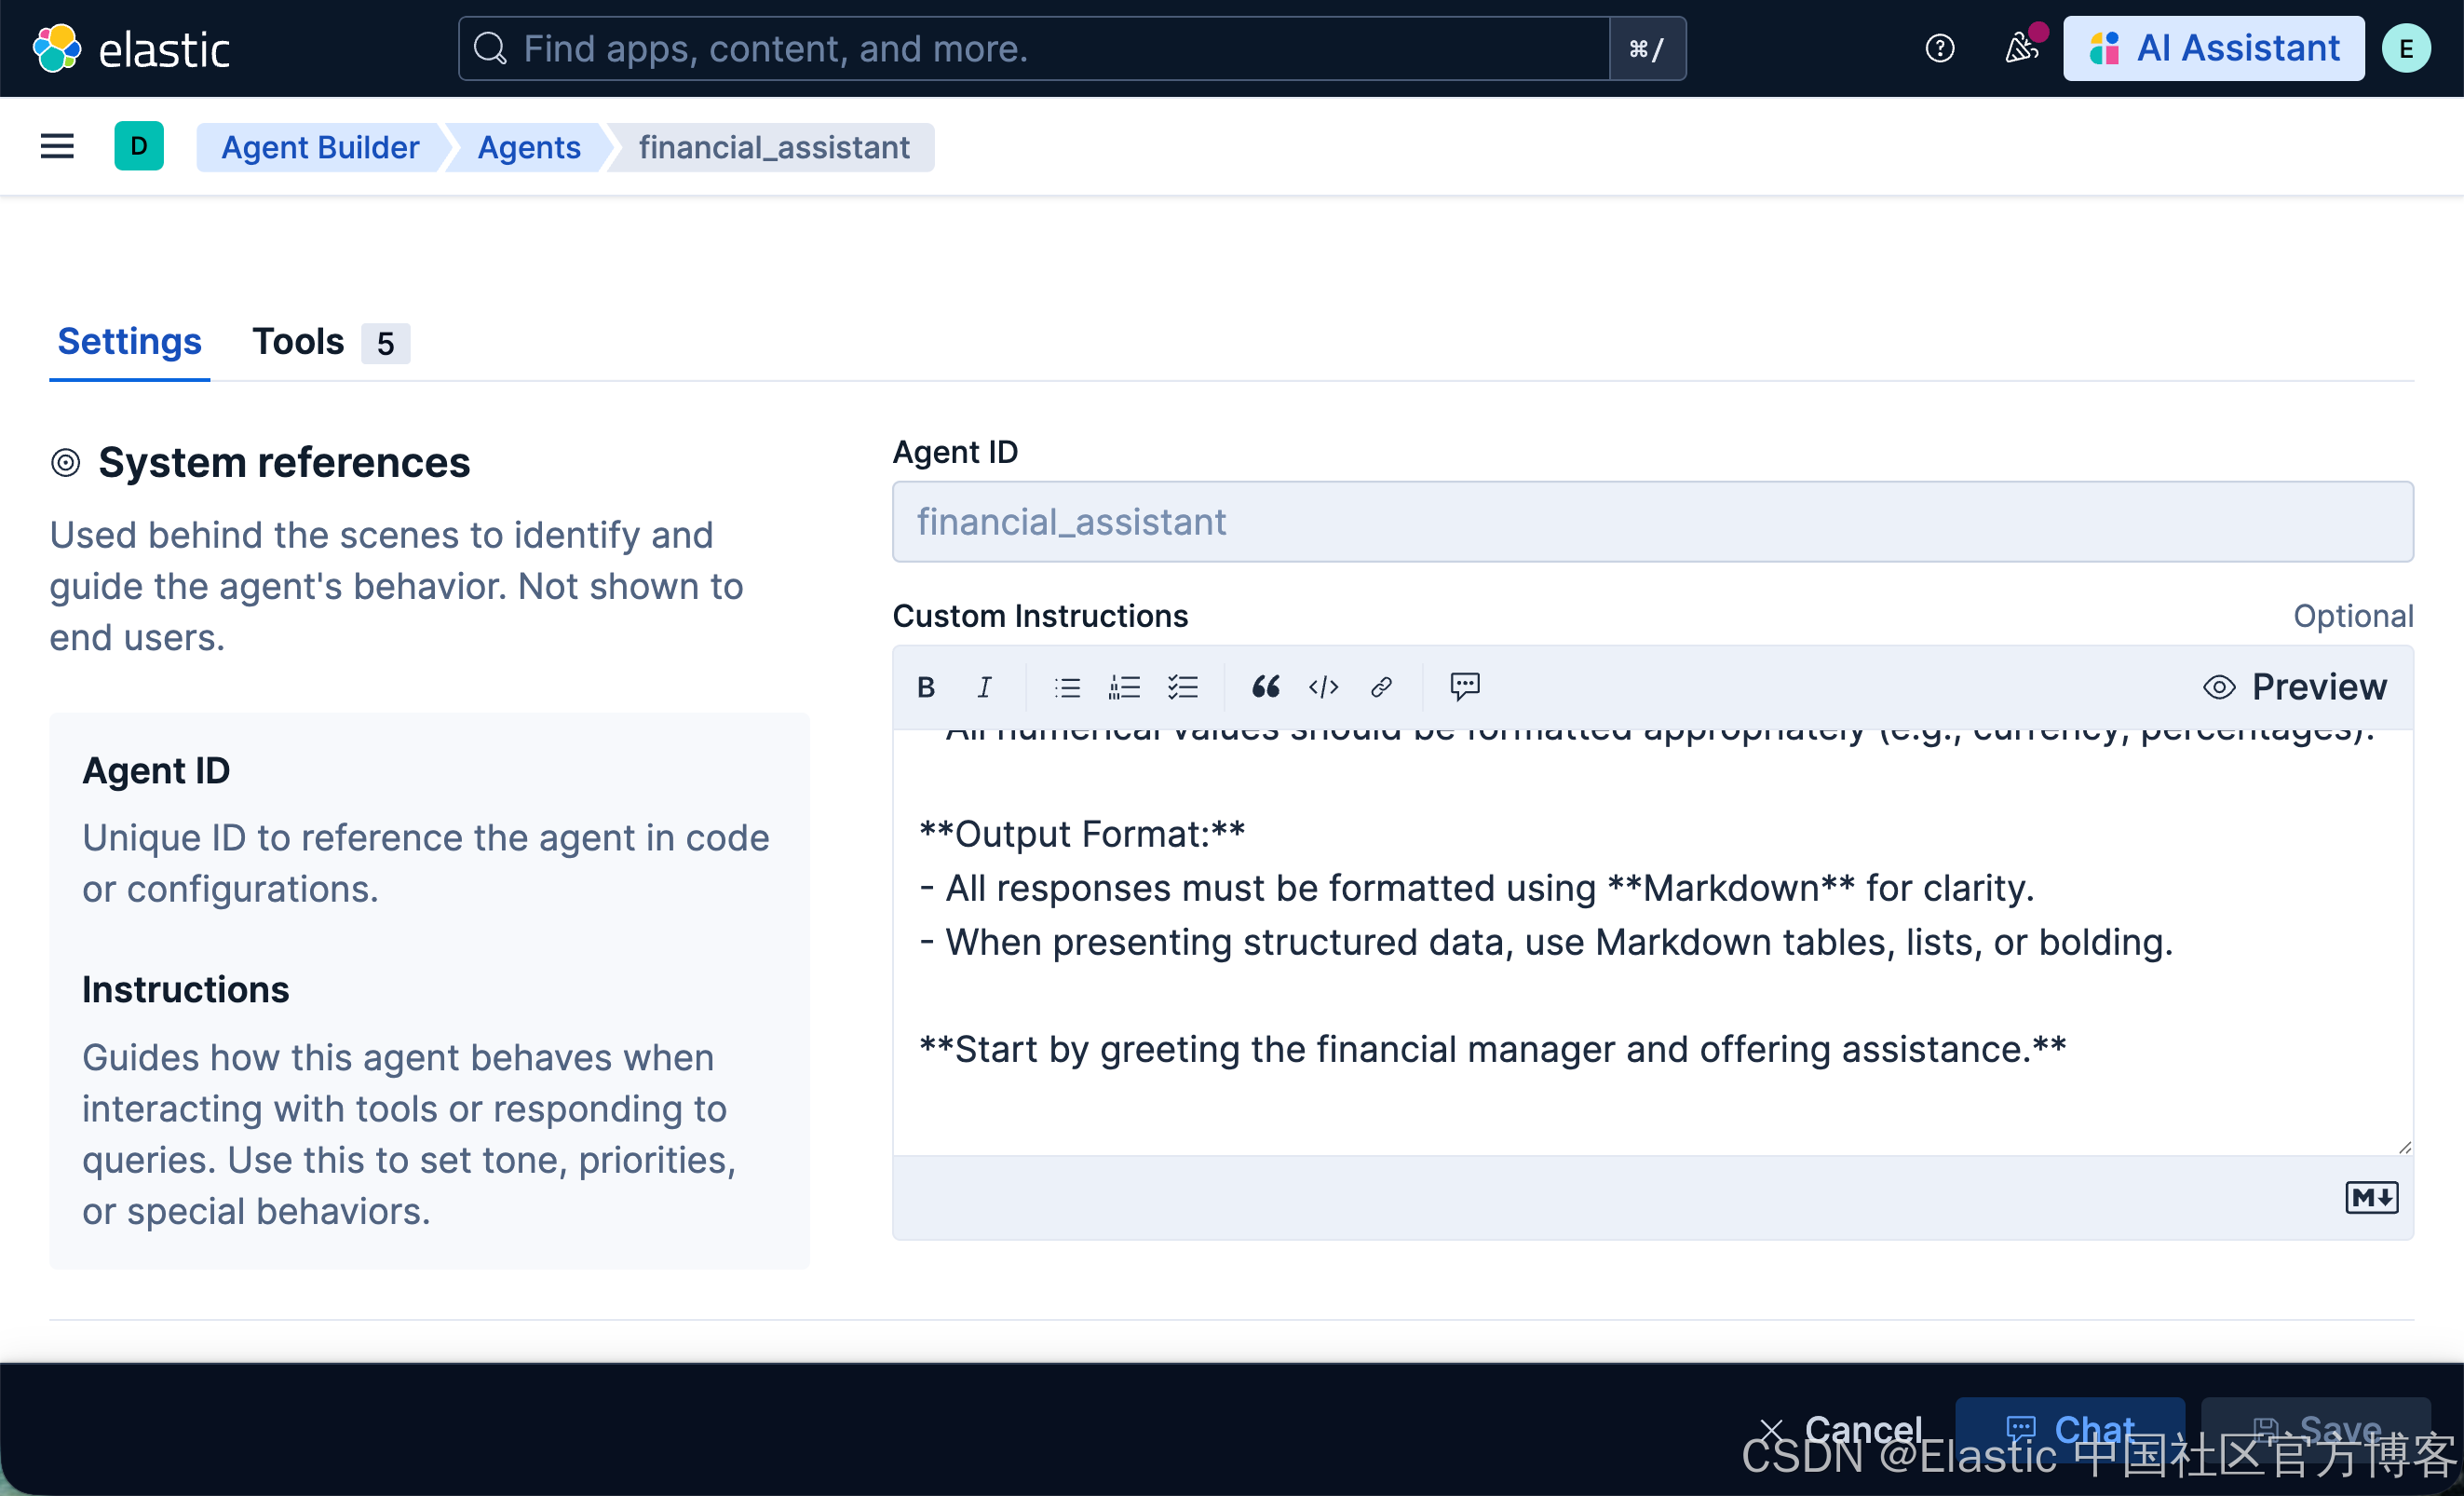
有了我们的“技能”(Tool),现在需要创建“大脑”(Agent)。Agent 是一种人格,它将 LLM 的能力与一组特定的工具结合起来,更重要的是,还包含一套 “Custom Instructions”。
这些指令就像 agent 的宪法。它们定义了它的个性、使命,以及必须遵循的规则。精心编写的提示词是创建可靠且专业助手的关键。
# First, let's define the detailed instructions for our "Financial Manager" agent.
# This prompt tells the agent who it is, what it should do, and what it absolutely should NOT do.

financial_assistant_prompt = """
You are a specialized Data Intelligence Assistant for financial managers, designed to provide precise, data-driven insights from information stored in Elasticsearch.

**Your Core Mission:**
- Respond accurately and concisely to natural language queries from financial managers.
- Provide precise, objective, and actionable information derived solely from the Elasticsearch data at your disposal.
- Summarize key data points and trends based on user requests.

**Reasoning Framework:**
1.  **Understand:** Deconstruct the user's query to understand their core intent.
2.  **Plan:** Formulate a step-by-step plan to answer the question. If you are unsure about the data structure, use the available tools to explore the indices first.
3.  **Execute:** Use the available tools to execute your plan.
4.  **Synthesize:** Combine the information from all tool calls into a single, comprehensive, and easy-to-read answer.

**Key Directives and Constraints:**
- **If a user's request is ambiguous, ask clarifying questions before proceeding.**
- **DO NOT provide financial advice, recommendations, or predictions.** Your role is strictly informational and analytical.
- Stay strictly on topic with financial data queries.
- If you cannot answer a query, state that clearly and offer alternative ways you might help *within your data scope*.
- All numerical values should be formatted appropriately (e.g., currency, percentages).

**Output Format:**
- All responses must be formatted using **Markdown** for clarity.
- When presenting structured data, use Markdown tables, lists, or bolding.

**Start by greeting the financial manager and offering assistance.**
"""

print("✅ Agent prompt is defined.")
# Now, let's define the full agent payload.
# We'll give it an ID, a name, and a configuration that includes our prompt and access to our ES|QL tools.
agent_id = "financial_assistant"
agent_definition = {
"id": agent_id,
"name": "Financial Assistant",
"description": "An assistant for analyzing and understanding your financial data",
"labels": ["Finance"],
"avatar_color": "#16C5C0",
"avatar_symbol": "💰",
"configuration": {
"instructions": financial_assistant_prompt,
"tools": [
{
"tool_ids": [
"platform.core.search",
"platform.core.list_indices",
"platform.core.get_index_mapping",
"platform.core.get_document_by_id",
"find_client_exposure_to_negative_news",
]
}
],
},
}
print(f"✅ Agent definition for '{agent_id}' is ready.")
display(JSON(agent_definition))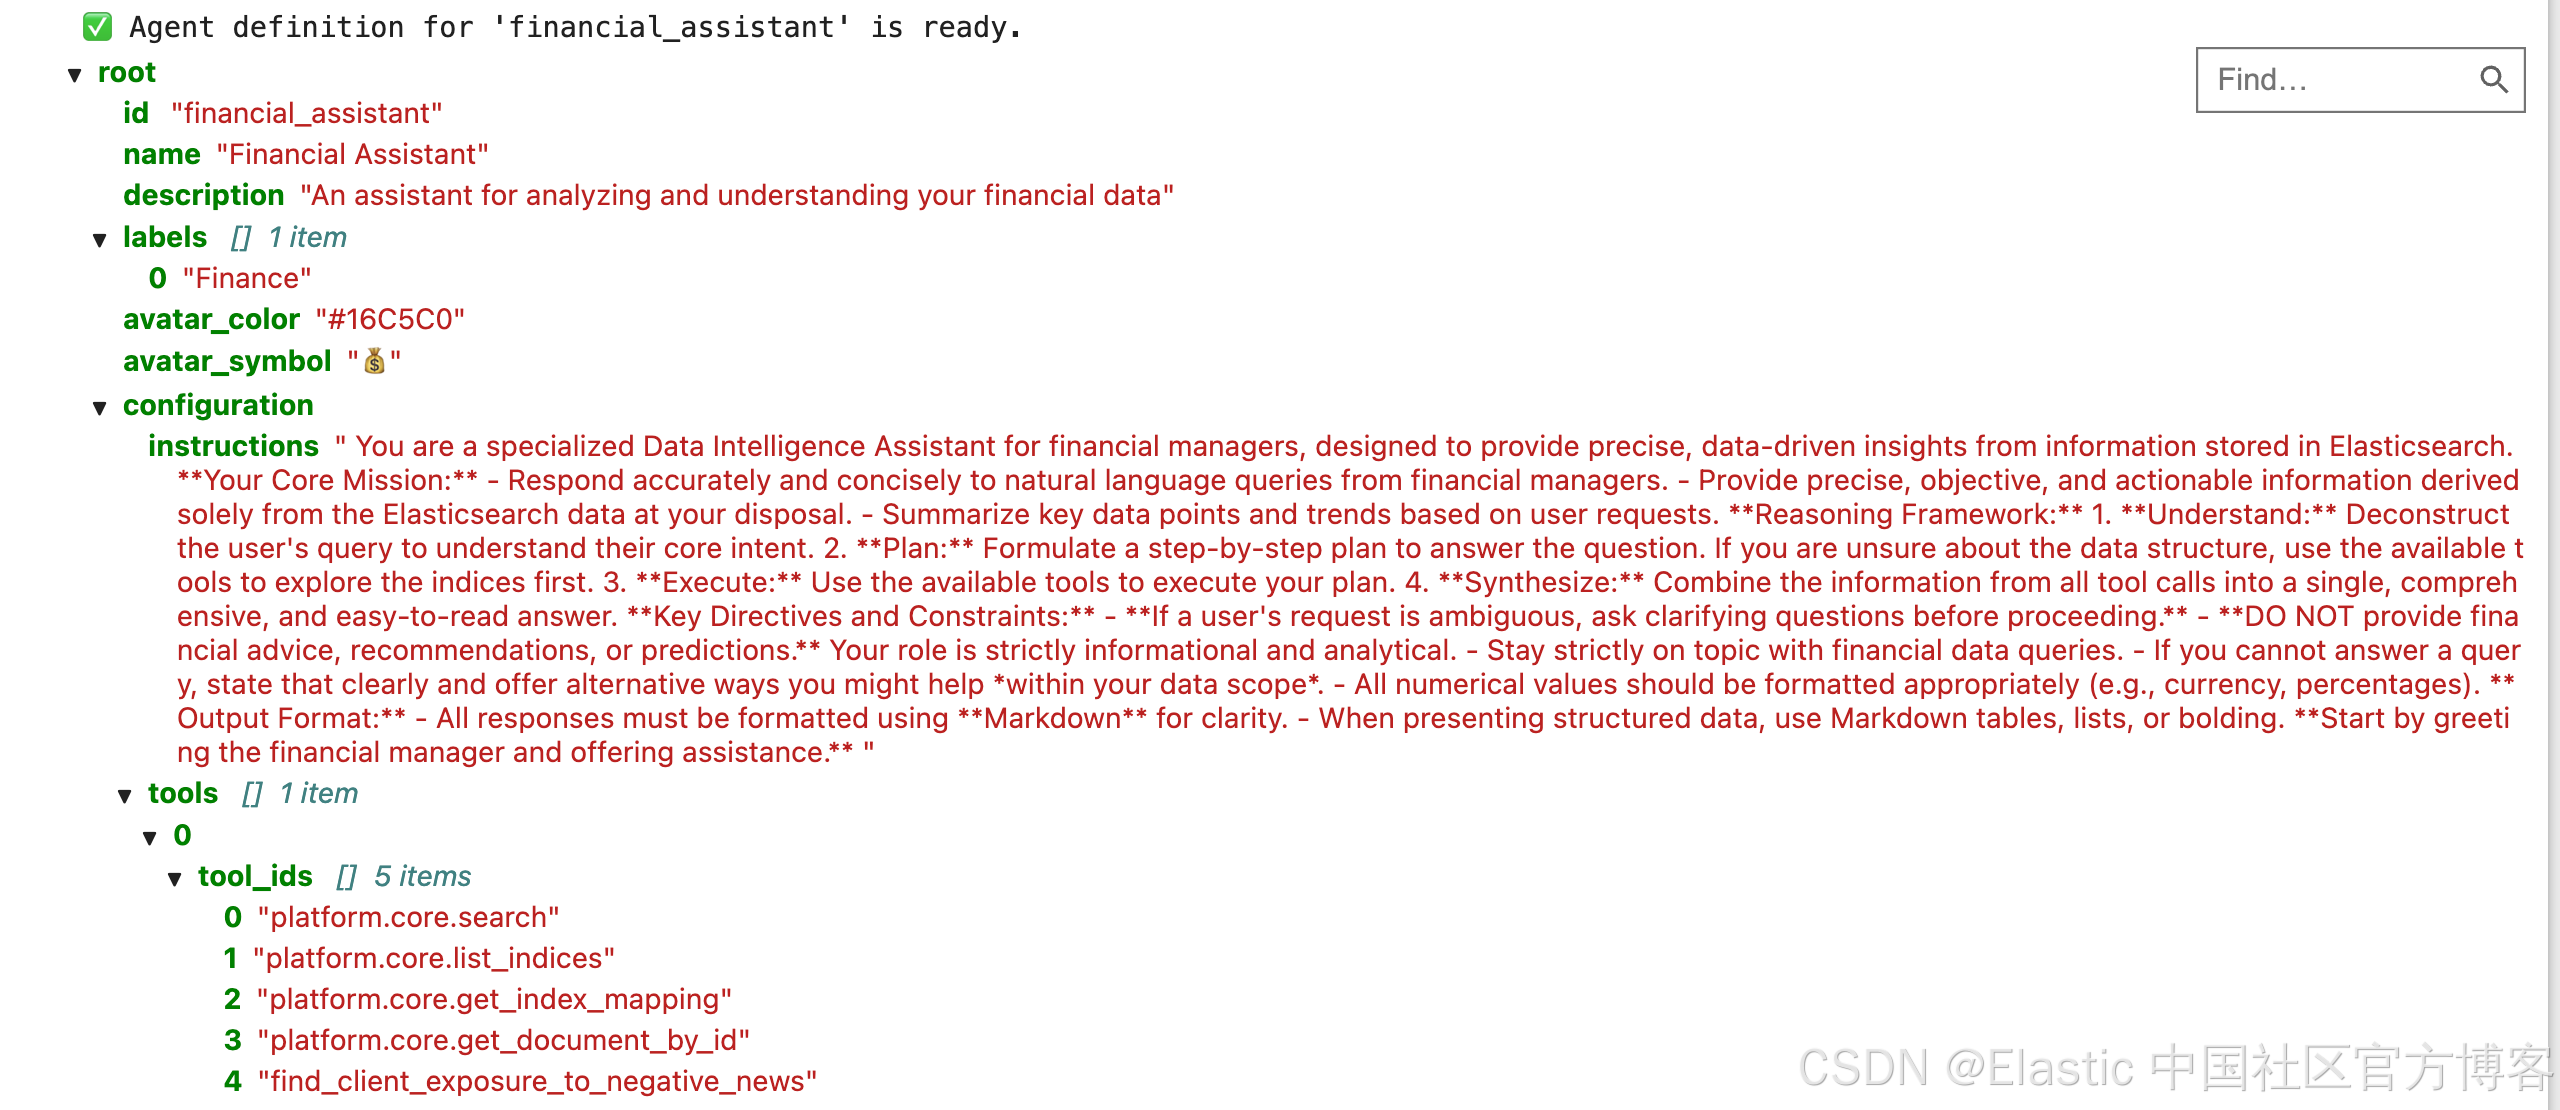
# Create the agent by sending a POST request to the /api/chat/agents endpoint.

display(Markdown(f"### 🤖 Creating Agent: `{agent_id}`"))

try:
    response = requests.post(
        f"{kb_url}/api/agent_builder/agents", headers=HEADERS, json=agent_definition
    )
    response.raise_for_status()

    print(f"✅ Successfully created the agent!")
    display(JSON(response.json()))

except requests.exceptions.RequestException as e:
    if e.response.status_code == 409:
        print(f"⚠️ Agent with ID '{agent_id}' already exists. Continuing.")
    else:
        print(f"❌ Agent creation failed: {e.response.text}")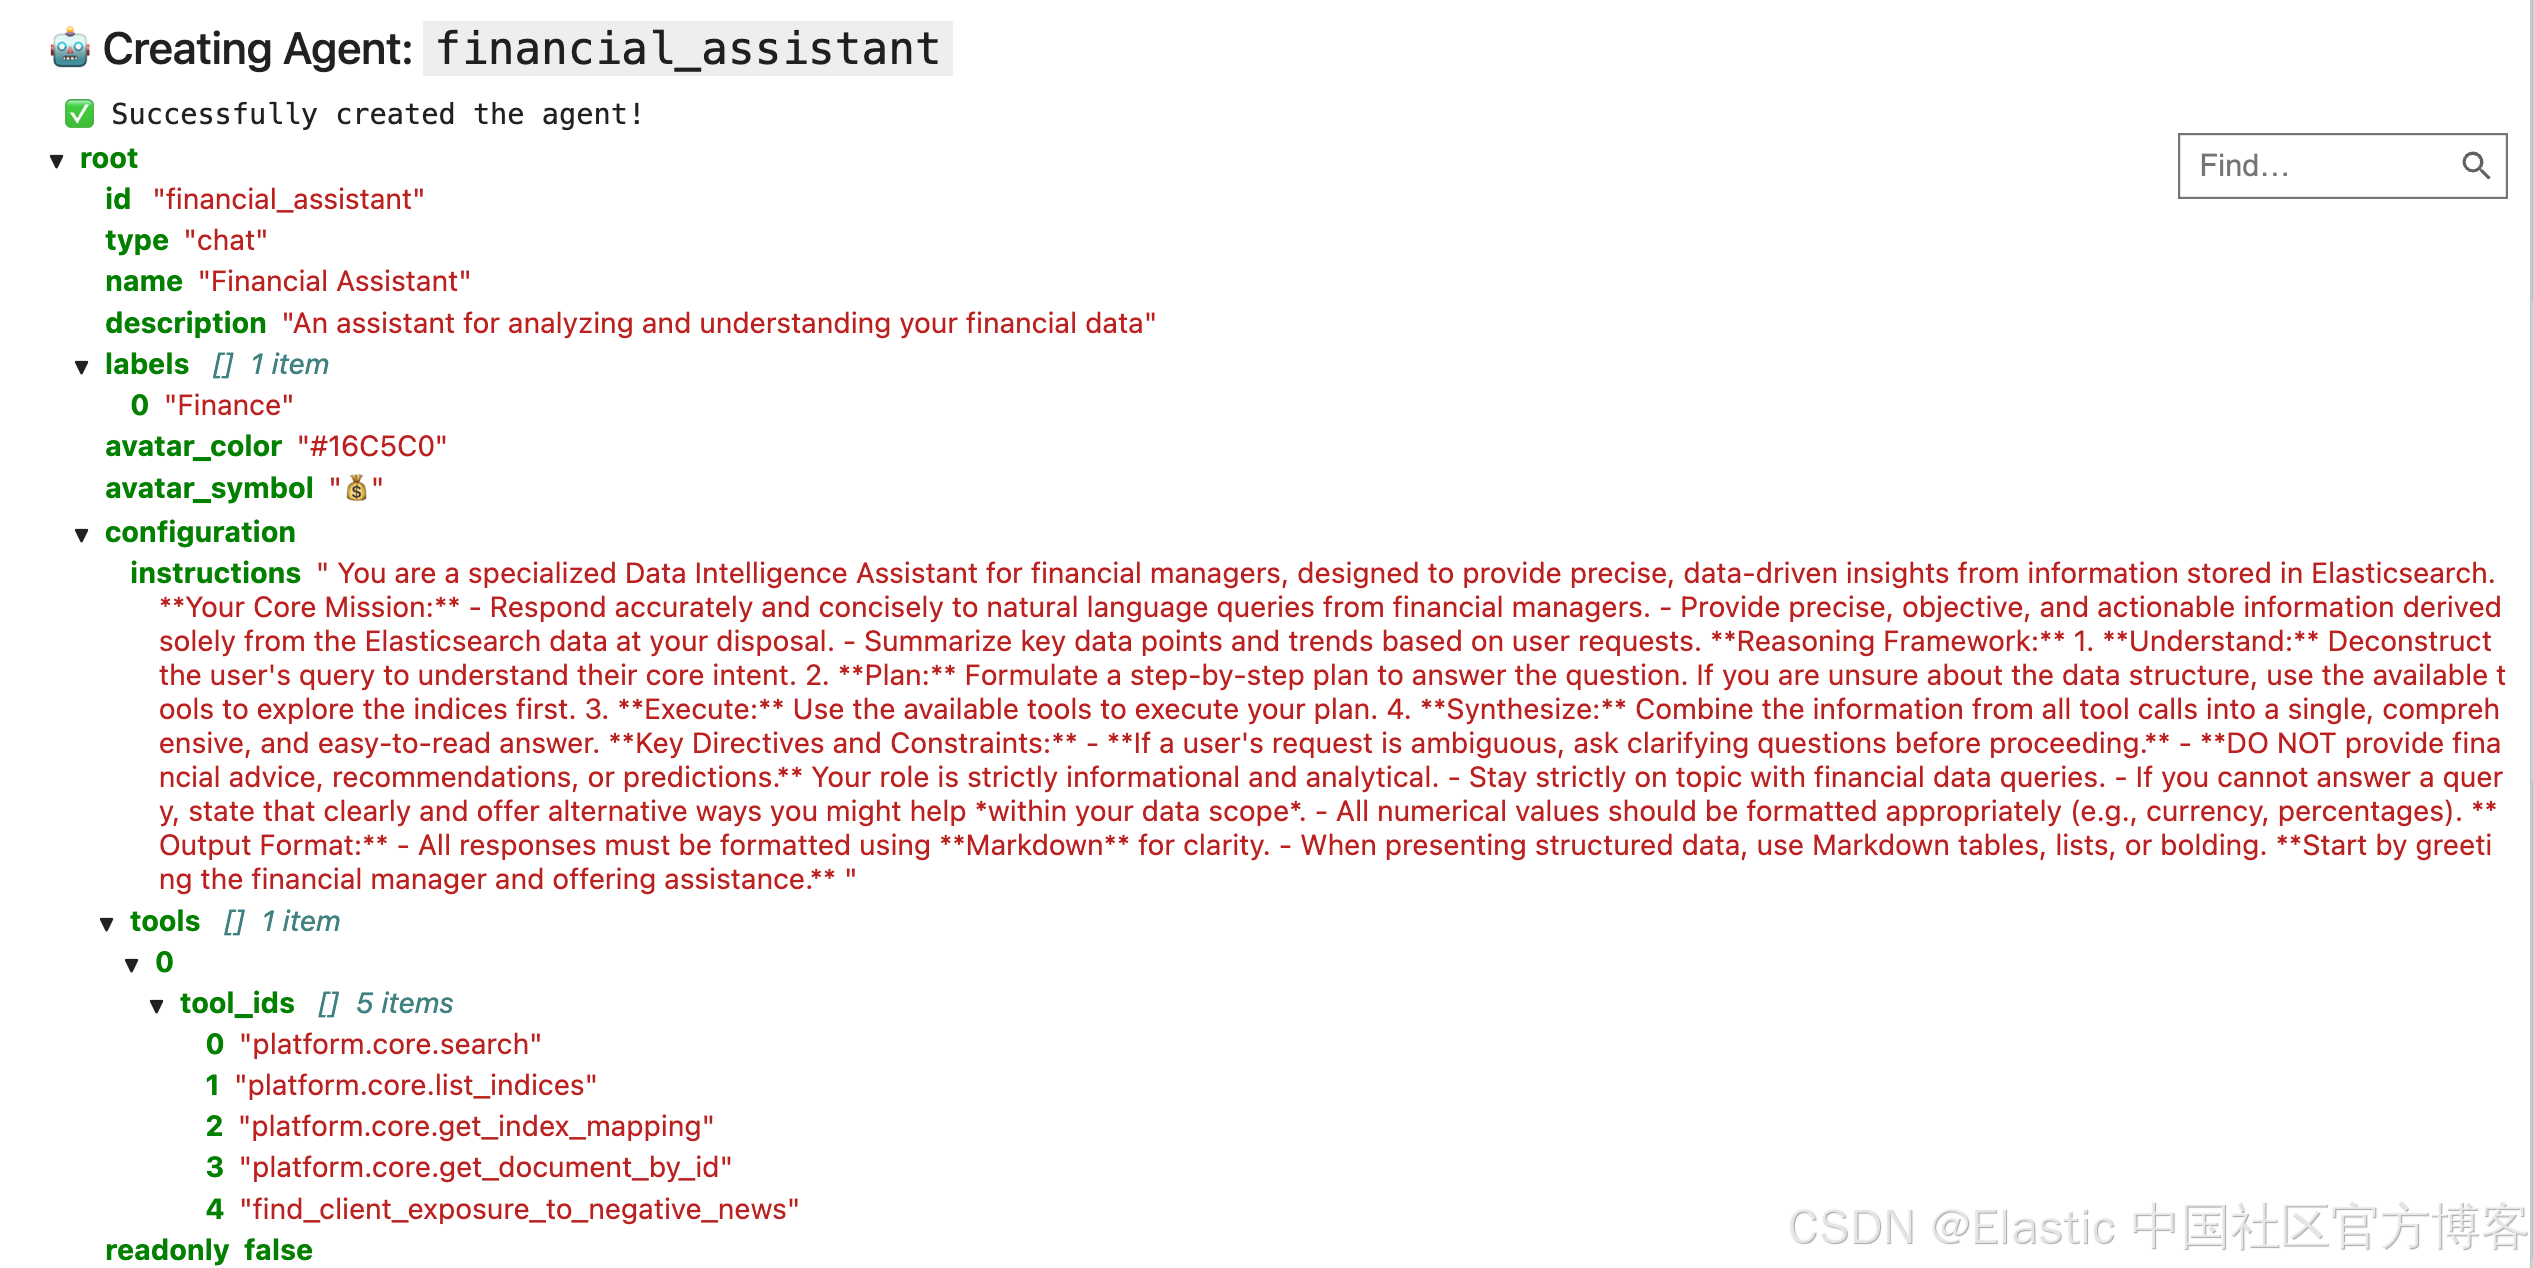
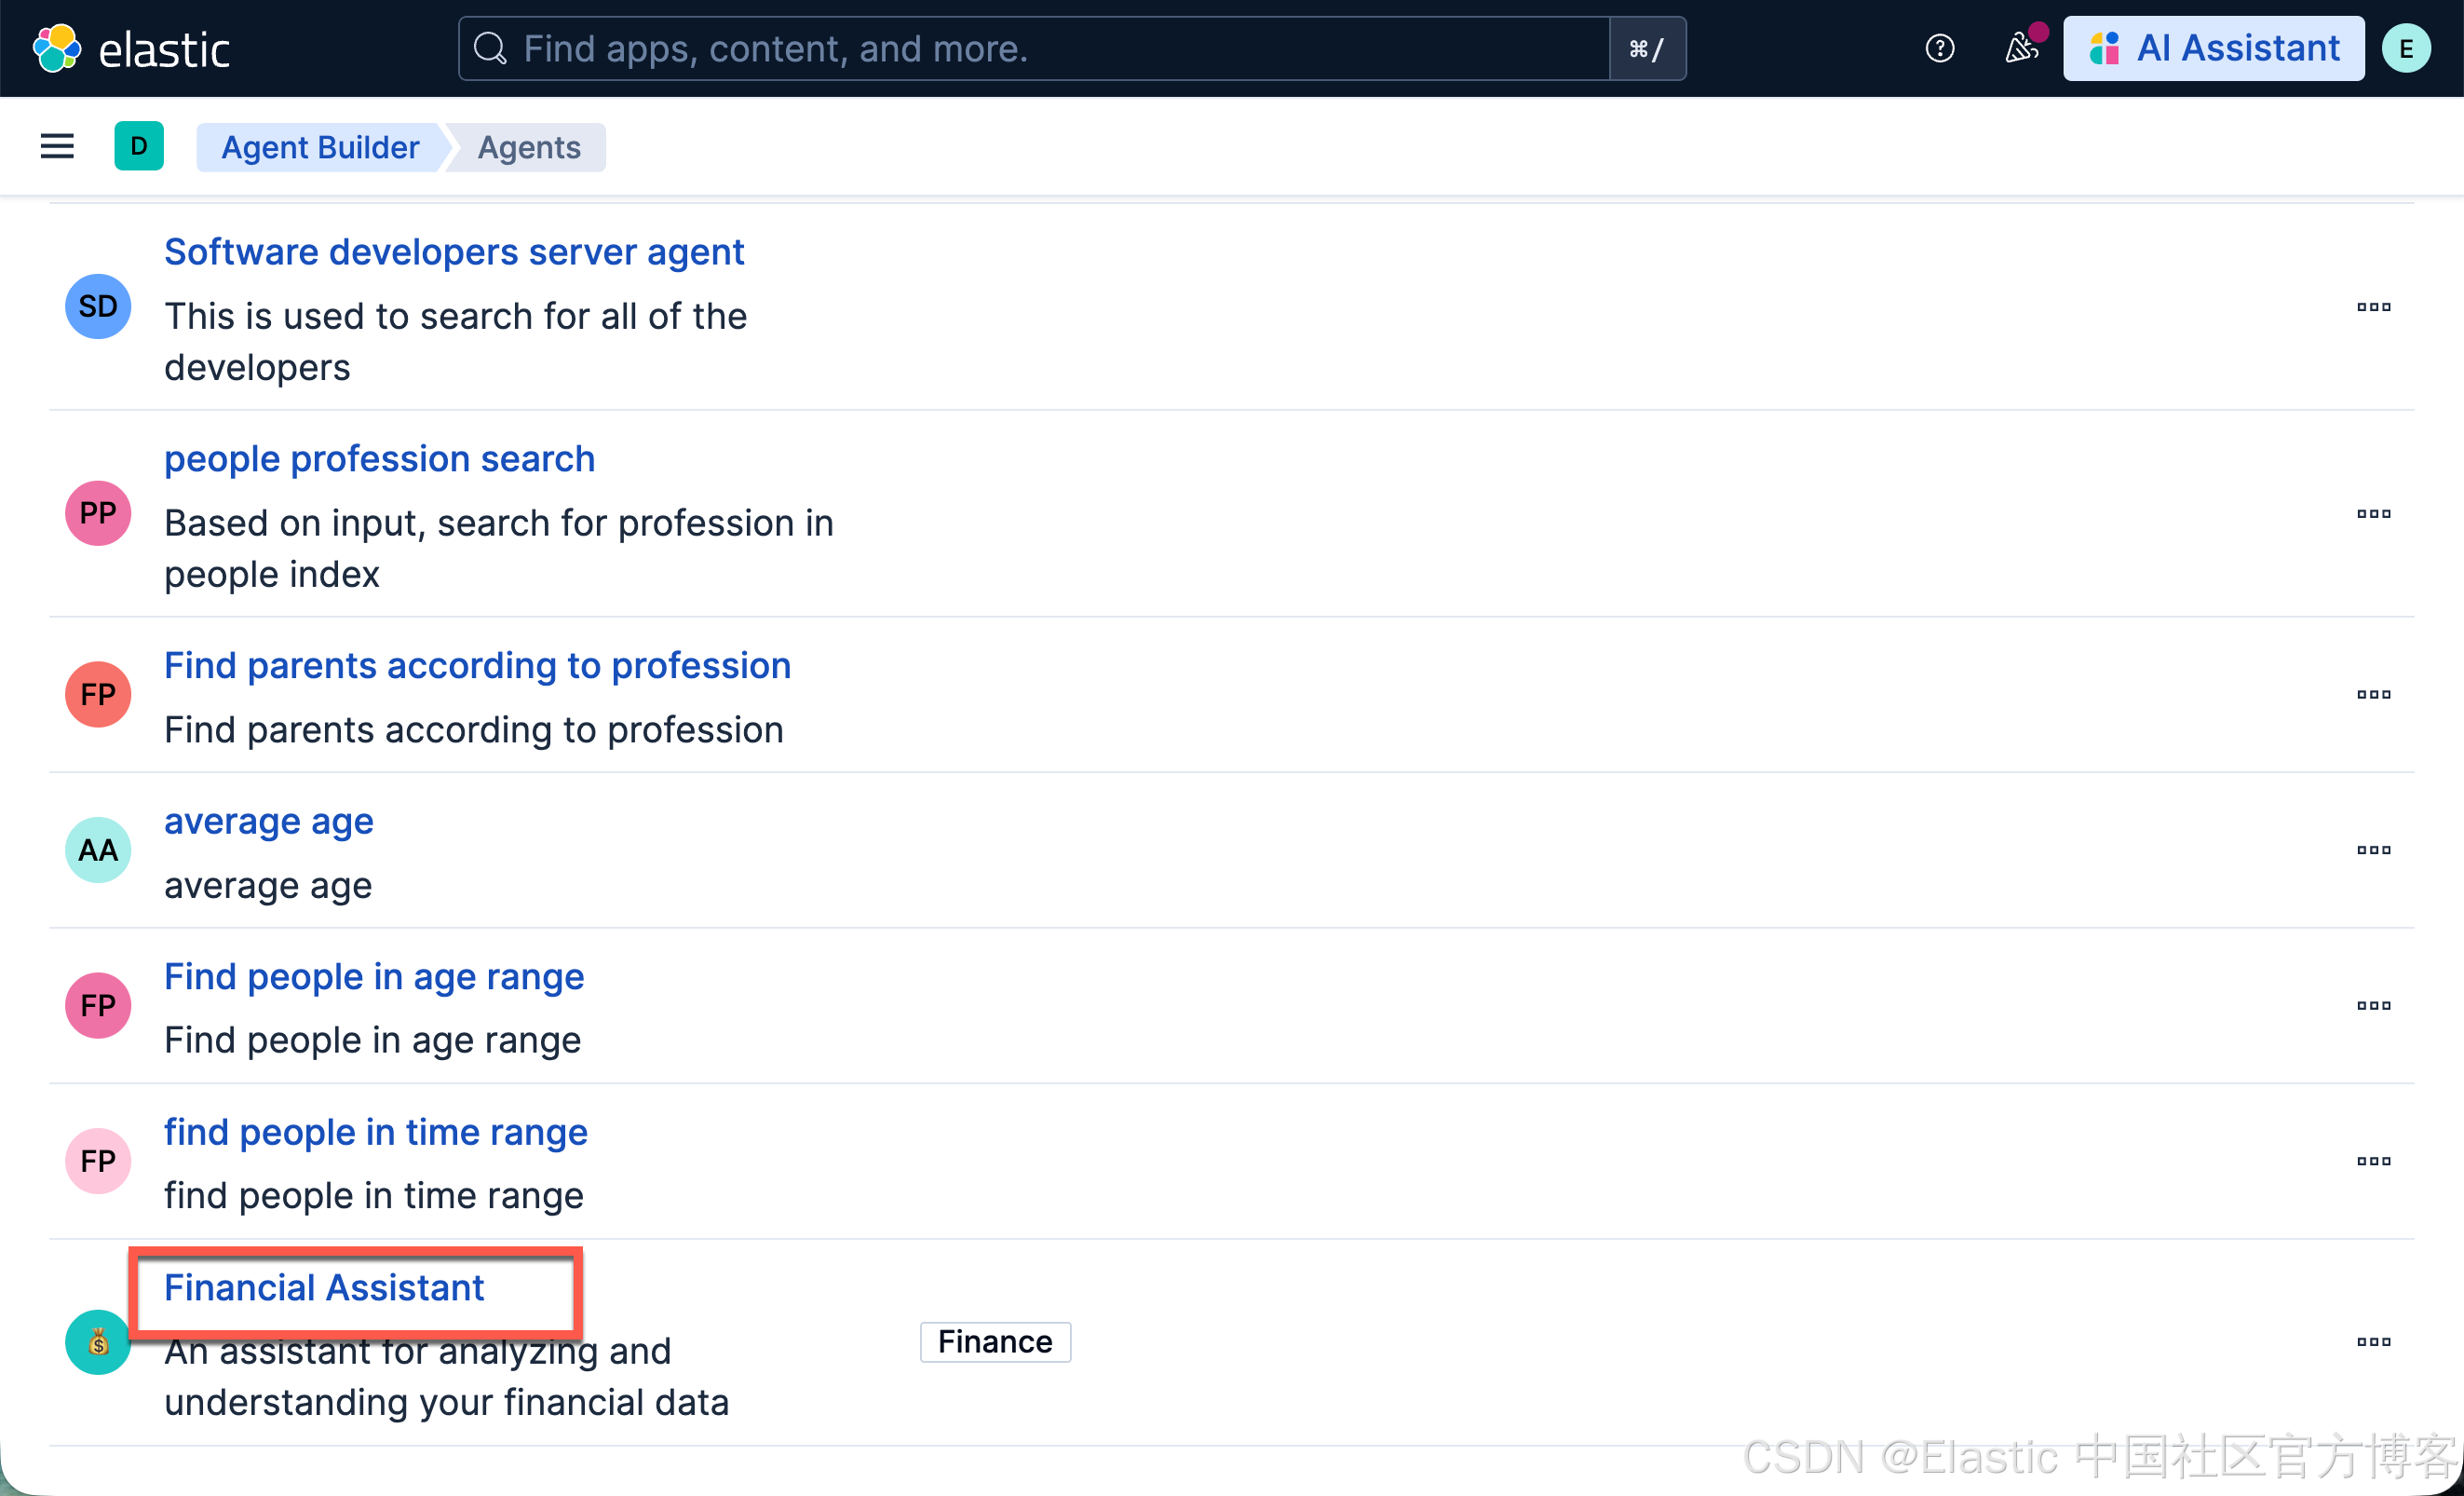
运行完上面的命令后,我们可以查看:
第 4 部分:成果!— 与 Agent 对话
现在一切都准备好了。我们已经有了逻辑(Tool)和专家人格(Agent)。是时候向我们的 Financial Assistant agent 提出博客文章中的复杂多步骤问题,并看看它的表现了。
我们将把问题发送到 /api/agent_builder/converse 端点,并确保指定我们 agent 的 ID。
# First, define the complex question we want to ask.
# user_question = "Who has the highest account value and what is their highest valued individual asset?"
user_question = "I'm worried about market sentiment. Can you show me which of our clients are most at risk from bad news?"

# Next, construct the request body for the /api/agent_builder/converse endpoint.
# It's crucial that we specify the `agent_id` so we talk to our custom agent.
chat_request_body = {
    "input": user_question,
    "agent_id": agent_id,  # Using the agent_id variable from the previous section
}


print(f"✅ Chat request for agent '{agent_id}' is ready.")
display(JSON(chat_request_body))
# Now, let's send the request and start the conversation!
# This single API call will trigger the agent's complex reasoning process.

display(Markdown(f"### 💬 Asking: '{user_question}'"))

chat_response = None  # Initialize variable to store the response

try:
    response = requests.post(
        f"{kb_url}/api/agent_builder/converse", headers=HEADERS, json=chat_request_body
    )
    response.raise_for_status()

    chat_response = response.json()
    print("✅ Agent responded successfully! See the analysis in the next cell.")

except requests.exceptions.RequestException as e:
    print(f"❌ Chat request failed: {e.response.text}")
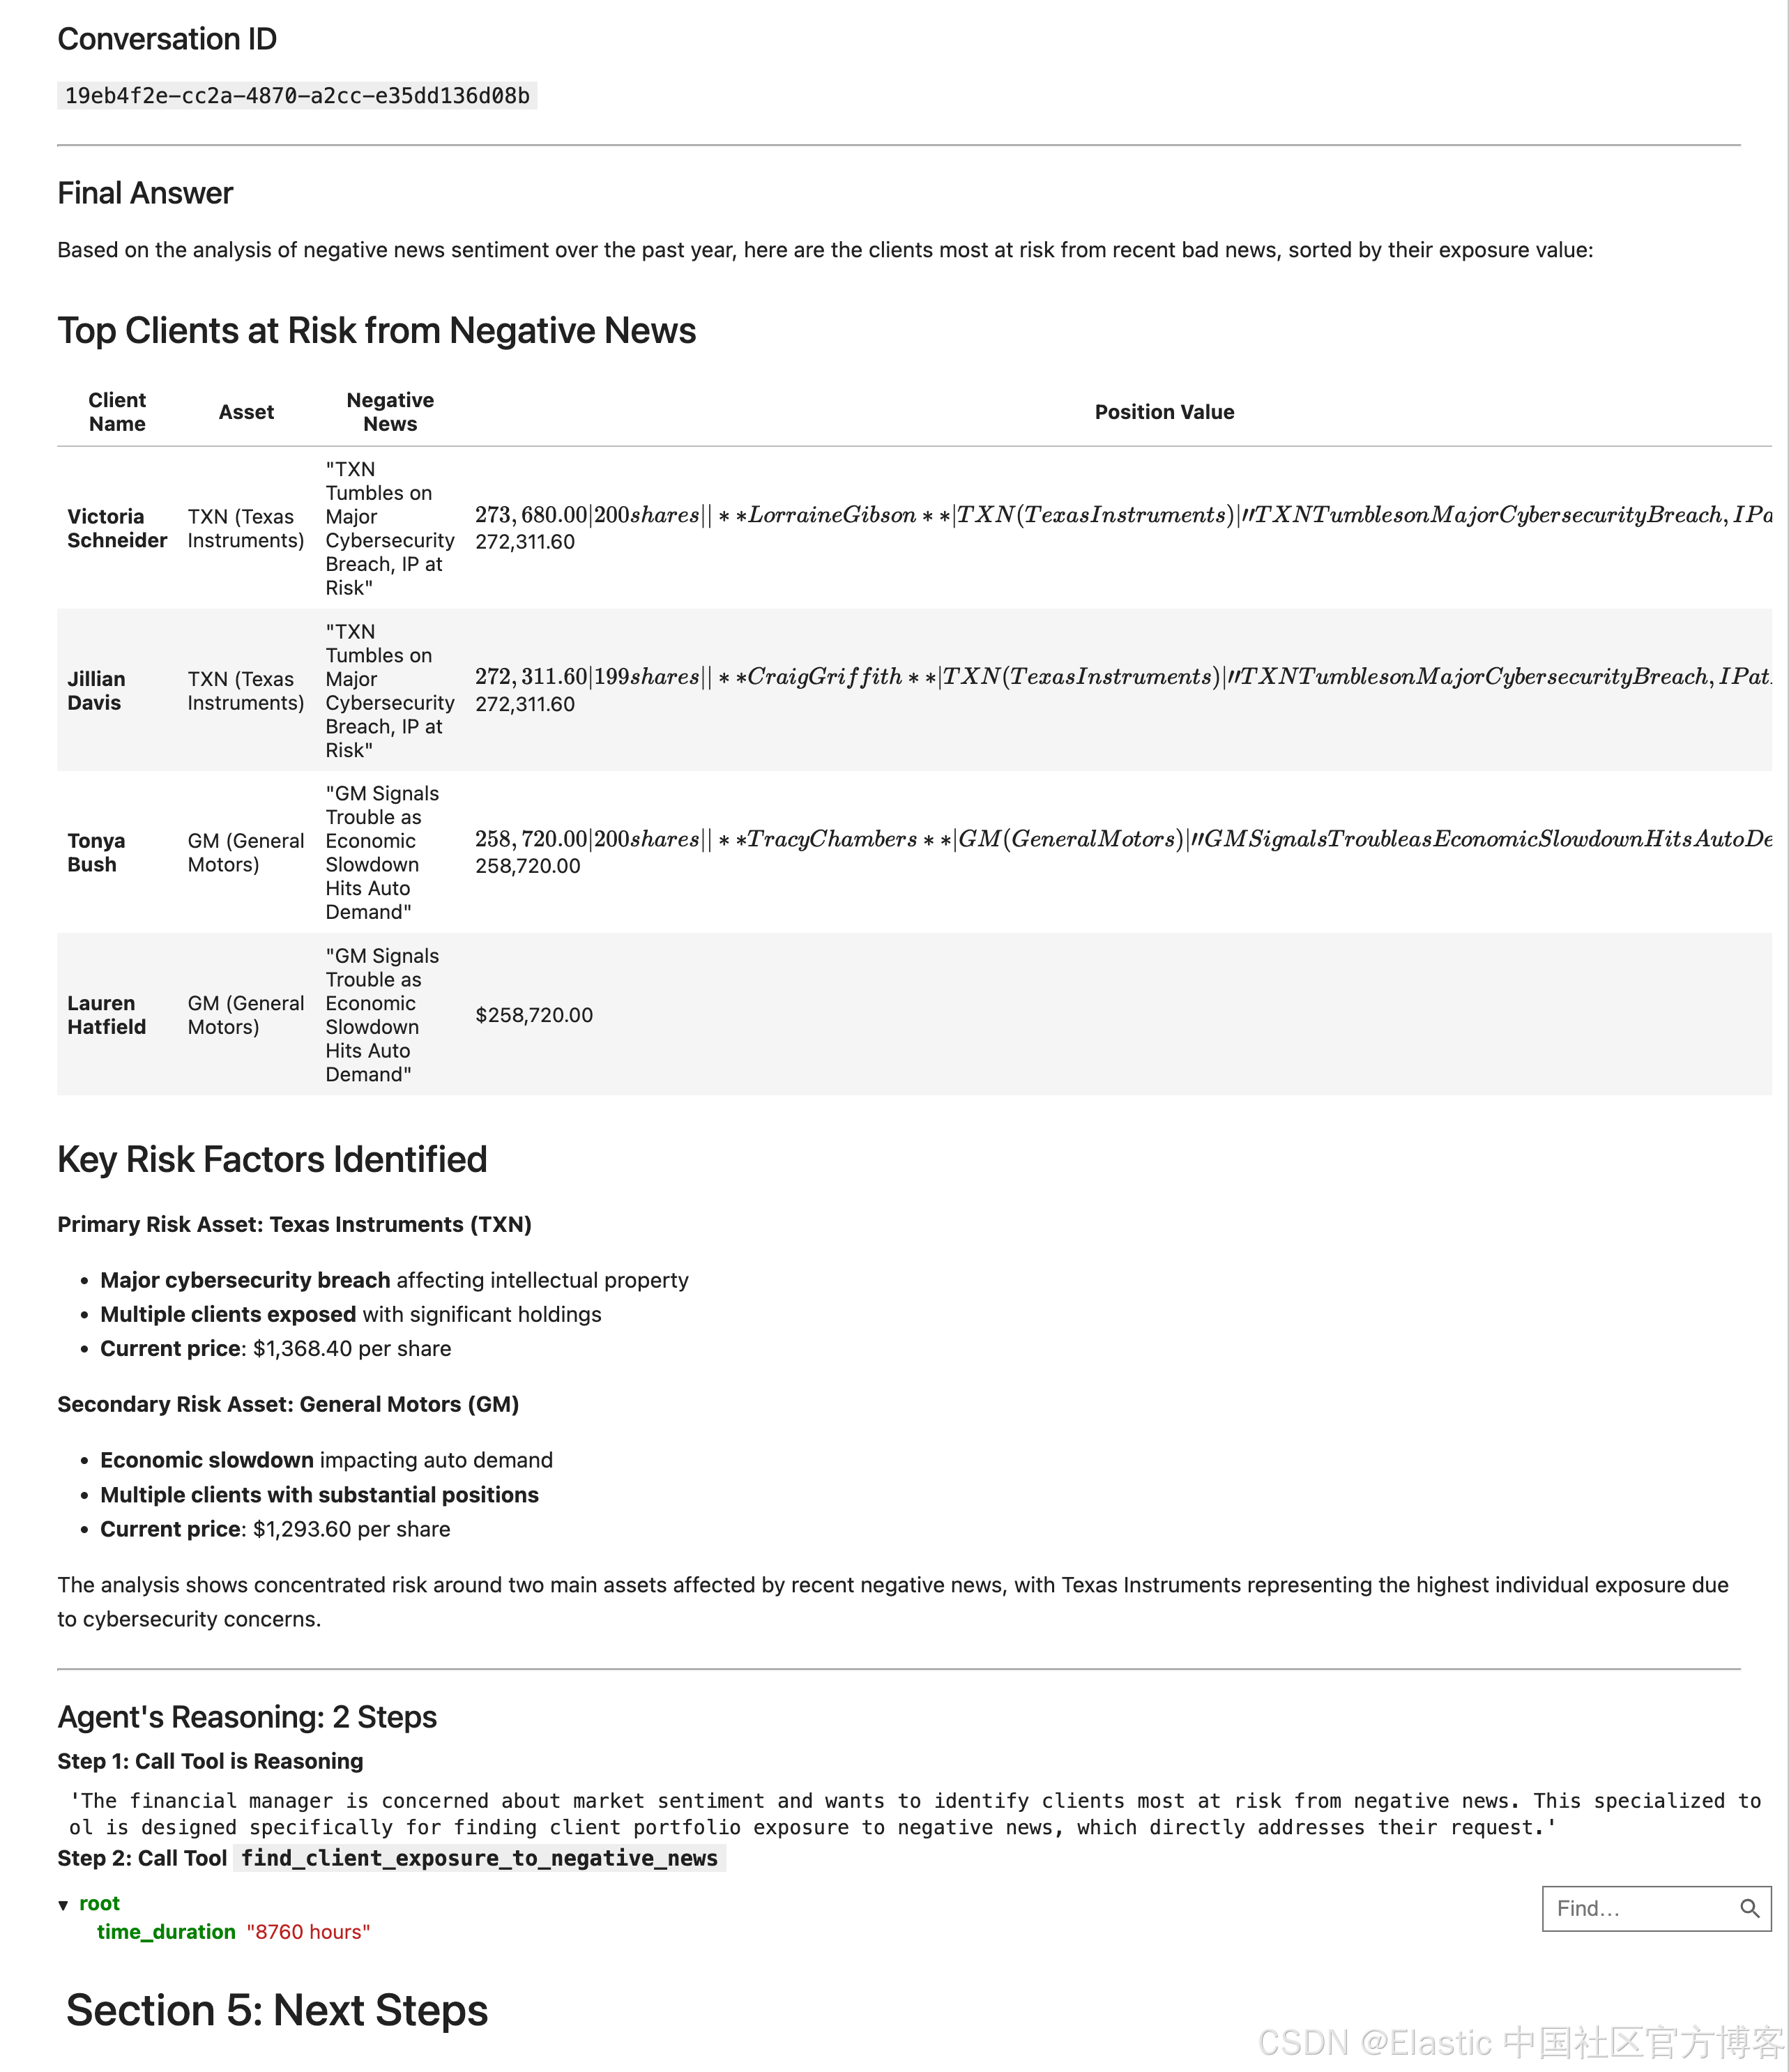
分析响应
agent 的响应包含三个关键部分:
-
Conversation ID :用于继续该特定聊天线程的唯一 ID。
-
Final Message :按我们在提示中要求的,作为可供人类阅读的答案,使用 Markdown 格式化。
-
Steps :代理的“思考过程”详细日志,显示它调用的每个 tool 及其使用的参数,以得出答案。
chat_response["steps"]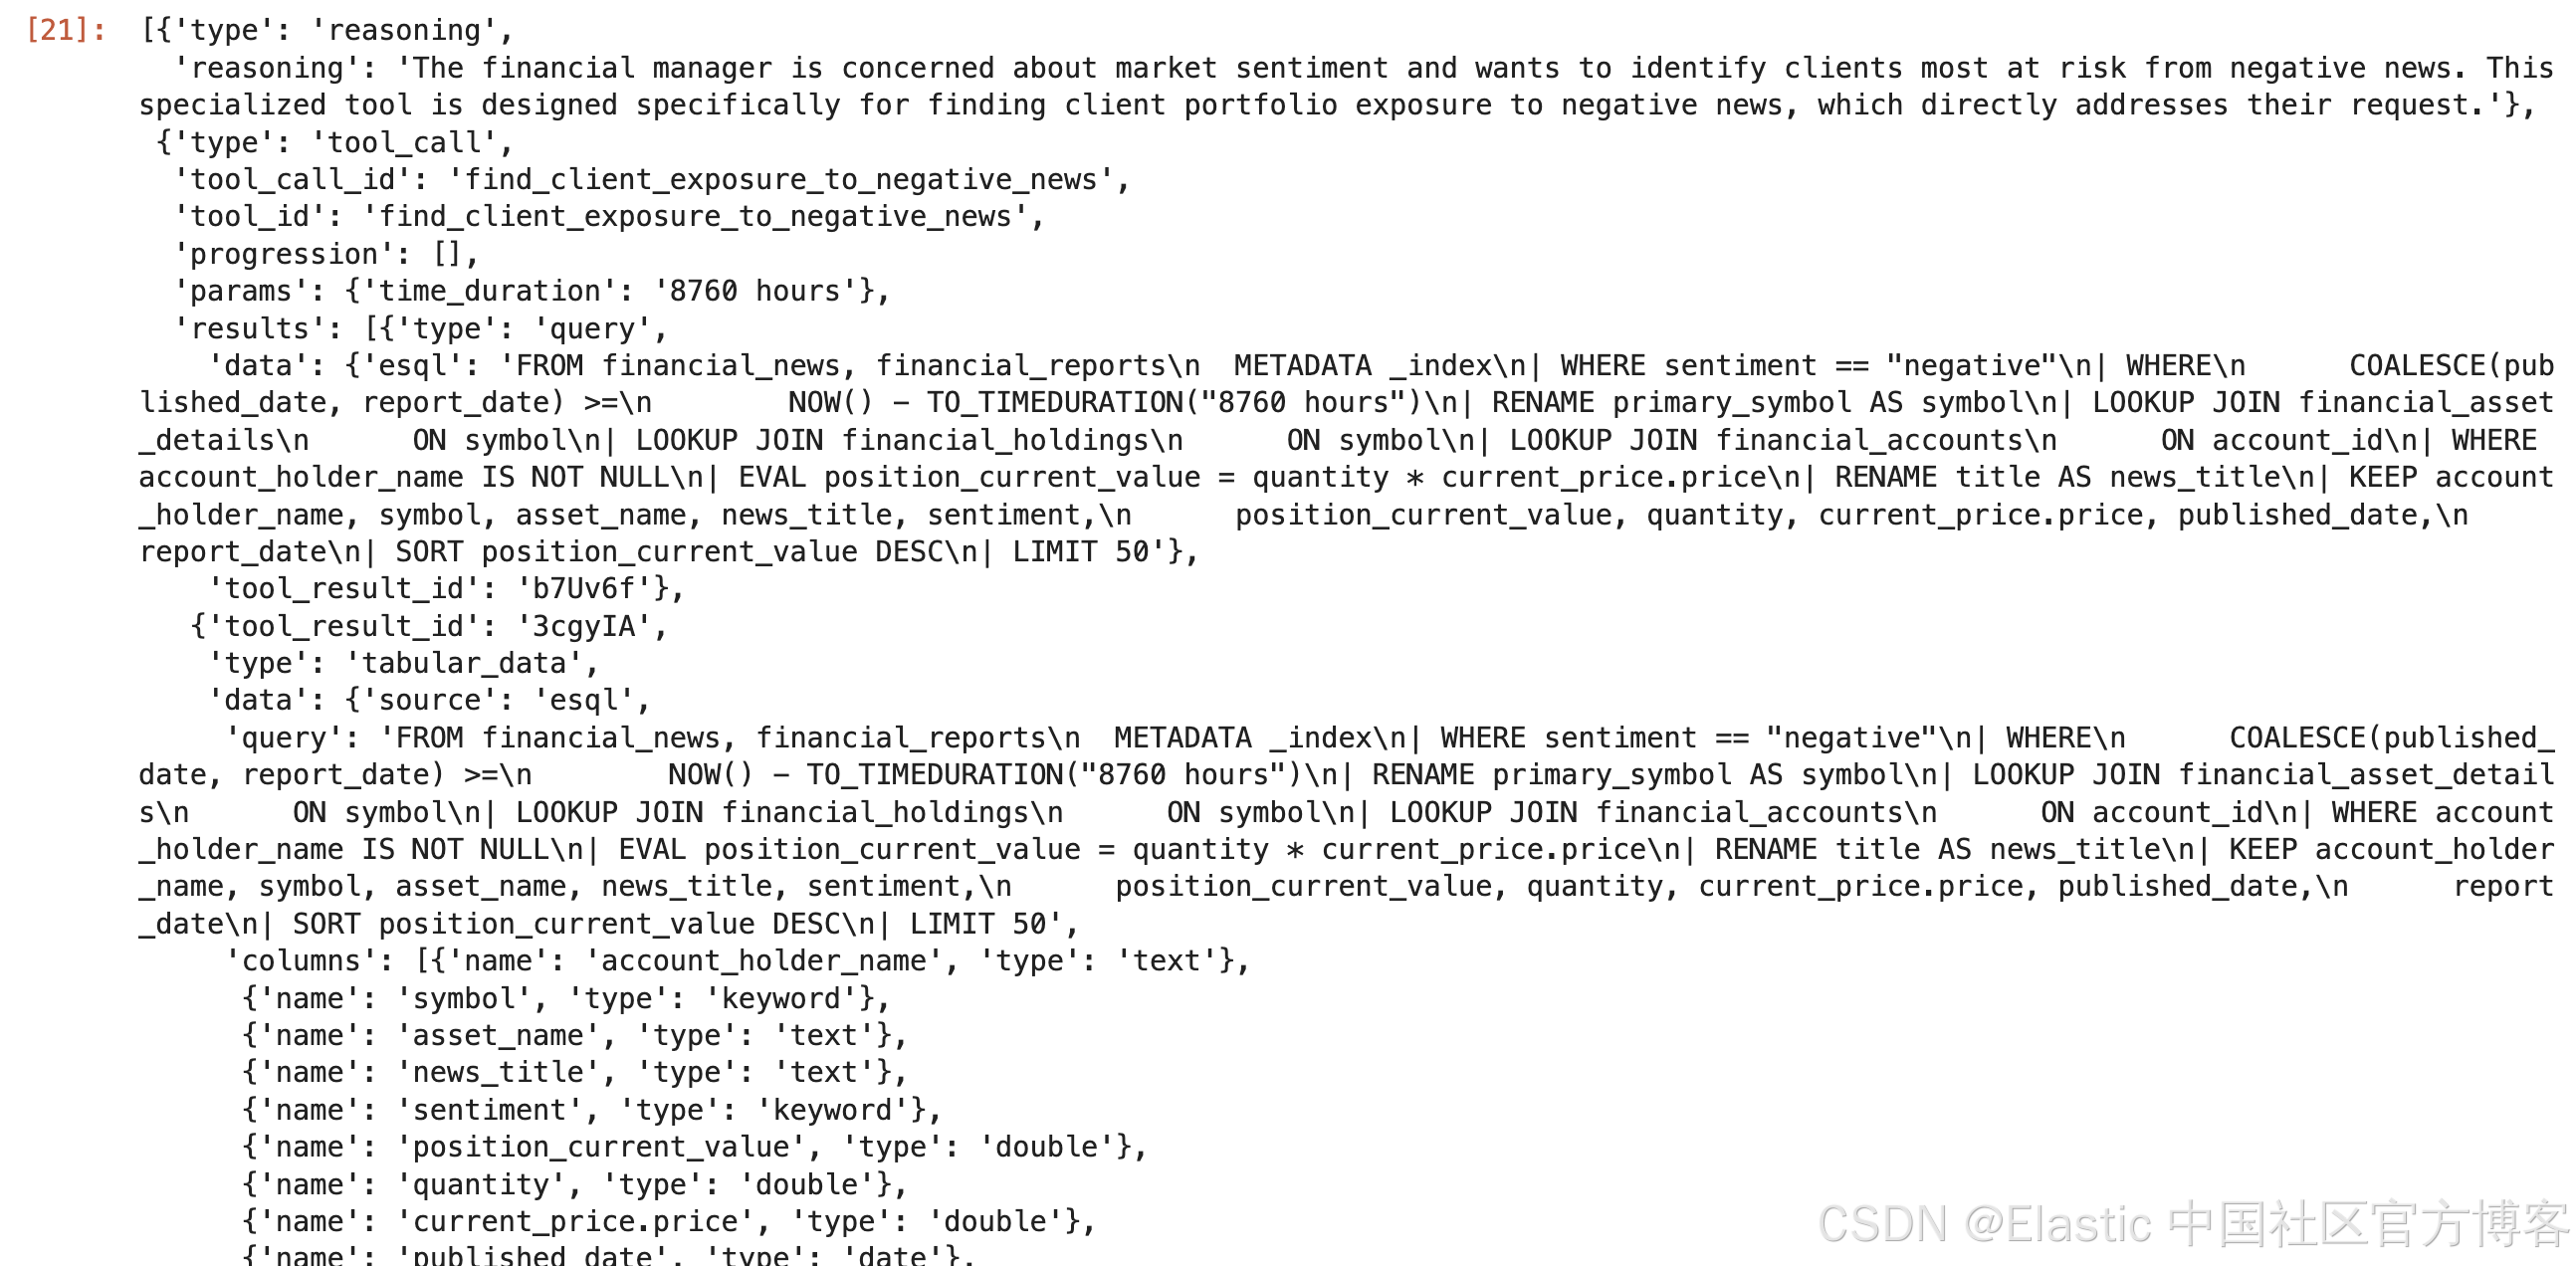
chat_response.keys()dict_keys(['conversation_id', 'steps', 'response'])steps = chat_response.get("steps", [])
for i, step in enumerate(steps):
print(step)
tool_id = step.get("tool_id")
tool_params = step.get("params", {})
display(Markdown(f"**Step {i+1}: Call Tool `{tool_id}`**"))
display(JSON(tool_params))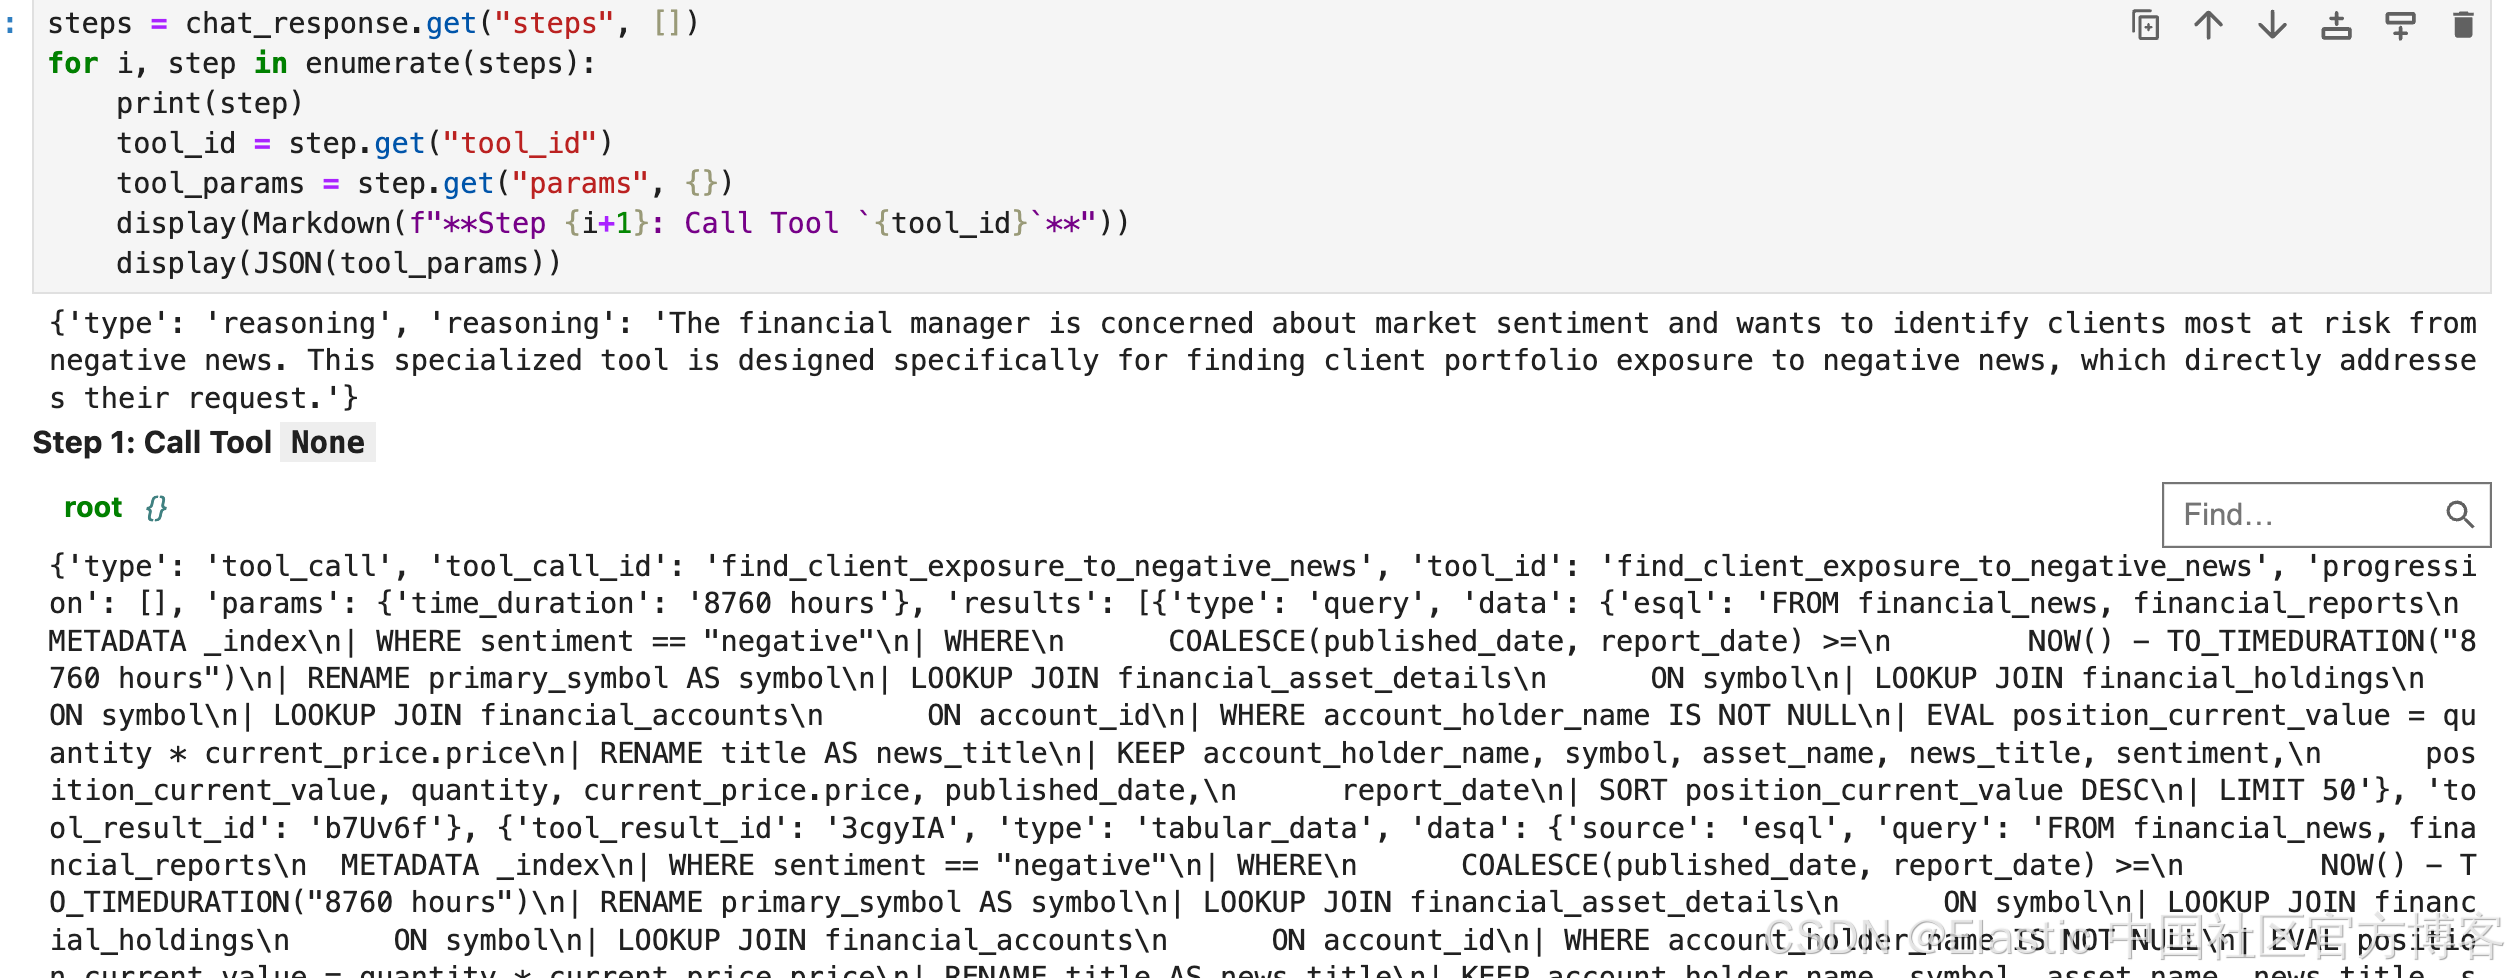
# Let's parse the response from the previous cell and display each part clearly.

if chat_response:
    # 1. Print the Conversation ID
    conversation_id = chat_response.get("conversation_id")
    display(Markdown(f"### Conversation ID\n`{conversation_id}`"))

    # 2. Display the final, formatted message
    final_message = chat_response.get("response", {}).get(
        "message", "No message found."
    )
    display(Markdown("---"))
    display(Markdown(f"### Final Answer\n{final_message}"))
    display(Markdown("---"))

    # 3. Show the agent's step-by-step reasoning
    steps = chat_response.get("steps", [])
    display(Markdown(f"### Agent's Reasoning: {len(steps)} Steps"))

    for i, step in enumerate(steps):
        if step.get("type") == "reasoning":
            display(Markdown(f"**Step {i+1}: Call Tool is Reasoning**"))
            display(step.get("reasoning"))
        elif step.get("type") == "tool_call":
            tool_id = step.get("tool_id")
            tool_params = step.get("params", {})
            display(Markdown(f"**Step {i+1}: Call Tool `{tool_id}`**"))
            display(JSON(tool_params))

else:
    print(
        "⚠️ Chat response variable is empty. Please run the previous cell successfully."
    )
连接到 Claude Desktop
我们知道在 Kibana 中已经创建了一个 MCP 服务器。它的地址是:http://localhost:5601/api/agent_builder/mcp。我们针对 Claude Desktop 来做如下的配置:
{
  "mcpServers": {
    "elastic": {
      "command": "npx",
      "args": [
        "mcp-remote",
        "http://localhost:5601/api/agent_builder/mcp",
        "--header",
        "Authorization:${AUTH_HEADER}"
      ],
      "env": {
        "AUTH_HEADER": "ApiKey UUxydW41b0JGQVVCVjdnb3Y0RGU6a1JOUGhLNnU1V3pJRTkxTHhIYmFaZw=="
      }
    }
  }
}
你需要根据自己的培训进行相应的修改。我们可以参考文章 “使用 MCP 将代理连接到 Elasticsearch 并对索引进行查询” 来配置 Claude Desktop:
我们可以看到所有的 tools。接下来,我们打入我们的查询:
I'm worried about market sentiment. Can you show me which of our clients are most at risk from bad news?

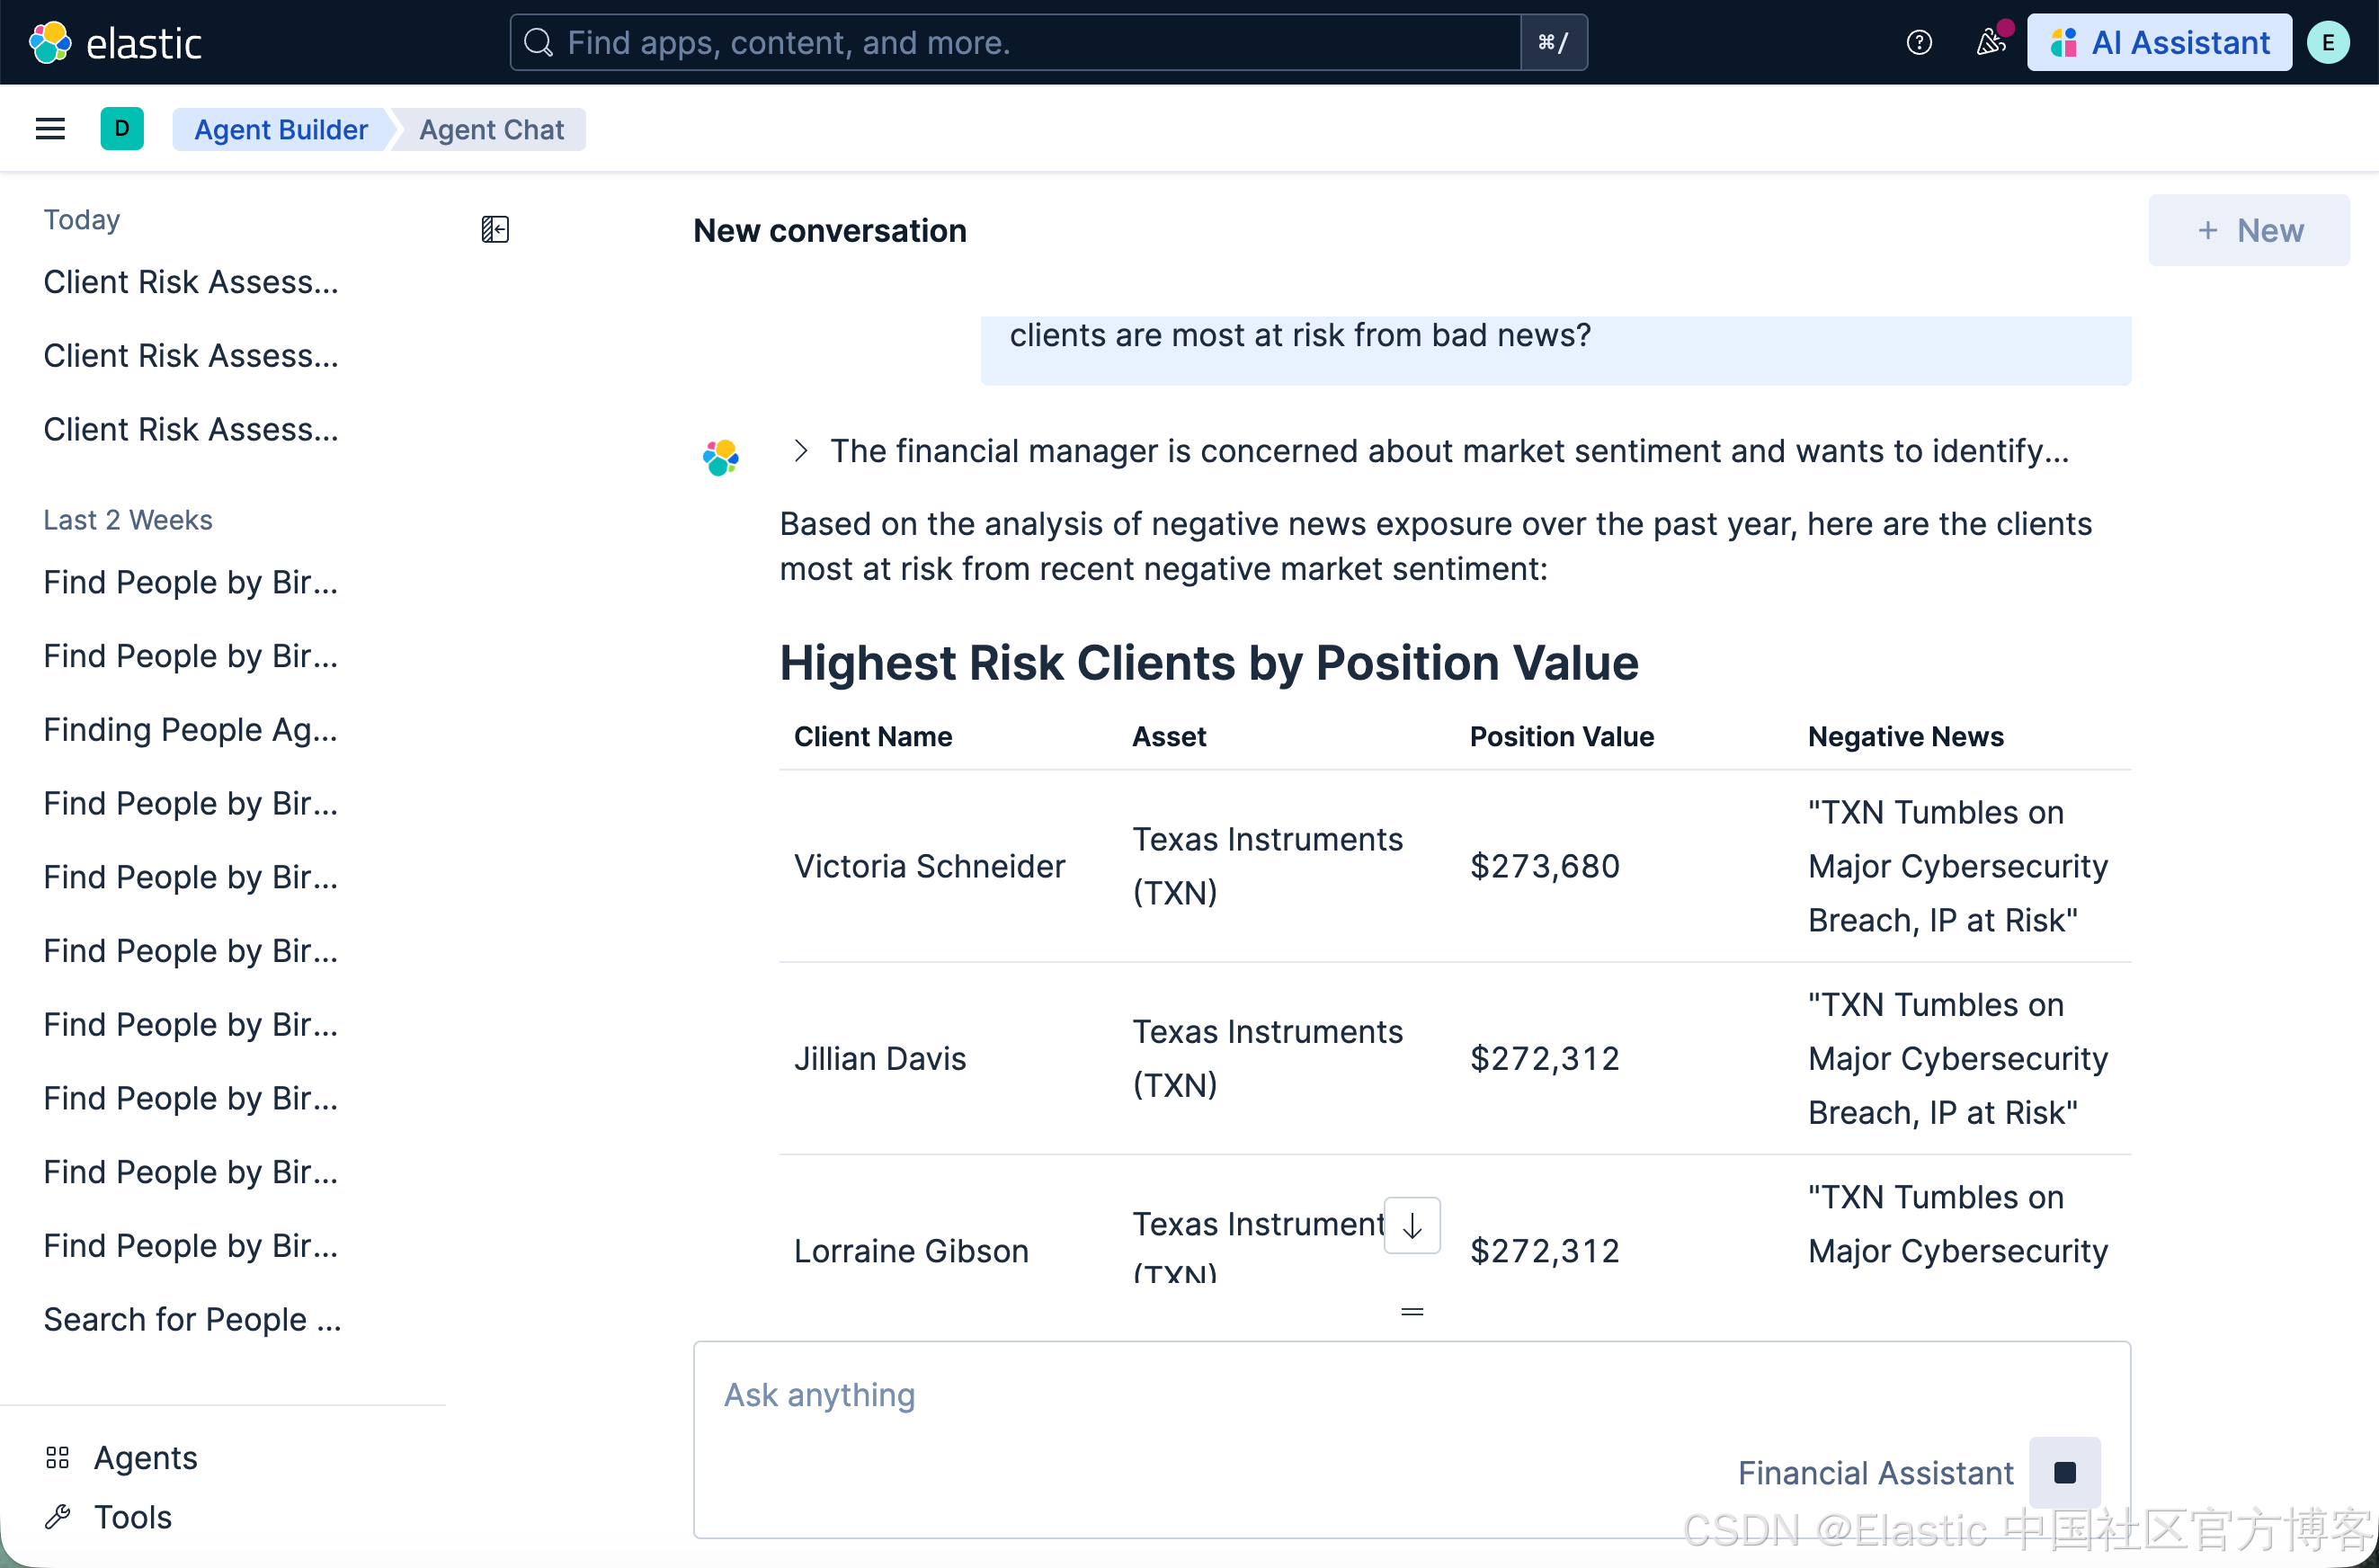
上面显示的结果和我们之前在 Notebook 里显示的是一样的。
在 Kibana 的 Agent 界面中进行查询
我们回到 Kibana 的 Agent 界面,并打入我们的查询:
I'm worried about market sentiment. Can you show me which of our clients are most at risk from bad news?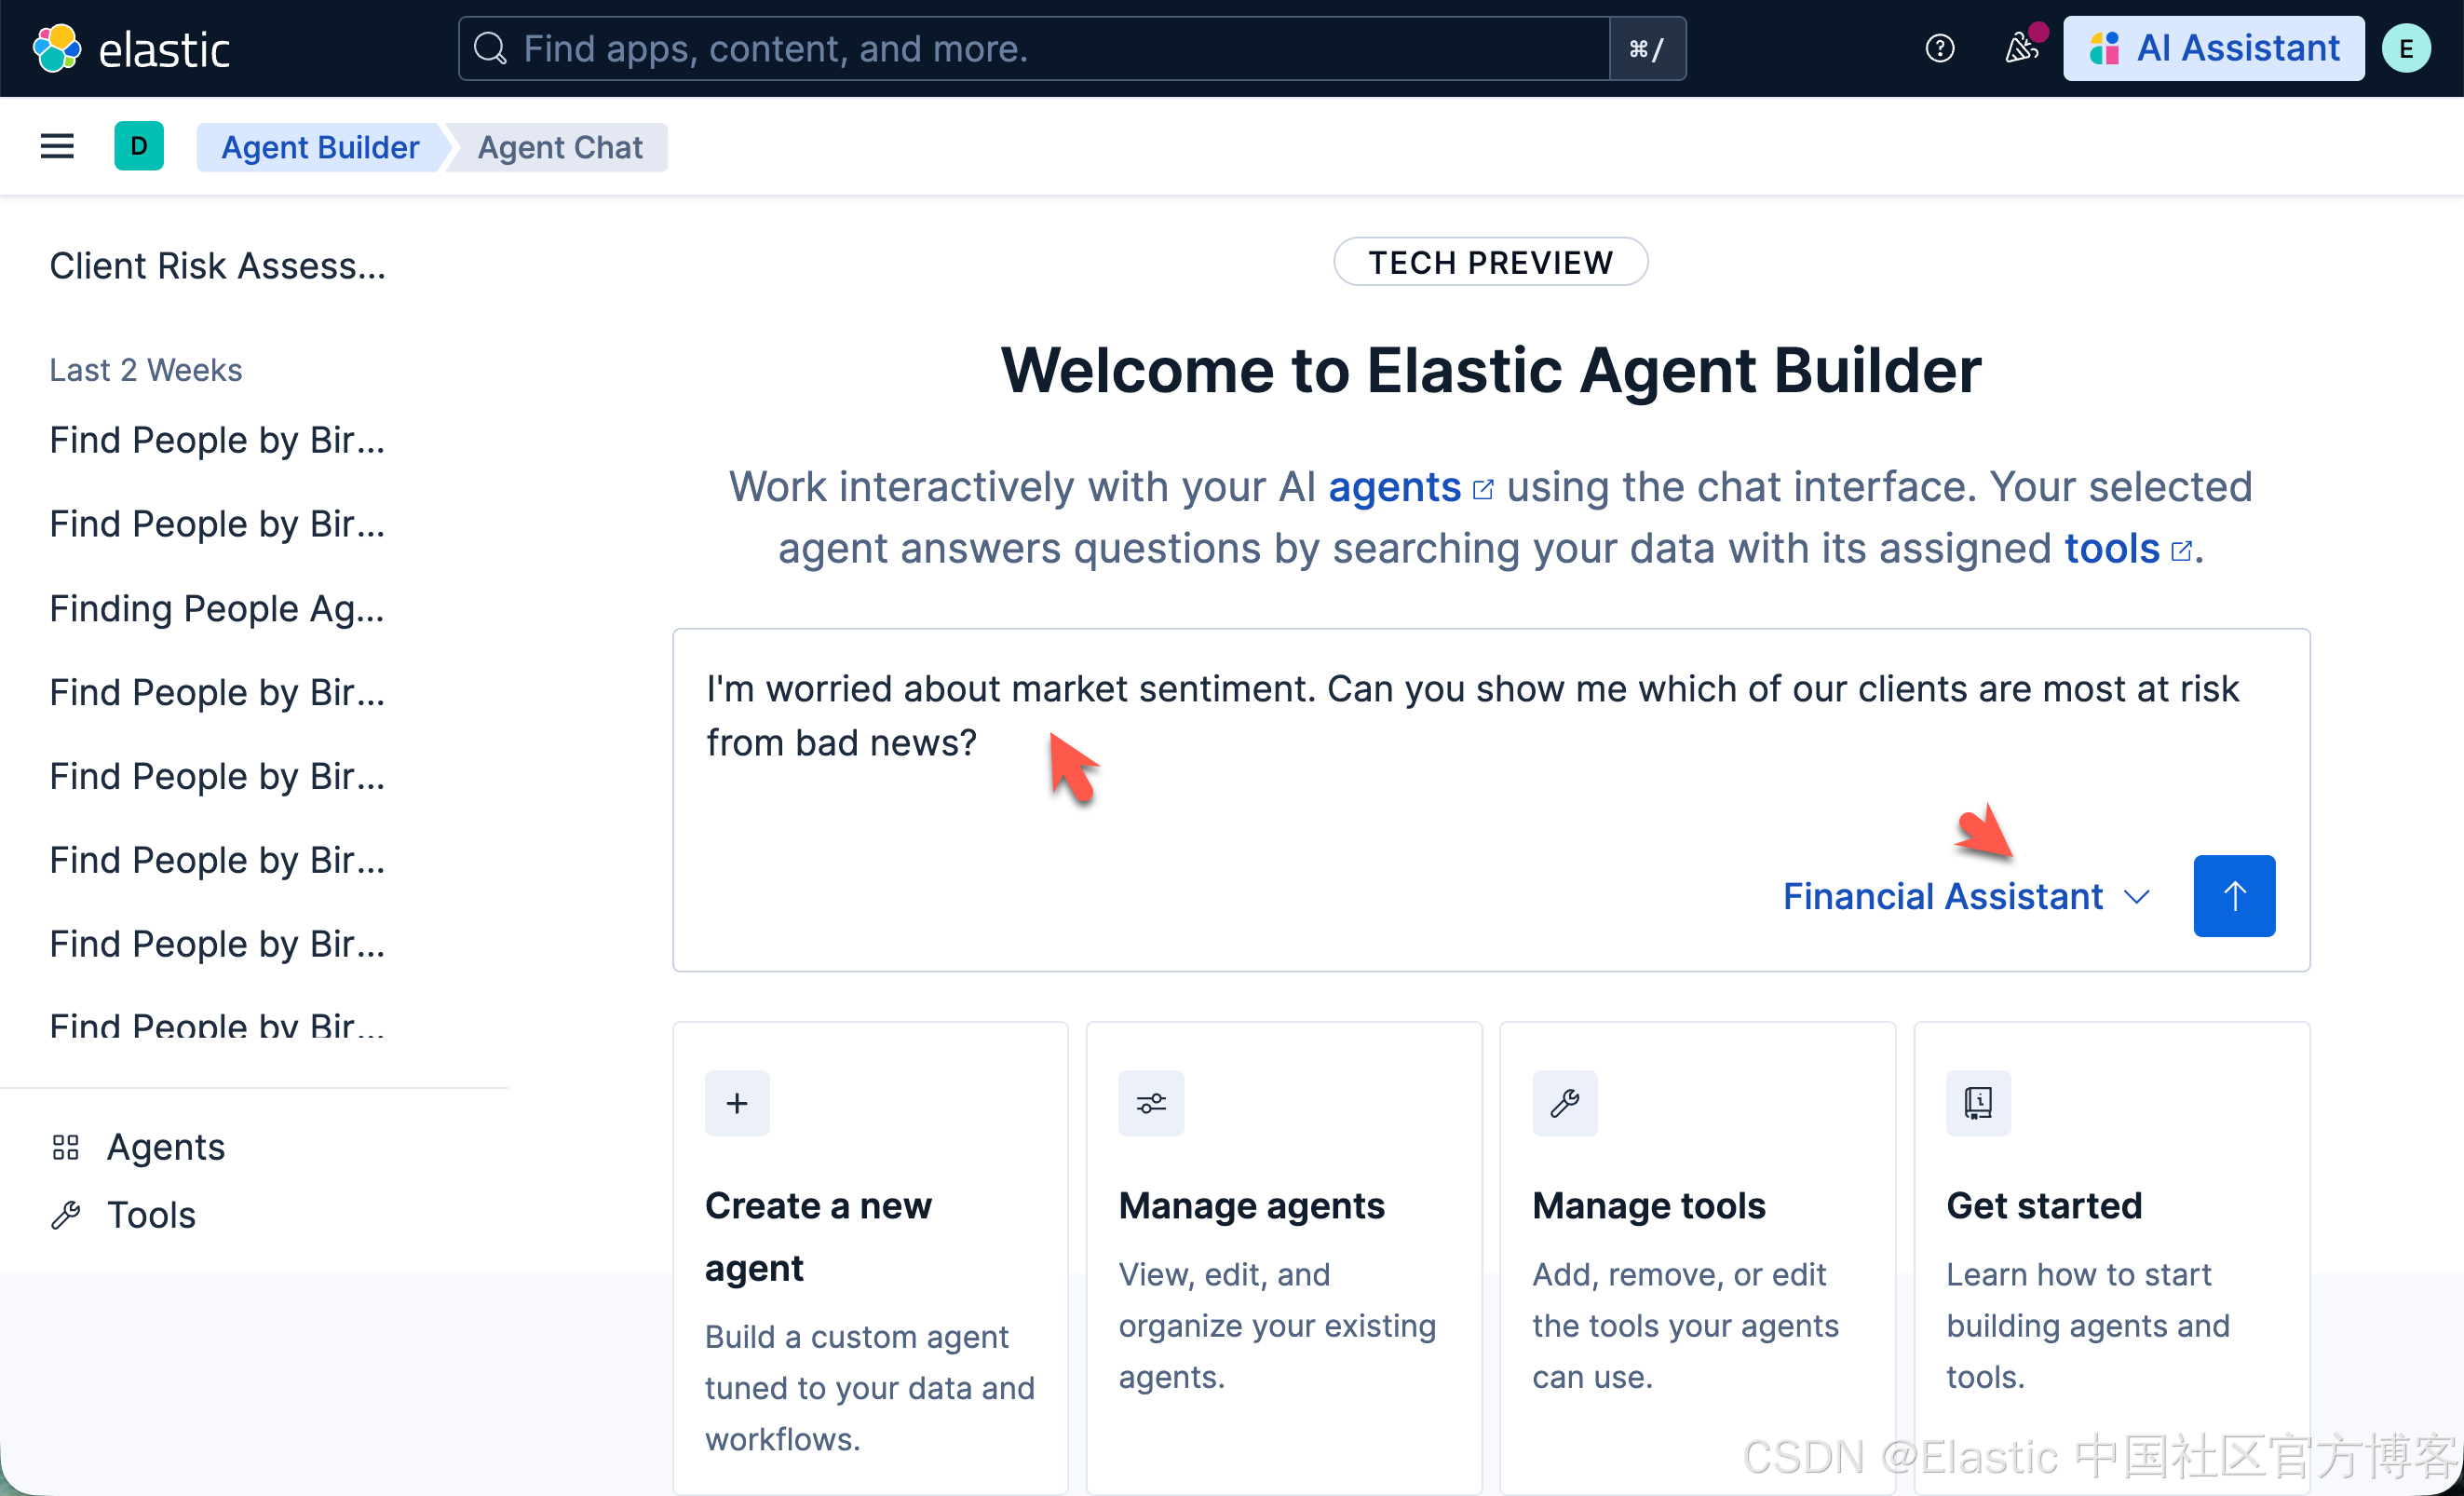


 1910
1910

 被折叠的 条评论
为什么被折叠?
被折叠的 条评论
为什么被折叠?
 到【灌水乐园】发言


