 Filebeat技术解析与实战指南


Beats核心架构解析
Beats是Elastic Stack生态体系中轻量级数据采集器的统称,其官方定位为:Lightweight Data Shippers for Collecting and Shaping Operational Data to Elasticsearch
相较于Logstash基于JVM的实现方案,Beats的核心优势体现在:
-
轻量化设计:
- 基于Go语言编译生成原生可执行文件
- 单二进制部署无运行时依赖
- 启动速度达到毫秒级(传统Logstash需5-15秒)
- 内存消耗仅为Logstash的1/10(典型场景10-50MB)
-
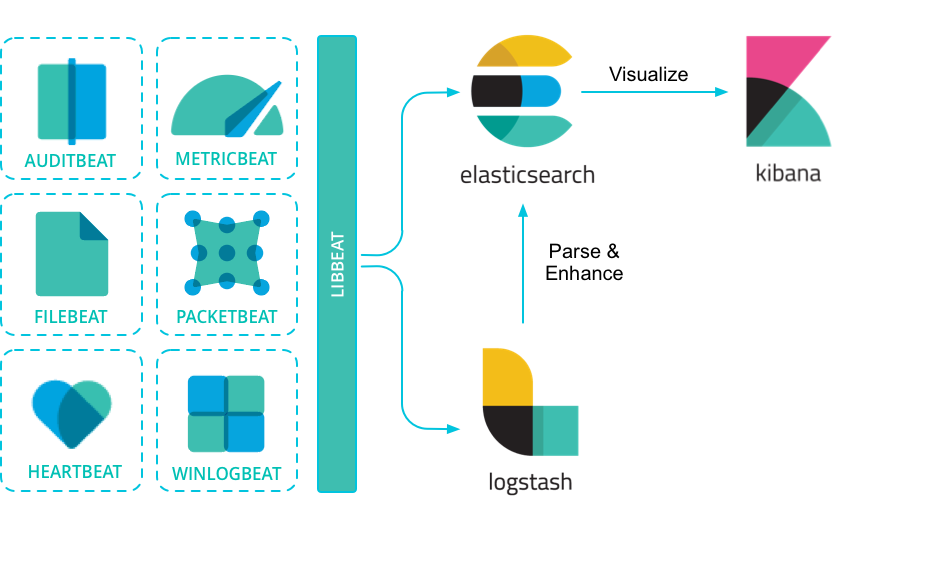
多源数据采集:
- Packetbeat:网络抓包分析(支持HTTP/MySQL/Redis等协议)
- Filebeat:日志文件采集(支持多行日志合并与JSON解析)
- Metricbeat:系统指标采集(CPU/内存/磁盘等)
- Winlogbeat:Windows事件日志采集
-
数据流架构:
[数据源] → [Beats Agent] → [Logstash(可选)] → [Elasticsearch] → [Kibana]Logstash在架构中承担数据转换角色(如Grok解析、字段处理),而Beats专注高效采集
4. 极简资源占用:基于Go语言开发,编译为单文件二进制程序:
# 典型部署命令(Linux)
wget https://artifacts.elastic.co/downloads/beats/filebeat/filebeat-8.7.0-linux-x86_64.tar.gz
tar -zxvf filebeat-*.tar.gz
./filebeat -e -c filebeat.yml # 启动进程
- 内存消耗仅为Logstash的1/10(实测<50MB)
- 无JVM依赖,跨平台部署效率提升300%
-
模块化数据源支持:
Beat类型 数据源 典型应用场景 Packetbeat 网络流量抓包 网络性能监控、安全审计 Filebeat 日志文件 应用日志收集(核心重点) Metricbeat 系统/服务指标 基础设施监控 Winlogbeat Windows事件日志 安全事件分析 -
弹性数据管道:
- Logstash路由场景:需复杂数据处理(如Grok解析、字段转换)
- ES直连场景:配合Ingest Node实现轻量级处理(5.x+版本核心特性)
Filebeat基础操作演示及调试技巧
1 ) 测试配置示例:
filebeat.yml 核心配置
filebeat.inputs:
- type: stdin   # 从标准输入读取数据
  tags: ["test"] # 添加标签
  fields:
    name: Alfred # 添加自定义字段
  fields_under_root: true # 字段置于根层级

output.console: # 输出到控制台
  pretty: true
2 ) 执行与调试:
./filebeat -e -c filebeat.yml
- 输入
ABC输出效果:{ "@timestamp": "2023-10-05T08:00:00.000Z", "message": "ABC", "tags": ["test"], "name": "Alfred" // fields_under_root=true时字段在根节点 }
3 ) 关键参数验证:
fields_under_root=false时,字段移至fields子对象:"fields": {"name": "Alfred"}- JSON解析:添加
json.keys_under_root: true,输入{"name": "Alfred"}直接解析为根字段;非法JSON触发error.message字段。 - 调试模式:
-d "publish"输出事件发布细节,结合output.elasticsearch时可预览发送至ES的数据结构。
Filebeat核心技术解析
1 ) 核心特性:
- 数据完整性:基于注册表文件(
registry)记录采集状态,确保日志at least once传输,极端情况下可能重复 - 多行日志处理:通过
multiline.pattern合并堆栈跟踪等跨行事件 - 原生JSON支持:
json配置项直接解析日志,跳过Logstash处理环节,提升吞吐量 - 字段级过滤:支持
include_fields/drop_fields控制事件输出字段
2 ) 核心工作机制
Filebeat采用双级管道架构保障数据完整性:
- Prospector:监视日志路径变化(支持Glob模式)
- Harvester:负责单个文件内容读取
- Spooler:事件聚合与状态管理
- Output:数据输出(支持批量发送)
简洁版架构:
3 ) 关键特性实现
-
At-Least-Once语义:
- 状态寄存器(Registry File)持久化读取位置
- ACK机制确保数据成功送达
- 重试队列应对网络波动
-
智能日志处理:
# 多行日志合并配置 multiline: pattern: '^\d{4}-\d{2}-\d{2}' # 新日志行起始模式 match: after # 向后合并 negate: true # 非匹配行视为续行 -
JSON预处理:
json.keys_under_root: true   # 解析字段提升至根层级
json.add_error_key: true     # 解析失败添加错误标记
4 ) 配置深度优化
# filebeat.yml 最佳实践配置
filebeat.inputs:
- type: log
  paths: [/var/log/app/*.log]  # Glob路径支持
  fields: {env: "production", app: "order-service"}
  fields_under_root: true      # 字段提升至根节点
  json.message_key: "log"      # JSON日志解析键

setup.template:
  name: "app-log-template"     # 自定义索引模板
  pattern: "app-logs-*"        # 索引模式匹配
  overwrite: true              # 模板更新策略

output.elasticsearch:
  hosts: ["es-node1:9200", "es-node2:9200"]
  pipeline: "log_processor"    # ES预处理管道
5 ) 索引模板管理:
- 动态生成模板命令:
filebeat export template > template.json - 字段映射核心配置(
fields.yml):- name: nginx.access.response_code type: integer description: "HTTP响应状态码" - name: client.geo.location type: geo_point # 地理空间数据类型
6 )数据处理原则:
- 非侵入式采集:原始日志不经处理直接转发,保持数据真实性
- 至少一次交付(At-Least-Once Delivery):通过注册表文件(
registry)记录采集位置:# filebeat.yml 关键配置 filebeat.registry.path: /var/lib/filebeat/registry filebeat.registry.flush: 10s # 状态刷新间隔 - 复杂日志处理能力:
- 多行事件合并(Java堆栈跟踪等)
- JSON原生解析(避免Logstash转发开销)
- 条件过滤(支持
drop_event处理器)
7 ) 数据处理流程:
- Prospector:监控日志路径(支持Glob模式),启动
harvester线程追踪文件变化。 - Harvester:逐行读取文件内容,发送至
spooler缓冲队列。 - 输出路由:经Libbeat输出至Elasticsearch/Logstash/Kafka等。
8 ) 配置模板关键项:
setup.template.name: "custom_template"
setup.template.pattern: "filebeat-*"
setup.template.fields: "${path.config}/fields.yml" # 字段类型定义
setup.dashboards.index: "filebeat-*" # Kibana仪表板索引
9 )字段映射示例(fields.yml):
- name: message
  type: text
  norms: false  # 关闭评分权重
- name: response_time
  type: float
操作命令:
- 导出配置:
./filebeat export config - 导出索引模板:
./filebeat export template > template.json - 最佳实践:禁用自带模板(
setup.template.enabled: false),通过ES API自定义Mapping以适配业务字段。
Elasticsearch Ingest Node技术实践
Ingest Node核心机制:
- 专属节点类型:通过
node.ingest: true启用,专司数据预处理 - Pipeline定义:由
processor链组成,支持Grok、Date、Script等40+处理器
1 ) 架构演进对比
| 方案 | 组件复杂度 | 延迟 | 资源开销 | 适用场景 | 组件链路 |
|---|---|---|---|---|---|
| Filebeat→Logstash | 高 | 中 | 高 | 复杂数据处理 | Filebeat → Logstash → ES → Kibana |
| Filebeat→Ingest | 低 | 低 | 低 | 轻量级预处理 | Filebeat → ES (Ingest) → Kibana |
2 ) Pipeline开发实践
Nginx日志解析管道:
PUT _ingest/pipeline/nginx_parser
{
  "description": "Parse Nginx access logs",
  "processors": [
    {
      "grok": {
        "field": "message",
        "patterns": [
          "%{IPORHOST:clientip} %{USER:ident} %{USER:auth} \\[%{HTTPDATE:timestamp}\\] \"%{WORD:verb} %{URIPATHPARAM:request} HTTP/%{NUMBER:httpversion}\" %{NUMBER:response:int} (?:%{NUMBER:bytes:int}|-)"
        ],
        "pattern_definitions": {
          "URIPATHPARAM": "%{PATH}(?:%{PARAM})?"
        }
      }
    },
    {
      "date": {
        "field": "timestamp",
        "formats": ["dd/MMM/yyyy:HH:mm:ss Z"],
        "target_field": "@timestamp"
      }
    },
    {
      "geoip": {
        "field": "clientip",
        "target_field": "geo"
      }
    },
    {
      "user_agent": {
        "field": "http_user_agent"
      }
    },
    {
      "remove": {
        "field": "message"
      }
    }
  ],
  # 错误处理
  "on_failure": [
    {
      "set": {
        "field": "error.message",
        "value": "{{ _ingest.on_failure_message }}"
      }
    }
  ]
}
实时调试技巧:
POST _ingest/pipeline/_simulate
{
  "pipeline": {...},  # 完整管道配置
  "docs": [
    {
      "_source": {
        "message": '192.168.1.1 - - [12/May/2023:09:15:32 +0000] "GET /index.html HTTP/1.1" 200 612'
      }
    }
  ]
}
3 ) 容错处理机制
{
  "on_failure": [
    {
      "set": {
        "field": "error.message",
        "value": "{{ _ingest.on_failure_message }}"
      }
    },
    {
      "redirect": {
        "dataset": "error_logs-{{ _ingest.timestamp }}"
      }
    }
  ]
}
4 )Filebeat集成Pipeline:
output.elasticsearch:
  hosts: ["es-server:9200"]
  pipeline: "nginx_parser"  # 指定Ingest Pipeline
Processor与Logstash插件对照:
| Logstash Plugin | ES Processor |
|---|---|
| grok | grok |
| date | date |
| useragent | user_agent |
| ruby | script (Painless) |
Filebeat Modules生产级应用
Module核心价值:
- 通过预置配置包解决四大步骤:
-
- Prospector定义 → 2. Index Template → 3. Ingest Pipeline → 4. Kibana仪表板
-
启用流程:
./filebeat modules list          # 查看可用模块
./filebeat modules enable nginx  # 启用Nginx模块
1 ) 模块化架构解析
filebeat.modules.d/
└── nginx.yml       # 模块启停开关
modules.d/
└── nginx/
    ├── access/
    │   ├── config/config.yml              # Prospector配置
    │   ├── ingest/pipeline.json           # Pipeline定义
    │   └── fields/fields.yml              # 字段映射
    ├──  kibana/dashboard/                 # 仪表板JSON定义
    └── manifest.yml                       # 模块元数据
自定义Module步骤:
- 复制
module目录结构至modules.d - 修改
config.yml中的日志路径变量 - 调整
pipeline.json适配业务日志格式 - 通过
./filebeat setup加载模板与仪表板
启用Nginx模块:
启用模块
filebeat modules enable nginx

导入资源
filebeat setup --pipelines --modules nginx
filebeat setup --dashboards

启动服务
filebeat -e
2 ) 自定义模块开发
-
字段映射定义:
- name: custom_app fields: - name: duration type: float description: "Request processing time in seconds" - name: upstream_addr type: group fields: - name: ip type: ip - name: port type: integer -
Ingest管道集成:
{
  "description": "Custom log processor",
  "processors": [
    {
      "dissect": {
        "field": "message",
        "pattern": "%{timestamp} [%{level}] %{trace_id} - %{msg}"
      }
    }
  ]
}
3 ) 开箱即用模块清单:
$ filebeat modules list
Enabled:
nginx         # Web服务器日志
mysql         # 慢查询日志
auditd        # Linux审计日志
Disabled:
cisco         # 网络设备日志
elasticsearch # ES集群日志
4 ) 模块四要素:
- 采集配置(
modules.d/nginx.yml) - 字段映射(
fields/module/nginx.yml) - Ingest管道(
ingest/nginx-access.json) - Kibana仪表盘(
kibana/7/dashboard/nginx.json)
启用流程:
filebeat modules enable nginx
filebeat setup --pipelines --modules nginx
filebeat setup --dashboards
工程示例:1
1 ) Filebeat日志采集方案
// src/logging/filebeat.config.ts
import { Transport } from 'winston';
import * as winston from 'winston';

export const createFilebeatTransport = (): Transport => {
  return new winston.transports.File({
    filename: '/var/log/nest-app/app.log',
    format: winston.format.combine(
      winston.format.timestamp(),
      winston.format.json()
    ),
    handleExceptions: true,
    maxsize: 1024 * 1024 * 100, // 100MB
    maxFiles: 10
  });
};

// main.ts
import { NestFactory } from '@nestjs/core';
import { WinstonModule } from 'nest-winston';
import { AppModule } from './app.module';
import { createFilebeatTransport } from './logging/filebeat.config';

async function bootstrap() {
  const app = await NestFactory.create(AppModule, {
    logger: WinstonModule.createLogger({
      transports: [createFilebeatTransport()]
    })
  });
  await app.listen(3000);
}
bootstrap();
Filebeat配置:
filebeat.inputs:
- type: log
  paths: ["/var/log/nest-app/*.log"]
  json.keys_under_root: true
  json.add_error_key: true

processors:
- add_fields:
    fields:
      service: "order-service"
      environment: "production"

output.elasticsearch:
  hosts: ["http://es-host:9200"]
  indices:
    - index: "app-logs-%{+yyyy.MM.dd}"
2 ) Elasticsearch Direct SDK方案
// src/elastic/elastic.provider.ts
import { Provider } from '@nestjs/common';
import { Client } from '@elastic/elasticsearch';

export const ELASTIC_SEARCH_PROVIDER = 'ELASTIC_SEARCH_CLIENT';

export const ElasticSearchProvider: Provider = {
  provide: ELASTIC_SEARCH_PROVIDER,
  useFactory: () => new Client({ node: 'http://es-host:9200' })
};

// src/logging/elastic-logger.service.ts
import { Inject, Injectable } from '@nestjs/common';
import { Client } from '@elastic/elasticsearch';

@Injectable()
export class ElasticLoggerService {
  constructor(
    @Inject('ELASTIC_SEARCH_CLIENT') private readonly esClient: Client
  ) {}

  async log(message: string, context: Record<string, any>) {
    await this.esClient.index({
      index: 'direct-logs',
      body: {
        '@timestamp': new Date().toISOString(),
        message,
        ...context
      }
    });
  }
}
3 ) APM监控集成方案
npm install elastic-apm-node --save
// src/apm/apm.module.ts
import { Module } from '@nestjs/common';
import apm from 'elastic-apm-node';

@Module({})
export class ApmModule {
  constructor() {
    apm.start({
      serviceName: 'order-service',
      serverUrl: 'http://apm-server:8200',
      environment: process.env.NODE_ENV || 'development',
      captureExceptions: true,
      metricsInterval: '30s'
    });
  }
}

// src/main.ts
import { ApmModule } from './apm/apm.module';

async function bootstrap() {
  const app = await NestFactory.create(AppModule);
  app.use(apm.middleware.connect());
  // ...
}
工程示例:2
1 ) 直接REST API调用
// src/logging/log.service.ts
import { Injectable } from '@nestjs/common';
import { HttpService } from '@nestjs/axios';

@Injectable()
export class LogService {
  constructor(private readonly httpService: HttpService) {}

  async ingestLog(data: Record<string, any>) {
    const url = `http://es-host:9200/filebeat-${new Date().getFullYear()}/_doc`;
    return this.httpService.post(url, {
      timestamp: new Date().toISOString(),
      ...data,
      service: 'nestjs-backend'
    });
  }
}
2 ) 官方Elasticsearch客户端
// src/elastic/elastic.provider.ts
import { Provider } from '@nestjs/common';
import { Client } from '@elastic/elasticsearch';

export const ELASTIC_SEARCH_PROVIDER = 'ELASTIC_SEARCH';

export const ElasticProvider: Provider = {
  provide: ELASTIC_SEARCH_PROVIDER,
  useFactory: () => new Client({ node: 'http://es-node:9200' })
};

// 在Controller中使用
@Injectable()
export class SearchService {
  constructor(
    @Inject(ELASTIC_SEARCH_PROVIDER) private readonly esClient: Client
  ) {}

  async indexDocument(index: string, body: any) {
    return this.esClient.index({ index, body });
  }
}
3 ) Filebeat Agent集成方案
// 日志结构化输出(配合Filebeat采集)
import { Logger } from '@nestjs/common';
import * as fs from 'fs';

export class StructuredLogger extends Logger {
  error(message: string, trace: string) {
    const logEntry = JSON.stringify({
      timestamp: new Date().toISOString(),
      level: 'ERROR',
      service: process.env.SERVICE_NAME,
      message,
      stack: trace
    });
    fs.appendFileSync('/var/log/app.json', logEntry + '\n');
  }
}
工程示例:3
1 ) 基础CRUD与索引管理
// nestjs.service.ts
import { Injectable } from '@nestjs/common';
import { Client } from '@elastic/elasticsearch';

@Injectable()
export class EsService {
  private readonly client: Client;

  constructor() {
    this.client = new Client({ node: 'http://localhost:9200' });
  }

  async createIndex(index: string): Promise<any> {
    return this.client.indices.create({ index });
  }

  async indexDocument(index: string, body: any): Promise<any> {
    return this.client.index({ index, body });
  }

  async search(index: string, query: any): Promise<any> {
    return this.client.search({ index, body: { query } });
  }
}
2 ) 注入Ingest Pipeline处理数据
// nestjs.controller.ts
import { Controller, Post, Body } from '@nestjs/common';
import { EsService } from './es.service';

@Controller('logs')
export class LogController {
  constructor(private readonly esService: EsService) {}

  @Post('nginx')
  async ingestNginxLog(@Body() log: string) {
    await this.esService.indexDocument('nginx-logs', {
      message: log,
      pipeline: 'nginx_parser'  // 指定Ingest Pipeline
    });
  }
}
配套ES配置:
创建生命周期策略(ILM)
PUT _ilm/policy/nginx_policy
{
  "policy": {
    "phases": {
      "hot": { "actions": { "rollover": { "max_size": "50GB" } } },
      "delete": { "min_age": "30d", "actions": { "delete": {} } }
    }
  }
}

关联索引模板
PUT _index_template/nginx_template
{
  "index_patterns": ["nginx-logs-*"],
  "template": {
    "settings": {
      "index.lifecycle.name": "nginx_policy",
      "number_of_shards": 3
    }
  }
}
3 ) Filebeat+自定义Module+NestJS监控
架构流程:
Filebeat (Nginx Module) → Elasticsearch → NestJS (Kibana API Client) → 告警服务
NestJS异步告警实现:
// kibana.service.ts
import { HttpService } from '@nestjs/axios';
import { Injectable } from '@nestjs/common';

@Injectable()
export class KibanaService {
  constructor(private http: HttpService) {}

  async fetchErrorLogs(): Promise<any> {
    const query = {
      query: { term: { "response_code": 500 } },
      size: 10
    };
    const response = await this.http.post(
      'http://kibana:5601/api/console/proxy?path=nginx-logs/_search',
      query,
      { headers: { 'kbn-xsrf': 'true' } }
    ).toPromise();
    return response.data.hits.hits;
  }
}
ES性能优化配置:
elasticsearch.yml
thread_pool:
  write:
    size: 16      # 写入线程数 (CPU核数×2)
    queue_size: 1000
indices.memory.index_buffer_size: 15%  # 索引缓冲内存占比
多方位考量点:
- 安全认证:Filebeat配置
output.elasticsearch.username/password,NestJS使用Client的auth参数 - 容错机制:ES客户端重试策略、Filebeat注册表备份
- 资源隔离:专用Ingest Node节点、索引分片路由策略
- 版本兼容:通过
fields.yml解耦ES版本差异
周边配置全链路方案
1 ) Elasticsearch集群配置
elasticsearch.yml
cluster.name: production-cluster
node.roles: [ingest, data] # 混合节点配置

启用安全模块
xpack.security.enabled: true
xpack.security.authc.api_key.enabled: true
2 ) Filebeat性能调优
filebeat.yml 高阶配置
queue.mem:
  events: 8192      # 内存队列大小
  flush.min_events: 512 # 批量发送阈值
  flush.timeout: 1s    # 最大等待时间

processors:
  - drop_fields:      # 字段过滤
      fields: ["log.offset"]
3 ) 安全加固方案
创建专用服务账号
POST _security/api_key
{
  "name": "filebeat-writer",
  "role_descriptors": {
    "filebeat_writer": {
      "indices": [
        {
          "names": ["filebeat-*"],
          "privileges": ["create_index", "create", "index"]
        }
      ]
    }
  }
}
最佳实践与排错指南
-
采集完整性校验:
# 检查注册表状态 cat /var/lib/filebeat/registry/filebeat/log.json # 监控事件吞吐 GET _nodes/stats/ingest?filter_path=nodes.*.ingest -
常见故障场景:
故障现象 排查命令 解决方案 数据未写入ES filebeat test output检查防火墙/证书 字段映射失败 GET filebeat-*/_mapping更新索引模板 Pipeline解析错误 GET _ingest/pipeline/_stats添加on_failure处理器 -
性能优化三角模型:
延伸阅读:Filebeat 8.x新增Agent Management特性,支持通过Kibana集中管理万台主机上的Beats配置,大幅降低运维复杂度。
生产环境调优指南
1 ) 性能优化参数
filebeat.prod.yml
queue.spool:
  file:
    path: "/var/spool/filebeat"  # 启用磁盘队列
    size: 1GB                    # 队列容量

output.elasticsearch:
  bulk_max_size: 500     # 批次事件数
  worker: 8              # 并发工作线程
  compression_level: 1   # GZIP压缩级别

processors:
- drop_event:            # 日志过滤
    when:
      equals:
        log.level: "debug"
2 ) 监控指标采集
Metricbeat监控配置:
metricbeat.modules:
- module: beat
  metricsets: ["stats"]
  period: 10s
  hosts: ["localhost:5066"]  # Filebeat监控API

- module: elasticsearch
  xpack.enabled: true
  hosts: ["es-host:9200"]
3 ) 高可用架构
关键组件配置:
Filebeat输出到Kafka
output.kafka:
  hosts: ["kafka1:9092", "kafka2:9092"]
  topic: "app-logs"
  partition.round_robin:
    reachable_only: true
  required_acks: 1
结论与最佳实践
通过系统化的架构解析与工程实践,我们得出以下核心结论:
1 ) 架构选型原则:
- 轻量级场景优先采用
Filebeat→Ingest Node直连模式 - 复杂数据处理需保留Logstash中间层
- 高吞吐场景引入Kafka作为缓冲层
2 ) 性能优化要点:
- 控制日志文件扫描频率(
scan_frequency) - 合理设置批量提交大小(
bulk_max_size) - 启用磁盘队列应对网络波动
3 ) 运维监控关键:
# Filebeat健康检查
curl http://localhost:5066/stats?pretty

# 队列深度监控
filebeat -c config.yml export monitoring | jq '.filebeat.events.active'
4 )版本管理策略:
- Beats与Elasticsearch版本偏差不超过一个主版本
- 索引模板需随版本升级主动更新
- 使用ILM(Index Lifecycle Management)自动化滚动管理
5 )初学者友好提示:
- Ingest Node:Elasticsearch 5.0+引入的轻量数据处理节点,替代Logstash基础ETL功能
- Painless脚本:ES内置安全脚本语言,语法类似Groovy,用于Pipeline复杂逻辑
- Libbeat:所有Beats共享的核心库,抽象了输出协议、缓冲队列和重试机制
Filebeat作为Elastic Stack数据采集的基石,配合Ingest Node的预处理能力,为企业提供了从日志采集、实时处理到可视化分析的全栈解决方案
通过本文提供的工程实践方案,开发者可快速构建高可靠、易维护的日志处理管道


 5101
5101

 被折叠的 条评论
为什么被折叠?
被折叠的 条评论
为什么被折叠?
 到【灌水乐园】发言


