


分布式架构与Cerebro部署
1 ) 分布式基础
Elasticsearch(ES)通过分片(Shard)和副本(Replica)实现分布式存储与计算。数据被拆分为多个分片分散在不同节点,每个分片的副本提供高可用
集群由三种角色节点组成:
- 主节点(Master):管理集群状态、分片分配
- 数据节点(Data):存储分片数据,执行读写操作
- 协调节点(Coordinating):接收客户端请求,路由到数据节点并聚合结果
2 ) Cerebro部署策略
- 作用:用于监控集群健康、管理索引、重定位分片
- 部署位置:独立于ES集群的专用机器(如
192.168.1.100),无需在每个节点部署 - 发现集群:通过连接任意ES节点(推荐协调节点)的HTTP端口(9200)自动发现全集群
- 官网地址:https://github.com/lmenezes/cerebro
3 )Cerebro 部署
# 在独立机器执行
wget https://github.com/lmenezes/cerebro/releases/download/v0.9.4/cerebro-0.9.4.tgz
tar -zxvf cerebro-*.tgz
cd cerebro-0.9.4
./bin/cerebro -Dhttp.port=9000
集群拓扑规划与IP分配
| 节点类型 | IP地址 | 数量 | 说明 |
|---|---|---|---|
| 主节点 | 192.168.1.101 (102, 103) | 3 | 管理集群元数据 |
| 数据节点 | 192.168.1.104 (105) | 2 | 存储分片数据 |
| 协调节点 | 192.168.1.106 (107) | 2 | 处理客户端请求 |
| Nginx代理 | 192.168.1.100 | 1 | 负载均衡与统一入口 |
| Cerebro监控 | 192.168.1.100 | 1 | 与Nginx共用机器 |
- 协调节点说明:ES默认所有节点具备协调能力,但独立部署可隔离负载,提升性能
- 注:还可加入一个 预处理节点(可选),按ETL负载独立部署 node.ingest: true
架构拓扑
节点角色分工与部署原则
1 ) 专用主节点(Master-eligible Nodes)
- 职责:集群状态管理、分片分配、节点协调
- 部署要求:
- 数量至少 3个(奇数),避免脑裂(如3/5/7)
- 配置:低CPU/内存(如4C8G),无数据存储(
node.data: false)
2 ) 数据节点(Data Nodes)
- 职责:存储分片数据、执行CRUD/聚合操作
- 部署要求:
- 数量根据数据量及负载动态扩展,初始建议≥2个
- 配置:高配置CPU、内存(建议≥64G)、SSD磁盘(避免NAS)
- 参数:
node.master: false,node.data: true
3 ) 协调节点(Coordinating Only Nodes)
- 职责:接收客户端请求,分发查询并聚合结果
- 部署要求:
- 高并发集群必选(如QPS>5000),数量=数据节点×0.5(例:4数据节点配2协调节点)
- 配置:高CPU/网络带宽,禁用数据角色(
node.master: false,node.data: false)
4 ) 预处理节点(Ingest Nodes)
- 职责:数据索引前处理(如格式转换、字段提取)
- 部署要求:按ETL需求启用,可与协调节点复用
集群规模与数量公式
| 节点类型 | 最小数量 | 扩展公式 | 关键参数示例 |
|---|---|---|---|
| 专用主节点 | 3 | 固定奇数(3/5/7) | node.master: true |
| 数据节点 | 2 | 按数据量/分片数增加 | node.data: true |
| 协调节点 | 可选 | 数据节点数×0.5(高并发场景) | node.roles: [ ] |
| 预处理节点 | 可选 | 按ETL负载独立部署 | node.ingest: true |
分片数量参考:
- 单个分片容量建议 30-50GB
- 总分片数 = 索引数 × (主分片数 × (1 + 副本数))
- 单数据节点分片上限建议 ≤800(避免性能瓶颈)
关键配置优化
1 ) 防止脑裂:
- 配置
discovery.zen.minimum_master_nodes: (master_nodes/2 + 1)(旧版) - 新版ES使用内置选举机制,但仍需奇数主节点
2 ) 硬件与路径:
- 数据目录独立分区:
path.data: /ssd_mount/elasticsearch/data - JVM内存 ≤ 32G(避免指针压缩失效)
3 ) 安全与维护:
- 生产环境启用TLS证书加密通信
- 定期监控分片均衡性,避免热点分片
总结建议
- 中小集群(<10节点):3专用主节点 + N数据节点(按存储扩展) + 1协调节点(可选)。
- 大型集群(>20节点):5专用主节点 + 分片感知的数据节点 + 独立协调层。
- 弹性扩展:优先横向扩展数据节点,协调节点按QPS增长追加
附:官方生产检查清单 → Elasticsearch Production Deployment Checklist
高可用主节点配置
1 ) 奇数节点原则
主节点数量必须为奇数(如3、5),避免脑裂(Split-Brain)
选举算法要求过半票数(Quorum),奇数确保选举结果唯一
2 ) 配置示例(主节点elasticsearch.yml)
# 所有主节点共用配置
cluster.name: my-es-cluster
node.name: master-01             # 每个节点名称唯一(如master-02、master-03)
node.roles: [ master ]          # 仅作为主节点
network.host: 192.168.1.101     # 当前节点IP
discovery.seed_hosts:            # 所有主节点IP列表
  - 192.168.1.101:9300
  - 192.168.1.102:9300
  - 192.168.1.103:9300
cluster.initial_master_nodes:    # 初始主节点名称列表
  - master-01
  - master-02
  - master-03
其他节点配置看下面示例
Nginx代理配置详解
1 ) 代理目标与必要性
- 代理对象:仅协调节点(非主节点/数据节点)
- 作用:
- 负载均衡:分散客户端请求到多个协调节点
- 统一入口:客户端只需访问Nginx的IP
- 安全隔离:屏蔽内部节点暴露
- 部署位置:独立机器(
192.168.1.100),避免资源竞争
2 ) Nginx配置(/etc/nginx/nginx.conf)
http {
  upstream es_coordinators {
    server 192.168.1.106:9200;  # 协调节点1
    server 192.168.1.107:9200;  # 协调节点2
    keepalive 32;
  }
  server {
    listen 9200;
    location / {
      proxy_pass http://es_coordinators;
      proxy_http_version 1.1;
      proxy_set_header Connection "";
    }
  }
}
关键点:
- 仅代理协调节点,主节点和数据节点不暴露给客户端
- 使用
keepalive提升连接复用率
注:Nginx 集群不展开, 仅配合ES的集群搭建
集群健康与分片管理
1 ) 健康状态检查
- 通过Nginx代理执行:
curl http://192.168.1.100:9200/_cluster/health?pretty - 优势:避免单点故障,自动路由到健康节点
2 ) 分片与副本设置
- 创建索引时配置:
curl -XPUT http://192.168.1.100:9200/my_index -H 'Content-Type: application/json' -d' { "settings": { "number_of_shards": 2, # 主分片数(建议=数据节点数) "number_of_replicas": 1 # 每个主分片的副本数 } }' - 动态调整副本:
curl -XPUT http://192.168.1.100:9200/my_index/_settings -H 'Content-Type: application/json' -d'
{ "number_of_replicas": 2 }'
节点间通信机制
或参考下面
- 传输层协议: 节点间通过TCP端口9300通信(如主节点选举、数据复制)
- 配置要求: 所有节点需在
discovery.seed_hosts中列出主节点的IP:9300地址
1 ) 通信机制:
- 基于Zen Discovery协议进行节点发现
- 9300端口用于节点间通信(Gossip协议)
- 9200端口处理客户端HTTP请求
2 ) 代理必要性:
- 必需:生产环境必须通过Nginx/Haproxy暴露服务
- 优势:
- 隐藏集群内部拓扑
- 实现负载均衡和故障转移
- 提供SSL/TLS加密终端
- 协调节点说明:ES 7.x+版本所有节点默认具备协调能力,专用协调节点仅需在超大规模集群中部署
CentOS集群搭建详细步骤
1 ) 系统准备(所有节点)
# 关闭防火墙与SELinux
systemctl stop firewalld && systemctl disable firewalld
setenforce 0
sed -i 's/SELINUX=enforcing/SELINUX=disabled/g' /etc/selinux/config

# 修改系统参数
echo "vm.max_map_count=262144" >> /etc/sysctl.conf
sysctl -p
2 ) 安装Java与ES
# 安装OpenJDK 11
yum install -y java-11-openjdk

# 下载并安装ES
wget https://artifacts.elastic.co/downloads/elasticsearch/elasticsearch-7.17.0-x86_64.rpm
rpm -ivh elasticsearch-7.17.0-x86_64.rpm
3 ) 配置节点角色
-
数据节点配置(
/etc/elasticsearch/elasticsearch.yml)node.name: data-01 node.roles: [ data ] # 仅作为数据节点 network.host: 192.168.1.102 discovery.seed_hosts: # 指向主节点 - 192.168.1.101:9300 - 192.168.1.102:9300 - 192.168.1.103:9300 -
协调节点配置
node.roles: [ ] # 空角色表示仅协调- 协调节点完整版参考
# 基础角色配置(必需)
node.roles:  []  # 空数组表示仅作为协调节点

# 网络与发现配置(必需)
cluster.name:  my-es-cluster  # 需与集群其他节点一致
network.host:  192.168.1.103  # 当前节点IP
discovery.seed_hosts:          # 指向主节点的IP列表
  - 192.168.1.101:9300
  - 192.168.1.102:9300
  - 192.168.1.103:9300

# JVM优化(推荐)
-Xms4g -Xmx4g                # 协调节点需处理请求聚合,建议分配足够堆内存

# 安全配置(若集群启用安全)
xpack.security.enabled:  true  # 开启安全传输
xpack.security.transport.ssl.enabled:  true
- 协调节点完整版参考
4 ) 启动集群
systemctl daemon-reload
systemctl enable elasticsearch
systemctl start elasticsearch
每台节点均启动
5 ) 验证集群状态
# 通过Nginx检查(输出green为正常)
curl http://192.168.1.100:9200/_cluster/health?pretty

# 或
curl http://192.168.1.100:9200/_cat/nodes?v
5 )说明
| 组件 | 最佳实践 |
|---|---|
| 主节点 | 3台奇数节点,独立部署避免混合角色 |
| 协调节点 | 独立部署2台,通过Nginx负载均衡 |
| 数据节点 | 至少2台,分片数匹配节点数量 |
| 代理层 | Nginx必需,仅代理协调节点 |
| 监控 | Cerebro独立部署,连接Nginx或协调节点 |
6 )故障排查提示:
- 节点未加入集群?检查
discovery.seed_hosts的IP和端口(9300) - 分片未分配?确保主节点存活且数据节点磁盘空间充足
node.roles 参数的完整类型说明及功能解析
node.roles 参数类型详解表
| 角色类型 | 配置值 | 核心功能 | 适用场景与注意事项 |
|---|---|---|---|
| 主节点 (Master) | [master] | 管理集群元数据、分片分配、节点状态监控、索引创建/删除。需奇数节点防脑裂。 | 生产环境至少配置 3 个专用主节点,避免与数据节点混用 |
| 仅投票主节点 | [master, voting_only] | 参与选举投票但不能被选为主节点,降低硬件要求。 | 超大规模集群中作为辅助节点,分担选举压力 |
| 数据节点 (Data) | [data] | 存储分片数据、执行 CRUD/搜索/聚合操作。默认包含协调功能。 | 通用场景,需高磁盘和内存资源 |
| 内容数据节点 | [data_content] | 存储用户创建的索引数据,支持基础数据操作。 | 多层存储架构的必备角色,不可与 [data] 共存 |
| 热数据节点 | [data_hot] | 存储高频访问的实时数据(如日志流),需高性能 SSD。 | 与 ILM(索引生命周期管理)配合,承载最新数据 |
| 温数据节点 | [data_warm] | 存储中期低频访问数据(如月度报表),配置中等(SATA 硬盘)。 | 承接从热节点迁移的数据,优化存储成本 |
| 冷数据节点 | [data_cold] | 存储长期归档数据(如历史记录),使用高容量 HDD。 | 数据只读,支持低频检索 |
| 协调节点 | [ ](空数组) | 默认角色,处理客户端请求路由、结果聚合,不存储数据。 | 高并发集群需独立部署,避免数据节点过载 |
| 采集节点 (Ingest) | [ingest] | 执行预处理管道(如数据转换、字段过滤),类似 Logstash Filter。 | 需高 CPU 资源,可独立部署或与数据节点共存 |
| 机器学习节点 | [ml, remote_cluster_client] | 执行异常检测、预测分析等机器学习任务。 | 需单独许可证,配置高内存和 CPU |
| 转换节点 | [transform, remote_cluster_client] | 执行 Transforms API 请求,生成聚合指标。 | 替代部分 Rollup 功能,用于离线分析 |
| 远程集群节点 | [remote_cluster_client] | 作为网关连接跨集群搜索(CCS)中的远程集群。 | 需在 elasticsearch.yml 中配置远程集群信息 |
关键使用规则
1 ) 角色组合限制
- 专用数据角色(
data_hot/data_warm等)不可与[data]共用 - 主节点角色应独立配置,避免与数据节点混合(如
[master, data]仅限测试环境)
2 ) 生产环境建议
# 专用主节点配置
node.roles: [master]  # 分配至独立高可用机器

# 数据节点配置(多层存储)
node.roles: [data_content, data_hot]  # 热层节点
3 ) 协调节点资源规划
- 每 5-10 个数据节点配置 1 个专用协调节点(
node.roles: []),提升请求吞吐量
4 ) 版本兼容性
- ES 7.9+ 使用
node.roles替代旧参数(如node.master: true)
验证节点角色分配
通过 API 查看集群节点角色分布:
curl -XGET "http://192.168.1.101:9200/_nodes?filter_path=nodes.*.roles"
输出示例:
{
  "nodes": {
    "node-101": { "roles": ["master"] },
    "node-104": { "roles": ["data_content", "data_hot"] }
  }
}
运维提示:角色规划直接影响集群性能与稳定性,大型集群建议参考 Elasticsearch 官方角色文档
故障排查与维护技巧
1 ) 脑裂问题(Split-Brain)
- 原因:网络分区导致多个主节点被选举
- 解决方案:严格设置 discovery.zen.minimum_master_nodes: (master_num/2 + 1)
- N/2 + 1 确定最小主节点数(如 3 节点集群需配置为 2)
或# 强制设置主节点 POST /_cluster/reroute?retry_failed { "commands" : [ { "move" : { "index" : "my_index", "shard": 0, "to_node" : "node-1" }} ]}POST /_cluster/reroute { "commands": [ { "move": { "index": "hot_index", "shard": 2, "from_node": "node1", "to_node": "node3" } } ] }
2 ) 数据一致性问题
- 写入冲突解决:基于版本号(_version)的乐观锁控制
- 读一致性:设置 replication=quorum 保证多数副本确认
3 ) 滚动重启步骤:
# 1. 禁用分片分配
PUT _cluster/settings { "transient": { "cluster.routing.allocation.enable":  "none" } }

# 2. 停止节点 -> 升级 -> 启动
# 3. 重新启用分配
PUT _cluster/settings { "transient": { "cluster.routing.allocation.enable":  "all" } }
4 ) 集群健康状态:
健康状态三元组:
- GREEN:所有主副分片均分配正常
- YELLOW:主分片正常但副本未完全分配
- RED:存在未分配的主分片(数据丢失风险)
健康检查API:
GET /_cluster/health
响应示例:
{
  "cluster_name": "my_cluster",
  "status": "yellow",
  "unassigned_shards": 3,
  "number_of_nodes": 2
}
故障转移处理流程
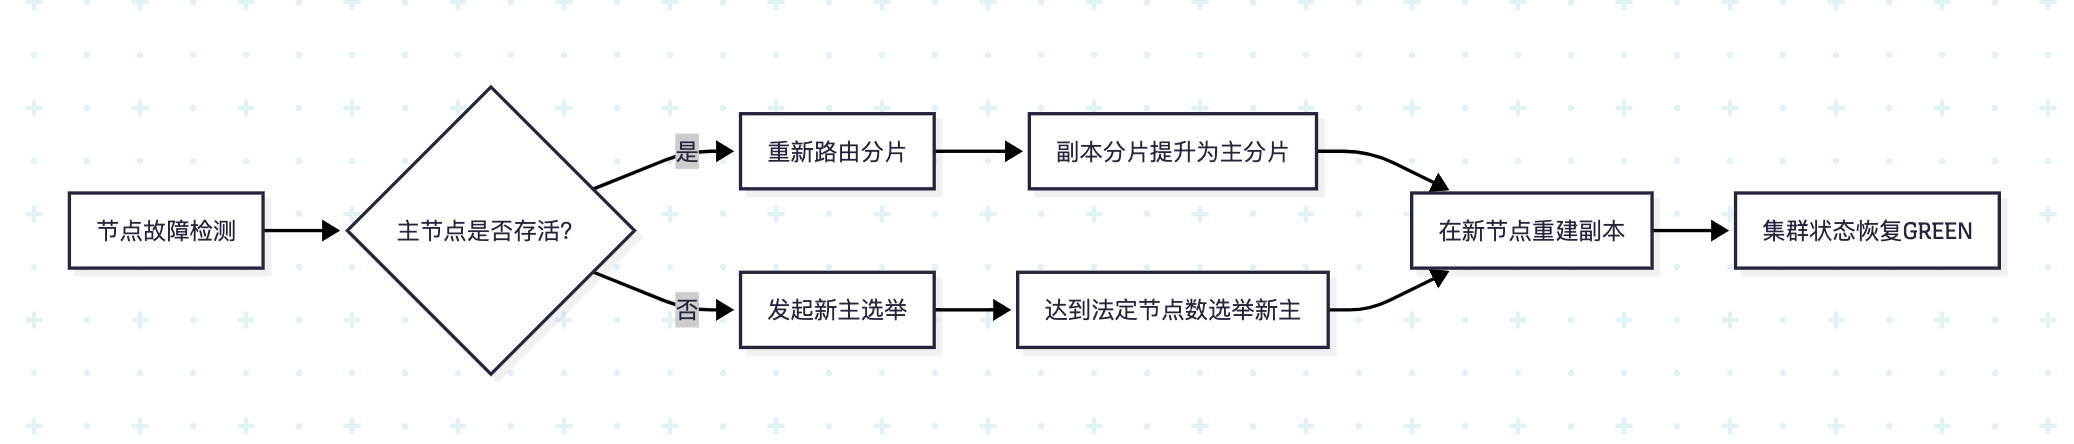
- 剩余节点检测Master失联
- 重新选举新Master节点
- 将未分配主分片的副本提升为主分片
- 在可用节点创建新副本
- 状态转换:RED → YELLOW → GREEN
- 关键特性:RED状态仍可服务可用分片数据,但存在数据缺失风险
ES集群关键配置
elasticsearch.yml 优化项:
# elasticsearch.yml  生产配置
cluster.name:  prod-cluster
node.name:  ${HOSTNAME}
node.master:  true

# 磁盘水位线(预防黄色状态)
cluster.routing.allocation.disk.watermark.low:  85%
cluster.routing.allocation.disk.watermark.high:  90%
cluster.routing.allocation.disk.threshold_enabled:  true

# 分片分配策略
cluster.routing.allocation.disk.threshold_enabled:  true
cluster.routing.allocation.disk.watermark.low:  "85%"
cluster.routing.allocation.disk.watermark.high:  "90%"
cluster.routing.allocation.same_shard.host:  true
indices.cluster.send_refresh_mapping:  false

# 线程池优化
thread_pool.write.queue_size:  1000
thread_pool.search.queue_size:  1000

# 容灾参数
cluster.routing.allocation.enable:  all
cluster.fault_detection.leader_check.interval:  5s
cluster.publish.timeout:  30s
运维最佳实践
1 ) 容量规划:
- 每GB堆内存对应20-25个分片
- 监控工具:ElasticHQ / Cerebro
2 ) 滚动重启流程:
# 禁用分片分配
# PUT _cluster/settings
{"transient":{"cluster.routing.allocation.enable":"none"}}

# 重启节点
systemctl restart elasticsearch

# 启用分片分配
# PUT _cluster/settings
{"transient":{"cluster.routing.allocation.enable":"all"}}
3 ) 灾难恢复:
# 注册快照仓库
PUT _snapshot/my_backup
{
  "type": "fs",
  "settings": {"location": "/mnt/es_backups"}
}

# 创建快照
PUT _snapshot/my_backup/snapshot_2023?wait_for_completion=true
4 ) 版本升级策略
ES集群运维命令手册
1 ) 分片分配控制
# 强制分配未分配分片
POST /_cluster/reroute?retry_failed
2 ) 磁盘阈值配置
PUT /_cluster/settings
{
  "persistent": {
    "cluster.routing.allocation.disk.threshold_enabled":  false
  }
}
3 ) 节点角色查询
GET /_cat/nodes?v&h=name,role,shards
4 ) 启用分片分配过滤:避免分片分配到故障节点
# PUT /_cluster/settings
{
  "transient": {
    "cluster.routing.allocation.exclude._ip":  "192.168.1.x" // 排除故障节点IP
  }
}
基于NestJS的ElasticSearch集成
1 )基础服务封装
// es.service.ts
import { Injectable } from '@nestjs/common';
import { Client, ClientOptions } from '@elastic/elasticsearch';

@Injectable()
export class EsService {
  private readonly client: Client;

  constructor() {
    const options: ClientOptions = {
      nodes: ['http://node1:5200', 'http://node2:5300'],
      maxRetries: 5,
      requestTimeout: 60000
    };
    this.client  = new Client(options);
  }

  // 创建索引
  async createIndex(index: string, body: any) {
    return this.client.indices.create({  index, body });
  }

  // 文档索引
  async indexDocument(index: string, id: string, document: object) {
    return this.client.index({  index, id, body: document });
  }
}
2 ) 集群健康监控与告警
import { Controller, Get } from '@nestjs/common';
import { Client } from '@elastic/elasticsearch';

@Controller('cluster')
export class ClusterHealthController {
  private readonly esClient: Client;

  constructor() {
    this.esClient  = new Client({ node: 'http://localhost:9200' });
  }

  @Get('health')
  async getHealth() {
    const { body } = await this.esClient.cluster.health();
    if (body.status  === 'red') {
      // 触发告警逻辑(如邮件/Slack通知)
      this.triggerAlert('CRITICAL:  Cluster status RED - Unassigned primary shards');
    }
    return body;
  }

  private triggerAlert(message: string) {
    // 集成第三方告警服务(如SendGrid/PagerDuty)
    console.error(`ALERT:  ${message}`);
  }
}
3 )动态分片再平衡
场景:节点扩容后自动优化分片分布
import { Injectable } from '@nestjs/common';
import { Client } from '@elastic/elasticsearch';

@Injectable()
export class ShardRebalanceService {
  private readonly esClient: Client;

  constructor() {
    // 这里连的不是 Nginx,而是 协调节点,也可以使用 Nginx 但是需要 node:{} 这样配置
    this.esClient  = new Client({ nodes: ['http://node1:9200', 'http://node2:9200'] });
  }

  async rebalanceShards(index: string) {
    // 1. 检查未分配分片
    const { body } = await this.esClient.cat.shards({  format: 'json' });
    const unassignedShards = body.filter(shard  => shard.state  !== 'STARTED');

    // 2. 手动分配分片到新节点
    if (unassignedShards.length  > 0) {
      await this.esClient.cluster.reroute({
        body: {
          commands: unassignedShards.map(shard  => ({
            allocate_replica: {
              index: shard.index,
              shard: shard.shard,
              node: "new_node_id"  // 新增节点ID
            }
          }))
        }
      });
    }
  }
}
4 )集群状态监控
// cluster-monitor.service.ts
import { Injectable } from '@nestjs/common';
import { Client } from '@elastic/elasticsearch';

@Injectable()
export class ClusterMonitorService {
  constructor(private readonly esClient: Client) {}

  async getClusterHealth() {
    return this.esClient.cluster.health();
  }

  async getShardAllocation() {
    return this.esClient.cat.allocation({  format: 'json' });
  }

  async relocateShard(shard: number, fromNode: string, toNode: string) {
    return this.esClient.cluster.reroute({
      body: {
        commands: [
          {
            move: {
              index: "my_index",
              shard,
              from_node: fromNode,
              to_node: toNode
            }
          }
        ]
      }
    });
  }
}
或
集群监控与自动恢复
// cluster-monitor.service.ts
import { Injectable, Logger } from '@nestjs/common';
import { Client } from '@elastic/elasticsearch';

@Injectable()
export class ClusterMonitor {
  private readonly logger = new Logger(ClusterMonitor.name);
  private readonly client: Client;

  constructor() {
    this.client  = new Client({ nodes: ['http://填入ip:填入port'] });
  }

  async checkShardAllocation() {
    const { body } = await this.client.cat.allocation({  format: 'json' });
    const unassigned = body.filter((node:  any) => node.shards  === '0');

    if (unassigned.length  > 0) {
      this.logger.warn(`Unassigned  shards detected: ${unassigned.length}`);
      await this.client.cluster.reroute({
        body: {
          commands: unassigned.map((node:  any) => ({
            allocate_stale_primary: {
              index: node.index,
              shard: node.shard,
              node: node.node,
              accept_data_loss: true
            }
          }))
        }
      });
    }
  }
}
5 ) 集群配置管理
// cluster-config.service.ts
import { Injectable } from '@nestjs/common';
import { Client } from '@elastic/elasticsearch';

@Injectable()
export class ClusterConfigService {
  private readonly client: Client;

  constructor() {
    this.client  = new Client({ node: 'http://localhost:5200' });
  }

  async disableDiskThreshold() {
    // 关闭磁盘空间阈值限制
    await this.client.cluster.putSettings({
      body: {
        persistent: {
          "cluster.routing.allocation.disk.threshold_enabled":  false
        }
      }
    });
  }
}
6 ) 智能分片管理:根据数据类型自动分配热/冷节点
async createTimeSeriesIndex(index: string) {
  return this.esService.indices.create({
    index,
    body: {
      settings: {
        number_of_shards: 12,
        number_of_replicas: 1,
        "index.routing.allocation.include._tier_preference":  "data_hot"
      }
    }
  });
}
7 ) 批量操作优化:使用管道技术提升吞吐量
const BATCH_SIZE = 500;

async bulkIndexWithRetry(index: string, documents: any[]) {
  for (let i = 0; i < documents.length;  i += BATCH_SIZE) {
    const batch = documents.slice(i,  i + BATCH_SIZE);
    await this.esService.bulk({
      body: batch.flatMap(doc  => [{ index: { _index: index } }, doc])
    });
  }
}
8 ) 灾难恢复机制:集成快照API
async restoreSnapshot(repo: string, snapshot: string) {
  return this.esService.snapshot.restore({
    repository: repo,
    snapshot,
    body: {
      indices: '*',
      include_global_state: true
    }
  });
}
9 ) 断路保护
// 使用circuit-breaker-js
import circuitBreaker from 'circuit-breaker-js';

const breaker = new circuitBreaker();

async safeEsOperation() {
  return breaker.run({
    execute: () => this.esService.search(/*  ... */),
    fallback: () => ({ error: 'Service unavailable' })
  });
}
10 )自动重试策略
async resilientSearch(query: SearchQueryDto, retries = 3) {
  try {
    return await this.search(query);
  } catch (e) {
    if (retries > 0 && e.message.includes('ES_CONNECTION_FAILED'))  {
      await new Promise(resolve => setTimeout(resolve, 1000));
      return this.resilientSearch(query,  retries - 1);
    }
    throw e;
  }
}
11 ) 性能优化
// 深度分页处理
async scrollSearch(index: string, query: any) {
  const scroll = '1m';
  const response = await this.esService.search({
    index,
    scroll,
    body: query
  });

  const results = [];
  let scrollId = response._scroll_id;

  while (results.length  < 10000) {
    const response = await this.esService.scroll({
      scroll_id: scrollId,
      scroll
    });

    results.push(...response.hits.hits);

    if (response.hits.hits.length  === 0) break;
  }

  await this.esService.clearScroll({  scroll_id: scrollId });
  return results;
}
12 ) 动态索引策略
// 按时间创建索引
getTimeSeriesIndex(baseName: string) {
  const date = new Date();
  return `${baseName}-${date.getUTCFullYear()}.${(date.getUTCMonth()+1).toString().padStart(2,  '0')}`;
}
13 ) 高级应用
// src/elastic/elastic.service.ts
import { Injectable } from '@nestjs/common';
import { ElasticsearchService } from '@nestjs/elasticsearch';
import { IndexDocumentParams, SearchResponse } from 'elasticsearch';
import {
  CreateIndexDto,
  DocumentDto,
  SearchQueryDto,
  UpdateDocumentDto
} from './dto';

@Injectable()
export class ElasticService {
  constructor(private readonly esService: ElasticsearchService) {}

  /**
   * 创建索引(自动配置分片策略)
   * @param dto {index: 索引名, shards: 主分片数, replicas: 副本数}
   */
  async createIndex(dto: CreateIndexDto): Promise<any> {
    const { index, shards = 3, replicas = 1 } = dto;
    return this.esService.indices.create({
      index,
      body: {
        settings: {
          number_of_shards: shards,
          number_of_replicas: replicas,
          "index.routing.allocation.include._tier_preference":  "data_content,data_hot",
        }
      }
    });
  }

  /**
   * 索引文档(自动生成ID)
   * @param index 索引名称
   * @param document 文档内容
   */
  async indexDocument(index: string, document: any): Promise<any> {
    return this.esService.index({
      index,
      body: document,
      refresh: 'wait_for' // 写入后立即刷新
    });
  }

  /**
   * 批量索引文档(高性能写入)
   * @param index 索引名称
   * @param documents 文档数组
   */
  async bulkIndex(index: string, documents: DocumentDto[]): Promise<any> {
    const body = documents.flatMap(doc  => [
      { index: { _index: index } },
      doc
    ]);

    return this.esService.bulk({
      refresh: 'wait_for',
      body
    });
  }

  /**
   * 全文检索(支持复杂查询)
   * @param dto 查询参数
   */
  async search(dto: SearchQueryDto): Promise<SearchResponse<any>> {
    const { index, query, size = 10, from = 0 } = dto;
    return this.esService.search({
      index,
      body: {
        query: {
          bool: {
            must: [
              {
                multi_match: {
                  query,
                  fields: ["title^3", "content"],
                  fuzziness: "AUTO"
                }
              }
            ],
            filter: [
              { range: { timestamp: { gte: "now-30d/d" } } }
            ]
          }
        },
        highlight: {
          fields: { content: {} }
        },
        aggs: {
          category_agg: {
            terms: { field: "category.keyword"  }
          }
        }
      },
      size,
      from
    });
  }

  /**
   * 获取集群健康状态
   */
  async clusterHealth(): Promise<any> {
    return this.esService.cluster.health();
  }

  /**
   * 分片重分配(运维接口)
   * @param index 索引名称
   */
  async rerouteShards(index: string): Promise<any> {
    return this.esService.cluster.reroute({
      body: {
        commands: [{
          move: {
            index,
            shard: 0,
            to_node: "data_node_1",
            from_node: "data_node_2"
          }
        }]
      }
    });
  }
}
深度总结
分布式集群设计精髓:
- 分片(Shard)是水平扩展的基石
- 分片数量直接决定数据分布粒度,需根据数据增长预期预先规划
副本(Replica)的双重价值:
- 数据高可用:物理故障时的数据完整性保障
- 读性能扩展:通过增加副本提升查询吞吐量
分片规划原则:
- 主分片数量 = 索引创建时固定,需预估未来容量
- 副本数量 = 可动态调整,建议 ≥1 保证高可用
扩容铁律:
- 现有索引扩容 → 需重建索引
- 读取吞吐提升 → 增加副本 + 补充节点
状态认知:
- RED ≠ 服务不可用 → 检查unassigned_shards定位分片问题
节点角色的精细化控制
- 生产环境建议:
- 专用Master节点(3/5/7奇数台)
- 纯Data节点集群
- 独立Coordinating节点
集群状态管理的核心原则
- 仅Master节点可修改Cluster State
- 选举机制依赖discovery.seed_hosts 配置
- 节点故障时副本自动晋升保障服务连续性


 1万+
1万+

 被折叠的 条评论
为什么被折叠?
被折叠的 条评论
为什么被折叠?
 到【灌水乐园】发言


