


 本文详细介绍了SpringBoot中的配置方法,包括基础配置、yaml文件格式、多环境开发配置,以及与Maven的配合,特别是如何处理不同环境的配置和配置文件优先级问题。
SpringBoot-配置相关
一、基础配置
-
SpringBoot提供了多种属性配置方式,主要有以下三种:
-
application.propertiesserver.port=80 -
application.ymlserver: port: 81 -
application.yamlserver: port: 82
-
-
三种格式同时存在时,加载顺序为:
application.properties=>application.yml=>application.yaml;
二、yaml文件格式
-
yaml格式简介:-
全称
YAML Ain't Markup Language,一种数据序列化格式; -
数组数据的描述方式如下:
enterprise:
  name: sea
  age: 18
  subject:
  	- Java
  	- Front
  	- Back
  	- BigData
-
-
优点:
- 1.容易阅读;
- 2.方便与脚本语言交互【方便解析】;
- 3.以数据为核心,重数据轻格式;
-
缺点:
- 1.语法格式敏感;
-
数据读取方式:
-
方式一:使用
@Value注解可以读取yaml文件中的单个数据; -
方式二:封装yaml文件的全部数据到
Environment对象,使用对象.数据名称读取数据; -
方式三:使用自定义对象封装指定数据;
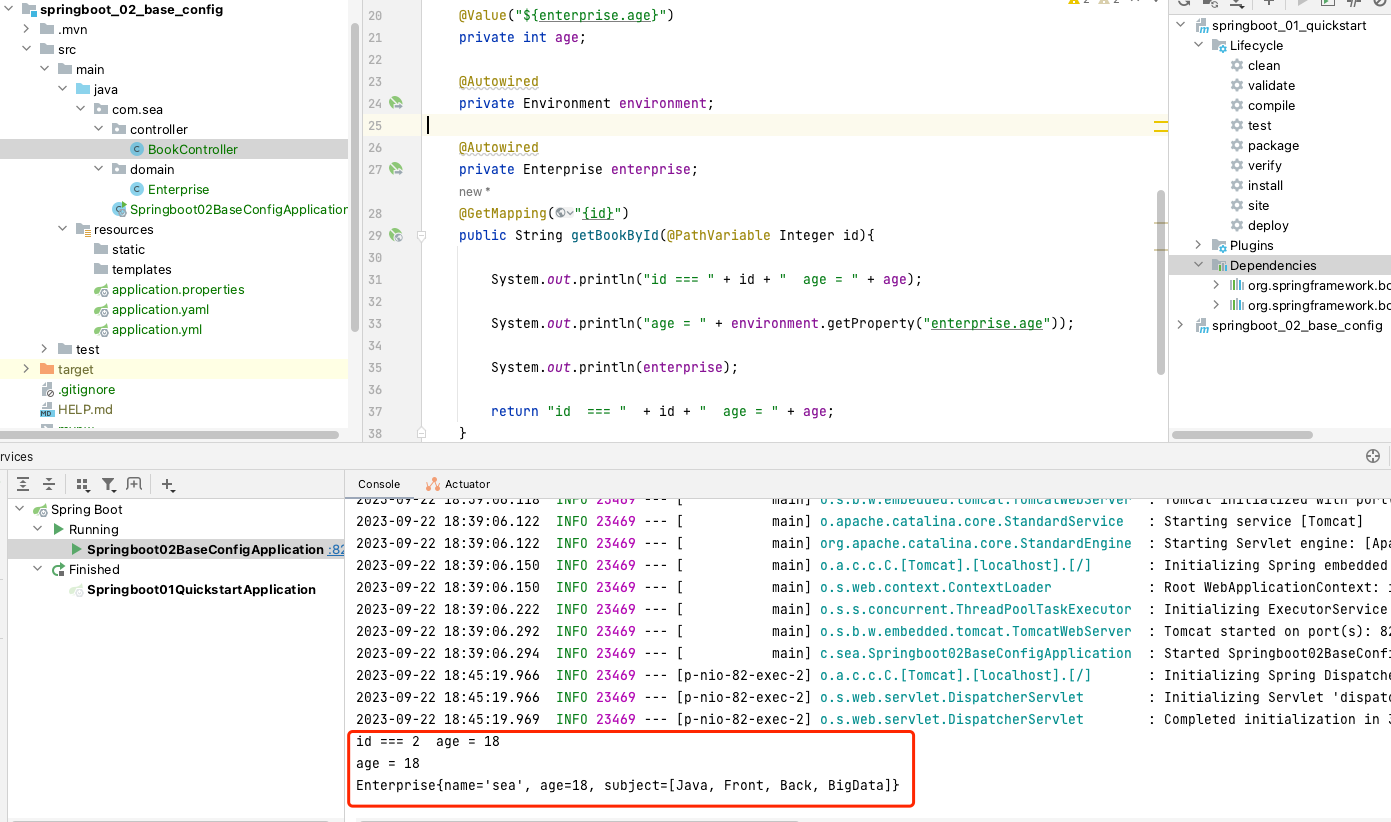
#yaml文件

server:
  port: 82

enterprise:
  name: sea
  age: 18
  subject:
    - Java
    - Front
    - Back
    - BigData
/** * @author: sea * @date: 2023/9/22 16:56 */ @RestController @RequestMapping("/books") public class BookController { //@Value注解读取单个数据 @Value("${enterprise.age}") private int age; //将全部数据封装到Environment对象中 @Autowired private Environment environment; @Autowired private Enterprise enterprise; @GetMapping("{id}") public String getBookById(@PathVariable Integer id){ //方式一 System.out.println("id === " + id + " age = " + age); //方式二 System.out.println("age = " + environment.getProperty("enterprise.age")); //方式三:自定义对象封装指定数据 System.out.println(enterprise); return "id === " + id + " age = " + age; } } -
方式三需要自定义的对象如下:
/** * @author: sea * @date: 2023/9/22 18:24 */ @Component//使Spring能够扫描到该对象,构建对应的bean @ConfigurationProperties(prefix = "enterprise")//指定封装的数据的层级前缀,该层下的数据都被封装到该对象中; public class Enterprise { private String name; private Integer age; private String[] subject; public Enterprise() { } ...... }-
使用注解
@ConfigurationProperties(prefix = "enterprise")时会报警告,需要添加以下依赖项坐标:<dependency> <groupId>org.springframework.boot</groupId> <artifactId>spring-boot-configuration-processor</artifactId> <optional>true</optional> </dependency>
-
-
三、多环境开发配置
- 即项目配置多套启动环境:开发环境、测试环境以及生产环境;
3.1 配置方式
-
方式一:在
application.yml文件中配置- 以
---作为文档分隔符,将多个环境分成独立的文档;
#设置启动环境 spring: profiles: active: test --- #开发环境 spring: profiles: dev server: port: 80 --- #测试环境 spring: profiles: test server: port: 81 --- #生产环境 spring: profiles: pro server: port: 82 - 以
-
方式二:以
application.properties文件作为主配置,控制当前项目启动环境;- 三个环境的配置文件命名为
application-环境名称.properties,主配置文件通过spring.profiles.active=环境名称来设置当前启动环境;
#application.properties文件 #设置启动环境【优先级高于.yml文件】 spring.profiles.active=dev #application-dev.properties文件 #开发环境 server.port=8080 #application-test.properties文件 #测试环境 server.port=8081 #application-pro.properties文件 #生产环境 server.port=8082 - 三个环境的配置文件命名为
-
打包之后产生的
jar包,,可以通过命令行参数设置临时启动环境参数。例如:java -jar springboot_03_profile-0.0.1-SNAPSHOT.jar java -jar springboot_03_profile-0.0.1-SNAPSHOT.jar --spring.profiles.active=testjar包中配置的默认启动环境为test环境,80端口;

- 设置临时启动环境参数为
dev,即以开发环境启动:

3.2 与Maven的pom.xml文件中配置的多环境之间的兼容问题
-
由于SpringBoot项目打包的过程是通过Maven的
package命令完成的,因此,需要将Maven中的环境配置参数传递给SpringBoot的配置文件进行修改;【否则SpringBoot项目并不知道Maven中指定的具体环境仍会以SpringBoot配置文件中的启动环境进行启动】 -
具体如何将【Maven中的环境配置参数】传递给【SpringBoot的配置文件】如下:
-
Maven的
pom.xml配置多环境以及解析资源文件的插件【没有该插件以及插件的相应配置则无法解析资源文件中的内容】<build> <plugins> <plugin> <groupId>org.springframework.boot</groupId> <artifactId>spring-boot-maven-plugin</artifactId> </plugin> <!--这个插件用来解析项目中的资源文件--> <plugin> <groupId>org.apache.maven.plugins</groupId> <artifactId>maven-resources-plugin</artifactId> <version>3.3.0</version> <configuration> <encoding>UTF-8</encoding> <!--当设置为 true 时,插件会使用默认的分隔符(${})来查找和替换占位符。--> <useDefaultDelimiters>true</useDefaultDelimiters> </configuration> </plugin> </plugins> </build> <profiles> <!--开发环境--> <profile> <id>dev</id> <properties> <profile.active>dev</profile.active> </properties> <activation> <!--Maven指定默认启动环境--> <!--此时,在SpringBoot项目中获取到的参数profile.active的值为:dev--> <activeByDefault>true</activeByDefault> </activation> </profile> <!--测试环境--> <profile> <id>test</id> <properties> <profile.active>test</profile.active> </properties> </profile> <!--生产环境--> <profile> <id>pro</id> <properties> <profile.active>pro</profile.active> </properties> </profile> </profiles> -
SpringBoot项目的配置文件
- 通过
${参数名称}进行动态修改SpringBoot项目的启动环境配置
#设置启动环境 spring: profiles: active: ${profile.active} --- #开发环境 spring: profiles: dev server: port: 80 --- #测试环境 spring: profiles: test server: port: 81 --- #生产环境 spring: profiles: pro server: port: 82 - 通过
-
-
这样就解决了兼容问题:
- Maven的配置文件
pom.xml负责控制整个SpringBoot项目的启动环境; - SpringBoot的配置文件通过读取Maven中的参数值动态改变启动环境;
- Maven的配置文件
四、配置文件优先级
-
在运行打包后的jar时,配置文件的优先级分类如下图:


 2778
2778

 被折叠的 条评论
为什么被折叠?
被折叠的 条评论
为什么被折叠?
 到【灌水乐园】发言


