


 本文对Java-JDBC知识进行了全面整理。介绍了JDBC概念与原理,说明了在Mac M1下载MySQL驱动包及编写JDBC程序的步骤。阐述了5种连接数据库的方式,还讲解了ResultSet结果集、Statement和PreparedStatement的使用,以及事务处理和批处理的优势。
Java-JDBC知识整理
一、概念介绍
-
JDBC是为访问不同的数据库提供了统一的接口,为使用者屏蔽了使用细节;
-
JDBC可以连接任何提供了JDBC驱动程序的数据库系统,从而完成对数据库的各种操作;
-
下图为JDBC原理示意图(来自韩顺平老师Java课程):

-
注意:JDBC只是一种数据库连接和操作的标准接口,具体的实现是由数据库供应商提供的驱动程序来实现的。
1.1 模拟JDBC原理
-
根据上述原理图,模拟JDBC的视线原理:
-
1.Java厂商指定JDBC接口规范:
/** * @author: sea * @date: 2023/6/9 14:53 */ public interface JDBCInterface { //连接数据库 public Object getConnection(); //操作数据库CRUD public void crud(); //关闭数据库 public void close(); } -
2.各个数据库的供应商商根据上述接口规范分别给出不同的实现:
/**
 * MySQL数据库的接口实现
 * @author: sea
 * @date: 2023/6/9 14:56
 */
public class MySQLJDBCImpl implements JDBCInterface{
    @Override
    public Object getConnection() {
        System.out.println("获得mysql数据库连接对象");
        return null;
    }

    @Override
    public void crud() {
        System.out.println("实现操作mysql数据库的方法,CRUD");
    }

    @Override
    public void close() {
        System.out.println("关闭mysql数据库连接");
    }
}
/** * Oracle数据库的接口实现 * @author: sea * @date: 2023/6/9 15:00 */ public class OracleJDBCImpl implements JDBCInterface{ @Override public Object getConnection() { System.out.println("获得Oracle数据库连接对象"); return null; } @Override public void crud() { System.out.println("完成对Oracle数据库的增删改查"); } @Override public void close() { System.out.println("关闭Oracle数据库连接"); } } -
3.开发人员想要操作不同的数据库时:
/**
 * @author: sea
 * @date: 2023/6/9 14:57
 */
public class TestJDBC {
    public static void main(String[] args) {
        //操作mysql数据库

        JDBCInterface jdbcInterface = new MySQLJDBCImpl();//通过接口调用实现类的方法
        jdbcInterface.getConnection();
        jdbcInterface.crud();
        jdbcInterface.close();

        //操作Oracle数据库

        JDBCInterface jdbcInterface1 = new OracleJDBCImpl();
        jdbcInterface1.getConnection();
        jdbcInterface1.crud();
        jdbcInterface1.close();
    }
}
-
二、基本使用
2.1 下载MySQL驱动包(Mac M1)
-
官网地址:
[MySQL :: Download Connector/J](https://dev.mysql.com/downloads/connector/j/) -
选择
Platform Independent选项(即不依赖平台的版本) -
点击下载并解压

-
在项目工程目录下新建一个
lib文件夹,将解压后的mysql-connector-j-8.0.33.jar包放进去;
-

最后,右键jar包,选择add as Library即可。
2.2 JDBC程序的编写步骤
-
1.注册驱动
- 此处,导入的包是
com.mysql.cj.jdbc.Driver;,一开始我导入的是import com.mysql.jdbc.Driver;包,也是可以的,在运行后控制台提示已弃用,建议更换;【前者是针对MySQL Connector/J 8.0及更高版本的驱动程序,后者是针对MySQL Connector/J 5.1及更早版本的驱动程序】
import com.mysql.cj.jdbc.Driver; ... //1.注册驱动 Driver driver = new Driver();//创建一个Driver对象 - 此处,导入的包是
-
2.获取数据库连接对象
- 本质上是socket连接!
//2.获取数据库连接 String url = "jdbc:mysql://localhost:3306/db_hspJava"; /* 【jdbc:mysql://】: 协议,表示通过jdbc连接mysql数据库; 【localhost】:主机(ip)地址; 【3306】:mysql监听的端口号; 【db_hspJava】:指定连接的mysql数据库名称; 注意:本质上是socket连接! */ //将连接数据库的用户放入一个Properties对象 Properties properties = new Properties(); properties.setProperty("user", "root");//用户 properties.setProperty("password", "12345678");//密码 Connection connect = driver.connect(url, properties); -
3.执行数据库操作
- 需要通过获得的连接对象创建一个Statement对象,用于执行静态SQL语句并返回其生成的结果;
//3.执行数据库操作(sql语句) //sql语句 String sql_op1 = "INSERT INTO actor (name, sex, borndate, phone) VALUES ('a', '男', '2000-06-03', 123456789), ('b' , '男', '2000-06-04', 123456789)"; //获取Statement对象,该对象是用于执行静态SQL语句并返回其生成的结果的对象 Statement statement = connect.createStatement(); //执行sql,返回结果是数据库中受影响的行数 int rowUpdate = statement.executeUpdate(sql_op1); System.out.println(rowUpdate > 0 ? "成功!" + rowUpdate + " rows" : "失败!"); -
4.关闭数据库连接并释放资源
//4.关闭数据库连接 statement.close(); connect.close(); -
5.运行后,数据库中增加了记录;

三、JDBC连接数据库的方式
- 一共5种方式,上面【基本使用】小节为其中一种方式;
3.1 方式一:静态加载驱动
Driver driver = new Driver();//创建一个Driver对象

String url = "jdbc:mysql://localhost:3306/db_hspJava";

Properties properties = new Properties();
properties.setProperty("user", "root");//用户
properties.setProperty("password", "12345678");//密码

Connection connect = driver.connect(url, properties);
3.2 方式二:使用反射机制动态加载驱动
Class aClass = Class.forName("com.mysql.cj.jdbc.Driver");//反射机制,动态加载
Driver driver = (Driver) aClass.newInstance();

String url = "jdbc:mysql://localhost:3306/db_hspJava";

Properties properties = new Properties();
properties.setProperty("user", "root");//用户
properties.setProperty("password", "12345678");//密码

Connection connect = driver.connect(url, properties);
System.out.println(connect);
3.3 方式三:使用DriverManager替换Driver
DriverManager可以根据不同的数据库连接URL自动加载并使用相应的驱动程序。- 根据JDBC规范和自动服务发现机制,
DriverManager可以识别连接URL中的数据库协议(例如jdbc:mysql://表示MySQL数据库)并加载相应的驱动程序。
//在较新版本的mysql驱动程序中,可以省略driver注册操作(即不需要显式的注册驱动)

Class aClass = Class.forName("com.mysql.cj.jdbc.Driver");
Driver driver = (Driver) aClass.newInstance();
DriverManager.registerDriver(driver);

//直接从这里开始也可以
String url = "jdbc:mysql://localhost:3306/db_hspJava";

Properties properties = new Properties();
properties.setProperty("user", "root");//用户
properties.setProperty("password", "12345678");//密码

Connection connection = DriverManager.getConnection(url, properties);//使用DriverManager统一进行管理
System.out.println(connection);
3.4 方式四:使用Class.forName()自动完成注册驱动,简化代码【推荐使用】
//jdk1.5以后使用了JDBC4,不需要再显式的注册驱动了,因此此处Class.forName()可省略
Class.forName("com.mysql.cj.jdbc.Driver");//反射机制动态加载Driver
//此处,加载Driver类时,底层自动注册驱动Driver:
/*
  Driver.class反编译得到的源码:
        public class Driver extends NonRegisteringDriver implements java.sql.Driver {
            public Driver() throws SQLException {
            }

            static {
                try {
                    DriverManager.registerDriver(new Driver());//此处进行了Driver驱动注册操作
                } catch (SQLException var1) {
                    throw new RuntimeException("Can't register driver!");
                }
            }
        }
 */

String url = "jdbc:mysql://localhost:3306/db_hspJava";

Properties properties = new Properties();
properties.setProperty("user", "root");//用户
properties.setProperty("password", "12345678");//密码

Connection connection = DriverManager.getConnection(url, properties);//使用DriverManager统一进行管理
System.out.println(connection);
3.5 方式五:使用配置文件
- 上述方式,数据库连接的url、user以及password都是写死了,不利于修改;
- 优化:使用配置文件properties
url=jdbc:mysql://localhost:3306/db_hspJava
user=root
password=12345678
driver=com.mysql.cj.jdbc.Driver
//通过Properties对象获取配置文件信息
Properties properties = new Properties();
properties.load(new FileInputStream("./hsp_ch25/mysql.properties"));

String user = properties.getProperty("user");
String password = properties.getProperty("password");
String driver = properties.getProperty("driver");
String url = properties.getProperty("url");

Class.forName(driver);

Connection connection = DriverManager.getConnection(url, user, password);
System.out.println(connection);
四、ResultSet结果集
-
执行查询数据库的语句生成的结果集;
-
ResultSet对象保持一个光标指向当前的数据行,初始时指向第一行;
-
next()方法将该光标移动到下一行,因此一般用while遍历结果集;
-
具体案例如下:
/** * @author: sea * @date: 2023/6/12 09:10 */ public class JDBC_04_ResultSet { public static void main(String[] args) throws IOException, ClassNotFoundException, SQLException { Properties properties = new Properties(); properties.load(new FileReader("./hsp_ch25/mysql.properties")); String driver = properties.getProperty("driver"); String url = properties.getProperty("url"); String user = properties.getProperty("user"); String password = properties.getProperty("password"); Class.forName(driver); Connection connection = DriverManager.getConnection(url, user, password); Statement statement = connection.createStatement(); String sql = "SELECT id, name, sex, phone FROM actor;"; //执行给定的SQL语句,返回单个ResultSet对象 ResultSet resultSet = statement.executeQuery(sql); System.out.println(resultSet); //使用while循环取出数据 while(resultSet.next()){ int id = resultSet.getInt(1);//获取当前行的第一列 String name = resultSet.getString("name"); String sex = resultSet.getString("sex"); String phone = resultSet.getString("phone"); System.out.println("[" + id + ", " + name + ", " + sex + ", " + phone + "]"); } //关闭连接 resultSet.close(); statement.close(); connection.close(); } } -
运行结果:

五、Statement
5.1 Statement
-
用于执行静态SQL语句并返回其生成结果的对象;
-
实际开发中一般不使用,原因:存在SQL注入!
-
什么是SQL注入?
- SQL注入通常发生在使用动态SQL语句构建的Web应用程序中,这些语句将用户提供的输入直接拼接到SQL查询中,而不进行充分的验证或转义。
- 攻击者可以通过在输入中插入特殊的SQL代码来干扰原始查询的结构,从而实现执行恶意操作的目的。
- 例如:

5.2 PreparedStatement
-
一种在关系型数据库中执行预编译SQL语句的机制。
-
它是SQL语句的预编译版本,允许开发人员定义参数化查询,并提供对输入参数的类型安全性验证。
-
PreparedStatement通常与绑定参数一起使用,以防止SQL注入攻击,并提供更高的性能和安全性。
-
基本使用流程:
- 1.准备查询:使用PreparedStatement创建SQL查询的模板。查询中的值部分使用占位符(通常是问号 ?)代替实际的参数值。
- 2.绑定参数:对于每个占位符,使用相应的方法将实际的参数值绑定到PreparedStatement对象上,例如setString()。
- 3.执行查询:执行PreparedStatement的executeQuery()方法来执行查询。数据库系统将使用预编译的SQL语句模板和绑定的参数来执行查询。
-
防止SQL注入!

六、事务
-
在JDBC中,当一个Connection对象创建时,默认为自动提交事务,即每一次执行SQL语句时,如果执行成功,就会向数据库自动进行事务提交操作;
-
为了让多个SQL语句作为一个整体执行,需要使用事务;
-
在JDBC中,调用Connection的
setAutoCommit(false)方法可以取消默认自动提交事务;这样就可以在所有SQL执行完成后,调用commit()方法提交事务;- 在当前事务中,调用
rollback()方法,可以撤销在当前事务中所做的所有更改,并且释放当前Connection对象持有的数据库锁;
- 在当前事务中,调用
-
案例:
银行转账:用户 马云 向 用户 马化腾 转100块 过程: 1.用户 马云 的余额 -100 2.用户 马化腾 的余额 +100 3.事务提交 4.若出现异常,事务回滚-
1.建表并插入两条记录:

-
2.模拟转账业务
/** * @author: sea * @date: 2023/6/12 12:04 */ public class JDBC_07_transaction { public static void main(String[] args) throws IOException, ClassNotFoundException, SQLException { String sql1 = "UPDATE account SET balance = balance - 100 WHERE id = 1;"; String sql2 = "UPDATE account SET balance = balance + 100 WHERE id = 2;"; Properties properties = new Properties(); properties.load(new FileReader("./hsp_ch25/mysql.properties")); String driver = properties.getProperty("driver"); String url = properties.getProperty("url"); String user = properties.getProperty("user"); String password = properties.getProperty("password"); Class.forName(driver); Connection connection = DriverManager.getConnection(url, user, password); try { //设置事务默认不自动提交 connection.setAutoCommit(false); //减100 PreparedStatement preparedStatement1 = connection.prepareStatement(sql1); preparedStatement1.executeUpdate(); int i = 1 / 0;//异常事件 //加100 PreparedStatement preparedStatement2 = connection.prepareStatement(sql2); preparedStatement2.executeUpdate(); //两个sql操作都执行完后提交事务 connection.commit(); preparedStatement1.close(); preparedStatement2.close(); connection.close(); } catch (Exception e) { System.out.println("出现异常,回滚事务"); connection.rollback(); throw new RuntimeException(e); } } } -
如果不使用事务处理,上述异常发生时,用户 马云 扣了100块,但是 用户 马化腾 没有加100块;
-
七、批处理
7.1 基本介绍
- 当需要成批插入或者更新记录时,可以采用Java的批处理机制,这一机制允许 多条语句一次性提交给数据库进行批量处理。【效率较高】
- 批处理往往和PreparedStatement搭配使用,可以减少编译次数和运行次数;
7.2 批处理的性能优势
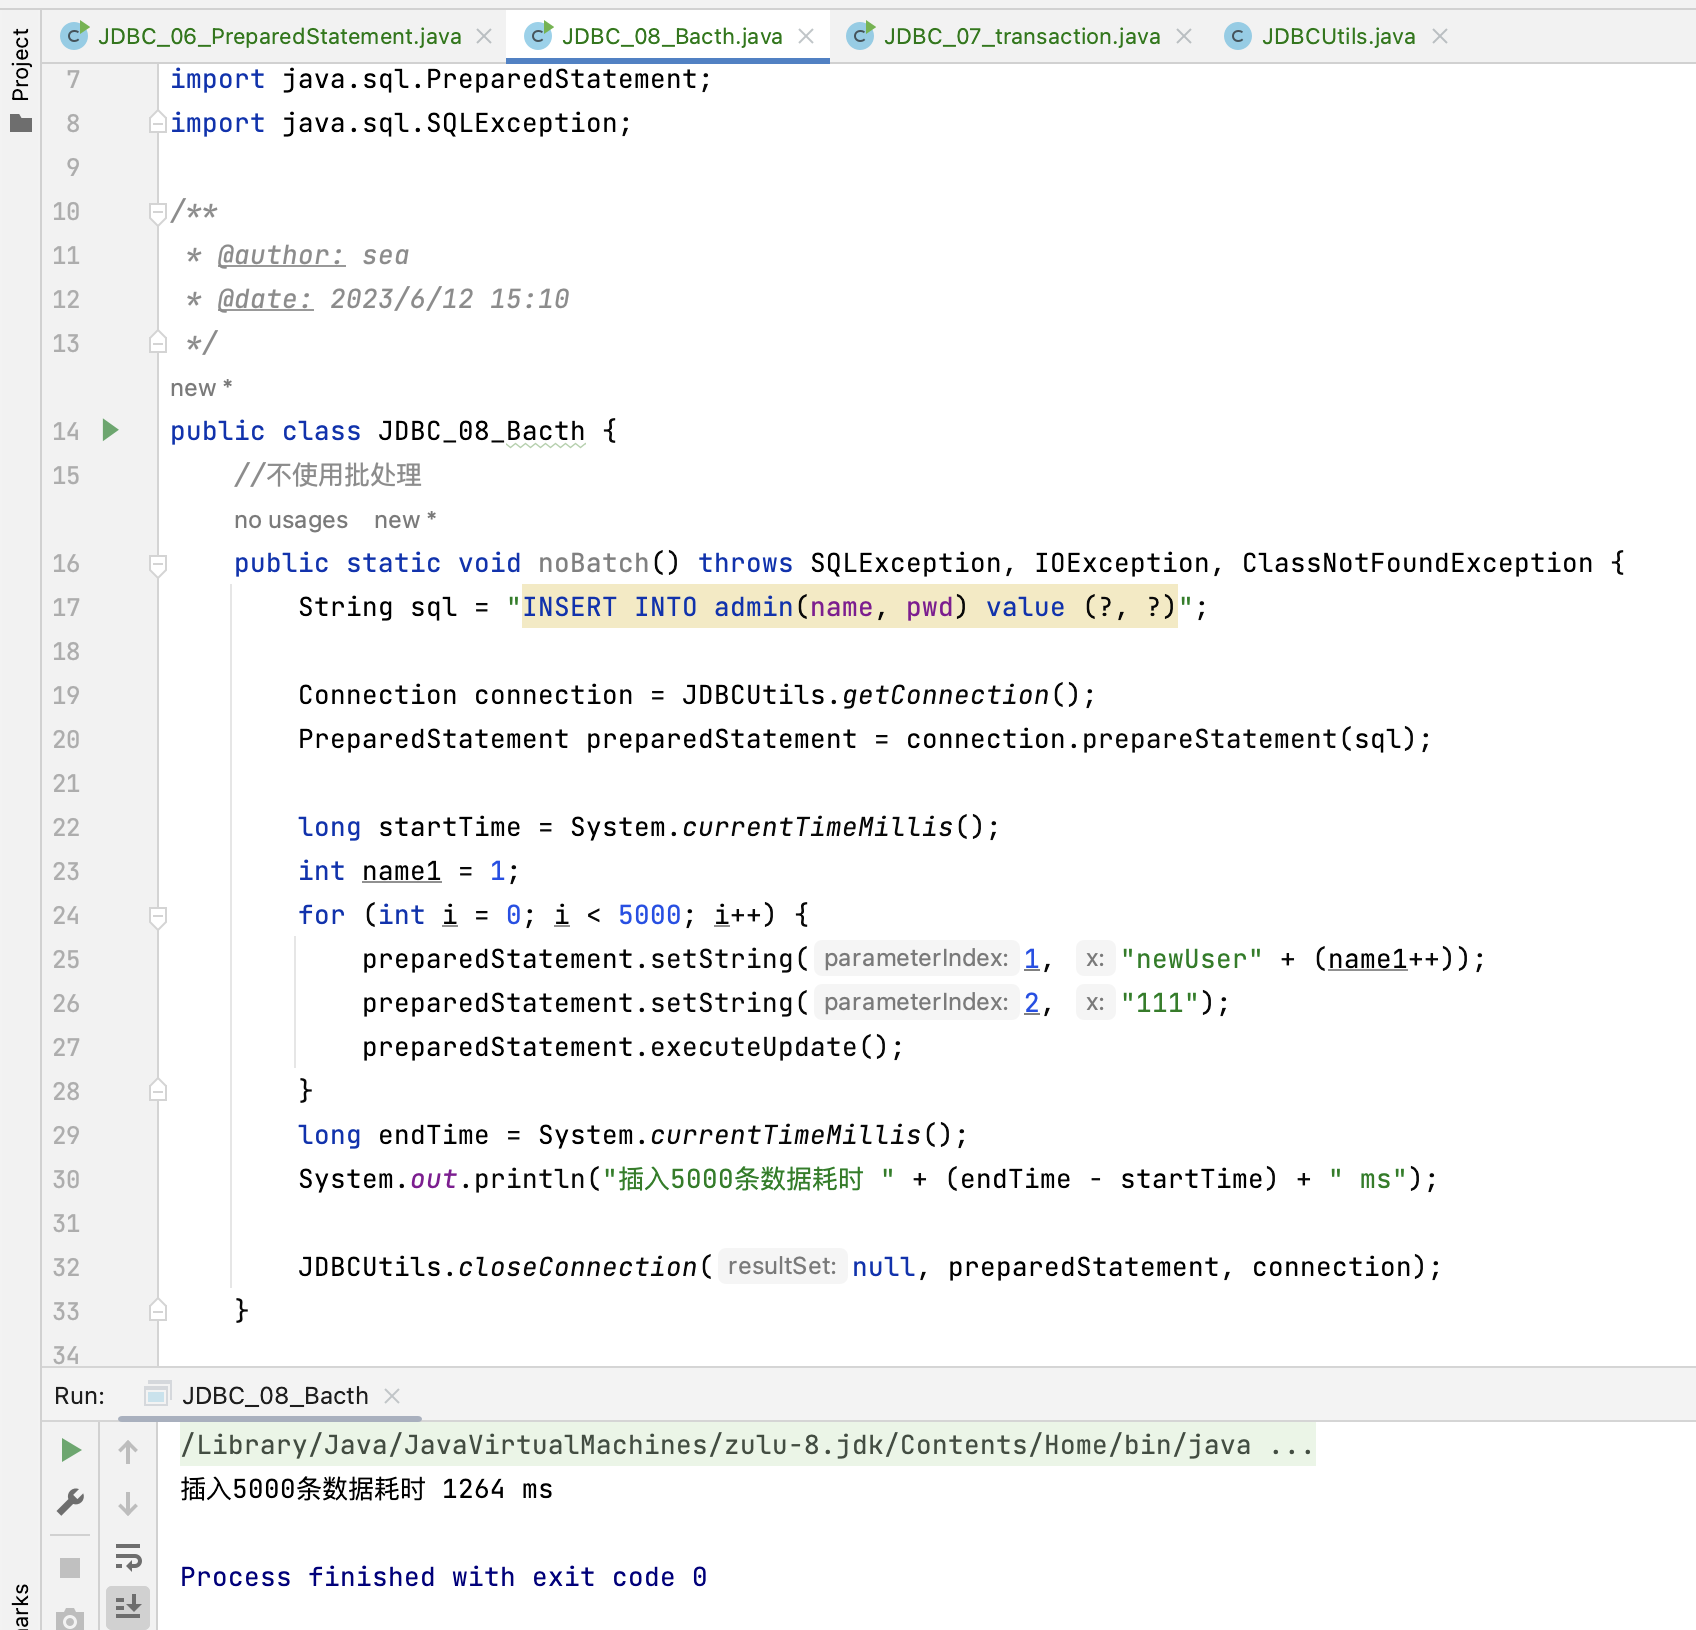
- 不使用批处理
-
使用批处理
-
注意:使用批处理需要配置url的参数
url_batch=jdbc:mysql://localhost:3306/db_hspJava?rewriteBatchedStatements=true- 该参数表示可以启用批处理写入的重写功能。作用是将批处理语句重写为更高效的形式【JDBC驱动程序将尝试将批处理语句转换为单个带有多个值的SQL语句】,以提高性能。


-
-
根据上述对比,不使用批处理,仅插入5000条数据就耗时1200多ms,而使用了批处理后,插入10万条数据,耗时780多ms!!!
-
性能提升的原因:
- 1.批处理:多条sql批量执行,减少执行次数;
- 2.PreparedStatement:预编译,减少编译次数;


 被折叠的 条评论
为什么被折叠?
被折叠的 条评论
为什么被折叠?
 到【灌水乐园】发言


