


1.下载pip2pi,并安装(下载地址)
2.新建一个目录“D:\program\python\package”,用于存储pypi文件,作为仓库目录
3.下载python中的所需包放至仓库文件夹“D:\program\python\package”
可以手动下载自己需要的文件包到该目录下,或者利用清华镜像库来下载所有的文件包。
可以使用如下方式下载全部的镜像文件(从清华镜像库中下载):
(3.1)将清华pypi镜像库文件列表粘贴到requirement.txt文件中。
import requests
import re
report = requests.request('get','https://mirrors.tuna.tsinghua.edu.cn/pypi/web/simple/')
# print(report.text)
text_str = str(report.text).split('\n')
with open('requirement.txt','w+') as f:
    for i in text_str:
        temp = re.findall('<a href="(.*?)/">',i)
        # print(i,temp)
        if temp != []:
            f.write(str(temp[0])+'\n')
(3.2)根据requirement.txt下载所有的镜像库文件:
#!/bin/bash
import os
file="C:\\software\\package\\requirement.txt"

with open(file,'r+') as f:
    text = f.readlines()
    for i in text:
        os.mkdir('C:\\software\\package\\'+i[:-1])
        os.system('pip download '+i[:-1]+' -i https://pypi.tuna.tsinghua.edu.cn/simple -d '+'C:\\software\\package\\'+i[:-1])
4.在cmd窗口中执行:
dir2pi 仓库目录
目录下多了一个simple目录,且simple目录里会自动创建每个软件包的目录。
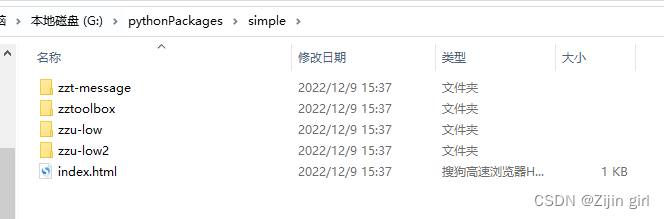
这里如果是在windows上操作,会存在一个问题(我就遇到了):
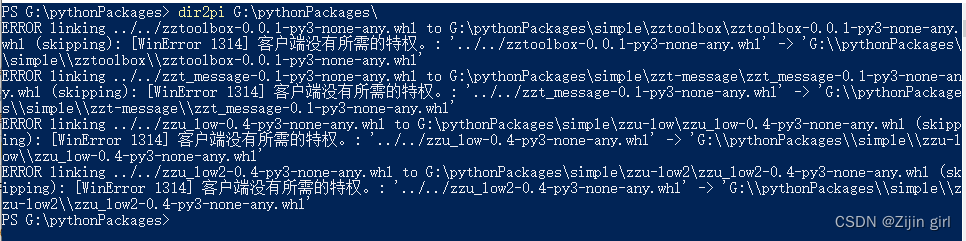
解决方法:用管理员身份打开cmd.
或者:需要去修改simple目录下每个软件包目录下的index.html文件(此部分修改可自行写个python脚本批处理下):
手动操作示范:

修改前:
修改后:
脚本修改:
import os
import glob


class Class_Util_Text():
    def __init__(self):
        pass

    def read_text(self,text_path):
        """
        读取本地text文件到列表,并返回该列表
        """
        assert os.path.exists(text_path)
        with open(text_path,"r") as f:
            lines=f.readlines() #读行
        return lines

    def write_text(self,text_path,text_content):
        """
        把文字写入文本文件中,会清空文本文件的原有内容
        """
        with open(text_path,"w") as f:
            f.writelines(text_content)
            f.writelines("\n")

    def append_text(self,text_path,text_content):
        """
        把文字添加到文本文件的末尾,保留原文本文件内容
        """
        with open(text_path,"a") as f:
            f.writelines(text_content)
            f.writelines("\n")

    def replace_text(self,text_path,replace_old,replace_new):
        """
        替换文本文件中的部分文字,先读文件,替换文字后,再重新写入文件
        """
        #read
        with open(text_path,"r") as f:
            lines=f.readlines()
            data=[]
            for i in lines:
                #根据条件修改
                if(replace_old in i):
                    i=i.replace(replace_old,replace_new)   #修改 replace_old 为 replace_new
                data.append(i)     #记录每一行
        #write
        with open(text_path,"w") as f:
            for i in data:
                f.writelines(i)


if __name__ =="__main__":
    txt_obj = Class_Util_Text()
    dir_path = "D:\pypi-packages\simple"
    html_files = glob.glob(dir_path+"/*/index.html")

    for html_path in html_files:
        txt_obj.replace_text(html_path,replace_old="<a href='",replace_new="<a href='../../" )
        # txt_obj.replace_text(html_path,replace_old="<a href='../../",replace_new="<a href='" )
        lines = txt_obj.read_text(html_path)
        print(html_path)
        print(lines)
5.安装nginx,修改nginx.conf:(nginx下载地址)
server{
    listen		8080;
    server_name 	127.0.0.1:8080;
    access_log 	logs/pip.log;
    location / {
            # root D:/program/python/package/simple/;##不work
            root D:/program/python/package; #work, root路径需要在simple目录的前一层才行
            autoindex on;
            autoindex_exact_size off;
            autoindex_localtime on;
    }
}
6.双击执行nginx.exe启动nginx
注意,如果系统中已经有nginx.exe在运行了,可以先关闭已经运行的nginx.exe程序。再重新执行nginx.exe程序。该程序双击执行即可,有一个对话框闪现一下然后立即消失了,这是正常现象。
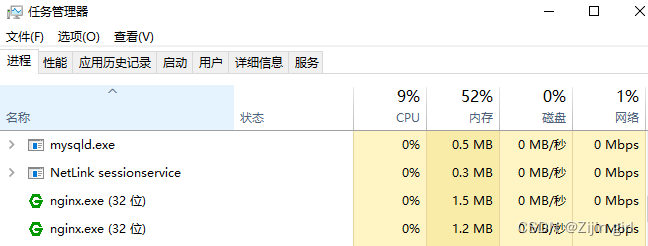
7.访问 : http://127.0.0.1:8080/simple/,就可以看到搭建好的镜像库啦~

8.使用自己搭建的本地镜像库安装python相关软件包:
临时性:
pip install django -i http://127.0.0.1:8000/simple/
永久性:
pip config set global.index-url http://127.0.0.1:8000/simple/
pip install django
转自:搭建自己的pypi镜像库_xiaomei-Liao的博客-优快云博客_搭建pypi镜像
更多参考(下载后其他布置环境的方法):从零开始搭建本地pip源_clkai的博客-优快云博客_搭建本地pip源
使用bandersnatch搭建pypi 本地镜像源(20211026)_liurizhou的博客-优快云博客_pypi 本地源
搭建、使用与维护私有PyPi仓库_何小有的博客-优快云博客_私有pypi
python搭建本地pip源,离线安装python模块 - 泉love水 - 博客园
Python3 搭建本地 PyPi 源_极客点儿的博客-优快云博客_pypi 本地源
快速搭建私有pip镜像源_m_merlon的博客-优快云博客_自己搭建pip源
查看pypi所有文件的大小:
后记:
1. 在win10环境下安装镜像容易存在多个问题,
1)一些文件名不符合win10标准,在dir2pi的时候会报错,我的处理方式是删除了这些文件。这个问题肯能在linux上不存在。
2)在win10下,执行dir2pi确实遇到了第四节中的错误,按照说明操作即可。
3.)nginx.exe的作用是把index.html暴露给浏览器,使得浏览器可以通过网址访问索引html,所以只需要最简单的功能即可。当刷新nginx.exe不成功时,应该是已经有多个nginx.exe在运行了,需要关掉这些正在运行的nginx.exe才能刷新nginx的配置。
2. 可能在linux上不存在这么多问题。所以,还是要选择linux作为服务器,而不是windows系统。
 502


 扫一扫


 被折叠的 条评论
为什么被折叠?
 到【灌水乐园】发言


