


背景
为什么使用Java加载模型?
在生产环境中没有任何必要使用Python在单独起一个服务提供服务接口,那会增加每次服务调用的时间,造成用户不好的体验。
同时为了减少部署的工作量,与其他业务功能都使用Java提供统一的服务接口,会减少很多的工作量,维护成本也相对减少。
环境说明
Java版本:11
操作系统:Windows
利用Python将模型本地化
下载模型
前往https://huggingface.co/中查找自己需要的开源模型,复制模型标识,比如如下图所示:
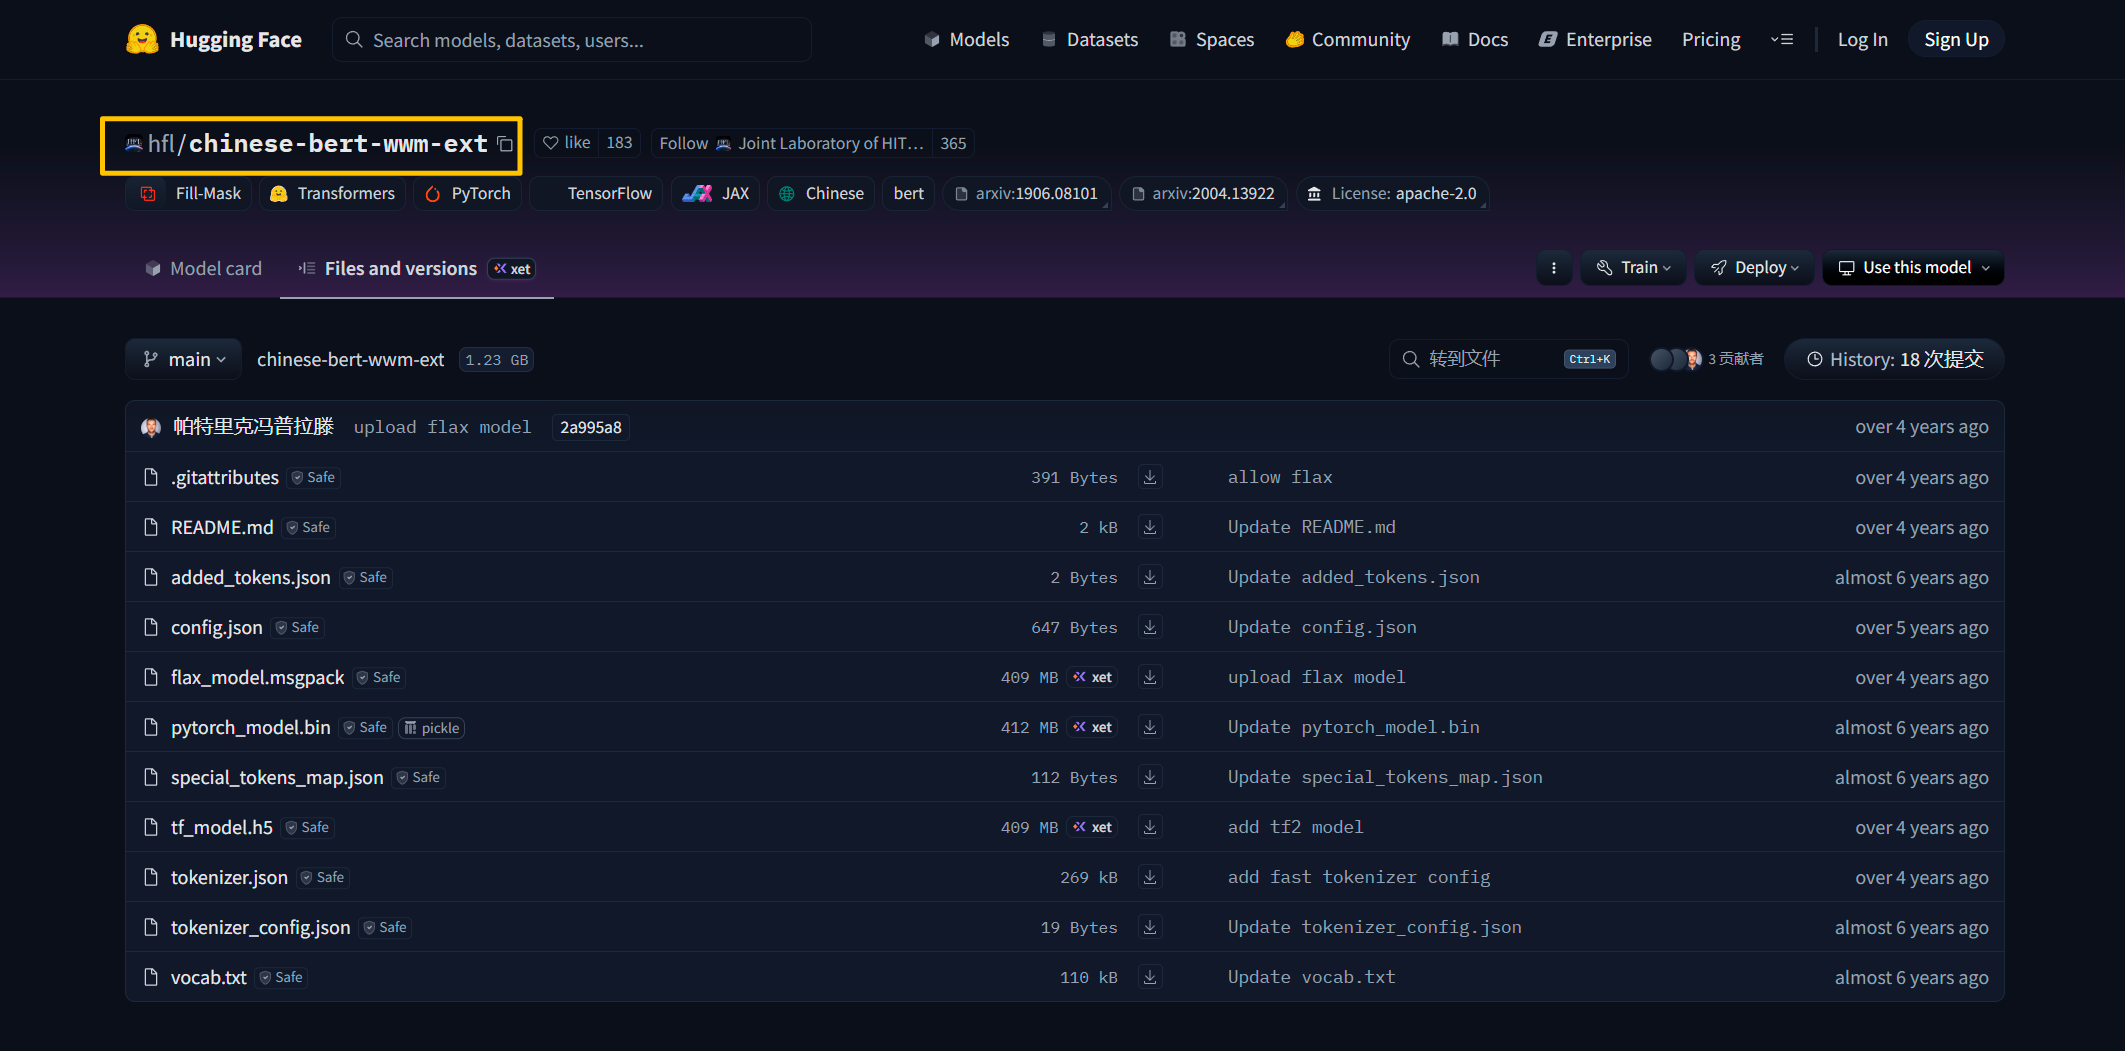
将模型标识替换掉下方代码中的mode_id内容,target_dir是输出目录,这里指定一个目录即可,目录不存在的话会自动创建目录。
import os, sys

model_id = "uer/roberta-base-finetuned-cluener2020-chinese"
target_dir = r"E:\Work\BERT\models\roberta-base-finetuned-cluener2020-chinese"
os.makedirs(target_dir, exist_ok=True)

# 常见需要的文件(可能有些模型文件名不同)
files = ["config.json", "vocab.txt", "tokenizer.json", "special_tokens_map.json", "pytorch_model.bin"]

api = HfApi()
for fname in files:
    try:
        print("Downloading", fname)
        path = hf_hub_download(repo_id=model_id, filename=fname, cache_dir=target_dir, local_dir=target_dir)
        print("Saved:", path)
    except Exception as e:
        print("Failed to download", fname, ":", e)
print("done")
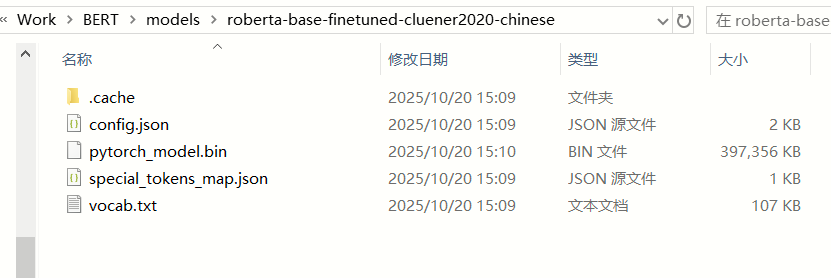
验证是否下载成功
打开输出目录,查看文件是否有下载完成。至少需要包含pytorch_model.bin、config.json、vocab.txt等以下文件。
生成tokenizer.json文件
有些模型是没有tokenizer.json文件的,就像我们现在所用的这个模型。但我们后续使用Java去加载这个模型时是需要用到tokenizer.json文件。下面是使用Python去根据下载的模型生成tokenizer.json文件代码:
from transformers import AutoTokenizer
tokenizer = AutoTokenizer.from_pretrained("E:\\Work\\BERT\\models\\roberta-base-finetuned-cluener2020-chinese")
tokenizer.save_pretrained("E:\\Work\\BERT\\models\\roberta-base-finetuned-cluener2020-chinese", legacy_format=False)
Python加载模型测试
通过以下代码加载刚刚下载到本地的模型。指定目录即可,保证目录中模型存在会自动读取模型文件的。
from transformers import BertTokenizerFast, BertForTokenClassification
import torch

model_dir = "E:\\Work\BERT\\models\\roberta-base-finetuned-cluener2020-chinese"
tokenizer = BertTokenizerFast.from_pretrained(model_dir)
model = BertForTokenClassification.from_pretrained(model_dir)

text = "程序员范宁在北京大学的燕园看了中国男篮的一场比赛。"
tokens = list(text)
inputs = tokenizer(tokens, return_tensors="pt", is_split_into_words=True)

with torch.no_grad():
    outputs = model(**inputs)
predictions = torch.argmax(outputs.logits, dim=2)

id2label = model.config.id2label
print([id2label[i.item()] for i in predictions[0]])
输出内容
上面的示例代码输出结果如下所示:
['O', 'B-position', 'I-position', 'I-position', 'B-name', 'I-name', 'O', 'B-organization', 'I-organization', 'I-organization', 'I-address', 'O', 'I-address', 'I-address', 'O', 'O', 'O', 'O', 'O', 'I-organization', 'O', 'O', 'O', 'O', 'O', 'O', 'O']
这个输出是一个典型的 命名实体识别(NER)任务的标签序列,使用的是 BIO 标注格式(有时也叫 IOB 格式)。
B-XXX:表示一个实体的开始(Begin),XXX 是实体类型(如 name、position、organization、address 等)。
I-XXX:表示该词属于 XXX 类型实体的中间或结尾部分(Inside),且前面已经有同类型的 B 或 I。
O:表示“Outside”,即不属于任何命名实体。
导出pt模型
常见的模型文件:
| 格式 | 主要框架 | 是否含结构 | 是否跨语言 | 是否可读 | 典型文件名 |
|---|---|---|---|---|---|
.pt | PyTorch | ✅(TorchScript) ❌(state_dict) | ✅(TorchScript) ❌(pickle) | ❌ | model.pt, traced_model.pt |
.bin | PyTorch (HF) | ❌ | ❌ | ❌ | pytorch_model.bin |
.h5 | TensorFlow/Keras | ✅ | ❌(限 TF) | ⚠️(需工具) | tf_model.h5 |
.msgpack | Flax/JAX | ❌ | ✅(数据) | ⚠️(二进制) | flax_model.msgpack |
如果你需要将模型转换为.pt标准格式模型用于Java服务,下面是用来将.bin模型导出为.pt模型的Python代码:
from transformers import BertTokenizerFast, BertForTokenClassification
import torch

model_dir = "E:\\Work\\BERT\\models\\roberta-base-finetuned-cluener2020-chinese"
tokenizer = BertTokenizerFast.from_pretrained(model_dir)
model = BertForTokenClassification.from_pretrained(model_dir)
model.eval()

# 示例输入(必须和实际输入格式一致)
text = "程序员范宁在北京大学的燕园看了中国男篮的一场比赛。"
tokens = list(text)
inputs = tokenizer(tokens, return_tensors="pt", is_split_into_words=True)

# 导出为 TorchScript
traced_model = torch.jit.trace(
    model,
    (inputs["input_ids"], inputs["attention_mask"]),
    strict=False
)
traced_model.save("roberta-cluener-traced.pt")
Java加载模型
引入工程依赖
以下为pom.xml文件的核心片段内容:
    <dependencyManagement>
        <dependencies>
            <dependency>
                <groupId>ai.djl</groupId>
                <artifactId>bom</artifactId>
                <version>0.34.0</version>
                <type>pom</type>
                <scope>import</scope>
            </dependency>
        </dependencies>
    </dependencyManagement>

    <dependencies>
        <!-- 系统依赖-->
        <dependency>
            <groupId>cn.tworice</groupId>
            <artifactId>tworice-system</artifactId>
        </dependency>

        <!-- 单元测试 -->
        <dependency>
            <groupId>org.springframework.boot</groupId>
            <artifactId>spring-boot-starter-test</artifactId>
        </dependency>

        <!-- DJL API -->
        <dependency>
            <groupId>ai.djl</groupId>
            <artifactId>api</artifactId>
        </dependency>

        <!-- DJL PyTorch engine -->
        <dependency>
            <groupId>ai.djl.pytorch</groupId>
            <artifactId>pytorch-engine</artifactId>
        </dependency>

        <!-- PyTorch native CPU binding -->
        <dependency>
            <groupId>ai.djl.pytorch</groupId>
            <artifactId>pytorch-native-cpu</artifactId>
            <version>2.7.1</version> <!-- 与 BOM 配合的 native 版本(可从 BOM 确认) -->
            <classifier>win-x86_64</classifier>
        </dependency>

        <!-- HuggingFace tokenizers helper(用于加载 tokenizer) -->
        <dependency>
            <groupId>ai.djl.huggingface</groupId>
            <artifactId>tokenizers</artifactId>
        </dependency>
    </dependencies>
加载模型
初始化标签映射
在实例初始化块中对标签映射关系进行初始化,这些标签对应关系一般在模型文件夹下的config.json文件中。config.json文件示例如下图所示:
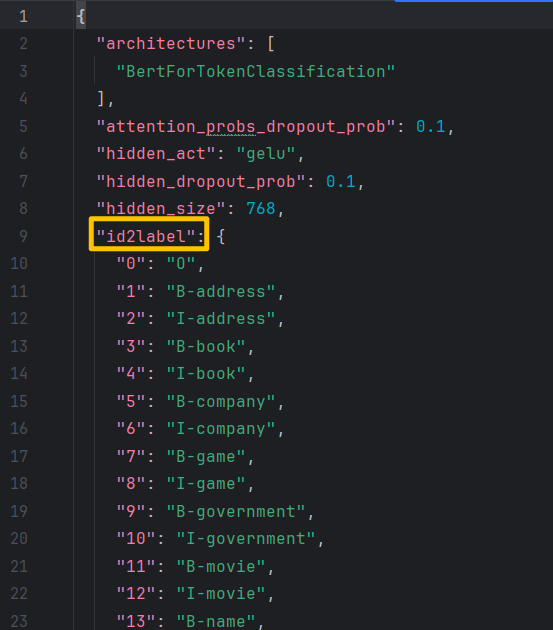
将该内容转换成Java中的Map存储,可以编写一个自动化内容,也可以手动转一下,我这里手动转了一下,核心代码:
private final Map<Integer, String> ID2LABEL = new HashMap<>();

{
    // 标签映射
    ID2LABEL.put(0, "O");
    ID2LABEL.put(1, "B-address");
    ID2LABEL.put(2, "I-address");
    ID2LABEL.put(3, "B-book");
    ID2LABEL.put(4, "I-book");
    ID2LABEL.put(5, "B-company");
    // 这里其他类似内容省略.......
}
加载模型
先加载模型配置文件,这里就用到了上文中生成的tokenizer.json文件,将tokenizer.json文件所在目录替换掉代码中的目录,之后替换掉代码中的pt文件绝对路径。
@PostConstruct
public void init() throws IOException, MalformedModelException {
    tokenizer = HuggingFaceTokenizer.builder()
            .optTokenizerPath(Paths.get("E:\\Work\\BERT\\models\\roberta-base-finetuned-cluener2020-chinese"))
            .optAddSpecialTokens(true)
            .build();

    model = Model.newInstance("ner");
    model.load(Paths.get("E:\\Work\\BERT\\models\\roberta-base-finetuned-cluener2020-chinese\\roberta-cluener-traced.pt"));
}
完整代码
下面是Java加载模型服务提供类的完整代码:
package cn.tworice.djl;

import ai.djl.MalformedModelException;
import ai.djl.Model;
import ai.djl.inference.Predictor;
import ai.djl.ndarray.NDArray;
import ai.djl.ndarray.NDList;
import ai.djl.ndarray.NDManager;
import ai.djl.ndarray.types.DataType;
import ai.djl.ndarray.types.Shape;
import ai.djl.translate.NoopTranslator;
import ai.djl.translate.TranslateException;
import ai.djl.huggingface.tokenizers.HuggingFaceTokenizer;
import ai.djl.huggingface.tokenizers.Encoding;
import org.springframework.stereotype.Service;

import javax.annotation.PostConstruct;
import java.io.IOException;
import java.nio.file.Paths;
import java.util.*;

@Service
public class NerService {

    private Model model;
    private HuggingFaceTokenizer tokenizer;
    private final Map<Integer, String> ID2LABEL = new HashMap<>();

    {
        // CLUEner2020 标签映射(请根据你的模型 config 确认)
        ID2LABEL.put(0, "O");
        ID2LABEL.put(1, "B-address");
        ID2LABEL.put(2, "I-address");
        ID2LABEL.put(3, "B-book");
        ID2LABEL.put(4, "I-book");
        ID2LABEL.put(5, "B-company");
        // 这里其他类似内容省略.......
    }

    @PostConstruct
    public void init() throws IOException, MalformedModelException {
        tokenizer = HuggingFaceTokenizer.builder()
                .optTokenizerPath(Paths.get("E:\\Work\\BERT\\models\\roberta-base-finetuned-cluener2020-chinese"))
                .optAddSpecialTokens(true)
                .build();

        model = Model.newInstance("ner");
        model.load(Paths.get("E:\\Work\\BERT\\models\\roberta-base-finetuned-cluener2020-chinese\\roberta-cluener-traced.pt"));
    }

    /**
     * 预测并打印每个 token 及其 label,同时返回实体列表
     */
    public List<NerEntity> predict(String text) throws TranslateException {
        try (NDManager manager = NDManager.newBaseManager()) {
            Encoding encoding = tokenizer.encode(text);
            long[] inputIds = encoding.getIds();
            long[] attentionMask = encoding.getAttentionMask();
            String[] tokens = encoding.getTokens(); // 实际分词结果

            // === 打印输入 ===
            System.out.println(">>> 输入文本: " + text);
            System.out.println(">>> 分词结果 (含 [CLS]/[SEP]): " + Arrays.toString(tokens));

            // 转为 NDArray
            NDArray inputIdsArr = manager.create(new Shape(1, inputIds.length), DataType.INT64);
            inputIdsArr.set(inputIds);
            NDArray attentionMaskArr = manager.create(new Shape(1, attentionMask.length), DataType.INT64);
            attentionMaskArr.set(attentionMask);

            // 推理
            try (Predictor<NDList, NDList> predictor = model.newPredictor(new NoopTranslator())) {
                NDList inputs = new NDList(inputIdsArr, attentionMaskArr);
                NDList outputs = predictor.predict(inputs);
                NDArray logits = outputs.singletonOrThrow(); // [1, seq_len, num_labels]
                NDArray predictions = logits.argMax(2);      // [1, seq_len]
                long[] predIds = predictions.toLongArray();  // length = seq_len

                // === 构建 token -> label 映射(跳过 [CLS] 和 [SEP])===
                System.out.println("\n>>> Token 与 Label 对应关系:");
                List<String> tokenLabels = new ArrayList<>();
                // tokens[0] = [CLS], tokens[tokens.length-1] = [SEP]
                for (int i = 1; i < tokens.length - 1; i++) {
                    String token = tokens[i];
                    String label = ID2LABEL.getOrDefault((int) predIds[i], "O");
                    tokenLabels.add(label);
                    System.out.printf("  %-12s -> %s%n", token, label);
                }
                System.out.println(); // 空行分隔

                // === 提取实体(使用 tokenLabels 转为 long[])===
                long[] labelIds = tokenLabels.stream()
                        .mapToLong(label -> {
                            for (Map.Entry<Integer, String> entry : ID2LABEL.entrySet()) {
                                if (entry.getValue().equals(label)) return entry.getKey();
                            }
                            return 0L;
                        })
                        .toArray();

                // 注意:这里 tokens[1:-1] 对应原始分词,但中文通常按字,可直接用于 decode
                String[] contentTokens = Arrays.copyOfRange(tokens, 1, tokens.length - 1);
                List<NerEntity> entities = decodeEntities(contentTokens, labelIds);

                return entities;
            }
        }
    }

    private List<NerEntity> decodeEntities(String[] tokens, long[] labels) {
        List<NerEntity> entities = new ArrayList<>();
        StringBuilder currentEntity = new StringBuilder();
        String currentType = null;
        int start = -1;

        for (int i = 0; i < tokens.length && i < labels.length; i++) {
            String token = tokens[i];
            String label = ID2LABEL.getOrDefault((int) labels[i], "O");

            if (label.startsWith("B-")) {
                if (currentType != null) {
                    entities.add(new NerEntity(currentEntity.toString(), currentType, start, i));
                }
                currentEntity = new StringBuilder(token);
                currentType = label.substring(2);
                start = i;
            } else if (label.startsWith("I-") && currentType != null && label.substring(2).equals(currentType)) {
                currentEntity.append(token);
            } else {
                if (currentType != null) {
                    entities.add(new NerEntity(currentEntity.toString(), currentType, start, i));
                    currentType = null;
                    currentEntity.setLength(0);
                }
            }
        }

        if (currentType != null) {
            entities.add(new NerEntity(currentEntity.toString(), currentType, start, tokens.length));
        }

        return entities;
    }

    public static class NerEntity {
        public String entity;
        public String type;
        public int start;
        public int end;

        public NerEntity(String entity, String type, int start, int end) {
            this.entity = entity;
            this.type = type;
            this.start = start;
            this.end = end;
        }

        @Override
        public String toString() {
            return String.format("{'entity': '%s', 'type': '%s', 'start': %d, 'end': %d}", entity, type, start, end);
        }
    }
}
测试使用
利用单元测试,传入一段文字查看输出结果。
@SpringBootTest
public class BertTest {

    @Autowired
    private NerService nerService;

    @Test
    void testNerPrediction() throws Exception {
        String text = "2025年10月1日,程序员范宁在中国北京看了中国男篮的一场比赛。";
        List<NerService.NerEntity> entities = nerService.predict(text);

        System.out.println("输入文本: " + text);
        System.out.println("识别实体:");
        for (var entity : entities) {
            System.out.println(entity);
        }
    }
}
结果输出:
>>> 输入文本: 程序员范宁在中国北京看了中国男篮的一场比赛。
>>> 分词结果 (含 [CLS]/[SEP]): [[CLS], 程, 序, 员, 范, 宁, 在, 中, 国, 北, 京, 看, 了, 中, 国, 男, 篮, 的, 一, 场, 比, 赛, 。, [SEP]]
[W1022 18:57:51.000000000 LegacyTypeDispatch.h:79] Warning: AutoNonVariableTypeMode is deprecated and will be removed in 1.10 release. For kernel implementations please use AutoDispatchBelowADInplaceOrView instead, If you are looking for a user facing API to enable running your inference-only workload, please use c10::InferenceMode. Using AutoDispatchBelowADInplaceOrView in user code is under risk of producing silent wrong result in some edge cases. See Note [AutoDispatchBelowAutograd] for more details. (function operator ())

>>> Token 与 Label 对应关系:
  程            -> B-position
  序            -> I-position
  员            -> I-position
  范            -> B-name
  宁            -> I-name
  在            -> O
  中            -> B-address
  国            -> I-address
  北            -> I-address
  京            -> I-address
  看            -> O
  了            -> O
  中            -> O
  国            -> O
  男            -> O
  篮            -> I-organization
  的            -> O
  一            -> O
  场            -> O
  比            -> O
  赛            -> O
  。            -> O

输入文本: 程序员范宁在中国北京看了中国男篮的一场比赛。
识别实体:
{'entity': '程序员', 'type': 'position', 'start': 0, 'end': 3}
{'entity': '范宁', 'type': 'name', 'start': 3, 'end': 5}
{'entity': '中国北京', 'type': 'address', 'start': 6, 'end': 10}


 1652
1652

 被折叠的 条评论
为什么被折叠?
被折叠的 条评论
为什么被折叠?
 到【灌水乐园】发言


