app自动化页面无法使用uiautomator和appium定位问题

Python uiautomator2 基于图像识别操作的核心代码封装类 Python uiautomator2 基于图像识别操作的核心代码封装类。 阅读详情

起因:
按照正常流程配置好caps,执行driver=Remote(command_executor=‘http://127.0.0.1:4723/wd/hub’,desired_capabilities=caps)
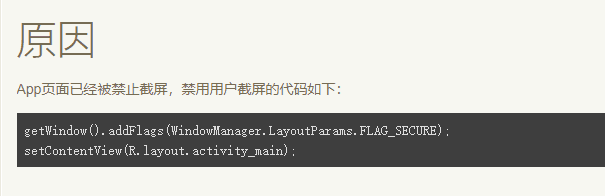
打开元素定位工具:sdk自带的uiautomator,发现页面无法被定位,分析原因后是由于开发在代码设置了禁止截屏: 在这里插入图片描述
解决办法:
一:让开发重新打包一个没有禁止截屏的apk
二:获取页面资源进行解析
driver.page_source
上面这一行代码获取的是一个页面的xml文件,也就是布局
此时打印在pycharm上的很乱,可以利用https://tool.oschina.net/codeformat/xml这个网站是用来格式化xml文件的,整体会清晰一点。

事实上上面的解决办法很抽象,看到了布局,但是如果布局没有text文件之类的,依然很难找到元素。

所以通过python的内置库import xml.etree.cElementTree as ET

def parse_page_source(page_source):

      locator_list=[]
#       current_inde=''
#       father_index=''
#       tree=ET.fromstring(page_source)
#       print(tree.iter())
#       for node in tree.iter():
#             global locator
#             name=node.get('name')
#
#             label=node.get('label')
#
#             value=node.get('value')
#
#             path=node.get('path')
#
#             tag_name=node.tag
#
#             clickable=node.get('clickable')
#             print(clickable)

  #       if path is not None:
  #
  #             current_index=path.split('/')[-1]
  #             father_index=path.split('/')[-2]
  #       if name !='':
  #                   value='''//%s[@name='%s']'''%(tag_name,name)
  #                   lacator={'by':'xpath','value':value}
  #       elif label !='':
  #                   value = '''//%s[@label='%s']''' % (tag_name, label)
  #                   lacator = {'by': 'xpath', 'value': value}
  #
  #       elif clickable==True:
  #             value = '''//%s[@name='%s']''' % (tag_name, clickable)
  #             lacator = {'by': 'xpath', 'value': value}
  #
  #       count=len(tree.findall('{}'.format(locator.get('value'))))
  #
  #       if count ==1:
  #                   locator_list.append(locator)
  #       elif count >1:
  #                   pass
  # return locator_list
UiAutomator——点击难以识别的控件技巧 有时候我们使用UiAutomator在查找元素的时候,发现明明元素在UiAutomator view工具中能够识别出,但是使用代码去识别的时候,却发现该元素 UiObjectNotFoundException,是偶然出现的,但是这些就够让我们的测试代码的容错性大大降低,给别人展示的时候,人家看到的是结果,发现时不时的出现错误,那就给人的影响是————你还没做好。 其实有些元素真的出现该现象的话 阅读详情

相关推荐

【APP测试】 uiautomator2,atx框架安装和简单使用

用途和特点:UIAutomator2 更专注于 Android 平台的原生应用和系统应用的自动化测试,性能稳定且无需额外的安装;而 Appium 则提供了跨平台的支持,可以用于 iOS、Android 和 Windows 应用的自动化测试,具有更灵活的定位方式和丰富的生态系统。定位策略:UIAutomator2 使用原生的 UI 属性来定位,而 Appium 支持更多定位策略,如 XPath、CSS 选择器等。技术栈和语言。

qq_45492643的博客 2912

app自动化 - 元素定位不到?别慌,3大工具帮你搞定!

在日常的android app自动化测试工作当中,很多朋友在元素定位时,会遇到以下类似的报错: 然后会来问,这是啥情况? 一般情况下,都会送上以下亲切的关怀: 1)adb能识别到设备吗? 2)设备有被其它的程序在占用吗? 3)ADT的版本正确吗? 当朋友们对以上关怀都确认之后,反馈仍然会遇到这样的报错。 那么为了不影响学习的热情,会提供以下三种定位工具,总有一款可以让你顺利的定位到元素哦!! 每一种工具定位的前提: 1、通过 adb devices命令能够识别到至少一个android设备; 2、设备当前没有

爱码小哥 1379

【Appium+python实战】大麦抢票APP自动化实战(附带源码)

基于uiautomator2+Appium的MuMu模拟器自动化测试实战

weixin_61226361的博客 3126

为网上流行论点“UIAutomator不能通过中文文本查找控件”正名

1. 问题描述和起因 相信大家学习UIAutomator一开始的时候必然会看过一下这篇文章。 Android自动化测试(UiAutomator)简要介绍 因为你在百度输入UIAutomator搜索的时候,该文章是排在第一位的。 但是里面有一段说法说UIAutomator不能支持通过中文文本查找控件,这个说法害人不浅,如果不是自己去实践调查过,必然也会轻易放...

weixin_34365417的博客 183

APP自动化之uiautomator2的使用整合与实际使用

环境:Python3.7,adb1.0.41 安装方式:pip install --pre uiautomator2 注意,在安装时处理截图数据要额外安装pillow库pip install pillow 即可。在安装uiautomator2不成功时,可以尝试把–pre换成-U或者-e去进行安装。 安装atx-agent:python -m uiautomator2 init 安装weditor并桌面化 1.pip install —pre weditor 2.python -m weditor —shor

Fread的博客 4532

Java+Uiautomator2手机UI自动化实战 -- 1. Uiautomator2以及Uiautomator介绍

一 什么是Uiautomator? UIAutomator是android的自动化测试框架,可跨APP。是谷歌在Android4.1版本发布时推出的一款用Java编写的UI测试框架。其最大的特点就是可以跨进程操作,我们可以使用UiAutomator框架提供的一些方便的API来对安卓应用进行一系列的自动化测试操作,如点击、滑动、键盘输入、长按以及常用的断言方法等。 Bootstrap是Appiu...

ricky_yangrui的博客 8476

App元素定位失败了,怎么办?

在日常的android app自动化测试工作当中,元素定位时会遇到以下类似的报错:

主要分享测试的学习资源,帮助快速了解测试行业,帮助想转行、进阶、小白成长为高级测试工程师。 1022

【Appium】使用uiautomator定位元素

介绍:appium可以使用uiautomator 来定位元素,或者滚动页面。使用uiautomator 只适用于Android。 下面以appium官方自带的调试App来演示。 调试App下载地址:https://github.com/appium/appium/blob/master/sample-code/apps/ApiDemos-debug.apk 通过className定位 通过clas...

galen2016的博客 1043

uiautomator2,一款比appium还好用的app自动化测试框架

一说到app自动化测试,第一反应就会想到appium这个框架,和web端的selenium一样,但是对于appium来说,搭建环境非常重要,很多人都被环境搞得望而却步了,放弃了appium。 下面说的uiautomator2这个框架,环境比appium简单多了,可以值得一学的 1.uiautomator2简介和原理分析 uiautomator2是一个自动化测试开源工具,仅支持Android平台的原生应用测试。它本来是Google提供的一个自动化测试的Java库,后来发展了python-uiautomator

shenshenruoxi的博客 1万+

告别Modern Standby噩梦:Win11睡眠断网冻结的根源剖析与S3睡眠回归实战

本文深入剖析了Windows 11中Modern Standby(现代待机)模式导致睡眠后断网、系统冻结等问题的根源,指出其与硬件驱动、后台活动的兼容性矛盾。文章提供了通过修改注册表键值强制系统回归稳定S3睡眠状态的详细实战步骤,帮助用户彻底解决睡眠故障,实现可靠的远程访问与挂机任务。

weixin_29210727的博客 603

用《Flappy Bird》游戏带你搞懂强化学习:从Q-learning到DQN的保姆级实战

本文通过《Flappy Bird》游戏实战,详细讲解了从Q-learning到DQN的强化学习技术。从环境搭建、Q表格构建到深度Q网络(DQN)的实现,逐步展示如何训练AI自主玩游戏。文章包含代码示例、训练技巧和性能优化方法,帮助读者深入理解强化学习的核心概念和应用。

weixin_42526415的博客 347

十分钟弄懂最快的APP自动化工具uiautomator2(入门到精通)

前言 相信很多使用appium做过APP自动化的人都深有感触: appium运行慢、时间长 uiautomatorviewer定位元素时得关掉appium server 在低版本的appium上获取toast需要切换automationName 现在有一款自动化测试工具uiautomator2,它几乎完美的避免了以上的问题。简单易学,对新手足够友好。本次我们介绍一下这款工具,让你在十分钟之内能迅速掌握它 一、介绍 uiautomator2是uiautomator的升级版,uiautomator是

weixin_67553250的博客 3万+

USC EE450 CSCI455 CSCI571 Midterm 总结

EE450 Compter Network                1.历年Midterm考题。(更新至2017年spring,如果大家有新的资源欢迎编辑)                 google drive:https://drive.google.com/drive/folders/0B_LCDxpiiXZ1cUNReFpZZHo4NG8?usp=sharing

Small_hour 7112

手机APP自动化 Appium教程

Appium原理与安装 Appium 是一个移动 App (手机应用)自动化工具。 手机APP 自动化有什么用? 自动化完成一些重复性的任务 比如微信客服机器人 爬虫 自动化测试 Appium 自动化方案的特点: 开源免费 支持多个平台 支持多种类型的自动化 支持多种编程语言 自动化原理 我们先来看一下Appium自动化的原理图 这图是不是很眼熟? 对啦,和Selenium 原理图很像。因为 Appium自动化架构就是借鉴的Selenium。 大家看看这幅图, 包含了 3个主体部分 : 自动化程序

乎你的博客 31万+

【HSCNN解析】HSCNN:从欠采样光谱图重建高光谱图的CNN网络

本文介绍HSCNN,是一个将欠采样光谱图重建为高光谱图的纯CNN网络,2017年提出。

上个大学哪有不疯的?硬撑罢了! 1619

槽型光电开关传感器原理图设计,已量产(光电传感器)

在嵌入式设备的位置限位、物料计数等场景中,槽型光电开关是性价比极高的传感器方案 —— 它通过遮挡发射器与接收器之间的光路实现电平切换,电路简单且抗干扰性优于漫反射式光耦。今天分享一个实际项目中落地的槽型光电开关检测电路,从器件选型到逻辑设计都做了简化适配,适合小批量原型或低成本产品的需求。

不脱发的程序猿 714

app 自动化工具uiautomator2 + app页面分析工具weditor的使用

文章目录一、踩坑经历习惯性思维转折--发现新大陆 weditor二、学习weditor1、安装和打开:2、简单使用1)、链接手机调试2)、分析页面元素3)、引发思考--找到可以代替appium的模块uiautomator2三、学习uiautomator2的简单使用:1、安装:2、连接手机:3、启动一个app--`app_start`函数4、停用一个app5、获取一个app信息6、等待app运行:7、 文件传输8、检测设备状态【测试感觉没有什么用,好像后期去掉了】9、执行shell命令:10、各种设备信息11

zhaojiafu的博客 5940

嵌入式工程师成长之路(0)----认识元件

在电子设计与维修中,认识元件是成功的关键!面对琳琅满目的电阻、电容、电感与二极管,样子形式千奇百怪,你是否也曾陷入困难? 本文基于行业权威分类标准,结合十年工程师实战经验,深度解析4大类、30+子类电子元件的核心特性、应用场景与避坑指南,助你从“小白”秒变“电子高手”!

云轩阁 11万+

App 自动化,Appium 凭什么使用 UiAutomator2?

点击上方“AirPython”,选择“加为星标”第一时间关注 Python 技术干货!1. UiAutomator2 是什么可能很多人对UiAutomator2和UiAutomat...

AirPython的博客 2947

Modbus协议学习第一篇之基础概念

因工作需要而接触Modbus,正在恶补知识,利用博客的方式来加深理解和记忆,同时希望同行大佬能一起交流。

hzf978742221的博客 880

基于STM32L4XX、HAL库的IP101GRI以太网收发器(PHY)驱动程序设计

define IP101GRI_PHY_ADDRESS 0x01 // 根据硬件设计设置PHY地址。#define IP101GRI_PHYSTS 0x10 // PHY状态寄存器。#define IP101GRI_PHYINIR 0x12 // PHY中断寄存器。#define IP101GRI_PHYCR 0x14 // PHY控制寄存器。#define IP101GRI_PHYID2 0x03 // PHY标识符2。

zhusl6688的博客 717

自动化测试框架对比(UIAutomator、Appium)

UiAutomator和Appium之间的区别和联系联系:在Android端,appium基于WebDriver协议,利用Bootstrap.jar,最后通过调⽤用UiAutomator的命令,实现App的自动化测试。UiAutomator测试框架是AndroidSDK自带的App UI自动化测试Java库。1、UiAutomator——基于UIAutomation的用户界面自动化测试框架,可以跨...

yongwan5637的博客 1万+

VC中sqlite的使用

在VC中对sqlite的使用,实现数据库大批数据的快速插入,读取数据库中的数据在ListCtrl中显示

App测试自动化工具UIAutomator2的使用

是一个安卓App测试的自动化工具,它通过模拟点击实现对App的功能测试。除了UIAutomator2外,还有Appium、AirTest等App自动测试框架。本文是App测试自动化系列工具之UIAutomator2的使用。

java_t_t的博客 3998

RU DOS版、EFI版32bit/64bit BIOS常用工具

DOS版、EFI版的RU工具,可用来查看IO、MEM、PCI、SMBIOS等资源。亲测在EFI SHELL下可用。

深度学习工具包 DeepLearningToolbox

深度学习工具包Deprecation notice.-----This toolbox is outdated and no longer maintained.There are much better tools available for deep learning than this toolbox, e.g. [Theano](http://deeplearning.net/software/theano/), [torch](http://torch.ch/) or [tensorflow](http://www.tensorflow.org/)I would suggest you use one of the tools mentioned above rather than use this toolbox.Best, Rasmus.DeepLearnToolbox================A Matlab toolbox for Deep Learning.Deep Learning is a new subfield of machine learning that focuses on learning deep hierarchical models of data.It is inspired by the human brain's apparent deep (layered, hierarchical) architecture.A good overview of the theory of Deep Learning theory is[Learning Deep Architectures for AI](http://www.iro.umontreal.ca/~bengioy/papers/ftml_book.pdf)For a more informal introduction, see the following videos by Geoffrey Hinton and Andrew Ng.* [The Next Generation of Neural Networks](http://www.youtube.com/watch?v=AyzOUbkUf3M) (Hinton, 2007)* [Recent Developments in Deep Learning](http://www.youtube.com/watch?v=VdIURAu1-aU) (Hinton, 2010)* [Unsupervised Feature Learning and Deep Learning](http://www.youtube.com/watch?v=ZmNOAtZIgIk) (Ng, 2011)If you use this toolbox in your research please cite [Prediction as a candidate for learning deep hierarchical models of data](http://www2.imm.dtu.dk/pubdb/views/publication_details.php?id=6284)```@MASTERSTHESIS\{IMM2012-06284, author = "R. B. Palm", title = "Prediction as a candidate for learning deep hierarchical models of data", year = "2012",}```Contact: rasmusbergpalm at gmail dot comDirectories included in the toolbox-----------------------------------`NN/` - A library for Feedforward Backpropagation Neural Networks`CNN/` - A library for Convolutional Neural Networks`DBN/` - A library for Deep Belief Networks`SAE/` - A library for Stacked Auto-Encoders`CAE/` - A library for Convolutional Auto-Encoders`util/` - Utility functions used by the libraries`data/` - Data used by the examples`tests/` - unit tests to verify toolbox is workingFor references on each library check REFS.mdSetup-----1. Download.2. addpath(genpath('DeepLearnToolbox'));Example: Deep Belief Network---------------------```matlabfunction test_example_DBNload mnist_uint8;train_x = double(train_x) / 255;test_x = double(test_x) / 255;train_y = double(train_y);test_y = double(test_y);%% ex1 train a 100 hidden unit RBM and visualize its weightsrand('state',0)dbn.sizes = [100];opts.numepochs = 1;opts.batchsize = 100;opts.momentum = 0;opts.alpha = 1;dbn = dbnsetup(dbn, train_x, opts);dbn = dbntrain(dbn, train_x, opts);figure; visualize(dbn.rbm{1}.W'); % Visualize the RBM weights%% ex2 train a 100-100 hidden unit DBN and use its weights to initialize a NNrand('state',0)%train dbndbn.sizes = [100 100];opts.numepochs = 1;opts.batchsize = 100;opts.momentum = 0;opts.alpha = 1;dbn = dbnsetup(dbn, train_x, opts);dbn = dbntrain(dbn, train_x, opts);%unfold dbn to nnnn = dbnunfoldtonn(dbn, 10);nn.activation_function = 'sigm';%train nnopts.numepochs = 1;opts.batchsize = 100;nn = nntrain(nn, train_x, train_y, opts);[er, bad] = nntest(nn, test_x, test_y);assert(er < 0.10, 'Too big error');```Example: Stacked Auto-Encoders---------------------```matlabfunction test_example_SAEload mnist_uint8;train_x = double(train_x)/255;test_x = double(test_x)/255;train_y = double(train_y);test_y = double(test_y);%% ex1 train a 100 hidden unit SDAE and use it to initialize a FFNN% Setup and train a stacked denoising autoencoder (SDAE)rand('state',0)sae = saesetup([784 100]);sae.ae{1}.activation_function = 'sigm';sae.ae{1}.learningRate = 1;sae.ae{1}.inputZeroMaskedFraction = 0.5;opts.numepochs = 1;opts.batchsize = 100;sae = saetrain(sae, train_x, opts);visualize(sae.ae{1}.W{1}(:,2:end)')% Use the SDAE to initialize a FFNNnn = nnsetup([784 100 10]);nn.activation_function = 'sigm';nn.learningRate = 1;nn.W{1} = sae.ae{1}.W{1};% Train the FFNNopts.numepochs = 1;opts.batchsize = 100;nn = nntrain(nn, train_x, train_y, opts);[er, bad] = nntest(nn, test_x, test_y);assert(er < 0.16, 'Too big error');```Example: Convolutional Neural Nets---------------------```matlabfunction test_example_CNNload mnist_uint8;train_x = double(reshape(train_x',28,28,60000))/255;test_x = double(reshape(test_x',28,28,10000))/255;train_y = double(train_y');test_y = double(test_y');%% ex1 Train a 6c-2s-12c-2s Convolutional neural network %will run 1 epoch in about 200 second and get around 11% error. %With 100 epochs you'll get around 1.2% errorrand('state',0)cnn.layers = { struct('type', 'i') %input layer struct('type', 'c', 'outputmaps', 6, 'kernelsize', 5) %convolution layer struct('type', 's', 'scale', 2) %sub sampling layer struct('type', 'c', 'outputmaps', 12, 'kernelsize', 5) %convolution layer struct('type', 's', 'scale', 2) %subsampling layer};cnn = cnnsetup(cnn, train_x, train_y);opts.alpha = 1;opts.batchsize = 50;opts.numepochs = 1;cnn = cnntrain(cnn, train_x, train_y, opts);[er, bad] = cnntest(cnn, test_x, test_y);%plot mean squared errorfigure; plot(cnn.rL);assert(er<0.12, 'Too big error');```Example: Neural Networks---------------------```matlabfunction test_example_NNload mnist_uint8;train_x = double(train_x) / 255;test_x = double(test_x) / 255;train_y = double(train_y);test_y = double(test_y);% normalize[train_x, mu, sigma] = zscore(train_x);test_x = normalize(test_x, mu, sigma);%% ex1 vanilla neural netrand('state',0)nn = nnsetup([784 100 10]);opts.numepochs = 1; % Number of full sweeps through dataopts.batchsize = 100; % Take a mean gradient step over this many samples[nn, L] = nntrain(nn, train_x, train_y, opts);[er, bad] = nntest(nn, test_x, test_y);assert(er < 0.08, 'Too big error');%% ex2 neural net with L2 weight decayrand('state',0)nn = nnsetup([784 100 10]);nn.weightPenaltyL2 = 1e-4; % L2 weight decayopts.numepochs = 1; % Number of full sweeps through dataopts.batchsize = 100; % Take a mean gradient step over this many samplesnn = nntrain(nn, train_x, train_y, opts);[er, bad] = nntest(nn, test_x, test_y);assert(er < 0.1, 'Too big error');%% ex3 neural net with dropoutrand('state',0)nn = nnsetup([784 100 10]);nn.dropoutFraction = 0.5; % Dropout fraction opts.numepochs = 1; % Number of full sweeps through dataopts.batchsize = 100; % Take a mean gradient step over this many samplesnn = nntrain(nn, train_x, train_y, opts);[er, bad] = nntest(nn, test_x, test_y);assert(er < 0.1, 'Too big error');%% ex4 neural net with sigmoid activation functionrand('state',0)nn = nnsetup([784 100 10]);nn.activation_function = 'sigm'; % Sigmoid activation functionnn.learningRate = 1; % Sigm require a lower learning rateopts.numepochs = 1; % Number of full sweeps through dataopts.batchsize = 100; % Take a mean gradient step over this many samplesnn = nntrain(nn, train_x, train_y, opts);[er, bad] = nntest(nn, test_x, test_y);assert(er < 0.1, 'Too big error');%% ex5 plotting functionalityrand('state',0)nn = nnsetup([784 20 10]);opts.numepochs = 5; % Number of full sweeps through datann.output = 'softmax'; % use softmax outputopts.batchsize = 1000; % Take a mean gradient step over this many samplesopts.plot = 1; % enable plottingnn = nntrain(nn, train_x, train_y, opts);[er, bad] = nntest(nn, test_x, test_y);assert(er < 0.1, 'Too big error');%% ex6 neural net with sigmoid activation and plotting of validation and training error% split training data into training and validation datavx = train_x(1:10000,:);tx = train_x(10001:end,:);vy = train_y(1:10000,:);ty = train_y(10001:end,:);rand('state',0)nn = nnsetup([784 20 10]); nn.output = 'softmax'; % use softmax outputopts.numepochs = 5; % Number of full sweeps through dataopts.batchsize = 1000; % Take a mean gradient step over this many samplesopts.plot = 1; % enable plottingnn = nntrain(nn, tx, ty, opts, vx, vy); % nntrain takes validation set as last two arguments (optionally)[er, bad] = nntest(nn, test_x, test_y);assert(er < 0.1, 'Too big error');```[![Bitdeli Badge](https://d2weczhvl823v0.cloudfront.net/rasmusbergpalm/deeplearntoolbox/trend.png)](https://bitdeli.com/free "Bitdeli Badge")

【appium】App类型、页面元素|UiAutomator与appium|App元素定位

—现在常见的,用的比较多——利用原生与H5的开发技术的混合应用,原生代码部分利用Web View插件或者其它框架为H5提供容器,程序主要的业务实现、界面展示都是利用与H5相关的Web技术进行实现的。当某个元素的各个属性及其组合都不足以定位时,那么可以利用其附近的元素等各种可以定位的元素进行定位。xpath其实就是一个path(路径),一个描述页面元素位置信息的路径,相当于元素的坐标。一旦页面结构发生变化(比如重新设计时,路径少了两节),该路径也随之失效,必须重新写。TableLayout(表格布局)

weixin_40772077的博客 2048

android 蓝牙通讯demo

android 下蓝牙通讯demo,实现了发现蓝牙,使能蓝牙,通过蓝牙发送消息。

App自动化部署:uiautomator2

快速安装库: pip3 install 库名 -i。

2301_76601922的博客 3100

APP自动化之UiAutomator2

UIAutomator2是UIAutomator的升级版,UIAutomator是Google开发的一款用来做Android自动化测试的Java库,而UIAutomator2就是在UIAutomator基础上开发的python库。因此可以通过UIAutomator2做APP自动化测试。它可以获取APP上任意的元素控件对其进行操作,相较于Appium,UIAutomator2环境搭建简单方便,执行速度快,不过它只支持Android平台,不支持iOS。

2301_78276982的博客 1026
上一篇: web自动化输入框碰到的变态清除问题
下一篇: app自动化环境管理参数化
评论 2
成就一亿技术人!
拼手气红包6.0元
还能输入1000个字符
 
 条评论被折叠 查看
添加红包

请填写红包祝福语或标题

个

红包个数最小为10个

元

红包金额最低5元

当前余额3.43元 前往充值 >
需支付:10.00元
成就一亿技术人!
领取后你会自动成为博主和红包主的粉丝 规则
hope_wisdom
发出的红包
实付元
使用余额支付
点击重新获取
扫码支付
钱包余额 0

抵扣说明:

1.余额是钱包充值的虚拟货币,按照1:1的比例进行支付金额的抵扣。
2.余额无法直接购买下载,可以购买VIP、付费专栏及课程。

余额充值