


 本文详细介绍了Android Studio中如何实现双击退出应用的功能,并深入讲解了Notification的各种用法,包括设置不同类型的图标、创建普通、自定义、进度条通知、通知分组和锁屏通知。同时,讨论了在Android 7.0中直接回复通知的实现,涉及PendingIntent的使用和构造方法。还探讨了Notification的震动、响铃效果以及如何更新和取消通知。
双击退出和Notification通知
一:双击退出
实现的基本原理就是,当按下BACK键时,会被onKeyDown捕获,判断是BACK键,则执行exit方法。
判断用户两次按键的时间差是否在一个预期值之内,是的话直接直接退出,不是的话提示用户再按一次后退键退出。
代码
public class MainActivity extends AppCompatActivity {

    private long firstTime = 0;

    @Override
    protected void onCreate(Bundle savedInstanceState) {
        super.onCreate(savedInstanceState);
        setContentView(R.layout.activity_main);
    }

    @Override
    public boolean onKeyDown(int keyCode, KeyEvent event) {
        if (keyCode == KeyEvent.KEYCODE_BACK && event.getAction() == KeyEvent.ACTION_DOWN){
            //判断用户两次按键的时间差是否在一个预期值之内,是的话直接直接退出,不是的话提示用户再按一次后退键退出。
            if (System.currentTimeMillis() - firstTime>2000){
                Toast.makeText(this, "再按一次退出程序", Toast.LENGTH_SHORT).show();
                firstTime = System.currentTimeMillis();
                return  true;
            }
        }else{
            finish();//结束当前Activity
        }
        return super.onKeyDown(keyCode, event);
    }
二:常用的通知
定义:是在系统的通知栏中呈现多样式持久性消息的类
1、在通知栏显示
2、消息持久性
3、种类多样性
用处:
显示客户端的推送消息(如有新版本发布、广告、推荐新闻等)
显示正在进行的事物(如音乐播放器、版本更新时候的下载进度等)
显示接收到短消息,即时消息等信息(如QQ、微信、新浪、短信)
常用方法:

setSmallIcon() 与 setLargeIcon()
当 setSmallIcon() 与 setLargeIcon() 同时存在时, smallIcon 显示在通知的右下角, largeIcon 显示在左侧;当只设置 setSmallIcon() 时, smallIcon 显示在左侧。

1.普通通知
//发送一个最简单的通知(无交互)
    public void Notification(View view) {
        //创建构造者
        Notification.Builder builder = new Notification.Builder(this);
        builder.setSmallIcon(R.mipmap.ic_launcher);//必须设置
        builder.setContentTitle("这是标题");//建议设置
        builder.setContentText("这是内容");//建议设置

//        builder.setTicker("提示信息");
//        builder.setContentInfo("附加信息");//7.0以后过期

        //创建对象.发送的就是这个对象
        Notification build = builder.build();
        //获取通知管理器,负责发通知、清除通知等
        NotificationManager notificationManager = (NotificationManager) getSystemService(Context.NOTIFICATION_SERVICE);
        notificationManager.notify(1,build);
    }
2.自定义通知
其实就是加载一个布局. 加载布局用到了 RemoteViews 代码中有详细注释.

//自定义通知
public void customNotification(View view) {
    NotificationManager notificationManager = (NotificationManager) getSystemService(Context.NOTIFICATION_SERVICE);
    //创建构造者
    Notification.Builder builder = new Notification.Builder(this);
    //设置属性
    builder.setSmallIcon(R.mipmap.ic_launcher);
    builder.setContentTitle("这是标题");
    builder.setContentText("这是内容");
    /**
     * RemoteViews是可以在别的进程(系统进程)中显示的View,并且提供了一组跨进程更新它界面的操作
     * 两个参数,第一个布局所在包名
     * 第二个是布局Id
     * 布局文件是自己创建的,随便一个线性布局,加一个textView和ImageView即可
     */
    //自定义布局
    RemoteViews remoteViews = new RemoteViews(getPackageName(),R.layout.item);
    /**
     * 由于运行在不同的进程中,所以RemoteViews无法像正常的View一样更新UI。
     * RemoteViews提供了一系列的set方法,但是这些set方法只是View全部方法的子集。
     */
    //都是两个参数,第一个参数相当于findViewById,第二个是设置一个值
    remoteViews.setTextViewText(R.id.title_id,"美国队长");
    remoteViews.setImageViewResource(R.id.pic_id,R.mipmap.meidui);

    //bulider.setContent(remoteViews);///过期
    builder.setCustomContentView(remoteViews);
    //参数一 id 通知的id   参数二 通知对象
    notificationManager.notify(2, builder.build());
}
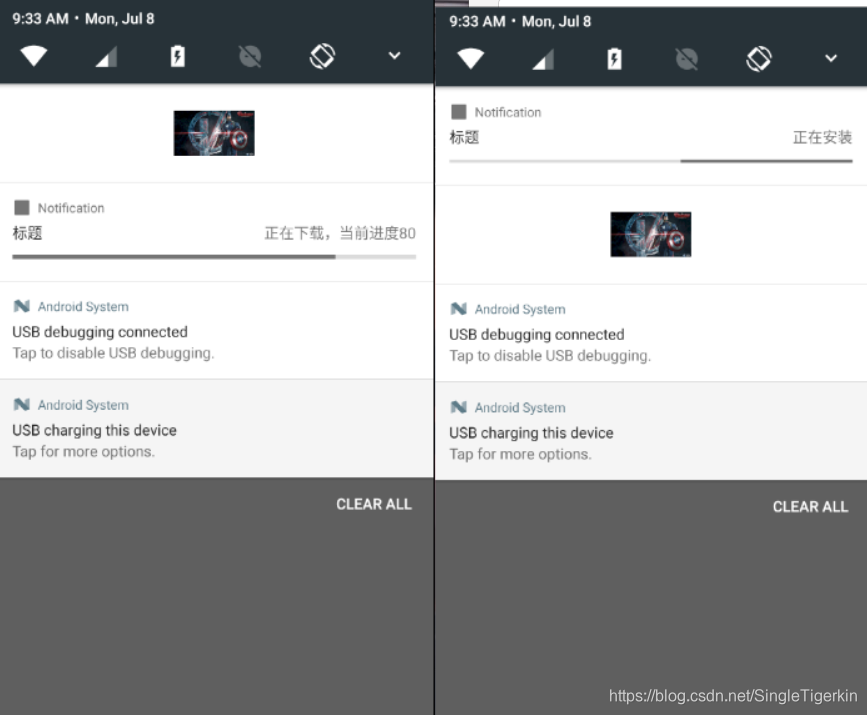
3.进度条通知
//进度条通知
    public void progress_notification(View view) {
        //获得通知管理者:发送通知 取消通知
        final NotificationManager notificationManager = (NotificationManager) getSystemService(Context.NOTIFICATION_SERVICE);
        //创建构造者
        final Notification.Builder builder = new Notification.Builder(this);
        //设置属性
        builder.setSmallIcon(R.mipmap.ic_launcher);
        builder.setContentTitle("标题");

        //设置进度条:参数一 最大值 参数二:当前进度 参数三 是否模糊
//        builder.setProgress(100,50,true);
        final Timer timer = new Timer();
        timer.schedule(new TimerTask() {
            int progress;
            @Override
            public void run() {
                //模拟下载过程
                builder.setContentText("正在下载,当前进度"+progress);
                builder.setProgress(100,progress,false);//确定的进度条
                progress+=10;
                notificationManager.notify(6,builder.build());
                if (progress == 100){
                    //安装过程
                    builder.setContentText("正在安装");
                    builder.setProgress(0,0,true);//安装模糊
                    notificationManager.notify(6,builder.build());
                    try {
                        Thread.sleep(7000);//模拟安卓过程
                    } catch (InterruptedException e) {
                        e.printStackTrace();
                    }
                    //安卓完成
                    notificationManager.cancel(6);//取消置顶的通知
                    timer.cancel();
                }
            }
        },0,1000);
    }
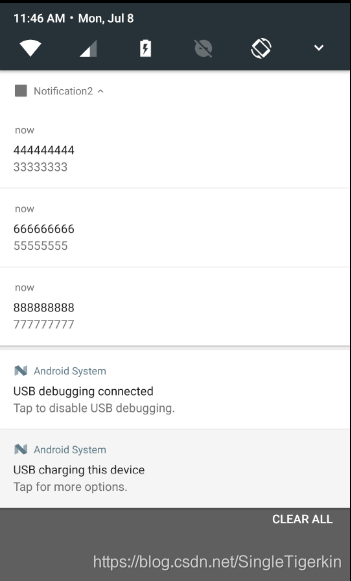
4.通知分组
//通知分组
public void groupNotification(View view) {
    NotificationManager manager = (NotificationManager) getSystemService(NOTIFICATION_SERVICE);
    Notification.Builder mBuilder0 = new Notification.Builder(this);
    Notification.Builder mBuilder1 = new Notification.Builder(this);
    Notification.Builder mBuilder2 = new Notification.Builder(this);
    Notification.Builder mBuilder3 = new Notification.Builder(this);

    //消息分组属性,group相同才能分到一组
    mBuilder0.setGroup("2");
    mBuilder0.setSmallIcon(R.mipmap.ic_launcher);
    //被设置setGroupSummary为true的消息会隐藏内容,其内容会显示另外分组成员消息
    mBuilder0.setGroupSummary(true);
    mBuilder0.setContentTitle("22222222");
    mBuilder0.setContentText("11111111");

    mBuilder1.setGroup("2");
    mBuilder1.setSmallIcon(R.mipmap.ic_launcher);
    mBuilder1.setContentText("33333333");
    mBuilder1.setContentTitle("444444444");

    mBuilder2.setGroup("2");
    mBuilder2.setSmallIcon(R.mipmap.ic_launcher);
    mBuilder2.setContentText("55555555");
    mBuilder2.setContentTitle("666666666");

    mBuilder3.setGroup("2");
    mBuilder3.setSmallIcon(R.mipmap.ic_launcher);
    mBuilder3.setContentText("777777777");
    mBuilder3.setContentTitle("888888888");

    manager.notify(0,mBuilder0.build());
    manager.notify(1,mBuilder1.build());
    manager.notify(2,mBuilder2.build());
    manager.notify(3,mBuilder3.build());

}
5.锁屏通知
Android 5.0(API level 21)开始,通知可以显示在锁屏上,通过设置选择是否允许敏感的通知内容显示在安全的锁屏上。
  //builde的时候
//通过 setVisibility() 方法设置即可
.setVisibility(VISIBILITY_PUBLIC)
.build();
setVisibility() 方法共有三个选值:
1.VISIBILITY_PRIVATE : 显示基本信息,如通知的图标,但隐藏通知的全部内容;
2.VISIBILITY_PUBLIC : 显示通知的全部内容;
3.VISIBILITY_SECRET : 不显示任何内容,包括图标。
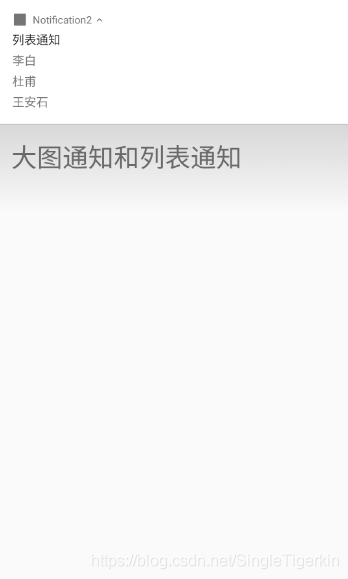
通知的样式
//通知的样式
    public void notificationStyle(View view) {
        NotificationManager manager = (NotificationManager) getSystemService(NOTIFICATION_SERVICE);
        Notification.Builder builder = new Notification.Builder(this);
        builder.setSmallIcon(R.mipmap.ic_launcher);
        builder.setContentTitle("列表通知");
//        builder.setContentTitle("大图通知");

        //通知内容为大图片
        Notification.BigPictureStyle bigPictureStyle = new Notification.BigPictureStyle();
        bigPictureStyle.bigPicture(BitmapFactory.decodeResource(getResources(),R.mipmap.ic_launcher));

        //通知内容为列表显示
        Notification.InboxStyle inboxStyle = new Notification.InboxStyle();
        inboxStyle.addLine("李白");
        inboxStyle.addLine("杜甫");
        inboxStyle.addLine("王安石");

//        builder.setStyle(bigPictureStyle);
        builder.setStyle(inboxStyle);
        //不能跨APP
        Intent intent = new Intent(this, MainActivity.class);
        //intent - PendingIntent
        PendingIntent intent1 = PendingIntent.getActivity(this, 10, intent, PendingIntent.FLAG_ONE_SHOT);
        builder.setFullScreenIntent(intent1,true);

        builder.setContentIntent(intent1);
        manager.notify(9,builder.build());
    }
三:安卓7.0直接回复通知
private void responseNotification2() {
// 其中RESULT_KEY是获取回复的内容,setLabel设置的值就是EditText的hint值
RemoteInput remoteInput = new RemoteInput.Builder(“KEY”).setLabel(“回复通知”).build();
Intent intent = new Intent(this, Main2Activity.class);
PendingIntent pendingIntent = PendingIntent.getService(this,1,intent,PendingIntent.FLAG_CANCEL_CURRENT);
NotificationCompat.Action action = new NotificationCompat.Action.Builder(R.mipmap.ic_launcher,"回复",pendingIntent).addRemoteInput(remoteInput).build();
// 其中这个Builder需要传递四个参数,第一个就是logo图片,第二个类似于标签我们要点击的。第三个就是要做的动作intent.最后把我们创建的remoteInput加入进来。
    NotificationCompat.Builder builder = new NotificationCompat.Builder(this,"1")
            .setSmallIcon(R.mipmap.ic_launcher)
            .setContentTitle("请问需要银行贷款吗?")
            .setContentText("您好,我是XX银行的XX经理, 请问你需要办理银行贷款吗?")
            .setColor(Color.CYAN)
            .setPriority(Notification.PRIORITY_MAX) // 设置优先级为Max,则为悬浮通知
            .addAction(action) // 设置回复action
            .setAutoCancel(true)
            .setWhen(System.currentTimeMillis())
            .setDefaults(Notification.DEFAULT_ALL) // 想要悬浮出来, 这里必须要设置
            .setCategory(Notification.CATEGORY_MESSAGE);

    NotificationManager nm = (NotificationManager) getSystemService(Context.NOTIFICATION_SERVICE);
// NotificationManager nm = getSystemService(NotificationManager.class);
Notification notification = builder.build();
nm.notify(1,notification);
从这里开始,以下方法在service中其中,以后课程会讲到.
    Bundle resultsFromIntent = RemoteInput.getResultsFromIntent(intent);
    Log.i(TAG, "responseNotification2: "+resultsFromIntent);
    //根据key拿回复的内容
    Log.i(TAG, "responseNotification2: ddd");
    if (null!=resultsFromIntent){
        String resultString = resultsFromIntent.getString("KEY");
        //处理回复内容
        Log.i(TAG, "responseNotification2: ");
        reply(resultString);
    }
}

private void reply(final String resultString) {
    new Thread(new Runnable() {
        @Override
        public void run() {
            SystemClock.sleep(1000);
            Log.i(TAG, "run: "+Main2Activity.class.getSimpleName()+resultString);
            onReply();
        }
    }).start();
}

private void onReply() {
    final NotificationManager nm = getSystemService(NotificationManager.class);
    final Handler handler = new Handler(getMainLooper());
    handler.post(new Runnable() {
        @Override
        public void run() {
            // 更新通知为“回复成功”
            Notification notification = new NotificationCompat.Builder(NotificationActivity.this,"1")
                    .setSmallIcon(R.mipmap.ic_launcher)
                    .setContentText("回复成功")
                    .build();
            nm.notify(1, notification);
        }
    });

    // 最后将通知取消
    handler.postDelayed(new Runnable() {
        @Override
        public void run() {
            nm.cancel(1);
        }
    }, 2000);
}
PendingIntent
说明
说明
PendingIntent 是一种特殊的 Intent ,字面意思可以解释为延迟的 Intent ,用于在某个事件结束后执行特定的 Action 。从上面带 Action 的通知也能验证这一点,当用户点击通知时,才会执行。
PendingIntent 是 Android 系统管理并持有的用于描述和获取原始数据的对象的标志(引用)。也就是说,即便创建该PendingIntent对象的进程被杀死了,这个PendingItent对象在其他进程中还是可用的。
日常使用中的短信、闹钟等都用到了 PendingIntent
构造方法
/获取一个用于启动 Activity 的 PendingIntent 对象
public static PendingIntent getActivity(Context context, int requestCode, Intent intent, int flags);

//获取一个用于启动 Service 的 PendingIntent 对象
public static PendingIntent getService(Context context, int requestCode, Intent intent, int flags);

//获取一个用于向 BroadcastReceiver 广播的 PendingIntent 对象
public static Pendin
PendingIntent 具有以下几种 flag:
FLAG_CANCEL_CURRENT:
如果当前系统中已经存在一个相同的 PendingIntent 对象,那么就将先将已有的 PendingIntent 取消,然后重新生成一个 PendingIntent 对象。
FLAG_NO_CREATE:
如果当前系统中不存在相同的 PendingIntent 对象,系统将不会创建该 PendingIntent 对象而是直接返回 null 。
FLAG_ONE_SHOT:
该 PendingIntent 只作用一次。
FLAG_UPDATE_CURRENT:
如果系统中已存在该 PendingIntent 对象,那么系统将保留该 PendingIntent 对象,但是会使用新的 Intent 来更新之前 PendingIntent 中的 Intent 对象数据,例如更新 Intent 中的 Extras 。
设置Notification的通知效果(震动需要真机)
Notification 有震动、响铃、呼吸灯三种响铃效果,可以通过 setDefaults(int defaults) 方法来设置。 Default 属性有以下四种,一旦设置了 Default 效果,自定义的效果就会失效。
 // 在builder的时候加上如下属性即可.
 builder.setDefaults(Notification.DEFAULT_ALL);
//设置系统默认提醒效果,一旦设置默认提醒效果,则自定义的提醒效果会全部失效。具体可看源码
//添加默认震动效果,需要申请震动权限
//<uses-permission android:name="android.permission.VIBRATE" />
Notification.DEFAULT_VIBRATE

//添加系统默认声音效果,设置此值后,调用setSound()设置自定义声音无效
Notification.DEFAULT_SOUND

//添加默认呼吸灯效果,使用时须与 Notification.FLAG_SHOW_LIGHTS 结合使用,否则无效
Notification.DEFAULT_LIGHTS

//添加上述三种默认提醒效果
Notification.DEFAULT_ALL
更新 Notification
更新通知很简单,只需要再次发送相同 ID 的通知即可,如果之前的通知还未被取消,则会直接更新该通知相关的属性;如果之前的通知已经被取消,则会重新创建一个新通知。
取消 Notification
取消通知有如下 5 种方式:
点击通知栏的清除按钮,会清除所有可清除的通知
设置了 setAutoCancel() 或 FLAG_AUTO_CANCEL 的通知,点击该通知时会清除它
通过 NotificationManager 调用 cancel(int id) 方法清除指定 ID 的通知
通过 NotificationManager 调用 cancel(String tag, int id) 方法清除指定 TAG 和 ID 的通知
通过 NotificationManager 调用 cancelAll() 方法清除所有该应用之前发送的通知
如果你是通过 NotificationManager.notify(String tag, int id, Notification notify) 方法创建的通知,那么只能通过 NotificationManager.cancel(String tag, int id) 方法才能清除对应的通知,调用NotificationManager.cancel(int id) 无效。


 400
400

 被折叠的 条评论
为什么被折叠?
被折叠的 条评论
为什么被折叠?
 到【灌水乐园】发言


