Gateway+Nacos动态路由

本文详细介绍了如何使用Spring Cloud Gateway和Nacos实现动态路由,包括配置依赖、yml设置、启动类编写、监听Nacos配置并更新路由,以及通过Controller接收请求的测试过程。重点展示了如何实现实时响应Nacos配置变化,确保服务路由的灵活性。

一、pom依赖(关键部分)

1.gateway模块

		<!--引入gateway依赖-->
        <dependency>
            <groupId>org.springframework.cloud</groupId>
            <artifactId>spring-cloud-starter-gateway</artifactId>
        </dependency>

        <!-- SpringCloud Alibaba Nacos -->
        <dependency>
            <groupId>com.alibaba.cloud</groupId>
            <artifactId>spring-cloud-starter-alibaba-nacos-discovery</artifactId>
        </dependency>

        <!-- SpringCloud Alibaba Nacos Config -->
        <dependency>
            <groupId>com.alibaba.cloud</groupId>
            <artifactId>spring-cloud-starter-alibaba-nacos-config</artifactId>
        </dependency>

2.test模块

		<!-- SpringCloud Alibaba Nacos -->
        <dependency>
            <groupId>com.alibaba.cloud</groupId>
            <artifactId>spring-cloud-starter-alibaba-nacos-discovery</artifactId>
        </dependency>

        <!-- SpringCloud Alibaba Nacos Config -->
        <dependency>
            <groupId>com.alibaba.cloud</groupId>
            <artifactId>spring-cloud-starter-alibaba-nacos-config</artifactId>
        </dependency>

二、配置yml

1.gateway模块

server:
  port: 7002

shine:
  dynamic:
    route:
      address: ${spring.cloud.nacos.config.server-addr}
      dataId: ${spring.application.name}
      groupId: SHINE_GROUP

spring:
  application:
    name: shine-gateway
  profiles:
    # 环境配置
    active: dev
  datasource:
    type: com.alibaba.druid.pool.DruidDataSource
    driverClassName: com.mysql.cj.jdbc.Driver
    druid:
      url: jdbc:mysql://127.0.0.1:3306/数据库名称?useUnicode=true&characterEncoding=utf8&zeroDateTimeBehavior=convertToNull&useSSL=true&serverTimezone=GMT%2B8
      username: 用户名
      password: 密码
      # 初始连接数
      initialSize: 5
      # 最小连接池数量
      minIdle: 10
      # 最大连接池数量
      maxActive: 20
      # 配置获取连接等待超时的时间
      maxWait: 60000
      # 配置间隔多久才进行一次检测,检测需要关闭的空闲连接,单位是毫秒
      timeBetweenEvictionRunsMillis: 60000
      # 配置一个连接在池中最小生存的时间,单位是毫秒
      minEvictableIdleTimeMillis: 300000
      # 配置一个连接在池中最大生存的时间,单位是毫秒
      maxEvictableIdleTimeMillis: 900000
  cloud:
    nacos:
      discovery:
        # 服务注册地址
        server-addr: 127.0.0.1:7001
      config:
        # 配置中心地址
        server-addr: 127.0.0.1:7001
        # 配置文件格式
        file-extension: yml
        # 共享配置
        shared-configs:
          - application-${spring.profiles.active}.${spring.cloud.nacos.config.file-extension}
    gateway:
      discovery:
        locator:
          # 服务名小写
          lower-case-service-id: true

# MyBatis配置
mybatis:
  # 加载全局的配置文件
  configLocation: classpath:mybatis/mybatis-config.xml
  # 配置mapper的扫描,找到所有的mapper.xml映射文件
  mapperLocations: classpath*:mapper/*Mapper.xml

2.test模块

server:
  port: 7003

spring:
  application:
    name: shine-client
  profiles:
    # 环境配置
    active: dev
  cloud:
    nacos:
      discovery:
        # 服务注册地址
        server-addr: 127.0.0.1:7001
      config:
        # 配置中心地址
        server-addr: 127.0.0.1:7001
        # 配置文件格式
        file-extension: yml
        # 共享配置
        shared-configs:
          - application-${spring.profiles.active}.${spring.cloud.nacos.config.file-extension}

三、编写启动类

1.gateway启动类

/**
 * @author ShineQianMo
 */
@SpringBootApplication
@EnableDiscoveryClient
public class ShineGatewayApplication {

    public static void main(String[] args) {
        SpringApplication.run(ShineGatewayApplication.class, args);
        System.out.println("Shine: shine-gateway模块启动成功");
    }

}

2.test启动类

/**
 * @author ShineQianMo
 */
@SpringBootApplication
@EnableDiscoveryClient
public class ShineClientApplication {

    public static void main(String[] args) {
        SpringApplication.run(ShineClientApplication.class, args);
        System.out.println("Shine: shine-client模块启动成功");
    }
    
}

四、业务逻辑

1.监听nacos配置

/**
 * @author ShineQianMo
 * DateTime 2021/8/17 16:09
 */
@Configuration
public class DynamicRouteConfiguration {

    private static final Logger log = LoggerFactory.getLogger(DynamicRouteConfiguration.class);

    @Autowired
    private DynamicRoute nacosDynamicRoute;

    @Autowired
    private GatewayRouteService gatewayRouteService;

    @PostConstruct
    private void init() {
        dynamicRouteByNacosListener(nacosDynamicRoute.getDataId(), nacosDynamicRoute.getGroupId(), nacosDynamicRoute.getAddress());
    }

	// dataId、groupId、address 自己定义, address就是nacos地址+端口,我这里这三个值分别是shine-gateway、SHINE_GROUP、127.0.0.1:7001 我是从yml里加载的这边你们随意
    private void dynamicRouteByNacosListener(String dataId, String groupId, String address) {
        try {
            ConfigService configService = NacosFactory.createConfigService(address);
            configService.addListener(dataId, groupId, new Listener() {
                @Override
                public Executor getExecutor() {
                    return null;
                }

                @Override
                public void receiveConfigInfo(String configInfo) {
                    log.warn("监听到新的路由配置,正在更新中、、、");
                    List<RouteDefinition> routeDefinitionList = JSON.parseArray(configInfo, RouteDefinition.class);
                    for (RouteDefinition routeDefinition : routeDefinitionList) {
                        gatewayRouteService.addGatewayRoute(routeDefinition);
                    }
                    log.warn("路由更新完成");
                }
            });
        } catch (NacosException e) {
            e.printStackTrace();
            // 通知路由负责人(邮件)
        }
    }

}

2.路由更新

/**
 * @author ShineQianMo
 * DateTime 2021/8/17 10:57
 */
@Service
public class GatewayRouteServiceImpl implements GatewayRouteService, ApplicationEventPublisherAware {

    private static final Logger log = LoggerFactory.getLogger(GatewayRouteServiceImpl.class);

    private ApplicationEventPublisher publisher;

    @Autowired
    private RouteDefinitionWriter routeDefinitionWriter;

    @Override
    public List<GatewayRoute> getGatewayRouteList(GatewayRoute gatewayRoute) {
        return gatewayRouteMapper.selectGatewayRouteList(gatewayRoute);
    }

    @Override
    public int addGatewayRoute(RouteDefinition routeDefinition) {
        this.loadingOneRouteDefinition(routeDefinition);
        return 1;
    }
    
	@Override
    public void loadingOneRouteDefinition(RouteDefinition routeDefinition) {
        log.info("加载路由");
        // 先删除重名路由
        routeDefinitionWriter.delete(Mono.just(routeDefinition.getId()));
        // 再添加路由
        routeDefinitionWriter.save(Mono.just(routeDefinition)).subscribe();
        this.publisher.publishEvent(new RefreshRoutesEvent(this));
    }
}

test模块编写Controller接收请求


/**
 * @author ShineQianMo
 * DateTime 2021/8/17 19:30
 */
@RestController
public class a {

    @GetMapping("/a")
    public String a() {
        return "你好难打s";
    }
}

五、测试

1.启动nacos

2.启动gateway、test模块

3.编写nacos配置文件

我这里用的JSON格式的配置,java监听nacos也是直接转JSON

[
    {
        "id": "shine-client", 
        "order": 0, 
        "uri": "lb://shine-client", 
        "predicates": [
            {
                "name": "Path",
                "args": {
                    "_genkey_0": "/client/**"
                }
            }
        ], 
        "filters": [
            {
                "name": "StripPrefix",
                "args": {
                    "_genkey_0": "1"
                }
            }
        ]
    }
]

这个JSON改为yml:

spring:
  cloud:
    nacos:
      routes:
		- id: shine-client
          uri: lb://shine-client
          predicates:
            - Path=/client/**
          filters:
            - StripPrefix=1

发布nacos配置,可以看到java监听到nacos并加载了新的路由。
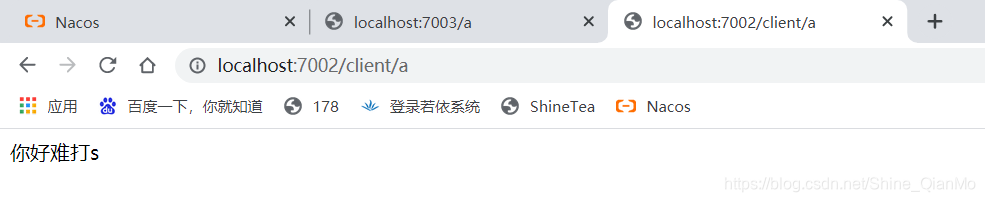
在这里插入图片描述

4.结果

7003请求正常通过
在这里插入图片描述
然后测试路由转发7002
在这里插入图片描述
完成,期间nacos遇到一些问题,还有gateway也有问题,后续将放到其他文章。

在使用 Spring Cloud Gateway + Nacos + Sentinel 的组合时,通常是为了构建一个具备**服务发现(Nacos)**、**API 网关路由Gateway)** 和 **流量控制/熔断降级(Sentinel)** 能力的微服务架构。以下是该技术栈集成的核心实现方式、常见问题及解决方案。 --- ### ✅ 一、功能角色说明 | 组件 | 作用 | |------|------| | **Nacos** | 作为注册中心和服务配置中心,管理微服务的注册与发现,以及动态配置 | | **Spring Cloud Gateway** | 作为统一入口网关,负责请求路由、过滤、限流等 | | **Sentinel** | 提供流量控制、熔断降级、系统自适应保护等功能,保障系统稳定性 | --- ### ✅ 二、集成步骤详解 #### 1. 添加依赖(Maven) ```xml <dependencies> <!-- Spring Cloud Gateway --> <dependency> <groupId>org.springframework.cloud</groupId> <artifactId>spring-cloud-starter-gateway</artifactId> </dependency> <!-- Nacos Discovery --> <dependency> <groupId>com.alibaba.cloud</groupId> <artifactId>spring-cloud-starter-alibaba-nacos-discovery</artifactId> </dependency> <!-- Sentinel for Gateway Flow Control --> <dependency> <groupId>com.alibaba.cloud</groupId> <artifactId>spring-cloud-starter-alibaba-sentinel</artifactId> </dependency> <!-- Sentinel Gateway Adapter --> <dependency> <groupId>com.alibaba.csp</groupId> <artifactId>sentinel-reactor-adapter</artifactId> <version>1.8.6</version> <!-- 根据 Spring Cloud Alibaba 版本匹配 --> </dependency> <dependency> <groupId>com.alibaba.csp</groupId> <artifactId>sentinel-spring-cloud-gateway-adapter</artifactId> <version>1.8.6</version> </dependency> <!-- WebFlux required by Gateway --> <dependency> <groupId>org.springframework.boot</groupId> <artifactId>spring-boot-starter-webflux</artifactId> </dependency> </dependencies> ``` > ⚠️ 注意版本兼容性!推荐使用如下组合: > > - Spring Boot 2.7.x > - Spring Cloud 2021.0.x > - Spring Cloud Alibaba 2021.0.5.0 > - Sentinel 1.8.6 --- #### 2. 配置文件 `application.yml` ```yaml server: port: 9000 servlet: context-path: / spring: application: name: api-gateway cloud: nacos: discovery: server-addr: 127.0.0.1:8848 # Nacos 服务地址 config: server-addr: ${spring.cloud.nacos.discovery.server-addr} file-extension: yaml gateway: discovery: locator: enabled: true # 开启自动根据注册中心服务名路由 routes: - id: user-service-route uri: lb://user-service # 使用负载均衡访问 user-service predicates: - Path=/api/users/** filters: - StripPrefix=1 sentinel: transport: dashboard: 127.0.0.1:8080 # Sentinel 控制台地址 eager: true # 立即初始化 Sentinel ``` --- #### 3. 启用 Sentinel 对 Gateway 的支持(Java 配置类) ```java import com.alibaba.csp.sentinel.adapter.gateway.common.rule.GatewayFlowRule; import com.alibaba.csp.sentinel.adapter.gateway.common.rule.RuleConstant; import com.alibaba.csp.sentinel.adapter.gateway.sc.SentinelGatewayFilter; import com.alibaba.csp.sentinel.adapter.gateway.sc.callback.BlockRequestHandler; import com.alibaba.csp.sentinel.adapter.gateway.sc.callback.GatewayCallbackManager; import com.alibaba.csp.sentinel.adapter.gateway.sc.exception.SentinelGatewayBlockExceptionHandler; import org.springframework.beans.factory.ObjectProvider; import org.springframework.cloud.gateway.filter.GlobalFilter; import org.springframework.context.annotation.Bean; import org.springframework.context.annotation.Configuration; import org.springframework.core.Ordered; import org.springframework.core.annotation.Order; import org.springframework.http.HttpStatus; import org.springframework.web.reactive.function.server.ServerResponse; import org.springframework.web.server.ServerWebExchange; import reactor.core.publisher.Mono; import javax.annotation.PostConstruct; import java.util.HashSet; import java.util.Set; @Configuration public class GatewayConfiguration { private final Set<GatewayFlowRule> rules = new HashSet<>(); @PostConstruct public void init() { // 定义针对 route 或 API 分组的限流规则 rules.add(new GatewayFlowRule("user-service-route") // 路由 ID .setCount(10) // 每秒最多 10 个请求 .setIntervalSec(1) // 统计间隔:1 秒 .setGrade(RuleConstant.FLOW_GRADE_QPS) // 限流维度:QPS ); // 可以添加基于 API 分组的规则 rules.add(new GatewayFlowRule("api_users") .setCount(20) .setIntervalSec(1) .setGrade(RuleConstant.FLOW_GRADE_QPS) ); } @Bean @Order(Ordered.HIGHEST_PRECEDENCE) public SentinelGatewayBlockExceptionHandler sentinelGatewayBlockExceptionHandler() { return new SentinelGatewayBlockExceptionHandler(); } @Bean @Order(-1) public GlobalFilter sentinelGatewayFilter() { return new SentinelGatewayFilter(); } /** * 自定义被限流后的返回内容 */ @PostConstruct public void setBlockHandler() { BlockRequestHandler blockRequestHandler = (exchange, t) -> { exchange.getResponse().setStatusCode(HttpStatus.TOO_MANY_REQUESTS); String msg = "{\"code\":429,\"message\":\"请求过于频繁,请稍后再试\"}"; byte[] bytes = msg.getBytes(org.springframework.util.Charset.forName("UTF-8")); DataBuffer buffer = exchange.getResponse().bufferFactory().wrap(bytes); return exchange.getResponse().writeWith(Mono.just(buffer)); }; GatewayCallbackManager.setBlockHandler(blockRequestHandler); } } ``` --- #### 4. 启动 Nacos 和 Sentinel Dashboard - 启动 Nacos Server: ```bash sh bin/startup.sh -m standalone ``` - 启动 Sentinel Dashboard: ```bash java -jar sentinel-dashboard-1.8.6.jar ``` 访问:http://localhost:8080,登录账号密码默认 `sentinel/sentinel` - 在你的微服务和网关中配置 `-Dcsp.sentinel.app.type=1` 表示是网关应用(可选) --- ### ✅ 三、Sentinel 控制台查看网关监控 启动后访问任意接口触发流量,然后打开 Sentinel 控制台: - 在“簇点链路”中可以看到 `/api/users/**` 这样的网关路由资源 - 点击“+ 流控”按钮,可以为某个 API 或路由设置 QPS 限制 - 支持按调用来源(origin)进行黑白名单控制 --- ### ✅ 四、常见问题与解决 #### ❌ 问题1:Sentinel 控制台看不到网关的 API 资源? **原因**:未正确引入 `sentinel-spring-cloud-gateway-adapter` 或未触发请求。 **解决**: - 确保已引入适配器依赖 - 发起真实请求触发资源注册 - 检查日志是否连接到 Sentinel 控制台成功 #### ❌ 问题2:网关限流不生效? **原因**:缺少 `@Bean SentinelGatewayFilter` 或异常处理器未注册。 **解决**:确保配置类中注册了 `SentinelGatewayFilter` 和 `SentinelGatewayBlockExceptionHandler` #### ❌ 问题3:如何基于用户 IP 限流? **方案**:可以通过自定义 `OriginParser` 实现: ```java @PostConstruct public void initOriginParser() { GatewayCallbackManager.setOriginParser(exchange -> { String remoteAddress = exchange.getRequest().getRemoteAddress().getAddress().getHostAddress(); return remoteAddress; // 使用 IP 作为 origin }); } ``` 然后在 Sentinel 控制台配置“流控应用”字段为特定 IP 即可实现按 IP 限流。 --- ### ✅ 五、优势总结 | 功能 | 实现方式 | |------|----------| | 动态路由 | Nacos 注册中心自动发现服务 | | 流量治理 | Sentinel 提供实时 QPS 限流、熔断 | | 可视化控制 | Sentinel Dashboard 图形化操作 | | 高可用 | Gateway 支持负载均衡 + 断路器 | ---
评论 1
添加红包

请填写红包祝福语或标题

红包个数最小为10个

红包金额最低5元

当前余额3.43前往充值 >
需支付:10.00
成就一亿技术人!
领取后你会自动成为博主和红包主的粉丝 规则
hope_wisdom
发出的红包
实付
使用余额支付
点击重新获取
扫码支付
钱包余额 0

抵扣说明:

1.余额是钱包充值的虚拟货币,按照1:1的比例进行支付金额的抵扣。
2.余额无法直接购买下载,可以购买VIP、付费专栏及课程。

余额充值