


10.父子组件的通信
子组件是不能引用父组件或者Vue实例的数据的
下层:
- 比如在一个页面中,我们从服务器请求到了很多的数据。
- 其中一部分数据,并非是我们整个页面的大组件来展示的,而是需要下面的子组件进行展示。
- 这个时候,并不会让子组件再次发送一个网络请求,而是直接让大组件(父组件)将数据传递给小组件(子组件)。
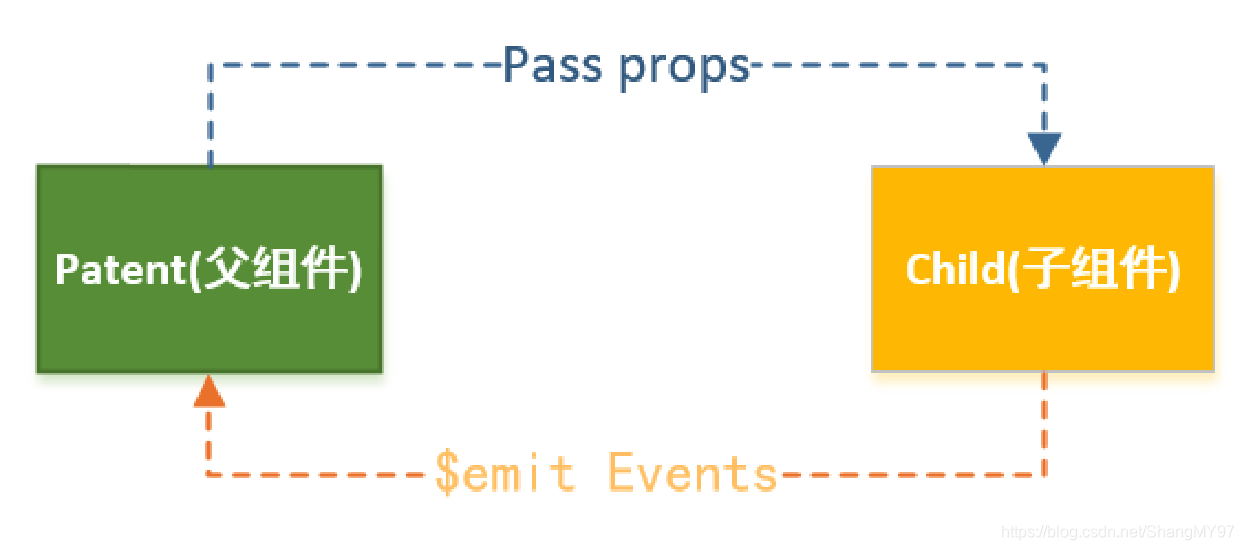
如何进行父子组件间的通信呢
- 通过props向子组件传递数据
- 通过事件向父组件发送消息
案例
下面的代码,想在template模块的两个props中间添加一个input输入框,当输入值时number1的值改变,跟组件中的数据num1也改变
<div id="app">
    <cpn :number1="num1" :number2="num2"/>
</div>

<template id="cpn">
    <div>
        <h2>props:{{number1}}</h2>
        <h2>props:{{number2}}</h2>
    </div>
</template>
    const app = new Vue({
            el: '#app',
            data: {
                num1: 1,
                num2: 0
            },
            components: {
                cpn: {
                    template: '#cpn',
                    props: {
                        number1: Number,
                        number2: Number
                    },
                }
            }
        })
</script>
- 第一步我们加上输入框
<template id="cpn">
    <div>
        <h2>props:{{number1}}</h2>
        <input type="text" v-model="number1">
        <h2>props:{{number2}}</h2>
        <input type="text" v-model="number2">
    </div>
</template>
运行结果:我输入值后报错了
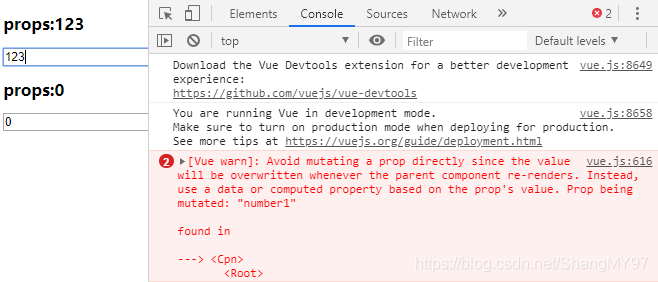
解决方案
在根组件的components中添加
data(){
   return{
       dnumber1: this.number1,
       dnumber2: this.number2
   }
}
初始化一下data中的这两个数据
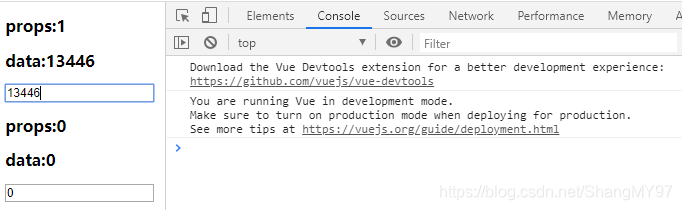
我们再把input中绑定的number1改为dnumber1
<template id="cpn">
    <div>
        <h2>props:{{number1}}</h2>
        <h2>data:{{dnumber1}}</h2>
        <input type="text" v-model="dnumber1">
        <h2>props:{{number2}}</h2>
        <h2>data:{{dnumber2}}</h2>
        <input type="text" v-model="dnumber2">
    </div>
</template>
修改后正常运行
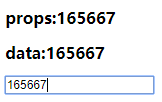
- 第二步,我们开始修改父组件中的num1和num2的值(这就是子级向父级传递了)
子组件不能跨过父组件去更改props的数据,也就是说子组件想要改变props的值,要先发送给父组件,然后父组件再修改props的数据
所以我们先让子组件给父组件传递
给模块中添加
<input type="text" :value="dnumber1" @input="num1Input">
子组件中添加
methods:{
      num1Input(event) {
           this.dnumber1 = event.target.value;
           this.$emit('num1change',this.dnumber1)
      }
}
在父组件模板中使用
<div id="app">
    <cpn :number1="num1" :number2="num2" @num1change="num1change"/>
</div>
最后再在父组件中写函数,可以用parseInt或者parseFloat来修改类型
methods:{
       num1change (value){
          this.num1 = parseFloat(value)//字符串类型变数字类型
       }
},
接下来我们附加功能:
- 在第一个文本框输入时num2和number2的值*100
- 在第二个文本框输入时num1和number1的值/100
修改子组件中的methods
methods: {
          num1Input(event) {
            // 1.将input中的value赋值到dnumber中
            this.dnumber1 = event.target.value;
            // 2.为了让父组件可以修改值, 发出一个事件
            this.$emit('num1change', this.dnumber1)
            // 3.同时修饰dnumber2的值
            this.dnumber2 = this.dnumber1 * 100;
            this.$emit('num2change', this.dnumber2);
          },
          num2Input(event) {
            this.dnumber2 = event.target.value;
            this.$emit('num2change', this.dnumber2)
            // 同时修饰dnumber2的值
            this.dnumber1 = this.dnumber2 / 100;
            this.$emit('num1change', this.dnumber1);
          }
 }
整个案例完整代码
<div id="app">
  <cpn :number1="num1"
       :number2="num2"
       @num1change="num1change"
       @num2change="num2change"/>
</div>

<template id="cpn">
  <div>
    <h2>props:{{number1}}</h2>
    <h2>data:{{dnumber1}}</h2>
    <input type="text" :value="dnumber1" @input="num1Input">
    <h2>props:{{number2}}</h2>
    <h2>data:{{dnumber2}}</h2>
    <input type="text" :value="dnumber2" @input="num2Input">
  </div>
</template>

<script src="../js/vue.js"></script>
<script>
  const app = new Vue({
    el: '#app',
    data: {
      num1: 1,
      num2: 0
    },
    methods: {
      num1change(value) {
        this.num1 = parseFloat(value)
      },
      num2change(value) {
        this.num2 = parseFloat(value)
      }
    },
    components: {
      cpn: {
        template: '#cpn',
        props: {
          number1: Number,
          number2: Number
        },
        data() {
          return {
            dnumber1: this.number1,
            dnumber2: this.number2
          }
        },
        methods: {
          num1Input(event) {
            this.dnumber1 = event.target.value;
            this.$emit('num1change', this.dnumber1)
            this.dnumber2 = this.dnumber1 * 100;
            this.$emit('num2change', this.dnumber2);
          },
          num2Input(event) {
            this.dnumber2 = event.target.value;
            this.$emit('num2change', this.dnumber2)
            this.dnumber1 = this.dnumber2 / 100;
            this.$emit('num1change', this.dnumber1);
          }
        }
      }
    }
  })
</script>
案例(watch实现)
watch用于监听某一个属性的改变,监听哪个在watch里写哪一个属性,一般属性里都会有一个参数newValue
上一个案例用watch实现的话,把子组件中的components去掉,改为watch
watch: {
      dnumber1(newValue) {//监听dnumber1的改变,当它改变了
         this.dnumber2 = newValue * 100;//2的值就变成了输入值的100倍
         this.$emit('num1change', newValue);//之后再传给父组件
      },
      dnumber2(newValue) {
         this.number1 = newValue / 100;
         this.$emit('num2change', newValue);
      }
}
11.父组件的访问
父子组件的访问方式: $children
有时候我们需要父组件直接访问子组件,子组件直接访问父组件,或者是子组件访问根组件。
- 父组件访问子组件:使用
$children或$refsreference(引用) - 子组件访问父组件:使用$parent
我们先来看下$children的访问
- this.$children是一个数组类型,它包含所有子组件对象。
- 我们这里通过一个遍历,取出所有子组件的message状态。
<div id="app">
  <cpn></cpn>
  <cpn></cpn>
  <button @click="btnClick">按钮</button>
</div>

<template id="cpn">
  <div>我是子组件</div>
</template>
<script src="../js/vue.js"></script>
<script>
  const app = new Vue({
    el: '#app',
    data: {
      message: '你好啊'
    },
    methods: {
      btnClick() {
         console.log(this.$children);
         for (let c of this.$children) {
           console.log(c.name);
           c.showMessage();
         }
      }
    },
    components: {
      cpn: {
        template: '#cpn',
        data() {
          return {
            name: '我是子组件的name'
          }
        },
        methods: {
          showMessage() {
            console.log('showMessage');
          }
        }
      },
    }
  })
</script>
父子组件的访问方式: $refs
$children的缺陷:
- 通过
$children访问子组件时,是一个数组类型,访问其中的子组件必须通过索引值。 - 但是当子组件过多,我们需要拿到其中一个时,往往不能确定它的索引值,甚至还可能会发生变化。
- 有时候,我们想明确获取其中一个特定的组件,这个时候就可以使用$refs
$refs的使用:
$refs和ref指令通常是一起使用的。- 首先,我们通过ref给某一个子组件绑定一个特定的ID。
- 其次,通过this.$refs.ID就可以访问到该组件了。
<div id="app">
  <cpn></cpn>
  <cpn></cpn>
  <cpn ref="aaa"></cpn>
  <button @click="btnClick">按钮</button>
</div>

<template id="cpn">
  <div>我是子组件</div>
</template>
<script src="../js/vue.js"></script>
<script>
  const app = new Vue({
    el: '#app',
    data: {
      message: '你好啊'
    },
    methods: {
      btnClick() {
        // 2.$refs => 对象类型
        console.log(this.$refs.aaa.name);
      }
    },
    components: {
      cpn: {
        template: '#cpn',
        data() {
          return {
            name: '我是子组件的name'
          }
        },
        methods: {
          showMessage() {
            console.log('showMessage');
          }
        }
      },
    }
  })
</script>
点击按钮
父子组件的访问方式: $parent(子访问父)
如果我们想在子组件中直接访问父组件,可以通过$parent
注意事项:
- 尽管在Vue开发中,我们允许通过$parent来访问父组件,但是在真实开发中尽量不要这样做。
- 子组件应该尽量避免直接访问父组件的数据,因为这样耦合度太高了。
- 如果我们将子组件放在另外一个组件之内,很可能该父组件没有对应的属性,往往会引起问题。
- 另外,更不好做的是通过$parent直接修改父组件的状态,那么父组件中的状态将变得飘忽不定,很不利于我的调试和维护。
<div id="app">
  <cpn></cpn>
</div>

<template id="cpn">
  <div>
    <h2>我是cpn组件</h2>
    <button @click="btnClick">按钮</button>
  </div>
</template>

<script src="../js/vue.js"></script>
<script>
  const app = new Vue({
    el: '#app',
    data: {
      message: '你好啊'
    },
    components: {
      cpn: {
        template: '#cpn',
		methods: {
            btnClick() {
                // 1.访问父组件$parent
                console.log(this.$parent);
         	}
        }
      }
    }
  })
</script>

<div id="app">
  <cpn></cpn>
</div>

<template id="cpn">
  <div>
    <h2>我是cpn组件</h2>
    <ccpn></ccpn>
  </div>
</template>

<template id="ccpn">
  <div>
    <h2>我是子组件</h2>
    <button @click="btnClick">按钮</button>
  </div>
</template>

<script src="../js/vue.js"></script>
<script>
  const app = new Vue({
    el: '#app',
    data: {
      message: '你好啊'
    },
    components: {
      cpn: {
        template: '#cpn',
        data() {
          return {
            name: '我是cpn组件的name'
          }
        },
        components: {
          ccpn: {
            template: '#ccpn',
            methods: {
              btnClick() {
                // 1.访问父组件$parent
                console.log(this.$parent);
              }
            }
          }
        }
      }
    }
  })
这个的父组件就是components了

访问根组件$root
btnClick() 中
console.log(this.$root);
console.log(this.$root.message);
非父子组件通信
刚才我们讨论的都是父子组件间的通信,那如果是非父子关系呢?
- 非父子组件关系包括多个层级的组件,也包括兄弟组件的关系。
在Vue1.x的时候,可以通过dispatch和dispatch和dispatch和broadcast完成
- $dispatch用于向上级派发事件
- $broadcast用于向下级广播事件
- 但是在Vue2.x都被取消了
在Vue2.x中,有一种方案是通过中央事件总线,也就是一个中介来完成。
- 但是这种方案和直接使用Vuex的状态管理方案还是逊色很多。
- 并且Vuex提供了更多好用的功能,所以这里我们暂且不讨论这种方案,后续我们专门学习Vuex的状态管理。
12.插槽
为什么使用slot
slot翻译为插槽:
- 在生活中很多地方都有插槽,电脑的USB插槽,插板当中的电源插槽。
- 插槽的目的是让我们原来的设备具备更多的扩展性。
- 比如电脑的USB我们可以插入U盘、硬盘、手机、音响、键盘、鼠标等等。
组件的插槽:
- 组件的插槽也是为了让我们封装的组件更加具有扩展性。
- 让使用者可以决定组件内部的一些内容到底展示什么。
栗子:移动网站中的导航栏。
- 移动开发中,几乎每个页面都有导航栏。
- 导航栏我们必然会封装成一个插件,比如nav-bar组件。
- 一旦有了这个组件,我们就可以在多个页面中复用了。
但是,每个页面的导航是一样的吗?No,我以京东M站为例
如何封装这类组件呢?slot
如何去封装这类的组件呢?
- 它们也很多区别,但是也有很多共性。
- 如果,我们每一个单独去封装一个组件,显然不合适:比如每个页面都返回,这部分内容我们就要重复去封装。
- 但是,如果我们封装成一个,好像也不合理:有些左侧是菜单,有些是返回,有些中间是搜索,有些是文字,等等。
如何封装合适呢?抽取共性,保留不同。
- 最好的封装方式就是将共性抽取到组件中,将不同暴露为插槽。
- 一旦我们预留了插槽,就可以让使用者根据自己的需求,决定插槽中插入什么内容。
- 是搜索框,还是文字,还是菜单。由调用者自己来决定。
这就是为什么我们要学习组件中的插槽slot的原因。
slot基本使用
了解了为什么用slot,我们再来谈谈如何使用slot?
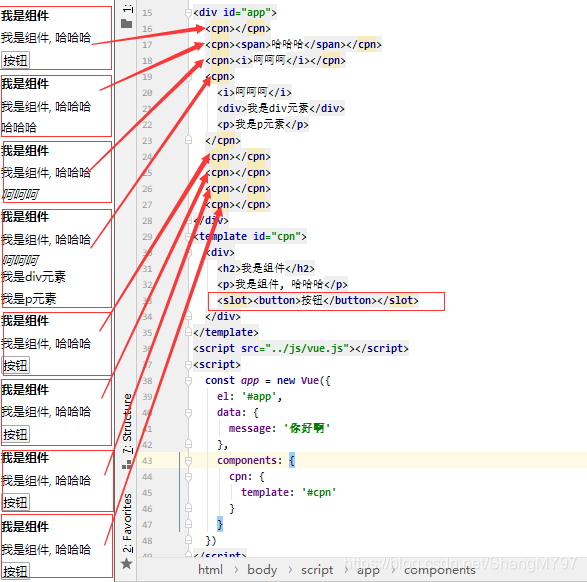
- 在子组件中,使用特殊的元素就可以为子组件开启一个插槽。
- 该插槽插入什么内容取决于父组件如何使用。
我们通过一个简单的例子,来给子组件定义一个插槽:
- 中的内容表示,如果没有在该组件中插入任何其他内容,就默认显示该内容
- 有了这个插槽后,父组件如何使用呢?
具名插槽slot
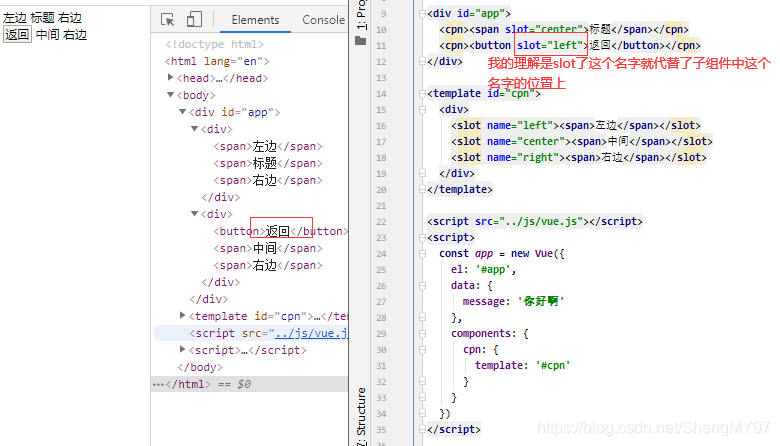
当子组件的功能复杂时,子组件的插槽可能并非是一个。
- 比如我们封装一个导航栏的子组件,可能就需要三个插槽,分别代表左边、中间、右边。
- 那么,外面在给插槽插入内容时,如何区分插入的是哪一个呢?
- 这个时候,我们就需要给插槽起一个名字
如何使用具名插槽呢?
- 非常简单,只要给slot元素一个name属性即可
<slot name='myslot'></slot>
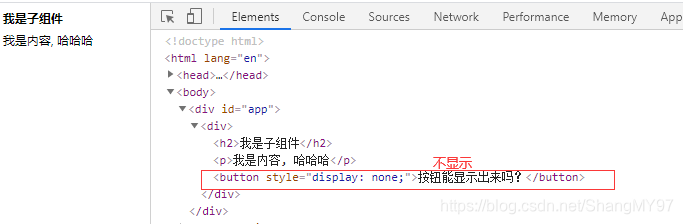
编译作用域
在真正学习插槽之前,我们需要先理解一个概念:编译作用域。
官方对于编译的作用域解析比较简单,我们自己来通过一个例子来理解这个概念:
我们来考虑下面的代码是否最终是可以渲染出来的:
<my-cpn v-show="isShow"></my-cpn>中,我们使用了isShow属性。- isShow属性包含在组件中,也包含在Vue实例中。
答案:最终可以渲染出来,也就是使用的是Vue实例的属性。
为什么呢?
- 官方给出了一条准则:父组件模板的所有东西都会在父级作用域内编译;子组件模板的所有东西都会在子级作用域内编译。
- 而我们在使用
<my-cpn v-show="isShow"></my-cpn>的时候,整个组件的使用过程是相当于在父组件中出现的。 - 那么他的作用域就是父组件,使用的属性也是属于父组件的属性。
- 因此,isShow使用的是Vue实例中的属性,而不是子组件的属性。
<div id="app">
  <cpn v-show="isShow"></cpn>
</div>

<template id="cpn">
  <div>
    <h2>我是子组件</h2>
    <p>我是内容, 哈哈哈</p>
    <button v-show="isShow">按钮能显示出来吗?</button>
  </div>
</template>

<script src="../js/vue.js"></script>
<script>
  const app = new Vue({
    el: '#app',
    data: {
      message: '你好啊',
      isShow: true
    },
    components: {
      cpn: {
        template: '#cpn',
        data() {
          return {
            isShow: false
          }
        }
      },
    }
  })
</script>
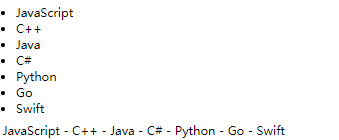
作用于插槽的案例
- 我们通过
<template slot-scope="slot">获取到slot属性 - 在通过slot.data就可以获取到刚才我们传入的data了
- join() 方法用于把数组中的所有元素放入一个字符串。元素是通过指定的分隔符进行分隔的。
<div id="app">
  <cpn></cpn>

  <cpn>
    <!--目的是获取子组件中的pLanguages-->
    <template slot-scope="slot">
      <!--<span v-for="item in slot.data"> - {{item}}</span>-->
      <span>{{slot.data.join(' - ')}}</span>
    </template>
  </cpn>
</div>

<template id="cpn">
  <div>
    <slot :data="pLanguages">
      <ul>
        <li v-for="item in pLanguages">{{item}}</li>
      </ul>
    </slot>
  </div>
</template>
  const app = new Vue({
    el: '#app',
    data: {
      message: '你好啊'
    },
    components: {
      cpn: {
        template: '#cpn',
        data() {
          return {
            pLanguages: ['JavaScript', 'C++', 'Java', 'C#', 'Python', 'Go', 'Swift']
          }
        }
      }
    }
  })
(以上内容根据微博“coderwhy”的vue视频课程整理,感谢王红元老师ღ( ´・ᴗ・` )比心)


 2895
2895

 被折叠的 条评论
为什么被折叠?
被折叠的 条评论
为什么被折叠?
 到【灌水乐园】发言


