


 本文介绍了在Spring框架中如何使用AOP功能,主要通过AspectJ实现。内容涵盖基于XML配置和注解两种方式,包括引入jar包、配置XML、定义切入点表达式以及实际应用示例。
Spring的AOP使用
我们在Spring框架中实现AOP功能主要是通过AspectJ实现的,AspectJ是一个面向切面的框架,它扩展了Java语言。AspectJ定义了AOP语法,它有一个专门的编译器用来生成遵守Java字节编码规范的Class文件。需要注意的是,AspectJ并不是Spring框架的一部分,它只是用于和Spring结合在一起共同完成有关AOP的操作而已。
AOP结合AspectJ的使用主要有两种方式:
- 基于XML配置的方式实现;
- 基于注解的方式实现;
基于XML配置的方式实现
1、引入AOP需要的相关jar包
在Spring框架的基本jar包的基础上,我们还需要引入AOP相关的jar包。
<!--AOP相关jar包-->
<dependency>
    <groupId>org.springframework</groupId>
    <artifactId>spring-aop</artifactId>
    <version>4.1.7.RELEASE</version>
</dependency>

<dependency>
    <groupId>org.aspectj</groupId>
    <artifactId>aspectjweaver</artifactId>
    <version>1.6.0</version>
</dependency>

<dependency>
    <groupId>aopalliance</groupId>
    <artifactId>aopalliance</artifactId>
    <version>1.0</version>
</dependency>
2、配置XML文件
在基础约束的基础上还需要导入AOP的相关约束条件。
<?xml version="1.0" encoding="UTF-8"?>
<beans xmlns="http://www.springframework.org/schema/beans"
       xmlns:xsi="http://www.w3.org/2001/XMLSchema-instance"
       xmlns:aop="http://www.springframework.org/schema/aop"
       xsi:schemaLocation="http://www.springframework.org/schema/beans
   http://www.springframework.org/schema/beans/spring-beans-3.0.xsd
   http://www.springframework.org/schema/aop
   http://www.springframework.org/schema/aop/spring-aop.xsd">

</beans>
3、通过相关实例进行AOP的使用
场景:在基础业务逻辑上增加某个功能的实现。例如,在书本相关操作的基础上添加日志操作。
- 实现类:
//基础类
public class Book {
    //方法1:写方法
    public void  writeBook() {
        //业务逻辑
        System.out.println("writeBook");
    }

    //读方法
    public void  readBook() {
        //业务逻辑
        System.out.println("readBook");
    }
}
- 增强类:
/**
 * 增强类
 * 完成添加日志
 */
public class DiyLog {
    public void log() {
        //业务逻辑
        System.out.println("打印日志");
    }
}
4、使用表达式来配置切入点
execution函数介绍:在通知中定义切入点,通过execution函数,可以定义切入点的方法切入。- 切入点:实际增强的方法。
- 常用的表达式:
execution(<访问限定符>?<返回类型><方法名>(<参数>)<异常>)execution(* com.test.bean.Book.writeBook(..)),表示类Book里面的writeBook的方法。execution(* com.test.bean.Book.*(..)),表示类Book下的所有的方法。execution(* *.*(..)),表示所有的。
- 例如:
- 匹配所有的public方法:
execution(public *.*(..)) - 匹配指定包路径下所有类的方法:
execution(* com.test.bean.*(..))(不包含子包) - 匹配指定包路径下所有类的方法:
execution(* com.test.bean..*(..))(包含包,子包的所有类) - 匹配指定类的所有方法:
execution(* com.test.bean.Book.*(..)) - 匹配特定开头的方法:
execution(* com*(..))
- 匹配所有的public方法:
5、配置切入点
<?xml version="1.0" encoding="UTF-8"?>
<beans xmlns="http://www.springframework.org/schema/beans"
       xmlns:xsi="http://www.w3.org/2001/XMLSchema-instance"
       xmlns:aop="http://www.springframework.org/schema/aop"
       xsi:schemaLocation="http://www.springframework.org/schema/beans
   http://www.springframework.org/schema/beans/spring-beans-3.0.xsd
   http://www.springframework.org/schema/aop
   http://www.springframework.org/schema/aop/spring-aop.xsd">

    <!--将基本对象交给spring管理-->
    <bean id="book" class="com.test.bean.Book"/>
    <bean id="diyLog" class="com.test.bean.DiyLog"/>

    <!--配置AOP操作-->
    <aop:config>
        <!--配置切入点:使用表达式,在实际的方法上添加通知的方法称之为切入点-->
        <aop:pointcut id="pointcut1" expression="execution(* com.test.bean.Book.writeBook(..))"/>

        <!--配置切面:把增强用到方法-->
        <aop:aspect ref="diyLog">
            <!--配置增强类型   method:增强类中的那个方法作为前置增强-->
            <aop:before method="log" pointcut-ref="pointcut1"/>
            <!--
                aop:before:前置通知
                aop:after 后置通知
                aop:after-returning:最终通知
                aop:after-throwing:异常通知
                aop:around:环绕通知
            -->
        </aop:aspect>
    </aop:config>
</beans>
6、使用AOP
public class Test {
        public static void main(String[] args) {
        //获取IOC的容器
        ClassPathXmlApplicationContext applicationContext = new ClassPathXmlApplicationContext("applicationContext.xml");
        //通过容器来获取当前的对象(通过无参构造来实例对象方法)

        //获取book对象
        //验证前置通知
        Book book = (Book) applicationContext.getBean("book");
        book.writeBook();
    }
}
- 执行结果:前置通知

- 注意:环绕通知:
import org.aspectj.lang.ProceedingJoinPoint;
/**
* 增强类
* 完成添加日志
*/
public class DiyLog {
public void log() {
//业务逻辑
System.out.println("打印日志");
}
//环绕通知 需要通过ProceedingJoinPoint类型的参数指定增强方法执行的时机
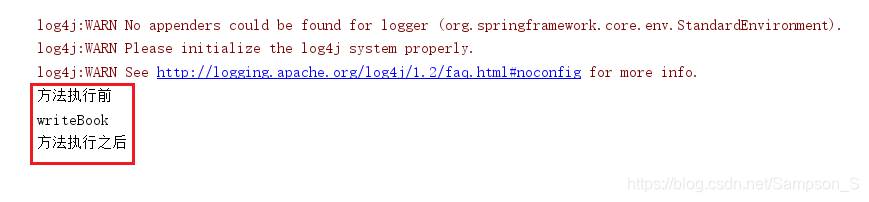
public void round(ProceedingJoinPoint joinPoint) throws Throwable{
System.out.println("方法执行前");
//执行增强的方法
joinPoint.proceed();
System.out.println("方法执行之后");
}
}
<?xml version="1.0" encoding="UTF-8"?>
<beans xmlns="http://www.springframework.org/schema/beans"
       xmlns:xsi="http://www.w3.org/2001/XMLSchema-instance"
       xmlns:aop="http://www.springframework.org/schema/aop"
       xsi:schemaLocation="http://www.springframework.org/schema/beans
   http://www.springframework.org/schema/beans/spring-beans-3.0.xsd
   http://www.springframework.org/schema/aop
   http://www.springframework.org/schema/aop/spring-aop.xsd">

    <!--将基本对象交给spring管理-->
    <bean id="book" class="com.test.bean.Book"/>
    <bean id="diyLog" class="com.test.bean.DiyLog"/>

    <!--配置AOP操作-->
    <aop:config>
        <!--配置切入点:使用表达式,在实际的方法上添加通知的方法称之为切入点-->
        <aop:pointcut id="pointcut1" expression="execution(* com.test.bean.Book.writeBook(..))"/>

        <!--配置切面:把增强用到方法-->
        <aop:aspect ref="diyLog">
            <!--配置增强类型   method:增强类中的那个方法作为前置增强-->
            <aop:around method="round" pointcut-ref="pointcut1"/>
            <!--
                aop:before:前置通知
                aop:after 后置通知
                aop:after-returning:最终通知
                aop:after-throwing:异常通知
                aop:around:环绕通知
            -->
        </aop:aspect>
    </aop:config>
</beans>

- 执行结果(测试代码不变):环绕通知
基于注解的方式实现
所用实例与上述基于XML方式实现的实例相同。
1、配置XML文件
- Bean对象装配
- 将接触类和增强类交给IOC容器管理。
- 在Spring的配置文件中,开启AOP操作
<?xml version="1.0" encoding="UTF-8"?>
<beans xmlns="http://www.springframework.org/schema/beans"
       xmlns:xsi="http://www.w3.org/2001/XMLSchema-instance"
       xmlns:aop="http://www.springframework.org/schema/aop"
       xsi:schemaLocation="http://www.springframework.org/schema/beans
   http://www.springframework.org/schema/beans/spring-beans-3.0.xsd
   http://www.springframework.org/schema/aop
   http://www.springframework.org/schema/aop/spring-aop.xsd">

    <!--将接触类和增强类交给IOC容器管理-->
    <bean id="book" class="com.test.bean.Book7"/>
    <bean id="diyLog" class="com.test.bean.DiyLog"/>

    <!--开启AOP的操作-->
    <aop:aspectj-autoproxy></aop:aspectj-autoproxy>
</beans>
2、在增强类上添加注解
@Aspect
public class DiyLog {
//前置增强
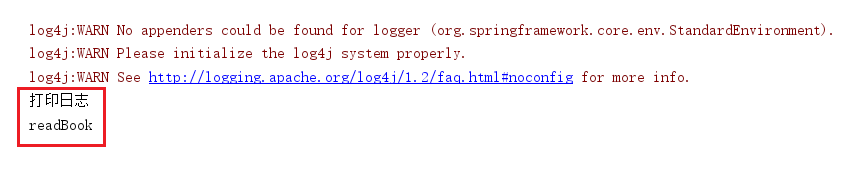
@Before(value = "execution(* com.test.bean.Book.readBook(..))")
//<aop:before method="round" pointcut-ref="pointcut1"/>
public void log() {
//业务逻辑
System.out.println("打印日志");
}
}
- 基于注解的AOP实现方式: 在增强类上添加
@Aspect注解。在该类中用哪一个方法来作为增强,就在方法上添加以下注解:@Before(value = "execution(* com.test.bean.Book.readBook(..))"),前置通知。@After(value = ""),后置通知。@AfterThrowing,异常通知。@Around(value = ""),环绕通知 ,需要在方法入参上添加ProceedingJoinPoint参数,见上面基于XML形式的具体实现。@AfterReturning,最终通知。
3、使用AOP
public class Test {
    public static void main(String[] args) {
        //获取IOC的容器
        ClassPathXmlApplicationContext applicationContext = new ClassPathXmlApplicationContext("applicationContext.xml");
        //通过容器来获取当前的对象(通过无参构造来实例对象方法)

        //获取book对象
        //验证前置通知
        Book book = (Book) applicationContext.getBean("book");
        book.readBook();
    }
}- 执行结果:前置通知


 416
416

 被折叠的 条评论
为什么被折叠?
被折叠的 条评论
为什么被折叠?
 到【灌水乐园】发言


