


 本文介绍如何使用 Spring Session 解决分布式环境下 Session 共享问题,通过配置 Spring Boot 和 Redis 实现跨服务器的数据共享。
Spring-Session Session共享
任何一种技术的出现,都是来解决特定的问题的!
本篇开始学习Spring-Session相关的一些知识学习整理,让我们开始吧!
Spring-Session介绍
- Spring-Session使用的场景?
HttpSession是通过Servlet容器进行创建和管理的,在单机环境中。通过Http请求创建的Session信息是存储在Web服务器内存中,如Tomcat/Jetty。
假如当用户通过浏览器访问应用服务器,session信息中保存了用户的登录信息,并且session信息没有过期失,效那么用户就一直处于登录状态,可以做一些登录状态的业务操作!
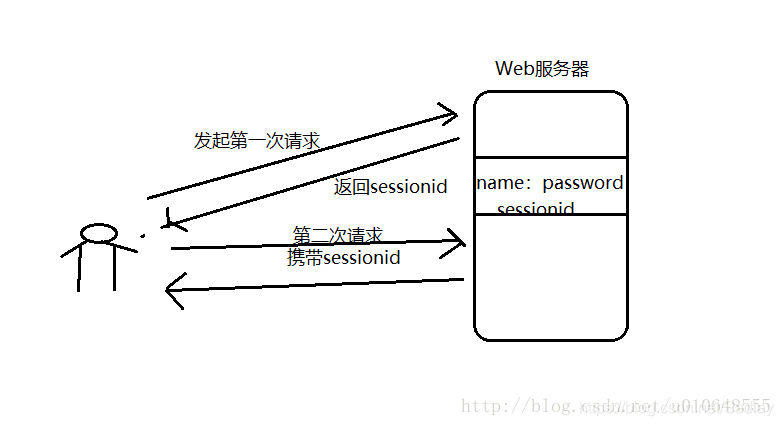
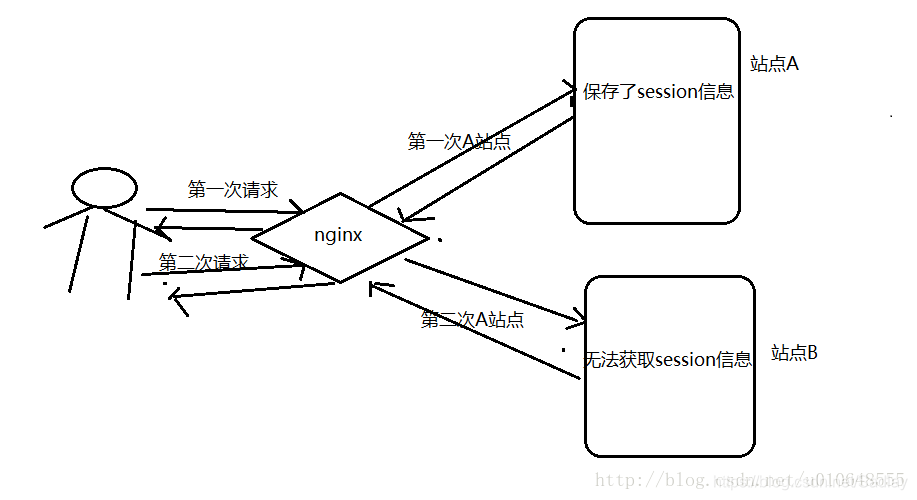
但是现在很多的服务器都采用分布式集群的方式进行部署,一个Web应用,可能部署在几台不同的服务器上,通过LVS或者Nginx等进行负载均衡(一般使用Nginx+Tomcat实现负载均衡)。此时来自同一用户的Http请求将有可能被分发到不同的web站点中去(如:第一次分配到A站点,第二次可能分配到B站点)。那么问题就来了,如何保证不同的web站点能够共享同一份session数据呢?
假如用户在发起第一次请求时候访问了A站点,并在A站点的session中保存了登录信息,当用户第二次发起请求,通过负载均衡请求分配到B站点了,那么此时B站点能否获取用户保存的登录的信息呢?答案是不能的,因为上面说明,Session是存储在对应Web服务器的内存的,不能进行共享,此时Spring-session就出现了,来帮我们解决这个session共享的问题!
- 如何进行Session共享呢?
简单点说就是请求http请求经过Filter职责链,根据配置信息过滤器将创建session的权利由tomcat交给了Spring-session中的SessionRepository,通过Spring-session创建会话,并保存到对应的地方。
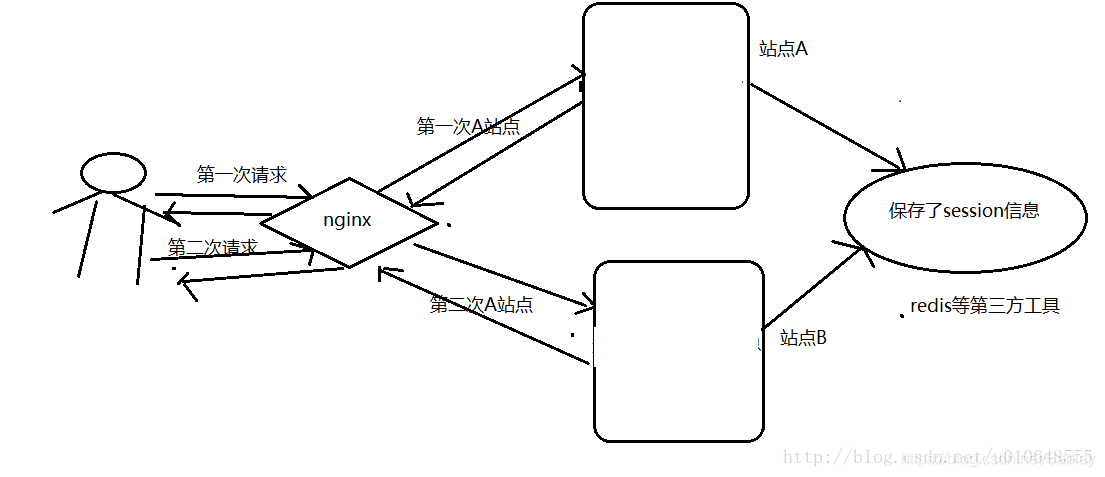
实际上实现Session共享的方案很多,其中一种常用的就是使用Tomcat、Jetty等服务器提供的Session共享功能,将Session的内容统一存储在一个数据库(如MySQL)或缓存(如Redis,Mongo)中,
而上面说的使用Nginx也可以,使用ip_hash策略。
在使用Nginx的ip_hash策略时候,每个请求按访问ip的hash结果分配,这样每个访客固定访问一个后端服务器,也可以解决session的问题。
- Spring官方介绍
Why Spring Session & HttpSession?
Spring会话提供了与HttpSession的透明集成,允许以应用程序容器(即Tomcat)中性的方式替换HttpSession,但是我们从中得到了什么好处呢?
- 集群会话——Spring会话使支持集群会话变得微不足道,而不需要绑定到应用程序容器的特定解决方案。
- 多个浏览器会话——Spring会话支持在单个浏览器实例中管理多个用户会话(也就是多个经过验证的帐户,类似于谷歌)。
- RESTful api——Spring会话允许在header中提供会话id以使用RESTful api。
- Spring Session & WebSockets的完美集成。
项目搭建
Spring Boot2.x
基于XML配置方式的Spring Session
本次只讲解xml配置方式,javaConfig配置可以参考官方文档:Spring Java Configuration
环境说明
Nginx
Redis
配置好了上面的环境,后下面开始正式的Spring-session搭建过程了!
1.添加项目依赖
首先新建一个Maven的Web项目,新建好之后在pom文件中添加下面的依赖:
<?xml version="1.0" encoding="UTF-8"?>
<project xmlns="http://maven.apache.org/POM/4.0.0" xmlns:xsi="http://www.w3.org/2001/XMLSchema-instance"
         xsi:schemaLocation="http://maven.apache.org/POM/4.0.0 http://maven.apache.org/xsd/maven-4.0.0.xsd">
    <modelVersion>4.0.0</modelVersion>
    <parent>
        <groupId>org.springframework.boot</groupId>
        <artifactId>spring-boot-starter-parent</artifactId>
        <version>2.1.2.RELEASE</version>
        <relativePath/> <!-- lookup parent from repository -->
    </parent>
    <groupId>com.lay.spring</groupId>
    <artifactId>session</artifactId>
    <version>0.0.1-SNAPSHOT</version>
    <name>spring-session</name>
    <description>Demo project for Spring Session</description>

    <properties>
        <java.version>1.8</java.version>
    </properties>

    <dependencies>
        <dependency>
            <groupId>org.springframework.boot</groupId>
            <artifactId>spring-boot-starter-web</artifactId>
        </dependency>

        <dependency>
            <groupId>org.springframework.boot</groupId>
            <artifactId>spring-boot-starter-test</artifactId>
            <scope>test</scope>
        </dependency>
        <dependency>
            <groupId>org.springframework.session</groupId>
            <artifactId>spring-session-data-redis</artifactId>
        </dependency>
        <dependency>
            <groupId>org.springframework.boot</groupId>
            <artifactId>spring-boot-starter-data-redis</artifactId>
        </dependency>

        <!-- fastJson -->
        <dependency>
            <groupId>com.alibaba</groupId>
            <artifactId>fastJson</artifactId>
            <version>1.2.17</version>
        </dependency>
    </dependencies>

    <build>
        <plugins>
            <plugin>
                <groupId>org.springframework.boot</groupId>
                <artifactId>spring-boot-maven-plugin</artifactId>
            </plugin>
        </plugins>
    </build>

</project>
2 .Xml配置
web.xml配置
<?xml version="1.0" encoding="UTF-8"?>
<web-app version="2.4"
         xmlns="http://java.sun.com/xml/ns/j2ee"
         xmlns:xsi="http://www.w3.org/2001/XMLSchema-instance"
         xsi:schemaLocation="http://java.sun.com/xml/ns/j2ee http://java.sun.com/xml/ns/j2ee/web-app_2_4.xsd">

  <context-param>
    <param-name>contextConfigLocation</param-name>
    <param-value>classpath*:spring/*xml</param-value>
  </context-param>

  <listener>
    <listener-class>org.springframework.web.context.ContextLoaderListener</listener-class>
  </listener>


  <!--DelegatingFilterProxy将查找一个Bean的名字springSessionRepositoryFilter丢给一个过滤器。为每个请求
  调用DelegatingFilterProxy, springSessionRepositoryFilter将被调用-->
  <filter>
    <filter-name>springSessionRepositoryFilter</filter-name>
    <filter-class>org.springframework.web.filter.DelegatingFilterProxy</filter-class>
  </filter>


  <filter-mapping>
    <filter-name>springSessionRepositoryFilter</filter-name>
    <url-pattern>/*</url-pattern>
    <dispatcher>REQUEST</dispatcher>
    <dispatcher>ERROR</dispatcher>
  </filter-mapping>


  <welcome-file-list>
    <welcome-file>index.jsp</welcome-file>
  </welcome-file-list>

</web-app>
Xml的配置
在resources 下面新建一个xml,名词为 application-session.xml
<?xml version="1.0" encoding="UTF-8"?>
<beans xmlns="http://www.springframework.org/schema/beans"
       xmlns:xsi="http://www.w3.org/2001/XMLSchema-instance"
       xmlns:context="http://www.springframework.org/schema/context"
       xsi:schemaLocation="http://www.springframework.org/schema/beans
           http://www.springframework.org/schema/beans/spring-beans-4.3.xsd
           http://www.springframework.org/schema/context http://www.springframework.org/schema/context/spring-context-4.3.xsd">

    <context:annotation-config/>


    <!--创建一个Spring Bean的名称springSessionRepositoryFilter实现过滤器。
    筛选器负责将HttpSession实现替换为Spring会话支持。在这个实例中,Spring会话得到了Redis的支持。-->
    <bean class="org.springframework.session.data.redis.config.annotation.web.http.RedisHttpSessionConfiguration"/>
    <!--创建了一个RedisConnectionFactory,它将Spring会话连接到Redis服务器。我们配置连接到默认端口(6379)上的本地主机!-->
    <bean class="org.springframework.data.redis.connection.lettuce.LettuceConnectionFactory"/>

</beans>
3.JavaCofig配置(推荐)
springboot 中 启动类添加@ServletComponentScan扫描组件注解
package com.lay.spring.session;

import org.springframework.beans.factory.annotation.Autowired;
import org.springframework.boot.SpringApplication;
import org.springframework.boot.autoconfigure.SpringBootApplication;
import org.springframework.boot.web.servlet.ServletComponentScan;
import org.springframework.data.redis.core.RedisTemplate;

@SpringBootApplication
@ServletComponentScan
public class SpringSessionApplication {


    public static void main(String[] args) {
        SpringApplication.run(SpringSessionApplication.class, args);
    }

}
4.测试代码
新建 LoginServlet.java
package com.lay.spring.session.HttpSessionDemo1;

import javax.servlet.ServletException;
import javax.servlet.annotation.WebServlet;
import javax.servlet.http.HttpServlet;
import javax.servlet.http.HttpServletRequest;
import javax.servlet.http.HttpServletResponse;
import java.io.IOException;

/**
 * @Description:
 * @Author: lay
 * @Date: Created in 11:45 2019/1/16
 * @Modified By:IntelliJ IDEA
 */
@WebServlet("/login")
public class LoginServlet extends HttpServlet {

    @Override
    protected void service(HttpServletRequest req, HttpServletResponse resp) throws ServletException, IOException {
        req.getSession().setAttribute("testKey","88888888@qq.com");
        req.getSession().setMaxInactiveInterval(10*1000);
        resp.sendRedirect(req.getContextPath()+"/session");
    }
}
新建 SessionServlet.java
package com.lay.spring.session.HttpSessionDemo1;

import org.slf4j.Logger;
import org.slf4j.LoggerFactory;

import javax.servlet.ServletException;
import javax.servlet.annotation.WebServlet;
import javax.servlet.http.HttpServlet;
import javax.servlet.http.HttpServletRequest;
import javax.servlet.http.HttpServletResponse;
import java.io.IOException;
import java.io.PrintWriter;
import java.text.MessageFormat;
import java.util.Date;

/**
 * @Description:
 * @Author: lay
 * @Date: Created in 11:45 2019/1/16
 * @Modified By:IntelliJ IDEA
 */
@WebServlet("/session")
public class SessionServlet extends HttpServlet {
    private static final Logger log= LoggerFactory.getLogger(SessionServlet.class);

    @Override
    protected void service(HttpServletRequest req, HttpServletResponse resp) throws ServletException, IOException {
        log.info(req.getRemoteAddr());
        log.info("{}:{}",req.getRemoteHost(),req.getRemotePort());

        String sessionId=req.getSession().getId();
        log.info("-----tomcat1 sessionId----------{}",sessionId);

        String testKey= (String) req.getSession().getAttribute("testKey");
        log.info("-----tomcat1 testKey----------{}",testKey);
        PrintWriter out=null;
        try {
            out = resp.getWriter();
            out.append(MessageFormat.format("-----tomcat1 sessionId----------{0}",sessionId));
            out.append(MessageFormat.format("-----tomcat1 testKey----------{0}",testKey));
        } catch (IOException e) {
            e.printStackTrace();
        } finally {
            if(out!=null){
                out.close();
            }
        }
    }

    public static void main(String[] args){
        String message=MessageFormat.format("{0}:{1}:{2}:'{''}","这是我","不是你",new Date());
        System.out.println(message);
    }
}
效果演示
1.启动Redis,默认端口6379就行!
2.配置Nginx,启动Nginx
Nginx的配置,轮询方式:
#user nobody;
worker_processes 1;
events{
    worker_connections 1024;
    }
http{
    upstream myproject {
        server 127.0.0.1:8888;
        server 127.0.0.1:9999;

    }
    server {
        listen 8080;
        server_name localhost;

        location / {
            proxy_pass http://myproject;
            }
        }
}
3.启动Tomcat1和Tomcat2
将上面搭建好的项目放入两个Tomcat中,分别启动。使用Nginx负载均衡均验证Session是否共享成功!
tomcat1 : http://localhost:8888/
tomcat2 : http://localhost:9999/
访问 http://localhost:8080/ 可以看到,每次刷新页面,请求都分发到不同的Tomcat里面,如图
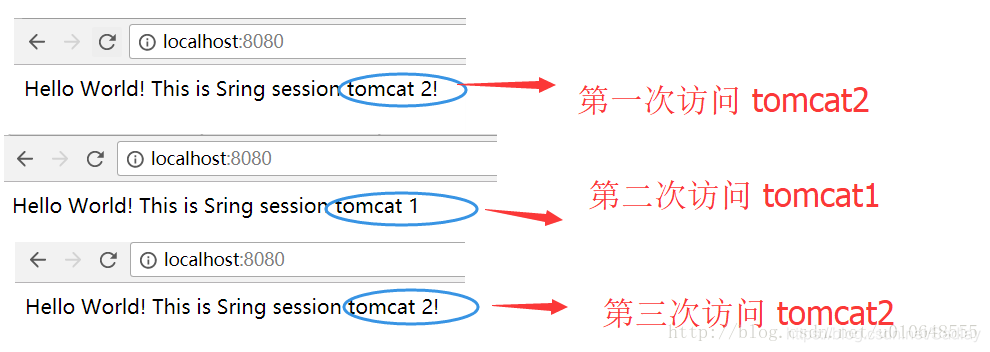
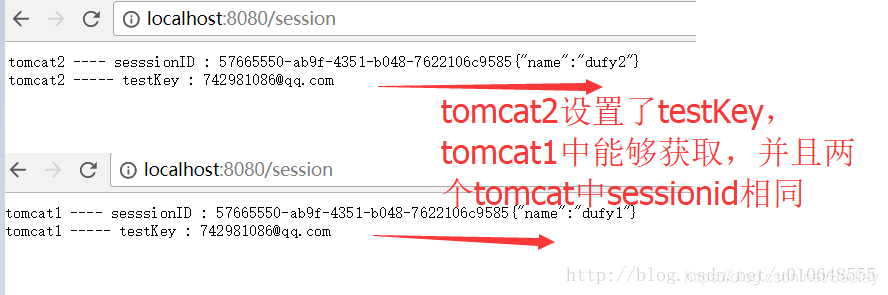
然后使用 http://localhost:8080/login 看到地址栏重定向到/session .发现浏览器返回了数据,进入tomcat2中,然后再次刷新请求进入了tomcat1,发现tomcat2中和tomcat1 sessionId一样,并且在tomcat1中存的testKey,在Tomcat2中也可以获取,不仅SessionId可以共享,其他一些数据也可以进行共享!
如何在Redis中查看Session数据,可以使用命令,或者在Windows的RedisDesktopManager中查看!
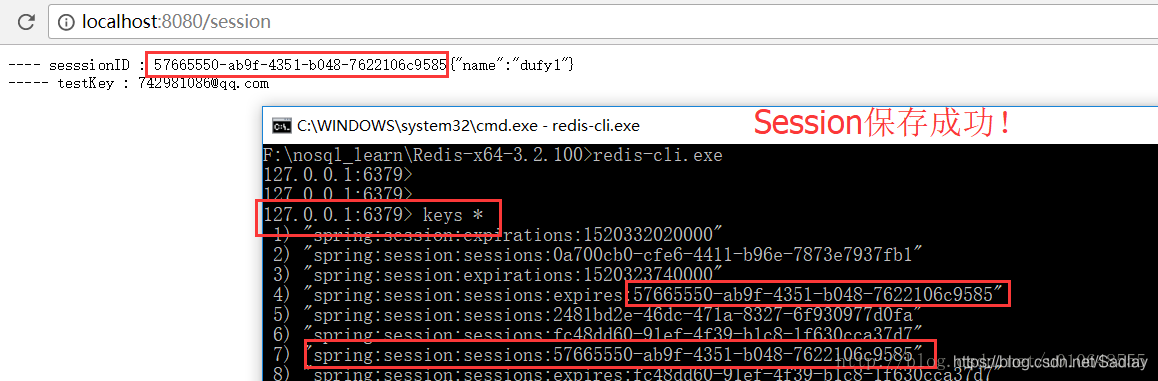
key的简单介绍说明:
# 存储 Session 数据,数据类型hash
Key:spring:session:sessions:XXXXXXX

# Redis TTL触发Session 过期。(Redis 本身功能),数据类型:String
Key:spring:session:sessions:expires:XXXXX

#执行 TTL key ,查看剩余生存时间

#定时Job程序触发Session 过期。(spring-session 功能),数据类型:Set
Key:spring:session:expirations:XXXXX


 7万+
7万+

 被折叠的 条评论
为什么被折叠?
被折叠的 条评论
为什么被折叠?
 到【灌水乐园】发言


