


1. 本地环境从0到1部署智能合约
本文讲解使用本地开发工具编写、部署智能合约。
- 准备环境
- Visual Studio Code
- Node
- 安装solidity插件,如图所示:
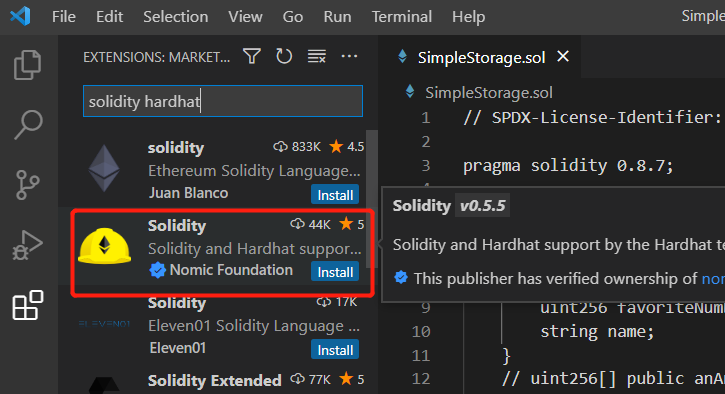
- 同理安装Prettier - Code formatter插件
安装插件后,重启Visual Studio Code
PS D:\blockchain\ehthers-simple-storage-fcc> node --version
v16.4.1
1.1 新建SimpleStorage.sol文件
// SPDX-License-Identifier: MIT

pragma solidity 0.8.7;

contract SimpleStorage {
    uint256 favoriteNumber;

    struct People {
        uint256 favoriteNumber;
        string name;
    }
    People[] public people;

    mapping(string => uint256) public nameToFavoriteNumber;

    function store(uint256 _favoriteNumber) public {
        favoriteNumber = _favoriteNumber;
    }

    function retrieve() public view returns (uint256) {
        return favoriteNumber;
    }

    function addPerson(string memory _name, uint256 _favoriteNumber) public {
        people.push(People(_favoriteNumber, _name));
        nameToFavoriteNumber[_name] = _favoriteNumber;
    }
}
1.2 新建.vscode/settings.json中添加格式化插件
{
    "[solidity]": {
        // 默认代码格式化方式
        "editor.defaultFormatter":"NomicFoundation.hardhat-solidity"
    },
    "[javascript]": {
        "editor.defaultFormatter": "esbenp.prettier-vscode"
    }
}
1.3 编译solidity
# 由于npm版本低于16.10
# 详见https://yarnpkg.com/getting-started/install#install-corepack
npm i -g corepack
yarn add solc@0.8.7-fixed

yarn solcjs --bin --abi --include-path node_modules/ --base-path . -o . SimpleStorage.sol
现在我们把脚本放置到package.json中,下次直接点击即可编译
{
  "dependencies": {
    "solc": "0.8.7-fixed"
  },
  "scripts": {
    "compile": "yarn solcjs --bin --abi --include-path node_modules/ --base-path . -o . SimpleStorage.sol"
  }
}
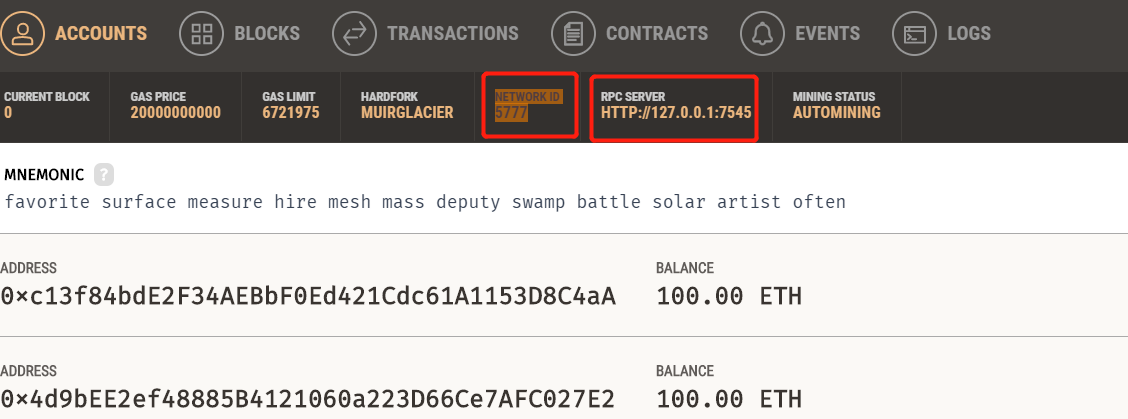
1.4 安装ganache
https://trufflesuite.com/ganache/
windows开发者设置,打开开发者模式,然后进入powershell
Add-AppxPackage -Path "D:\Users\Domi\Downloads\Ganache-2.5.4-win-x64.appx"
启动应用后,找到
RPC SERVER:http://127.0.0.1:7545
NETWORK ID:5777
1.5 新建deploy.js
const ethers = require("ethers");
const fs = require("fs-extra");
require("dotenv").config();

async function main() {
  let provider = new ethers.providers.JsonRpcProvider(process.env.RPC_URL);
  // 私钥不加密方式,开发
  let wallet = new ethers.Wallet(process.env.PRIVATE_KEY, provider);

  // 生产环境私钥一定要加密,并且history历史命令记录也要清空,否则后果自负!!!!!!!!
  // const encryptedJson = fs.readFileSync("./.encryptedKey.json", "utf8");
  // let wallet = new ethers.Wallet.fromEncryptedJsonSync(
  //   encryptedJson,
  //   process.env.PRIVATE_KEY_PASSWORD
  // );
  // wallet = wallet.connect(provider);

  const abi = fs.readFileSync("./SimpleStorage_sol_SimpleStorage.abi", "utf8");
  const binary = fs.readFileSync(
    "./SimpleStorage_sol_SimpleStorage.bin",
    "utf8"
  );
  const contractFactory = new ethers.ContractFactory(abi, binary, wallet);
  console.log("Deploying, please wait...");
  const contract = await contractFactory.deploy();
  const deploymentReceipt = await contract.deployTransaction.wait(1);
  console.log(`Contract deployed to ${contract.address}`);

  let currentFavoriteNumber = await contract.retrieve();
  console.log(`Current Favorite Number: ${currentFavoriteNumber}`);

  console.log("Updating favorite number...");
  let transactionResponse = await contract.store(7);
  let transactionReceipt = await transactionResponse.wait();

  currentFavoriteNumber = await contract.retrieve();
  console.log(`New Favorite Number: ${currentFavoriteNumber}`);
}

main()
  .then(() => process.exit(0))
  .catch((error) => {
    console.error(error);
    process.exit(1);
  });
新建.env配置文件
# 随便找个本地ganache账户address的私钥【点击🔑】
PRIVATE_KEY=fb5bd474d1e90d0083591744e12619bac24d29f1f56cb766653de494be9e6dc7
# 修改为本机ganache RPC SERVER地址
RPC_URL=http://127.0.0.1:7545
PRIVATE_KEY_PASSWORD=password
安装deploy.js中依赖的包
npm install --save ethers
npm install dotenv
npm install fs-extra
1.6 运行deploy.js本地部署合约
node deploy.js


成了,是不是很激动呢,👍
2. 私钥管理
本文讲解如何对私钥加密处理以及部署后需注意的事项
2.1 新建encryptKey.js
const ethers = require("ethers");
const fs = require("fs-extra");
require("dotenv").config();

async function main() {
  const wallet = new ethers.Wallet(process.env.PRIVATE_KEY);
  const encryptedJsonKey = await wallet.encrypt(
    process.env.PRIVATE_KEY_PASSWORD,
    process.env.PRIVATE_KEY
  );
  console.log(encryptedJsonKey);
  fs.writeFileSync("./.encryptedKey.json", encryptedJsonKey);
}

main()
  .then(() => process.exit(0))
  .catch((error) => {
    console.error(error);
    process.exit(1);
  });
目前我们的.env文件配置为
PRIVATE_KEY=36b785b98b0567f1e6cdfe4f67e884d8d3fb24ba0dbac0776f935d558f39e165
RPC_URL=http://127.0.0.1:7545
PRIVATE_KEY_PASSWORD=shenjian.online
控制台执行生成.encryptedKey.json文件
(base) PS D:\blockchain\ehthers-simple-storage-fcc> node encryptKey.js
现在我们删除.env中的PRIVATE_KEY=36b785b98b0567f1e6cdfe4f67e884d8d3fb24ba0dbac0776f935d558f39e165
2.2 修改deploy.js私钥部分
现在我们将上节介绍的deploy.js文件中注释私钥部分放开
async function main() {
  let provider = new ethers.providers.JsonRpcProvider(process.env.RPC_URL);
  // 私钥不加密方式,开发
  //let wallet = new ethers.Wallet(process.env.PRIVATE_KEY, provider);

  // 生产环境私钥一定要加密,并且history历史命令记录也要清空,否则后果自负!!!!!!!!
  const encryptedJson = fs.readFileSync("./.encryptedKey.json", "utf8");
  let wallet = new ethers.Wallet.fromEncryptedJsonSync(
    encryptedJson,
    process.env.PRIVATE_KEY_PASSWORD
  );
  wallet = wallet.connect(provider);
  ......
}
再次运行部署,同样成功
(base) PS D:\blockchain\ehthers-simple-storage-fcc> node deploy.js
Deploying, please wait...
Contract deployed to 0xe52A9CFCCAd1cDF934614D0Cd93BB7Fa9650ae64
Current Favorite Number: 0
Updating favorite number...
New Favorite Number: 7
2.3 linux下进一步安全
.env文件中我们去掉PRIVATE_KEY_PASSWORD=shenjian.online,
然后运行[linux下]
PRIVATE_KEY_PASSWORD=shenjian.online node deploy.js
history -c
欢迎关注公众号算法小生或沈健的技术博客shenjian.online


 1302
1302

 被折叠的 条评论
为什么被折叠?
被折叠的 条评论
为什么被折叠?
 到【灌水乐园】发言


